

Page 1
RADIATION ALERT
®
User Manual
Manuel d’instructions Page 31
Manual de Instrucciones Page 60
&
+
+
EXP
Page 2

06/1/05
Inspector+ User Manual - Contents
Chapter Page
1 Introduction 4
How the Inspector+ Detects Radiation 4
Precautions 4
2 Features 5
The Display 6
The Switches 7
The Detector 8
The Input/Output Ports 9
3 Operation 10
Units of Measurement 10
Starting the Inspector+ 10
Start Up 10
Display Update 10
Maximum Level 10
Response Time (Autoaveraging) 10
Operating in Dose Rate Modes 11
Operating in Total/Timer Mode 11
Taking a Timed Count 12
Using Dose Rates While Timer is On 13
Taking a Total Count 13
Autoranging 13
Using the Alert 14
Utility Menu 14
Interfacing to an External Device 15
Options 16
Page 3

06/18/03
WipeTest Plate 16
4 Common Procedures 16
Establishing the Background Count 16
Environmental Area Monitoring 16
Checking for Surface Contamination 17
Maintenance 17
Calibration 17
Troubleshooting 20
Service 21
6 Basics of Radiation and Its Measurement 22
Ionizing Radiation 23
Chart of Radionuclides 23
Radiation Measurement Units 23
Appendix A Technical Specifications 24
Appendix B Sensitivity to Common Isotopes 25
Appendix C Inspector+ EXP carrying case 26
Warranty 28
Calibration Data Base Application 29
List of Illustrations
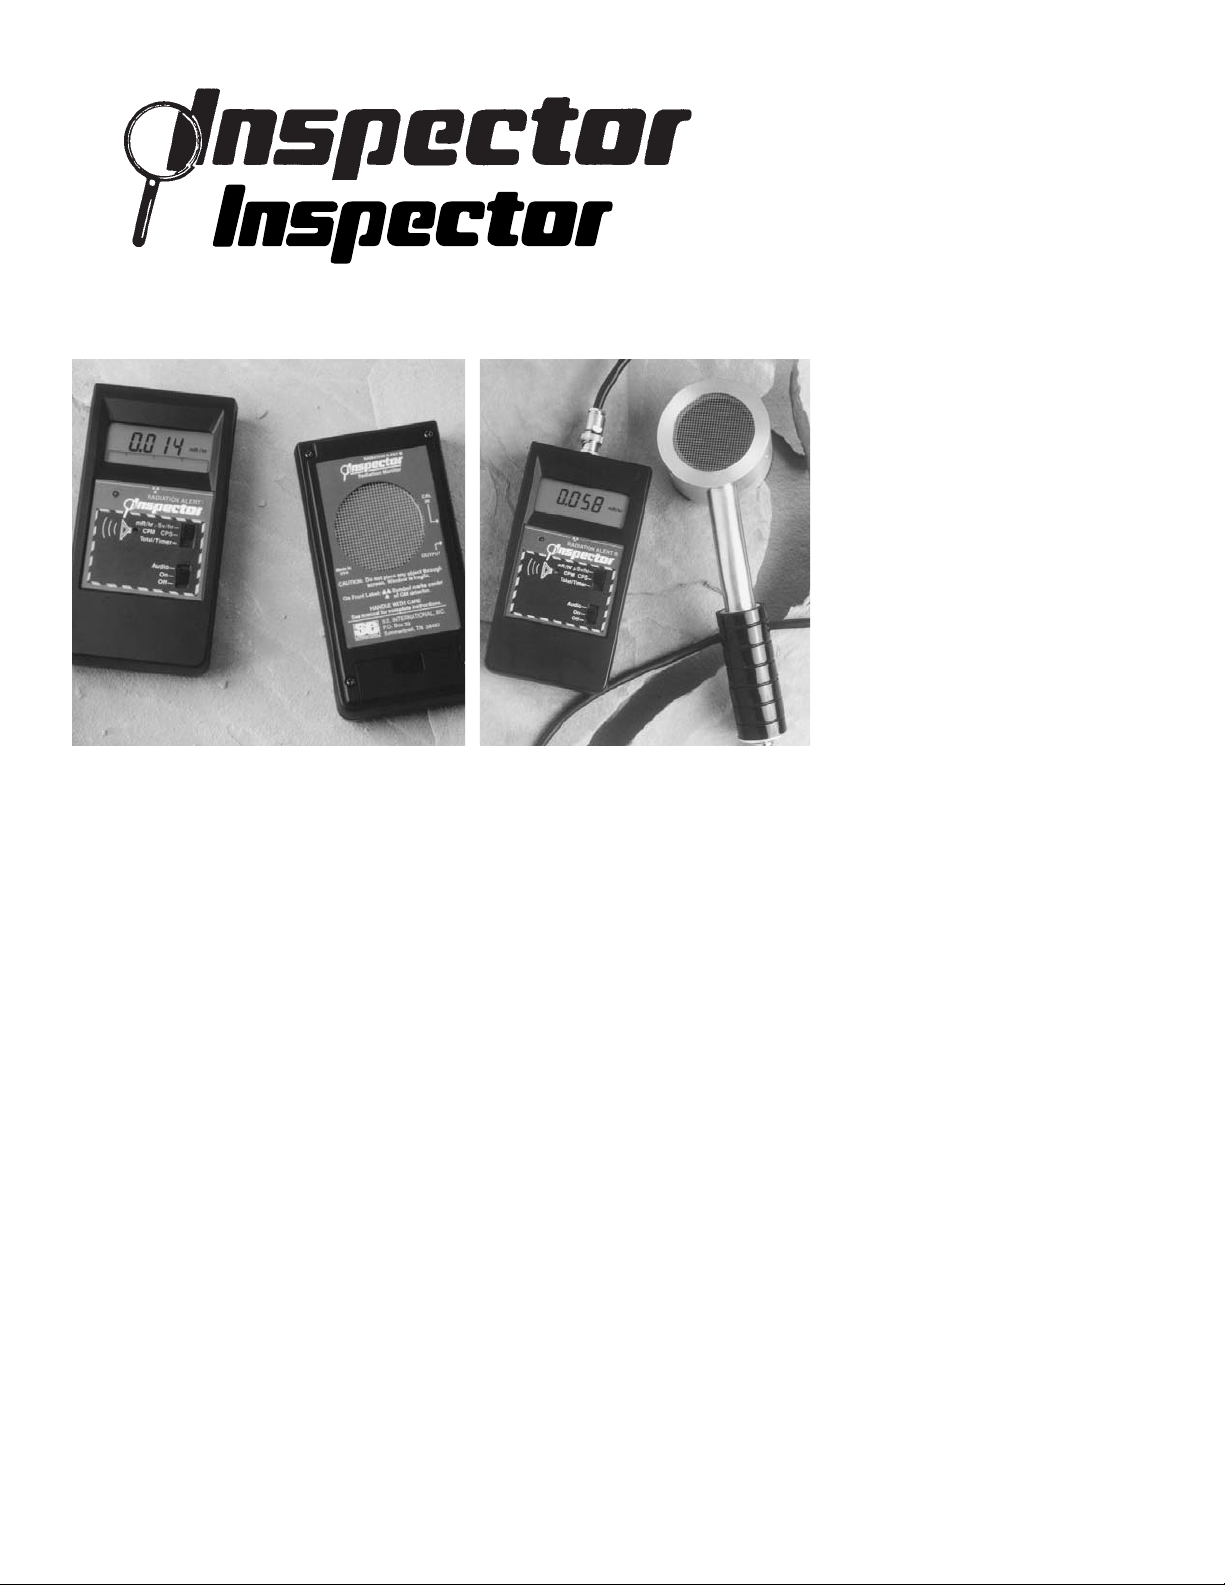
Figure 1 Front View 5
Figure 2 End Panel View 6
Figure 3 Display 6
Figure 4 Rear View (Detector) 9
Page 4

4
1 Introduction
The Inspector+ is a health and safety instrument that is optimized to detect low
levels of radiation. It measures alpha, beta, gamma, and x-ray radiation.
Its applications include:
• Detecting and measuring surface contamination
• Monitoring possible radiation exposure while working with radionuclides
• Screening for environmental contamination
• Detecting noble gases and other low energy radionuclides
How the Inspector+ Detects Radiation
The Inspector+ uses a Geiger-Mueller tube to detect radiation. The Geiger tube
generates a pulse of electrical current each time radiation passes through the
tube and causes ionization. Each pulse is electronically detected and registers as
a count. The Inspector+ displays the counts in the mode you choose.
The number of counts detected by the Inspector+ varies from minute to minute
due to the random nature of radioactivity. A reading is expressed more accurately
as an average over time, and the average is more accurate over a longer time
period. For details, see “Operating in Total/Timer Mode” in Chapter 3.
Precautions
To keep the Inspector+ in good condition, handle it with care, and observe the
following precautions:
• Do not contaminate the Inspector+ by touching it to radioactive surfaces
or materials. If contamination is suspected, replacement rubber strips are
stapled inside this manual.
• Do not leave the Inspector+ in temperatures over 100° F (38° C) or in
direct sunlight for extended periods of time.
• Do not get the Inspector+ wet. Water can damage the circuitry and the
mica surface of the Geiger tube.
• Do not put the Inspector+ in a microwave oven. It cannot measure
microwaves, and you may damage it or the oven.
Page 5
5
• This instrument may be sensitive to and may not operate properly in radio
frequency, microwave, electrostatic, and electromagnetic fields.
• If you expect to not use the Inspector+ for longer than one month, remove
the battery to avoid damage from battery corrosion.
• Change the battery promptly when the battery indicator appears on the
display.
2 Features
The Inspector+ measures alpha, beta, gamma, and x-ray radiation. It is optimized
to detect small changes in radiation levels and to have high sensitivity to many
common radionuclides. For more information, see Appendix A, “Sensitivity to
Common Radionuclides.”
This chapter briefly describes the Inspector+’s functions. For more information on
how to use the Inspector+, see Chapter 3, “Operation.”
The Inspector+ counts ionizing events and displays the results on the liquid crystal
display (LCD). You control which unit of measurement is shown by using the
mode switch.
Whenever the Inspector+ is operating, the red count light (8) flashes each time a
count (an ionizing event) is detected.
(1) LCD Display
(9) CAL Input
(8) Count Light
(7) Tube Center
Indicator
(3) On/Off/Audio
Switch
(2) Mode Switch
(10) Output
Figure 1 Front View
Page 6
6
Figure 2 End Panel View
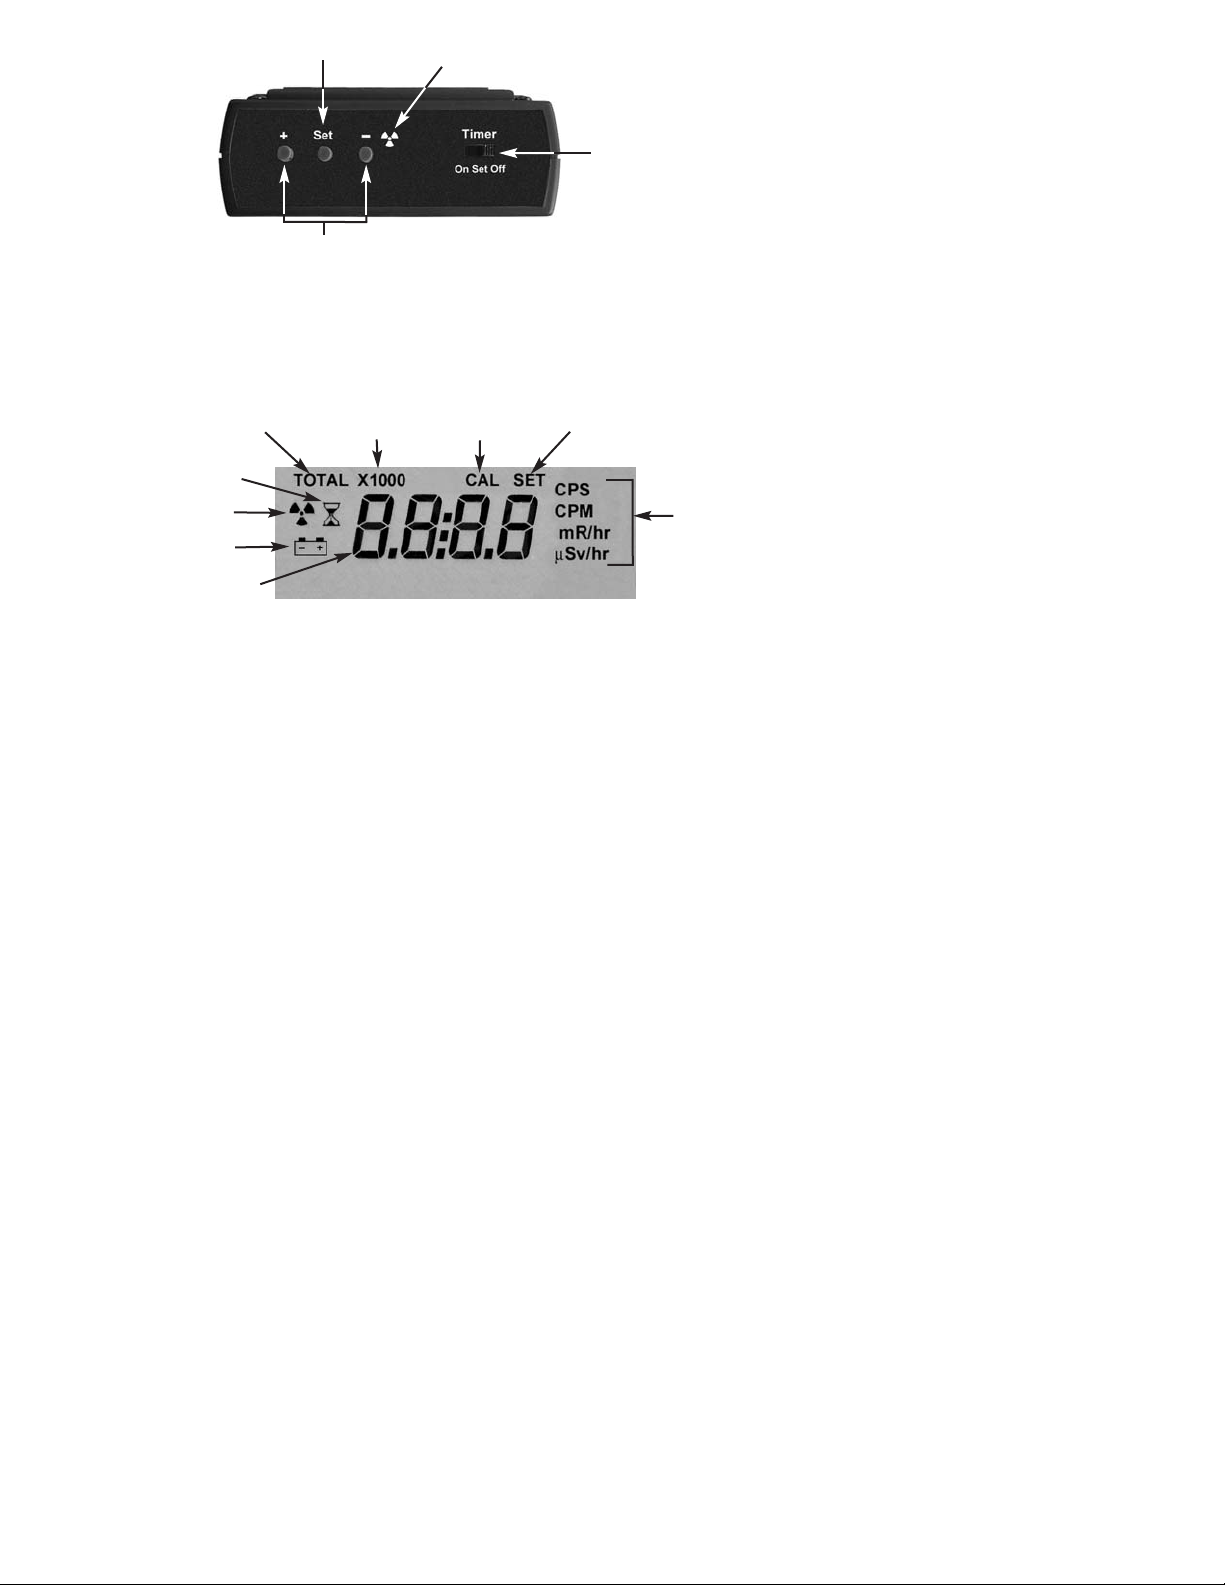
The Display (1)
The LCD (liquid crystal display) shows various indicators according to the mode
setting, function being performed, and battery condition.
Figure 3 Display Indicators
INDICATORS:
• The numeric display (A) shows the current radiation level in the unit
specified by the mode switch setting.
• A small battery (B) appears to the left of the numeric display indicating
low battery voltage.
•ARadiation Symbol (C) Appears to the left of the numeric display when
the Alert mode is activated.
• An hourglass (D) appears to the left of the numeric display while in the
Cal mode or during a timed count.
(A) Numeric Display
(B) Low Battery
(C) Alert
(D) Timer
(E) Total
Mode
(I) Units of
Measurments
(H) Utility Menu, Timer,
Calibation, Alarm
Set Mode
(G) CAL
Mode
(F) X1000
Mode
(4) Timer Switch
(6) Plus & Minus Buttons
(5) Set Button
GM Center Inticator
Page 7

7
• TOTAL (E) appears when the Inspector+ is in Total/Timer mode.
• X1000 (F) appears when the numeric display is to be multiplied by 1000.
• CAL (G) is shown while you are calibrating the Inspector+.
• SET (H) appears when you are setting the timer (the numeric display
shows the timed period instead of the current radiation level), in the
Cal mode (the numeric display shows the Cal factor instead of the current
radiation level), and while adjusting settings in the Utility and Alarm
Menus.
• The current unit of measurement (I)—CPM, CPS, mR/hr or µµSv/hr—is
displayed to the right of the numeric display.
The Switches
The Inspector+ has two switches on the front, and one switch and three buttons
on the end panel. Each switch has three settings which are described below.
Mode Switch (Figure 1(2))
mR/hr µµSv/hr. The numeric display shows the current radiation level in
milliroentgens per hour or, when SI units are used, in microsieverts per hour.
In mR/hr mode, the Inspector+ displays the radiation level from .001 to 100.
In µSv/hr mode, the Inspector+ displays the radiation level from .01 to 1000.
See “Utility Menu” in Chapter 3 for details on how to activate this mode.
CPM CPS. In CPM, the display shows the current radiation level in counts
per minute from 0 to 300,000. When X1000 is shown on the display, multiply
the numeric reading by 1000 to get the complete radiation level. When using
SI units, the display shows the radiation level in counts per second from 0 to
5000.
Total/Timer. The display shows the accumulated total of counts from 1 to
9,999,000. When X1000 is shown on the display, multiply the numeric
reading by 1000 to get the complete radiation level. Totaling starts when the
switch is moved to this position. For details, see “Taking a Timed or Total
Count” in Chapter 3.
Off/On/Audio Switch (Figure 1 (3))
Audio. The Inspector+ is on and makes a clicking sound for each
radiation event detected.
On. The Inspector+ is operating, but audio is off.
Page 8

8
Off. The Inspector+ is not operating.
Timer Switch (Figure 2 (4))
Off. The timer is not operating.
Set. The length of the timed period can now be set using the “+” and
“-” buttons. If the timer is already operating, the display shows
the time remaining in the timed period.
On. The timer is operating, and the display shows the total counts
accumulated so far in the timed period.
Set Button (Figure 2 (5))
The Set button is used to set the alert, select items in the Utility Menu, and
set the Calibration settings. See “Using the Alert” and “Utility Menu” in
Chapter 3 and “Calibration” in Chapter 5.
+ and - Buttons (Figure 2 (6))
The “+” and “-” buttons are used to adjust the numeric display for timed
counts, alert settings, and calibration settings. See “Taking a Timed Count”
and “Setting the Alert” in Chapter 3 and “Calibration” in Chapter 5.
The “+” and “-” buttons can also be used to make selections in the “Utility
Menu”. For details, see “Utility Menu” in Chapter 3.
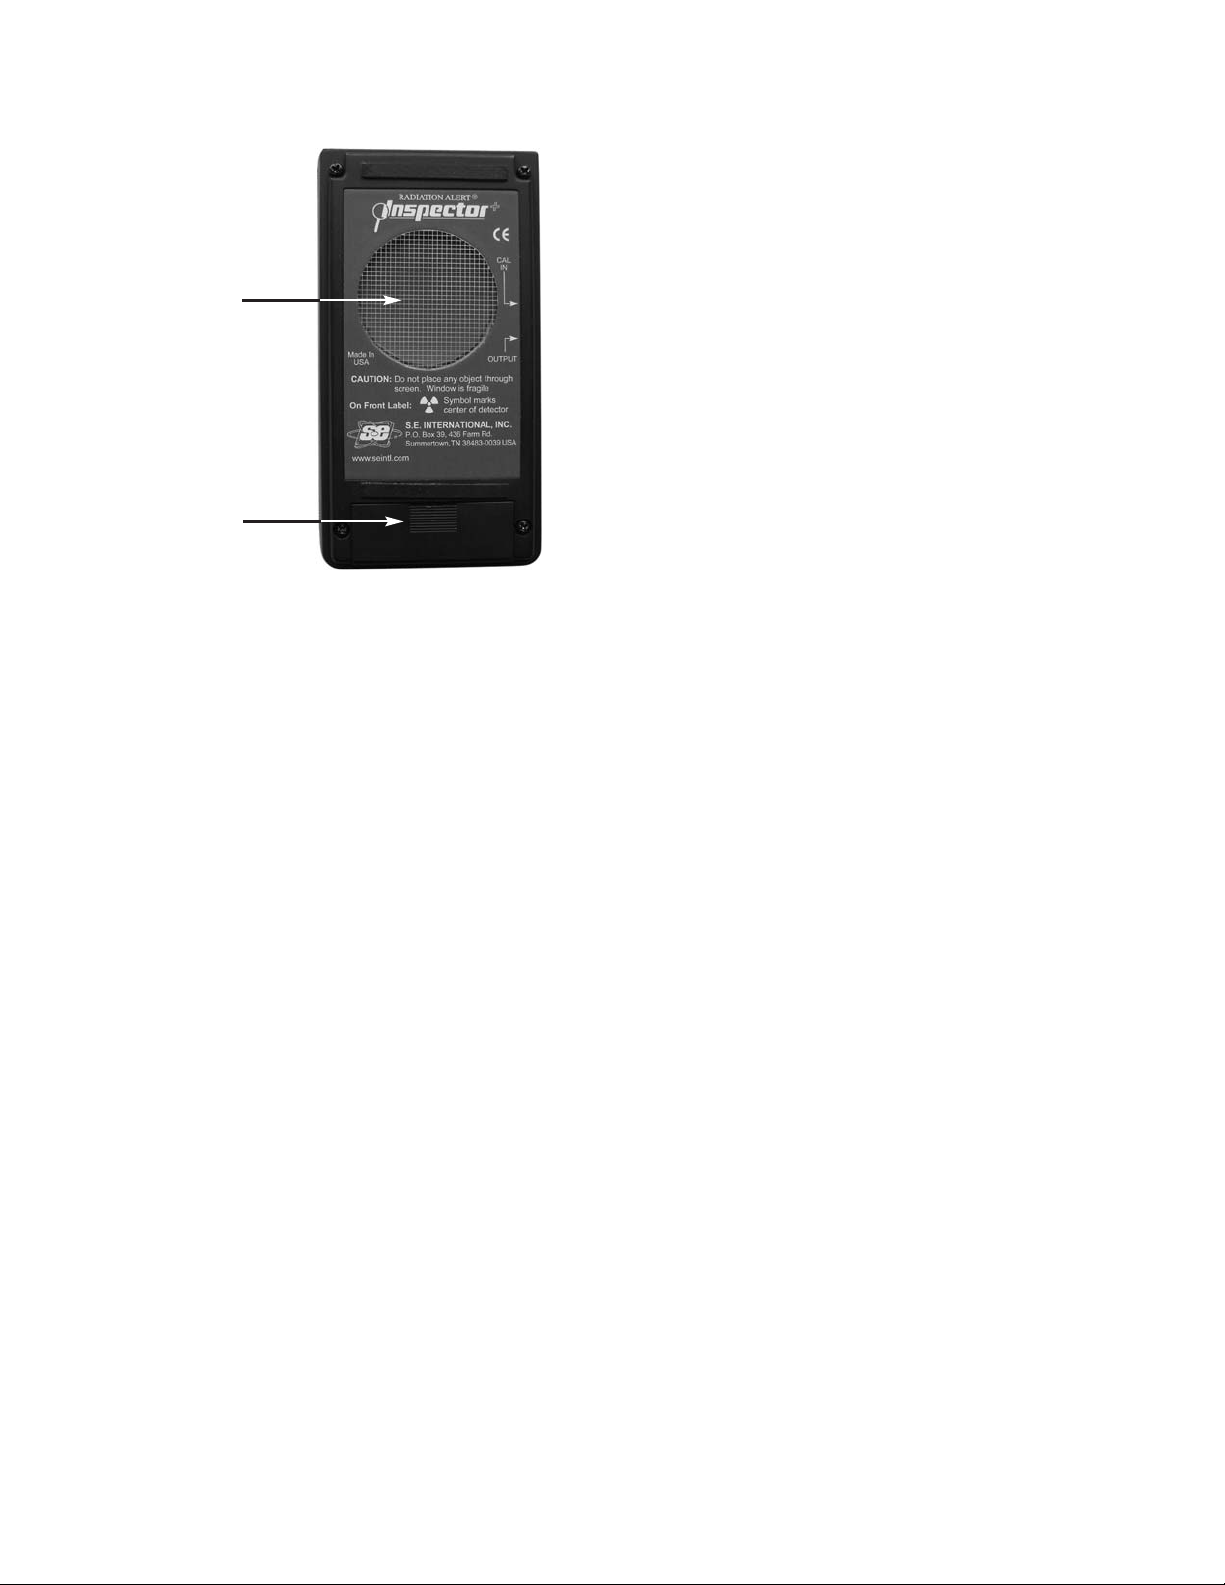
The Detector
CAUTION: The mica surface of the Geiger tube is fragile. Be careful not to let
anything penetrate the screen.
Internal- For Inspector+ only
The Inspector+ uses a two-inch Geiger tube, commonly called a “pancake tube.”
On the back of the Inspector+, the screen is called the window. See Figure 4. It
allows alpha and low-energy beta and gamma radiation, which cannot get through
the plastic case, to penetrate the mica surface of the tube. The small radiation
symbol (Figure 1 (7)) on the front label indicates the center of the Geiger tube .
External - For Inspector+ EXP only
The Inspector+ EXP has an external pancake probe instead of the built-in
detector. To connect the detector, plug one end of the cable into the connector on
Page 9
9
the end panel and the other end to the probe. Caution: If the probe is not
connected when turning the instrument on, the instrument will not function
properly and may cause damage. Do no remove the probe while the
instrument is on.
Figure 4 Inspector+ Rear View (Detector)
The Input/Output Ports
The Cal Input (Figure 1 (9)) port is used for calibrating electronically using a
pulse generator. For details, see “Calibrating Electronically” in Chapter 5.
The Output (Figure 1 (10) port below the Cal Input jack allows you to interface
the Inspector+ to a computer, data logger, or other device. For details, see
“Interfacing to an External Device” in Chapter 3.
The probe port on the end panel is for attaching the external probe. (present on
Inspector+ EXP only)
GM Detector
Window
Battery
Compartment
Page 10

10
3 Operation
Units of Measurement
The Inspector+ is designed for use of conventional units (milliroentgens per hour
and counts per minute) or SI units (microsieverts per hour and counts per
second). To switch between conventional or SI units choose Option 2 in the Utility
Menu. For details, see “Utility Menu” in Chapter 3.
Starting the Inspector+
Before starting the Inspector+, install a standard 9-volt alkaline battery in the
battery compartment in the lower rear. Note: Place the battery against the
bottom wall and make sure the wires are placed along the side of the battery and
not under it.
Start Up. To start the Inspector+, set the top switch to the mode you want, and
set the bottom switch to On or Audio. The Inspector+ then begins a 6-second
system check. All indicators and numbers are displayed.
After the system check, the radiation level is displayed in the selected mode.
Approximately thirty seconds after you start the Inspector+, a short beep indicates
that enough information has been collected to ensure statistical validity
.
Display update. In the dose rate modes, the numeric display is updated every
three seconds. In Total/Timer mode, the numeric display is updated twice a
second.
Maximum level. When the maximum level for the current mode is reached, the
Inspector+ beeps for three seconds, pauses for three seconds, and repeats that
pattern. The numeric display flashes. The beeping pattern and the flashing
display continue until the level decreases or the Inspector+ is turned off.
Response Time (Autoaveraging). When the radiation level is less than 6,000
CPM, the reading in any of the dose rate modes is based on the radiation
detected in the immediately previous 30 seconds. In order to give a quicker
response to changes, when the radiation level exceeds 6,000 CPM in any 30
second period, the reading is based on the previous 6 seconds. When the
radiation level exceeds 12,000 CPM in any 30-second period, the reading is
Page 11

11
based on the previous 3 seconds. Note: You can choose the 3 second response
at any radiation level by using the Utility Menu detailed in Chapter 3. Refer to the
following table.
After 30 second start-up the reading will be based
if instrument is detecting on an average of the previous
(<100 CPS) 30 seconds
< 6000 CPM or <1.75 mR/hr
(100 -200 CPS) 6 seconds
6000-12,000 CPM or 1.75-3.6 mR/hr
(>200 CPS) 3 seconds fast response
>12,000 CPM or >3.6 mR/hr
Autoranging
When radiation levels increases in some modes over certain preset levels, the
Inspector+ uses autoranging, automatically changing to the X1000 scale.
Whenever X1000 is shown above the numeric display, multiply the displayed
reading by 1000 to determine the radiation level. mR/hr, µSv/hr and CPS are not
applicable.
Mode Ranges as they are displayed
CPM 0 to 2,999 CPM > 2,999
X1000
3.000 (3,000) CPM to 350 (350,000) CPM
Total/Timer 0-9,999 counts > 9,999
X1000
10.00 (10,000) to 9999 (9,999,000) counts
Operating in Dose Rate Modes
Caution: 1. Be sure there is no obstruction between the detector window and
source being monitored/surveyed. 2. Avoid making measurements
with the GM window facing the sun, it could affect your readings.
When the mode switch is set to mR/hr µµSv/hr or CPM CPS, the numeric display
is updated every three seconds. At low count rates, significant changes in the
Page 12

radiation level displayed can take up to 30 seconds to stabilize. For details, see
“Autoranging” in this chapter.
CPM (or CPS) and total counts are the most direct methods of measurement;
mR/hr (or µSv/hr) is calculated using a conversion factor optimized for Cesium-
137. This mode is less accurate for other radionuclides unless you have
calibrated the Inspector+ for a similar radionuclide.
The most immediate indicators of the radiation level are the audio and count light.
It takes 3 seconds before a change is shown on the numeric display unless you
are using the Total/Timer mode.
Operating in Total/Timer Mode
When the mode switch is set to Total/Timer, the numeric display is updated twice
a second and totaling starts.
Taking a Timed Count
When a timed count is taken over a longer period, the average count per minute
is more accurate, and any small increase is more significant. For example, if one
10-minute average is one count higher than another 10-minute average, the
increase may be due to normal variation. But over 12 hours, a one-count
increase over the 12-hour background average may be statistically significant.
The Inspector+ can give you a total count for a timed period from 1 minute to 24
hours. For a timed count of less than one minute, watch the seconds countdown
on the display. You can manually shut off the timer at any point.
Follow these steps to take a timed count:
1. With the Inspector+ turned on, set the Mode switch to Total/Timer and the
timer switch on the end panel to Set. The timer Hourglass and the SET icon
appear on the display and the value is set to 00:01(1 minute).
2. Use the “+” and “-” buttons to adjust the timing period. The timed period can
be set for 1 to 10 minutes in one-minute increments, for 10 to 50 minutes in
ten-minute increment
s, or for 1 to 24 hours in one-hour increments.
3. Set the Timer switch to On. The Inspector+ beeps three times and starts
counting. The hourglass icon flashes during the timed period.
If you want to see how many minutes remain, set the Timer switch to Set.
12
Page 13

13
The display counts down from the time setting in hours and minutes to zero.
For example, if the display says 00:21, 21 minutes remain. During the timed
period, you can switch back and forth between Total/Timer and the dose
rate modes without interrupting the timed period. The hourglass indicator will
show in any mode setting and will blink while the timer is totaling.
4. At the end of the timed period, the Inspector+ beeps three times, and repeats
the beeping several times over fifteen seconds. The number displayed is the
total count.
5. Set the Timer switch to Off to return to normal operation.
To find the average counts per minute for the timed period, divide the total by the
number of minutes.
6. To reset the timer to take another timed count, move the timer switch to the
Off position and then to the On position. The instrument will retain the timer
setting of the last entered time.
Using Dose Rate Modes While Timer is On
Dose rate modes can be used while the timer is on. In any dose rate mode, the
hour glass indicator will continue to flash during a timed period. At the end of the
timed period, the hour glass will remain continuously on and the timed reading is
held in the Total/ Timer mode.
Taking a Total Count
The timer can take timed counts of up to twenty-four hours. In certain situations,
you may want to take a total count without the timer; for example, taking a count
for longer than twenty-four hours. Follow these steps:
1. Place the Inspector+ in the location where you plan to take the count.
2. Note the time.
3. Immediately when you note the time, set the mode switch to Total/Timer.
4. At the end of the time period, note the time and the number of counts on the
numeric display.
5. Subtract the starting time from the ending time to determine the exact
number of minutes in the timing period.
6. To get the average count, divide the total counts by the number of minutes in
Page 14

14
the timing period.
Using The Alert
The Alert can be set in mR/hr or cpm. Once the alert threshold is reached the
beeper will sound until the alert is deactivated, or the radiation level drops below
the set alert threshold.
1. To set the Alert, press the "SET" button on the end panel. The "ALERT" icon
(radiation symbol) and the "SET" icon are displayed.
2. Use the "+" and "-" buttons to adjust the display to the desired level.
3. Press the "Set" button once to retain the setting in memory. Then press it
again to turn the alert mode on. The "ALERT" icon is now displayed to
indicate the instrument is operating in the Alert mode.
4. To use the previous alert setting, press the set button twice. Now the alert
mode is on.
5. To deactivate the Alert mode, press the "Set" button again. The "ALERT" icon
is no longer displayed.
Utility Menu
The Utility Menu allows the user to change default settings for several operating
parameters. Once a setting is changed, it remains in effect unless they are
changed through the Utility Menu.
1. To activate the Utility Menu, hold down the “+” button while turning the
instrument on. The display will show the "MENU" icon. Release the “+” button
and a “1” indicating option 1 will appear along with the “Menu” icon.
2. Scroll through the menu by pushing the “+” or “-” buttons.
3. To select an option, push the “Set” button and the “SET” icon is displayed.
4. Use the “+” or “-” buttons to toggle between choices and press the “Set” button
to enter the new value. The instrument will continue to operate in the Utility
Menu mode, and the display will show "0" and "MENU". To adjust another
Utility Menu option, repeat the above steps.
Page 15

5. To exit the Utility Menu at any time, press the SET button again. The
Inspector+ continues with the normal start-up routine. See options in the table
below:
Options Function Comments
1. Auto Averaging or “on” selects Auto Averaging Refer to
3 sec. Averaging “oFF” selects 3 second “Response Time
(fast response) averaging (Autoaveraging)” in
Chapter 3
2. Units Of Selects between mR/hr
Measurements and CPM or µSv and CPS
3. Cal 100 Reset Automatically resets Cal Press the set Button
factor to 100 No toggling required
4, 5, 6 Reserved for future options
7. Cal Factor Adjust Manually adjusts cal factor Use + or - Buttons
to increase or
decrease the value
8. Factory Default Automatically resets to Press the set Button
Reset Auto Averaging, mR/hr, CPM, No toggling required
and CAL 100
9. Revision # Displays software version number
Interfacing to an External Device
The lower output jack (Figure 1 (10)) on the left side of the Inspector+ is a dual
miniature jack that provides a data output that can be used to drive a CMOS or
TTL device. You can use it to record the counts on a computer, data logger, or
accumulating counter. The output at the tip of the plug provides a positive (5 volt)
pulse each time the Geiger tube detects a count. Visit seintl.com for more
information on Observer Software.
Options
Wipe T est Plate (p atent # 5,936,246)
The stainless steel WipeTest Plate has a circular depression for placement of a
15
Page 16

16
wipe parallel to the detector window at a fixed distance of 1 cm. The WipeTest
Plate is designed to slide easily onto the back of the Inspector+.
4 Common Procedures
The following sections give instructions for several commonly-used procedures.
With any procedure, the user must determine the suitability of the instrument or
procedure for that application.
Establishing the Background Count
Normal background radiation levels vary at different locations, time, even in
different areas of the same room. To accurately interpret the readings you get on
the Inspector+, it is good to establish the normal background radiation count rate
for each area you plan to monitor. You can do this by taking a timed count. For
more information on using the timer, see “Taking a Timed Count” in Chapter 3.
A ten-minute average is moderately accurate. You can repeat it several times and
see how close the averages are. To establish a more accurate average, take a
one-hour timed count. If you need to determine whether there is prior
contamination, take averages in several locations and compare the averages.
Environmental Area Monitoring
You can keep the Inspector+ in CPM or mR/hr mode whenever you want to
monitor the ambient radiation, and look at it from time to time to check for
elevated readings.
If you suspect an increase in ambient radiation, use the timer and take a five or
ten minute count, and compare the average to your average background count. If
you suspect an increase that is too small to detect with a short timed reading, you
can take a longer count (for example 6, 12, or 24 hours).
Checking for Surface Contamination
CAUTION: Never touch the Inspector+ to a surface that may be contaminated.
You may contaminate the instrument. The rubber strips on the back
can be replaced if they become contaminated. Replacement strips
are supplied in this manual.
Page 17

17
To check a surface, hold the detector window close to the surface and read the
count rate (wait 30 seconds or until the reading has stabilized). If you want to find
out if a surface is slightly radioactive, take a timed count or a longer accumulated
count.
5 Maintenance
The Inspector+ requires regular calibration and careful handling to assure good
measurements. Use the following guidelines to maintain the Inspector+ properly.
Calibration
The Inspector+ should be calibrated as often as your regulations require, or in any
case, at least once a year. The best way to calibrate is using a calibrated source.
If no source is available, it is possible to calibrate electronically using a pulse
generator.
The standard radionuclide for calibration is Cesium-137. A certified calibration
source should be used. To calibrate the Inspector+ for another radionuclide, you
must use a calibrated source for that radionuclide or the appropriate conversion
factor referenced to Cs-137.
CAUTION: Errors can occur when using low level sources or background to set
CAL factor. In the Calibration mode, the smallest increment which can be
adjusted is .010, which prevents fine adjustment of the CAL factor.
Calibrating Using a Source
1. Place the Inspector+ or Inspector+ EXP probe at a distance from the source
that corresponds to a 50 mR/hr field with the detector window facing the
source.
2. Set the Inspector+ mode switch to mR/hr.
3. Turn the Inspector+ on.
4. Open the source and record 20 consecutive readings.
5. Close the source.
6. Calculate the average of the readings and record.
a) If the average is ± 10% of 50 mR/hr, go to Step 7.
b) If the average is not ± 10% of 50 mR/hr, go to Step 10.
Page 18

18
7. Place the Inspector+ or the Inspector+ EXP probe at a distance from the
source that corresponds to a 5 mR/hr field with the detector window facing
the source.
8. Repeat Steps 2 - 5.
9. Calculate the average of the readings and record.
a) If the average is ± 10% of 5 mR/hr, the calibration procedure is complete.
b) If the average is not ± 10% of 5 mR/hr, go to Step 10.
10. Turn off the AUDIO in order to hear the count down timer sound.
11. Turn off the Inspector+. Hold down the “-” button on the end panel and turn
on the Inspector+. The display shows CAL, and the Inspector+ counts down
for 15 seconds, chirping each second. This delay gives you a chance to
move out of the field and then expose the source. At the end of the 15
seconds, the Inspector+ beeps.
12. The Inspector+ now collects data for 30 seconds, chirping every 2 seconds,
with CAL and the hourglass icon flashing. At the end of the 30 seconds, it
beeps. The display shows CAL and SET is flashing.
13. Close the source.
14. Press the “+” and “-” buttons on the Inspector+ to adjust the reading to what
it should be.
15. When the reading is correct, press the Set button. The new calibration factor
is displayed for several seconds, then the Inspector+ beeps and resumes
normal operation.
16. Record the new calibration factor.
17. Place the Inspector+ or the Inspector+ EXP probe at a distance from the
source that corresponds to a 5 mR/hr field with the detector window facing
the source.
18. Repeat Steps 2 - 5.
19. Calculate the average of the readings and record.|
a) If the average is ± 10% of 5 mR/hr, the calibration procedure is complete.
b) If the average is not ± 10% of 5 mR/hr, repeat steps 11 - 16 and go to
step 20.
20. Calculate the average of the calibration factor for 50 mR/hr and the
calibration factor for 5 mR/hr.
Page 19

19
21. Turn the Inspector+ off. Hold down the “+” button while turning the
Inspector+ on. The numeric display will show a single number.
23. Press the “+” or “-” button until 7 is shown on the numeric display.
24. Push the Set button.
25. The calibration factor is displayed. Press the “+” or “-” buttons to adjust
the calibration factor to the average calibration factor calculated in Step 20.
26. Push the Set button to enter the new setting and resume normal operation.
The calibration factor is set to 100 (percent) at the factory. If you change the
reading, for example, to 20% higher than the factory reading, the new calibration
factor would be 120. The current calibration factor is displayed during the system
check when the Inspector+ is first turned on.
Calibrating Electronically
You can calibrate electronically using a pulse or function generator. Electronic
calibration requires a cable with a 2.5 mm plug, with the tip carrying the signal.
Follow these steps:
1. Set the signal height to 3.3 volts and a negative pulse width of 85
microseconds positive pulse.
CAUTION: Do not inject a pulse when the Inspector+ is turned off.
Do not exceed 5 volts.
2. Turn on the Inspector+ and set the mode switch to mR/hr µµSv/hr.
3. Plug the cable into the upper jack.
4. Use the following table to check the Inspector+’s accuracy. The table shows
appropriate pulse generator count rates to calibrate for Cs-137. If the
accuracy is not within desired limits, follow steps 5-7. Note that the
Inspector+ automatically compensates for lost counts due to GM tube dead
time. Thus, the display reading in CPM mode will not equal the input
frequency. You can display uncompensated counts in the CPM mode by
continuously holding down the “-” button. The reading will now correspond to
the input frequency.
Page 20

20
Pulse Generator CPM mR/Hr
µµ
Sv/hr CPS
Input (PPM)
31,423 33,400 10.00 100.0 557
59,335 66,800 20.00 200.0 1,113
127,043 166,999 50.00 500.0 2,783
177,752 267,200 80.00 800.0 4,453
205,031 334,000 100.0 1,000 5,567
5. Turn off the Inspector+. Hold down the ”-” button on the end panel and turn
on the Inspector+. The display shows CAL, and the Inspector+ counts down
for 15 seconds, chirping each second. At the end of the 15 seconds, the
Inspector+ beeps.
6. The Inspector+ collects data for 30 seconds, chirping every 2 seconds, with
CAL and the hourglass icon flashing. At the end of the 30 seconds, it beeps.
The display shows CAL, and SET is flashing
7. Press the “+” and “-” buttons to adjust the reading to what it should be.
When the reading is correct, press the Set button.
The new calibration factor is displayed for several seconds, then the
Inspector+ beeps and resumes normal operation.
Troubleshooting
The Inspector+ is a highly reliable instrument. If it does not seem to be working
properly, look through the following chart to see if you can identify the problem.
Problem Possible Cause What To Check
Display is blank no battery, dead battery, install a new 9-volt battery
poor battery connection if count light and audio
defective LCD work, the LCD may
need to be replaced
Page 21

21
Problem Possible Cause What To Check
Display works, but no defective Geiger tube or look through the window to
counts are registered bad cable check the mica surface of
the tube; if it is wrinkled or
a break is visible, replace it
check EXP cable connection
Reading is high, but contamination scan the Inspector+ (EXP)
another instrument; with another instrument
has a normal reading replace rubber strips on
in the same location back of Inspector+
Instrument has false moisture circuit board may be wet;
high reading dry the instrument in a warm
dry place; if it still has a
problem, it requires service
Instrument has false photosensitivity remove from direct sunlight
high reading and ultraviolet sources; if
the high count drops, the
mica window coating may
have washed off the Geiger
tube due to getting wet; the
tube will need to be replaced
Instrument has false continuous discharge replace the Geiger tube
high reading
Instrument has false electromagnetic field move the instrument away
high reading from possible sources of
electromagnetic or radio
frequency radiation
Service
CAUTION: Do not send a contaminated instrument for repair or calibration under
any circumstances. There are no user serviceable parts inside
instrument.
If the Inspector+ requires servicing, please contact your distributor or the
Page 22

22
manufacturer at the following address:
S.E. International, Inc.
P.O. Box 39, 436 Farm Rd.
Summertown, TN USA 38483-0039
Tel 931-964-3561, Fax 931-964-3564
E-mail: radiationinfo@seintl.com
6 Basics of Radiation and Its Measurement
This chapter briefly tells what radiation is and how it is measured. This
information is provided for users who are not already familiar with the subject. It
is helpful in understanding how the Inspector+ works and in interpreting your
readings.
Ionizing Radiation
Ionizing radiation is radiation that changes the structure of individual atoms by
ionizing them. The ions produced in turn ionize more atoms. Substances that
produce ionizing radiation are called radioactive.
Radioactivity is a natural phenomenon. Nuclear reactions take place continuously
on the sun and all other stars. The emitted radiation travels through space, and a
small fraction reaches the Earth. Natural sources of ionizing radiation also exist in
people and in the ground. The most common of these are uranium and its decay
products.
Ionizing radiation is categorized into four types:
X-rays are manmade radiation produced by bombarding a metallic target with
electrons at a high speed in a vacuum. X-rays are electromagnetic radiation of
the same nature as light waves and radio waves, but at extremely short
wavelength, less than 0.1 billionth of a centimeter. They are also called photons.
The energy of X-rays are millions of times greater than that of light and radio
waves. Because of this high energy level, X-rays penetrate a variety of materials,
including body tissue.
Gamma rays are almost identical to X-rays. Gamma rays generally have a
shorter wavelength than X-rays. Gamma rays are very penetrating; thick lead
Page 23

23
shielding is generally required to stop them.
Beta radiation A beta particle consists of an electron emitted from an atom. It
has more mass and less energy than a gamma ray, so it doesn’t penetrate matter
as deeply as gamma and X-rays.
Alpha radiation An alpha particle consists of two protons and two neutrons, the
same as the nucleus of a helium atom. It generally can travel no more than 1 to 3
inches in air before stopping, and can be stopped by a piece of paper.
Decay: When an atom emits an alpha or beta particle or a gamma ray, it
becomes a different type of atom. Radioactive substances may go through
several stages of decay before they change into a stable, or non-ionizing, form.
For example; U-238 has 14 different stages of decay before it stabilizes.
An element may have several forms, or isotopes. A radioactive isotope of an
element may be called “radioisotope”. However, the more correct term is
radionuclide.
Half-life: Each radionuclide has a characteristic half-life, which is the time
required for half of a quantity of the material to decay.
Radiation Measurement Units
Several different units are used to measure radiation, exposure to it and dosage.
A roentgen is the amount of X-radiation or gamma radiation that produces one
electrostatic unit of charge in one cc of dry air at 0° C and 760 mm of mercury
atmospheric pressure. The Inspector+ displays in milliroentgens per hour
(mR/hr).
A rad is the unit of exposure to ionizing radiation equal to an energy of 100 ergs
per gram of irradiated material. This is approximately equal to 1.07 roentgen.
A rem is the dosage received from exposure to a rad. It is the number of rads
multiplied by the quality factor of the particular source of radiation. The rem and
millirem are the most commonly-used measurement units of radiation dose in the
U.S. 1 rem= 1rad.
A sievert is the standard international measurement of dose. One sievert is
Page 24
24
equivalent to one hundred rems. A microsievert (µSv) is one millionth of a sievert.
A curie is the amount of radioactive material that decays at the rate of 37 billion
disintegrations per second, approximately the decay rate of one gram of radium.
Microcuries (millionths of a curie) and picocuries (trillionths of a curie) are also
often used as units of measurement.
A becquerel (Bq) is equivalent to one disintegration per second.
Appendix A - Technical Specifications
Detector: Internal Halogen-quenched Geiger-Mueller tube.
Effective dia. 1.75” (45 mm).
Mica window density 1.5-2.0 mg/cm2.
External RAP-RS1 Same detector as internal. Anodized aluminum
housing with black vinyl grip. 500 volt power
supply is located in the probe head.
Connectors: Amphenol 31226 twinax.
Display: 4-Digit liquid crystal display including mode
indicators
Operating Range: mR/hr: .001 to 100.0
CPM: 0 to 350,000
Total: 1 to 9,999,000 counts
mSv/hr: .01 to 1,000
CPS: 0 to 5,000
Efficiency: Sr(Y)-90: approx. 38%; C-14: approx. 5.3%
4 p at contact P-32: approx 33%; Co-57: approx. .3%
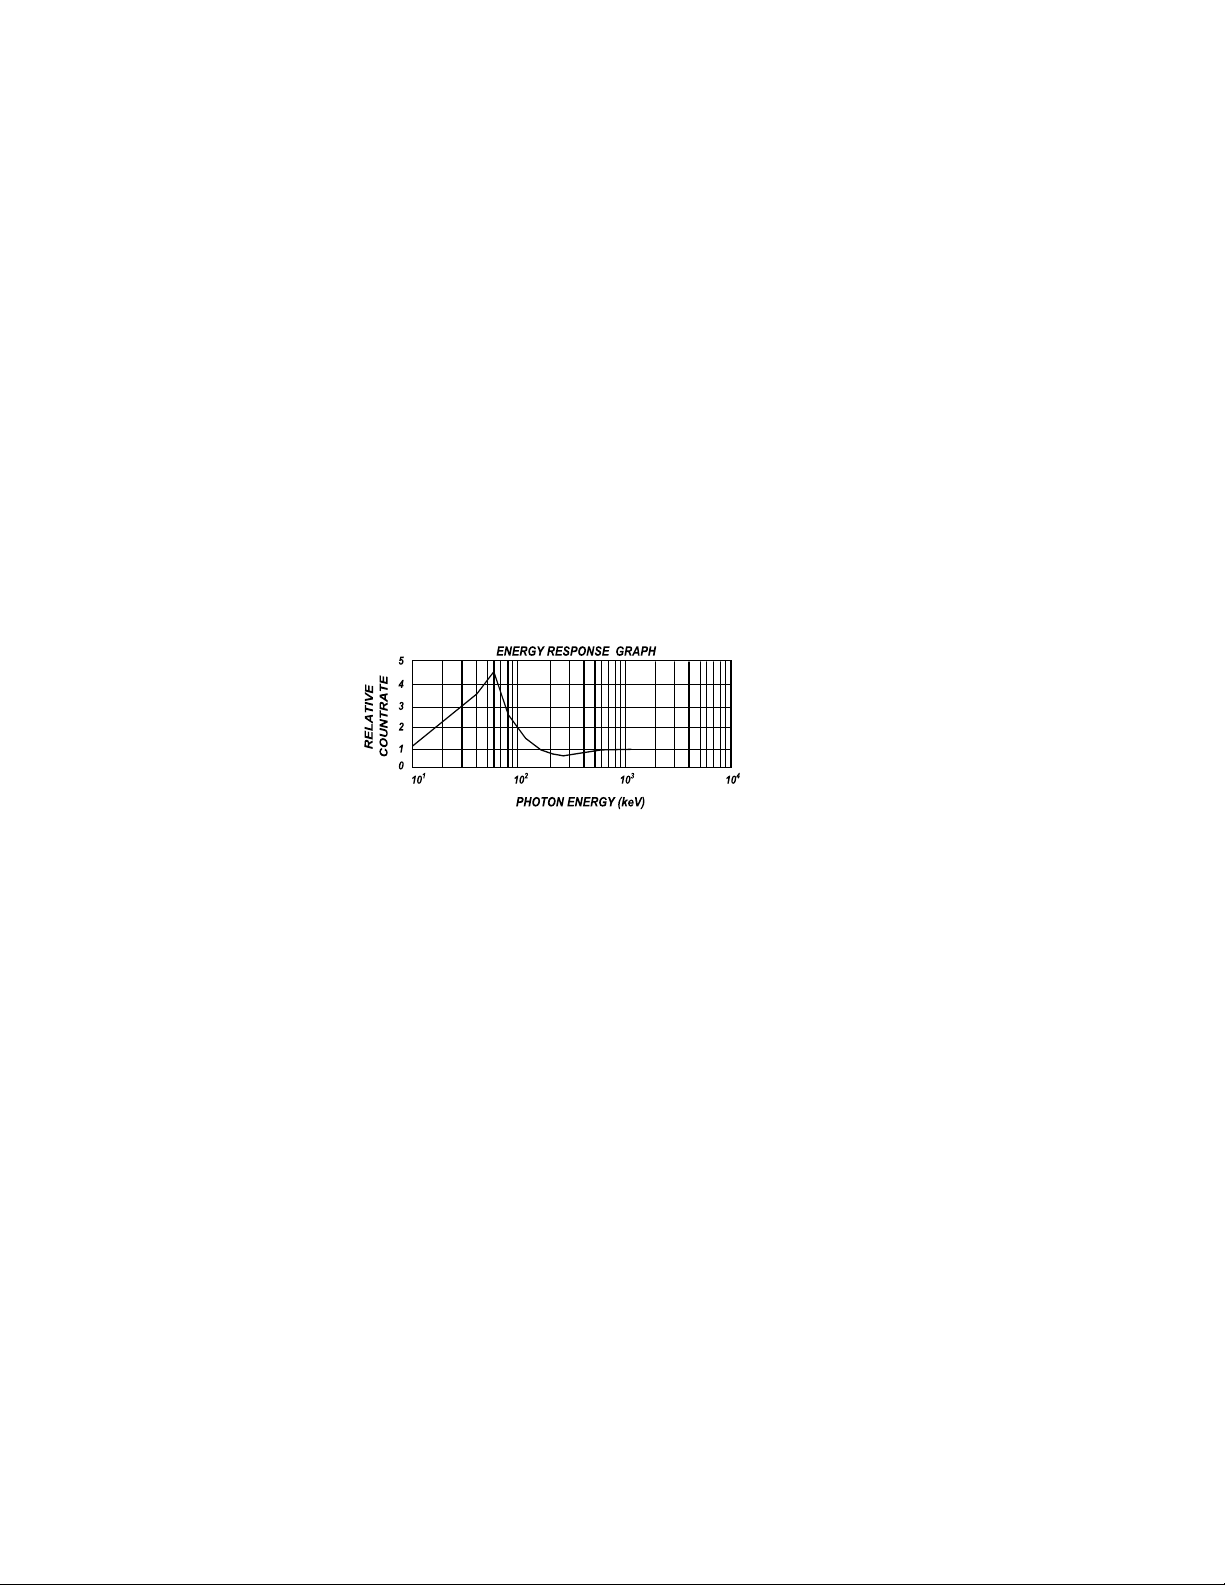
Gamma Sensitivity:
3500 CPM/mR/hr referenced
to Cs-137
Smallest detectable level for
I-125 is .02 mCi at contact
Page 25

25
Averaging Periods: Display updates every 3 seconds, showing the
average for the past 30-second time period at
normal levels. The averaging period decreases
as the radiation level increases. Refer to Chapter 3
Operation- Autoranging, Display update.
CAL Factor Range: 001 to 199
Timer: Can set 1-10 minute sampling periods in one minute
increments, 10-50 minute sampling periods in 10-
minute increments, and 1-24 hour sampling periods in
1-hour increments
Alert Range: mR/hr: 0 to 50
CPM: 0 to 160,000
Accuracy: ± 10%
Beeper: Operational in Audio mode only
Anti-Saturation: Readout holds at full scale in fields up to 100
times the maximum reading.
Temperature Range: -10° to +50° C , 14° to 122° F
Power: One 9-volt alkaline battery. Battery life is minimum
2160 hrs at normal background. Minimum battery life
is 625 hrs at 1 mR/hr.
Size: 150 x 80 x 30 mm (5.9” x 3.2” x 1.2”)
Weight: 323 grams (11.4 oz) including battery
Appendix B Sensitivity to Common Isotopes
Typical GM tube efficiency for 4 Pi geometry at contact
Isotope E max. MeV Efficiency
Beta
14
C 49 keV Avg. 156 keV Max. 5.3%
210
Bi 390 keV Avg. 1.2 MeV Max. 32%
90
Sr(Y) 546 keV and 2.3 MeV 38%
32
P 693 keV Avg. 1.7 MeV max. 33%
Alpha
241
Am 5.5 MeV 18%
Page 26
26
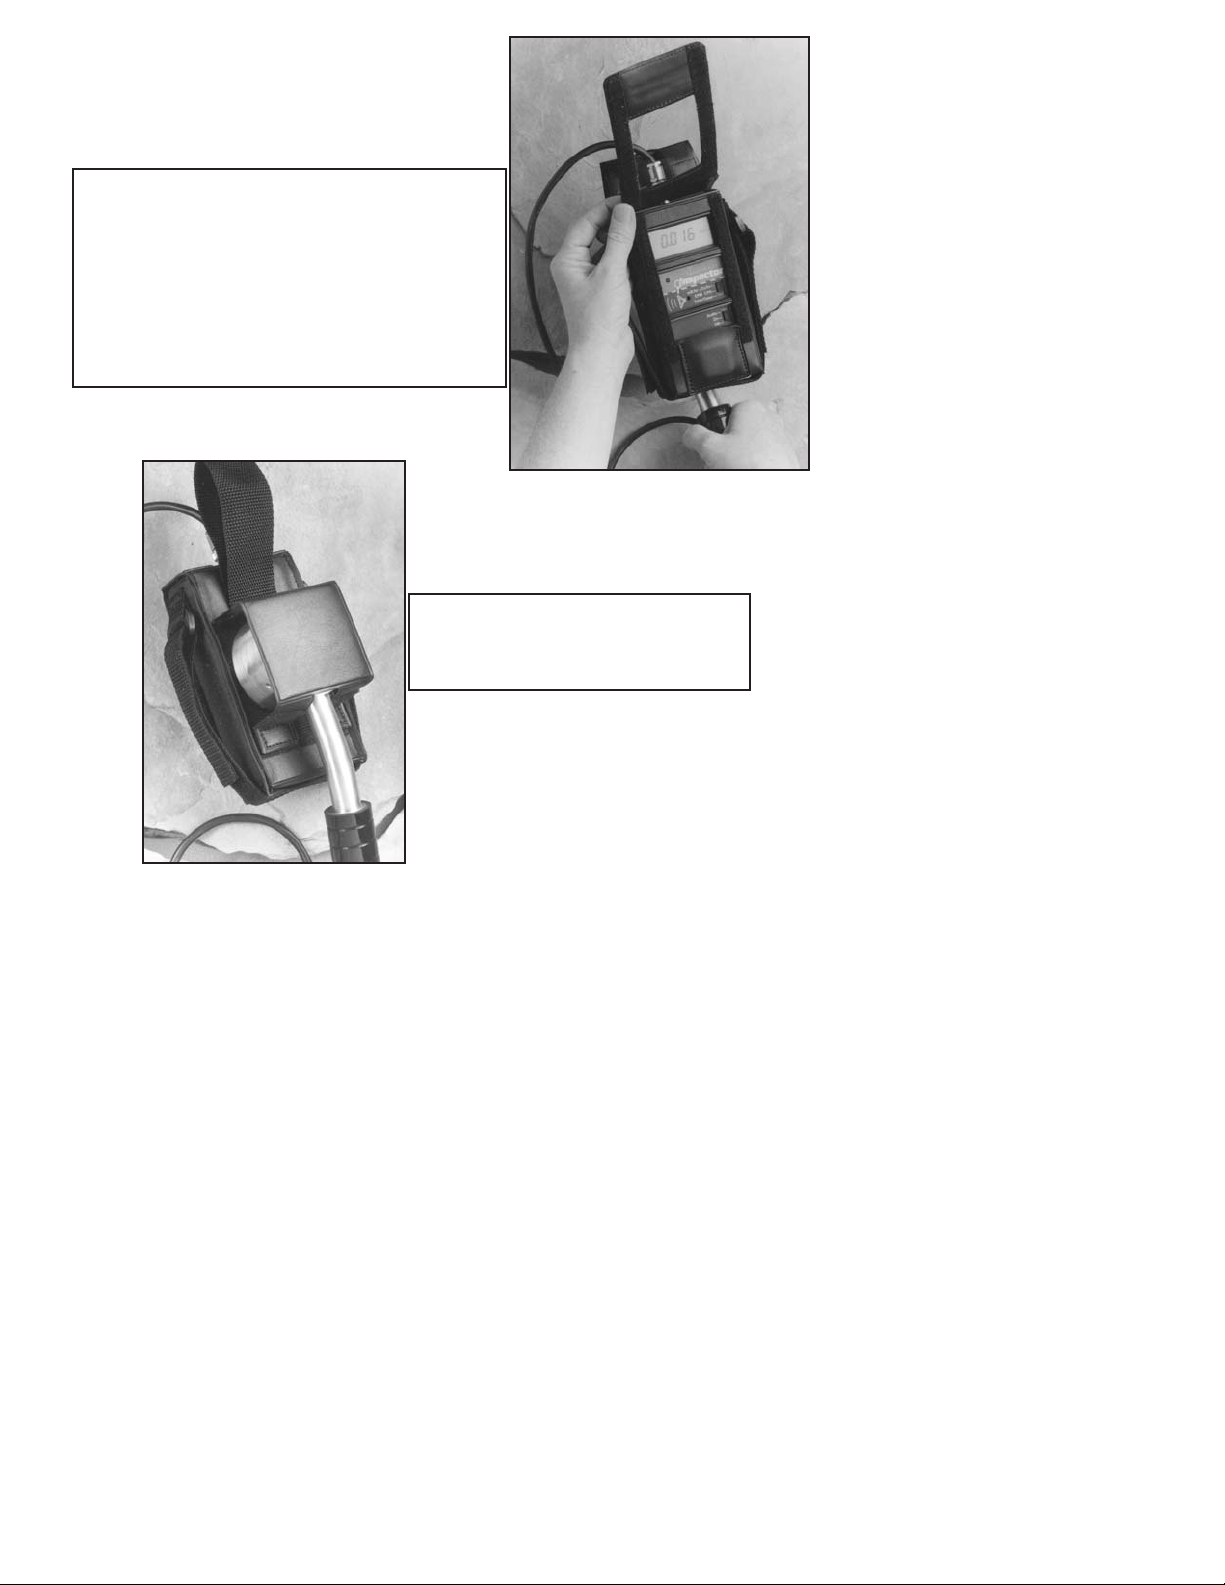
Appendix C - Inspector++ EXP Carrying Case
The unique design of
attaching the probe to the
carrying case allows one
handed operation.
The carrying case has a clear window panel
providing full view of the readout, count light
and access to the switches. Convenient
hand straps and a belt loop are provided for
carrying the instrument.
Page 27
27
The reinforced protective probe
cover prevents damage to the
fragile window of the detector.
The front flap lifts out of the way to gain
access to switches and a small pocket is
provided to hold a check source. For the
protection of the user, we recommend that
you use a .1 microcurie Cesium 137 check
source shielded on both sides. Gamma
shields for this source are available through
your distributor.
Page 28

28
Warranty
LIMITED WARRANTY
WARRANTOR: S.E. International, Inc., P.O. Box 39, 436 Farm Road,
Summertown, TN 38483-0039, USA, (931) 964-3561
ELEMENTS OF WARRANTY: S.E. International, Inc., warrants for 90 days the
Geiger-Mueller tube and for one year all materials and craftsmanship in this
product to be free from all defects with only the limitations set out below.
WARRANTY DURATION: The warranty shall terminate and be of no further
effect one year (90 days on the GM tube) after the original date of purchase of the
product or at the time the product is: a) damaged or not maintained as is
reasonable or necessary, b) modified, c) repaired by someone other than the
warrantor for a defect or malfunction covered by this Warranty, d) contaminated
with radioactive materials, or e) used in a manner or purpose for which the
instrument was not intended or contrary to S.E. International, Inc.’s written
instructions. This warranty does not apply to any product subjected to corrosive
elements, misuse, abuse, or neglect.
STATEMENT OF REMEDY: In the event that the product does not conform to
the warranty at any time while this warranty is effective, the Warrantor will repair
the defect and return the instrument to you prepaid, without charge for parts or
labor.
NOTE: While the product will be remedied under this warranty without charge,
this warranty does not cover or provide for the reimbursement or payment of
incidental or consequential damages arising from the use of or the inability to use
this product. The liability of the company arising out of the supplying of this
instrument, or its use, whether on warranties or otherwise, shall not in any case
exceed the cost of correcting defects in the instrument, and after the said one
year (90 days on the tube) period all such liability shall terminate. Any implied
warranty is limited to the duration of the written warranty.
PROCEDURE FOR OBTAINING PERFORMANCE OF WARRANTY: In the
event that the product does not conform to this warranty, please write or call to
the address above. S.E. International, Inc. will not accept contaminated
instruments for calibration or repair under warranty or otherwise.
NOTE: Before using this instrument, the user must determine the suitability of the
product for his or her intended use. The user assumes all risk and liability
connected with such use.
Page 29

29
Cut along dotted line
CALIBRATION DATABASE APPLICATION
name model name
company serial no.
(Inside battery compartment or rear label)
address
City, state, zip code +4 calibrations per year
(circle) 1 2 3 4
phone number date placed in service
Mail to Attn: Robert Russell
S.E. International, Inc., P.O. Box 39, Summertown, TN 38483-0039 or fax to (931) 964-3564
Page 30

30
Découper sur le pointillé
INSCRIPTION À LA BASE DE DONNÉES D’ÉTALONNAGE
nom dénomination du modèle
société numéro de série (se trouve à l’intérieur dn
compartiment à pile ou sur étiquette au dos)
adresse
Ville, état ou province, code postal complet Étalonnages par an
(veuillez indiquer) 1 2 3 4
Numéro de téléphone
Renvoyer à l’intention de: Steve Skinner / Robbin Cramer
S.E. International, Inc., P.O. Box 39, Summertown, TN 38483-0039 ou bien envoyer par
télécopie à (931) 964-3564
Page 31

31
Inspector+ Manuel d’instructions - Table de Matiéres
Chapitre Page
1 Introduction 33
2 Caractéristiques 34
Affichage 35
Sélecteurs 36
Détecteur 37
Prises de sortie/entrée 39
3 Opération 39
Unités de mesure 39
Mise en route de l'Inspector 39
Démarrage 40
Mise à jour de l'affichage 40
Niveau maximal 40
Temps de réponse (calcul automatique de moyennes) 40
Sélection automatique de gamme 41
Opération en mode de débit de dose 41
Opération en mode totalisateur minuté 42
Prise d'un comptage minuté 43
Emploi des débits de dose lorsque la minuterie marche 43
Prise d'un comptage totalisé 41
Utilisation de l'alerte 44
Menu d'utilités 45
Interfaces avec un appareil externe 46
Options 46
4 Utilisation courante 46
Établir le comptage général 47
Contrôle de l'aire d'environnement 47
5. Entretien 48
Étalonnage 48
RADIATION ALERT
®
INSPECTOR+ Manuel d’instructions
Page 32

04/03/00
Dépistage de pannes 49
Service après-vente 53
6. Radiation ionisante et unités de mesure 53
Annexe A Spécifications techniques 55
Annexe B Sensibilité aux radionucléides communs 57
Garantie 57
Appendice C Étui de l'Inspector EXP 58
Inscription à la base de données d'étalonnage 30
Liste des illustrations
Illustration 1 Vue du devant 33
Illustration 2 Vue du panneau de l'extrémité 34
Illustration 3 Affichage 34
Illustration 4 Vue du dos (Détecteur) 37
Précautions
Afin de préserver votre Inspector dans de bonnes conditions d'utilisation, utilisez
avec soin et veuillez observer les précautions d'emploi figurant ci-dessous :
• Ne pas contaminer l'Inspector en mettant en contact des surfaces ou
matériaux radioactifs. Si l'on soupçonne une contamination, il y a des
bandes en caoutchouc de remplacement agrafées à l'intérieur de ce
manuel.
• Éviter d'exposer l'instrument à des températures dépassant 38° C
(100° F) ainsi qu'à la lumière directe du soleil pendant des périodes
prolongées.
• Éviter d'exposer l'Inspector aux liquides. L'eau pourrait endommager les
circuits et la surface en mica du tube Geiger-Müller
• Ne jamais placer l'Inspector dans un four à micro-ondes. Il est incapable
de mesurer les micro-ondes et risque d'être endommagé ou bien
d'endommager le four.
• Cet instrument peut être sensible aux radiofréquences, aux micro-ondes,
dans les champs électrostatiques et électromagnétiques et pourrait ne
pas bien fonctionner dans ces conditions.
Page 33

33
• Si l’on ne doit pas utiliser l’Inspector+ pendant plus d’un mois, ôter la
pile pour éviter les dommages dus à la corrosion de la pile.
• Remplacer la pile immédiatement lorsque l’indicateur de pile paraît à
l’écran d’affichage.
1 Introduction
L'Inspector est un instrument de santé et de sécurité optimisée pour détecter les
niveaux de rayonnement faible. Il mesure le rayonnement alpha, beta, gamma et
de rayons-x.
Ses applications comprennent :
• Détection de la contamination superficielle et sa quantification
• Contrôle d’exposition possible lors de la manipulation de radio nucléides
• Contrôle de contaminations de l’environnement
• Détection des gaz nobles et d’autres radionucléides à faible énergie
Comment l'Inspector détecte des radiations
L'inspector utilise un tube Geiger-Mueller afin de détecter les radiations.
Le tube produit une pulsation de courant électrique à chaque fois que des
radiations passent qu travers du tube et provoquent des ionisations. Chaque
pulsation est détectée électroniquement puis compté comme une unité.
L'inspector peut afficher le décompte d'unités dans le mode de votre choix.
Le nombre d'unités détecté par l'inspector peut varier d'une minute á l'autre en
raison de la nature aléatoire de la radioactivité. Une meilleure lecture du résultat
sera plus exacte si l'on effectue une moyenne dans une période de temps
donnée et par conséquent encore plus précise lorsqu'elle sera effectuée sur une
longue période de temps. Pour plus de détails, veuillez consulter la rubrique "
opération en mode utilisateur minuté " au chapitre 3.
Page 34

2 Caractéristiques
L'inspector mesure le rayonnement alpha, beta, gamma et les rayons X.
L'instrument est optimisé pour détecter de faibles changements de niveaux de
radiation et pour être extrêmement sensible à beaucoup de radio nucléides
courants.
Pour plus amples détails, consulter l'Annexe A, " Sensibilité aux radionucléides
courants "
Ce chapitre fait une description succincte des fonctions de l'Inspector.
Pour plus amples détails sur le mode d'emploi de l'Inspector, consulter le chapitre
3,"Opération. "
34
Illustration 1 Vue du devant
(2) Sélecteur de mode
(3) Sélecteur
Off(Arrêt)/
On(Marche)/
Audio
(7) Indicateur du
centre du tube
(8) Clignotant
(10) Sortie
(1) Affichage LCD
(9) Entrée Étalonnage
CAL
(5) Bouton SET
(6) Boutons + et -
(4) Sélecteur
minuterie
Indicateur du centre du tube GM
Illustration 2 Vue du panneau de l’extrémité
Page 35

35
Affichage (1)
Le LCD ( affichage de cristaux liquides) présente plusieurs indicateurs selon le
mode choisi, la fonction en cours d'utilisation et l'état des piles.
Illustration 3 Indicateurs affichés
INDICATEURS:
• L’affichage numérique (A) indique le niveau actuel de radiation dans l’unité
spécifiée par le sélecteur de mode.
• Une petite pile (B) apparaît à gauche de l'affichage numérique pour indiquer
que la pile est faible.
• Un symbole radiation (C) apparaît à gauche de l'affichage numérique
lorsque le mode Alerte est enclenché.
• Un petit sablier (D) apparaît à gauche de l'affichage numérique en mode
CAL ou pendant un comptage minuté.
• Le mot TOTAL (E) apparaît lorsque l'Inspector est en mode Total/Timer
(totalisateur minuté).
• X1000 (F) apparaît lorsqu'il faut multiplier ce qui est affiché par 1000.
• Le mot CAL (G) apparaît lorsque l'on étalonne l'Inspector.
• Le mot SET (H) apparaît lorsque l'on règle la minuterie (l'affichage
numérique affiche l'intervalle minuté au lieu du niveau actuel de
rayonnement) et au mode CAL (l'affichage numérique affiche le facteur
d'étalonnage au lieu du niveau actuel de radiation) et lorsque l'on ajuste
(A) Affichage numérique
(B) Petite pile
(C) symbole
radiation
(D) Sablier
(E) Mode
Totalisation
(F) Mode
X1000
(G) Mode
d'étalonnage
(H) Menu d'utilités,
minuterie, Etalonnage,
Alarme, mode SET
(I) L'unité
actuelle de
mesure
Page 36

36
l'appareil dans les menus Utilisation.
• L'unité actuelle de mesure (I)-CPM, CPS, mR/hr ou mSv/hr-- est affichée
à droite de l'affichage numérique.
Sélecteurs
L'Inspector possède 2 sélecteurs devant et un sélecteur plus 3 boutons à l'arrière.
Chaque bouton possède 3 sélections décrites ci-dessous :
Sélecteur de mode (Illustration 1(2))
mR/hr µµSv/hr. L’affichage numérique affiche le niveau actuel de
rayonnements en milliroentgens par heure ou, lorsqu’on utilise les unités SI,
en microsieverts par heure.
En mode mR/h, l’Inspector+ affiche le niveau de rayonnements de 0,001 à
100.
En mode µSv/h, l’Inspector+ affiche le niveau de rayonnements de 0,01 à
1000. Voir « Menu d’utilité » au chapitre 3 pour plus amples détails sur la
mise en route de ce mode.
CPM CPS. En mode CPM (IPM), l’affiche montre le niveau actuel de
rayonnements en impulsions par minute (CPM) de 0 à 350 000. Lorsqu’on
voit X1000 à l’affichage, multiplier la lecture numérique par 1000 pour obtenir
le niveau de rayonnements. Pour les unités SI, l’affichage affiche le niveau
de rayonnements en impulsions par seconde (IPS) de 0 à 5000.
Total/Timer. L’affichage affiche le total accumulé d’impulsions de 1 à 9 999
000. Lorsque X1000 est affiché, multiplier la lecture numérique par 1000
pour obtenir le niveau complet de rayonnements. La totalisation commence
lorsque le sélecteur est mis sur cette position. Pour plus amples détails,
consulter la rubrique . « Prise d’un comptage totalisé » au chapitre 3.
Sélecteur Off/On/Audio (3)
Audio. . L'Inspector fait un déclic chaque fois qu'il détecte un rayonnement.
ON (Marche). L'Inspector fonctionne mais le son ne fonctionne pas.
OFF (Arrêt). L’Inspector+ ne fonctionne pas.
Boutons + et - (6)
Les boutons + et - s’emploient pour régler l’affichage numérique pour les
comptages totalisés et pendant l’étalonnage. Voir « Prise d’un comptage
Page 37

37
minuté » au chapitre 3 et «Étalonnage » au chapitre 4.
Les boutons + et - peuvent aussi s’employer pour sélectionner dans le
« Menu d’utilités ». Pour plus amples détails, consulter la rubrique « Menu
d’utilités » au chapitre 3.
Sélecteur minuterie (Illustration 2 (4)
Off (Arrêt). La minuterie ne fonctionne pas.
Set (Régler). On peut alors régler l'intervalle minuté à l'aide des
boutons "+" et "-". Si la minuterie fonctionne déjà,
l'affichage donne le temps restant dans l'intervalle minuté.
On (Marche). La minuterie fonctionne et l'affichage donne le comptage
totalisé dans l'intervalle minuté.
Le bouton réglage (Illustration 2 (5))
Le bouton réglage s'utilise pour programmer l'alerte, sélectionner des
fonctions dans le menu d'utilités et programmer le niveau " d'étalonnage "
au chapitre 5.
Boutons "+" et - (Illustration 2(6))
Les boutons "+" et - s'emploient pour régler l'affichage numérique pour les
comptages totalisés, le programme alerte et le programme d'étalonnage.
Voir " Prise d'un comptage minuté "et " programmer l'alerte " au chapitre 3 et
"Étalonnage " au chapitre 5.
Les boutons "+" et - peuvent aussi s'employer pour sélectionner dans le
" Menu d'utilités ". Pour plus amples détails, consulter la rubrique " Menu
d'utilités " au chapitre 3.
Le Détecteur
ATTENTION: La surface en mica du tube GM est fragile. S’assurer de ne rien
laisser pénétrer l’écran.
Page 38

38
Illustration 4 Vue du dos
(Détecteur)
Interne - Seulement pour Inspector+
L'Inspector utiliser un tube GM de 5 cm (2 pouces) appelé couramment le tube
pancake. L'écran au dos de l'Inspector s'appelle un hublot. Voir illustration 4. Il
permet aux rayonnement alpha et aux rayonnement bêta et gamma de faible
énergie, qui ne peuvent pas passer au travers de la paroi en plastique, de
pénétrer la surface en mica du tube. Le petit symbole rayonnement (Illustration
1(7)) sur l'étiquette centrale indique le milieu du tube Geiger.
Externe - Seulement pour Inspector+ EXP
Inspector+ EXP possède une sonde externe ronde au lieu d'un détecteur
incorporé. Pour brancher le détecteur, brancher une extrémité de son câble dans
la prise située à l'extrémité de l'Inspector+ et l'autre extrémité à la sonde.
Attention : Les connecteurs sont directionnels. Bien les aligner avant de tenter de
les brancher. Si le détecteur n'est pas complètement branché, l'lnstrument ne
fonctionnera pas comme il faut.
Hublot du tube GM
Compartiment
à piles
Page 39

39
Prises d’entrée/sortie
L'entrée Cal ( Illustration 1 (9)) s'emploie pour étalonner électroniquement
l'instrument à l'aide d'un générateur d'impulsions. Pour plus amples détails,
consulter la rubrique " Étalonnage électronique " du chapitre 5.
La Prise de sortie (Illustration 1 (10)) en dessous de la prise d'entrée CAL permet
de faire l'interface entre l'Inspecteur et un ordinateur, un enregistreur de données
ou un autre appareil. Pour plus amples détails, consulter la rubrique " Interface
avec un appareil externe " du chapitre 3.
La prise facultative de sonde située sur l extrémité permet d'utiliser l'Inspector
avec une sonde externe. (présente sur les modèles de l'Inspector EXP
seulement)
3 Opération
Unités de mesure
L'Inspector a été conçu pour un emploi avec des unités de mesure
conventionnelles (milliroentgens par heures et impulsions par minute) ou bien
avec des unités SI (microsieverts par heure et impulsions par seconde). Pour
choisir les unités de mesure, allez sur Option 2 du menu d'utilités. Pour plus
amples détails, consulter la rubrique " Menu d'utilités " du chapitre 3.
Mise en route de l’Inspector+
Avant de mettre en route l'Inspector, installer une pile alcaline ordinaire de 9 volts
dans le compartiment à piles en bas sur le dos. Nota : Placer la pile contre la
paroi du fond et s'assurer que les câbles sont placés à côté de la pile et pas en
dessous.
Démarrage. Pour mettre en route l'Inspector, sélectionner à l'aide du sélecteur
supérieur le mode voulu, puis régler le sélecteur inférieur sur On (marche) ou
Audio. L'Inspecteur commence alors une vérification du système qui dure 6
secondes. Tous les indicateurs et chiffres sont affichés.
Après la vérification du système, le niveau de rayonnement est affiché au mode
sélectionné. Environ trente secondes après la mise en route de l'Inspector, un
Page 40

40
court bip indiquera que suffisamment de renseignements ont été collectionnés
pour assurer une validité statistique.
Mise à jour de l’affichage. Dans les modes de débit de dose, l'affichage
numérique est mis à jour toutes les trois secondes. Au mode Total/Timer
(totalisateur minuté), l'affichage numérique est mis à jour deux fois par seconde.
Niveau maximal. Lorsque le niveau maximal pour le mode actuel est atteint,
l'inspecteur émet des bips pendant trois secondes, fait une pause de trois
secondes, puis répète cette configuration. L'affichage numérique clignote. Le
clignotement et le bip continuent jusqu'à ce que le niveau s'abaisse ou bien que
l'Inspecteur soit arrêté.
Temps de réponse Lorsque le niveau de rayonnement est moins de 6 000 CPM,
quel que soit le mode de débit de dose, la lecture des modes de débit est fondée
sur les rayonnements détectés dans les 30 dernières secondes. Afin de produire
une réponse qui réagit plus rapidement aux changements lorsque le niveau de
rayonnement dépasse 6 000 CPM dans une période de 30 secondes, la lecture
est fondée sur les 6 dernières secondes. Lorsque le niveau de rayonnement
dépasse 12 000 CPM dans une période de 30 secondes, la lecture est fondée sur
les 3 secondes précédentes.
Note: On peut choisir un temps de réponse de 3 secondes à tout niveau de
rayonnement en utilisant le "Menu d'utilité " décrit au chapitre 3.
Veuillez consulter le tableau suivant :
Après 30 secondes de mise en marche la lecture sera fondée sur la
Si l'instrument détecte des rayonnements moyenne des dernières 30
secondes.
(<100 IPS) 30 secondes
< 6 000 CPM ou <1.75 mR/hr
(100 -200 IPS) 6 secondes
6 000-12 000 CPM ou 1.75-3.6 mR/hr
(>200 IPS) 3 secondes, réponse rapide
>12 000 CPM ou >3.6 mR/hr
Page 41

41
Sélection automatique de gamme
Lorsque, dans certains modes préréglés, le niveau de rayonnement dépasse les
niveaux préréglés, l'Inspector met en oeuvre un changement automatique de
gamme et change automatiquement à l'échelle X1000. Lorsque X1000 est affiché
en haut de l'affichage numérique, multipliez la lecture affichée par 1000 pour
trouver le niveau de radiations.
Mode Gammes affichées
CPM 0 à 2 999 CPM > 2,999
X1000
(3 000) CPM à 350 (350 000) CPM
Totalisateur 0 à 9 999 impulsions > 9 999
minuté X1000
10,00 (10 000) to 9999 (9 999 000)
Opération en modes de débit de dose
Attention: 1. Assurez-vous qu'il n'y a aucune obstruction entre le hublot du
détecteur et la source à contrôler. 2. Éviter de prendre des mesures avec le
hublot Geiger-Müller face au soleil car la lecture pourrait en être modifiée.
Lorsque le sélecteur de modes est réglé sur mR/hr, mSv/hr ou CPM, CPS,
l'affichage numérique est mis à jour toutes les trois secondes. Aux débits faibles,
les modifications significatives du niveau de rayonnement affichées peuvent
mettre jusqu'à 30 secondes pour se stabiliser. Pour plus amples détails, consulter
la rubrique " Sélection automatique de gamme " de ce chapitre.
Les modes CPM (ou CPS) et le compte total sont les méthodes de mesure les
plus directes : mR/hr (ou mSv/hr) est calculé à l'aide d'un facteur de conversion
optimisé pour le Césium-137. Ce mode est moins précis pour d'autres
radionucléides, à moins d'avoir étalonné l'Inspecteur pour un radionucléide
équivalent.
Les indicateurs de rayonnement les plus rapides sont les indicateurs audio et à
voyants lumineux de décompte. Cela peut prendre 3 secondes avant qu'un
changement puisse apparaître sur l'affichage numérique a moins que vous
Page 42

42
n'utilisiez le mode Total/Timer.(Totalisateur minuté).
Opération en mode Total/Timer (totalisateur minuté)
Lorsque l'interrupteur Total/Timer est mis en position marche, l'affichage
numérique est mis à jour deux fois par secondes et le comptage commence.
Effectuer un comptage
Lorsque l'on effectue un comptage minuté sur une longue période de temps, la
moyenne par minute est plus exacte et la moindre augmentation est plus
significative. Par exemple, si une moyenne effectuée sur 10 minutes totalise un
point supplémentaire par rapport à une autre moyenne sur 10 minutes,
l'augmentation peut être due à une variation normale. Mais au-delà de 12 heures,
une augmentation d'impulsion d'un point au-dessus de la moyenne peut
statistiquement être plus significative.
L'Inspector est capable de donner un compte total sur une période de temps
donnée allant de une minute à 24 heures. Pour un comptage minuté de moins
d'une minute, suivre le décompte par seconde figurant sur l'affichage. Vous
pouvez arrêter le décompte manuellement à tout moment.
Suivre ces étapes pour prendre un comptage minuté:
1. Avec l'Inspector en marche, régler le sélecteur de mode sur Total/Timer
(totalisateur minuté) et le bouton Timer (minutage) placé sur le panneau
arrière sur Set (programmé). Le sablier et le sigle SET apparaissent sur
l'écran et la valeur est programmée sur 00 :01 (1 minute).
2. Utiliser les boutons "+" et - pour régler la période à minuter. Cette période
peut être programmée de une à dix minutes en augmentant à la minute, de
10 à 50 minutes en augmentant en tranche de 10 minutes ou de 1 heure à
24 heures en augmentant par tranche d'une heure.
3. Régler le bouton minuterie sur On (marche). L'Inspector bipera trois fois puis
commencera à compter. Le sigle sablier clignotera pendant la période
minutée. Si vous désirez savoir combien de minutes il vous reste, mettez le
bouton minuterie sur SET (régler). L'affichage décompte à partir de la
période donnée, réglée en heures et minutes jusqu'à zéro. Par exemple, si
l'affichage indique 00:21, il vous reste encore 21 minutes. Au cours de la
période minutée, vous pouvez faire passer le bouton de Total/Timer à la
Page 43

43
position débit de dose sans que le comptage soit interrompu. Le sigle sablier
sera apparent quel que soit le mode sélectionné et continua à clignoter
pendant l'exécution du total du décompte.
4. A la fin de la période minutée, l'Inspector bipera trois fois puis répète les bips
plusieurs fois pendant quinze secondes. Le chiffre affiché est le comptage
total.
5. Régler le bouton de la minuterie sur Off (arrêt) pour retourner à l'opération
normale.
Pour trouver la moyenne d'impulsions à la minute pendant la période
minutée, diviser le total par le nombre de minutes.
6. Pour reprogrammer la minuterie pour effectuer un autre comptage minuté,
positionnez le bouton de minuterie sur Off (arrêt) puis de nouveau en
position ON(marche). L'instrument gardera les niveaux programmés la fois
précédente.
Emploi des modes de débit de dose lorsque la minuterie fonctionne
Les modes de débit de dose peuvent s'employer lorsque la minuterie fonctionne.
Dans n'importe quel mode de dose, le symbole du sablier continuera à clignoter
pendant la période minutée. A la fin de la période minutée, le sablier restera
affiché en continu et la lecture minutée est maintenue dans le mode Total/Timer
(totalisateur minuté).
Prise d’un comptage totalisé
La minuterie peut effectuer des comptages minutés jusqu'à une durée de 24
heures.
En certains cas, il peut vous arriver de vouloir établir un comptage sans
l'utilisation de la minuterie, par exemple lorsque vous effectuez un comptage
pendant une période supérieure à 24 heures.
Suivre ces étapes :
1. Placez l'Inspector à l'endroit où vous avez l'intention de prendre le
comptage.
2. Notez l'heure.
3. Immédiatement après avoir noté l'heure, réglez le sélecteur de mode sur
Total/Timer (totalisateur minuté).
Page 44

44
4. A la fin de la période, notez l'heure et le nombre d'impulsions enregistrées
sur l'affichage numérique.
5. Faites la soustraction entre l'heure du début et l'heure de fin de comptage
pour déterminer le nombre exact de minutes dans la période minutée.
6. Pour trouver la moyenne, divisez le comptage totalisé par le nombre de
minutes dans la période minutée.
Utilisation de l'alerte
L'alerte peut être programmée en mR/hr ou en CPM. Lorsque l'on atteint le seuil
d'alerte, le biper fonctionnera jusqu'à ce que l'alerte soit désengagée ou jusqu'à
ce que le niveau de radiations descende en dessous du seuil d'alerte.
1. Pour programmer l'alerte, appuyez sur le bouton " SET "placé sur le
panneau arrière. Le signe alerte (symbole des radiations) et le symbole "
SET "(en fonction) figurent sur l'affichage.
2. Utilisez les boutons "+" et "-"afin d'ajuster l'affichage au niveau désiré.
3. Appuyez une fois sur le bouton " SET "pour sauvegarder le niveau en
mémoire. Puis recommencez pour mettre en marche l'alerte. Le symbole "
ALERTE " figure maintenant sur l'affichage pour indiquer que l'instrument
fonctionne avec la fonction alerte.
4. Pour utiliser le programme alerte utilisé précédemment, appuyez sur le
bouton " SET "deux fois. Le système d'alerte est maintenant en marche.
5. Pour désactiver la fonction alerte appuyez à nouveau sur le bouton.
Le symbole " ALERTE "ne figure plus sur l'affichage.
Menu d’utilités
Le menu d'utilités permet à l'utilisateur de modifier la programmation par défaut
pour certaines opérations. Une fois que la programmation est modifiée, elle reste
en action, à moins que celle-ci ne soit de nouveau changée par l'intermédiaire du
menu d'utilités.
1. Pour activer le menu d'utilités, maintenez appuyé le bouton "+" tout en
mettant l'instrument en marche. L'affichage montrera le symbole " MENU ".
Relâchez le bouton "+" et un " 1 " indiquant l'option 1 apparaîtra en même
temps que le symbole " Menu ".
2. Faire défiler le Menu en appuyant sur les boutons "+" ou "-"
Page 45

3. Pour sélectionner une option, appuyez sur le bouton SET et le symbole "
SET " apparaîtra.
4. Utilisez les boutons "+" ou"-" pour passer d'un choix à l'autre puis appuyez
sur le bouton SET pour saisir le nouveau réglage. L'instrument continuera à
opérer en menu d'utilités et les symboles " 0 " et " Menu " apparaîtront. Pour
ajuster une autre option du menu d'utilités, refaire la même démarche.
5. Pour sortir du menu d'utilités á n'importe quel moment, appuyez de nouveau
sur le bouton SET. L'Inspector continuera alors avec le programme normal
de mise en marche.
Options Fonction Remarques
1.Moyenne automatique " ON " sélectionne moyenne Voir "Temps de
ou moyenne 3 secondes automatique " OFF" réponse" (moyenne
sélectionne moyenne automatique) au
3 secondes chapitre 3.
(réponse accélérée)
2.L'unité de Mesure Choisit entre mR/hr et CPM
ou µSv et CPS
3.CAL 100 re-régler Re-règle automatiquement Appuyez sur le bouton
le facteur CAL á 100 " set "
Pas d'alternance de
bouton nécessaire.
4, 5, et 6.Réservés pour de futures options
7.Régler facteur CAL réglage manuel du facteur Utilisez les boutons "+"
CAL ou "-" pour augmenter
ou diminuer la valeur
8. Modifier réglage usine règle á nouveau Appuyez sur le bouton
par défaut automatiquement à la " set "
moyennemR/hr, CPM et Pas d'alternance CAL
100 de bouton nécessaire
9. No. de révision Affiche le numéro de la version
actuelle du logiciel
45
Page 46

Interface avec un appareil externe
La prise de sortie inférieure ( Illustration 1(10))sur le côté gauche de l'Inspector
est une double prise miniature qui fournit une sortie de données qui peut être
utilisée pour piloter un appareil CMOS ou TTL. On peut l'utiliser pour enregistrer
les impulsions sur un ordinateur, un enregistreur de données ou un compteur
accumulateur. La sortie au bout de la prise fournit une impulsion positive de 5
volts chaque fois que le tube Geiger détecte une impulsion. Veuillez visiter le site
Internet www.seintl.com pour obtenir plus d'information sur le logiciel Observer.
Options
Plaque Wipe Test- (brevet No. 5 936 246)
La plaque Wipe Test en acier inoxydable possède une dépression circulaire pour
le placement d'un tampon de nettoyage parallèle au hublot du détecteur à une
distance fixe d'un cm. La plaque Wipe Test est conçue pour se glisser facilement
au dos de l'Inspector.
4 Utilisation courante
Le paragraphe ci-dessous indique le mode d'emploi pour des marches à suivre
couramment utilisées. Quel que soit le procédé, l'utilisateur doit déterminer si
l'utilisation ou le procédé de l'instrument est adéquat.
Etablir le comptage général
Les niveaux de radiation généraux varient selon le lieu, l'heure et à l'intérieur
d'une même pièce à des emplacements différents. Afin de lire correctement les
niveaux que vous pouvez obtenir à l'aide de l'Inspector, il est bon d'établir le
décompte du niveau général de radiation pour chaque emplacement que vous
allez tester. Vous pouvez réaliser ceci en effectuant un comptage. Pour obtenir
plus d'information sur l'utilisation de la minuterie, voir " comptage minuté " au
chapitre 3.
Une moyenne de 10 minutes est approximative. Vous pouvez répéter l'opération
plusieurs fois et déterminer si les moyennes sont proches. Afin d'établir une
moyenne plus exacte, effectuez un comptage sur une heure. Si vous devez
46
Page 47

47
déterminer s'il y a eu une contamination antérieure, prenez la moyenne de
différentes locations et comparez les moyennes.
Contrôle de l'aire d'environnement
Vous pouvez laisser l'Inspector en CPM ou en mode mR/hr lorsque vous
souhaitez contrôler le niveau de radiation ambiant et le surveiller de temps à
autre pour d'éventuelles sautes de niveaux. Si vous pensez qu'il y a eu une
augmentation ambiante des radiations, utilisez la minuterie et effectuez un
comptage sur 5 ou 10 minutes puis comparez le résultat à votre moyenne
générale. Si vous pensez qu'il y a eu une augmentation trop minime à détecter
sur une période de temps courte, vous pouvez effectuer un comptage sur une
période de temps plus longue(par exemple 6, 12 ou 24 heures).
Vérification de contamination de surface
ATTENTION : Ne jamais mettre en contact l'Inspector avec une surface qui
pourrait être contaminée. Vous pourriez contaminer l'instrument. Les bandes de
caoutchouc sur l'envers peuvent être remplacées en cas de contamination.
De nouvelles bandes sont fournies avec ce manuel.
Pour inspecter une surface, maintenez le hublot du détecteur proche de la
surface à contrôler et regardez le taux de comptage ( attendre 30 secondes ou
jusqu'à ce que la lecture soit stabilisée.) Si vous voulez savoir si une surface est
légèrement radioactive, effectuez un comptage minuté ou un comptage accumulé
plus long.
5 Entretien
Étalonnage
Votre Inspector doit être étalonné aussi souvent que votre réglementation vous
l'impose ou de toutes façons au moins une fois par an. Le meilleur moyen
d'effectuer un étalonnage est d'utiliser une source étalonnée. Si aucune source
étalonnée n'est disponible, il est possible de faire le calibrage électroniquement
en utilisant un générateur d'impulsions.
Le radionucleide standard pour un étalonnage est Cesium-137.
Page 48

48
Vous devez vous servir d'une source d'étalonnage certifiée. Pour étalonner
l'Inspector pour un autre radionucleide, vous devez utiliser une source pour le
radionucleide correspondant ou effectuer la conversion du facteur référencé à Cs-
137.
ATTENTION: Les erreurs sont possibles avec des sources à faible niveau ou une
radiation générale pour régler le facteur CAL. Au mode d'étalonnage, le plus petit
incrément qui puisse être réglé est de .010, ce qui rend impossible un réglage fin
du facteur CAL.
Étalonnage à l'aide d'une source
1. Placer la sonde de l'Inspector ou Inspector EXP à une distance de la source
qui correspond à un champ de 50 mR/hr avec le hublot du détecteur en face
de la source.
2. Régler le sélecteur de mode de l'Inspector à mR/hr.
3. Allumer l'Inspector.
4. Ouvrir la source et enregistrer 20 lectures consécutives.
5. Fermer la source.
6. Calculer la lecture moyenne et l'enregistrer.
a) Si la moyenne est ± 10 % de 50 mR/hr, passez à l'étape 7.
b) Si la moyenne n'est pas ± 10 % de 50 mR/hr, passez à l'étape 10.
7. Placer la sonde de l'Inspector EXP ou Inspector EXP à une distance de la
source qui correspond à un champ de 5 mR/hr avec le hublot du détecteur
en face de la source.
8. Répéter les étapes 2 à 5.
9. Calculer la lecture moyenne et l'enregistrer.
a) Si la moyenne est ± 10 % de 5 mR/hr, la procédure d'étalonnage est
terminée.
b) Si la moyenne n'est pas ± 10 % de 5 mR/hr, passez à l'étape 10.
10. Eteindre le son (AUDIO) pour permettre d'entendre le décompte.
11. Eteindre l'Inspector. Appuyez en maintenant le bouton "-"du panneau arrière
et remettez l'Inspector en marche. L'affichage indique CAL et l'Inspector fait
un décompte de 15 secondes, avec un grésillement toutes les secondes. Ce
Page 49

49
retard vous donne la possibilité de quitter le champ et d'ensuite pouvoir
exposer la source.
A la fin des 15 secondes, l'Inspector émet un bip.
12. A partir de maintenant, l'Inspector enregistre des données pendant 30
secondes, en grésillant toutes les deux secondes, et avec le symbole du
sablier et CAL qui clignotent. À la fin des 30 secondes, il émet un bip. Le
mot CAL est affiché et le mot SET clignote.
13. Fermez la source.
14. Appuyez sur les boutons "+"ou "-"de l'Inspector pour régler la lecture comme
elle doit être.
15. Lorsque la lecture est correcte, appuyez sur le bouton SET. Le nouveau
facteur d'étalonnage est affiché pendant quelques secondes, puis l'Inspector
émet un bip et reprend son fonctionnement normal.
16. Enregistrez le nouveau facteur d'étalonnage.
17. Placez la sonde de l'Inspector EXP à une distance de la source qui
correspond à un champ de 5 mR/hr avec le hublot du détecteur en face de
la source.
18. Renouvelez les étapes 2 à 5.
19. Calculez la lecture moyenne et l'enregistrer.
a) Si la moyenne est ± 10 % de 5 mR/hr, la procédure d'étalonnage est
terminée.
b) Si la moyenne n'est pas ± 10 % de 5 mR/hr, refaire les étapes 11 à 16,
puis continuer par l'étape 20.
20. Calculez la moyenne du facteur d'étalonnage pour 50 mR/hr et pour 5
mR/hr.
21. Éteindre l'Inspector.
22. Maintenez appuyé le bouton "+" en allumant l'Inspector. L'affichage
numérique affichera un seul numéro.
23. Appuyez sur le bouton "+" ou"-" jusqu'à ce que le chiffre 7 apparaisse.
24. Appuyez sur le bouton SET.
25. Le facteur d'étalonnage est affiché. Appuyer sur le bouton "+" ou"-" pour
ajuster le facteur d'étalonnage à la moyenne calculée à l'étape 20.
Page 50

50
26. Appuyez sur le bouton SET pour saisir le nouveau réglage et reprenez
l'opération normalement.
Le facteur d'étalonnage est réglé à 100 (%) à l'usine. Si vous modifiez la lecture,
par exemple à 20 % de plus que la lecture d'usine, le nouveau facteur
d'étalonnage sera 120. Le facteur d'étalonnage courant est affiché pendant la
vérification du système lorsque vous mettez l'Inspector en marche.
Étalonnage électronique
L'étalonnage peut se faire électroniquement à l'aide d'un générateur d'impulsions
ou de fonctions. L'étalonnage électronique exige un câble muni d'une prise de 2,5
mm dont l'extrémité porte le signal.
Suivre ces étapes :
1. Programmez la hauteur du signal à 3,3 volts et la largeur négative de
l'impulsion à 85 microsecondes d'impulsion positive.
ATTENTION: ne pas injecter d'impulsion lorsque l'Inspector est éteint.
Ne pas dépasser 5 volts.
2. Mettez l'Inspector en marche et réglez le sélecteur de mode à mR/hr,
mSv/hr.
3. Connectez le câble à la prise supérieure.
4. Utilisez le tableau suivant pour vérifier la précision de l'Inspector.
Le tableau indique le taux de décompte d'impulsions du générateur
approprié pour l'étalonnage sur Cs-137. Si cela n'est pas précisément
compris dans les limites désirées, suivre les étapes 5 à 7. Note : L'Inspector
compense automatiquement les impulsions perdues à cause du temps mort
du tube GM. De surcroît la lecture de l'affichage en mode CPM ne sera pas
égale à la fréquence d'entrée. Pour afficher le
nombre d'impulsions non-compensées en CPM, appuyez et maintenez le
bouton "-"continuellement. La lecture correspondra alors à la fréquence
d'entrée.
Page 51

51
Entrée du générateur CPM mR/hr mSv/hr CPS
d'impulsions (PPM)
31 423 33 400 10,00 100,0 557
59 335 66 800 20,00 200,0 1 113
127 043 166 999 50,00 500,0 2 783
177 752 267 200 80,00 800,0 4 453
205 031 334 000 100,00 1 000 5 567
5. Eteignez l'Inspector. Appuyez et maintenez le bouton "-"qui se trouve sur le
panneau arrière et allumez l'Inspector.
Le mot CAL est affiché et l'Inspector fait un décompte pendant 15 secondes
en grésillant toutes les secondes. A la fin des 15 secondes, l'Inspector émet
un bip.
6. L'Inspector enregistre des données pendant 30 secondes, en grésillant
toutes les 2 secondes. Le mot CAL et le sablier clignoteront sur l'affichage.
7. Appuyer sur les boutons "+" et "-" pour ajuster la lecture comme elle doit
être. Lorsque la lecture est correcte, appuyez sur le bouton SET.
Le nouveau facteur d'étalonnage est affiché pendant quelques secondes,
puis l'Inspector émet un bip et retourne à l'opération normale.
Dépistage de pannes
L'Inspector est un instrument très fiable. S'il paraît ne pas fonctionner comme il
devrait, consultez le tableau suivant pour essayer de trouver le problème.
Problème Cause possible Ce qu’il faut vérifier
Pas d'affichage pas de pile, pile morte, Installer une nouvelle
mauvaise connexion de pile de 9 volts
pile affichage LCD si le témoin de comptage
défectueux et le son marchent bien,
il faudra remplacer
l'affichage LCD.
Page 52

52
L’affichage marche tube GM défectueux regarder la surface en mica
mais pas d’impulsions ou mauvais câble du tube par le hublot. Si elle
de connexion est gondolée ou fissurée, il
remplacez-la. Vérifiez la
connexion du câble EXP
Lecture élevée Contamination Scanner l'Inspector
avec un autre
instrument(EXP).
La lecture d'un instrument Humidité Remplacer les bandes
placé au même endroit est de caoutchouc au dos de
normale. L'instrument a l'Inspector. Les circuits sont
une mauvaise lecture. peut-être humides.
Sécher l'instrument dans un
endroit chaud et sec. S'il ne
fonctionne toujours pas, cela
nécessite l'intervention de
l'usine.
La lecture de l'instrument photosensibilité Retirer du soleil direct et
est trop élevée de toute source d'ultraviolet;
le revêtement en mica du
hublot peut avoir disparu du
tube Geiger pour cause
d'humidité ; il faut remplacer
le tube.
La lecture de l'instrument décharge continuelle Remplacer le tube Geiger
est trop élevée
La lecture de l'instrument champ retirer l'instrument de toute
est trop élevée électromagnétique source électromagnétique
ou de radiation par
fréquences radio.
Service après-vente
ATTENTION: Ne jamais, en aucun cas, envoyer d'instrument contaminé pour
Page 53

53
réparations ou étalonnage. Les pièces à l'intérieur de l'instrument ne peuvent pas
être réparées.
S'il s'avère nécessaire de réparer l'Inspector, veuillez contacter votre distributeur
ou écrire à l'adresse suivante :
S.E. International, Inc.
P.O. Box 39, 436 Farm Rd.
Summertown, TN 38483-0039 USA
Tél 931-964-3561, Fax 931-964-3564
E-mail: radiationinfo@seintl.com
6 Rayonnements ionisants et unités de mesure
Ce chapitre explique brièvement quelle est la radiation et comment la mesurer.
Nous fournissons ces informations pour les utilisateurs qui ne sont pas encore
familiers avec le sujet. Cela est utile pour comprendre comment marche
l'Inspector et de quelle façon interpréter les lectures.
Radiations ionisantes
La radiation ionisante est une radiation qui modifie la structure des atomes
individuels en les ionisant. Les ions produits à la chaîne ionisent plus d'atomes.
Les substances qui produisent des radiations ionisantes sont appelées
radioactives.
La radioactivité est un phénomène naturel. Il y a continuellement des réactions
nucléaires sur le soleil et d'autres étoiles. La radiation émise parcoure l'espace et
une infime quantité peut atteindre la terre. Le sol et les individus sont aussi une
source naturelle de radiations ionisantes. Les radiations ionisantes les plus
répandues sont l'uranium et ses déchets.
Les radiations ionisantes sont divisées en quatre catégories :
Les rayons x sont des radiations produites par l'homme en bombardant sous vide
une cible métallique d'électrons à grande vitesse. Les rayons x sont un
rayonnement électromagnétique de la même nature que la lumière et les ondes
radio, mais d'une longueur d'onde extrêmement courte de moins de 0,1 milliard
de centimètre. On les appelle aussi les photons. L'énergie des rayons x est
Page 54

54
plusieurs millions de fois plus grande que celle des ondes de lumière et de radio.
A cause de ce niveau d'énergie élevé, les rayons x pénètrent toute une variété de
matériaux, y compris l'épiderme.
Les rayons gamma sont presque identiques aux rayons x. En général les rayons
gamma possèdent une longueur d'onde plus courte que celle des rayons x. Les
rayons gamma sont très pénétrants ; une protection épaisse en plomb est en
général nécessaire pour les arrêter.
Le rayonnement beta. Une particule bêta est composée d'un seul électron émis
d'un atome. Il possède plus de masse et moins d'énergie que le rayon gamma et,
ainsi, ne pénètre pas la matière aussi profondément que les rayons gamma ou
les rayons x.
Le rayonnement alpha. Une particule alpha comprend deux protons et deux
neutrons, la même chose que le noyau d'un atome d'hélium. En général, elle ne
pénètre l'air que de 2 à 7 cm avant de s'arrêter et l'on peut l'arrêter avec un
morceau de papier.
Déchet: Lorsqu'un atome émet une particule alpha, beta ou un rayon gamma, il
devient un atome de type différent. Les matières radioactives passent par
plusieurs étapes de décroissance avant de devenir une forme stable et nonionisante. Par exemple ; U-238 comprend 14 différentes étapes de décroissance
avant de se stabiliser.
Un seul élément peut posséder plusieurs formes ou isotopes. L'isotope radioactif
d'un élément peut s'appeler 'radioisotope'. Quoi qu'il en soit, le terme
radionucleide est le plus correct.
Mi-parcours: Chaque radionucleide a un mi-parcours caractéristique, qui indique
le moment oú la moitié de la matière en décroissance doit être rejetée.
Les unités de mesures de rayonnement.
Plusieurs différentes unités sont employées pour mesurer le rayonnement,
l'exposition et la dose.
Un roentgen représente la quantité de rayonnement x ou gamma qui produit une
seule unité électrostatique de charge par centimètre cube d'air sec à 0° C et à
une pression de 760 mm de pression atmosphérique de mercure. L'Inspector
Page 55

55
affiche en milliroentgens par heure (mR/hr).
Un rad est l'unité de dose absorbée de radiation ionisante égale à l'énergie de
100 ergs par gramme de matière irradiée. Cela équivaut approximativement à
1,07 roentgen.
Un rem est la dose reçue d'une exposition à un rad. C'est le nombre de rads
multiplié par l'efficacité biologique relative (BR) d'une source spécifique de
radiation. Le rem et le millirem sont les unités de mesure d'une dose de radiation
les plus utilisées aux USA. 1 rem = 1 rad.
Un sievert est la mesure standard internationale de dose. Un sievert est
équivalent à cent rems. Un microsievert (mSv) est un millionième d'un sievert.
Une curie représente la quantité de matière radioactive qui décroît à une vitesse
de 37 milliards de décroissances par seconde, environ la vitesse de décroissance
d'un gramme de radium. Les micro curies (millionième de curie) et les picocuries
(milliardième de curie) sont employés souvent comme unités de mesure.
Un becquerel (Bq) est l'équivalent d'une décroissance par seconde.
Annexe A - Spécifications techniques
Détecteur: Interne: Tube Geiger-Müller à halogène non-compensé.
Diamètre efficace de 45 mm. Densité de l’hublot en
mica 1,5 à 2,0 mg/cm2.
RAP-RSI externe: Même détecteur que le modèle incorporé. Couvercle
en aluminium anodisé avec poignée en vinyle noir.
Alimentation de 500 volts située dans la tête de la
sonde.
Affichage: Affichage à cristaux liquides, à 4 chiffres, y compris
indications de mode.
Gamme d’opération: mR/hr: 0,001 à 100,0
IPM: 0 à 350 000
Total: 1 à 9 999 000 impulsions
µSv/hr: 0,01 à 1 000
IPS: 0 à 5 000
Efficacité : Sr(Y)-90: approx. 38%; C-14: approx. 5,3%
4 p au contact : P-32: approx. 33%; C0-57: approx. 0,3%
Page 56

56
Sensibilité gamma:
3500 CPM/mR/hr par
rapport à Cs-137
Niveau minimum détectable
de I-125 est de 0,02 mCi au
contact.
Périodes de calcul de moyennes:
Mise à jour de l’affichage toutes les 3 secondes, qui
montre la moyenne pour une période de 30 secondes
à niveaux normaux. La période pendant laquelle la
moyenne est calculée diminue au fur et à mesure que
le niveau de rayonnement augmente. Consulter le
chapitre 3, Opération - Sélection automatique de
gamme, mise à jour de l’affichage.
Gamme du facteur
d’étalonnage CAL: 001 à 199
Minuterie: Peut se régler pour des périodes d’échantillonnage
de 1 à 10 minutes en incréments d’une minute, de
10 à 50 minutes en incréments de 10 minutes, et en 1
à 24 heures en incréments d’une heure.
Rayon de l'alerte: mR/hr : 0 à 50 mR/hr
CPM : 0 à 160 000 CPM
Précision: mR/hr: ± 10% CPM: ± 10%
Bip: Fonctionne uniquement en mode AUDIO
Anti-saturation: La lecture se tient à pleine échelle dans des champs
de jusqu’à 100 fois la lecture maximale.
Gamme de températures:-10° à +50° C, 14° à 122° F
Puissance: Une pile alcaline de 9 volts. Durée minimum de vie de
2 160 h utilisation normale Durée minimum de vie de
625h à 1 mR/hr
Taille: 150 x 80 x 30 mm (5,9 po. x 3,2 po. x 1,2 po.)
Poids: 323 grammes (11,4 onces) pile comprise
Page 57

57
Annexe B Sensibilité aux radionucléides courants
Efficacité typique du tube GM pour une géométrie de 4 π au contact
Isotope Énergie Efficacité
Beta
14
C 49 keV Avg. 156 keV Max. 5.3%
210
Bi 390 keV Avg. 1.2 MeV Max. 32%
90
Sr(Y) 546 keV and 2.3 MeV 38%
32
P 693 keV Avg. 1.7 MeV Max. 33%
Alpha
241AM 5.5 MeV 18%
Garantie
ÉLÉMENTS DE GARANTIE: S.E. International, Inc. garantie le tube GeigerMüller pendant une période de 90 jours et tous les matériaux et toute la
fabrication du produit pendant une année contre tout vice de matière ou de
fabrication. Les seules limites et exclusions sont énumérées ci-dessous.
DURÉE DE LA GARANTIE: Cette garantie s’achèvera et n’aura plus aucun effet
un an (90 jours pour le tube GM) après la date d’achat d’origine du produit ou
lorsque ce dernier est : a) endommagé ou non entretenu comme il est
raisonnable ou nécessaire, b) modifié, c) réparé par tout antre que la société se
portant garante, en raison d’un vice ou d’une opération incorrecte couvert par
cette garantie, d) contaminé par des matières radioactives ou e) utilisé d’une
manière ou dans un but pour lequel l’instrument n’a pas été destiné ou encore
contraire aux instructions écrites fournies par S.E. International, Inc. La garantie
ne s’applique pas à tout produit sujet aux éléments corrosifs, à une utilisation
incorrecte ou abusive ou encore à une négligence.
REMÈDES: Si alors qu’il est couvert par cette garantie, le produit devient non
conforme à la garantie, la société se portant garante s’engage à réparer le vice du
produit et à le renvoyer, port payé, à l’utilisateur, sans facturer les pièces ni la
main d’oeuvre.
REMARQUE: Bien que le produit soit réparé sans frais dans le cadre de cette
garantie, celle-ci ne couvre ni ne rembourse ni ne paie les dommages fortuits ou
consécutifs survenant de l’utilisation ou de l’impossibilité d’utiliser cet instrument.
La responsabilité de la société due à la diffusion de cet instrument, ou à son
utilisation, qu’il soit ou non couvert par la garantie, ne devra en aucun cas
dépasser les frais entraînes par la réparation des vices de l’instrument. Cette
responsabilité s’achèvera à la fin de ladite année de garantie (90 jours pour le
tube GM). Toute garantie implicite est limitée en durée à celle de la garantie
Page 58

58
écrite.
PROCÉDURE POUR OBTENIR L’EXÉCUTION DE LA GARANTIE: Prière de
nous contacter si ce produit devient non conforme à cette garantie. S.E.
International, Inc. n’acceptera pas d’instruments contaminés pour l’étalonnage ni
pour la réparation, qu’elle soit couverte ou non par la garantie.
REMARQUE: Avant d’utiliser cet instrument, l’utilisateur doit déterminer l’aptitude
du produit à ses buts spécifiques. Tous les risques et les responsabilités ayant
trait à la date d’utilisation sont à la charge de l’utilisateur.
Un étui durable en vinyle est livré avec
l'Inspector+ EXP. Une ouverture transparent
fournit une vue de la lecture, du comptage
affiché et permet d'accéder aux boutons.
Des sangles pratiques et une boucle pour la
ceinture permettent de porter l'instrument.
Appendice C Étui de l'Inspector+ EXP
Page 59

59
La protection de la sonde
s'escamote facilement
pendant l'opération.
Une poche sur le devant de l'étui est fournie pour la source. Pour protéger
l'utilisateur, nous recommandons l'emploi d'une source à 0,1 microcurie de
Césium 137 bien protégée des deux côtés. Des protections gamme pour cette
source sont en vente chez votre concessionnaire.
L'idée originale d'attacher la
sonde à l'étui permet une
opération à une seule main, si
l'on veut.
Page 60

60
Manual de Instrucciones del INSPECTOR+ - Temario
Capítulo Página
1 Introducción 62
Modo en que el Inspector detecta la radiación 62
Precauciones 62
2 Características 63
Pantalla 64
Llaves selectoras 65
Detector 67
Accesos de entrada/salida 68
3 Funcionamiento 68
Unidades de medición 68
Encendido del Inspector 69
Encendido 69
Actualización de datos de pantalla 69
Nivel máximo 69
Tiempo de respuesta (cálculo automático de promedios) 69
Selección automática de rango 70
Funcionamiento en modalidades de tasa de dosis 70
Funcionamiento en modalidad Total/Temporizador 71
Medición de un recuento temporizado 71
Uso de modalidades de tasa de dosis mientras
el temporizador está activado 73
Medición de un recuento total 73
Uso de alertas 73
Menú de utilidades 74
Interfaz con un dispositivo externo 75
RADIATION ALERT
®
Inspector
+
Inspector EXP
+
Manual de instrucciones
Page 61

61
Capítulo Página
Opciones 75
Placa WipeTest 75
4 Procedimientos comunes 75
Manera de establecer el recuento de fondo 75
Monitorización del medio ambiente 75
Control de contaminación en superficies 75
5 Mantenimiento 76
Calibración 76
Determinación de problemas y su posible solución 80
Servicio 82
6 Información básica sobre la radiación y su medición 82
Radiación ionizante 82
Tabla de radio nucleidos
Unidades de medida de la radiación 83
Anexo A - Especificaciones Técnicas 84
Anexo B - Sensibilidad a isótopos comunes 86
Garantía 86
Anexo C - Funda para transporte del Inspector EXP 88
Lista de ilustraciones
Ilustración 1 Vista frontal 63
Ilustración 2 Vista del panel delantero 64
Ilustración 3 Pantalla 64
Ilustración Vista posterior (detector) 67
Page 62

62
1 Introducción
El Inspector+ es un instrumento para monitorizar riesgos para la salud y la
seguridad que ha sido optimizado para detectar bajos niveles de radiación y
medir radiación alfa, beta, gamma y rayos X.
Sus usos comprenden:
• Detección y medición de la contaminación superficial
• Monitorización de posible exposición a radiación durante el manejo de radio
nucleidos
• Detección de contaminación ambiental
• Detección de gases nobles y otros radio nucleidos de baja energía
Modo en que el Inspector detecta la radiación
Para detectar la radiación, el Inspector utiliza un tubo Geiger-Mueller. El tubo
Geiger genera un pulso de corriente eléctrica cada vez que pasa radiación por el
tubo y provoca una ionización. Cada pulso se detecta electrónicamente y se
registra como un impulso. El Inspector muestra los impulsos en el modo que el
usuario seleccione.
La cantidad de impulsos detectados varía minuto a minuto debido a la naturaleza
aleatoria de la radiactividad. Una lectura se expresa con mayor precisión cuando
se hace un promedio en función del tiempo, por lo que el promedio será más
preciso si el lapso considerado es mayor. En el Capítulo 3 encontrará más
detalles en "Funcionamiento en Modalidad Total/Temporizador".
Precauciones
Para mantener el aparato en buenas condiciones, manéjelo con cuidado y tome
las siguientes precauciones:
• No contamine el Inspector; no deje que entre en contacto con superficies o
materiales radiactivos. Si se sospecha que se produjo una contaminación,
cambie las tiras de goma (hule) y coloque las que están engrapadas en este
manual.
• No deje el Inspector en sitios cuya temperatura supere los 38 °C (100 °F) ni
a la luz directa del sol durante períodos prolongados.
Page 63

63
• No permita que el Inspector se moje. El agua daña los circuitos y la
superficie de mica del tubo Geiger.
• No ponga el Inspector adentro de un horno de microondas. No sólo no
puede medir microondas, sino que además podría averiar el horno.
• Este instrumento puede ser sensible y por ello no funcionar correctamente si
hay presentes radiofrecuencias, microondas y campos electrostáticos y
electromagnéticos.
• Si no va a usar el Inspector por más de un mes, quítele la pila para evitar
daños por una posible corrosión de la pila.
• Cuando en la pantalla aparezca el símbolo de una batería, cambie de
inmediato la pila.
2 Características
El Inspector+ mide radiación alfa, beta, gamma y rayos X. El instrumento ha
sido optimizado para detectar pequeños cambios en los niveles de radiación y
para tener alta sensibilidad a muchos radio nucleidos comunes. En el Anexo A,
"Sensibilidad a los radio nucleidos comunes", encontrará más detalles al
respecto.
En este capítulo se describen brevemente las funciones del Inspector. Para
Ilustración 1 Vista frontal
(2) Llave selectora de
modalidad
(3) Llave selectora
"On/Off/Audio"
(7) Indicador del centro
del tubo
(8) Luz del contador
(9) Entrada CAL
(10) Salida
(1) Pantalla LCD
Page 64

64
obtener más detalles sobre su uso, refiérase al Capítulo 3, "Funcionamiento".
El Inspector cuenta los fenómenos ionizantes y exhibe los resultados en la
pantalla de cristal líquido (LCD). El usuario selecciona la unidad de medición con
la llave selectora de modalidad.
Toda vez que el Inspector esté funcionando, la luz roja de conteo (8) destellará
cada vez que se detecte un impulso (un fenómeno ionizante).
Ilustración 2 Vista del Panel de delantero
Pantalla (1)
En la pantalla LCD se observan diversos indicadores según la modalidad
seleccionada, la función realizada y la carga de la pila.
Ilustración 3 Indicadores de la pantalla
(4) Llave selectora de temporizador
(5) Botón de configuración
(6) Botones "+" y "-"
(D) Temporizador
(C) Alerta
(B) Pila descargada
(A) Visualizador numérico
(E) Modalidad "Total"
(F) Modalidad "X1000" (G) Modalidad CAL
(H) Menú utilitario,
Temporizador, Calibración,
Modalidad Configuración
Alarma
(I) Unidades de
medición
Page 65

65
INDICADORES:
• El visualizador numérico (A) indica el nivel actual de radiación en la
unidad especificada por el selector de modalidad.
• A la izquierda del visualizador numérico aparece una pequeña batería (B) el
visualizador para indicar que la pila tiene poca carga.
• A la izquierda del visualizador numérico aparece un símbolo de radiación
(C) cuando la modalidad "Alerta" está activada.
• A la izquierda del visualizador numérico aparece un reloj de arena (D) el
visualizador cuando se activa la modalidad Cal o durante un conteo
programado.
• TOTAL (E) aparece cuando el Inspector está en la modalidad
Total/Temporizador (Total/Timer).
• X1000 (F) aparece cuando el valor del visualizador numérico tiene que
multiplicarse por 1000.
• CAL (G) aparece durante la calibración del Inspector.
• SET (H) (configuración) aparece cuando se programa el temporizador (el
visualizador numérico indica el período programado en vez del nivel
actual de radiación), en la modalidad Cal (el visualizador numérico indica
el factor Cal en vez del nivel actual de radiación) y cuando se configuran
los Menús de Utilidades y Alarma.
• La unidad de medida en uso (I)-CPM, CPS, mR/h o µSv/h -se exhibe a la
derecha del visualizador numérico.
Llaves Selectores
El Inspector tiene dos llaves selectoras en la parte frontal y una llave selectora y
tres botones en el panel delantero. Cada llave puede colocarse en tres
posiciones, cuya función se describe a continuación.
Llave selectora de modalidad [Ilustración 1 (2)]
mR/h µµSv/h. El visualizador numérico indica el nivel actual de radiación en
miliroentgens por hora o, si se usan unidades SI (del sistema internacional),
en microsieverts por hora.
En la modalidad mR/h, el Inspector exhibe el nivel de radiación desde 0,001
hasta 100.
Page 66

66
En la modalidad µSv/h, el Inspector exhibe el nivel de radiación desde 0,01
hasta 1000. En el "Menú de Utilidades" del Capítulo 3 hay más detalles
sobre cómo activar esta modalidad.
En el "Menú de Utilidades" del Capítulo 3 hay más detalles sobre cómo
activar esta modalidad.
IPM IPS (CPM, CPS). En la modalidad IPM (Recuentos por Minuto), la
visualización indica el nivel actual de radiación en impulsos por minuto
desde 0 hasta 300.000. Cuando la visualización indica X1000, multiplique la
lectura numérica por 1000 para obtener el nivel completo de radiación.
Cuando se usan unidades SI, la visualización indica el nivel de radiación en
impulsos por segundo, desde 0 hasta 5000.
Total/Temporizador (Total/Timer). La visualización indica el total acumulado de
impulsos desde 1 hasta 9.999.000. Cuando la visualización indica X1000,
multiplique la lectura numérica por 1000 para obtener el nivel completo de
radiación. La totalización comienza cuando se pone el selector en esta
posición. Para más detalles, consulte “ Toma del Recuento Temporizado o
Total” en el Capítulo 3.
Llave selectora Off/On/Audio (Apagado/Encendido/Audio)
[Ilustración (3)]
Audio. El Inspector emite un chasquido cada vez que detecta un fenómeno
de radiación.
On (Encendido). El Inspector está funcionando, pero la función de audio está
desactivada.
Apagado (Off). No está funcionando el Inspector+.
Llave selectora de temporizador [Ilustración 2 (4)]
Off (Apagado). El temporizador no está funcionando.
Set (Configurar). La duración del período temporizado puede programarse
con los botones "+" y “-”. Si el temporizador ya está funcionando, el
visualizador indica el tiempo remanente en el período temporizado.
On (Encendido). El temporizador está funcionando y el visualizador indica el
total de impulsos acumulados hasta este momento en el período temporizado
Botones "+" y "?" [Ilustración 2 (6)]
Page 67

67
Los botones + y - se usan para ajustar el visualizador numérico para
recuentos programados, configuración de alertas y durante la calibración.
Consulte "Toma de un Recuento Temporizado" y "Configuración de alertas"
en el Capítulo 3 y "Calibración" en el Capítulo 4.
Los botones + y - pueden usarse también para efectuar selecciones en el
"Menú de Utilidades". Para obtener más detalles, consulte el "Menú de
Utilidades" en el Capítulo 3.
Detector
PRECAUCIÓN: La superficie de mica del tubo Geiger es frágil. No permita
que nada penetre la pantalla.
Interno - Solamente para Inspector
El Inspector posee un tubo Geiger de 2 pulgadas de longitud (5,1 cm),
comúnmente llamado "tubo panqueque". La pantalla de la parte posterior del
Ventanilla del detector GM
Compartimiento de la pila
Ilustración 4 Vista
posterior del Inspector
(Detector)
Page 68

68
Inspector se llama "ventanilla" (ver Ilustración 4). Esta ventanilla permite que las
radiación alfa y las radiaciones beta y gamma de baja energía, que no pueden
traspasar la cubierta de plástico, penetren la superficie de mica del tubo. El
pequeño símbolo de radiación [Ilustración 1 (7)] de la etiqueta delantera indica el
centro del tubo Geiger.
Externo - Solamente para Inspector EXP
El Inspector EXP tiene una sonda externa en forma de panqueque en lugar del
detector incorporado. Para conectar el detector, enchufe un extremo del cable en
el conector del panel delantero del Inspector y el otro extremo en la sonda.
Precaución: Si la sonda no estuviera conectada cuando se enciende el
instrumento, éste no funcionará correctamente y podría averiarse. No quite la
sonda mientras el instrumento esté encendido.
Accesos de Entrada/Salida
El acceso de Entrada Cal [Ilustración 1 (9)] se utiliza para calibrar
electrónicamente el instrumento con un generador de impulsos. Para obtener más
detalles, refiérase a "Calibración Electrónica" en el Capítulo 5.
El acceso de Salida [Ilustración (10)] que se encuentra debajo del enchufe de
entrada Cal posibilita la interfaz del Inspector con una computadora, un
registrador de datos u otro dispositivo. Para obtener más detalles, refiérase a
"Interfaz con un dispositivo externo" en el Capítulo 3.
El acceso para sonda del panel delantero (presente únicamente en el Inspector
EXP) se usa para conectar una sonda externa.
3 Funcionamiento
Unidades de Medida
El Inspector está diseñado para usar unidades convencionales (miliroentgens por
hora e impulsos por minuto) o unidades SI (microsieverts por hora e impulsos por
segundo). Para alternar entre unidades convencionales o SI, elija la Opción 2 en
el Menú de Utilidades. Para obtener más detalles, refiérase al "Menú de
Utilidades" en el Capítulo 3.
Page 69

69
Encendido del Inspector
Antes de encender el Inspector, instale una pila alcalina estándar de 9 voltios en
el compartimiento correspondiente de la parte posterior inferior. Nota: coloque la
pila contra la pared de fondo y asegúrese de que los cables pasen por el costado
de la pila y no por debajo de la misma.
Encendido. Para encender el Inspector, coloque la llave selectora superior en la
modalidad deseada y coloque la llave selectora inferior en la posición "On" o
Audio. El Inspector iniciará entonces una verificación del sistema que dura seis
segundos. Se exhiben todos los indicadores y números.
Después de la verificación del sistema, el nivel de radiación se exhibe en la
modalidad seleccionada. Aproximadamente treinta segundos después de
encender el Inspector en marcha, un breve pitido indica que se ha reunido
suficiente información para asegurar la validez estadística de las medidas.
Actualización del visualizador. En las modalidades de tasa de dosis, el
visualizador numérico se actualiza cada tres segundos. En la modalidad
Total/Temporizador (Total/Timer), el visualizador numérico se actualiza dos veces
por segundo.
Nivel Máximo. Cuando se alcanza el nivel máximo para la modalidad actual, el
Inspector emite pitidos por tres segundos, hace una pausa por tres segundos y
luego repite el ciclo. El visualizador numérico destella. El patrón de pitidos y el
visualizador destellante continúan hasta que el nivel disminuye o se apaga el
Inspector.
Tiempo de Respuesta (Cálculo automático de promedios). Cuando el nivel de
radiación es inferior a 6000 CPM, la lectura de la tasa de dosis en cualquiera de
las modalidades se basa en la radiación detectada en los últimos 30 segundos.
Para responder más rápidamente a los cambios, cuando el nivel de radiación
supera los 6000 CPM en cualquier período de 30 segundos, la lectura se basará
en los 6 últimos segundos. Cuando el nivel de radiación supera los 12000 CPM
en cualquier período de 30 segundos, la lectura se basará en los 3 últimos
segundos. Nota: puede elegir la respuesta de 3 segundos en cualquier nivel de
radiación por medio del "Menú de Utilidades" detallado en el Capítulo
Page 70

70
Después de estar encendido por 30 la lectura se basará en un promedio
segundos, si el instrumento detecta… de los últimos…
(<100 IPS) 30 segundos
< 6 000 IPM o <1,75 mR/h
(100 -200 IPS) 6 segundos
6 000-12 000 IPM o 1,75-3,6 mR/h
(>200 IPS) 3 segundos, respuesta rápida
>12 000 IPM o >3,6 mR/h
Selección Automática de GamaSelección automática de rango
Cuando en algunas modalidades los niveles de radiación aumentan por encima
de ciertos niveles predeterminados, el Inspector usa la selección automática de
rango para cambiar automáticamente a la escala "X1000". Cuando aparece
X1000 encima del visualizador numérico, multiplique la lectura visualizada por
1000 para determinar el nivel de radiación.
Modalidad Rangos exhibidos
CPM 0 a 2 999 IPM > 2 999
X1000
3,000 (3 000) IPM a 3500 (350 000)IPM
Total/ 0-9 999 impulsos > 9 999
Temporizador X1000
10,00 (10 000) a 9999 (9 999 000)
impulsos
Funcionamiento en las modalidades tasa de dosis
Precaución: 1. Cerciórese de que no haya ninguna obstrucción entre la
ventanilla del detector y la fuente que esté vigilando/controlando. 2. Evite tomar
medidas con la ventanilla GM orientada hacia el sol, pues eso podría afectar las
lecturas.
Cuando el selector de modalidades está en mR/h ?Sv/h o CPM CPS, el
visualizador numérico se actualiza cada tres segundos. Si la tasa de impulsos
fuera baja, los cambios importantes en el nivel de radiación exhibida podrán
Page 71

71
demorar hasta 30 segundos en estabilizarse. Para obtener más detalles, refiérase
a "Selección Automática de Gama" en este capítulo
CPM o CPS y los recuentos totales son los métodos más directos de medición;
mR/h (o ?Sv/h) se calcula usando un factor de conversión optimizado para el
Cesio 137. Esta modalidad es menos precisa para otros radio nucleidos a no ser
que se haya calibrado el Inspector para un radionucleido similar.
Los indicadores más inmediatos del nivel de radiación son la señal sonora y la luz
de conteo. Transcurrirán 3 segundos antes de que se exhiba un cambio en el
visualizador numérico, a menos que se esté usando la modalidad
Total/Temporizador (Total/Timer).
Funcionamiento en la Modalidad Total/Temporizador
(Total/Timer)
Cuando la llave selectora de modalidad se coloca en Total/Temporizador
(Total/Timer), el visualizador numérico se actualiza dos veces por segundo y se
inicia la totalización.
Medición de un recuento temporizado
Cuando se toma un recuento temporizado durante un período más largo, el
recuento promedio por minuto es más preciso, y cualquier aumento pequeño es
más significativo. Por ejemplo, si un promedio para un intervalo de 10 minutos
supera en un impulso otro promedio de 10 minutos, el aumento podría ser el
resultado de una variación normal. Pero durante 12 horas, un aumento de un
impulso basado en el promedio de fondo de 12 horas podrá ser estadísticamente
significativo.
El Inspector mide un recuento total para un período temporizado que puede ser
desde un minuto hasta 24 horas. Si el período considerado fuera inferior a 1
minuto, observe la cuenta regresiva en segundos que aparece en la pantalla. El
temporizador puede detenerse manualmente en cualquier momento que se
desee.
Siga estos pasos para tomar un recuento temporizado:
1. Con el Inspector funcionando, coloque la llave selectora de modalidad en
Total/Temporizador (Total/Timer) y la llave selectora del Temporizador en el
Page 72

72
panel delantero en Configurar (Set). En la pantalla aparecerán los símbolos
del reloj de arena y "SET"; el valor visible será 00:01 (un minuto).
2. Use los botones "+" y "?" para fijar el período temporizado. El período
temporizado puede ser de 1 a 10 minutos en incrementos de un minuto,
para 10 a 50 minutos en incrementos de diez minutos, o de 1 a 24 horas en
incrementos de una hora.
3. Coloque la llave selectora del Temporizador en Encendido (On). El Inspector
emite tres pitidos e inicia el conteo. El símbolo del reloj de arena destella
durante el período seleccionado.
Si desea ver cuántos minutos restan, coloque la llave selectora del
Temporizador en Configurar (Set). El visualizador realiza una cuenta
regresiva desde el tiempo fijado en horas y minutos hasta cero. Por ejemplo,
si la pantalla indica 00:21, restan 21 minutos. Durante el tiempo
seleccionado puede alternar entre Total/Temporizador y las modalidades de
tasa de dosis sin por ello interrumpir dicho tiempo seleccionado. El indicador
de reloj de arena se muestra en todas las configuraciones y estará
destellando mientras funcione el temporizador.
4. Al final del período seleccionado, el Inspector emite tres pitidos y repite los
pitidos varias veces durante quince segundos. La cifra exhibida es el
recuento total.
5. Coloque la llave selectora del Temporizador en la posición de Apagado (Off)
para volver al funcionamiento normal.
Para determinar los impulsos promedio por minuto para el período
temporizado, divida el total por el número de minutos.
6. Para reconfigurar el temporizador para hacer otra medición, mueva la llave
selectora del temporizador a la posición de Apagado (Off) y luego regrésela
a la posición de Encendido (On). El instrumento conservará el temporizador.
Uso de modalidades de tasa de dosis mientras el temporizador está activado
Las modalidades de la tasa de dosis pueden utilizarse mientras el temporizador
está activado. En cualquier modalidad de tasa de dosis el indicador del reloj de
arena continuará destellando durante el período temporizado. Al final de dicho
período, el reloj de arena permanecerá continuamente encendido y la lectura
temporizada se mantendrá en la modalidad de Total/Temporizador (Total/ Timer).
Page 73

73
Medición de un recuento total
El temporizador puede tomar recuentos temporizados de períodos de hasta 24
horas. Es posible tomar un recuento sin el temporizador, por ejemplo, tomando un
recuento por un período superior a 24 horas. Para ello, siga estos pasos:
1. Ponga el Inspector+ en el lugar donde usted piensa efectuar el recuento.
2. Anote la hora.
3. Inmediatamente, cuando usted anote la hora, ponga el selector de
modalidad en Total/Temporizador (Total/Timer).
4. Al final del período temporizado, anote la hora y el número de impulsos en la
visualización numérica.
5. Reste la hora al comienzo de la hora al final para determinar el número
exacto de minutos en el período temporizado.
6. Para obtener el recuento promedio, divida el recuento total por el número de
minutos en el período temporizado.
Uso de alertas
La alerta puede establecerse en mR/h o en CPM. Cuando se alcanza el umbral
de la alerta, se escuchará un pitido hasta que se desactive la alerta o el nivel de
radiación caiga por debajo del umbral predeterminado.
1. Para configurar la alerta, oprima el botón "SET" del panel delantero;
aparecerán los símbolos "ALERT" (alerta, símbolo de radiación) y "SET"
(configurar).
2. Use los botones "+" y "?" para seleccionar el valor deseado.
3. Oprima una vez el botón "SET" para guardar el valor en la memoria. Vuelva
a oprimirlo para activar la modalidad alerta. En la pantalla se verá el símbolo
"ALERT", para indicar que el instrumento está funcionando en esa
modalidad.
4. Para usar el valor de alerta previamente seleccionado, oprima el botón
"SET" dos veces; así se activará la modalidad alerta.
5. Para desactivar la modalidad alerta, vuelva a oprimir el botón "SET".
Observe que ya no se verá el símbolo "ALERT".
Page 74

74
Menú de Utilidades
El Menú de Utilidades permite cambiar los valores predeterminados de diversos
parámetros. Una vez cambiada la configuración, se mantendrá en efecto a menos
que se la cambie usando el Menú de Utilidades.
1. Para activar el Menú de Utilidades, mantenga oprimido el botón "+" mientras
enciende el instrumento. En la pantalla se verá el símbolo "MENU". Deje de
oprimir el botón "+" y verá un "1", correspondiente a la opción 1, junto con el
símbolo "MENU".
2. Para desplazarse por el menú, oprima factor Cal.
3. Para seleccionar una opción, oprima el botón "SET" y se mostrará el
símbolo "SET".
4. Use los botones "+" o "?" para alternar entre las opciones y oprima el botón
"SET" para ingresar el nuevo valor. El instrumento continuará funcionando
en la modalidad de Menú de Utilidades y en la pantalla se verá "0" y
"MENU". Para seleccionar otra opción del Menú de Utilidades, repita el
proceso anterior.
5. Para salir del Menú de Utilidades, oprima el botón "SET" cuando lo desee.
El Inspector continuará con la rutina de encendido normal. Vea las opciones
en la tabla siguiente:
Opciones Funciones Comentarios
1. Promedio automático o "On" selecciona promedio Refiérase a "Tiempo de
promedio de 3 segundos automático y "Off" respuesta (Cálculo
selecciona promedio de 3 automático de el
segundos (respuesta rápida) Capítulo 3
2. Unidades de medición Selecciona mR/h y CPM o ?Sv y CPS
3. Configuración Cal 100 Reconfigura Oprima el botón "Set";
no es necesario
alternar
4, 5, 6 Reservado para futuras opciones
Page 75

75
Opciones Funciones Comentarios
7. Selección del factor Cal Selecciona manualmente el Use los botones "+" y "-"
factor Cal para aumentar o
disminuir el valor
deseado
8. Selección del va Automáticamente regres Oprima el botón "Set";
predeterminado en fábrica los valores de Cálculo no es necesario
automático de promedios,
mR/h, CPM y CAL 100 a
los valores originales de
fábrica
9. Número de versión Indica el número de versión del programa
Interfaces con un Dispositivo Externo
El enchufe de salida inferior [Ilustración 1 (10)] en el lado izquierdo del Inspector
es un enchufe doble en miniatura utilizado para salida de datos que puede usarse
para accionar un dispositivo TTL o CMOS. Puede utilizarse para registrar los
impulsos en una computadora, un registrador de datos o un contador acumulador.
La salida en la punta del enchufe proporciona un impulso positivo(5 voltios) cada
vez que el tubo Geiger detecta un impulso. Para obtener más información acerca
del programa Observer, visite seintl.com.
Opciones
Placa WipeTest para pruebas (patente N° 5.936.246)
La placa de acero inoxidable WipeTest posee una depresión circular para colocar
una prueba hecha en forma paralela a la ventanilla del detector a una distancia
fija de 1 cm. La placa WipeTest está diseñada para deslizarse fácilmente en la
parte posterior del Inspector.
4 Procedimientos comunes
En las siguientes secciones se indica cómo realizar diversos procedimientos
comunes. Al igual que con cualquier otro procedimiento, el usuario debe
determinar la adecuación del instrumento o del procedimiento para la aplicación
Page 76

76
deseada.
Manera de Establecer el Recuento de Fondo
Los niveles normales de radiación de fondo varían según el lugar, la hora, aún en
diferentes partes de una misma habitación. Para interpretar correctamente las
lecturas del Inspector, lo ideal es establecer la tasa de conteo normal de la
radicación de fondo para cada área que piensa monitorizar. Para ello, haga un
recuento temporizado. Para obtener más información sobre el uso del
temporizador, refiérase a "Toma de un recuento temporizado" en el Capítulo 3.
Un promedio obtenido en un período de diez minutos es moderadamente exacto.
Puede repetirse varias veces para comparar los promedios. Para establecer un
promedio más exacto, tome un recuento en una hora. Si fuera necesario
determinar si hay una contaminación previa, mida los promedios en varios
lugares y compare los resultados.
Monitorización del medio ambiente
Cuando desee monitorizar la radiación en el medio ambiente, mantenga el
Inspector en la modalidad CPM o mR/h y observe la lectura de vez en cuando
para ver si se detectan valores elevados.
Si sospecha que hay un aumento de la radiación en el medio ambiente, use el
temporizador para hacer un conteo de cinco o diez minutos; compárelo luego con
el promedio de la radiación de fondo. Si sospecha que hay un aumento
demasiado pequeño para detectarlo con una lapso corto, tome una medida con
un tiempo mayor (por ejemplo, 6, 12 ó 24 horas).
Control de contaminación en superficies
PRECAUCIÓN: No deje que el Inspector entre en contacto con superficies que
pudieran estar contaminadas, porque contaminaría el instrumento. Si las tiras de
goma (hule) de la parte posterior se contaminaran, cámbielas. Las tiras de
repuesto están engrapadas en este manual.
Para controlar una superficie, coloque la ventanilla del detector cerca de la
superficie y lea la tasa de conteo (espere 30 segundos o hasta que la lectura se
estabilice). Si desea determinar si la superficie es ligeramente radiactiva, haga un
conteo temporizado o un conteo acumulativo más prolongado.
Page 77

77
5 Mantenimiento
El Inspector debe calibrarse periódicamente y manipularse con cuidado para
obtener lecturas correctas. Para mantener el instrumento en buenas condiciones,
obedezca las siguientes pautas:
Calibración
El Inspector debe calibrarse tan a menudo como la regulación lo exija, o en todo
caso, una vez al año. La mejor manera de calibrarlo es usando una fuente
certificada de calibración. Si no hay ninguna disponible, es posible efectuar una
calibración electrónica con un generador de impulsos.
La fuente estándar de calibración es el Cesio 137. Debe usarse una fuente
certificada de calibración. Para calibrar el Inspector para otro radionucleido, es
imprescindible usar una fuente calibrada para dicho radionucleido o el factor
apropiado de conversión con relación al Cesio 137.
PRECAUCIÓN: pueden producirse errores cuando se usa una fuente o fondo de
bajo nivel de energía para seleccionar el factor CAL. En la modalidad Calibración,
el incremento más pequeño que puede obtenerse es 0,010, que evita el ajuste
fino del factor CAL.
Calibración Usando una Fuente
1. Coloque la sonda del Inspector o Inspector EXP a una distancia de la fuente
correspondiente a un campo de 50 mR/h, con la ventanilla del detector
orientada hacia la fuente.
2. Coloque la llave selectora de modalidad del Inspector en mR/h.
3. Encienda el Inspector.
4. Abra la fuente y registre 20 lecturas consecutivas.
5. Cierre la fuente.
6. Calcule el promedio de las lecturas y regístrelo.
a) Si el promedio es ±10% de 50 mR/h, prosiga con el Paso 7.
b) Si el promedio no es ±10% de 50 mR/h, prosiga con el Paso 10.
7. Coloque la sonda del Inspector o del Inspector EXP a una distancia de la
fuente correspondiente a un campo de 5 mR/h, con la ventanilla del detector
Page 78

78
orientada hacia la fuente.
8. Repita los Pasos 2 - 5.
9. Calcule el promedio de las lecturas y regístrelo.
a) Si el promedio es ±10% de 5 mR/h, se ha terminado el proceso de
calibración.
b) Si el promedio no es ±10% de 5 mR/h, prosiga con el Paso 10.
10. Apague el AUDIO para oír cuando suene el temporizador de cuenta
regresiva.
11. Apague el Inspector. Mantenga oprimido el botón "?" del panel delantero y
encienda el Inspector. Las letras CAL aparecerán en la pantalla y el
Inspector realizará la cuenta regresiva por 15 segundos, chirriando a cada
segundo. Esta demora le da la oportunidad de salir del campo y luego dejar
la fuente al descubierto. Al final de los 15 segundos, el Inspector emite
pitidos.
12. El Inspector ahora recopila datos por 30 segundos, chirriando cada 2
segundos, con las letras CAL y el símbolo del reloj de arena destellando. Al
final de los 30 segundos, emite pitidos. Aparecen las letras CAL y SET
destellando.
13. Cierre la fuente.
14. Oprima los botones "+" y "?" en el Inspector para cambiar la lectura a lo que
debería corresponder.
15. Cuando la lectura sea la correcta, oprima el botón "SET". El nuevo factor de
calibración se visualiza por varios segundos y luego el Inspector emite
pitidos y reanuda el funcionamiento normal.
16. Registre el nuevo factor de calibración.
17. Coloque la sonda del Inspector o del Inspector EXP a una distancia de la
fuente correspondiente a un campo de 5 mR/h, con la ventanilla del detector
orientada hacia la fuente.
18. Repita los Pasos 2 - 5.
19. Calcule el promedio de las lecturas y regístrelo.
a) Si el promedio es ±10% de 5 mR/h, se ha terminado el proceso de
calibración.
b) Si el promedio no es ±10% de 5 mR/h, repita los pasos 11 - 16 y prosiga con
Page 79

79
el paso 20.
20. Calcule el promedio del factor de calibración para 50 mR/h y el factor de
calibración para 5 mR/h.
21. Apague el Inspector.
22. Mantenga oprimido el botón "+" mientras enciende el Inspector. En el
visualizador numérico se verá un solo número.
23. Oprima el botón "+" o "?" hasta que aparezca el número 7.
24. Oprima el botón "SET".
25. Se verá el factor de calibración. Oprima los botones "+" o "?" para que el
factor de calibración sea el promedio que se calculó en el Paso 20.
26. Oprima el botón "SET" para introducir el nuevo valor y reanudar el
funcionamiento normal.
Se fija el factor de calibración en 100 (por ciento) en la fábrica. Si cambia la
lectura, por ejemplo, a un 20% mayor que la lectura de fábrica, el nuevo factor de
calibración sería 120. El factor de calibración actual se ve durante el chequeo del
sistema cuando se enciende el Inspector.
Calibración Electrónica
Es posible realizar la calibración electrónica con un generador de impulsos o de
funciones. La calibración electrónica requiere un cable provisto de un enchufe de
2,5 mm, con la señal llevada en la punta. Siga estos pasos:
1. Ajuste la altura de señal a 3,3 voltios y la duración negativa del impulso a 85
microsegundos.
PRECAUCIÓN: no inyecte un impulso cuando el Inspector está apagado.
No supere los 5 voltios.
2. Encienda el Inspector y coloque la llave selectora de modalidad en mR/h
?Sv/h.
3. Conecte el cable en el enchufe superior.
4. Use la siguiente tabla para verificar la precisión del Inspector. La tabla indica
las tasas de impulsos del generador apropiadas para efectuar la calibración
para Cs-137. Si la precisión no queda dentro de los límites deseados, siga
los pasos 5 a 7. Nota: el Inspector compensa automáticamente por los
impulsos perdidos debido al tiempo muerto del tubo GM. La lectura del
Page 80

80
visualizador en la modalidad CPM no igualará la frecuencia de entrada. Para
exhibir el número de impulsos no compensados en CPM, mantenga
oprimido continuamente el botón "?". La lectura corresponderá ahora a la
frecuencia de entrada.
Entrada del Generador CPM mR/H
µµ
Sv/h CPS
de Impulsos (PPM)
31,423 33,400 10.00 100.0 557
59,335 66,800 20.00 200.0 1,113
127,043 166,999 50.00 500.0 2,783
177,752 267,200 80.00 800.0 4,453
205,031 334,000 100.0 1,000 5,567
5. Apague el Inspector. Mantenga oprimido el botón "?" del panel delantero y
encienda el Inspector. En el visualizador se ve "CAL", y el Inspector realiza
una cuenta regresiva por 15 segundos, chirriando a cada segundo. Después
de 15 segundos, el Inspector emite un pitido.
6. El Inspector recoge datos por 30 segundos, chirriando cada 2 segundos,
haciendo que destellen la palabra CAL y el símbolo del reloj de arena.
Después de 30 segundos, emite otro pitido. El visualizador indica CAL, y la
palabra "SET" destella.
7. Oprima los botones "+" y "?" para que la lectura sea lo que debe ser.
Cuando la lectura sea la correcta, oprima el botón "SET".
El nuevo factor de calibración se exhibe durante varios segundos y luego el
Inspector emite un pitido y reanuda su funcionamiento normal.
Determinación de problemas y su posible solución
El Inspector es un instrumento altamente confiable. Si no parece estar
funcionando correctamente, repase el siguiente cuadro para determinar si puede
identificar el problema.
Page 81

81
Problema Causa Posible Qué hacer
Pantalla en blanco Falta la pila, pila Instalar una pila nueva de 9
descargada, pila mal voltios; si la luz de conteo y
conectada, LCD el audio funcionan, quizás
defectuosa haya que reemplazar la
pantalla LCD
La pantalla funciona pero Tubo Geiger Mire a través de la ventanilla
no se registra ningún defectuoso o para inspeccionar la superficie
impulso cable averiado de mica del tubo; si está
arrugada o rota, reemplácela
Inspeccione el cable de conexión
Lectura alta, pero otro Contaminación Con otro instrumento, mida la
instrumento indica una radiación del Inspector (EXP)
lectura normal en el Reemplace las tiras de goma
mismo sitio (hule) de la parte posterior del
Inspector
Lectura alta falsa Humedad Los circuitos integrados pueden
estar mojados; seque el
instrumento en un sitio seco y
cálido; si el problema persiste,
hágalo reparar en fábrica
Lectura alta falsa Fotosensibilidad aparte el instrumento de la luz
solar directa y de toda fuente de
luz UV; si la lectura disminuye, la
cobertura de la ventanilla de
mica podría haberse perdido
porque el tubo Geiger se mojó;
reemplace el tubo
Lectura alta falsa Descarga continua Reemplace el tubo Geiger
Page 82

82
Lectura alta falsa Campo Aparte el instrumento de
electromagnético cualquier posible fuente
electromagnética o de radiación
de radiofrecuencia
Servicio
PRECAUCIÓN: bajo ningún concepto envíe un instrumento contaminado para su
reparación o calibración. No existen piezas en el interior que puedan ser
reparadas por el usuario.Si el Inspector+ requiere servicio, sírvase ponerse en
contacto con su distribuidor o diríjase a la siguiente dirección:
Si el Inspector necesita servicio, comuníquese con el distribuidor de su zona o
diríjase a la siguiente dirección:
S.E. International, Inc.
P.O. Box 39, 436 Farm Rd.
Summertown, TN USA 38483-0039
Tel 931-964-3561, Fax 931-964-3564
E-mail: radiationinfo@seintl.com
6 Información básica sobre la radiación y su medición
En este capítulo se explica brevemente qué es la radiación y cómo se mide. Esta
información es para los usuarios que no están familiarizados con el tema. Resulta
muy útil para comprender cómo funciona el Inspector y cómo interpretar las
lecturas.
Radiación ionizante
La radiación ionizante es una radiación que cambia la estructura de los átomos
individuales pues los ioniza. Los iones producidos, a su vez, ionizan más átomos.
A las sustancias que producen una radiación ionizante se las llama radiactivas.
La radiactividad es un fenómeno natural. En el sol y en otras estrellas se
producen reacciones nucleares continuamente. La radiación emitida viaja por el
espacio y una pequeña fracción de ella llega a la Tierra. En la gente y en la tierra
también existen las fuentes naturales de radiación ionizante. La más común de
estas fuentes es el uranio y sus productos de degradación natural.
Page 83

83
La radiación ionizante se divide en cuatro grupos:
Los rayos X son una radiación artificial producida al bombardear en el vacío un
blanco metálico con electrones a alta velocidad. Los rayos X son una radiación
electromagnética de la misma naturaleza que las ondas luminosas y las de radio,
pero de una longitud de onda extremadamente corta, inferior a 0,1 x 10⁻⁹ cm.
También se llaman fotones. La energía de los rayos X es millones de veces
mayor que la de las ondas luminosas o de radio. Debido a este elevado nivel de
energía, los rayos X penetran diversos materiales, inclusive los tejidos orgánicos.
Los rayos gamma son casi idénticos a los rayos X, pero generalmente tienen
una longitud de onda más corta que la de los rayos X. Los rayos gamma son muy
penetrantes, por lo cual normalmente se requiere un blindaje grueso de plomo
para detenerlos.
Radiación beta. Una partícula beta es un electrón emitido por un átomo. Tiene
más masa y menos energía que un rayo gamma, por lo que no penetra la materia
tan profundamente como los rayos gamma o los rayos X.
Radiación alfa. Una partícula alfa consta de dos protones y dos neutrones, lo
mismo que el núcleo de un átomo de helio. Generalmente no puede desplazarse
más de 1 a 3 pulgadas (2,5 a 7,5 cm) por el aire antes de detenerse, y se puede
detenerse con una hoja de papel.
Degradación: cuando un átomo emite una partícula alfa o beta o un rayo
gamma, se convierte en un tipo diferente de átomo. Las sustancias radiactivas
podrán pasar por varias etapas de degradación antes de convertirse en una
forma estable y no ionizante. Por ejemplo, el U 238 pasa por 14 etapas diferentes
de degradación antes de estabilizarse.
Un elemento puede presentarse de varias maneras, llamadas isótopos. A un
isótopo radiactivo de un elemento puede llamársele "radioisótopo". Sin embargo,
la forma más correcta es "radionucleido".
Vida media: cada radionucleido posee una vida media característica, que es el
tiempo necesario para que la mitad de su masa se degrade.
Unidades de medida de la radiación
Para medir la radiación, la exposición a ella y la dosis se emplean diversas
Page 84

84
unidades.
Un roentgen es la cantidad de radiación X o radiación gamma que produce una
unidad electrostática de carga en un cc de aire seco a 0 C y 760 mm de presión
atmosférica de mercurio. El Inspector da resultados en miliroentgens por hora
(mR/h).
Un rad es la unidad de exposición a la radiación ionizante igual a la energía de
100 ergios por gramo de materia irradiada. Es aproximadamente igual a 1,07
roentgens.
Un rem es la dosis recibida por la exposición a un rad. Es la cantidad de rads
multiplicada por el factor de calidad de la fuente particular de radiación. El rem y
el milirem son las unidades de medida más comúnmente utilizadas para la dosis
de radiación en EUA. 1 rem= 1 rad.
Un sievert es la medida internacional normal para medir la dosis. Un sievert
equivale a cien rems. Un microsievert (µSv) es un millonésimo de un sievert.
Una curie es la cantidad de materia radiactiva que se degrada a razón de 37 mil
millones de desintegraciones por segundo, aproximadamente la velocidad de
desintegración de un gramo de radio. Los microcuries (millonésimos de un curie)
y picocuries (billonésimos de un curie) también se usan como unidades de
medida.
Un bequerel (Bq) es equivalente a una desintegración por segundo.
Anexo A - Especificaciones Técnicas
Detector: Interno: Tubo Geiger-Mueller con halógeno. Diámetro
efectivo de 1,75” (45 mm). Densidad de la
ventanilla de mica: 1,5-2,0 mg/cm2.
RAP~RSl Externo: El mismo detector que el modelo incorporado. Caja
de aluminio anodizado con mango de vinilo negro.
Alimentación de energia de 500 voltios ubicada en
el cabezal de la sonda.
Adaptadores: Amphenol 31226 twinax.
Visualización: Una visualización de cristal líquido (LCD) de 4
dígitos incluyendo indicadores de modalidad.
Gama Operacional: mR/h: 0,001 a 100,0
Page 85

85
IPM: 0 a 350 000
Total: 1 a 9 999 000 impulsos
µSv/h: 0,01 a 1 000
IPS: 0 a 5 000
Eficiencia 4p: Sr-(y)90: aprox. 38%; C-14: aprox. 5,3%
P-32: aprox. 33%; Co-57: aprox. 0,3% en contacto
Sensibilidad Energética:
3400 IPM/mR/h en relación
al Cs-137
lo más mínimo detectable
para I a 125 es 0,02 µCi
en contacto
Respuesta Energética:
Período Promedio: las actualizaciones se muestran cada 3 segundos
y se muestra el promedio para el último período de
30 segundos a niveles normales. El período para
los promedios disminuye a medida que aumenta el
nivel de radiación. Refiérase a el Capítulo 3,
Funcionamiento - Selección automática de rango,
Actualización del visualizador.
Gama del Factor CAL: 001 a 199
Temporizador: Puede programar períodos de muestreo de 1 a 10
minutos en incrementos de un minuto, de 10 a 50
minutos en incrementos de 10 minutos, y en 1 a 24
horas en incrementos de 1 hora
Rango de alerta: mR/h 0 a 50 CPM 0 a 160000
Precisión: 10%
Alarma Sonora: funciona únicamente en modalidad Audio
Antisaturación: La lectura se mantiene en plena escala en campos
de hasta 100 veces la lectura máxima.
Gama de Temperaturas: -10 °C a +50 °C , 14 °F a 122 °F
Page 86

86
Potencia: Una pila alcalina de 9 voltios. La vida útil de la pila
es al menos de 2160 horas con un fondo normal .
Mínimo 625 horas a 1 mR/h.
Dimensiones: 150 x 80 x 30 mm (5,9” x 3,2” x 1,2”)
Peso: 323 gramos (11,4 onzas) incluyendo la pila
Anexo B Sensibilidad a Isótopos Comunes
Eficiencia típica del tubo GM para geometría 4 Pi en contacto
Isótopo
Beta E máx. MeV Eficiencia
14
C 49 keV Promedio 156 keV Máx. 5,3%
210
Bi 390 keV Promedio 1,2 MeV Máx. 32%
90
Sr(Y) 546 keV y 2,3 MeV 38%
32
P 693 keV Promedio 1,7 MeV Máx. 33%
Alfa
241
Am 5,5 MeV 18%
Garantía
ELEMENTOS DE LA GARANTÍA: S.E. International, Inc. garantiza el tubo
Geiger-Mueller por 90 días y todos los materiales y la fabricación del producto por
un año contra todo defecto de materiales y fabricación. Las únicas exclusiones y
limitaciones se enumeran a continuación.
DURACIÓN DE LA GARANTÍA: La garantía terminará y no tendrá más vigencia
un año (90 días para el tubo GM) después de la fecha original de compra del
producto o en el momento en que el producto : a) se daña o no se mantiene en
forma razonable o necesaria, b) sea modificado, c) sea reparado por alguien que
no sea el garante para un defecto o mal funcionamiento cubierto por esta
Garantía, d) se haya contaminado con materiales radiactivos, o e) sea usado en
una forma o para un propósito para el que no se había destinado o en forma
contraria a las instrucciones escritas de S.E. International, Inc. Esta garantía no
se aplica a productos expuestos a elementos corrosivos, uso inapropiado, abuso
o negligencia.
DECLARACIÓN DE REMEDIO: En el caso de que en cualquier momento el
producto no conforme con la garantía mientras esté vigente esta garantía, el
Garante reparará el defecto y devolverá el instrumento (porte previamente
pagado) sin facturarle los repuestos o mano de obra.
NOTA: Mientras se subsanará el producto bajo garantía sin cobro alguno, esta
Page 87

87
garantía no cubre ni proporciona el reembolso o pago por daños consecuentes o
incidentales que surjan del uso o imposibilidad de uso de este producto. La
responsabilidad de la compañía a raíz del suministro de este instrumento o de su
uso, independientemente de si está cubierto o no por la garantía, de ninguna
manera excederá el costo de subsanar los defectos en el instrumento, y después
de dicho período de un año (90 días en el caso del tubo GM), toda
responsabilidad mencionada terminará. Cualquier garantía implícita se limita a la
duración de la garantía escrita.
PROCEDIMIENTO PARA OBTENER EL CUMPLIMIENTO DE LA GARANTÍA:
En el caso de que el producto no se conforme a la garantía, sírvase escribir o
llamar a la dirección y teléfono indicados arriba. S.E. International, Inc. no
aceptará instrumentos contaminados para calibración o reparación, sean o no
cubiertos por la garantía.
NOTA: Antes de utilizar este instrumento, el usuario debe determinar la
idoneidad del producto para el uso destinado. El usuario asume todo riesgo y
responsabilidad relacionada con tal uso.
Page 88

88
El exclusivo diseño para
guardar la sonda en la
funda para transporte
permite utilizar el
instrumento con una sola
mano.
La funda para transporte posee una ventana
transparente para poder ver claramente la
lectura y la luz de conteo, y se levanta para
poder acceder a las llaves selectoras. Para
facilitar el transporte del instrumento, la
funda cuenta con correas y presilla para el
cinturón.
Anexo C Funda para
transporte del Inspector EXP
Page 89

89
La cubierta reforzada para
protección de la sonda protege
contra daños a la frágil ventanilla
del detector.
La cubierta delantera se levanta para permitir
acceder a las llaves selectoras; hay un
pequeño bolsillo para guardar una fuente de
calibración. Para protección del usuario,
recomendamos usar una fuente de 0,1
microcurie de Cs-137 con blindaje en ambos
lados. El distribuidor de su zona puede
proporcionarle el blindaje necesario para esta
fuente de radiación gamma.
 Loading...