

Page 1

Configuring Radiant POS terminals 1
Configuring Radiant POS terminals
Each Radiant Point-of-Sale terminal includes an Intel Pentium M or Celeron M processor,
a 15” or 12” touchscreen monitor, and an integrated magnetic stripe reader (MSR).
Radiant POS terminals can be configured with an electronic cash drawer, a thermal
receipt printer, a 2-line x 20-character external pole display or built-in line display, and a
barcode scanner.
After you unpack and connect your Radiant hardware, follow the appropriate instructions
in the current CounterPoint Installation Guide
Radiant POS terminal as a CounterPoint workstation.
NOTE: If you are running CounterPoint over Windows Terminal Services, you will
configure your terminal server as a CounterPoint workstation, instead of your
POS terminals.
When you finish installing CounterPoint, complete the appropriate steps—depending on
which POS terminal(s) you are using and whether you are running CounterPoint over
Terminals Services—to configure your Radiant hardware for use with CounterPoint, as
outlined in the following tasks:
y Configuring Radiant hardware for Terminal Services
y Configuring the P1550 POS terminal
y Configuring the P1515/P1520 POS terminal
y Configuring the P1220 POS terminal
to install CounterPoint and configure each
Page 2
Configuring Radiant POS terminals 2
Configuring Radiant hardware for Terminal Services
Skip this section if you are not running CounterPoint over Terminal Services.
If you are running CounterPoint over Windows Terminal Services, you must perform
some preliminary steps to configure your Radiant POS terminals and peripherals to work
with Terminal Services.
When you finish installing CounterPoint, you must perform each of the tasks listed
below—as detailed on the following pages—to configure your Radiant POS terminals for
use with Terminal Services:
y Configure Remote Desktop Connection settings
y Configure MSR settings
y Configure 2x20 display settings
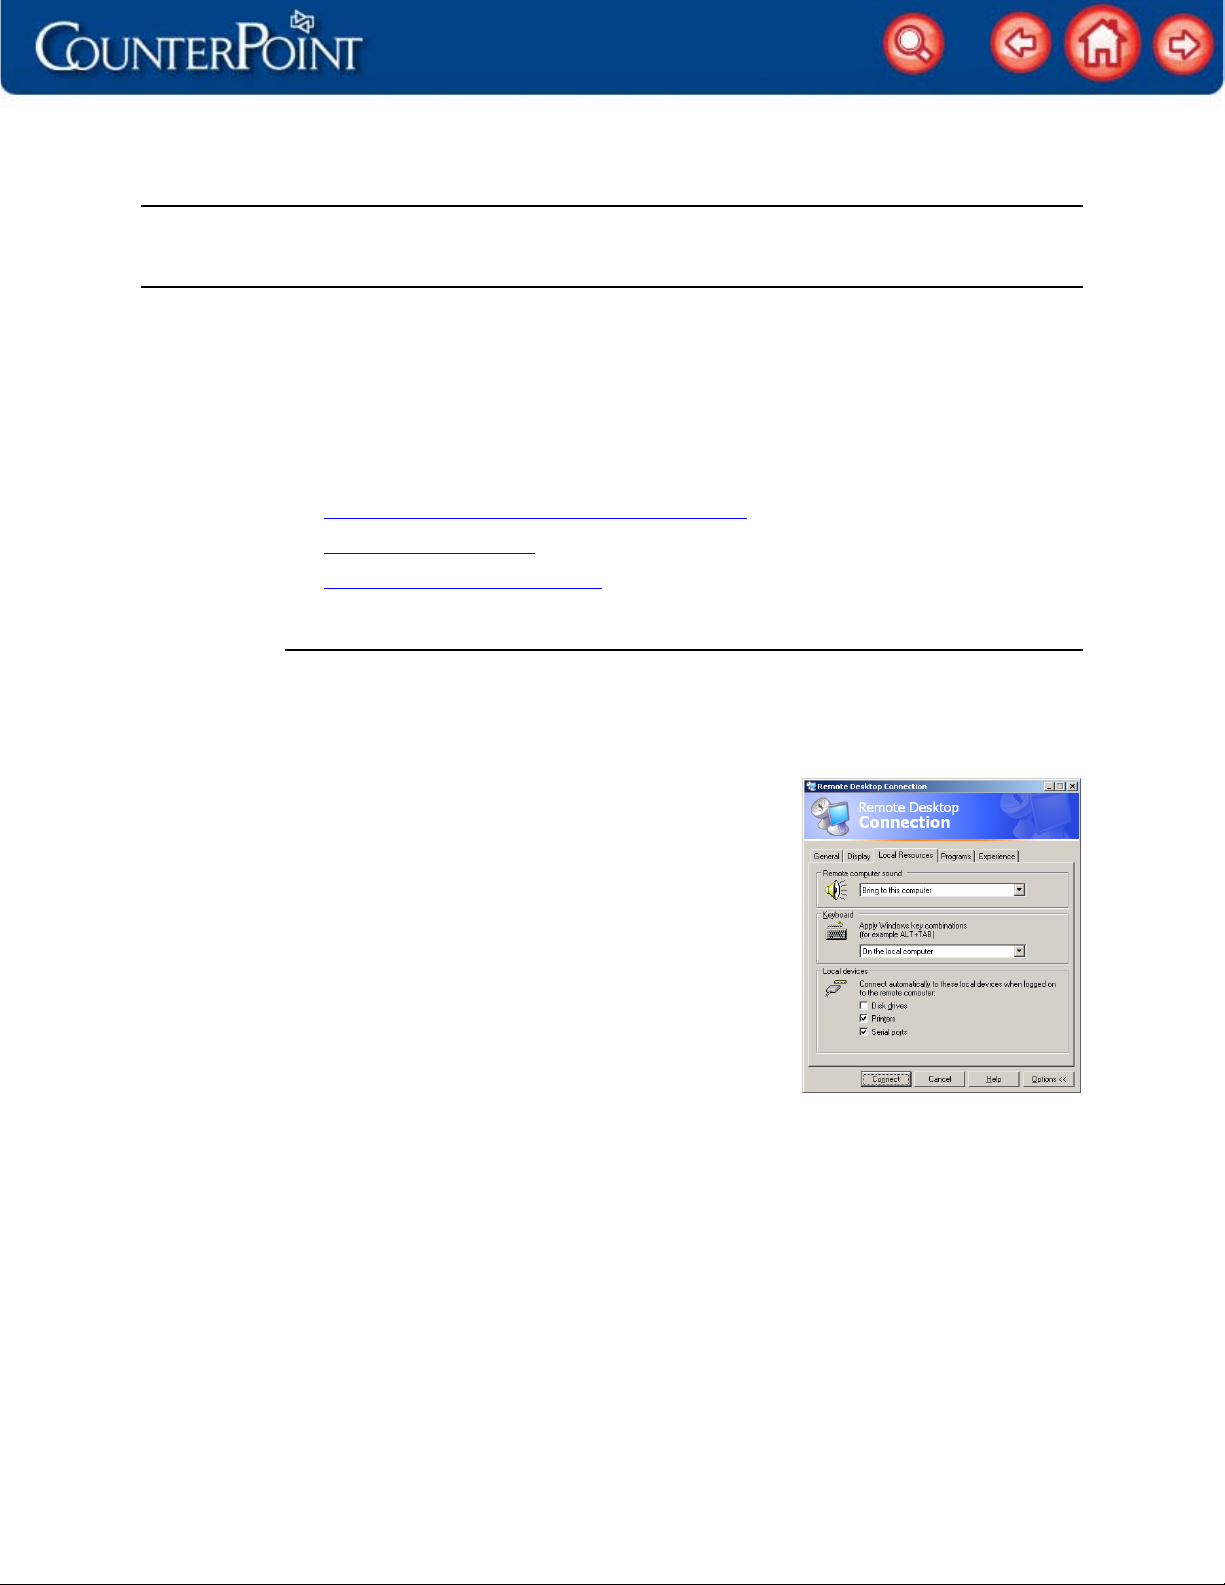
Configure Remote Desktop Connection settings
Follow these steps to configure the Remote Desktop Connection settings on ea ch of your
Radiant POS terminals:
1. From one of your POS terminals, select Start > Programs > Accessories >
Communications > Remote Desktop Connection.
2. Click the Options button, and then click the Local
Resources tab.
3. Select the On the local computer option from the
Apply Windows key combinations list.
4. Under Local devices, select the Printers check box if
you are using a Windows printer with the POS
terminal.
5. Select the Serial ports check box.
6. Configure the settings on the remaining tabs to
allow your POS terminal to connect to your terminal
server and start a Terminal Services session.
7. Click Connect to connect to your terminal server.
NOTE: Repeat these steps for each of your Radiant POS terminals.
Page 3

Configuring Radiant POS terminals 3
Configure MSR settings
Follow these steps to allow your POS terminals’ built-in MSRs to function over Windows
Terminal Services:
1. Copy the OPOSim.exe file from your top-level directory of your CounterPoint server to
the Windows Startup directory for all users (i.e., C:\Documents and Settings\All Users\Start
Menu\Programs\Startup) on your terminal server.
2. On your terminal server, double-click OPOSim.exe in the Startup directory to start the
OPOS Input Manager.
3. From a command prompt window, browse to the C:\Program Files\OPOS\CommonCO
directory on your terminal server, and then enter the following command to register
the necessary .dll files:
regansi
Configure 2x20 display settings
Follow these steps to allow the 2x20 displays connected to your POS terminals to
function over Terminal Services:
1. On your CounterPoint server, browse to your top-level directory (e.g., C:\SYN) and
double-click the SYNRUN.SYN file to open it in Notepad or another text editor.
2. If you are using any P1220 or P1550 terminals with external (i.e., pole mount) 2x20
displays, add the following lines to SYNRUN.SYN:
CPSIO2=WN
SYNCOM2=F8n1
3. If you are using any P1220 terminals with built-in (POS mount) 2x20 displays, add
the following lines to SYNRUN.SYN:
CPSIO5=WN
SYNCOM5=T8n1
4. If you are using P1520 terminals with external (pole mount) or built-in (POS mount)
2x20 display, add the following lines to SYNRUN.SYN:
CPSIO4=WN
SYNCOM4=F8n1
5. Save the modified SYNRUN.SYN file, and then close your text editor.
Page 4

Configuring Radiant POS terminals 4
Configuring the P1550 POS terminal
Follow these steps to configure a P1550 POS terminal for use with CounterPoint:
1. If you are using any of the following external devices with your P1550 POS terminal,
connect them to the following ports:
Device Radiant Part # Port
Printer-driven cash drawer
(16” or 18.8”)
Epson TM-T88 series receipt printer
(RS232 interface)
2x20 display (POS mount or
pole mount)
Serial modem N/A
NOTE: If you are using a se rial modem with your P1550, follow the instructions included
with your USB to serial adapter to connect the modem to an available USB port.
2. Browse to the top-level directory on your CounterPoint server (e.g., C:\SYN) and
double-click the SYNRUN.SYN file to open it in Notepad or another text editor.
3. Add the following lines to SYNRUN.SYN:
CPSIO1=C
SYNCOM1=98n1
4. If you are not running CounterPoint over Terminal Services, add the following line to
SYNRUN.SYN:
CPSIO2=W
5. Save the modified SYNRUN.SYN file, and then close your text editor.
6. Copy the CP1550Mode.bat and OPOSim.exe files from your top-level directory to the
Windows Startup directory for all users (i.e., C:\Documents and Settings\All Users\Start
Menu\Programs\Startup) on your POS terminal.
P000F024 or
P000F031
P201F019 or
P201F039
P703F000 or
P703F001
DK (on Epson TM-T88)
Serial 1
Serial 2
USB (with USB to serial adapter)
7. Double-click OPOSim.exe in the Startup directory to start the OPOS Input Manager.
8. Right-click the OPOS Input Manager icon (
) in the Windows
system tray and select Options to display the OPOS Input
Manager window.
9. Select RSMsr from the MSR list, and then select the Track
you want to read.
NOTE: If you are processing debit cards, select track 2.
10. Select the Auto-enable on start-up check box, and then click
the Enable button.
11. Close the OPOS Input Manager window.
12. Select Start / Settings / Printers and Faxes, right-click the Epson TM-T88 - Serial printer, and
then click Properties.
Page 5

Configuring Radiant POS terminals 5
13. Click the Ports tab, select an unused Serial Port (e.g., COM4), and then click OK.
NOTE: Alternatively, you can delet e the Epson TM-T88 - Serial printer, instea d of assigning
it to an unused port.
14. Start CounterPoint and log in to your company database.
15. Select File Utilities / Special / System / Update pre-defined data.
16. Select Yes from the Are you sure you want to do this ? prompt, and then press Enter to
load the pre-defined device codes for Radiant POS terminals.
17. When the pre-defined data is updated, press ESC to return to the main menu.
18. Select Setup / Point of Sale / Registers, specify a Register number for your POS terminal,
and then complete the remaining fields on the first Registers screen.
19. On the next Registers screen, enter 1550 in the Device code field for the Printer 1 device,
select the Print method you want to use, and then enter COM1 in the corresponding
Device ID field.
20. Enter or look up one or more Form ID options to specify the forms you want to print
with your receipt printer.
Page 6

Configuring Radiant POS terminals 6
21. On the next Registers screen, enter 1550 in the Device code field for the Card reader
device.
NOTE: Do not specify a Device ID for the Card reader device.
22. Enter 1550 in the Device code field for the Display device, and then enter COM2 in the
corresponding Device ID field.
23. Press Enter at the Field number to change ? prompt to save your changes, and then
press ESC to close the Registers screen and return to the main menu.
24. Select Setup / Point of Sale / Drawers, specify a Drawer number and Register number for the
POS terminal’s cash drawer, and then enter a Description for the drawer.
25. Enter 1550 in the Drawer device code field, and then enter COM1 in the Drawer device ID
field.
26. Press Enter at the Field number to change ? prompt to save your changes, and then
press ESC to close the Drawers screen and return to the main menu.
Your P1550 POS terminal is ready to use! Start Ticket Entry or Touchscreen Ticket Entry and
enter some sample tickets to try out each device. If you encounter any problems with
your devices, test each device in Setup / Point of Sale / Device codes.
Page 7

Configuring Radiant POS terminals 7
Configuring the P1515/P1520 POS terminal
Follow these steps to configure a P1515 or P1520 POS terminal for use with
CounterPoint:
1. If you are using any of the following external devices with your P1515 or P1520,
connect them to the following ports:
Device Radiant Part # Port
Printer-driven cash drawer
(16” or 18.8”)
Epson TM-T88 series receipt printer
(RS232 interface)
2x20 display (POS mount or
pole mount)
Serial modem N/A
NOTE: If you are using a se rial modem with your P1515 or P1520, follow the instructions
included with your USB to serial adapter to connect the modem to an available
USB port.
2. Browse to your top-level directory (e.g., C:\SYN) and double-click the SYNRUN.SYN file
to open it in Notepad or another text editor.
3. Add the following lines to SYNRUN.SYN:
CPSIO3=C
SYNCOM3=98n1
4. If you are not running CounterPoint over Terminal Services, add the following line to
SYNRUN.SYN:
CPSIO4=W
5. Save the modified SYNRUN.SYN file, and then close your text editor.
P000F024 or
P000F031
P201F019 or
P201F039
P703F000 or
P703F001
DK (on Epson TM-T88)
Serial 3
Serial 4
USB (with USB to serial adapter)
6. Copy the CP1550Mode.bat and OPOSim.exe files from your top-level directory to the
Windows Startup directory for all users (i.e., C:\Documents and Settings\All Users\Start
Menu\Programs\Startup).
7. Select Start / Settings / Printers and Faxes, right-click the Epson TM-T88 - Serial printer, and
then click Properties.
8. Click the Ports tab, select an unused Serial Port (e.g., COM6), and then click OK.
NOTE: Alternatively, you can delet e the Epson TM-T88 - Serial printer, instea d of assigning
it to an unused port.
9. Start CounterPoint and log in to your company database.
10. Select File Utilities / Special / System / Update pre-defined data.
11. Select Yes from the Are you sure you want to do this ? prompt, and then press Enter to
load the pre-defined device codes for Radiant POS terminals.
12. When the pre-defined data is updated, press ESC to return to the main menu.
13. Select Setup / Point of Sale / Registers, specify a Register number for your POS terminal,
and then complete the remaining fields on the first Registers screen.
Page 8

Configuring Radiant POS terminals 8
14. On the next Registers screen, enter 1520 in the Device code field for the Printer 1 device,
select the Print method you want to use, and then enter COM3 in the corresponding
Device ID field.
15. Enter or look up one or more Form ID options to specify the forms you want to print
with your receipt printer.
16. On the next Registers screen, enter 1520 in the Device code field for the Display device,
and then enter COM4 in the corresponding Device ID field.
17. Press Enter at the Field number to change ? prompt to save your changes, and then
press ESC to close the Registers screen and return to the main menu.
18. Select Setup / Point of Sale / Drawers, specify a Drawer number and Register number for the
POS terminal’s cash drawer, and then enter a Description for the drawer.
19. Enter 1520 in the Drawer device code field, and then enter COM3 in the Drawer device ID
field.
20. Press Enter at the Field number to change ? prompt to save your changes, and then
press ESC to close the Drawers screen and return to the main menu.
Page 9

Configuring Radiant POS terminals 9
Configuring the P1515/P1520 Payment Guard MSR
If you are setting up a P1515 or a P1520 POS terminal with a Payment Guard MSR
(available as of July 1, 2010), follow these steps to configure the MSR:
1. Download the RadUSerialMSR1-0-0-1.zip file from the Support area of the CounterPoint
Web site (www.counterpointpos.com/support/softwa
archive to a temporary directory.
2. Browse to the directory to which you extracted the RadUSerialMSR1-0-0-1.zip archive
and double-click Setup.exe to install the Payment Guard MSR driver.
3. In the directory to which you extracted the RadUSerialMSR1-0-0-1.zip archive, doubleclick the MSRtracks_2only.reg file, and then click Yes on the Registry Editor dialog to
update the Windows registry with the track settings for the Payment Guard MSR.
4. Click OK to close the Registry Editor dialog.
5. In CounterPoint, select Setup > Point of Sale > Registers, specify the Register number for
your POS terminal, and then proceed to the third Registers screen.
6. Enter 1520 in the Device code field for the Card reader device and enter COM5 in the
corresponding Device ID field.
re_cpv7.htm) and extract the
Configuring the P1520 keyboard-transparent MSR
If you are setting up a P1520 POS terminal with a keyboard-transparent MSR (available
before July 1, 2010), follow these steps to configure the MSR:
1. Double-click OPOSim.exe in the Startup directory to start the OPOS Input Manager.
2. Right-click the OPOS Input Manager icon (
system tray and select Options to display the OPOS Input
Manager window.
3. Select RSMsr from the MSR list, and then select the Track
you want to read.
NOTE: If you are processing debit cards, select track 2.
4. Select the Auto-enable on start-up check box, and then click
the Enable button.
5. Close the OPOS Input Manager window.
6. In CounterPoint, select Setup > Point of Sale > Registers, specify the Register number for
your POS terminal, and then proceed to the third Registers screen.
7. Enter 1520 in the Device code field for the Card reader device.
NOTE: Do not specify a Device ID for the Card reader device.
Your POS terminal is ready to use! Start Ticket Entry or Touchscreen Ticket Entry and enter
some sample tickets to try out each device. If you encounter any problems with your
devices, test each device in Setup / Point of Sale / Device codes.
) in the Windows
 Loading...