

Page 1
Wo r k h o r s e
500 Series Rack & Mixer
True to the Music
™
Order No. R700 0100
Radial Engineering Ltd.
1588 Kebet Way, Port Coquitlam BC V3C 5M5
tel: 604-942-1001 • fax: 604-942-1010
www.radialeng.com
email: info@radialeng.com • web: www.radialeng.com
Specications and appearance are subject to change without notice.
Copyright © 2014 Radial Engineering Ltd.
User GUide
www.radialeng.com
Page 2

THIS PAGE INTENTIONALY LEFT BLANK
Page 3
True to the Music
Radial Workhorse
™
500 Series Rack and Mixer
Table of Contents .....................................................................................................Page
Front Panel Feature Set Overview ......................................................................................................................1
Rear Panel Feature Set Overview .......................................................................................................................2
Introduction To The Workhorse............................................................................................................................3
Feature Set Overview ..........................................................................................................................................4
Power Supply Capacity .......................................................................................................................................7
Installing The Workhorse .....................................................................................................................................7
Easy-Glide Card Slot Tray and Removal .............................................................................................................8
Workhorse Signal Flow and Levels .....................................................................................................................8
Using The Workhorse ..........................................................................................................................................9
Workhorse Applications .....................................................................................................................................13
Frequently Asked Questions..............................................................................................................................14
Specications and Block Diagram .....................................................................................................................15
Connector Pin-out..............................................................................................................................................16
Card Edge Connector Specications.................................................................................................................16
Radial Limited Warranty .....................................................................................................................Back Cover
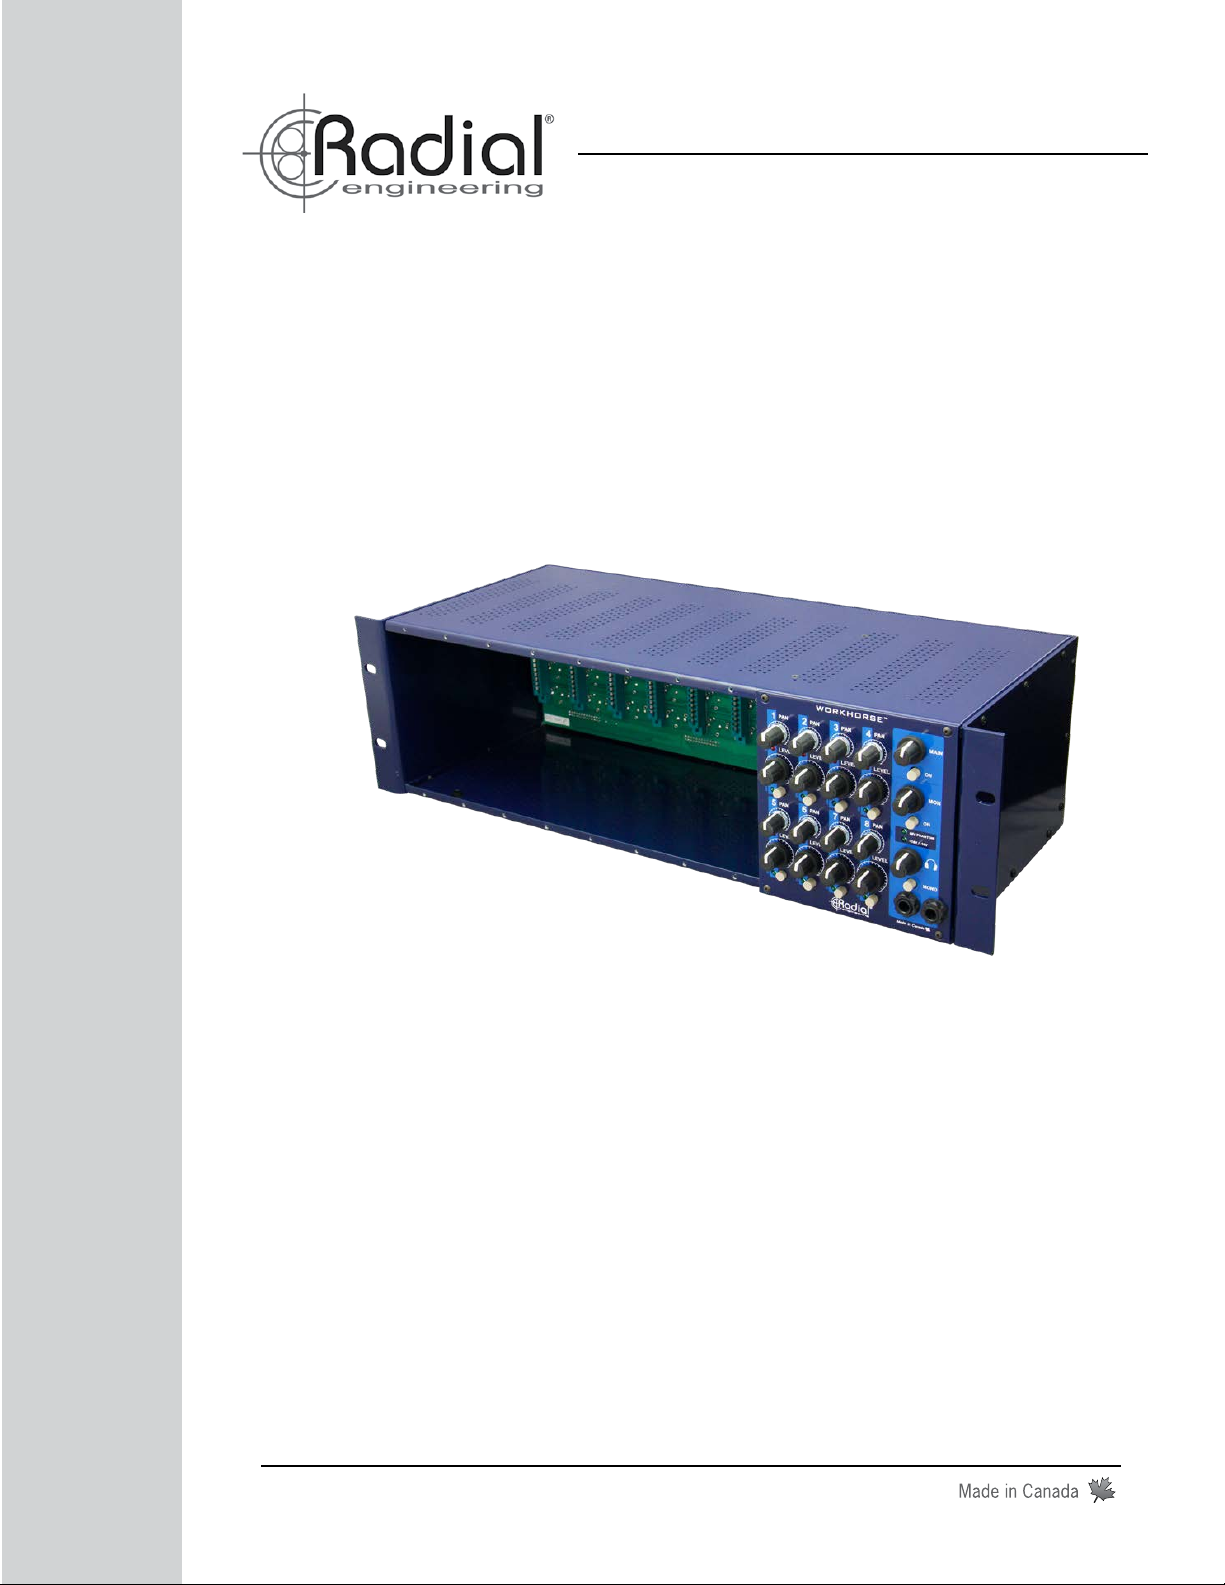
Congratulations and thank you for purchasing the Radial Workhorse, an innovative eight channel card frame
and mixer designed to take full advantage of 500 series modules. This manual covers installation and operation
of the Workhorse. We recommend that you take a few minutes to read through this manual in order to familiarize
yourself with the many innovative features incorporated into the Workhorse. Inside you will nd important safety
features along with tips on how to get the most out of your 500 modules while using the Radial Workhorse.
To make the manual as easy to understand as possible, we have divided it into several sections. It begins with
on overview, then descriptions of each function, ending with some real world applications. Should you have any
questions, comments or concerns not covered in these pages, we invite you to log onto the Radial web site at
www.radialeng.com and visit the Workhorse FAQ section. This is where we post the latest details and applications. If you do not nd what you need, feel free to send us an email at info@radialeng.com and we will do our
best to answer your question as quickly as possible. Get ready to Plug in, Turn on and Tune in your 500 modules
with the Radial Workhorse.
IMPORTANT SAFETY & USER NOTICE - FOR PROFESSIONAL USE ONLY
!
The Radial Workhorse is specically designed for use by qualied professional audio engineers. The
open frame design is not intended for use by consumers or those unfamiliar with this format. Even
though the current and voltage levels are relatively low, we recommend that all slots be lled with a
module or covers be placed over unlled slots. This will help protect you from electrical shock.
The Workhorse™ rack frame and mixer is designed to be used with 500 series or what are commonly
known as Lunchbox™ modules. The Workhorse has been designed following the framework as
outlined by the VPR Alliance as described on the API™ website. Although some manufacturers
build modules that are not VPR compliant, they may in fact work with the Workhorse. Please consult
those specic manufacturers for details regarding their compatibility. The Radial Workhorse Open
Source Document outlines the required technical specications for manufacturers that intend to
have their modules used in the Workhorse. Compatibility of any modules other than a module made
by Radial Engineering Ltd. is the sole responsibility of the user. Please read the Limited Radial
Warranty for details. There are no replacement or user serviceable parts inside.
Radial Engineering Ltd. Workhorse User Guide
Page 4
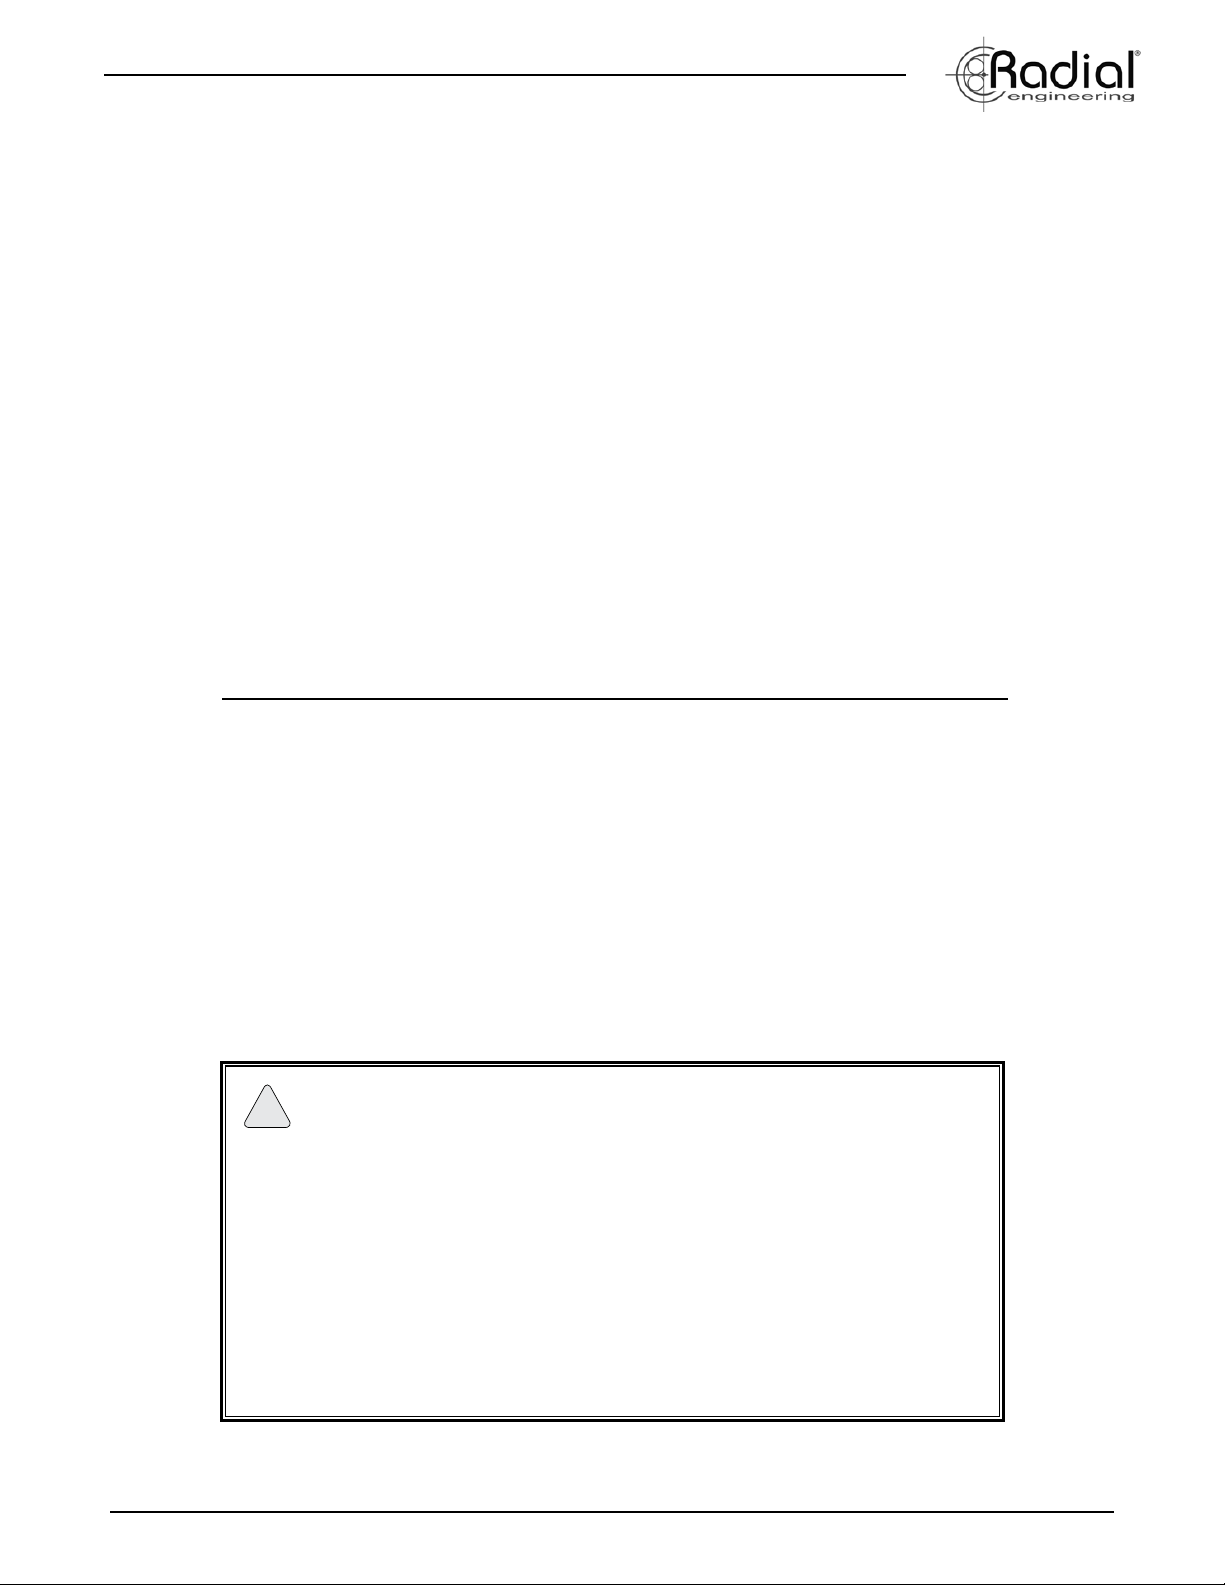
OUTPUT SECTION: Separate
stereo controls for main,
monitors and headphones
make it easy to adjust levels
or mute signals when needed.
LED INDICATORS: Provide
visual power status for the
+/- 16 volt module rails and
True to the Music
48V phantom power.
MIXER CHANNEL INPUTS:
Each Workhorse channel is
equipped with volume control,
left-right pan, LED overload
indicator and channel on-off
for muting.
MIXER SECTION: Ultra quiet
built-in mixer lets you tap
signals from each module and
mix them to the main, monitor
or headphones.
EIGHT CARD SLOTS: Up to
eight 500 series compatible
modules may be loaded into
the Workhorse and connected
via standard card edge
receptacle.
DUAL HEADPHONES: Super
high output dual headphone
amp with level control to
ensure you can mix in any
environment. Mono check
switch.
FRONT PANEL FEATURE SET
Radial Engineering Ltd.
STEEL CASE: The
Workhorse chassis is made
from heavy steel to provide
extra shielding against stray
magnetic elds and RF.
DEEP CURRENT POOL:
Modules can draw as much
current as they need from a
shared pool. Up to 1200mA
total current is available.
1
Workhorse User Guide
Page 5
True to the Music
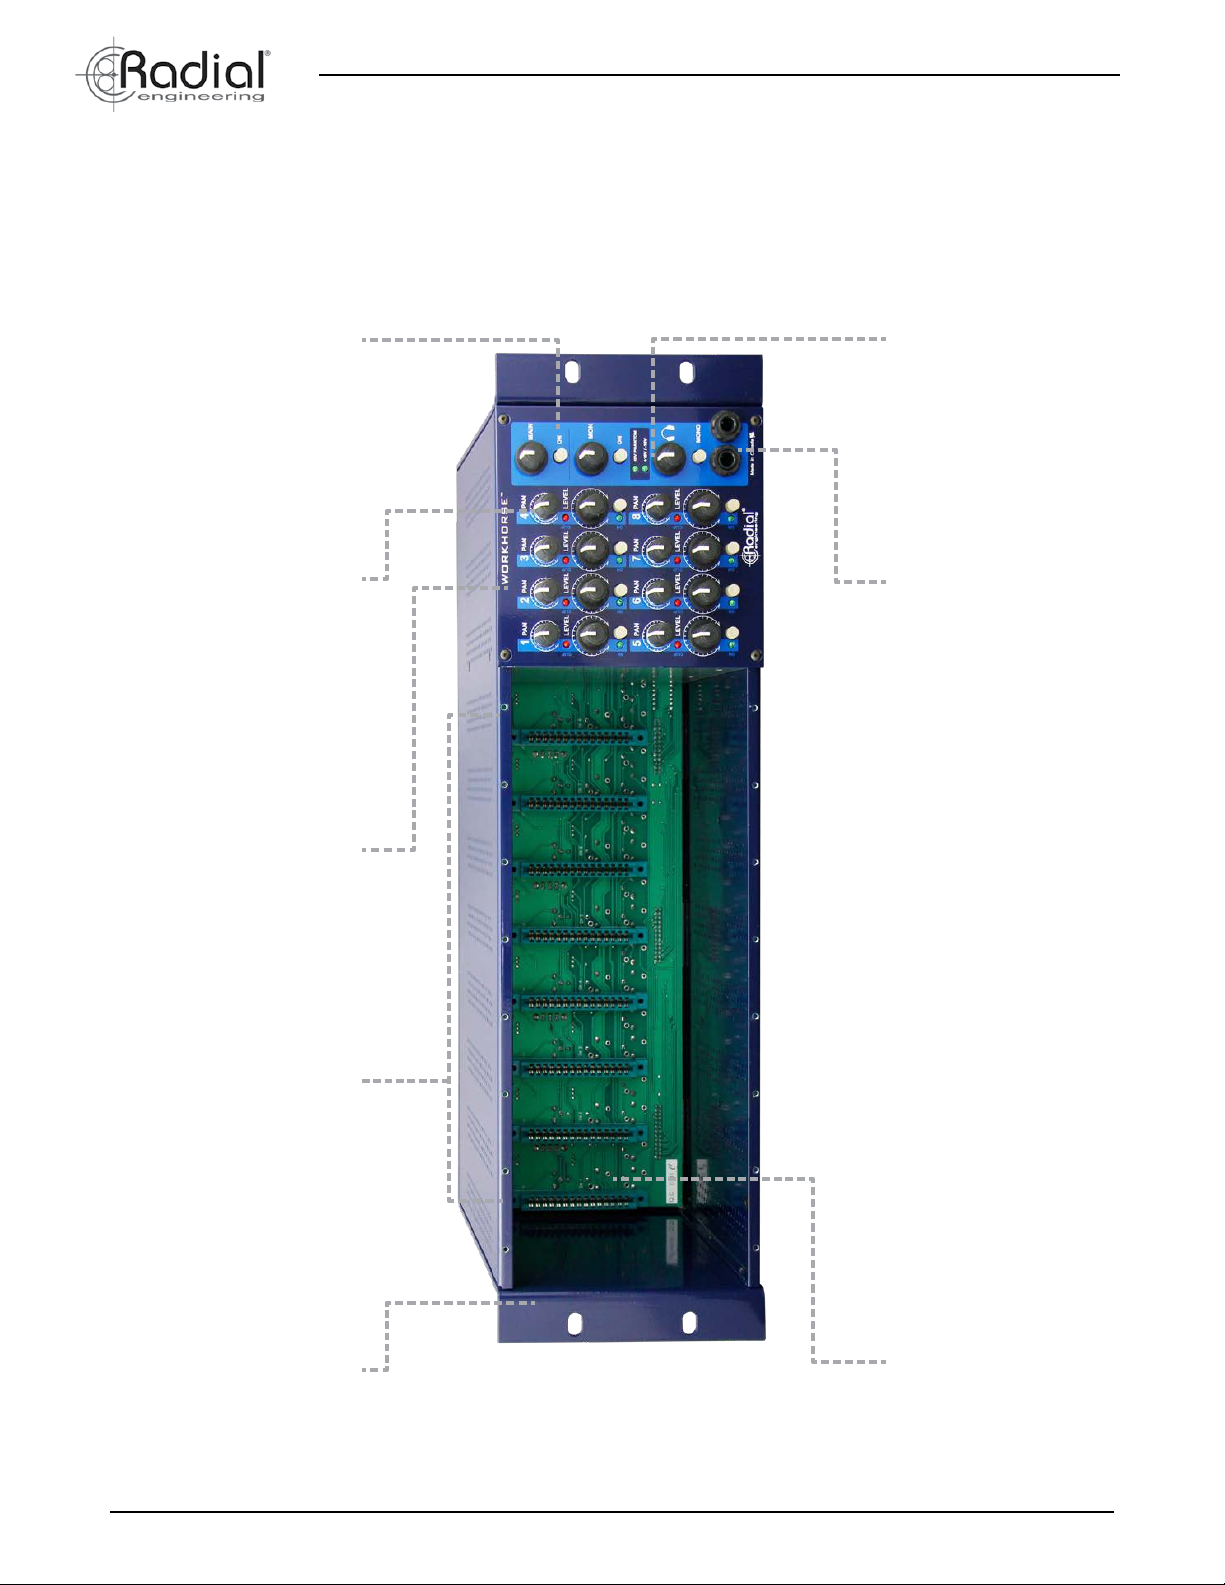
CARD SLOT CONNECTORS:
Follows original XLR I/O
format and adds parallel
¼” TRS jacks for easy
connectivity to workstations.
OMNIPORT™: 1/4”
TRS connector adds
functionality to enhance
each module’s capability
as set by the manufacturer.
BALANCED 25-PIN D-SUBS:
Eight channel D-Subs follow
ProTools standard for easy
connectivity to workstations.
Wired in parallel to XLR inputs
and outputs.
STEREO LINK: Makes it easy
to pair up modules equipped
with a stereo link function in
standard API master slave
conguration.
FEED FUNCTION: Lets you
connect one module into
the next to set up elaborate
channel strips without having
to hard patch with cables.
MAIN OUTPUTS: Jensen
transformer isolated to
eliminate noise and add
warmth. Equipped with TRS
insert jacks for effects.
SUMMING MIXER: Built-in
eight channel summing mixer
lets you mix ‘outside the box’
in the analog domain for
added warmth and character.
STUDIO GROUNDING:
External grounding lugs
makes it easy to set up star
grounding schemes for high-
end studio wiring.
EXTERNAL POWER: High
current external switching
supply delivers 1600mA to
the Workhorse plus separate
48V phantom feed for mic
preamps.
REAR PANEL FEATURE SET
Radial Engineering Ltd. Workhorse User Guide
MONITOR OUTPUTS: Used
to send signal to your neareld
monitors with choice of XLR
and ¼” TRS jacks. Features
independent level control.
2
EXPANSION BUS: Expand
the Workhorse to 16x2 or
larger by connecting one
Workhorse into another.
Simple ¼” connections
makes it easy.
Page 6
INTRODUCTION
True to the Music
The Workhorse is an eight channel card frame and mixer designed
for 500 series modules. Up to eight modules may be used at any
one time. Once ‘plugged in’, the Workhorse automatically routes
the module’s signal to the XLR, ¼” and D-sub connectors on the
rear panel via a 15-pin card-edge connector and receptacle. Radial
modules and those that have been designed by other manufacturers
OUTPUTS 1~8INPUTS 1~8
INPUT
OUTPUT
OMNIPORT
OUT
-10dB
CARD SLOT 1
CARD SLOT 2
IN
CARD SLOT 3
CARD SLOT 4
CARD SLOT 5
CARD SLOT 6
Mix Buss
Mixer Control Section
LEVEL PAN
LEVEL PAN
LEVEL PAN
LEVEL PAN
LEVEL PAN
LEVEL PAN
to take advantage of the Workhorse’s extra features will enjoy the
added convenience of having the signal sent to the internal mix bus
and the built-in 8x2 stereo summing mixer. For older generation
modules, the individual channel outputs can be routed to the
summing mixer using a D-sub cable affording them much the same
functionality as newer Radial designs.
LEFT IN RIGHT IN
EXPANSION
BUSS
Master Stereo Buss
MONITOR
LEVEL
CLIP
CLIP
CLIP
CLIP
CLIP
CLIP
1/4” TRS - TIP SEND / RING RETURN
INSERT
INSERT
MAIN
LEVEL
JENSEN
TRANSFORMERS
LEFT RIGHT
MON
LEFT RIGHT
OUT
MAIN
OUT
+4dB
+4dB
LEVEL PAN
CARD SLOT 7
LEVEL PAN
CARD SLOT 8
SUMMING MIXER INPUTS
SIGNAL FLOW
The signal ow chart above shows the basic signal routing that the
Workhorse provides. Flowing from left to right, the signal comes into
the Workhorse via the rear panel XLR female and ¼” TRS connector.
Once the signal goes into a module, it is then sent back out after it is
processed to the male XLR and ¼” TRS. This of course happens on
all eight channels. Simultaneously Radial modules send the signal
to the internal mix bus which feeds the mixer.
CLIP
CLIP
LEFT OUT RIGHT OUT
EXPANSION
BUSS
After the signal has been panned left or right it can go to the
expansion bus if feeding a second Workhorse. It is then fed into the
master output stage where it is once again buffered and sent to the
main, monitors and headphones. Note the main outputs are Jensen
transformer isolated. The next section in this manual discusses
each feature in detail following the signal ow.
HEADPHONE
MONO
Radial Engineering Ltd.
3
Workhorse User Guide
Page 7

True to the Music
CARD SLOT 1CARD SLOT 2
OUTPUT
INPUT
FEED
INPUT
INPUT
FEED
OFF
CARD SLOT 1CARD SLOT 3CARD SLOT 5CARD SLOT 7 CARD SLOT 2CARD SLOT 4CARD SLOT 6CARD SLOT 8
OFFOFF
ON
ON
MONO
2
3
41
Made in Canada
LEVEL
6
78
LEVEL
MAIN
MON
48V PHANTOM
+16V / -16V
LEVEL
CLIP
PAN
ON
LEVEL
CLIP
PAN
ON
LEVEL
CLIP
PAN
ON
LEVEL
LEVEL
CLIPON
LEVEL
CLIPON
LEVEL
CLIPON
INPUT
FEED
INPUT
INPUT
FEED
OFF
CARD SLOT 1CARD SLOT 3CARD SLOT 5CARD SLOT 7 CARD SLOT 2CARD SLOT 4CARD SLOT 6CARD SLOT 8
OFFOFF
ON
ON
MONO
2
3
41
Made in Canada
LEVEL
6
78
LEVEL
MAIN
MON
48V PHANTOM
+16V / -16V
LEVEL
CLIP
PAN
ON
LEVEL
CLIP
PAN
ON
LEVEL
CLIP
PAN
ON
LEVEL
LEVEL
CLIPON
LEVEL
CLIPON
LEVEL
CLIPON
8I
ON
ON
MONO
2
3
41
LEVEL
CLIP
PAN
Made in Canada
LEVEL
ON
6
78
5
LEVEL
MAIN
MON
48V PHANTOM
+16V / -16V
LEVEL
CLIP
PAN
ON
LEVEL
CLIP
PAN
ON
LEVEL
CLIP
PAN
PANPANPANPAN
ON
LEVEL
CLIP
LEVELONLEVEL
CLIPON
LEVEL
CLIPON
LEVEL
CLIPON
INPUT
FEED
INPUT
INPUT
FEED
OFF
CARD SLOT 1CARD SLOT 3CARD SLOT 5CARD SLOT 7 CARD SLOT 2CARD SLOT 4CARD SLOT 6CARD SLOT 8
OFFOFF
ON
ON
MONO
2
3
41
Made in Canada
LEVEL
6
78
LEVEL
MAIN
MON
48V PHANTOM
+16V / -16V
LEVEL
CLIP
PAN
ON
LEVEL
CLIP
PAN
ON
LEVEL
CLIP
PAN
ON
LEVEL
LEVEL
CLIPON
LEVEL
CLIPON
LEVEL
CLIPON
INPUT
FEED
INPUT
INPUT
FEED
OFF
CARD SLOT 1CARD SLOT 3CARD SLOT 5CARD SLOT 7 CARD SLOT 2CARD SLOT 4CARD SLOT 6CARD SLOT 8
OFFOFF
ON
ON
MONO
2
3
41
Made in Canada
LEVEL
6
78
LEVEL
MAIN
MON
48V PHANTOM
+16V / -16V
LEVEL
CLIP
PAN
ON
LEVEL
CLIP
PAN
ON
LEVEL
CLIP
PAN
ON
LEVEL
LEVEL
CLIPON
LEVEL
CLIPON
LEVEL
CLIPON
FEATURE SET
Card Slot I/O Connections
Each of the Workhorse card slots is equipped with XLR, ¼” TRS and
D-sub inputs and outputs. The input sensitivity will be dependant
on the type of module being used. For instance if you are using a
microphone preamplier, the input will of course be suited for a low
level microphone. If you are using a dynamic processor like a limiter
or an EQ, then the input will usually be set to handle a professional
+4dB balanced signal.
Feed Switch
As you delve further into the functionality of the 500 series, you will
nd that the modular format allows all kinds of connectivity options.
With older 500 series racks, connections between modules were
done using an XLR cable whereby the output from one module
would plug into the input of another. The Workhorse simplies
the process by introducing a Feed switch on the rear panel. This
connects the balanced output of one module to the balanced input of
the adjacent module to the immediate right. The Feed switch allows
you to daisy chain a series of adjacent modules making it easy to
create ‘customized’ channel strips whereby a mic preamp could feed
FEED
INPUT
FEED
INPUT
an EQ which in turn could feed a compressor. Changing the order is
simply a matter of relocating the modules or patching using an XLR
cable. The UP position turns the Feed connection on.
OFF
OUTPUT OUTPUT
OMNIPORT
INPUT
OUTPUT
Because the Workhorse is equipped with an internal mix bus,
most Radial modules are equipped with an internal buffer so that
OFF
LINK
OFF
12
OUTPUT
OMNIPORT
INPUT
FEED FEED INPUT
INPUT
FEED
OUTPUT OUTPUT OUTPUT
LINK
OFF
INPUT
OUTPUT
FEED
OFFOFF
OUTPUT
INPUT
OMNIPORTOMNIPORT
INPUT
CARD SLOT 1CARD SLOT 3 CARD SLOT 2
FEED
OFF
LINK
OFF
123
OUTPUT
the output can be sent along the bus to the mixer section. As such,
the XLR male and TRS outputs will usually follow suit with a +4dB
balanced line level signal that is able to feed a professional recording
system or line level mixing console. This may sound a bit complex,
but as we look into applications later in this document, it will become
very clear.
Put simply, the input level is determined by the type of module being
used while the output level will typically be a balanced +4dB line level
signal. If you use ¼” mono cables you will unbalance the signal. This
will reduce the level by about -6dB but everything will still remain
completely functional. Simply adjust the levels to compensate.
Omniport
Omniport™ is a special ¼” TRS jack located on the rear panel that
has been left ‘open’ to allow the module to perform a unique task.
In other words, depending on the type of module, the manufacturer
can assign the Omniport to perform a function that may be most
appropriate. This could be a key input on a gate, a footswitch on a
guitar effect or maybe an instrument input on a mic preamp.
The card-edge pins 7 and 9 (unused in the original spec) have
been assigned to the Omniport™ TRS connector. The application
here is only limited to one’s imagination as to the function that best
relates to a given module. As the Omniport function is determined
by the module, you will need to consult the module manufacturer’s
specication for details on how it was designed to be used.
Stereo Link Switch
Every second card slot is equipped with a Link switch. The Link
function allows modules that are ‘stereo ready’ to be linked together.
A typical example would be using two limiters on a stereo track where
you want the dynamics to be the same for both channels. Pin-6 on
the card edge connector is designated for this function and used to
send control voltage from one module to the other. One module will
take on the master role while the second will act as the slave. This is
a ‘standard’ function on all API Lunchbox™ generations.
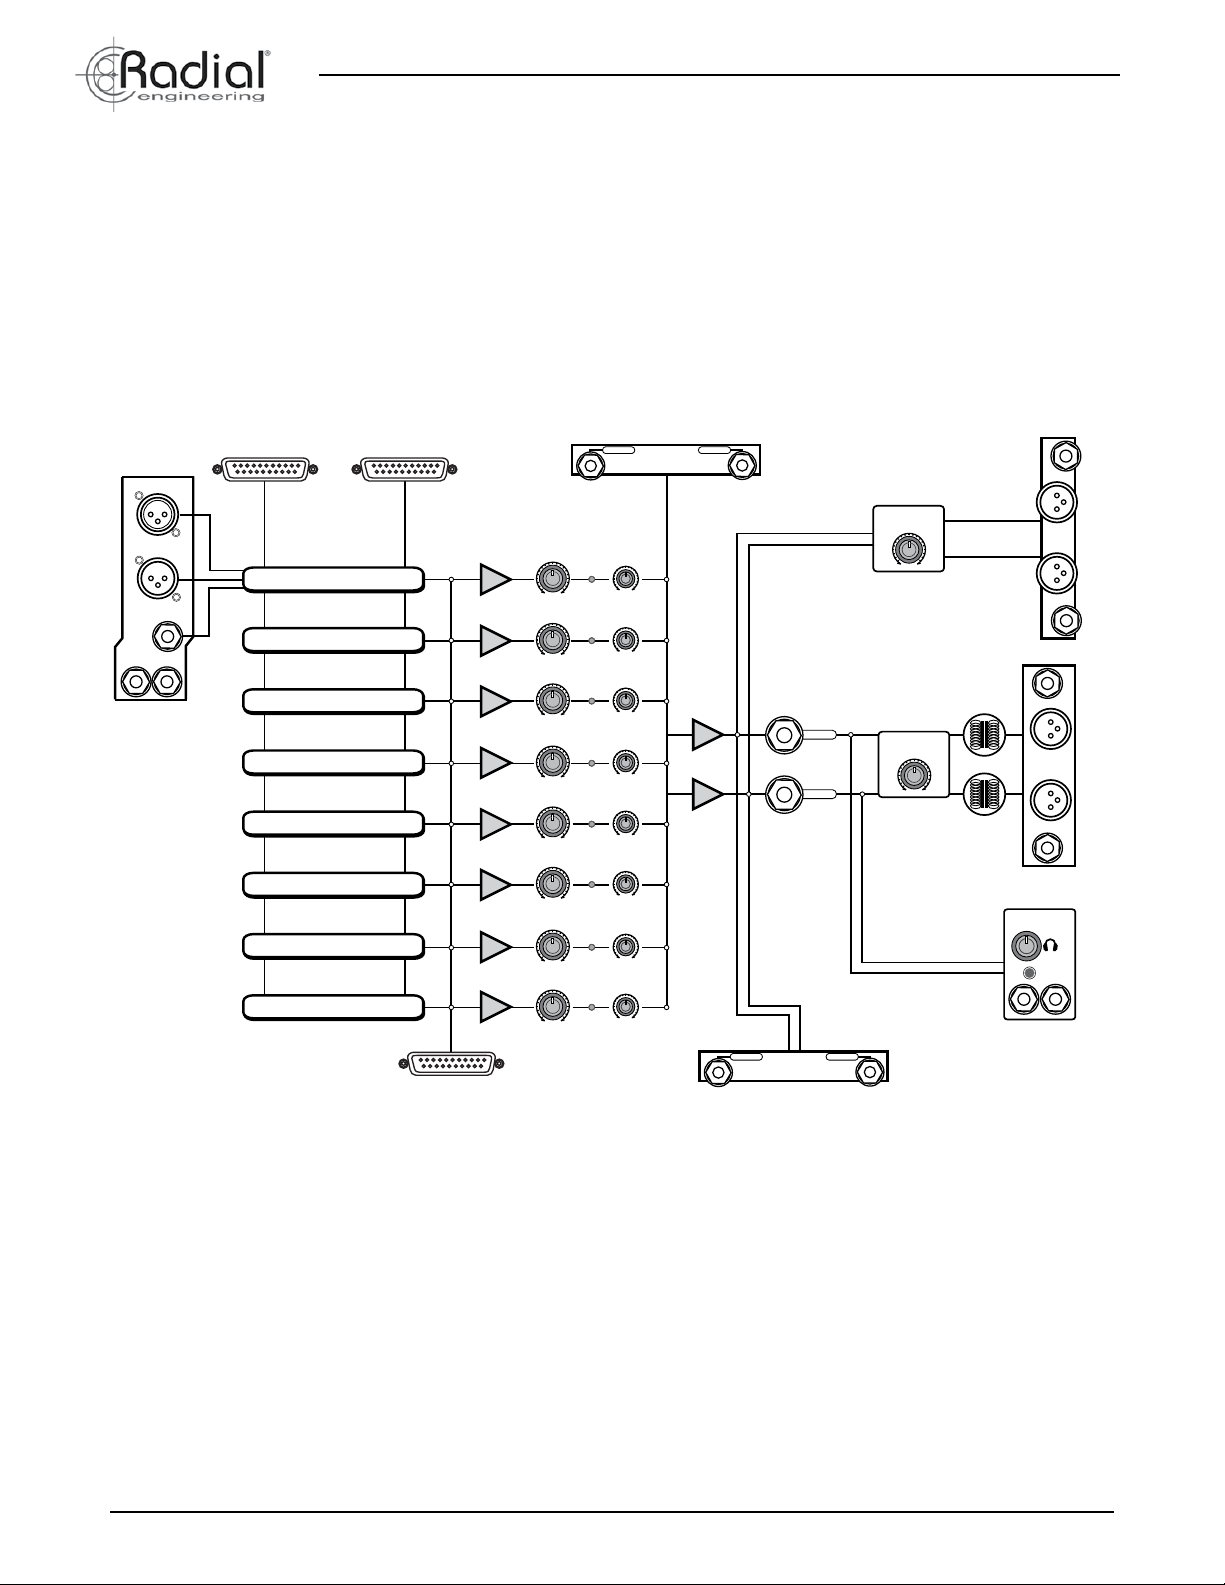
D-Sub I/O Connectors
To add exibility, all eight balanced card-slot input and output
connections are duplicated on two 25-pin D-Subs wired to the
Tascam™/ProTools™ pin-out standard. These parallel connections
are designed to make it easy to integrate the Workhorse with
recording systems that employ this industry standard.
WORKHORSE RACK & MIXER
LEFT
MAIN
OUT
INSERTINSERT
1/4” TRS - TIP SEND / RING RETURN
LEFTRIGHT
MON
OUT
LEFT RIGHT
EXPANSION
OUT
IN
SPLIT VOLTAGE POWER SUPPLY
OUT
BUSS
IN
POWER SUPPLY
COM
+18VDC
+48VDC
COM
+18VDC
CHASSISCIRCUIT
GROUND
RIGHT
INPUT
INPUT
FEED
OUTPUT
OUTPUT OUTPUT OUTPUTOUTPUTOUTPUTOUTPUT OUTPUT
LINK
OFF
78
INPUT
INPUT
OUTPUT
OUTPUT
SUMMING MIXER INPUTS 1 ~ 8
Radial Engineering Ltd.
FEED
OFFOFF
OUTPUT
Made in Canada
INPUT
INPUT
DIRECT OUT 1 ~
INPUT
FEED
FEED
OFFOFF
LINK
OFF
INPUT
OUTPUT
OUTPUT
PIN DIAGRAM - PANEL VIEW
13
G
-
2
-
1
G
+
INPUT
FEED
LINK
OFF
INPUT
OUTPUT
Radial Omniport Assignment:
Module Omniport function
PowerPre Instrument input
JDV Line level output (low Z out for live touring)
X-Amp Instrument input
Phazer Balanced direct out (original dry signal out)
JDX Direct box output (low Z out for live touring)
EXTC TRS insert for patch bay
Komit Compressor key input
Radial Engineering Ltd. Workhorse User Guide
INPUTS
OUTPUTS
PROTOOLS INTERFACE
4
+
+
G
-
4
-
3
G
+
INPUT
OMNIPORT
INPUT
INPUT
INPUT
-
6
8
5
7
G
+
CARD SLOT 1CARD SLOT 3CARD SLOT 5CARD SLOT 7 CARD SLOT 2CARD SLOT 4CARD SLOT 6CARD SLOT 8
INPUT
INPUT
FEED
FEED
OFF
OFFOFF
LINK
OFF
OMNIPORT
OMNIPORTOMNIPORTOMNIPORTOMNIPORTOMNIPORTOMNIPORTOMNIPORT
123456
INPUT
INPUT
OUTPUT
OUTPUT
NPUTS 1 ~ 8
Page 8

True to the Music
NP
WORKHORSE RACK & MIXER
!
The D-sub pin conguration is printed on the back panel so you can
ensure the cable that is being used is properly wired. The good news
is that today, most music shops carry these types of cables and they
are usually wired correctly.
13
Pin #
1 Channel 8 Hot
2 Channel 8 Ground
3 Channel 7 Cold
4 Channel 6 Hot
5 Channel 6 Ground
6 Channel 5 Cold
7 Channel 4 Hot
8 Channel 4 Ground
9 Channel 3 Cold
10 Channel 2 Hot
11 Channel 2 Ground
12 Channel 1 Cold
13 Not Used
+
G
-
1
G
25
-
2
-
3
G
+
+
+
G
4
-
+
G
-
6
-
5
G
+
Pin #
14 Channel 8 Cold
15 Channel 7 Hot
16 Channel 7 Ground
17 Channel 6 Cold
18 Channel 5 Hot
19 Channel 5 Ground
20 Channel 4 Cold
21 Channel 3 Hot
22 Channel 3 Ground
23 Channel 2 Cold
24 Channel 1 Hot
25 Channel 1 Ground
1
+
G
-
8
-
7
G
+
14
Mixer Section
The mixer section in the Workhorse features an eight channel
summing mixer with stereo outputs. It derives its signal via pin11 from the slot card-edge connector or from the D-sub summing
mixer input connector. Each channel features an ON-OFF switch
that enables you to select or mute the signal from the designated
card slot. Individual channel gain controls are used to adjust the mix
level while the pan control lets you position the signal across the
stereo spectrum. To assign a channel to a left or right output, one
simply hard-pans the module using the pan control. A channel-on
LED lets you know when a channel is activated plus an overload
peak indicator lets you monitor signal levels to ensure you are not
overloading the summing mixer’s input.
Mixer Master Section and Outputs
The mixer’s master section features three stereo outputs: main,
monitor and headphones, each with individual level control. The
main stereo output is equipped with TRS insert jacks for connecting
effects or equalizers and Jensen transformers that isolate the
output to reduce the hum and buzz caused by ground loops. This
is particularly useful in live recording environments where control
over the electrical system is often compromised. These also play an
important role by introducing the warm ‘Jensen sound’ at the mixers
main output. Jensen transformers are legendary in their ability to
withstand huge transients without distortion while delivering a
smooth articulated sound.
The monitor output provides a second stereo pair that can be used
in the studio for monitoring, as a direct output for recording or to
feed a PA system in a live environment. Both the main and monitor
outputs are equipped with individual on-off switches and outtted
with balanced XLR-male and ¼” TRS connectors. Although both the
main and monitor outputs are balanced +4dB line level, you can use
an unbalanced ¼” cable if need be. This will of course unbalance the
signal and reduce the output by about -6dB.
Headphone Amplier
The Workhorse is equipped with a high-output stereo headphone
amplier with two standard ¼” TRS headphone connections. This
enables the engineer to share the mix and discuss the situation with
the producer while both are listening. To use, simply plug in a pair of
headphones with a ¼” TRS jack and adjust the level to suit.
The headphone bus is equipped with a switch that sums the stereo
image to mono. This switch only affects the headphone out and
is intended to provide the engineer with a quick reference to hear
how the mix correlates when sent as a mono broadcast. This handy
feature also helps identify stereo pairs that may be out of phase.
When set to mono, instead of summing together and getting louder,
they will get quieter and sound thin.
PAN
2
LEVEL
CLIP
CLIP
ON
ON
PA
5
6
LEVEL
CLIP
CLIPON
LEFT
LEFT RIGHT
PAN
PAN
3
LEVEL
LEVEL
CLIP
ON
78
LEVEL
LEVEL
CLIPON
MAIN
OUT
1/4” TRS - TIP SEND / RING RETURN
MON
OUT
CLIP
ON
CLIPON
It is important to note that the Workhorse is intended for professional
PAN
41
MAIN
use in high Sound Pressure Level (SPL) environments and the
headphone amplier is capable of producing very high audio volume
levels with most headphones. In fact, the maximum sound level
LEVEL
LEVEL
ANPANPAN
ON
ON
48V PHANTOM
+16V / -16V
MON
is much louder than what battery operated portable music players
can produce. Care and attention must be paid to ensure you do
not damage your hearing by setting the signal too loud. Always test
signals at a low volume before increasing the listening level.
Headphone Safety Warning
Caution: Very Loud Amplier
LEVEL
LEVELONLEVEL
MONO
As with all products capable of producing high Sound Pressure
Levels (SPL) users must be very careful to avoid the hearing
damage that may occur from prolonged exposure. This is
particularly important as it applies to headphones. Prolonged
Made in Canada
listening at high SPLs will eventually cause tinnitus and can lead
to partial or complete loss of hearing. Please be aware of the
recommended exposure limits within your legal jurisdiction and
RIGHT
follow them very closely. The user agrees that Radial Engineering
Ltd. remains harmless from any health effects resulting from the
use of this product and the user clearly understands that he or
she is entirely responsible for the safe and proper use of this
product. Please consult the Radial Limited Warranty for further
INSERTINSERT
details.
Radial Engineering Ltd.
5
Workhorse User Guide
Page 9

True to the Music
LEFT
WORKHORSE RACK & MIXER
RIGHT
LEFT RIGHT
EXPANSION
BUSS
1/4” TRS - TIP SEND / RING RETURN
INSERTINSERT
MAIN
OUT
MON
OUT
IN
OUT
LEFT RIGHT
IN
OUT
LEFT
WORKHORSE RACK & MIXER
RIGHT
LEFT RIGHT
EXPANSION
BUSS
1/4” TRS - TIP SEND / RING RETURN
INSERTINSERT
MAIN
OUT
MON
OUT
IN
OUT
LEFT RIGHT
IN
OUT
ON
ON
MONO
2341
LEVEL
CLIP
PAN
Made in Canada
LEVEL
ON
6
78
5
LEVEL
MAIN
MON
48V PHANTOM
+16V / -16V
LEVEL
CLIP
PAN
ON
LEVEL
CLIP
PAN
ON
LEVEL
CLIP
PAN
PANPANPANPAN
ON
LEVEL
CLIP
LEVELONLEVEL
CLIPON
LEVEL
CLIPON
LEVEL
CLIPON
ON
ON
MONO
2341
LEVEL
CLIP
PAN
Made in Canada
LEVEL
ON
6
78
5
LEVEL
MAIN
MON
48V PHANTOM
+16V / -16V
LEVEL
CLIP
PAN
ON
LEVEL
CLIP
PAN
ON
LEVEL
CLIP
PAN
PANPANPANPAN
ON
LEVEL
CLIP
LEVELONLEVEL
CLIPON
LEVEL
CLIPON
LEVEL
CLIPON
ON
ON
MONO
2341
LEVEL
CLIP
PAN
Made in Canada
LEVEL
ON
6
78
5
LEVEL
MAIN
MON
48V PHANTOM
+16V / -16V
LEVEL
CLIP
PAN
ON
LEVEL
CLIP
PAN
ON
LEVEL
CLIP
PAN
PANPANPANPAN
ON
LEVEL
CLIP
LEVELONLEVEL
CLIPON
LEVEL
CLIPON
LEVEL
CLIPON
8I
ON
ON
MONO
2
3
41
LEVEL
CLIP
PAN
Made in Canada
LEVEL
ON
6
78
5
LEVEL
MAIN
MON
48V PHANTOM
+16V / -16V
LEVEL
CLIP
PAN
ON
LEVEL
CLIP
PAN
ON
LEVEL
CLIP
PAN
PANPANPANPAN
ON
LEVEL
CLIP
LEVELONLEVEL
CLIPON
LEVEL
CLIPON
LEVEL
CLIPON
INPUT
FEED
INPUT
INPUT
FEED
OFF
CARD SLOT 1CARD SLOT 3CARD SLOT 5CARD SLOT 7 CARD SLOT 2CARD SLOT 4CARD SLOT 6CARD SLOT 8
OFFOFF
ON
ON
MONO
2
3
41
Made in Canada
LEVEL
6
78
LEVEL
MAIN
MON
48V PHANTOM
+16V / -16V
LEVEL
CLIP
PAN
ON
LEVEL
CLIP
PAN
ON
LEVEL
CLIP
PAN
ON
LEVEL
LEVEL
CLIPON
LEVEL
CLIPON
LEVEL
CLIPON
INPUT
FEED
INPUT
INPUT
FEED
OFF
CARD SLOT 1CARD SLOT 3CARD SLOT 5CARD SLOT 7 CARD SLOT 2CARD SLOT 4CARD SLOT 6CARD SLOT 8
OFFOFF
ON
ON
MONO
2
3
41
Made in Canada
LEVEL
6
78
LEVEL
MAIN
MON
48V PHANTOM
+16V / -16V
LEVEL
CLIP
PAN
ON
LEVEL
CLIP
PAN
ON
LEVEL
CLIP
PAN
ON
LEVEL
LEVEL
CLIPON
LEVEL
CLIPON
LEVEL
CLIPON
INPUT
FEED
INPUT
INPUT
FEED
OFF
CARD SLOT 1CARD SLOT 3CARD SLOT 5CARD SLOT 7 CARD SLOT 2CARD SLOT 4CARD SLOT 6CARD SLOT 8
OFFOFF
ON
ON
MONO
2
3
41
Made in Canada
LEVEL
6
78
LEVEL
MAIN
MON
48V PHANTOM
+16V / -16V
LEVEL
CLIP
PAN
ON
LEVEL
CLIP
PAN
ON
LEVEL
CLIP
PAN
ON
LEVEL
LEVEL
CLIPON
LEVEL
CLIPON
LEVEL
CLIPON
INPUT
FEED
INPUT
INPUT
FEED
OFF
CARD SLOT 1CARD SLOT 3CARD SLOT 5CARD SLOT 7 CARD SLOT 2CARD SLOT 4CARD SLOT 6CARD SLOT 8
OFFOFF
ON
ON
MONO
2
3
41
Made in Canada
LEVEL
6
78
LEVEL
MAIN
MON
48V PHANTOM
+16V / -16V
LEVEL
CLIP
PAN
ON
LEVEL
CLIP
PAN
ON
LEVEL
CLIP
PAN
ON
LEVEL
LEVEL
CLIPON
LEVEL
CLIPON
LEVEL
CLIPON
INPUT
FEED
INPUT
INPUT
FEED
OFF
CARD SLOT 1CARD SLOT 3CARD SLOT 5CARD SLOT 7 CARD SLOT 2CARD SLOT 4CARD SLOT 6CARD SLOT 8
OFFOFF
ON
ON
MONO
2
3
41
Made in Canada
LEVEL
6
78
LEVEL
MAIN
MON
48V PHANTOM
+16V / -16V
LEVEL
CLIP
PAN
ON
LEVEL
CLIP
PAN
ON
LEVEL
CLIP
PAN
ON
LEVEL
LEVEL
CLIPON
LEVEL
CLIPON
LEVEL
CLIPON
INPUT
FEED
INPUT
INPUT
FEED
OFF
CARD SLOT 1CARD SLOT 3CARD SLOT 5CARD SLOT 7 CARD SLOT 2CARD SLOT 4CARD SLOT 6CARD SLOT 8
OFFOFF
ON
ON
MONO
2
3
41
Made in Canada
LEVEL
6
78
LEVEL
MAIN
MON
48V PHANTOM
+16V / -16V
LEVEL
CLIP
PAN
ON
LEVEL
CLIP
PAN
ON
LEVEL
CLIP
PAN
ON
LEVEL
LEVEL
CLIPON
LEVEL
CLIPON
LEVEL
CLIPON
INPUT
FEED
INPUT
INPUT
FEED
OFF
CARD SLOT 1CARD SLOT 3CARD SLOT 5CARD SLOT 7 CARD SLOT 2CARD SLOT 4CARD SLOT 6CARD SLOT 8
OFFOFF
ON
ON
MONO
2
3
41
Made in Canada
LEVEL
6
78
LEVEL
MAIN
MON
48V PHANTOM
+16V / -16V
LEVEL
CLIP
PAN
ON
LEVEL
CLIP
PAN
ON
LEVEL
CLIP
PAN
ON
LEVEL
LEVEL
CLIPON
LEVEL
CLIPON
LEVEL
CLIPON
INPUT
FEED
INPUT
INPUT
FEED
OFF
CARD SLOT 1CARD SLOT 3CARD SLOT 5CARD SLOT 7 CARD SLOT 2CARD SLOT 4CARD SLOT 6CARD SLOT 8
OFFOFF
ON
ON
MONO
2
3
41
Made in Canada
LEVEL
6
78
LEVEL
MAIN
MON
48V PHANTOM
+16V / -16V
LEVEL
CLIP
PAN
ON
LEVEL
CLIP
PAN
ON
LEVEL
CLIP
PAN
ON
LEVEL
LEVEL
CLIPON
LEVEL
CLIPON
LEVEL
CLIPON
8I
ON
ON
MONO
2
3
41
LEVEL
CLIP
PAN
Made in Canada
LEVEL
ON
6
78
5
LEVEL
MAIN
MON
48V PHANTOM
+16V / -16V
LEVEL
CLIP
PAN
ON
LEVEL
CLIP
PAN
ON
LEVEL
CLIP
PAN
PANPANPANPAN
ON
LEVEL
CLIP
LEVELONLEVEL
CLIPON
LEVEL
CLIPON
LEVEL
CLIPON
Expansion Bus
The Workhorse stereo expansion bus is designed to allow multiple
Workhorses to be used together to create larger mixing systems. This
also lets you create ‘sub-zones’ and ‘group’ mixes. Standard unbalanced
¼” cables are used to connect between units with choice of input or output
depending on which Workhorse will be set as the ‘master’ and which will
be designated as the ‘slave’. All you do to link one to the other is connect
two cables (left and right). The output from the ‘slave’ will now feed the
input on the ‘master’ essentially combining the two to create a 16x2 mixer.
Workhorse 1
Slave
Workhorse 2
Master
You can take things a step or two further by adding more Workhorses with
the each subsequent unit delivering more and more channels. This could
for instance be used in a live scenario where channels 1~8 from the rst
Workhorse are vocals with the output being treated like a sub-group sent
to a wedge monitor system while the full mix from the master (1~16 or
1~24 channels) is sent to the PA and recording system.
D-Sub Summing Mixer Input
One of the cool extras built into the Workhorse is the ability to use it as
a stand-alone eight channel analog summing mixer. This feature also
enables older 500 series modules to be hard wired into the
Workhorse
mix bus. A dedicated unbalanced 25-pin D-Sub input on the rear
panel provides access to the eight mixer inputs and accepts both
+4dB and -10dB line level sources.
For instance, if you prefer the sound of analog summing and want to
mix eight channels from your ProTools™ rig, you simply connect the
output of your recording interface to the Workhorse summing mixer
D-Sub input and you can now mix using the eight front panel level
and pan controls.
WORKHORSE RACK & MIXER
LEFT
MAIN
OUT
INSERTINSERT
1/4” TRS - TIP SEND / RING RETURN
LEFTRIGHT
MON
OUT
LEFT RIGHT
EXPANSION
OUT
IN
SPLIT VOLTAGE POWER SUPPLY
OUT
BUSS
IN
POWER SUPPLY
COM
+18VDC
+48VDC
COM
+18VDC
CHASSISCIRCUIT
GROUND
RIGHT
FEED
OFFOFF
OUTPUT
Made in Canada
INPUT
INPUT
FEED
FEED
OFFOFF
LINK
OFF
INPUT
INPUT
OUTPUT
OUTPUT
DIRECT OUT 1 ~
INPUT
INPUT
FEED
OUTPUT
OUTPUT OUTPUT OUTPUTOUTPUTOUTPUTOUTPUT OUTPUT
LINK
OFF
78
INPUT
INPUT
OUTPUT
OUTPUT
SUMMING MIXER INPUTS 1 ~ 8
Radial Engineering Ltd.
OUTPUTS
INPUT
INPUT
INPUT
FEED
LINK
OFF
INPUT
OUTPUT
PIN DIAGRAM - PANEL VIEW
13
+
+
G
G
-
-
-
4
2
-
-
5
3
1
G
G
G
+
+
+
6
7
CARD SLOT 1CARD SLOT 3CARD SLOT 5CARD SLOT 7 CARD SLOT 2CARD SLOT 4CARD SLOT 6CARD SLOT 8
INPUT
INPUT
FEED
FEED
OFF
OFFOFF
LINK
OFF
OMNIPORT
OMNIPORTOMNIPORTOMNIPORTOMNIPORTOMNIPORTOMNIPORTOMNIPORT
123456
INPUT
INPUT
OUTPUT
OUTPUT
8
NPUTS 1 ~ 8
PROTOOLS INTERFACE
Expansion Bus Expansion Bus
RL RL RL
Slave 1 - Channels 1 - 8 Slave 2 - Channels 1 - 16 Master - Channels 1 - 24
Keep in mind that the Workhorse’s modular exibility also enables you to
use the individual XLR or ¼” outputs from each module card slot to feed a
recorder should this be desired. Once you get to know the Workhorse the
creative options are almost endless!
Radial Tech Note: Expansion Bus
The Radial ‘open source’ approach also enables the expansion bus
to be interfaced with other manufacturer’s electronic equipment
that is equipped with similar functionality such as products made
by Rupert Neve Designs™. The expansion bus is essentially the
inverting (virtual earth) input of an op-amp in the mixer section of the
rack with a 4.75K Ohm resistor in series for unity gain connectivity.
This can be used by an external device so long as it can operate into
a 4.75K Ohm load. There is no DC blocking. This means that if there
is any DC on the output of the external device, the clipping response
of this stage will be non-symmetrical and headroom will be reduced.
Radial Engineering Ltd. Workhorse User Guide
Using The Summing Mixer Input To Mix Older Modules
If you have a bunch of older API™ preamps and want to mix their
outputs using the built-in mixer, simply connect the individual
card-slot outputs to the summing mixer input using a D-Sub cable
and you are all set. The modules output signal will appear at the
corresponding mixer channel.
WORKHORSE RACK & MIXER
LEFT
MAIN
OUT
INSERTINSERT
1/4” TRS - TIP SEND / RING RETURN
LEFTRIGHT
MON
OUT
LEFT RIGHT
EXPANSION
OUT
IN
SPLIT VOLTAGE POWER SUPPLY
OUT
BUSS
IN
POWER SUPPLY
COM
+18VDC
+48VDC
COM
+18VDC
CHASSISCIRCUIT
GROUND
RIGHT
FEED
OFFOFF
OUTPUT
Made in Canada
INPUT
INPUT
FEED
LINK
OFF
INPUT
INPUT
OUTPUT
DIRECT OUT 1 ~
INPUT
INPUT
FEED
OUTPUT
OUTPUT OUTPUT OUTPUTOUTPUTOUTPUTOUTPUT OUTPUT
LINK
OFF
78
INPUT
INPUT
OUTPUT
OUTPUT
SUMMING MIXER INPUTS 1 ~ 8
Radial Engineering Ltd.
INPUT
INPUT
FEED
LINK
OFF
INPUT
OUTPUT
PIN DIAGRAM - PANEL VIEW
13
+
+
G
G
-
-
-
4
2
-
-
5
3
1
G
G
G
+
+
+
FEED
OFFOFF
OMNIPORTOMNIPORTOMNIPORTOMNIPORTOMNIPORTOMNIPORTOMNIPORT
OUTPUT
6
8
7
FEED
OFFOFF
INPUT
OUTPUT
Grounding Posts
The connection between chassis and circuit (analog) ground is made
between the binding posts on the rear panel (factory set). Opening
this connection will separate these grounds in the Workhorse itself
so the only connection point between them is in the power supply.
Further separation is not allowed by electrical safety authorities. It
will only be in rare and unusual circumstances these grounds will
need to be separated.
CHASSIS CIRCUIT
GROUND
Tie Bar
Factory Installed
6
CARD SLOT 1CARD SLOT 3CARD SLOT 5CARD SLOT 7 CARD SLOT 2CARD SLOT 4CARD SLOT 6CARD SLOT 8
INPUT
INPUT
FEED
OFF
LINK
OFF
OMNIPORT
123456
INPUT
INPUT
OUTPUT
NPUTS 1 ~ 8
Page 10

True to the Music
-16VDC
+48VDC
+16VDC
POWER SUPPLY
ON
ON
MAIN
MON
ON
ON
MONO
2341
LEVEL
CLIP
PAN
Made in Canada
LEVEL
ON
6
78
5
LEVEL
MAIN
MON
48V PHANTOM
+16V / -16V
LEVEL
CLIP
PAN
ON
LEVEL
CLIP
PAN
ON
LEVEL
CLIP
PAN
PANPANPANPAN
ON
LEVEL
CLIP
LEVELONLEVEL
CLIPON
LEVEL
CLIPON
LEVEL
CLIPON
NP
-16VDC
+48VDC
+16VDC
POWER SUPPLY
Power Supply and Capacity
The Workhorse employs a universal power supply that will
automatically convert the various voltages used around the world
and regulate them before sending the power to the Workhorse. A
standard male IEC/EIN power input connector makes it easy to
travel as you need only change the cable to suit the local power
connector type.
The Workhorse does not have a power switch. As soon as you
connect the 5-pin XLR from the external supply to the Workhorse
it will be activated. Two front panel LEDs in the master section will
illuminate as soon as power is established. These indicate 48V
phantom power is available and the +/-16V power supply for the
modules is active.
COM
1
234
5
COM
48V PHANTOM
+16V / -16V
The Workhorse power supply is a 1600 milliamps (mA) external
‘brick’ that provides 48 volts for phantom power and the required +/16 volts to supply each module. Pin-15 on the card-edge connector
provides phantom power. Turning phantom power on or off is module
dependent. So for instance if you plug in a mic preamp, it will normally
be set up to feed the phantom power from the Workhorse supply
to the microphone input thus enabling you to send +48V phantom
power to a condenser microphone or active DI. For modules such
as dynamic processors or EQs that do not use phantom power, the
module simply ignores pin-15 as if it were not there.
Single Slot Modules Double Slot Modules
1 Mic Preamp 80mA 1 Tube Mic Pre 250mA
2 Equalizer 60mA 2
3 Compressor 60mA 3 Tube Limiter 250mA
4 Gate 60mA 4
5 Mic Preamp 80mA 5 Tube Mic Pre 250mA
6 Equalizer 60mA 6
7 Compressor 60mA 7 Tube Limiter 250mA
8 Gate 60mA 8
TOTAL DRAW 520mA TOTAL DRAW 1000mA
Installing The Workhorse
The Workhorse can be either mounted in a standard IEC 19” rack
system or placed on the desktop with the user installed rubber feet
that are included in the packaging.
Unlike some 500 series racks that are ‘power limited’, the Workhorse
pools the available current so that the user can congure the system
based on his or her requirements. The 1600 milliamps are rst
divided whereby 400 milliamps are reserved for the master mix
section. This leaves 1200 milliamps that can be shared among the 8
module slots and supplied via pins 12, 13 and 14.
EXTERNAL POWER SUPPLY
INPUT: 100V - 240V
(50 ~ 60 Hz)
CARD SLOTS: 1200mA
1 2 3 4 5 6 7 8
OUTPUT: +/-16V and
+48V Phantom (1600mA)
COM
PAN
PAN
2341
LEVEL
LEVEL
CLIP
CLIP
CLIP
MIXER:
ON
ON
ON
PA
5
78
6
400mA
LEVEL
LEVEL
CLIP
CLIPON
CLIPON
5
1
234
COM
PAN
PAN
MAIN
ON
LEVEL
LEVEL
LEVEL
CLIP
MON
ON
ON
48V PHANTOM
ANPANPAN
+16V / -16V
LEVEL
LEVELONLEVEL
LEVEL
CLIPON
MONO
Made in Canada
So for instance if you have a couple of power-hungry tube preamps
in slots 1 and 2 that require 250 milliamps of current, you still have
700 milliamps of current left to power the other six slots. Considering
most 500 series modules use between 40 and 80 milliamps of
current, it is unlikely you will ever exceed the Workhorse’s available
power. Note: The original API spec calls for 130mA on each slot.
The Workhorse not only exceeds this (150mA when current draw is
divided equaly between eight card slots) but allows you to distribute
the available power as needed.
Radial Engineering Ltd.
The Workhorse is 19” wide, 7” deep and uses three standard vertical
rack spaces or 5.25”. The total rack depth needed for installation is
11” (280mm) to accommodate rear panel cable connectors. It is a
good idea to provide some means of support and strain relief for the
cable bundle connecting to the rear panel.
3RU
11”
7
Workhorse User Guide
Page 11

True to the Music
Installing Modules In The Workhorse
Modules slide into the Workhorse card slots and make contact with
the card edge connector on the inside rear plane. Once in place,
modules are fastened using two 4/40 thread machine screws.
Exchanging Modules
When making any electrical connection, it is always safer to do
so with the power disconnected. The Workhorse power supply is
equipped with internal protective measures intended to provide a
margin of safety should a module exchange be performed in error
with the power on. However, the Workhorse is not designed to allow
repeated insertion and removal of modules while the power supply
is active. Always disconnect the power from the Workhorse before
exchanging modules.
SAFETY NOTICE - NO HOT SWAPPING
!
‘Hot Swapping’, or exchanging modules while the power is on is not
covered under the Radial Limited Warranty. The user is responsible for
any damage to the Workhorse or module arising out of hot swapping and
the user shall save Radial Engineering Ltd. harmless should any damage
occur. Please consult the Radial Limited Warranty for further details.
Signal Flow And Levels
Because the Workhorse is modular, it can accept a multitude of
different devices. This also means that you need to understand the
signal ow so that you can be sure what you want to do will work.
In the world of audio there are basically four low level signal groups
to contend with before you get to high power output levels such as
those produced by power ampliers to drive loudspeakers.
MIXER
+4dB
-10dB
-20dB
-50dB
0dB
NOMINAL
3
MIC / DI
1
WORKHORSE MIX BUS
ACOUSTIC
2
4
1. MIC LEVEL RANGE: Microphones and direct boxes
produce the weakest signals. These typically range from
-60dB to -40dB depending on type. Some such as ribbon
microphones can be as low as -70dB while condenser
mics will generally be at the top end of this range. With a
Workhorse, one would connect a microphone to a preamp
like the PowerPre™. This would elevate the signal to either
-10dB to feed the internal mix bus or produce +4dB at the
XLR direct out.
2. INSTRUMENT LEVEL RANGE: The output levels produced
by instruments can range widely. A single coil electric guitar
can produce as little as -40dB while an electronic keyboard,
sampler or digital piano is capable of producing as much
as -10dB. For low level instruments, 500 series modules
like the JDV™ amplify the signal to -10dB for the internal
bus while also producing +4dB at the XLR output for direct
recording. High output keyboards can also be connected
directly to the Workhorse summing input and mixer as this
is set at -10dB (nominal).
3. UNBALANCED -10dB LINE LEVEL RANGE: Unbalanced
outputs from CD players, keyboards, mixers and home
hi- components are usually specied at -10dB and are
often referred to as consumer line level. The internal
mix bus inside the Workhorse is designed to accept an
unbalanced -10dB signal (in fact it can handle more).
Once a microphone signal has been amplied using, for
instance, the Radial PowerPre™, the preamp output will
feed the Workhorse mix bus. When a +4dB balanced line
level signal is brought into the Workhorse via a device like
the Radial Komit™ compressor-limiter, the Workhorse will
unbalance the signal before it is sent to the internal bus
which in turn will feed the mixer. The D-Sub summing mixer
input is also a -10dB unbalanced input.
4. BALANCED +4dB LINE LEVEL RANGE: Most electronic
devices process unbalanced audio signals. In other words,
after the balanced signal arrives at the input, it is usually
unbalanced inside, processed and then balanced again to
deal with the outside world. This is how most 500 series
modules work and is why the direct output is balanced
line level. After it is unbalanced, the Workhorse internal
bus follows the same architecture whereby the signal is
rst mixed, then the Workhorse mixer output steps up the
level and balances the signal to a full +4dB professional
balanced output. Depending on how much signal the
mixer gets, this can increase to as much as +22dB before
distortion.
Matching the output level of one device to the input of the next
will help you avoid distortion and maximize signal-to-noise. For
instance, using a +4dB output to drive a -10dB input could overload
the input and cause distortion. Conversely, a -10dB output may not
have enough gain to drive the input of a +4dB device resulting in a
higher noise oor.
Radial Engineering Ltd. Workhorse User Guide
8
Page 12

True to the Music
0dB
-10dB
-20dB
-50dB
+4dB
NOMINAL
ACOUSTIC
MIC / DI
WORKHORSE MIX BUS
MIXER
1
2
3
4
INPUT
OMNIPORT
FEED
LINK
123456
OFF
OFF
CARD SLOT 1CARD SLOT 3CARD SLOT 5CARD SLOT 7 CARD SLOT 2CARD SLOT 4CARD SLOT 6CARD SLOT 8
OUTPUT
INPUT
ON
ON
MONO
Made in Canada
MAIN
MON
48V PHANTOM
+16V / -16V
INPUT
OMNIPORT
FEED
LINK
123456
OFF
OFF
CARD SLOT 1CARD SLOT 3CARD SLOT 5CARD SLOT 7 CARD SLOT 2CARD SLOT 4CARD SLOT 6CARD SLOT 8
OUTPUT
INPUT
ON
ON
MONO
Made in Canada
MAIN
MON
48V PHANTOM
+16V / -16V
INPUT
OMNIPORT
FEED
LINK
123456
OFF
OFF
CARD SLOT 1CARD SLOT 3CARD SLOT 5CARD SLOT 7 CARD SLOT 2CARD SLOT 4CARD SLOT 6CARD SLOT 8
OUTPUT
INPUT
ON
ON
MONO
Made in Canada
MAIN
MON
48V PHANTOM
+16V / -16V
INPUT
OMNIPORT
FEED
LINK
123456
OFF
OFF
CARD SLOT 1CARD SLOT 3CARD SLOT 5CARD SLOT 7 CARD SLOT 2CARD SLOT 4CARD SLOT 6CARD SLOT 8
OUTPUT
INPUT
ON
ON
MONO
Made in Canada
MAIN
MON
48V PHANTOM
+16V / -16V
INPUT
OMNIPORT
FEED
LINK
123456
OFF
OFF
CARD SLOT 1CARD SLOT 3CARD SLOT 5CARD SLOT 7 CARD SLOT 2CARD SLOT 4CARD SLOT 6CARD SLOT 8
OUTPUT
INPUT
ON
ON
MONO
Made in Canada
MAIN
MON
48V PHANTOM
+16V / -16V
INPUT
OMNIPORT
FEED
LINK
123456
OFF
OFF
CARD SLOT 1CARD SLOT 3CARD SLOT 5CARD SLOT 7 CARD SLOT 2CARD SLOT 4CARD SLOT 6CARD SLOT 8
OUTPUT
INPUT
ON
ON
MONO
Made in Canada
MAIN
MON
48V PHANTOM
+16V / -16V
INPUT
OMNIPORT
FEED
LINK
123456
OFF
OFF
CARD SLOT 1CARD SLOT 3CARD SLOT 5CARD SLOT 7 CARD SLOT 2CARD SLOT 4CARD SLOT 6CARD SLOT 8
OUTPUT
INPUT
ON
ON
MONO
Made in Canada
MAIN
MON
48V PHANTOM
+16V / -16V
INPUT
OMNIPORT
FEED
LINK
123456
OFF
OFF
CARD SLOT 1CARD SLOT 3CARD SLOT 5CARD SLOT 7 CARD SLOT 2CARD SLOT 4CARD SLOT 6CARD SLOT 8
OUTPUT
INPUT
ON
ON
MONO
Made in Canada
MAIN
MON
48V PHANTOM
+16V / -16V
INPUT
OMNIPORT
FEED
LINK
123456
OFF
OFF
CARD SLOT 1CARD SLOT 3CARD SLOT 5CARD SLOT 7 CARD SLOT 2CARD SLOT 4CARD SLOT 6CARD SLOT 8
OUTPUT
INPUT
ON
ON
MONO
Made in Canada
MAIN
MON
48V PHANTOM
+16V / -16V
With this in mind let’s track the signal ow and level as it passes
through the Workhorse. The diagram below shows the signal chain
starting with a microphone.
MIC / DI MIX-BUS MAIN
-50dB
PREAMP
+4dB
DIRECT OUT
-10dB
BUS
-10dB
BUS
+4dB
RECORD
The mic is connected to a mic preamp like the PowerPre™ that
boosts the signal from -50dB to line level. The preamp direct output
increases the signal to +4dB so that it can feed a recorder or another
processor such as a compressor or EQ. While this is happening,
Radial modules and others compatible with the Workhorse have a
special buffer to unbalance the signal and drive it on to the internal
-10dB mix bus where it ows to one of the mixer channels. The
mixer then amplies and balances the signal at the main outputs to
deliver a +4dB (nominal) level.
Because each of the Workhorse module slots is equipped with a
balanced line level input and a balanced line level direct output
(depending on the module), you are free to interconnect modules
or route signals to other devices using standard XLR patch cables.
Once you start working with your Workhorse, you will quickly come
to understand all of the capabilities and how easy it is to use.
USING THE WORKHORSE
Because the Workhorse is a modular device, there are practically no
limits as to what kind of signal chain you can create. For instance
it can be used as an analog effects router for your workstation,
as a customizable channel strip, a multi-channel preamp for live
recording or as part of a play-back and overdub system. The magic
is the simplicity that manages to bring unlimited exibility together.
An example here could be connecting two limiters to tame a stereo
drum track during mix down. Take the output from your recording
system; plug it into the Workhorse XLR inputs and then take the
direct output back from the same card slots. Adjust the limiter to suit.
This is the most basic function.
MULTI-TRACK
INPUT
INPUT
OUTPUT
OUTPUT
LIMITERLIMITER
Setting Up A Channel Strip
The next stage is using several modules together to create a channel
strip. For instance, when recording a vocal track, you may want to
run a mic preamp into an EQ to add some presence and then into a
limiter so that the track stays out of the ‘red’.
Using the old API system, you would connect the microphone to the
mic preamp using a standard XLR cable. The mic preamp output
would then connect to the EQ which in turn would connect to the
limiter. The direct XLR output from the limiter would then be sent to
the recording system.
As with all electronic equipment, turn off the power and turn down
levels before making connections. This will avoid the loud on-off
transient that can damage equipment or blow speakers. Plugging
PATC H
CABLE
PATC H
CABLE
in a module is merely a matter of sliding it into the Workhorse and
carefully aligning the 15-pin card edge connector. Once plugged in,
secure the module in place using the supplied Phillips screws. After
the module is connected it will automatically route the signal from
the rear panel connectors to and from the module. If you are using
a Radial 500 series module or one that has been designed to take
advantage of the internal mix bus and Omniport features, these too
will automatically be routed.
Old School Lunchbox
The rst step in approaching the Workhorse is going back to the
original API lunchbox. This device was basically a steel enclosure
that fed power to a number of modules. Connecting to and from
modules was done using the XLR connector that was associated with
each card slot. The Workhorse retains all of this connectivity while
adding the convenience of ¼” TRS and 25-in D-sub connectors.
FROM
MODULE TO
NEXT DEVICE
FROM
SOURCE TO
INPUT
MODULE
OUTPUT
Radial Engineering Ltd.
The Workhorse simplies the process with a FEED function. This
basically replaces inter-module patch cables. Instead of using an
XLR cable, you simply push the FEED switch into the UP position
and it routes the signal to the adjoining module. When engaged, the
FEED function always sends the signal to the next module working
from left to right (front view). Because the FEED function is tied to
the XLR connector, it will work with new Radial modules and older
500 series modules.
9
MIC PREAMPEQUALIZERCOMPRESSOR
FEEDFEED
MIC PREAMPEQUALIZERCOMPRESSOR
Workhorse User Guide
Page 13

True to the Music
INPUT
OMNIPORT
FEED
LINK
123456
OFF
OFF
CARD SLOT 1CARD SLOT 3CARD SLOT 5CARD SLOT 7 CARD SLOT 2CARD SLOT 4CARD SLOT 6CARD SLOT 8
OUTPUT
INPUT
ON
ON
MONO
Made in Canada
MAIN
MON
48V PHANTOM
+16V / -16V
INPUT
OMNIPORT
FEED
LINK
123456
OFF
OFF
CARD SLOT 1CARD SLOT 3CARD SLOT 5CARD SLOT 7 CARD SLOT 2CARD SLOT 4CARD SLOT 6CARD SLOT 8
OUTPUT
INPUT
ON
ON
MONO
Made in Canada
MAIN
MON
48V PHANTOM
+16V / -16V
INPUT
OMNIPORT
FEED
LINK
123456
OFF
OFF
CARD SLOT 1CARD SLOT 3CARD SLOT 5CARD SLOT 7 CARD SLOT 2CARD SLOT 4CARD SLOT 6CARD SLOT 8
OUTPUT
INPUT
ON
ON
MONO
Made in Canada
MAIN
MON
48V PHANTOM
+16V / -16V
INPUT
OMNIPORT
FEED
LINK
123456
OFF
OFF
CARD SLOT 1CARD SLOT 3CARD SLOT 5CARD SLOT 7 CARD SLOT 2CARD SLOT 4CARD SLOT 6CARD SLOT 8
OUTPUT
INPUT
ON
ON
MONO
Made in Canada
MAIN
MON
48V PHANTOM
+16V / -16V
INPUT
OMNIPORT
FEED
LINK
123456
OFF
OFF
CARD SLOT 1CARD SLOT 3CARD SLOT 5CARD SLOT 7 CARD SLOT 2CARD SLOT 4CARD SLOT 6CARD SLOT 8
OUTPUT
INPUT
ON
ON
MONO
Made in Canada
MAIN
MON
48V PHANTOM
+16V / -16V
INPUT
OMNIPORT
FEED
LINK
123456
OFF
OFF
CARD SLOT 1CARD SLOT 3CARD SLOT 5CARD SLOT 7 CARD SLOT 2CARD SLOT 4CARD SLOT 6CARD SLOT 8
OUTPUT
INPUT
ON
ON
MONO
Made in Canada
MAIN
MON
48V PHANTOM
+16V / -16V
INPUT
OMNIPORT
FEED
LINK
123456
OFF
OFF
CARD SLOT 1CARD SLOT 3CARD SLOT 5CARD SLOT 7 CARD SLOT 2CARD SLOT 4CARD SLOT 6CARD SLOT 8
OUTPUT
INPUT
ON
ON
MONO
Made in Canada
MAIN
MON
48V PHANTOM
+16V / -16V
NP
INPUT
OMNIPORT
FEED
LINK
123456
OFF
OFF
CARD SLOT 1CARD SLOT 3CARD SLOT 5CARD SLOT 7 CARD SLOT 2CARD SLOT 4CARD SLOT 6CARD SLOT 8
OUTPUT
INPUT
ON
ON
MONO
Made in Canada
MAIN
MON
48V PHANTOM
+16V / -16V
INPUT
OMNIPORT
FEED
LINK
123456
OFF
OFF
CARD SLOT 1CARD SLOT 3CARD SLOT 5CARD SLOT 7 CARD SLOT 2CARD SLOT 4CARD SLOT 6CARD SLOT 8
OUTPUT
INPUT
ON
ON
MONO
Made in Canada
MAIN
MON
48V PHANTOM
+16V / -16V
INPUT
OMNIPORT
FEED
LINK
123456
OFF
OFF
CARD SLOT 1CARD SLOT 3CARD SLOT 5CARD SLOT 7 CARD SLOT 2CARD SLOT 4CARD SLOT 6CARD SLOT 8
OUTPUT
INPUT
ON
ON
MONO
Made in Canada
MAIN
MON
48V PHANTOM
+16V / -16V
NP
+
INPUT
OMNIPORT
FEED
LINK
123456
INPUT
78
INPUT
FEED
LINK
INPUT
FEED
LINK
INPUT
FEED
LINK
INPUT
FEED
INPUT
FEED
INPUT
FEED
INPUT
OUTPUT
OFF
OFF
CARD SLOT 1CARD SLOT 3CARD SLOT 5CARD SLOT 7 CARD SLOT 2CARD SLOT 4CARD SLOT 6CARD SLOT 8
OMNIPORTOMNIPORTOMNIPORTOMNIPORTOMNIPORTOMNIPORTOMNIPORT
Made in Canada
Radial Engineering Ltd.
OFFOFF
OFF
OFFOFF
OFF
OFFOFF
OFF
OUTPUT OUTPUT OUTPUTOUTPUTOUTPUTOUTPUT OUTPUT
OUTPUT
INPUT
OUTPUT
INPUT
OUTPUT
INPUT
OUTPUT
INPUT
OUTPUT
INPUT
OUTPUT
INPUT
OUTPUT
INPUT
PIN DIAGRAM - PANEL VIEW
1
-
+
G
-
+
G
2
3
-
+
G
-
+
G
4
5
-
G
6
7
8
13
ON
ON
MONO
2
3
41
LEVEL
CLIP
PAN
Made in Canada
LEVEL
ON
6
78
5
LEVEL
MAIN
MON
48V PHANTOM
+16V / -16V
LEVEL
CLIP
PAN
ON
LEVEL
CLIP
PAN
ON
LEVEL
CLIP
PAN
PANPANPA NPA N
ON
LEVEL
CLIP
LEVELONLEVEL
CLIPON
LEVEL
CLIPON
LEVEL
CLIPON
Now consider another variation that uses both a patch cable and the
FEED function to split the signal and route it to a fourth module. The
image below shows how this is done by connecting a patch from the
rst module to the fourth module while the FEED function routes the
signal to the second and third modules. The mic signal has been
split into two signal paths that can be processed seperately.
FEEDFEED
COMPRESSOR
EQUALIZERCOMPRESSOR
MIC PREAMP
Using Modules In Series And Parallel
When you are using Radial modules, the signal will automatically be
sent to the Workhorse’s internal mix bus while still making the output
available at each card slot. The way this works is quite simple; each
module output is sent to the Workhorse mixer where it can be turned
on, panned left or right and be adjusted. This is where things can
really get wild.
Using the same ‘channel strip’ example as above, you can set up a
mic preamp to connect to an EQ which then will feed a compressor.
The signal will not only be available at the direct output of the
compressor module, but each of the module outputs will also be
routed to the individual mixer channels 1~3. This means that you
can turn on or off each module at the mixer and listen to the signal
before it goes into the next module. This lets you optimize the signal
ow for distortion and sonic character. You can record the combined
signal via the warm sounding Jensen transformers on the main
outputs while still capturing the sound of the original unprocessed
signal using the mic preamp’s direct output at the card slot I/O.
Using The Workhorse For Overdubs
Begin by setting up a channel strip using a mic preamp, EQ and
limiter. These are plugged into slots 1, 2 and 3. Set the FEED switch
in the up position on modules 1 and 2 so that the signal is routed in
series. Plug your mic in and turn on the phantom power on the mic
preamp if you are using a condenser microphone. Take the XLR
output from card-slot 3 (limiter) and send this to your recorder. Turn
on channel-3 on the Workhorse mixer to monitor the level via the
monitor outputs or headphones.
To overdub, send the stereo playback tracks into the Workhorse
using mixer channels 7 and 8 via the summing input D-Sub. Pan
channel-7 left, and channel-8 right. Adjust the relative signals
between the channel strip on mixer channel-3 and the stereo
program on channels 7 and 8. Hit record!
MIC
MAIN OUT
PAN
LEVEL
CLIP
ON
PA
5
LEVEL
CLIP
CLIP
ON
CLIPON
2341
6
PAN
LEVEL
LEVEL
PAN
LEVEL
CLIP
CLIP
ON
ON
78
LEVEL
CLIPON
CLIPON
PAN
LEVEL
LEVEL
ANPANPAN
LEVEL
LEVELONLEVEL
Made in Canada
SUMMING MIXER INPUT
PLAYBACK
TRACKS 7~8
MULTI-TRACK
MAIN
ON
MON
ON
48V PHANTOM
+16V / -16V
MONO
FEED FEED
DIRECT OUT
RECORD
TRACK 1
23
MIC PREAMPEQUALIZERCOMPRESSOR
MIC
Mix Bus
Channel 1
23
MIC PREAMPEQUALIZERCOMPRESSOR
DIRECT OUT
Mix Bus
Mix Bus
PAN
LEVEL
CLIP
ON
PA
5
LEVEL
CLIP
2341
CLIP
ON
6
CLIPON
PAN
LEVEL
LEVEL
PAN
LEVEL
CLIP
CLIP
ON
ON
78
LEVEL
CLIPON
CLIPON
PAN
LEVEL
LEVEL
LEVEL
LEVELONLEVEL
Channel 3
MAIN
ON
MON
ON
48V PHANTOM
ANPANPAN
+16V / -16V
MONO
Made in Canada
MAIN OUT
Channel 2
FEED FEED
MULTI-TRACK
Radial Engineering Ltd. Workhorse User Guide
10
Page 14

VARIOUS SETUPS USING THE WORKHORSE
The following setups show how the Workhorse can be used
in the studio or in a live recording environment. There are of
course an unlimited number of possibilities… but these will give
you some ideas of how you can use your Workhorse to create
simple recording channels to advanced reamping systems as
you mix and match various 500 series modules.
Standard Setup For A Vocal Track
This setup uses a microphone, EQ and compressor. The
microphone feeds the PowerPre™ mic preamplier which
simultaneously sends a dry, unprocessed track to the recording
system. This track is saved in case further reamping will be
required. The PowerPre™ feeds the EQ which in turn feeds
the Komit™ compressor-limiter where the signal is sent to the
Workhorse’s internal mix bus. The main output is used to record
the track while the monitor out feeds the near-eld playback
system.
True to the Music
Eight Channel Live Recording
This example discusses recording a small jazz ensemble using
eight microphones. For this set up, Radial PowerPre™ mic
preamps are used. Each module’s direct output is connected to
an eight channel recording system so that each instrument can
be recorded individually and properly mixed back in the studio.
The main outputs are used to feed the PA system. As these are
transformer isolated, ground loops will not pose a problem. The
monitor out is connected to a two channel eld recorder. This
will enable the engineer to give the band a reference recording
right after the show. Back at the studio, the recorder output will
feed the Workhorse D-Sub summing input where the mix will be
nalized.
Stereo Channel Strip
This setup is used to record a solo acoustic instrument such
as an acoustic guitar, viola or piano using two microphones by
creating two high-performance recording channels using the
Workhorse FEED function. Two PowerPre™ mic preampliers
feed equalizer modules like the Radial Q3™ coil EQ. The output
of the equalizers feed the Komit™ compressor-limiters. The
output of the Komit™ compressor-limiters are routed to the
mixer through the Workhorse internal mix bus. The Workhorse
main output sends the mix to the recorder taking advantage of
the added warmth afforded by the Jensen™ transformers. On
‘recording channel #2’ we have added a Radial Phazer™ module
to the setup. This enables us to focus the two microphone
signals by bringing the fundamentals into phase. Phase aligning
the fundamentals creates for greater realism which can produce
astonishingly clear results. We have turned off the output of most
modules going to the mix bus, choosing instead to only capture
the signal at the end of each chain. At any time you can audition
the signal from any of the modules going into the mixer section
to compare or if you like, mix it in by adjusting the level to suit.
Radial Engineering Ltd.
11
Workhorse User Guide
Page 15

True to the Music
Crazy Sounding Vocal Track
This is an example of how one can create a weird, wonderful,
extreme vocal track by inserting guitar pedals into the mix and
then creating a radical EQ curve using the Phazer™. This is
done ‘live’ by connecting a mic into the PowerPre™ and
feeding the signal using the feed function into the EXTC™
and Phazer™. The effects loop from the EXTC is used to feed
various pedals such as a tube distortion for added grit or maybe
a warm sounding analog chorus instead of the usual digital
plug-in. Notice that only the outputs from the PowerPre and the
Phazer feed the Workhorse mix bus. This allows you to mix in
the Phazer’s effect for radical EQ by either phase cancelling or
phase adding certain frequencies.
Reamping Using The Workhorse
The Workhorse is ideally suited for reamping. This is a two-stage
process whereby you start by recording a dry track and then
once recorded, you send the dry track back from the recorder
to the effects and ampliers. Reamping allows the engineer to
change tones and position microphones to optimize the sounds
during the recording process.
Part-1 Recording
The guitar is connected to the JDV™ where the signal is split to
feed the guitarist’s amplier using the front panel aux out (you
can take this a step further by adding a Radial X-Amp™ module
which would then allow the guitarist to audition two amps at the
same time). While the guitarist is playing, you are also capturing
a clean track directly from the JDV’s balanced XLR output. This
feeds a spare track on your recording system. You could also
put some mics up in front of the amps to capture the guitarist’s
performance. This may be used later to thicken up tracks. Once
the magical performance is recorded, you can send the guitar
player home. You are now set for part-2 and Reamping. You can
monitor the whole process using headphones or by connecting
your monitors to the Workhorse mixer outputs.
Part-2 Reamping
Send the clean recorded track back into the Radial X-Amp™.
The signal will then be converted to high impedance and sent
to two ampliers. You can also introduce effects. Both guitar
amplier outputs are transformer isolated to eliminate ground
loops. The amps are captured using microphones that connect to
two PowerPre™ mic preamps. The output from each PowerPre
FEEDs the Komit™ compressors limiters to keep the levels
under control. The stereo signal is sent to the Workhorse mix
bus. Best part here is that you can take your time to move the
microphones around the room to nd the best tone (alternately,
if you do not want to use a ‘live’ amp, you can send the signal
into the Radial EXTC™ which can feed a bunch of pedals. Then
bring the signal back and process the tone using the Radial JDX
guitar cabinet emulator. This will produce a much more ‘natural’
sounding recording).
Radial Engineering Ltd. Workhorse User Guide
12
Page 16

FREQUENTLY ASKED QUESTIONS
True to the Music
Q: How do I turn the Workhorse phantom power off?
A: There is no reason to turn the phantom power off. Only modules
such as mic preamps will connect to the phantom power supply
on the edge card connector pins. Turning on or off phantom is
usually done on the mic preamp module.
Q: How do I know that there is sufcient power for all my
modules?
A: Most manufacturers specify the draw required to properly run
their modules. The Workhorse has 1200mA of current available.
Simply add up the draw and make sure you do not exceed
1200mA.
Q: What happens if I exceed 1200mA?
A: Sometimes nothing will happen as most times you will not be
running the modules to their fullest. But when they are run hard,
starving the module will result in distortion and reduced signal
handling.
Q: Can I damage a module due to under-powering?
A: No. It just won’t sound as good.
Q: Why is there no power switch on the Workhorse?
A: Mostly because there is no more space. We recommend that all
studio equipment be routed to a central power strip. These are
usually equipped with an on-off switch that would enable you to
turn on or off all your gear at one time. For safety, always turn
the speakers on after other equipment. This will avoid turn-on
transients from damaging your speakers.
Q: I nd that putting in and pulling modules out is difcult. Is
this normal?
A: Yes. Most modules are designed to t snugly. Just patiently
wiggle them in and out. Be careful when putting them in so that
they align properly with the card edge connector. Once you
have done this a few times it will become easier.
Q: I nd some non-Radial modules very tight. Is this normal?
A: Unfortunately due to lack of standards, you may nd this to be
the case. You can usually wiggle them in. This is why we have
created the Workhorse Open Source Document. Hopefully most
manufacturers will adopt this standard as we move forth.
Q: Can I hurt myself by touching the back plane PC board?
A: This is a low power device so getting a shock is unlikely. Due
to legal liability, we cannot recommend the practice. This is why
the Workhorse comes with a protective plastic cover that can be
cut as needed to keep dust and roaming hands out.
Q: The headphone out is very loud. Can this damage some
headphones?
A: Yes. Always set the headphone level down low and increase
until comfortable. The extra loud headphone out is designed
to accommodate all types of headphones and enable the
Workhorse to be used in very loud environments such as in
night clubs. Read the warnings in the manual for safe use.
Q: Do I need to worry about the red and black ground lugs on
the back panel?
A: No. These are coupled together from the factory. These are
only made available for professional studios that have special
grounding requirements.
Q: What is the difference between the XLR and 1/4” TRS
jacks?
A: There is no difference. They are wired in parallel and there for
convenience.
Q: I notice that there are air vents on the top. Will covering
these pose a problem?
A: Air vents are designed to allow modules to cool down. Try to
leave a space above for ventilation. Most modules will not run
so hot as to be a concern. Simply touch the module to see if it
runs hot.
Q: Can I plug a keyboard directly into the Workhorse summing
mixer?
A: Yes. There is plenty of gain in the mixer to handle most buffered
instruments.
Q: Why is the power supply external?
A: The main reason for an external power supply is to free up
space inside the chassis for the Workhorse mixer section.
Additional benets include reduced electromagnetic
interference (EMI) and easy adaptability to international AC
power standards.
Q: Will the FEED function work on old API modules?
A: Yes, the FEED switch connects the card slot’s output jack to the
input of the next card slot.
Q: Can I damage the card edge connector?
A: Although unlikely, you can damage anything if you are not
careful. The Workhorse employs high-quality EDAC connectors
that are designed for many insertions. Just take it easy when
plugging in or out. Always disconnect the power before inserting
or removing modules.
Q: What happens if I use a 1/4” mono connector instead of a
1/4” TRS?
A: You will unbalance the signal and the level will drop by around
6dB. This means it will not be as loud and, if you are running
cables beyond 20’, you are more likely to pick up noise.
Otherwise, it should work ne.
Radial Engineering Ltd.
13
Workhorse User Guide
Page 17

True to the Music
TROUBLE SHOOTING
1. No Power:
• Check the power 5-pin XLR connection on the rear panel.
• Ensure the power supply is plugged into a working outlet.
2. No sound at individual XLR outputs outputs:
• Check the front panel LED power indicators and ensure the
Workhorse is powered up.
• Check that all modules are seated properly and secured.
• Check audio cable connecting to and from the Workhorse.
• If you are using the mixer section, ensure that it is setup
correctly and the channel is on. Also check the level and pan
settings.
• Check that the eight FEED switches are set to the proper
setting for your setup.
3. No sound at mixer outputs:
• Ensure the correct mixer channels are active and their LED
indicators are illuminated.
• Check that the level controls are set to a nominal level and the
pan controls are positioned at the center mark.
• Ensure the main and monitor master level controls are set to a
nominal level and that the ‘ON” switch is depressed.
• If you are using the main outputs check the insert jack and any
equipment connected there.
4. A loud humming noise is audible in the system:
• Check the source device for proper connections and settings.
• If the module(s) you are working with allow it you can try lifting
the signal ground.
• Plug all your equipment into the same power source to
minimize ground loops.
• Use the Workhorse main outputs. These are transformer
isolated to eliminate hum and buzz caused by ground loops.
5. Some modules are louder than others:
• Use the mixer section to amplify a low output module and bring
it up to par with other modules.
6. Sound is distorted when using the Summing Mixer input:
• Although the 25-pin D-Sub input for the summing mixer is
based on the Tascam™ analog audio pin-out it unbalances
the signal by grounding the cold (-) lead. Most devices with
a balanced 25-pin D-Sub output will work ne driving the
unbalanced summing mixer input. However, in the remote
chance that the source device creates distortion with this
arrangement you can solve the issue with a custom 25-pin
D-Sub to XLRF cable wherein the XLRs pin-3 (cold) is left
unconnected inside the shell.
7. Sound from one module is appearing on different output:
• Check the FEED switch on the rear panel. It may be mistakenly
engaged causing the signal from one module to be routed to
the next.
Radial Engineering Ltd. Workhorse User Guide
14
Page 18

SPECIFICATIONS
True to the Music
Circuit Type: Virtual earth mix bus integrated operational
amplier - Class AB
Max Output Level: +22dB (20Hz to 20kHz)
Voltage Gain: Up to +23dB on the main output
Distortion: 0.007% @ 1kHz with 10dB in and 10dB
out
0.05% @ 20Hz with 10dB in and 10dB out
Signal to Noise: -91dB with +20dB output
Card Slot Inputs: 8 x balanced XLR, ¼” TRS, D-SUB
Card Slot Outputs: 8 x balanced XLR, ¼” TRS, D-SUB
Card Slot Impedance: Depends on modules used
Internal Mix Bus: 4.75k Ohms input coupling resister
Summing Mixer Input: DB-25, Unbalanced +4dB/-10dB
with up to +20dB capacity;
input impedance = 4.75K Ohms
WORKHORSE BLOCK DIAGRAM
D-SUB INPUTS D-SUB OUTPUTS SUMMING MIXER INPUTS
OTHER
INPUTS
4K75
INPUT OUTPUT INPUT OUTPUT
4K75
CHANNEL 8
Main Output: +4dB balanced stereo XLR and ¼” TRS
outputs; Jensen™ transformer isolated
Main Inserts: ¼” TRS - tip = send; ring = return
Monitor Output: +4dB balanced stereo XLR and ¼” TRS
outputs; transformerless; +4dB balanced
Headphone Out: ¼” TRS Stereo - 2.8VRMS @ 8 Ohms
(up to 7VRMS depending on headphone
impedance)
Ground: Red: audio, Black: chassis
Power Supply Input: 100V - 240V AC (50~60Hz)
Power Supply Output: 1600mA - External switching type with
5-pin XLR, +/-16 VDC; 48V phantom
Dimensions: 19” wide x 5.25” tall x 7.44” deep
482.6 wide x 134 tall x 189mm deep
Weight: 22lbs / 10kg
INSERT: TIP=SEND / RING=RETURN
MAINS INSERT
MONITOR
ON/OFF
MONITOR
LEVEL
MONITOR OUTPUT
LEFT
FEED SW
CARD SLOT 1
LINK SW
PIN 11
MIX Bus
PIN 9
PIN 7
OMNIPORT
Radial Engineering Ltd.
PIN 11
MIX Bus
PIN 9
PIN 7
OMNIPORT
EXPANSION Bus
STEREO OUTPUTS
FEED TO
NEXT CHANNEL
MAINS INSERT
OVERLOAD
LED
OVERLOAD
LED
EXPANSION Bus
STEREO INPUTS
PAN
MIXER CH. 1
ON/OFF
PAN
MIXER CH. 2
ON/OFF
CARD SLOT 2
MIXER CH. 1
LEVEL
MIXER CH. 2
LEVEL
MASTER BUS
15
MASTER
ON/OFF
MONO / STEREO SW
MASTER
LEVEL
HEADPHONE
LEVEL
MONITOR OUTPUT
TRANSFORMER
ISOLATION
TRANSFORMER
ISOLATION
HEADPHONE
OUTPUT
RIGHT
MAIN OUTPUT
LEFT
MAIN OUTPUT
RIGHT
Workhorse User Guide
Page 19

True to the Music
13
1
13
-16VDC
+48VDC
+16VDC
POWER SUPPLY
D-SUB CONNECTOR FOR CARD SLOT I/O
+
G
-
2
-
1
G
+
25
Pin #
1 Channel 8 Hot
2 Channel 8 Ground
3 Channel 7 Cold
4 Channel 6 Hot
5 Channel 6 Ground
6 Channel 5 Cold
7 Channel 4 Hot
8 Channel 4 Ground
9 Channel 3 Cold
10 Channel 2 Hot
11 Channel 2 Ground
12 Channel 1 Cold
13 Not Used
+
G
-
4
-
3
G
+
+
G
-
5
G
+
Pin #
14 Channel 8 Cold
15 Channel 7 Hot
16 Channel 7 Ground
17 Channel 6 Cold
18 Channel 5 Hot
19 Channel 5 Ground
20 Channel 4 Cold
21 Channel 3 Hot
22 Channel 3 Ground
23 Channel 2 Cold
24 Channel 1 Hot
25 Channel 1 Ground
G
-
6
-
8
-
7
G
+
14
+
D-SUB CONNECTOR FOR UNBALANCED
SUMMING MIXER INPUT
+
G
2
1
GG GG
+
Pin #
1 Channel 8 Hot
2 Channel 8 Ground
3 Channel 7 Ground
4 Channel 6 Hot
5 Channel 6 Ground
6 Channel 5 Ground
7 Channel 4 Hot
8 Channel 4 Ground
9 Channel 3 Ground
10 Channel 2 Hot
11 Channel 2 Ground
12 Channel 1 Ground
13 Not Used
+
G
4
3
G
+
+
GGGG
5
G
+
Pin #
14 Channel 8 Ground
15 Channel 7 Hot
16 Channel 7 Ground
17 Channel 6 Ground
18 Channel 5 Hot
19 Channel 5 Ground
20 Channel 4 Ground
21 Channel 3 Hot
22 Channel 3 Ground
23 Channel 2 Ground
24 Channel 1 Hot
25 Channel 1 Ground
GGG
6
8
7
G
+
+
CONNECTOR WIRING
XLR Connector
GROUND
TRS ¼” Phone Connector
5-Pin XLR Power Connector
COM
GROUND
1
3
COLD (-)
1
234
2
COLD (-)
5
COM
HOT (+)
HOT (+)
CARD-EDGE CONNECTOR SPECIFICATIONS
The following details the pin conguration as used in the Workhorse. The ‘Old’ refers to the published API/VPR specications. The ‘Current’
refers to the various racks we have investigated on the market. The ‘New’ is the Radial standard as outlined in the Workhorse Open Source
Document.
Pin # Old API Specication Current use in market New Radial Specication
1 Chassis Ground Chassis Ground Chassis Ground
2 Output +4dB Hot Output +4dB Hot Output +4dB + Phase
3 Output -2 Hot - - - Reserved for future use
4 Output Cold Output Cold Output +4db - Phase
5 A- Ground A- Ground Analog Ground
6 Stereo link Stereo link Stereo link
7 Input -2 Cold - - - ¼” TRS Omniport - Ring
8 Input +4dB Cold Input +4dB Cold Input +4dB - Phase
9 Input -2 Hot - - - ¼” TRS Omniport - Tip
10 Input +4dB Hot Input +4dB Hot Input +4dB + Phase
11 Gain adjustment - - - Radial Bus feed
12 +16VDC supply +16VDC supply +16VDC supply
13 Power Ground - 0V ref Power Ground - 0V ref Power Ground - 0V ref
14 -16VDC supply -16VDC supply -16VDC supply
15 +48VDC Phantom +48VDC Phantom +48VDC Phantom
Due to the lack of clear standards, we have worked within the
limitations of keeping the old standards while making the Workhorse
as exible as possible. For instance, pin-3 has been left open
because sometimes (on some modules) it is paralleled with pin-2.
This arrangement eliminates problems between other modules. We
a ‘Virtual Earth Mix Bus’. It is low noise and less prone to problems.
We chose 4K7 because it is lower noise than a higher value and
because the Rupert Neve Designs Portico series has a 4K7 mix bus
on all of their modules. This provides cross-compatibility between
Radial and Rupert Neve Designs.
also discovered that sometimes pin-7 and pin-9 can be paralleled
with pin-8 and pin-10, so the Omniport™ jack will not interfere.
The Bus output on pin-11 of each Radial module connects to a
level and pan control in the master mixer area. By being able to
The Bus FEED (pin-11) is simply whatever signal the designer
will want to send to the bus (main out of module typically) and is
essentially an amplier feeding a 4K7 resistor to pin-11. This is
connected to the inverting (virtual earth) input of an op-amp (in the
mix together the output of what may be several modules in series,
various new effects may be created. For example, if the Phazer
phase adjustment tool is in a series chain of modules, it can be used
as a radical EQ to phase cancel the tone by creating a nulling effect.
mix section of the rack) with a 4K75 feedback resistor. This is called
Radial Engineering Ltd. Workhorse User Guide
16
Page 20

THREE YEAR TRANSFERABLE LIMITED WARRANTY
RADIAL ENGINEERING LTD. (“Radial”) warrants this product to be free from defects in material and workmanship and will remedy any such defects free of charge according to the terms of this warranty. Radial will
repair or replace (at its option) any defective component(s) of this product (excluding nish and wear and
tear on components under normal use) for a period of three (3) years from the original date of purchase. In
the event that a particular product is no longer available, Radial reserves the right to replace the product
with a similar product of equal or greater value. In the unlikely event that a defect is uncovered, please call
604-942-1001 or email service@radialeng.com to obtain an RA number (Return Authorization number)
before the 3 year warranty period expires. The product must be returned prepaid in the original shipping
container (or equivalent) to Radial or to an authorized Radial repair center and you must assume the risk of
loss or damage. A copy of the original invoice showing date of purchase and the dealer name must accompany any request for work to be performed under this limited and transferable warranty. This warranty shall
not apply if the product has been damaged due to abuse, misuse, misapplication, accident or as a result of
service or modication by any other than an authorized Radial repair center.
THERE ARE NO EXPRESSED WARRANTIES OTHER THAN THOSE ON THE FACE HEREOF AND DESCRIBED ABOVE. NO WARRANTIES WHETHER EXPRESSED OR IMPLIED, INCLUDING BUT NOT
LIMITED TO, ANY IMPLIED WARRANTIES OF MERCHANTABILITY OR FITNESS FOR A PARTICULAR
PURPOSE SHALL EXTEND BEYOND THE RESPECTIVE WARRANTY PERIOD DESCRIBED ABOVE
OF THREE YEARS. RADIAL SHALL NOT BE RESPONSIBLE OR LIABLE FOR ANY SPECIAL, INCIDENTAL OR CONSEQUENTIAL DAMAGES OR LOSS ARISING FROM THE USE OF THIS PRODUCT. THIS
WARRANTY GIVES YOU SPECIFIC LEGAL RIGHTS, AND YOU MAY ALSO HAVE OTHER RIGHTS,
WHICH MAY VARY DEPENDING ON WHERE YOU LIVE AND WHERE THE PRODUCT WAS PURCHASED.
www.radialeng.com
Radial Engineering Ltd.
1588 Kebet Way, Port Coquitlam BC V3C 5M5
tel: 604-942-1001 • fax: 604-942-1010
email: info@radialeng.com • web: www.radialeng.com
Radial Workhorse™ User Guide - Part #R870 1239 00 / 07-2018
Specications and appearance are subject to change without notice.
 Loading...