

Page 1

TRIM-TWO useR guIde
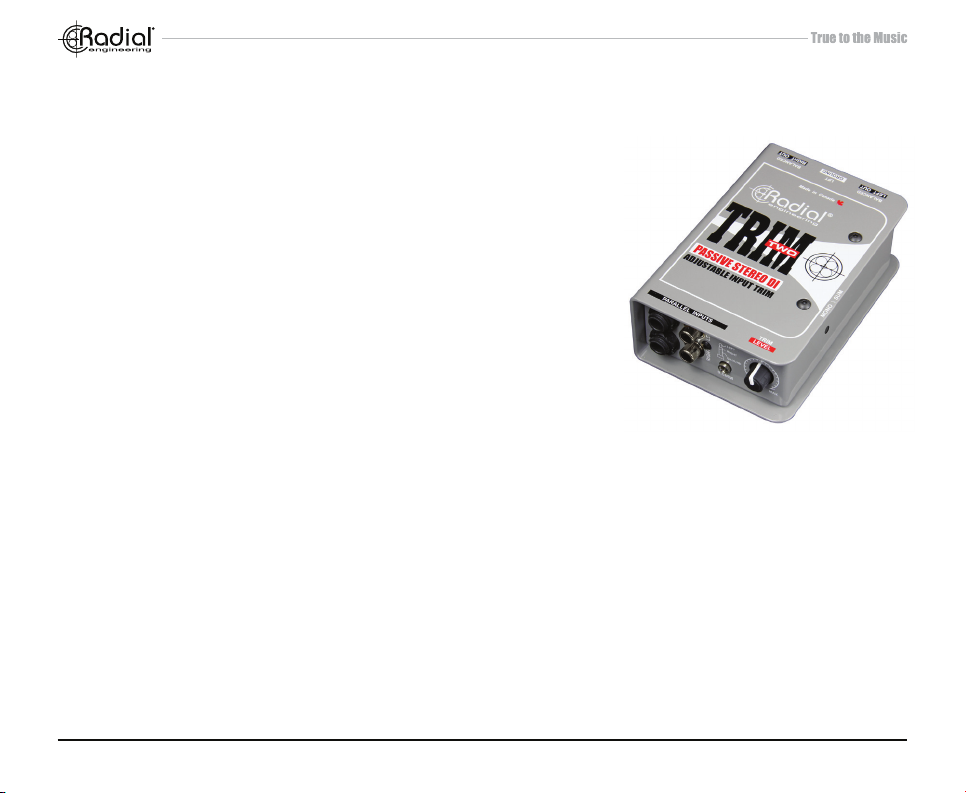
PAssIVe sTeReO dIReCT BOX
AdJusTABLe INPuT TRIM
Radial Engineering Ltd.
1588 Kebet Way, Port Coquitlam BC V3C 5M5
Tel: 604-942-1001 • Fax: 604-942-1010 • Email: info@radialeng.com
Page 2
TRIM-TWO™ sTeReO dIReCT BOX
useR guIde
Introduction ...................................................................................... 1
Features .......................................................................................... 2
Overview.......................................................................................... 3
Making Connections ........................................................................ 4
Controls ........................................................................................... 5
Applications ..................................................................................6-7
Optional Mounting Accessories ....................................................... 8
Specications .................................................................................. 9
Block Diagram ............................................................................... 10
Warranty ......................................................................... Back Cover
Thank you for purchasing the Radial Trim-Two. This is without a doubt one of the most useful direct boxes that we have
ever produced and is sure to give you years of enjoyment.
As with all new products, it is best that you take a few minutes to read through this short manual to review the many fea-
tures that are built in. If you nd yourself wondering about something, please take a moment to view the Trim-Two FAQ
page on our web site. This is where we post the latest updates and questions from users. If afterwards you feel you are still
in need of an answer, feel free to send us a note at info@radialeng.com and we will do our very best to reply in short order.
Now get ready to enjoy the advantages of having a volume control at your ngertips.
Radial Engineering Ltd. Trim-Two™ Stereo Direct Box User Guide
1
Page 3
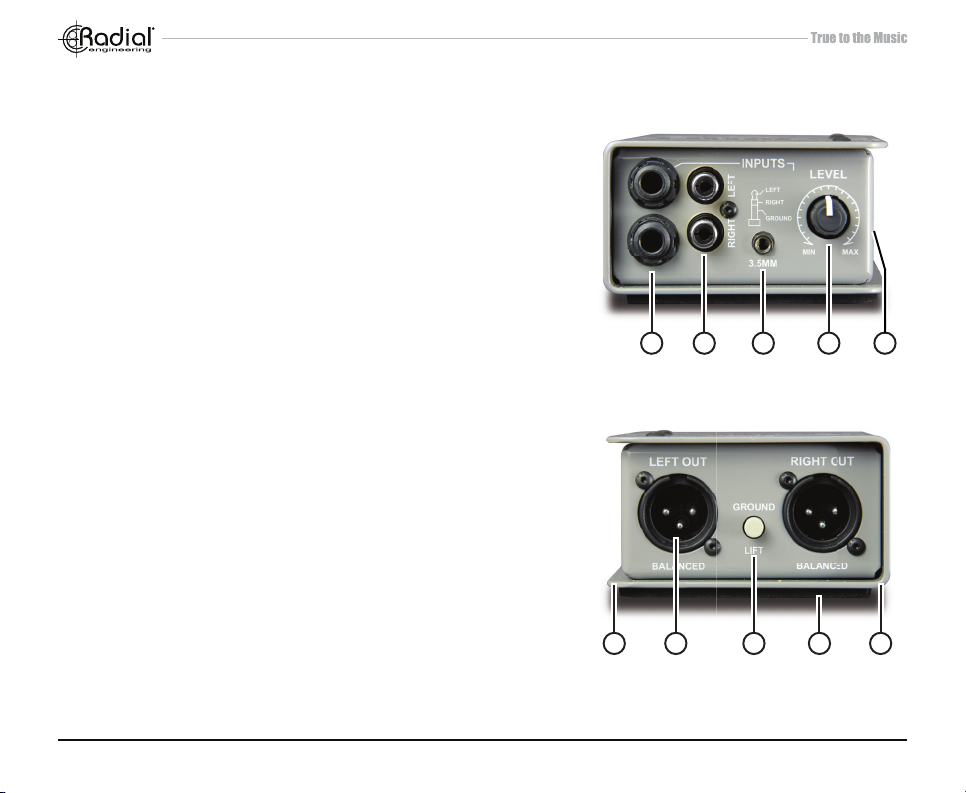
FEATURES
1. ¼” INPUTS: Left and right inputs ideally suited for stereo keyboards or drum machines, wired in parallel with the RCA and
mini 3.5 TRS connector.
2. RCA INPUTS: Left and right inputs provide an easy connection
from a CD player or other -10dB consumer audio device.
3. 3.5mm TRS INPUT: Standard mini TRS stereo input for connecting a laptop, tablet or iPhone to the Trim-Two.
4. LEVEL: Used to set the input level going into the Trim-2. Eliminates the need for a typical PAD switch.
5. MONO SUM: Side access set & forget switch sums stereo signals to mono at both XLR outputs.
6. BOOKEND DESIGN: Creates protective zone around the connectors and switches for added durability.
7. XLR OUT: Left and right balanced, low-Z mic-level output. Wired to
AES standard pin-1 ground, pin-2 hot (+) and pin-3 cold (-).
8. GROUND LIFT: Lifts pin-1 at both XLR outputs to help eliminate
hum and buzz caused by ground loops.
9. NO SLIP PAD: Provides electrical & mechanical isolation and
keeps Trim-Two from sliding around.
10. 14:GAUGE STEEL: I-Beam construction prevents circuit board
from being torqued which could lead to part failure. Durable
powder-coat nish keeps your Trim-Two looking great for years.
21 3 4 5
6 7 8 9 10
Radial Engineering Ltd. Trim-Two™ Stereo Direct Box User Guide
2
Page 4
OVERVIEW
The Trim-Two is passive stereo direct box that has been designed from the ground up to be super easy to use. But unlike other DI boxes, the Trim-Two comes with a level control that lets you adjust the volume by simply reaching over and
twisting a knob. The reason that the Trim-Two can be used this way is that it is intended to be used with buffered or active
sources. Examples include keyboards, sound modules, DJ mixers, laptop computers or tablets. It is not designed for use
with an old Fender bass as the transformers inside that do the balancing are not optimized for passive instruments.
It is important to note that the Trim-Two is a unity gain device. What this means is that when the volume control is set to
maximum, it will produce about the same output level as the source instrument coming in - minus a slight bit due to the
passive nature of transformers. So if you have a loud source such as a line level output from a DJ mixer, you would connect the output from the Trim-Two to the line level input on your mixer.
Since the Trim-Two is passive, it does not require any power to work. You simply connect your source to the Trim-Two and
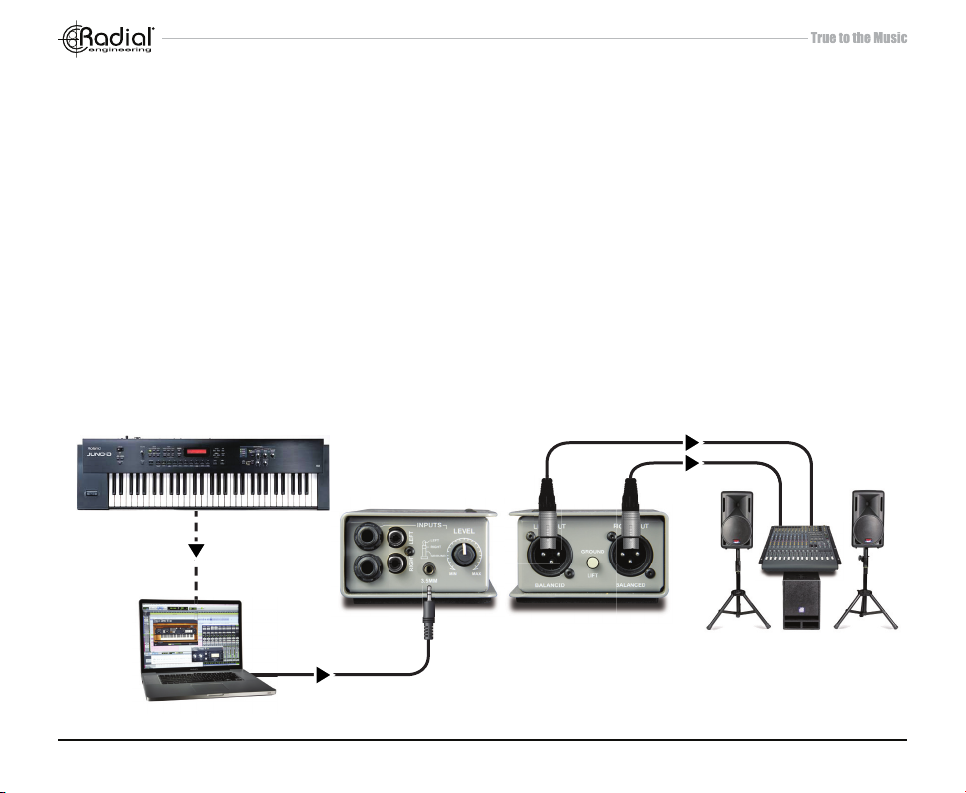
the outputs to the PA system, and you are set to go.
Typical connection using laptop as sound source
Balanced Out
USB
Input
PC Sound Source
Radial Engineering Ltd. Trim-Two™ Stereo Direct Box User Guide
3
PA System
Page 5

MAKING CONNECTIONS
Before making connections, it is good practice to always ensure your equipment is either turned off or volume levels set to
zero. This will reduce the possibility of turn-on or connection transients from damaging more sensitive components such
as tweeters.
Connect the source instrument or audio device to the Trim-Two using the ¼”, RCA or 3.5mm stereo inputs. All of these are
wired in parallel which enables you to use these as ‘THRU’ outputs for your personal monitoring system. This could necessitate using a pair of RCA to ¼” cables to connect to powered monitors. Try to keep hi-Z unbalanced cables under 8 meters (25’) in length as they are much more susceptible to noise versus low-Z balanced cables. Connect the XLR outputs
to the mixing console. These balanced low-Z outputs can be connected to a mic or line input, depending on the source
(as explained above). Once balanced, you can easily drive cables to 100 meters (300’). You are now set to test the audio.
Powered Monitors
Balanced Out
Thru
Input
PC Sound Source
Radial Engineering Ltd. Trim-Two™ Stereo Direct Box User Guide
4
PA System
Page 6

ADJUSTING THE VOLUME
Direct boxes are normally connected to the mic input on a mixing desk.
This enables the DI signals and mics to live side-by-side inside a snake
without cross-talk. Set the volume control to 2 o’clock. Although this will
reduce the output, it is a good place to start as it will likely approximate the
level produced by a typical direct box. This of course is dependent of the
source. If you hear distortion in the PA system or need more gain, simply
adjust the level on the Trim-Two to suit.
LIFTING THE GROUND
As the Trim-Two is completely passive, it is perfect for eliminating hum and
buzz caused by so called ground loops. The transformers inside will block
stray DC voltages that could introduce noise into the audio system. To further suppress noise, a ground lift switch can be engaged that disconnects
pin-1 on the two XLR outputs. This lifts the audio ground, providing 100%
isolation. If you hear noise, simply push in to solve the problem.
USING THE MONO SWITCH
Sometimes, it is bene cial to mix the stereo source to mono reducing the
channel count going to the PA. The MONO switch is a recessed so that
it can be set & forgotten. This also avoids it being switched by mistake.
Simply depress if needed.
Radial Engineering Ltd. Trim-Two™ Stereo Direct Box User Guide
5
Page 7

APPLICATIONS
The following are some common setups that you can enjoy using the Trim-Two:
Music playback with a laptop computer or tablet - Simply connect the output from your laptop using a 3.5mm stereo
cable to the Trim-Two. Connect the XLRs to the PA system. Set the volume on the Trim-Two to 2 o’clock and adjust the
output level from your laptop to suit.
CD player in restaurant - Connect the CD player’s RCA output to the Trim-Two using standard RCA cables. Activate the
mono sum to use the Trim-Two as a distribution point for two ampli ers. Send the output to ceiling speakers and outdoor
speakers that are powered separately. Note that CD players typically do not have a volume control, so they play at full
output all of the time. If you hear distortion, reduce the Trim-Two level control and adjust the power amp to compensate.
Ceiling Mounted
Stereo RCA
Mono
XLR
Mono
Speakers
Outdoor Patio
Speakers
Radial Engineering Ltd. Trim-Two™ Stereo Direct Box User Guide
6
Page 8

¼” TRS Input
Powered Monitor
RCA Thru
XLR
Stereo keyboard with monitors - Connect to the Trim-Two
using standard ¼” coaxial cables and XLRs for the PA system. If you are adding personal monitors, use a set of RCA
to ¼” cables to feed the powered monitors. This essentially
uses the RCA connectors as a typical THRU. Note that the
PA
THRU outputs will not be affected by the Trim-Two Level
control. In other words, your keyboard volume control will
determine the sound going to your monitors. Start by setting
this up so that it is comfortable for you and then set the level
control for the PA.
Powered Monitor
Controller keyboard with laptop - More and more key-
board players are using a laptop to generate audio les and
USB
3.5mm Input
¼” TRS
Thru
XLR
Powered Monitor
PA
‘play’ the computer using a controller keyboard with a USB
port. Connect the output from the laptop to the Trim-Two using the 3.5mm connector. Use the XLR outs to feed the PA
and the ¼” outputs to feed the monitors on stage.
Using the Trim-Two for a DJ setup - DJ mixers can be notoriously problematic due to the DJ being too loud. This can
cause distortion or even harm the PA system. Connecting
¼” TRS
Thru
RCA Input
XLR
PA
Radial Engineering Ltd. Trim-Two™ Stereo Direct Box User Guide
the DJ mixer to the Trim-Two enables you to set a maximum
level and is quick to adjust should need be. Connect a device to the Trim-Two using the RCA or ¼” inputs.
7
Page 9

OPTIONAL RACK MOUNTING KITS
The J-Rak 8 and J-Rak 4 are an innovative rack mount chassis. The J-Rak 8 has eight vertical slots for Radial Trim-Two Stereo
direct boxes or the other Radial J-Class products. The J-Rak 4 has four horizontal slots. Note you cannot access the mono
switch on the Trim-Two when mounted in a J-Rak product, set before installing.
J-RAK 8 J-RAK 4
Each direct box can be front or rear mounted allowing the system designer to have the XLR’s on the front of the rack or rear,
depending on the application.
LAPTOP AND MULTIMEDIA The 3.5mm inputs face front
allowing easy connection for electronics devices.
J-CLAMP
The J-Clamp is a mounting adapter that allows any of the
Radial J-Class products to be permanently mounted in locations such as in podiums, under board room tables and inside
ampli er and effect racks. Features a heavy-duty steel shell
with built in mounting ange and user-writable tabs.
Radial Engineering Ltd. Trim-Two™ Stereo Direct Box User Guide
8
Page 10

SPECIFICATIONS
Audio circuit type: .................................................................................................................... Passive transformer isolated
Frequency response: ..................................................................................................................... 20Hz to 20kHz (-1/+3db)
Total Harmonic Distortion: (THD+N) ......................................................................................0.009% (1kHz with 100k load)
Dynamic range: .................................................................. >126dB (difference between noise oor and maximum output)
Input impedance: .............................Approx 10k with 100k load (depends on load impedance; about 6k with mono mode)
Maximum input: ..................................................................................................................................................... > +20dBu
Gain: ................................................................................................................... -1dB (10k load; level control at maximum)
Clip Level - Output: ................................................................................................................................................ > +11dBu
Output impedance: ..................................................................2800Ω (level control at maximum; higher at lower settings)
Noise oor: ........................................................................................................................................................... < -115dBu
Intermodulation distortion: ............................................................................................................. extension (-10dBu input)
Phase Deviation: ........................................................................................................ <10° (20Hz to 20kHz with 100k load)
THD+N: ...............................................................................................................................................0.006% (-5dBu input)
Input pad:...............................................................................................................................................Variable trim control
XLR conguration: ................................................................................................ Pin-1 ground; pin-2 hot (+); pin-3 cold (-)
Other connectors: ............................................................................................................ 1/4” TRS, RCA and Mini Phone In
Power: ............................................................................................................................................................None, passive
Construction: ............................................................................................................................................... Steel Enclosure
Size: (LxWxD) ............................................................................................... 5” x 3.3” x 1.8” (127mm x 84.1mm x 45.5mm)
Weight: .................................................................................................................................................1.55 lbs (703 grams)
Shipping size: ...................................................................................................... 6.5” x 4” x 3” (165mm x 102mm x 76mm)
Shipping weight: ................................................................................................................................1.92 lbs (870.9 grams)
Warranty: .................................................................................................................................... Radial 3-year, transferable
Radial Engineering Ltd. Trim-Two™ Stereo Direct Box User Guide
9
Page 11

Block Diagram
PHONO
INPUT
TOP LEFT
1/4” PHONE
INPUTS
BOTTOM/RIGHT
MONO
1/8” MINI-PHONE
INPUT
BLEND
Radial Engineering Ltd. Trim-Two™ Stereo Direct Box User Guide
DUAL
LEVEL
CONTROL
CW
10
OUTPUT
LEFT
RIGHT
GROUND
LIFT
CHASSIS
GROUND
Page 12

RADIAL ENGINEERING
3 YEAR TRANSFERABLE WARRANTY
RADIAL ENGINEERING LTD. (“Radial”) warrants this product to be free from defects in material and workmanship and will remedy
any such defects free of charge according to the terms of this warranty. Radial will repair or replace (at its option) any defective
component(s) of this product (excluding nish and wear and tear on components under normal use) for a period of three (3) years
from the original date of purchase. In the event that a particular product is no longer available, Radial reserves the right to replace the
product with a similar product of equal or greater value. In the unlikely event that a defect is uncovered, please call 604-942-1001 or
email service@radialeng.com to obtain a RA number (Return Authorization number) before the 3 year warranty period expires. The
product must be returned prepaid in the original shipping container (or equivalent) to Radial or to an authorized Radial repair center
and you must assume the risk of loss or damage. A copy of the original invoice showing date of purchase and the dealer name must
accompany any request for work to be performed under this limited and transferable warranty. This warranty shall not apply if the
product has been damaged due to abuse, misuse, misapplication, accident or as a result of service or modication by any other than
an authorized Radial repair center.
THERE ARE NO EXPRESSED WARRANTIES OTHER THAN THOSE ON THE FACE HEREOF AND DESCRIBED ABOVE. NO
WARRANTIES WHETHER EXPRESSED OR IMPLIED, INCLUDING BUT NOT LIMITED TO, ANY IMPLIED WARRANTIES OF
MERCHANTABILITY OR FITNESS FOR A PARTICULAR PURPOSE SHALL EXTEND BEYOND THE RESPECTIVE WARRANTY
PERIOD DESCRIBED ABOVE OF THREE YEARS. RADIAL SHALL NOT BE RESPONSIBLE OR LIABLE FOR ANY SPECIAL, INCI-
DENTAL OR CONSEQUENTIAL DAMAGES OR LOSS ARISING FROM THE USE OF THIS PRODUCT. THIS WARRANTY GIVES
YOU SPECIFIC LEGAL RIGHTS, AND YOU MAY ALSO HAVE OTHER RIGHTS, WHICH MAY VARY DEPENDING ON WHERE
YOU LIVE AND WHERE THE PRODUCT WAS PURCHASED.
To meet the requirements of California Proposition 65, it is our responsibility to inform you of the following:
WARNING: This product contains chemicals known to the State of California to cause cancer, birth defects
or other reproductive harm.
Please take proper care when handling and consult local government regulations before discarding.
Radial Engineering Ltd.
1588 Kebet Way, Port Coquitlam BC V3C 5M5
Tel: 604-942-1001 • Fax: 604-942-1010 • Email: info@radialeng.com
Radial Trim-Two™ User Guide - Part #: R870 1213 00 Copyright © 2015, all rights reserved.
Appearance and specications subject to change without notice.
 Loading...