

Page 1
®
True to the Music
™
MC3
Studio Monitor Controller
User Guide
Radial Engineering Ltd.
1588 Kebet Way, Port Coquitlam
British Columbia, Canada, V3C 5M5
Tel: 604-942-1001 • Fax: 604-942-1010
Email: info@radialeng.com
www.radialeng.com
Page 2

Radial® MC3™ User Guide
Table of Contents Page
Overview ...........................................................................1
Front panel features ..........................................................2
Rear and top panel features .............................................3
Balanced vs unbalanced ...................................................4
Connecting the MC3 .........................................................5
Using the level adjustment trims .......................................6
Setting up a subwoofer .....................................................7
Using the DIM control .......................................................7
Headphones ......................................................................8
Specications ....................................................................9
Block diagram ...................................................................9
Warranty............................................................Back cover
Congratulations and thank you for purchasing the Radial
MC3 Studio Monitor Controller. The MC3 is an innovative
tool designed to make managing audio signals easy in
the studio while adding the convenience of an on-board
headphone amplier.
Even though the MC3 is super simple to use, as with any
new product, the best way to get to know the MC3 is by
taking a few minutes to read the manual and familiarize
yourself with the many features that are built-in before you
begin connecting things together. This could save you time.
If by chance you nd yourself seeking an answer to a
question, take a few minutes to log onto the Radial website
and visit the MC3 FAQ page. This is where we post the
latest information, updates and of course other questions
that may be similar in nature. If you do not nd an answer,
feel free to write us an email at info@radialeng.com and
we will do our very best to get back to you promptly.
Now get ready to mix with greater condence and control
than ever before!
Page 3
®
True to the Music
OVERVIEW
The Radial MC3 is a studio monitor selector that enables you to switch
between two sets of powered loudspeakers. This lets you compare how
your mix will translate on different monitors which in turn will help deliver
more convincing mixes to the audience.
Because most folks today listen to music with an iPod® using ear buds or
some other type of headphones, the MC3 features a built-in headphone
amplier. This makes it easy to audition your mixes using different
headphones and monitors.
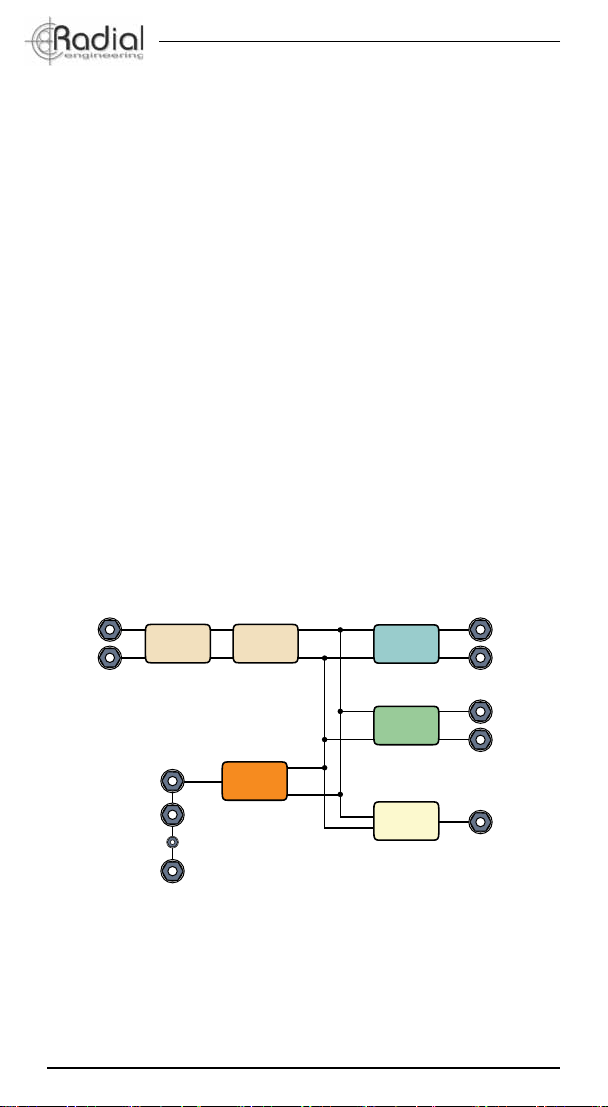
Looking at the block diagram from left to right, the MC3 begins with stereo
source inputs. At the other end are the stereo outputs for monitors-A and
B, which are turned on or off using the front panel controls. The stereo
output levels can be trimmed to match for smooth switching between
different monitors without jumps in the listening level. The ‘large’ master
level control makes it easy to adjust the overall volume using a single
knob. Note that the master volume control sets the output going to all
speakers and headphones.
Using the MC3 is merely a matter of turning on the speakers you want,
adjusting the level and listening. All of the extra cool features in between
are icing on the cake!
INPUT
LEFT
RIGHT
FRONT
FRONT
3.5mm
HEADPHONE
AUX
SOURCE
Radial Engineering Ltd.
MASTER
LEVEL
JACKS
DIM &
MONO
HEAD
PHONES
LEFT
RIGHT
RIGHT
MONITOR-A
OUTPUT
LEFT
MONITOR-B
OUTPUT
SUBWOOFER
OUTPUT
OUT-A
TRIM
OUT-B
TRIM
SUB OUT
TRIM
1
MC3 Monitor Controller
Page 4
®
1 953 72 64 8
True to the Music
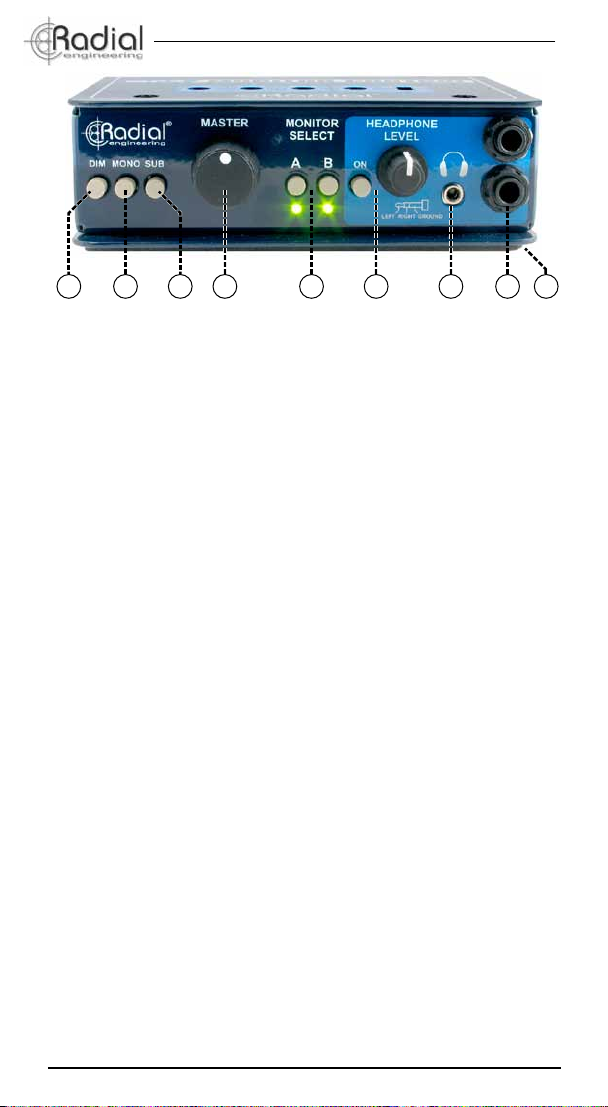
FRONT PANEL FEATURES
1. DIM: When engaged, the DIM toggle switch temporarily reduces the
playback level in the studio without having to adjust the MASTER
level control. The DIM level is set using the top panel LEVEL
ADJUSTMENT control.
2. MONO: Sums the left and right inputs to test for mono-compatibility
and phase problems.
3. SUB: Separate on/off toggle switch lets you activate the subwoofer.
4. MASTER: Master level control used to set the overall output level
going to the monitors, subwoofer and AUX outputs.
5. MONITOR SELECT: Toggle switch activates the A and B monitor
outputs. Separate LED indicators illuminate when outputs are active.
6. HEADPHONE CONTROLS: Level control and on/off switch used to
set the level for the front panel headphone jacks and the rear panel
AUX output.
7. 3.5MM JACK: Stereo headphone jack for ear-bud style headphones.
8. ¼” JACKS: Dual stereo headphone jacks let you share the mix with
the producer when listening to playback or for overdubbing.
9. BOOKEND DESIGN: Creates protective zone around the controls
and connectors.
Radial Engineering Ltd.
2
MC3 Monitor Controller
Page 5

®
1110 15 16141312
True to the Music
REAR PANEL FEATURES
10. CABLE CLAMP: Used to secure the power supply cable and prevent
accidental power disconnection.
11. POWER: Connection for a Radial 15VDC 400mA power supply.
12. AUX: Unbalanced ¼” TRS stereo auxiliary output controlled by the
headphone level. Used to drive an auxiliary audio system like a studio
headphone amplier.
13. SUB: Unbalanced ¼” TS mono output used to feed a subwoofer.
The output level may be trimmed using the top panel LEVEL
ADJUSTMENT controls to match the level of other monitor speakers.
14. MONITORS OUT-A & OUT-B: Balanced/unbalanced ¼” TRS outputs
used to feed active monitor speakers. The level of each stereo output
may be trimmed using the top panel LEVEL ADJUSTMENT controls
to balance the level between monitor speakers.
15. SOURCE INPUTS: Balanced/unbalanced ¼” TRS inputs receive the
stereo signal from your recording system or mixing console.
16. BOTTOM PAD: A full pad covers the underside, keeps the MC3 in
one place and won’t scratch your mixing console.
TOP PANEL FEATURES
17. LEVEL ADJUSTMENT: Separate set & forget trim controls on the
top panel make it easy to adjust A and B monitor levels for optimal
balance between different monitors.
18. SUB WOOFER: Level adjustment and 180º PHASE switch for the
subwoofer output. The phase control is used to reverse the polarity
of the subwoofer to counter the effect of room modes.
17 18
Radial Engineering Ltd.
3
MC3 Monitor Controller
Page 6

®
A
B B
A
S
RING
TIP
SLEEVE
RING
TIP
SLEEVE
SHIELD
RING
1 2
3
TIP
SLEEVE
RING
TIP
SLEEVE
RING
TIP
SLEEVE
SHIELD
SHIELD
RING
1 2
3
TIP
SLEEVE
RING
TIP
SLEEVE
RING
TIP
SLEEVE
SHIELD
SHIELD
SHIELD
1 2
3
TIP
SLEEVE
True to the Music
TYPICAL MC3 SETUP
The MC3 Monitor Controller is typically connected to the output of your
mixing console, digital audio interface or laptop computer represented as
a reel-to-reel machine in the diagram. The outputs of the MC3 connect two
pairs of stereo monitors, a subwoofer and up to four pairs of headphones.
BALANCED VS UNBALANCED
The MC3 can be used with either balanced or unbalanced signals.
Because the main stereo signal path through the MC3 is passive, like a
‘straight-wire’, you should not mix balanced and unbalanced connections.
Doing so will ultimately ‘un-balance’ the signal through the MC3. If this is
done, you may encounter crosstalk or bleed. For proper performance,
always maintain either a balanced or unbalanced signal ow through
the MC3 by using appropriate cables for your equipment. Most
mixers, workstations and near-eld monitors can work either balanced or
unbalanced so this should not pose a problem when used with the proper
interface cables. The diagram below shows various types of balanced
and unbalanced audio cables.
Balanced TRS Source
Balanced XLR Source
Balanced XLR Source
Radial Engineering Ltd.
1 2
1 2
Balanced ¼” TRS ~ Balanced ¼” TRS
TIP
RING
SLEEVE
SHIELD
Balanced XLR ~ Balanced ¼” TRS
3
SHIELD
Unbalanced XLR ~ Unbalanced ¼” TS
3
SLEEVE
SHIELD
Unbalanced ¼” TS ~ Unbalanced ¼” TS
TIP
SHIELD
4
TIP
RING
SLEEVE
Balanced TRS Destination
TIP
RING
SLEEVE
Balanced TRS Destination
TIP
SLEEVE
Unbalanced ¼” TS Destination
TIP
SLEEVE
Unbalanced ¼” TS DestinationUnbalanced ¼” TS Source
MC3 Monitor Controller
Page 7

®
True to the Music
CONNECTING THE MC3
Before making any connections always ensure levels are turned down or
equipment is turned off. This will help avoid turn-on transients that could
harm sensitive components like tweeters. It is also a good practice to test
signal ow at a low volume before turning things up. There is no power
switch on the MC3. As soon as you plug in the power supply it will turn on.
The SOURCE INPUT and MONITORS-A and B output connection jacks
are balanced ¼” TRS (Tip Ring Sleeve) connectors that follow the AES
convention with tip positive (+), ring negative (-), and sleeve ground.
When used in unbalanced mode, the tip is positive and the sleeve shares
the negative and ground. This convention is maintained throughout.
Balanced TRS ¼” Phone Unbalanced TS ¼” Phone
Ring (-)
Ground
Ground
Ring (-)
Tip (+)
Tip (+)
Connect the stereo output of your recording system to the ¼” SOURCE
INPUT connectors on the MC3. If your source is balanced, use ¼” TRS
cables to connect. If your source is unbalanced, use ¼” TS cables to connect.
Connect the stereo OUT-A to your main monitors and OUT-B to your
second set of monitors. If your monitors are balanced, use ¼” TRS cables
to connect. If your monitors are unbalanced, use ¼” TS cables to connect.
Turn the A and B outputs on or off using the front
panel selectors. The LED indicators will illuminate
when the output is active. Both stereo outputs can
be active at the same time.
Radial Engineering Ltd.
5
MC3 Monitor Controller
Page 8

®
True to the Music
SETTING THE TRIM CONTROLS
The MC3 top panel is congured with a series of recessed trim controls.
These set & forget trim controls are used to ne tune the output level going
to each component so that when you switch from one set of monitors to
the other, they play back at relatively similar levels. Although most active
monitors are equipped with level controls, getting to them while listening
is difcult. You have to reach around the back to make the adjustments,
go back to the engineer’s seat, listen and then ne tune again which can
take forever. With the MC3 you adjust the level while sitting in your chair!
Easy and efcient!
Except for the active headphone and subwoofer outputs, the MC3 is a
passive device. This means it does not contain any active circuitry in the
stereo signal path to your monitors and therefore does not add any gain.
The MON-A and B LEVEL ADJUSTMENT controls will actually reduce
the level going to your active monitors. The overall system gain can
easily be made up by increasing the output from your recording system
or increasing the sensitivity on your active monitors.
1. Start by setting the gain on your monitors to
their nominal level setting. This is usually
identied as 0dB.
2. Set the recessed LEVEL ADJUSTMENT
controls on the MC3 top panel to the fullclockwise position using a screwdriver or guitar
pick.
3. Before you hit play, make sure the master
volume is turned all the way down.
4. Turn on monitor output-A using the MONITOR
SELECTOR switch. The output-A LED indicator
will illuminate.
5. Hit play on your recording system. Slowly
increase the MASTER level on the MC3. You
should hear sound from monitor-A.
6. Turn off monitor-A and turn on monitor-B. Try
going back and forth a few times to hear the
relative volume between the two sets.
7. You can now set the trim controls to balance
the level between your two monitor pairs.
Radial Engineering Ltd.
6
MC3 Monitor Controller
Page 9

®
True to the Music
CONNECTING A SUBWOOFER
You can also connect a subwoofer to the MC3. The SUB output on the MC3
is actively summed to mono so that the stereo input from your recorder
sends both the left and right bass channels to the subwoofer. You would of
course adjust the sub’s crossover frequency to suit. Connecting the MC3 to
your subwoofer is done using an unbalanced ¼” cable. This will not affect the
balanced monitor-A and B connections. Turning on the subwoofer is done by
depressing the SUB toggle switch on the front panel. The output level may
be adjusted using the top mounted SUB WOOFER trim control. Again, you
should set the relative level so that it sounds balanced when played with
your monitors.
On the top panel and next to the SUB WOOFER LEVEL control is a PHASE
switch. This changes the electrical polarity and inverts the signal going to
the subwoofer. Depending on where you are sitting in the room, this can
have a very dramatic effect on what is known as room modes. Room modes
are basically places in the room where two sound waves collide. When the
two waves are at the same frequency and in-phase, they will amplify each
other. This can form hot spots where certain bass frequencies are louder
than others. When two out-of-phase sound waves collide, they will cancel
each other out and create a null spot in the room. This can leave the bass
sounding thin.
Try moving your subwoofer around the room following the manufacturer’s
recommendation and then try reversing the phase of the SUB output to
see how it affects the sound. You will quickly come to realize that speaker
placement is an imperfect science and that once you nd a comfortable
balance you will likely leave the monitors alone. Getting used to how your
mixes translate to other playback systems takes some time. This is normal.
USING THE DIM CONTROL
A cool feature built into the MC3 is the DIM control. This lets you reduce the
level going to your monitors and subs without affecting the MASTER level
settings. For instance, if you are working on a mix and someone comes in
to the studio to discuss something or your cell phone starts ringing, you can
temporarily lower the volume of the monitors and then instantly go back to
the settings you had before the interruption.
As with the monitors and sub outputs, you can set the DIM attenuation
level using the set & forget DIM LEVEL ADJUSTMENT control on the top
panel. The attenuated level is usually set quite low so that you can easily
communicate over the playback volume. The DIM is sometimes used by
engineers who like to mix at low levels to reduce ear fatigue. Being able to
precisely set the DIM volume makes it easy to go back to familiar listening
levels with a push of a button.
Radial Engineering Ltd.
7
MC3 Monitor Controller
Page 10

®
True to the Music
HEADPHONES
The MC3 is also equipped with a built-in stereo headphone amplier. The
headphone amplier taps the feed after the MASTER level control and
sends it to the front panel headphone jacks and the rear panel ¼” AUX
output. There are two standard ¼” TRS stereo headphone outputs for
studio headphones and a 3.5mm (1/8”) TRS stereo out for ear buds.
The headphone amp also drives the rear panel AUX output. This active
output is an unbalanced stereo ¼” TRS output that is set using the
headphone level control. The AUX output can be used to drive a fourth
set of headphones or as a line-level output to feed additional equipment.
Be Careful: The output of the headphone amp is very powerful. Always
ensure the headphone level is turned down (fully counter-clockwise)
before auditioning music through headphones. This will not only save
your ears, but save the ears of your client! Slowly increase the headphone
volume control until you reach a comfortable listening level.
Headphone Safety Warning
Caution: Very Loud Amplier
As with all products capable of producing high Sound Pressure Levels (SPL)
users must be very careful to avoid the hearing damage that may occur from
prolonged exposure. This is particularly important as it applies to headphones.
Prolonged listening at high SPLs will eventually cause tinnitus and can lead
to partial or complete loss of hearing. Please be aware of the recommended
exposure limits within your legal jurisdiction and follow them very closely. The
user agrees that Radial Engineering Ltd. remains harmless from any health
effects resulting from the use of this product and the user clearly understands
that he or she is entirely responsible for the safe and proper use of this
product. Please consult the Radial Limited Warranty for further details.
MIXING IT UP
Top studio engineers tend to work in rooms they are familiar with. They
know how these rooms sound and instinctively know how their mixes
will translate to other playback systems. Switching speakers helps you
develop this instinctive sense by allowing you to compare how your mix
translates from one set of monitors to another.
Once you are satised with your mix on various monitor speakers you
will want to try listening with a subwoofer as well as through headphones.
Keep in mind that many songs today are downloaded for iPods and
personal music players and it is essential that your mixes also translate
well to ear bud style headphones.
TESTING FOR MONO
When recording and mixing, listening in mono can be your best friend.
The MC3 is equipped with a front panel MONO switch that sums the left
and right channels together when depressed. This is used to check if two
microphones are in phase, test stereo signals for mono compatibility, and
of course help you determine if your mix will hold up when played on AM
radio. Simply depress the MONO switch and listen. Phase cancellation in
the bass range is the most noticeable and will sound thin if out of phase.
Radial Engineering Ltd.
8
MC3 Monitor Controller
Page 11

®
True to the Music
SPECIFICATIONS*
Radial MC3 Monitor Control
Circuit type: ......................................... Passive stereo with active headphones and subwoofer outputs
Number of channels: .......................... 2.1 (Stereo with subwoofer output)
Frequency response: .......................... 0Hz ~ 20KHz (-1dB @ 20kHz)
Dynamic range: .................................. 114dB
Noise: ................................................. -108dBu (Monitor A and B outputs); -95dBu (Subwoofer output)
THD+N: .............................................. <0.001% @1kHz (0dBu output, 100k load)
Intermodulation distortion: .................. >0.001% 0dBu output
Input impedance: ................................ 4.4K Minimum Balanced; 2.2K Minimum Unbalanced
Output impedance: ............................. Varies with level adjustment
Headphone max output: ..................... +12dBu (100k Load)
Features
Dim attenuation: ................................. -2dB to -72dB
Mono: .................................................. Sums left & right sources to mono
Sub: .................................................... Activates the subwoofer output
Source input: ...................................... Left & right balanced/unbalanced ¼” TRS
Monitors output: .................................. Left & right balanced/unbalanced ¼” TRS
Aux output: ......................................... Stereo unbalanced ¼” TRS
Sub output: ......................................... Mono unbalanced ¼” TS
General
Construction: ..................................... 14 gauge steel chassis & outer shell
Finish: ................................................. Baked enamel
Size: (W x H x D) ............................... 148 x 48 x 115mm (5.8” x 1.88” x 4.5”)
Weight: .............................................. 0.96 kg (2.1 lbs)
Power: ............................................... 15VDC 400mA power adapter (center pin positive)
Warranty: ........................................... Radial 3-year, transferable
BLOCK DIAGRAM*
LEFT
MASTER
LEVEL
RIGHT
SOURCE
INPUT
FRONT
HP
FRONT
HP
FRONT
3.5MM
AUX ON
REAR PANEL
* Subject to change without notice.
Radial Engineering Ltd.
HEAD
PHONE
LEVEL
NORMAL
DIM
LEVEL
MONO
SWITCH
DIM
9
OUT-A
LEVEL
ON
OFF
OUT-B
LEVEL
ON
OFF
SUB
LEVEL
ON
OFF
MC3 Monitor Controller
LEFT
RIGHT
MONITOR
OUT-A
LEFT
RIGHT
MONITOR
OUT-B
SUB
OUT
PHASE
180º
Page 12

THREE YEAR TRANSFERABLE LIMITED WARRANTY
RADIAL ENGINEERING LTD. (“Radial”) warrants this product to be free from defects in
material and workmanship and will remedy any such defects free of charge according
to the terms of this warranty. Radial will repair or replace (at its option) any defective
component(s) of this product (excluding nish and wear and tear on components under
normal use) for a period of three (3) years from the original date of purchase. In the event
that a particular product is no longer available, Radial reserves the right to replace the
product with a similar product of equal or greater value. In the unlikely event that a defect
is uncovered, please call 604-942-1001 or email service@radialeng.com to obtain a RA
number (Return Authorization number) before the 3 year warranty period expires. The
product must be returned prepaid in the original shipping container (or equivalent) to
Radial or to an authorized Radial repair centre and you must assume the risk of loss or
damage. A copy of the original invoice showing date of purchase and the dealer name
must accompany any request for work to be performed under this limited and transferable
warranty. This warranty shall not apply if the product has been damaged due to abuse,
misuse, misapplication, accident or as a result of service or modication by any other than
an authorized Radial repair center.
THERE ARE NO EXPRESSED WARRANTIES OTHER THAN THOSE ON THE FACE
HEREOF AND DESCRIBED ABOVE. NO WARRANTIES WHETHER EXPRESSED
OR IMPLIED, INCLUDING BUT NOT LIMITED TO, ANY IMPLIED WARRANTIES OF
MERCHANTABILITY OR FITNESS FOR A PARTICULAR PURPOSE SHALL EXTEND
BEYOND THE RESPECTIVE WARRANTY PERIOD DESCRIBED ABOVE OF THREE
YEARS. RADIAL SHALL NOT BE RESPONSIBLE OR LIABLE FOR ANY SPECIAL,
INCIDENTAL OR CONSEQUENTIAL DAMAGES OR LOSS ARISING FROM THE USE
OF THIS PRODUCT. THIS WARRANTY GIVES YOU SPECIFIC LEGAL RIGHTS, AND
YOU MAY ALSO HAVE OTHER RIGHTS, WHICH MAY VARY DEPENDING ON WHERE
YOU LIVE AND WHERE THE PRODUCT WAS PURCHASED.
To meet the requirements of California Proposition 65, it is our responsibility to inform you of the following:
WARNING: This product contains chemicals known to the State of California to cause
cancer, birth defects or other reproductive harm.
Please take proper care when handling and consult local government regulations before discarding.
®
True to the Music
www.radialeng.com
Radial Engineering Ltd.
1588 Kebet Way, Port Coquitlam, British Columbia, V3C 5M5
Tel: 604-942-1001 • Fax: 604-942-1010 • Email: info@radialeng.com
Radial® MC3™ User Guide - Part #: R870 1230 00 / 03-2017 - v2
Copyright 2017 Radial Engineering Ltd. All rights reserved.
Specications and appearances subject to change without notice.
 Loading...