

Page 1
®
True to the Music™
™
JX•42
Guitar and Amp Switcher
User Guide
Radial Engineering Ltd.
1588 Kebet Way, Port Coquitlam
British Columbia, Canada, V3C 5M5
Tel: 604-942-1001 • Fax: 604-942-1010
Email: info@radialeng.com
www.radialeng.com
Page 2

Page 3

Radial® JX•42™ User Guide
Table of Contents Page
Front and Top Panel Features ............................................. 1
Rear Panel Features ............................................................ 2
Introduction .......................................................................... 3
Making Connections .........................................................4-5
Using the Drag and Trim Controls ........................................6
Switching Amps .................................................................... 7
Switching Guitars ................................................................. 8
Using Effects ........................................................................ 9
Using with Multiple Instruments ......................................... 10
Block Diagram .................................................................... 11
Specications ..................................................................... 12
Warranty............................................................... Back cover
Thank you for purchasing the Radial JX-42 guitar and amp
switcher. This compact device is designed to provide tons
of connectivity options while being super easy to use. But
as with all products, learning the ins-and-outs by reading
the manual can save you a lot of time and optimize the way
you approach to using it. Who knows... you may even nd
ways to improve upon your original setup concept and nd
a more streamlined approach to your needs.
If after you have read this short document you nd yourself
asking a question; please take a moment to visit the Radial
JX-42 FAQ page as this is where we post questions and
answers from users like yourself. If you still do not nd what
you are looking for, feel free to send us a note at info@
radialeng.com and we will do our best to reply in short
order.
Now get ready to start switching faster than a speeding
bullet, quieter than a bat in ight and with the most natural
tone you have ‘never’ heard.
Page 4
®
2 3 4 51
True to the Music
6
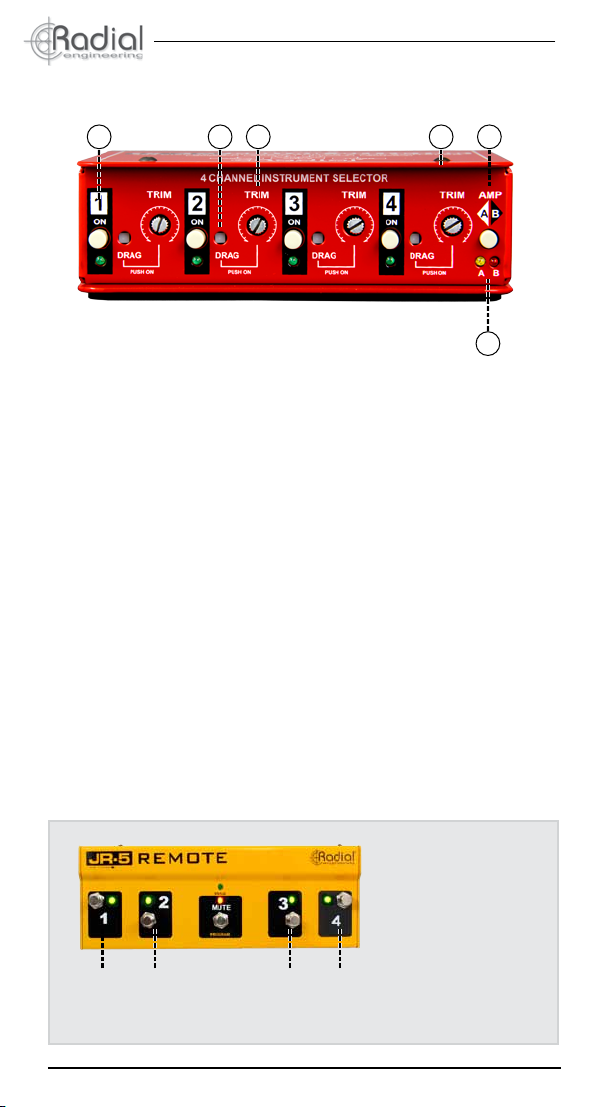
FRONT PANEL FEATURES
1. ON: Activates the input channel. LED indicator lets you know which
channel is active. Radio-style buttons only allow one input to be
active at one time.
2. TRIM / DRAG Switch: Used to set the potentiometer function for
either TRIM or DRAG (push in for DRAG).
3. TRIM / DRAG ADJUST: Potentiometer used to adjust the DRAG
(load) on passive sources or TRIM (level) on active sources.
4. BOOKEND DESIGN: Inovative book-end design creates protective
zone around switches, potentiometers and connectors.
5. AB AMP: Selector switch, lets you toggle between A or B amp
outputs.
6. AB LED: Indicator to show which amp is selected.
Select
Select
Ch.1
Ch.2
Radial Engineering Ltd.
Select
Ch.3
1
JR-5 Remote:
Optional accessory
to select active
instrument input.
Note: Mute will not affect
the JX-42. To mute the
Select
output use JR-2.
Ch.4
JX-42™ Guitar and Amp Switcher
Page 5
®
9 10 12 13
8 11 14 157
True to the Music
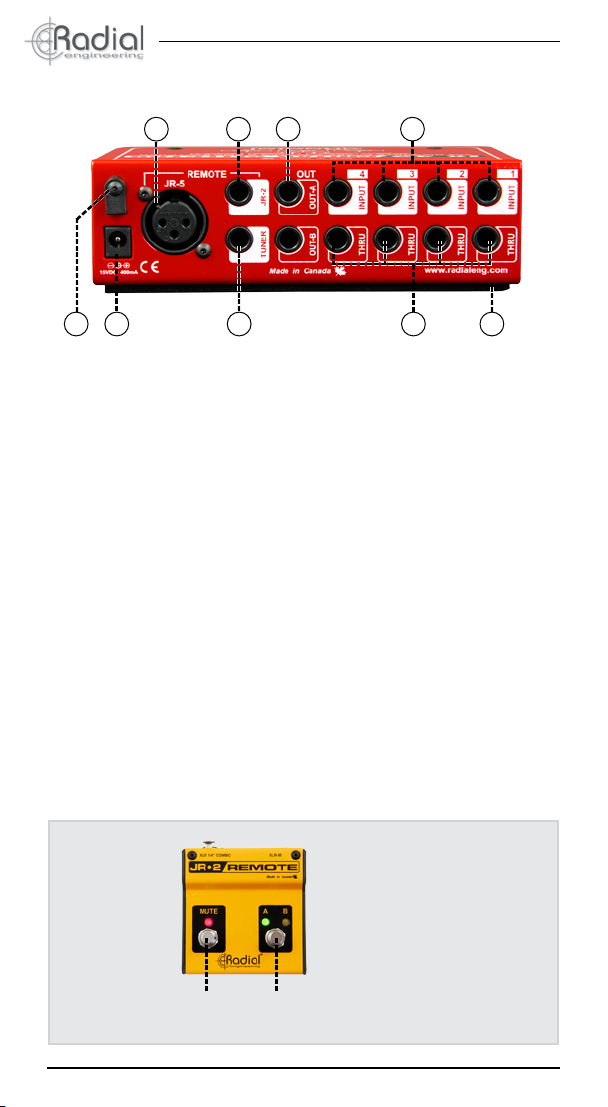
REAR PANEL FEATURES
7. CABLE CLAMP: Secures the power cable to prevent accidental
disconnection.
8. POWER: 15VDC power connection for external power supply.
9. REMOTE JR-5: XLR for optional Radial JR-5 remote footswitch.
10. REMOTE JR-2: TRS ¼” for optional Radial JR-2 remote
footswitch.
11. TUNER: Dedicated tuner output is always on for quick adjustments.
Separately buffered to reduce noise from the tuner’s quartz clock.
12. OUT AB: Unbalanced outputs used to feed A or B guitar amps.
13. INPUT: Hi-Z ¼” instruments input used to connect guitar, bass or
wireless system to the JX-42.
14. THRU: Thru connections used to feed dedicated pedals, amplier,
rack effects or direct boxes.
15. NO SLIP PAD: Pad provides electrical insulation from the chassis
and mechanical isolation from rough handling.
Radial Engineering Ltd.
Mute Amp
Select
JR-2 Remote:
Optional accessory
for amp output.
JX-42™ Guitar and Amp Switcher
2
Page 6

®
True to the Music
INTRODUCTION
The JX-42 is an unbalanced switcher designed to seamlessly switch
between 4 guitars and 2 amps on a hectic concert stage. Every effort
has been made to eliminate switches or controls that could either be
cumbersome or get in the way. This switcher is all about efciency and
making sure the user stays out of trouble.
The four inputs are designed for guitar or bass but may also be used with
other sources. Radio-style push button switches ensure only one input
will be active at any one time. The outputs are also exclusive in that only
one amp may be active at one time. The amps may be controlled using
the front panel switch or via the optional JR-2 footswitch. When using
the JR-2, a mute function becomes available that allows quiet on-stage
tuning via a dedicated tuner output.
The compact design makes it easy to pack while enabling two JX-42’s to
be rack-mounted in a single 19” rack space (see page 12).
USE WITH GUITAR
USE WITH BASS
Radial Engineering Ltd.
JX-42™ Guitar and Amp Switcher
3
Page 7

®
True to the Music
MAKING CONNECTIONS
As always, before making any electrical or audio connections, ensure all
volume levels are turned down or systems turned off. This prevents turnon or connection transients from damaging more sensitive components
such as tweeters. A handy cable clamp is provided that can be used to
secure the power supply if needed. Simply loosen with a hex key, slip the
power supply cable into the cavity and tighten. There is no power switch.
As soon as you plug in the JX-42 it will come to life.
Use a hex driver to
loosen the cable lock.
Pass the cable through
and re-tighten.
As high impedance circuits are prone to noise, we recommend using high
quality coaxial cables with sturdy metal connectors. It is also worth noting
that shorter cables will be less prone to noise versus longer ones and
when you exceed 8 meters (25’), the capacitive effect of the cable will
begin to be audible.
When testing, start by connecting 1 guitar and 1 amp without any pedals.
This keeps things simple and avoids lengthily trouble shooting. Connect
your guitar into the JX-42 input-1 and the output-A from the JX-42 to your
guitar amp. Check to make sure the power supply is properly connected.
One of the front panel LEDs will illuminate to let you know if you are good
to go. Using the front panel switch, select input-1 and output-A
Radial Engineering Ltd.
JX-42™ Guitar and Amp Switcher
4
Page 8

®
True to the Music
Be sure to set all of the DRAG / TRIM switches in the in (DRAG) position
and potentiometers turned are fully clockwise (5 o’clock). Make sure
input-1 is active and output A is on. Turn on your amp and slowly increase
the volume. Once satised that things are working as they should, add a
second guitar by connecting it to input-2. Toggle between them using the
front panel selector switches.
IN
IN / ON
You can now add a second amp by connecting it from output-B. Use the
front panel selector switch to toggle between your amps. Output-B on the
JX-42 is transformer isolated in order to prevent hum and buzz caused
by ground loops.
CAUTION: For safety, always ensure your guitar ampliers are
properly grounded following your local electrical code. Never remove
the electrical ground. It is there to save your life!
It is good practice to connect all your amps and pedals using a common
power bar. This helps reduce noise while ensuring all of your equipment
is sharing a single common electrical ground.
There is also a THRU output on each channel. This non-buffered output
allows you to take a signal direct from the instrument to feed a specic
guitar amp, direct box or maybe an effects processor.
Output-B is
transformer
isolated
Radial Engineering Ltd.
JX-42™ Guitar and Amp Switcher
5
Page 9

®
True to the Music
USING THE DRAG AND TRIM CONTROLS
One of the innovative features found on the JX-42 is the combination
DRAG and TRIM control. This ‘trick’ is done using a dual wafer
potentiometer with one wafer dedicated for the Drag function, the other
for Trim. You merely select between the two functions using the recessed
‘set & forget’ switch.
TRIM
Select
DRAG
Select
Adjusting the Trim Control
When combining non-buffered signals such as a typical passive Fender
®
bass with a buffered source such as an active Yamaha® bass or wireless
system, you will nd that the signals can vary signicantly. You can
convert the DRAG control to a TRIM by simply pushing the recessed
switch outward. To adjust the trim, set the potentiometers fully clockwise
to 5 o’clock. Once all of the instruments are connected, compare them by
switching between one another. For those that are loudest, simply reduce
the level to suit.
Adjusting the Drag Control
A common complaint from guitarists is the way that buffers alter the
tone of their instrument. This is most commonly heard from players that
employ wireless systems. Part of the problem is manufacturers have
followed Leo Fender’s lead by employing the same 1MΩ input that
Fender® used on his tube amps. Early on, we discovered that a 1MΩ
input sounds very different when used with a solid-state circuit and is
likely one of the reasons guitarists still prefer the warmth of a tube amp
over the solid state counterpart.
Drag™ control is a load correction circuit that lets you adjust the load
or the impedance that is applied to the incoming source. Drag control
only works on passive devices such as magnetic pickups. If the signal is
buffered, the control will have little or no effect on the tone. Active basses
or acoustic guitars with built in preamps and electronic keyboards are
examples of buffered sources. Drag essentially replicates the ‘tone and
feel’ as if connected to a tube amp, producing a warmer, more natural
tone. Start by setting the Drag control to 12 o’clock. As you turn the
control clockwise, it will sound brighter, when turned counter-clockwise,
darker. Simply adjust to suit.
Radial Engineering Ltd.
JX-42™ Guitar and Amp Switcher
6
Page 10

®
True to the Music
SWITCHING AMPS
Two amp setup for soloing
There are two primary reasons for switching amps on stage. The most
common is for artists that want to radically change their tone such as
going from a clean ‘Fender
®
’ to a distorted ‘Marshall®’ to add crunch or
maybe for soloing.
AMP A
AMP B
Two amp setup for backup
The second is to provide the artist on stage with a backup. Should one
amp fail, the technician can quickly select the backup amp without having
to reconnect wires half way through a show.
AMP A
AMP B
Switching between amps may be done by either using the front panel
AB selector switch or by adding the JR-2 remote control footswitch. To
eliminate hum and buzz caused by ground loops output B is transformer
isolated. It is important to note that only one amp can be active at any
one time.
Switching channels may also be done using the optional JR-2 remote
footswitch (part no. R800 2090). This compact device features two
footswitches: the rst is an AB SELECT switch with two LED status
indicators and the second a MUTE with another LED. The LEDs are
remotely powered via the ¼” TRS remote connection on the JX-42 thus
eliminating the need for batteries. With a JR-2, you can use either a ¼”
TRS to TRS or a TRS to XLR-F cable. To switch channels, make sure
the JR-2 is connected properly. One of the LED indicators will illuminate
to let you know if power is being received. Simply depress the footswitch
to select the active amp.
Radial Engineering Ltd.
JX-42™ Guitar and Amp Switcher
7
Page 11

®
True to the Music
SWITCHING GUITARS
You can also select guitars using the optional JR-5 remote footswitch
(part no. R800 6600) by connecting it to the JX-42 using a standard XLR
cable. This lets you remotely select the inputs, allowing a stage tech to
select the active channel back stage while the JX-42 can be stationed
near the on stage amps. This has LED indicators that are powered by
the JX-42 to give you instant status notication. Note that the middle
mute footswitch on the JR-5 is not active when used with the JX-42. This
is because the mute is controlled using the optional JR-2 amp selector
footswitch discussed on page 7.
JR-2 Selects Amp JR-5 Selects Instrument Input
As an added bonus, there is a dedicated TUNER out on the rear panel.
This separately buffered output is always on to allow quick on-the y
adjustments. You can use the JR-2 footswitch to mute the signal for quiet
on-stage tuning. When selected, the LED will illuminate and it will mute
both the A and B amp outputs.
Radial Engineering Ltd.
JX-42™ Guitar and Amp Switcher
8
Page 12

®
True to the Music
USING EFFECTS
There are a number of ways that you can use guitar pedals or rack effects
with the JX-42. These can be positioned in between a particular guitar before the JX-42 (A), either of the output A or B outputs (B) or share a
pedal board using your amps effects loop with the Twinline™ (C).
(A)
JR-2
(B)
JR-2 Remote signal passed
through the Twinline’s
Slingshot™ output to select
Amp A or Amp B
EFX Loop EFX Loop
Radial Engineering Ltd.
(C)
Twinline™
JX-42™ Guitar and Amp Switcher
9
Page 13

®
True to the Music
USING WITH MULTIPLE INSTRUMENTS
The JX-42 is a valuable tool that can be used for all kinds of instruments
alongside guitar and bass. Since each input is buffered, has a variable
load or can be trimmed so that the all of the instruments connected
will have the same output, it is easy to incorporate the JX-42 into just
about any multi-instrument setup. When using similar instruments such
as mandolins, banjos and ddles, one can easily connect a direct box
like the Radial JDI at the AMP output to feed a PA system and share
a single channel. Alternatively you can choose your ideal direct box for
each instrument by using the THRU on each channel.
Single DI Setup
OUTPUT-A
Multiple DI Setup
Radial Engineering Ltd.
OUTPUT-A
10
THRU
JX-42™ Guitar and Amp Switcher
Page 14

®
BLOCK DIAGRAM*
OUTPUT A
OUTPUT B
CONTROL IN
SWITCH
1 IN/2 OUT
MUTE
CONTROL IN
True to the Music
TUNER OUT
OPTICAL
SWITCH
CLASS A
DRAG
TRIM /
INPUT 1
SWITCH
CONTROL
CONTROL IN
THROUGH
OPTICAL
CLASS A
DRAG
TRIM /
INPUT 2
SWITCH
CONTROL IN
SWITCH
CONTROL
THROUGH
* Subject to change without notice.
Radial Engineering Ltd.
OPTICAL
CLASS A
DRAG
TRIM /
SWITCH
CONTROL IN
SWITCH
CONTROL
INPUT 3
OPTICAL
CLASS A
TRIM /
THROUGH
SWITCH
SWITCH
DRAG
CONTROL
INPUT 4
CONTROL IN
PIC
1 OF 4
BOARD
SELECTOR
123
4
MOMENTARY SWITCHES
THROUGH
JX-42™ Guitar and Amp Switcher
11
JR-5 REMOTE IN
A/B
CONTROL
A/B SWITCH
INPUT
JR2 REMOTE
MUTE
CONTROL
Page 15

®
True to the Music
RACK MOUNTING
You may also special order a rack mount kit (part no. R800 9420 10)
for the JX-42 that lets you mount one or two JX-42’s into a single 19”
rack space. This is particularly handy for touring musicians that need
to have their switcher nearby their amps or for technicians that require
strategically positioned amp setups.
SPECIFICATIONS*
Audio circuit type: Class-A BiFET buffering amplier
Dynamic range: 112dB
Gain - Input to all outputs: -1.5dB
Equivalent input noise: -103dB
Intermodulation distortion: 0.04%
Maximum input: +11dBu
Total harmonic distortion: 0.002% @ -20dBu
Input impedance: Drag Control - Variable from 22K to 500K
Output impedance: 1000Ω
Phase Deviation: 5° @ 50Hz
Features
Controls: Dual function Trim or Drag Control
Switches: Input select, Trim/Drag, Amp A/B select
Input connections: ¼” inputs and thru-puts for each channel
Output connections: A/B Amp outputs, Tuner Output
Remote controls: Slingshot contact closure in/out
General
Construction: 14 gauge steel chassis & outer shell
Finish: Durable powder coat
Size: (W x H x D) 4.5” x 2” x 6” (114 x 57 x 147mm)
Weight: 2.8lbs (1.3Kg)
Power: 15V 400mA Power Adapter
Warranty: Radial 3-year, transferable
* Subject to change without notice.
Radial Engineering Ltd.
JX-42™ Guitar and Amp Switcher
12
Page 16

THREE YEAR TRANSFERABLE LIMITED WARRANTY
RADIAL ENGINEERING LTD. (“Radial”) warrants this product to be free from defects in
material and workmanship and will remedy any such defects free of charge according
to the terms of this warranty. Radial will repair or replace (at its option) any defective
component(s) of this product (excluding nish and wear and tear on components under
normal use) for a period of three (3) years from the original date of purchase. In the event
that a particular product is no longer available, Radial reserves the right to replace the
product with a similar product of equal or greater value. In the unlikely event that a defect
is uncovered, please call 604-942-1001 or email service@radialeng.com to obtain a RA
number (Return Authorization number) before the 3 year warranty period expires. The
product must be returned prepaid in the original shipping container (or equivalent) to
Radial or to an authorized Radial repair centre and you must assume the risk of loss or
damage. A copy of the original invoice showing date of purchase and the dealer name
must accompany any request for work to be performed under this limited and transferable
warranty. This warranty shall not apply if the product has been damaged due to abuse,
misuse, misapplication, accident or as a result of service or modication by any other than
an authorized Radial repair center.
THERE ARE NO EXPRESSED WARRANTIES OTHER THAN THOSE ON THE FACE
HEREOF AND DESCRIBED ABOVE. NO WARRANTIES WHETHER EXPRESSED
OR IMPLIED, INCLUDING BUT NOT LIMITED TO, ANY IMPLIED WARRANTIES OF
MERCHANTABILITY OR FITNESS FOR A PARTICULAR PURPOSE SHALL EXTEND
BEYOND THE RESPECTIVE WARRANTY PERIOD DESCRIBED ABOVE OF THREE
YEARS. RADIAL SHALL NOT BE RESPONSIBLE OR LIABLE FOR ANY SPECIAL,
INCIDENTAL OR CONSEQUENTIAL DAMAGES OR LOSS ARISING FROM THE USE
OF THIS PRODUCT. THIS WARRANTY GIVES YOU SPECIFIC LEGAL RIGHTS, AND
YOU MAY ALSO HAVE OTHER RIGHTS, WHICH MAY VARY DEPENDING ON WHERE
YOU LIVE AND WHERE THE PRODUCT WAS PURCHASED.
To meet the requirements of California Proposition 65, it is our responsibility to inform you of the following:
WARNING: This product contains chemicals known to the State of California to cause
cancer, birth defects or other reproductive harm.
Please take proper care when handling and consult local government regulations before discarding.
All trademarks belong to their respective owners. All references to these are for example only and are
not associated with Radial.
®
www.radialeng.com
Radial Engineering Ltd.
1588 Kebet Way, Port Coquitlam, British Columbia, V3C 5M5
Tel: 604-942-1001 • Fax: 604-942-1010 • Email: info@radialeng.com
Radial® JX-42™ User Guide - Part #: R870 1062 00
Copyright 2015 Radial Engineering Ltd. All rights reserved.
Specications and appearance subject to change without notice.
 Loading...