

Page 1

Radial Engineering Ltd.
1588 Kebet Way, Port Coquitlam BC V3C 5M5
tel: 604-942-1001 • fax: 604-942-1010
www.radialeng.com
email: info@radialeng.com • www.radialeng.com
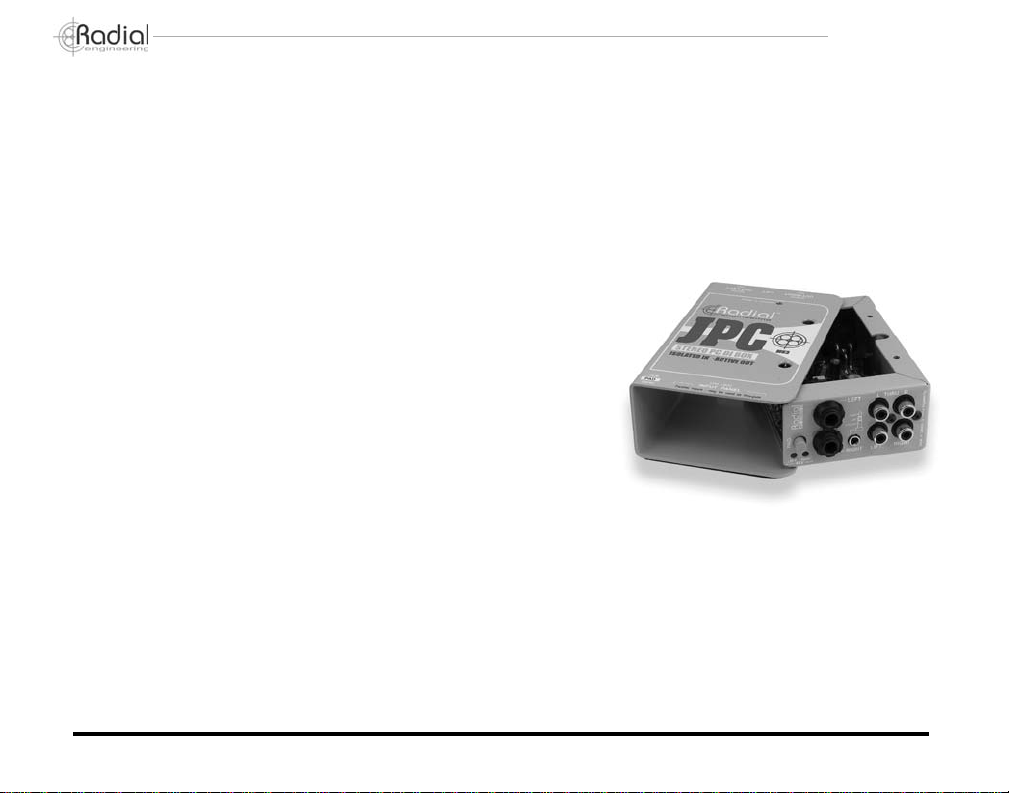
JPC
STEREO PC DI BOX
ISOLATED IN· ACTIVE OUT
MK3
USER GUIDE
Page 2

Page 3

JPC USER GUIDE
Stereo PC Direct Box
TABLE OF CONTENTS PAGE
Introduction ..............................................................................1
Input & output panel features ..................................................2
Inside view & features .............................................................3
Connecting the JPC.................................................................4
JPC features ............................................................................7
Frequently asked questions.....................................................8
Block diagram and specifi cations ............................................11
Warranty ....................................................................Back cover
Radial Engineering Ltd.
1588 Kebet Way, Port Coquitlam BC V3C 5M5
tel: 604-942-1001 • fax: 604-942-1010
email: info@radialeng.com • web: www.radialeng.com
Features and specifi cations are subject to change without notice.
Page 4
®
INTRODUCTION
Congratulations on your purchase of the Radial JPC direct box.
The Radial JPC is a stereo direct box that has been specifi cally designed to interface computer sound
cards and other consumer electronic products with professional sound systems. It is unique in
that it combines the advantages of transformer-isolated inputs with an active drive circuit,
giving you the ‘best of both worlds’ in a compact and extremely fl exible package.
Transformer coupled inputs have the unique advantage of isolating the
‘source’ from the ‘destination’. This proven approach eliminates 60-cycle hum
and buzz caused by ground loops when two electrically powered devices are
connected together. Because the active circuit does all of the impedance
conversion and balancing, a dedicated 1:1 transformer can be used. This
results in a hybrid design that is at once great sounding, compact and
more affordable.
As with all great designs, simplicity is a fundamental trait, and the
Radial JPC certainly fi ts the bill. A choice of ¼”, 3.5mm and RCA input /
thru-put connectors make interfacing a snap with all types of equipment.
A single switch inserts a –15dB pad into both channels, two power LEDs
(one for each channel) confi rm 48V phantom is turned on, and a pair of
XLR output connectors round out the feature set.
Of course like all Radial products, the JPC is built to handle the most
abusive environments. Our unique bookend design protects switches and
connectors from damage while the 14-gauge steel I-beam construction
eliminates outside stress that could torque the PC board and cause solder
joint failure. A full-bottom no-slip pad provides electrical insulation and mechanical
isolation while also helping the JPC ‘stay-put’ on hectic stages.
Although the JPC is really easy to use, we highly suggest you read through this
manual and familiarize yourself with the JPC’s features. This will help you make the most
out of this marvellous device. We also suggest visiting our web site at www.radialeng.com for more
information and updates. Should you have any questions or concerns that are not covered in this manual
we invite you to contact us by email at info@radialeng.com.
Now plug in your JPC and let the show begin!
True to the Mu sic
Radial Engineering JPC User Guide
1
Page 5
®
FEATURES AND FUNCTIONS
True to the Music
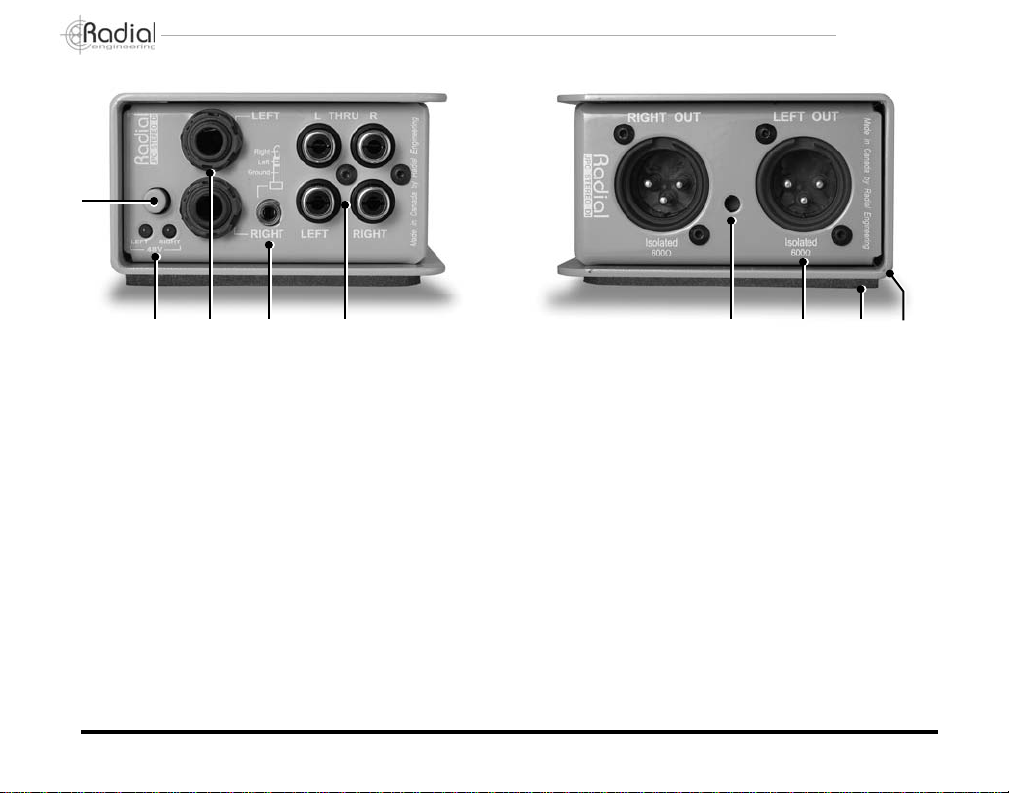
INPUT PANEL
1. –15dB Pad is used to prevent loud sources from
overloading the JPCs audio circuit.
2. 48V Power LEDs let you know that phantom has been
turned on and is powering the two channels.
3. Dual 1/4” jacks can be use for a stereo device or two
mono signals.
4. 3.5mm TRS stereo mini connector designed for direct
connection of PCs, laptops, and portable audio devices
without adaptors.
5. Stereo RCA connectors are great for connecting
consumer electronics like CD players, VCRs and DJ
mixers. RCA thru-puts provide a duplicate output for
splitting and routing fl exibility .
Radial Engineering JPC User Guide
OUTPUT PANEL
6. Ground lift switch breaks the ground connection between
the input and the output. The default position is lifted to
prevent hum from ground loops.
7. Stereo left and right XLR male output connectors are
isolated from the chassis and follow AES standard with
pin-2 hot.
8. No-slip full rubber bottom provides mechanical isolation,
electrical insulation and ‘stay-put-ability!’
9. 14-gauge steel bookend design creates a protective zone
around buttons and connectors. Tough baked enamel
fi nish for years of ‘great looking’ performance.
2
Page 6

®
INSIDE VIEW
True to the Music
10 11 12 13 14 15
10. Isolated XLR connectors to eliminate chassis ground
potential.
11. Active drive circuit electronically balances stereo
signals for long cable runs without loss.
12. Transformers on both inputs provide 100% isolation
to eliminate hum and noise from ground loops.
Radial Engineering JPC User Guide
13. Military grade PC board with full surface ground plane
to reduce RF noise susceptibility.
14. High duty-cycle switches for a maintenance free long
life.
15. Welded I-beam construction makes it impossible to
torque the PC board.
3
Page 7

®
True to the Music
CONNECTING THE JPC
Caution! Make sure all levels are down before connecting!
The JPC is powered by 48V phantom thru the XLR outputs, and automatically turns on when phantom
power is activated. Activating phantom power at the console can cause a loud transient signal spike
which could cause a big “bang” in your sound system or even cause a speaker to blow. Make sure your
system levels are turned off before connecting the JPC and activating phantom power.
The JPC is designed to make connecting all types of audio signals easy. The JPC features a combination of standard stereo
connectors found on PCs and consumer electronic devices. These are connected just like a home stereo system. Cables that
ship with many devices will work with the 3.5mm and RCA inputs. The JPC can even interface electronic musical instruments,
like keyboards and drum machines with 1/4” cables. Or, in a pinch, the JPC can be used as a standard instrument DI.
Finally, the JPC’s ‘thru-put’ feature gives you the option to split the signal and adapt from one connector type to another.
The Inputs and thru-puts
The JPC is outfi tted with a wide array of connectors to make life easy during hectic set-ups. It is important to note that the
3.5mm mini jack is a stereo TRS (tip-ring-sleeve) connector. The ring connects to channel-1 (left), the tip to channel-2 (right)
and the sleeve is a common ground. The RCA jacks follow standard left and right confi guration and also feature parallel
thru-put jacks for convenience. One of the wonderful features of the JPC is that all inputs on the front panel are wired in
parallel and may also be used as thru-puts.
Radial Engineering JPC User Guide
4
Page 8

®
3.5mm TRS stereo input
This is a standard connector used on notebook
computers and personal music players. It uses a mini
Tip, Ring, Sleeve (TRS) jack in a stereo confi guration.
When used with the -15dB PAD, this input can be used
with headphone level outputs. When using a headphone
output as a source, be sure to turn down the headphone
level to minimum. Even with the -15dB PAD a headphone
amplifi er can overload the JPC when it's level is not set
to minimum.
RCA stereo inputs
These jacks accept unbalanced, consumer audio signals.
Virtually any audio output that appears on an RCA
connector can be connected to this input. This includes a
long list of electronics like CD players, cassette recorders,
AM/FM tuners, video cassette recorders, etc.
RCA thru-puts
A duplicate of the input signal is available at the RCA
thru-put connectors. This feature can come in handy to
split the signal to a second mixer or tape recorder.
Un-used connectors as thru-puts
All of the JPC’s input connectors are parallelled together.
This means that any unused inputs can also be a thruput to split the stereo signal and/or adapt one format
connector to another. For example, one can connect a
CD player using the RCA stereo input jacks and use the
3.5mm jack as a thru-put to split the signal to a notebook
computer. It also works the other way . When the 3.5mm
jack is used as an input, the RCA thru-puts can be used
to connect a recorder or second mixer. Clever!
True to the Music
Notebook PC with single stereo 3.5mm cable
Cass, CD, or VCR connected with stereo RCA cable
3.5mm input used as thru-put to connect laptop
Radial Engineering JPC User Guide
5
Page 9

®
Dual mono 1/4” TRS input
These two unbalanced 1/4” input jacks are used with
stereo devices like electronic musical instruments and
PC audio recording interfaces that output left and right
signals on separate jacks.
A 1/4" headphone output from a stereo device may also
be connected to the JPC 1/4" inputs with a stereo-to-dual
mono adaptor cable as show to the right. Engage the PAD
when using a headphone outputs as a source.
Using the JPC as an instrument DI
Although the Radial JPC is designed to work with
computer sound cards and other consumer level hiimpedance devices, it can also be used with instruments
that feature active electronics such as acoustic guitars that
have a built-in pick-up and pre-amplifi er, bass guitars with
active pickups and electonic keyboards.
We do not, however, recommend using the JPC with
instruments that have passive pickups, like a standard
bass guitar or contact pezio pickups. The JPCs input
transformers will introduce impedance loading when used
with passive pickups due to the impedance mismatch.
Impedance loading will cause high frequency loss that
may be unacceptable. The Radial JDI, ProD1, J48 and
Pro48 are DIs better suited because the input impedance
is designed to match instrument with passive pickups.
True to the Music
Stereo 1/4” TRS connector wired to dual mono connectors
An instrument with active pickups connects to the 1/4"
input. If a thru-put to an amp is required an adaptor must
be applied to the like RCA output.
Radial Engineering JPC User Guide
6
Page 10

®
True to the Music
The -15dB pad
This push-button switch reduces the input level going to the JPC circuit. Some audio devices with overly powerful outputs
can overload the JPC inputs. Simply depress the pad switch if the sound is distorted.
Phantom power LED indicators
The JPC is powered by 48V phantom thru the XLR outputs, and automatically turns on when phantom power is activated.
Activating phantom power can cause a loud transient signal spike. Make sure your system levels are turned off before
activating phantom power. The two power-on LEDs on the front panel will illuminate when phantom power is present. If the
LED’s do not light, check to see if the phantom power for each channel is active at the console. The JPC is not equipped
to run off a battery or a separate power supply.
Transformer isolation
Probably the most challenging aspect when setting up a sound system is reducing system noise. The most common problem
is buzz and hum due to ground loops. This is generally caused by two pieces of equipment, each with its own separate
ground path, and differing voltage potentials, interacting together. The JPC eliminates this problem by providing 100%
transformer isolation on both inputs.
Using the ground lift
To ensure the widest possible compatibility with a variety of audio devices, a ground lift switch is provided on the JPC. The
default position is lifted (pushed in) as the JPC’s transformers are designed to isolate the input ground from the output.
However, there may be times when a ground path thru the JPC is desired. In these circumstances, the switch by-passes
the input transformers to provide the input source with a path to ground (pin-1).
Using the XLR output
The JPC XLR outputs follow the AES standard with pin-2 hot. This is generally connected to a microphone snake or directly
into a mixing console. As a phantom powered device, this is also where the JPC derives it’s working power. The output is
mic level and as such, should be connected to a mic pre-amp such as is common in professional mixers.
Plug and play easy
Ultimately, a good direct box should be plug and play easy to use. The JPC is a sophisticated device on the inside that is
designed to be easy to use on the outside. By understanding the design, we feel that you can now make better use of the
features that are built into this marvelous direct box.
Radial Engineering JPC User Guide
7
Page 11

®
True to the Music
FREQUENTL Y ASKED QUESTIONS
What is a direct box anyway?
The name ‘direct box’ comes from direct insert box. This is why these marvelous contraptions are also called DI’s. ‘Direct
Insertion’ means exactly that: To insert a signal directly or take an audio signal from the source and send it directly to a
mix point or recorder.
Direct boxes perform several important functions: They are designed as impedance matching and signal balancing devices.
This means that they take the high impedance source and ‘transform’ it to the low impedance used in balanced sound
systems. Balanced signals inherently cancel noise and due to their lower impedance, can travel much further. Balanced
signals are the norm in professional recording, broadcast and live sound. By properly matching the impedance you will
enjoy better sound, less noise and an extended frequency response.
What kinds of audio devices will the JPC work with?
Virtually any electronic audio device that outputs an unbalanced, hi-z signal. See the chart below for more details.
JPC Input Compatible Device
3.5mm Notebook computers
Personal music & MP3 players
Solid state voice recorders
Micro-cassette recorders
Any device with a 3.5mm output
RCA CD players
Cassette players/recorders
Video cassette recorders
Any device with RCA outputs
1/4” Stereo electronic musical instruments
Stereo headphone outputs
Radial Engineering JPC User Guide
8
Page 12

®
True to the Music
Can I use any input as an output?
Yes, any unused input can also be used as an output. The input side of the JPC is wired in parallel. The signal from one
stereo input will be available on the other connectors as a stereo output. RCA jacks are a very common connector found on
most consumer electronics. This is why the JPC has a dual stereo set of RCA jacks labelled ‘input’ and ‘thru-put’. However ,
on some occasions it may be necessary to patch a stereo signal from a device with RCA jacks, like a CD player , to a device
with 3.5mm jacks, like a notebook computer. The JPC can perform as a connector adapter while at the same time output
a balanced signal on XLR connectors.
Can I use the Radial JPC like a regular DI box for instruments?
Although the Radial JPC was designed to work with computer sound cards and other consumer level hi-impedance devices,
it can also be used with active instruments such as acoustic guitars that have built-in pick-up pre-amplifi ers with internal
batteries. We do not, however, recommend using the JPC with passive instruments like a bass guitar , as the input transformers
low impedance may introduce some loading due to the impedance mismatch.
Will it then harm the JPC if I connect a bass to it?
No, of course not. We only state this advisory as we make DIs for instruments such as the J48 and JDI that are simply
better for instruments. The JPC will certainly work in a pinch.
Can I use the JPC on keyboards?
Yes. Just make sure you do not overload the JPC by driving too much signal through it. The JPC’s smaller transformers
are designed for consumer type levels. Keyboards, samplers and drum machines usually output a much more dynamic and
uncompressed level. The JDI, the Duplex, ProD1 and ProD2 are better suited for electronic musical instruments.
What is the advantage of transformer isolating the inputs?
When any two pieces of electrically powered equipment are connected together, they form a circuit. Most often, the reference
voltages from each device differs, causing stray voltage to appear at the connections, which in turn can cause system noise
commonly known as ground loops. By isolating the inputs through a transformer, we are physically de-coupling the signal
path, and thus, eliminating any opportunity for ground loops in the system.
I am not getting any sound.
Check to see if you have the 48V phantom power turned on at your mixer. The two LEDs on the JPC will illuminate when
phantom power is present.
Radial Engineering JPC User Guide
9
Page 13

®
True to the Music
The sound is distorted.
Try turning down the level from the source or depressing the –15dB pad to reduce the input signal from the source. Excessive
levels can saturate the input transformers, which could cause distortion. Make sure you are supplying the JPC with a full
48V phantom supply. Some inexpensive mixers will supply lower voltages, which could starve the JPC’s circuit.
I am hearing buzz / hum.
Check the ground lift switch on the side of the JPC. Select the lifted position for the JPC to isolate the input ground from the
output. This will eliminate buzz & hum caused by voltage potential between the input source device and the main console
at the other end of the XLR outputs.
Can the JPC be rack mounted?
Yes. With the Radial J-Rak, as many as 8 JPCs may be mounted in two standard 19” rack spaces. The J-Rak allows the
JPC inputs to face either to the front or the rear of the rack as needed.
Radial J-Rack
Radial Engineering JPC User Guide
10
Page 14

®
BLOCK DIAGRAM AND SPECIFICATIONS
JPC Specifi cations
Type of DI: Stereo active 48V phantom powered
Input impedance: Unbalanced 10K-Ohms
Output impedance: Balance 600-Ohms
Frequency response: 20Hz to 20kHz
Linear performance: +/- 2dB from 20Hz to 20kHz
Total harmonic distortion: 0.06% @ 20Hz, 0.005% @ 1kHz
Phase distortion: 0.02º at 1kHz
Maximum input voltage: 3.12 Volts RMS ( 9V peak )
Output level -30dBu w/o pad (0dBu/ref: 1V RMS input)
-45dBu w/ pad (0dBu/ref: 1V RMS input)
Input connections: 1/4” TS, 3.5mm TRS, stereo RCA x 2
Output connections: XLR balanced, AES pin-2 HOT
Size: 3.5” wide, 2” high, 5.5” deep
Weight: 1kg or 2lbs
Construction: Welded 14-gauge steel
Finish: Baked enamel coating
True to the Music
Radial Engineering JPC User Guide
11
Page 15

Page 16

RADIAL ENGINEERING
3 YEAR TRANSFERABLE WARRANTY
RADIAL ENGINEERING LTD. (“Radial”) warrants this product to be free from defects in material and workmanship
and will remedy any such defects free of charge according to the terms of this warranty. Radial will repair or replace
(at its option) any defective component(s) of this product (excluding fi nish and wear and tear on components under
normal use) for a period of three (3) years from the original date of purchase. In the event that a particular product is
no longer available, Radial reserves the right to replace the product with a similar product of equal or greater value.
To make a request or claim under this limited warranty, the product must be returned prepaid in the original shipping
container (or equivalent) to Radial or to an authorized Radial repair center and you must assume the risk of loss or
damage. A copy of the original invoice showing date of purchase and the dealer name must accompany any request
for work to be performed under this limited warranty. This limited warranty shall not apply if the product has been
damaged due to abuse, misuse, misapplication, accident or as a result of service or modifi cation by any other than
an authorized Radial repair center.
THERE ARE NO EXPRESSED WARRANTIES OTHER THAN THOSE ON THE FACE HEREOF AND DESCRIBED
ABOVE. NO WARRANTIES WHETHER EXPRESSED OR IMPLIED, INCLUDING BUT NOT LIMITED TO, ANY
IMPLIED WARRANTIES OF MERCHANTABILITY OR FITNESS FOR A PARTICULAR PURPOSE SHALL EXTEND
BEYOND THE RESPECTIVE WARRANTY PERIOD DESCRIBED ABOVE OF THREE YEARS. RADIAL SHALL NOT
BE RESPONSIBLE OR LIABLE FOR ANY SPECIAL, INCIDENTAL OR CONSEQUENTIAL DAMAGES OR LOSS
ARISING FROM THE USE OF THIS PRODUCT. THIS WARRANTY GIVES YOU SPECIFIC LEGAL RIGHTS, AND
YOU MAY ALSO HAVE OTHER RIGHTS, WHICH MAY VARY DEPENDING ON WHERE YOU LIVE AND WHERE
THE PRODUCT WAS PURCHASED.
www.radialeng.com
Radial Engineering Ltd.
1588 Kebet Way, Port Coquitlam BC V3C 5M5
tel: 604-942-1001 • fax: 604-942-1010
email: info@radialeng.com • web: www.radialeng.com
JPC MK3- Manual v2.1 part#: R800-9631-00
 Loading...