

Page 1

®
True to the Music
JDX
Amplifi er Direct Box
User Guide
CAUTION: Please read safety disclosure
statement on the inside cover before
connecting your Radial JDX.
Radial Engineering Ltd.
1588 Kebet Way, Port Coquitlam BC V3C 5M5
Tel: 604-942-1001 Fax: 604-942-1010
email: info@radialeng.com
www.radialeng.com
Page 2

SAFETY DISCLOSURE STATEMENT
CAUTION:
Please read before
connecting your Radial JDX
THE JDX IS NOT A LOAD BOX
It is mandatory that your amplifi er be connected to a
loudspeaker or load box at all times. The JDX does not
provide a signifi cant resistive load for an amplifi er to
safely operate. Damage may occur to your amp if the
JDX is used without a proper loudspeaker load.
ALWAYS TURN YOUR AMPLIFIER OFF BEFORE
CONNECTING OR DISCONNECTING THE JDX.
It is your responsibility to confi rm the JDX is connected
properly before operating your amplifi er. If you are
unsure about connecting or operating the JDX consult
a qualifi ed technician or see your dealer. Damage
caused by improper operation is not covered under the
warranty. See the back cover for warranty details.
www.radialeng.com
Page 3

True to the Music
Radial JDX Amplifi er Direct Box
Users Guide
Table of Contents Page
Introduction ...................................................................1
Design Concept ............................................................2
Applications ..................................................................5
Feature Set ...................................................................6
Input Panel ...................................................................7
Output Panel ................................................................7
Making Connections .....................................................8
FAQ ..............................................................................8
Specifi cations ...............................................................9
Warranty ................................................................Back Cover
Congratulations on your purchase of the Radial JDX guitar amp
direct box, a unique tool for recording and performing with amplifi ed electric guitar. The JDX is an active speaker-level DI that taps
the natural tone of your amplifi er and interfaces it with professional
recording and PA systems.
The Radial JDX is easy to use, however it differs signifi cantly from
standard direct boxes. Like any tool, the best way to get the most
out of your JDX is by understanding the design, functions and
safety features. We recommend you take a few minutes to read
this manual before operating your JDX.
Should you have any questions regarding the JDX or it’s functions
check our FAQ at www.radialeng.com. If you would like to share
your experience with Radial products we invite you to contact us
at info@radialeng.com.
The JDX, one small step for mankind, one huge leap for tone
fanatics!
Radial Engineering
JDX User Guide
1
Page 4
True to the Music
DESIGN CONCEPT
The JDX differs from a standard DI like the Radial J48. A standard DI taps the output of the guitar before it is connected to an
amplifi er. The JDX taps the output of your amplifi er yielding a
completely different sound.
The JDX is placed between the amplifi er and loudspeaker. A pro-
prietary reactive circuit follows the constantly changing interaction
between amp and speaker to capture the dynamic response of
your amp. Then an active multi-stage fi lter processes the signal to
emulate the frequency response of a loudspeaker and fi nally, the
JDX uses a Class-A buffering amplifi er to output a signal suitable
for pro-recording and and PA systems.
JDX Amplifi er Direct Box vs. Standard Direct Box
JDX Amplifi er DI J48 Standard DI
Bass and acoustic guitars often use a standard DI to capture the
clean sound of the instrument. This works because these instruments almost always use an unprocessed sound and the PA
system merely amplifi es the levels of the direct signal.
Electric guitars generally don’t use standard DIs because the amplifi er and loudspeaker play an important part in a player’s sound.
Typically a microphone is used to capture the amplifi ed guitar
sound. This raises several other variables such as bleed, placement and acoustics that come along with using microphones.
The Radial JDX offers an easy solution by eliminating the microphone and delivering the sound of a player’s amp directly
to the recording or PA console. By removing the variables of a
microphone the consistency of the sound from night to night is
improved. This is a boon to in-ear monitor users. When listening
through in-ear monitors subtle differences in mic placement and
room acoustics can translate into huge changes in tone. The JDX
provides great sound while eliminating bleed from other instruments, like drums, from leaking into the guitar mix.
Radial Engineering
Mixing Console
JDX User Guide
2
Page 5

True to the Music
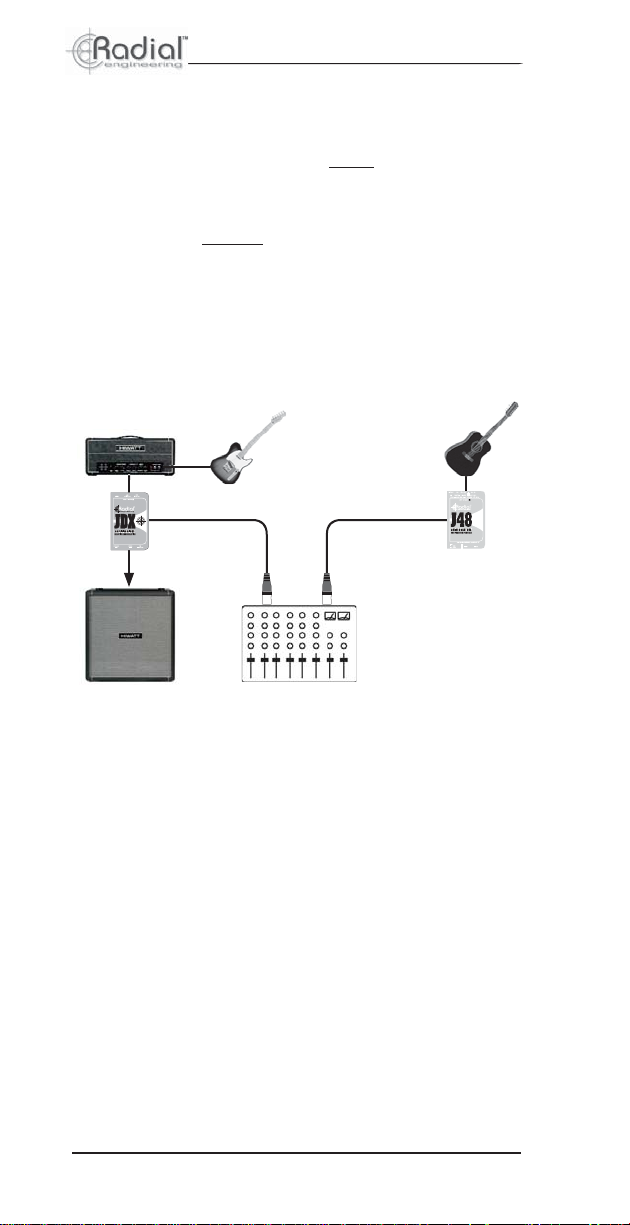
TYPICAL APPLICA TIONS
Replace a Microphone with JDX.
The most basic use of the JDX is to eliminate the need to use an
open microphone to capture the sound from the guitarist’s amp.
The diagram shows the typical connection of the JDX.
Using the JDX with a Microphone
Mixing the signal from the JDX with a microphone is a great way to
create new sounds. The JDX can also be mixed with a clean direct
box signal for a cool effect. Try recording the JDX and microphone
to separate tracks that are panned hard left and right.
Using the JDX with the Radial Phazer
When the signal from the JDX and a microphone combine there
will inevitably be a small time delay between the signals. The
Radial Phazer can be used to time-align the JDX signal with the
microphone for perfect phase response. The Radial Phazer saves
you editing time because it works in real-time while recording.
JDX
Microphone
AMPLITUDE
TIME
Radial Engineering
Phase off-set
JDX and Microphone in
perfect time-alignment.
AMPLITUDE
TIME
Radial Phazer inserted
on JDX channel
JDX User Guide
3
Page 6

True to the Music
BLOCK DIAGRAM
T o help you understand how the JDX works take a few moments
to trace the signal fl ow through the block diagram.
TRANSFORMER
FROM AMP
TO SPEAKER
REACTIVE LOAD
GROUND
LIFT
CAUTION, THE JDX IS NOT A LOAD BOX
Please read the saftey disclosure statement on the
inside cover of this manual before connecting or
operating the JDX.
ACTIVE
BANDPASS
FILTER
ACTIVE
BALANCED
DRIVER
POLARITY
REVERSE
BALANCED
XLR OUTPUT
Parallel Amplifi er Input and Speaker Thru-put
The FROM AMP input and TO SPEAKER thru-put jacks are
paralleled together and provides the means to patch the JDX
in-between the amp output and loudspeaker.
Transformer
The transformer is the front end of the JDX reactive circuit and
is used as a reactive load that responds into the various electrical phenomena that dictate how a particular amplifi er and loud-
speaker sound together.
This is what makes the JDX unique when compared to the “load
box” approach. A load box simply burns off the excess energy
into heat and completely ignores the amp and loudspeaker interaction. By capturing the reactive effect between the amp and
loudspeaker the JDX comes closer to the original tone than any
other interface system.
The transformer also pulls double duty by electrically isolating
the signal passing through it, effectively blocking noise caused by
ground loops. This is important because the JDX connects a guitar
amplifi er to a recording or PA system that may be powered from
a different AC main circuit. Without the transformer a ground loop
may form that can cause buzz and hum in sound systems.
Radial Engineering
JDX User Guide
4
Page 7

True to the Music
Ground Lift
A ground lift switch is provided to further reduce noise caused
by ground loops.
Active Bandpass Filter
The analog fi lter section is the back-end of the reactive circuit
and its job is to emulate the typical response curve of a speaker
cabinet. The Class-A active fi lter in the JDX produces superior
sound over passive fi lter circuits.
Active Balanced Driver
The output driver in the JDX converts the output to a balanced 600
ohm mic-level signal for driving long cables without signal loss or
noise. This JDX output can be patched into typical microphone
snakes and be processed along with other microphone signals.
The active balanced driver uses a discrete Class-A design for
excellent headroom and low distortion.
180° Polarity Reverse
The polarity of the JDX output can be inverted with the 180°
switch. Depressing the switch will reverse the signal on pin-2
and pin-3 at the XLR output. The polarity reverse may be used
to interface older "pin-3 hot" equipment that does not follow the
AES standard for XLR pin-out, or to correct a polarity reversal
upstream in the signal chain.
Balanced XLR Output
The JDX outputs a balanced mic-level signal. The male XLR connector pin-out is wired to the AES (Audio Engineering Society)
standard with pin-1 ground, pin-2 hot and pin-3 cold.
Radial Engineering
5
JDX User Guide
Page 8

FEATURES AND FUNCTIONS
True to the Music
GROUND LIFT switch
eliminates hum and buzz
caused by ground loops.
POWER LED lights to indicate the JDX is connected
to its power supply.
XLR OUTPUT mic-level,
600 Ohms balanced XLR
output connects to your
mixing console.
FROM AMP connection
for amplifi er output, max
300 watts.
TO SPEAKER connects your amp
to the speaker through the JDX.
Connection to a loudspeaker is
mandatory. Please read the safety
disclosure statement before connecting the JDX.
BOOKEND DESIGN
creates a protective zone
for the jacks switches.
POLARITY RREVERSE
for pin-2 and pin-3 at
the XLR output. Used
to correct signal polarity
problems.
Radial Engineering
PSU JACK connection
for the included 15 volt
DC power supply.
FULL BOTTOM PAD Neoprene
keeps it from sliding around and
provides isolation from electrified
amplifi er frames and handles.
JDX User Guide
6
Page 9

True to the Music
CONNECTING THE JDX
The JDX will typically be located on or near the guitar amplifi er to
facilitate short speaker cables. We recommend speaker cables be
6 feet or less in length with a minimum of 16AWG two conductor
cable. Longer cables should use heavier gauges to maintain the
best power transfer. The balanced XLR connection from the JDX
to the mixing console may be made through several hundred feet
of balanced cable without signal loss.
Before you begin, ensure your amplifi er and PA or record-
ing system are turned off. Lower all the volume controls to
minimum to avoid loud transients.
1. Connect your amplifi er’s speaker output to the FROM AMP
¼” jack on the JDX.
2. Connect the SPEAKER ¼” jack on the JDX to your speaker
cabinet.
3. Connect the XLR output to a mic preamp input on your mixing
console using a standard XLR microphone cable.
4. Connect the JDX power supply and check the LED power
indicator to confi rm power is present.
5. Turn on your amp and bring up the volume to a low level for
testing. Always test at low volume before cranking it up.
6. If all is well, set the amp volume to an appropriate level. Keep
in mind that the level at the balanced XLR output will follow
the amp so it’s best to set the level of the amp before setting
levels at the mixing console.
Radial Engineering
JDX User Guide
7
Page 10

True to the Music
FREQUENTL Y ASKED QUESTIONS
Q: Can I mount the JDX on the back or inside my amp/speaker
cabinet?
A: Yes, the Radial J-Clamp allows you securely mount the JDX
to almost anything.
Q: Does the JDX provide a load for the amp to drive.
A: No. The JDX is not a load box. For safe operation a loudspeaker
must be connected to the SPEAKER OUT jack.
Q: Can I use the JDX with a load box or power attenuator?
A: Yes. The load box takes the place of a loudspeaker and provides a load for the amp to drive.
Q: Can I leave the JDX connected to my amp when I’m not
using it?
A: Yes, as long as a loudspeaker is connected the amps output
will fl ow thru the JDX to your speaker even when the JDX power
supply is disconnected.
Q: Can I use the JDX with a bass amp?
A: Yes. Keep in mind the JDX has a max power input of 300
watts. Bass amps that exceed this rating can damage the JDX.
Try combining the signals from the JDX and a standard direct box
to record bass guitar for a new sound.
Q: My combo amp doesn't have amp and speaker jacks on
the back. Can I still use the JDX.
A: Yes. Solder a 1/4" plug onto your amps speaker cable to connect to the FROM AMPLIFIER jack. Then make a short jumper
cable to connect the TO SPEAKER jack to the speaker terminals.
Or contact a qualifi ed amp tech to make these changes.
Q: Can I also use the JDX like a standard direct box.
A: No. The JDX is an amp DI exclusively.
Q: What does the speaker emulation sound like?
A: The active analog speaker fi lter circuit is a compromise between
a closed-back 4x12 and an open-back 2x12 speaker cabinet.
Q: Will the JDX sound exactly like my amp?
A: Nothing is 100% transparent. We feel the JDX comes closer
than anything else and sounds terrifi c.
Radial Engineering
JDX User Guide
8
Page 11

True to the Music
JDX Specifi cations
Circuit type: Class-A 100% discreet
Speaker emulation Reactive load sensing with
proprietary band pass fi ltering
Total harmonic distortion 0.005 % @ 1KHz
Amp input 1/4", 300 watts max
Speaker thru-put 1/4", paralleled to amp input
Balanced outputs XLR 600, -60dB mic-level
XLR pin confi guration AES standard: pin 1 ground
pin 2 hot (+)
pin 3 cold (-)
Power supply (included) 15VDC, 400mA current draw
Size (W x D x H) 3.25”x 5”x1.75” (83x126x45mm)
Weight 1.5 lbs. (.7 kg)
Warranty 3 Years, transferable
Radial Engineering
JDX User Guide
9
Page 12

RADIAL ENGINEERING
3 YEAR LIMITED WARRANTY
RADIAL ENGINEERING LTD. (“Radial”) warrants this product to
be free from defects in material and workmanship and will remedy
any such defects free of charge according to the terms of this
warranty. Radial will repair or replace (at its option) any defective
component(s) of this product (excluding fi nish and wear and tear on
components under normal use) for a period of three (3) years from
the original date of purchase. In the event that a particular product is
no longer available, Radial reserves the right to replace the product
with a similar product of equal or greater value. To make a request
or claim under this limited warranty, the product must be returned
prepaid in the original shipping container (or equivalent) to Radial
or to an authorized Radial repair center and you must assume the
risk of loss or damage. A copy of the original invoice showing date
of purchase and the dealer name must accompany any request
for work to be performed under this limited warranty. This limited
warranty shall not apply if the product has been damaged due to
abuse, misuse, misapplication, accident or as a result of service or
modifi cation by any other than an authorized Radial repair center.
THERE ARE NO EXPRESSED WARRANTIES OTHER THAN
THOSE ON THE FACE HEREOF AND DESCRIBED ABOVE. NO
WARRANTIES WHETHER EXPRESSED OR IMPLIED, INCLUDING BUT NOT LIMITED TO, ANY IMPLIED WARRANTIES OF
MERCHANTABILITY OR FITNESS FOR A PARTICULAR PURPOSE SHALL EXTEND BEYOND THE RESPECTIVE WARRANTY
PERIOD DESCRIBED ABOVE OF THREE YEARS. RADIAL SHALL
NOT BE RESPONSIBLE OR LIABLE FOR ANY SPECIAL, INCIDENTAL OR CONSEQUENTIAL DAMAGES OR LOSS ARISING
FROM THE USE OF THIS PRODUCT. THIS WARRANTY GIVES
YOU SPECIFIC LEGAL RIGHTS, AND YOU MAY ALSO HAVE
OTHER RIGHTS, WHICH MAY VARY DEPENDING ON WHERE
YOU LIVE AND WHERE THE PRODUCT WAS PURCHASED.
www.radialeng.com
®
Radial Engineering Ltd.
1588 Kebet Way, Port Coquitlam BC V3C 5M5
Tel: 604-942-1001 Fax: 604-942-1010
email: info@radialeng.com
Radial JDX user guide - Part #: R870 1200 00 - Rev1.1 - Oct. 2009
Apperances and specifi cations subject to change without notice.
Copyright © 2009 Radial Engineering Ltd. all rights reserved.
True to the Music
 Loading...