

Page 1
®
True to the Music
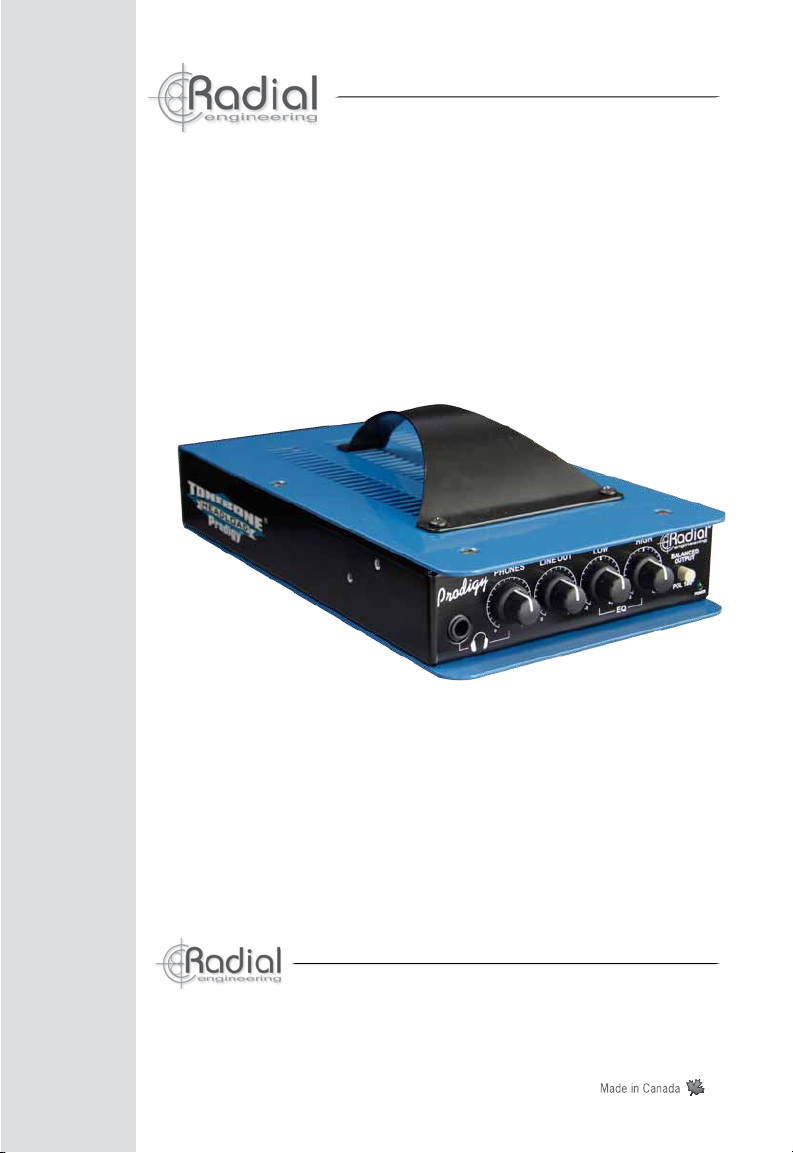
Headload Prodigy
Load Box and Amp DI
™
Radial Engineering Ltd.
1588 Kebet Way, Port Coquitlam
British Columbia, Canada, V3C 5M5
tel: 604-942-1001 • fax: 604-942-1010
email: info@radialeng.com
www.radialeng.com
User Guide
®
True to the Music
www.radialeng.com
Page 2
! !
The Headload Prodigy is a load box that is designed to safely handle and attenuate up
to 120 watts RMS of power from a guitar or bass amplier. The Headload Prodigy is
intended for 8 Ohm. For best performance and proper power transfer, NEVER EXCEED
THE PRODIGY’S 120 WATT POWER RATING and always match the impedance. Exceeding this power can cause the Headload Prodigy to overheat which could damage
the unit. The Headload Prodigy speaker connections employ switching jacks that reroute
the signal to the amp and/or internal load resisters. DO NOT DISCONNECT CABLE AT
SPEAKER BOX END AND LEAVE IT CONNECTED TO THE HEADLOAD PRODIGY.
CAUTION!
Page 3

True to the Music
TM
Radial® Headload Prodigy
Load Box and Amp DI
Table of Contents Page
Feature set ..............................................................................................................1-2
Making Connections ................................................................................................... 3
How to Use ..............................................................................................................4-5
JDX Balanced Output ................................................................................................. 6
JDX Unbalanced Output .............................................................................................7
Using the Features .................................................................................................. 8-9
Rack Mounting and Cable Length ............................................................................ 10
Block Diagram .......................................................................................................... 11
Specications ...........................................................................................................12
Warranty .................................................................................................... Back Cover
®
Thank you for purchasing the Headload Prodigy. The Prodigy is a multi-purpose load box
that enables you to reduce the output of your speaker cabinet and to send your guitar
amp and cabinet sound to the PA or recording system using the built-in JDX direct box
output. You can simultaneously set your amp to full output, 50% or 25% volume, or turn it
completely off for quiet on-stage performance or late night recording.
Best of all, the Prodigy has been designed to be straight forward and easy to use. However,
as with all products, making sure you understand the features will not only improve your
musical experience, it will ensure your equipment is safe from damage due to misuse. So
please take a few minutes to read through this manual to familiarize yourself with all of the
built-in features.
If after reading, you nd yourself looking for more answers, please visit the Prodigy FAQ
page on the Radial web site. This is where we post updates and questions from users like
yourself. If you still do not nd what you are looking for, feel free to send us an email at
info@radialeng.com and we will do our best to reply in short order.
Now get ready to rock out at full, half or no volume at all.
Radial Engineering Ltd.
Headload Prodigy™ Load Box
Page 4
®
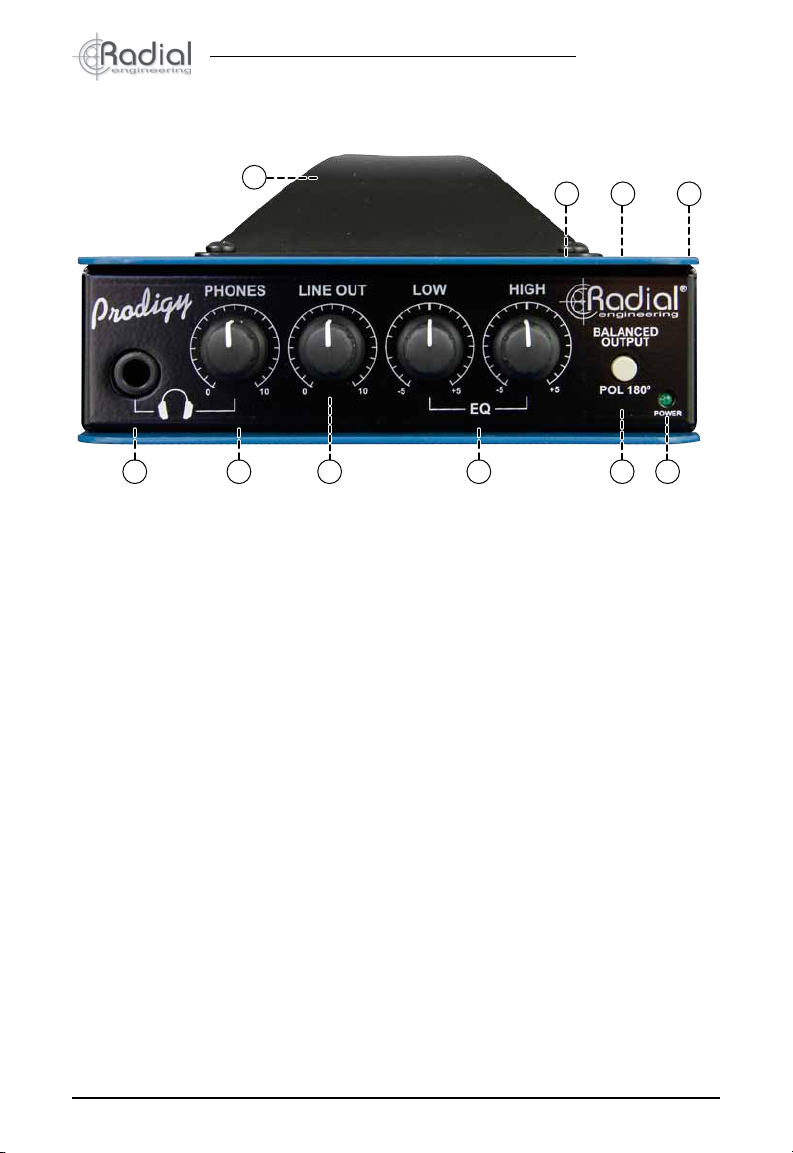
FRONT PANEL FEATURE SET
True to the Music
7
1 2 3 4 5 6
8 9 10
1. HEADPHONE: ¼” TRS mono summed output for headphones, lets you quietly practice
while your amp is being driven hard.
2. PHONES: Variable control used to adjust headphone level to suit.
3. LINE OUT: Variable control to adjust the level going to the unbalanced ¼" JDX outputs.
4. EQ: Lets you ne tune the tone of the JDX output to optimize your wedge monitors or
in-ears.
5. POL 180: Inverts phase by toggling pin-2 and pin-3 at the XLR out to correct acoustic
resonance or to help phase-align the direct out with a microphone.
6. POWER: LED indicator lets you know the Prodigy is activated.
7. HANDLE: Makes it easy to carry your Prodigy around the studio – may be removed for
rack mounting.
8. STEEL CASE: Solid 14-gauge steel outer shell shields the inner electronics from
disruptive magnetic elds generated by the amplier’s power transformer.
9. VENTS: Top access ventilation slots allow excess heat to be dissipated without the
need of a fan.
10. BOOK-END DESIGN: Creates protective zone around the switches and potentiometer
to keep them out of harm’s way.
Radial Engineering Ltd.
1
Headload Prodigy™ Load Box
Page 5
True to the Music
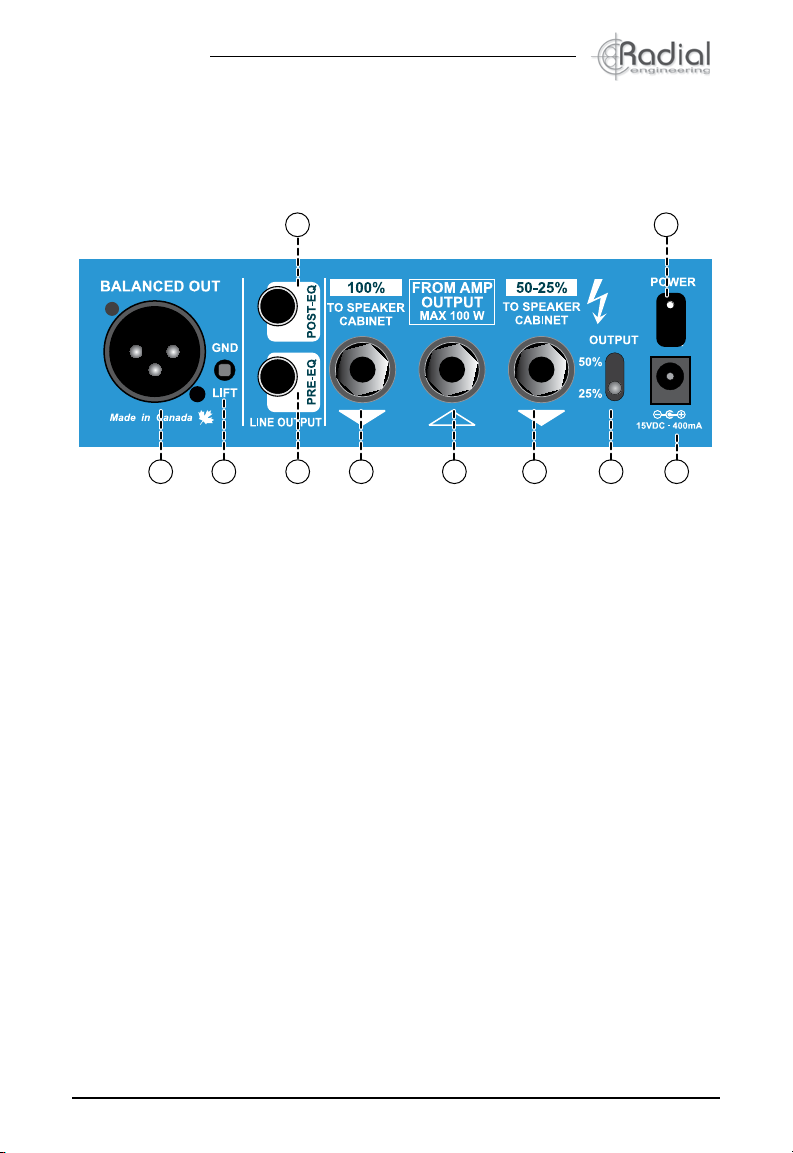
REAR PANEL FEATURE SET
®
11 12
13
14 15 16 17 18 19
20
11. BALANCED OUT: JDX lo-Z balanced mic level output used to feed the PA system,
monitors or recorder.
12. GND LIFT: Lifts pin-1 on the XLR output to help eliminate hum and buzz caused by
ground loops.
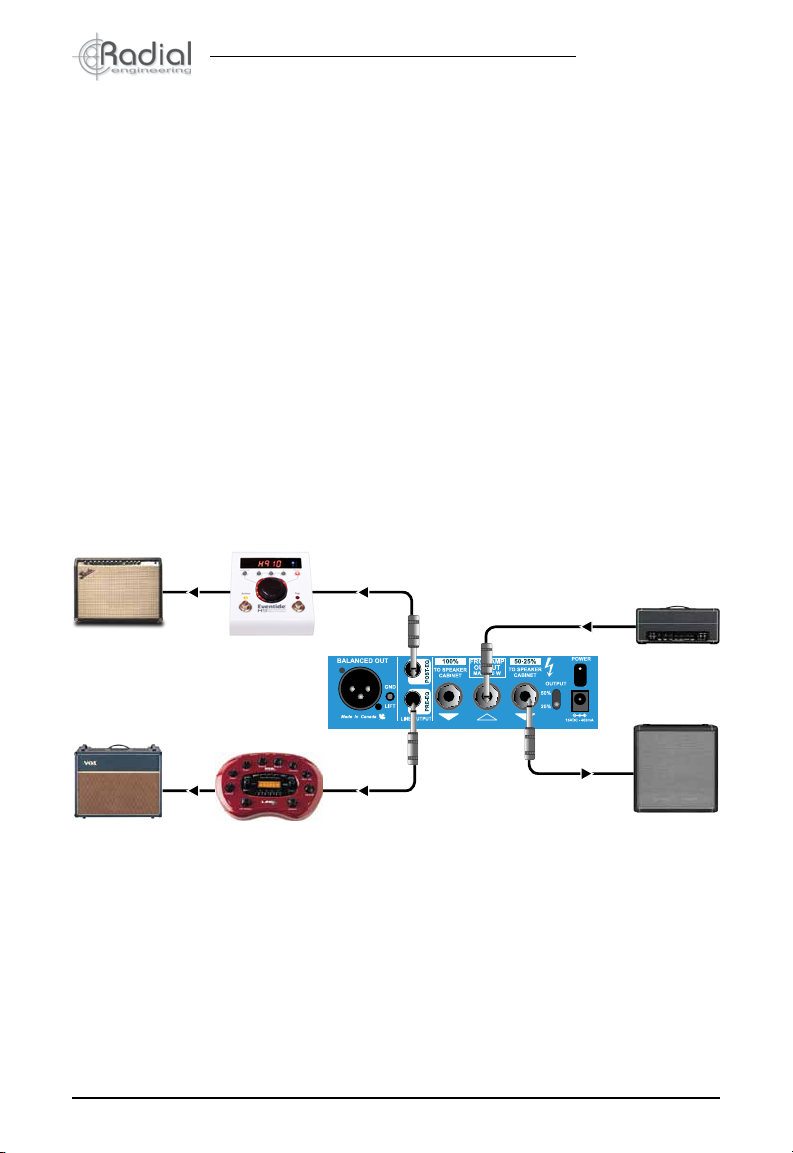
13. POST-EQ: Presents a post JDX and post (wet) EQ output to feed a second direct box for
recording or external effects processor.
14. PRE-EQ: Pre-JDX direct output sends the unaffected (dry) direct signal from your amp to
feed another stage amp or effects.
15. 100% OUTPUT: ¼” output delivers full output of your amp to the speaker cabinet.
16. FROM AMP: ¼” input connects signal from your amp head output to the Prodigy.
17. 25%-50% OUTPUT: ¼” output is used to attenuate the volume for quiet on-stage
performance.
18. OUTPUT SELECT: Choose between 50% and 25% output level to the speaker cabinet.
19. POWER: Connection for the external 15VDC 400mA power supply.
20. CABLE CLAMP: Secures the DC adapter cable to prevent accidental power disconnect.
Radial Engineering Ltd.
2
Headload Prodigy™ Load Box
Page 6

®
True to the Music
MAKING CONNECTIONS
Before making any connections, make sure your guitar amp is turned off and the audio system
is either turned down or volume levels turned off. This will protect sensitive components such
as tweeters and speakers from turn-on or connection transients. If you are connecting to a
preamp or mixer, make sure the 48V phantom power is turned off as it is not required. Always
use heavy 14-gauge speaker wires (or heavier if possible) between the Headload Prodigy and
your amplier to ensure optimal signal ow from the head to the speaker cabinet.
The Prodigy does not have a power switch. As soon as you connect the power supply, it will
automatically turn on and the front panel power LED will illuminate. A handy cable clamp is
provided that can be used to secure the power supply if needed. Simply loosen with a hex
key, slip the power supply cable into the cavity and tighten.
Use a hex driver to
loosen the cable lock.
Pass the cable through
and re-tighten.
Set the Prodigy controls to the start position with the tone controls to 12 o’clock, the two level
controls to off (7 o’clock), and the ground lift and polarity reverse switches in the outward
position. The rear panel ground lift switch is recessed to prevent accidental changes during
a show. To activate, use a small screwdriver.
GND LFT in 'out' position
Radial Engineering Ltd.
3
Headload Prodigy™ Load Box
Page 7

True to the Music
FOOTPEDAL
WARNING!: RISK OF HAZARDOUS ENERGY
AVIS!: ENERGIE ELECTRIQUE DANGEREUSE!
!
SPEAKERS
FOOTPEDAL
WARNING!: RISK OF HAZARDOUS ENERGY
AVIS!: ENERGIE ELECTRIQUE DANGEREUSE!
!
SPEAKERS
HOW TO USE THE PRODIGY
As the Prodigy may be used in three different ways, it is important that you rst determine
how you plan to use it before making connections.
1. As a simple direct box
2. For 50% or 75% attenuation
3. For silent performance
1. Using the Prodigy as a Simple Direct Box
Used this way, the Prodigy acts as an interface that lets you send the sound of your amp using
the built-in Radial JDX™ balanced output to the PA or recording system. This takes advantage
of the reactive load that captures both the sound of your amp head and the back-electromotive
impulse from the loudspeaker. It has no audible effect to your amp sound.
a. Connect the output from your amp to the Prodigy FROM AMP ¼” input
b. Connect the 100% output from the Prodigy to your speaker cabinet
c. Connect the XLR output from the Prodigy to the PA mixer or recording preamp
d. Connect the power adaptor to the Prodigy to turn it on – there is no power switch
e. Power up your amp and slowly increase the volume
Back view of amp
®
Radial Engineering Ltd.
4
Speaker Input
Headload Prodigy™ Load Box
Page 8

®
True to the Music
2. Using the Prodigy to send 50% or 25% of the amp output to the speaker cabinet
Here, the Prodigy reduces the output level on your amp. This lets you drive the power amp
section of your amp harder to optimize the tone while lowering the volume level on stage or
in the studio. Engineers will sometimes combine the JDX output with a mic in front of the
cabinet and mix the two sounds.
a. Connect the output from your amp to the Prodigy FROM AMP ¼” input
b. Connect the 25%-50% output from the Prodigy to your speaker cabinet
c. Set the output switch to either 25% or 50%
d. Connect the XLR output from the Prodigy to the PA mixer or recording preamp
e. Connect the power adaptor to the Prodigy to turn it on – there is no power switch
f. Power up your amp and slowly increase the volume
AMP
MIXER
CAB
3. Using the Headload Prodigy to silence your amp
This setting turns off your guitar amp’s speaker cabinet completely for silent performance.
This works great for gigs where you do not want to haul a speaker cabinet to the show or for
quiet late-night recording in the studio. This takes full advantage of the built-in JDX speaker
simulator to capture your amplier’s tone and the load box to keep your amp safe and quiet.
a. Connect the output from your amp to the Prodigy FROM AMP ¼” input
b. Do not connect the output from the Prodigy to your speaker cabinet
c. Connect the XLR output from the Prodigy to the PA mixer or recording preamp
d. Connect the power adaptor to the Prodigy to turn it on – there is no power switch
e. Power up your amp and slowly increase the volume
When testing, it is good practice to keep the volume level down low to ensure proper connections have been made before turning up. This can prevent connection spikes from damaging
sensitive components.
AMP
MIXER
Radial Engineering Ltd.
5
Headload Prodigy™ Load Box
Page 9

True to the Music
THE JDX BALANCED OUTPUT
The Headload Prodigy’s JDX balanced output is designed to simulate the sound of a 4 x 12
half stack. This lets you capture your sound ‘direct’ without having to use a microphone. The
benets to performing and recording this way are numerous. Moving a microphone ever so
slightly will change the sound, so getting it exactly the same every night or for every session
is practically impossible. Further, each time you change venues, resonant frequencies caused
by the stage and room acoustics vary, which means that EQ’ing the tone to get it right has
to be redone every show. Finally, noise pollution from the other instruments on stage, such
as bass or drums, entering the mic makes it difcult to solo the instrument. With the Prodigy
direct out, all of these problems simply go away. You get consistency night after night, gig
after gig, and from one recording to the next.
The JDX output is set to mic level in order to match up with other mics on stage. This makes
it possible to feed a traditional snake or mic splitter, which in turn can feed the PA, wedge
monitors and in-ear monitors.
In the studio you can record as usual with a mic and record a second channel using the JDX
output. This lets you compare or combine the two signals to create richer and more consistent tones. You can take things further by introducing a Radial Phazer™ into the equation by
phase correcting the direct JDX signal so that it is time-aligned with the mic. The Prodigy is
a creative tool that should be used to experiment.
®
DIRECT SIGNAL
Radial Engineering Ltd.
PHAZER
DIRECT SIGNAL
TIME ALIGNED
6
MIC SIGNAL
Headload Prodigy™ Load Box
Page 10
®
True to the Music
USING THE JDX AUX OUTPUTS
There are two additional ¼” unbalanced outputs on the rear panel. These provide connectivity
options that can open the door to new sounds or creative ideas. A dedicated front panel level
control lets you adjust the signal for both outputs to suit.
• Dry Output (pre-JDX)
This takes the original 'dry' sound from your guitar amp head and attenuates it so that it
can be used to drive another guitar amp, digital modeling device, effects pedals, or maybe
a JDI direct box so that you can then process the sound in your digital workstation or
reamp it in the future.
• Wet Output (post-JDX)
This parallel output produces the same processed or 'wet’ signal as the JDX – only here
it is unbalanced. This means that the front panel EQ will also affect this output. It can be
used to feed effects pedals, digital modeler or maybe some other innovative studio device.
POST EQ
AMP
Radial Engineering Ltd.
PRE EQ
CAB
7
Headload Prodigy™ Load Box
Page 11

True to the Music
dBu
EQ Frequency Response Range
USING THE PRODIGY FEATURES
Adjusting the Tone Using the 2-band EQ
The Prodigy is equipped with a two band equalizer that lets you ne tune the tone of the JDX
output. It has no effect on the amplier’s speaker signal. Used live, this lets you adjust the
tone of the wedge monitors on in-ears to suit. In the studio, it lets you quickly tailor the tone
as needed. Start with the EQ settings at 12 o’clock and adjust as you see t.
®
Frequency response
with at EQ settings
+20
+15
+10
+5
0
-5
-10
-15
-20
20 20k 50 100 200 500 1k 2k 5k 10k
Frequency response
of EQ range
Hz
Using Headphones
Finally, one of the coolest features on the Prodigy is the headphone out which will work with
most headphones from 8 Ohms to 400 Ohms and lets you quietly practice using your amp to
create the signal. It is equipped with a dedicated level control and ¼” TRS connection. Note
that the headphone output is mono.
Radial Engineering Ltd.
8
Headload Prodigy™ Load Box
Page 12

®
True to the Music
The 180º Polarity Reverse Switch
The Headload Prodigy’s JDX output is wired to the AES standard with pin-1 (ground), pin-2 (+),
and pin-3 (-). This follows convention with all pro audio gear made in recent years. But when
combining the JDX with older vintage gear, you may nd that the input on your vintage processor
may have the polarity reversed. To address this, the Prodigy is equipped with a 180º polarity
reverse switch that toggles pin-2 and pin-3 at the XLR output, inverting the relative phase.
The polarity reverse function can also be used to compensate for ‘acoustic peaks and valleys’ at certain spots on stage that can cause some frequencies to sound louder than others
due the interaction of the amp, monitors and PA. Switching the polarity can sometimes help
normalize the sound where you may be standing.
Finally, when recording, placing a mic in front of the cabinet and then further away will change
the tone depending on room acoustics and the effects of comb-ltering. Combining the mic'd
sound with the Prodigy’s JDX direct output can lead to great results. Try reversing the polarity
to improve the phase relationship between the two signals and then, for fun, try moving the
distant mic around. Simply nd the setting that sounds best to your ears.
Using the Ground Lift
A common problem in both studios and live PA is the hum and buzz that seems to propagate
as soon as various pieces of audio devices are connected together. This problem is often
referred to as a ground loop. In general terms, when plugged in to the electrical system,
for safety, all of the devices share the same electrical ground. When an audio connection is
made, the audio ground creates a loop that allows noise from spurious DC currents and other
‘gremlins’ to pollute the audio signal.
To help eliminate the hum and buzz caused by ground loops, the Headload Prodigy is
equipped with a ground lift switch that lifts pin-1 on the XLR output. If you hear hum, push
the switch inward. The switch is recessed in order to prevent accidental use. To switch, use
a small screwdriver.
Radial Engineering Ltd.
9
Headload Prodigy™ Load Box
Page 13
True to the Music
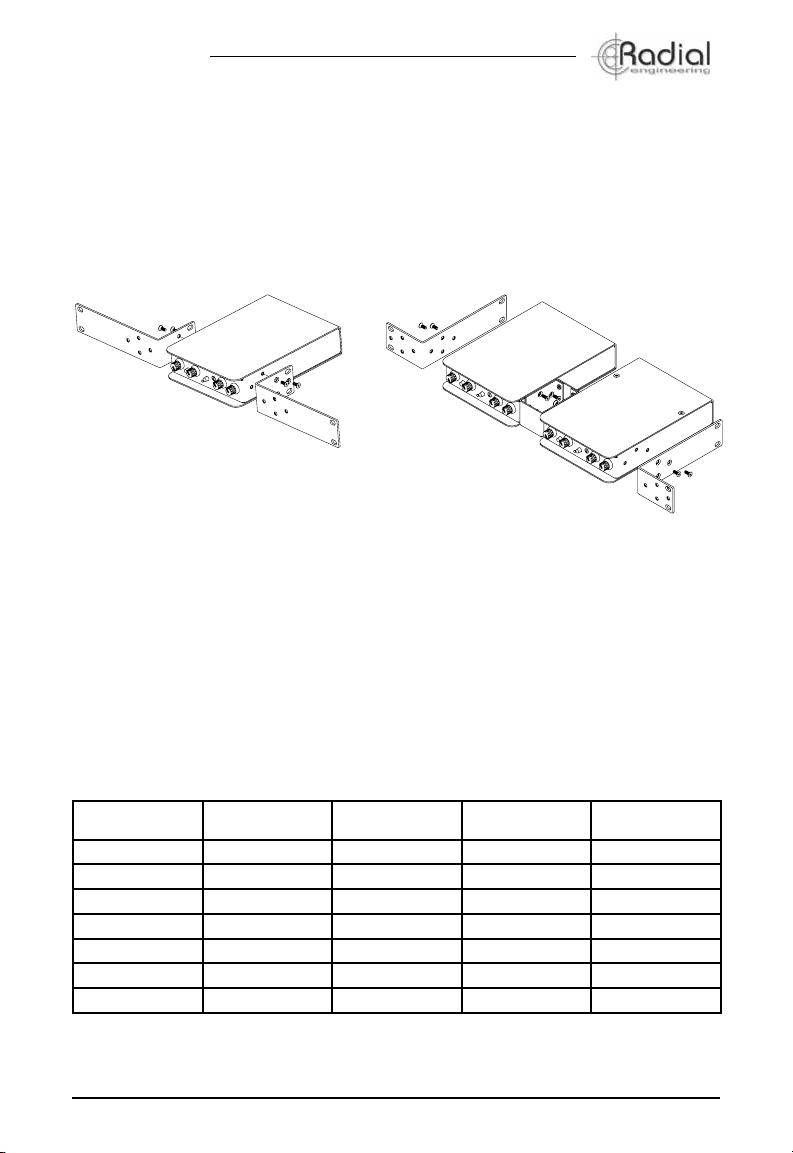
RACK MOUNTING THE PRODIGY
For touring, the Prodigy may be mounted into a standard 19” rack using the optional rack
mount kit. This three piece kit (part number: R800 2020 02) enables one or two Prodigy to
be rack mounted in a 1RU rack space. We recommend leaving one rack space open above
the Prodigy to allow air ow.
Single unit mounting: Double unit mounting:
®
CONNECTING THE AMPLIFIER AND SPEAKER
You can connect ampliers up to 120 Watts RMS (180W peak) to the Prodigy and drive
them at full power. We recommend using speaker cables eight feet or less in length with a
minimum gauge of 1.5mm2 (14 awg). Longer speaker cables should use heavier gauges to
maintain the best power transfer. Use the chart below as a guide when selecting speaker
cables to use with your Prodigy.
Cable Length 100 Watt Amp
1.2 meters (4’) 1.0mm
2.4 meters (8’) 1.5mm
3 meters (10’) 1.5mm
3.7 meters (12’) 2.5mm
4.9 meters (16’) 2.5mm
5.5 meters (18’) 4.0mm
6.0 meters (20’) Do not use Do not use 2.5mm
8 Ohms
2
(16 awg) 1.0mm2(16 awg) 1.0mm2(16 awg) 1.0mm2(16 awg)
2
(14 awg) 1.5mm2(14 awg) 1.0mm2(16 awg) 1.5mm2(14 awg)
2
(14 awg) 2.5mm2(12 awg) 1.5mm2(14 awg) 1.5mm2(14 awg)
2
(12 awg) 2.5mm2(12 awg) 1.5mm2(14 awg) 2.5mm2(12 awg)
2
(12 awg) 4.0mm2(10 awg) 1.5mm2(14 awg) 2.5mm2(12 awg)
2
(10 awg) Do not use 2.5mm2(12 awg) 2.5mm2(12 awg)
Radial Engineering Ltd.
100 Watt Amp
4 Ohms
10
50 Watt Amp
8 Ohms
2
(12 awg) 2.5mm2(12 awg)
50 Watt Amp
Headload Prodigy™ Load Box
4 Ohms
Page 14

®
BLOCK DIAGRAM
LINE
OUTPUT
True to the Music
OUTPUT
BALANCED
OUTPUT
PHASE
REVERSE
HEADPHONE
LINE
AMPLIFIER
LINE
LEVEL
LOW PASS
LOW FREQUENCY
BUFFER/
BUFFER/
PHASE
INVERTER
FILTER
EQUALIZER
EQUALIZER
HIGH FREQUENCY
LIFT
GROUND
AMPLIFIER
HEADPHONE
LEVEL
HEADPHONE
OUTPUT
SPEAKER
ATTENUATED
LINE
OUTPUT
50% LEVEL
25% LEVEL
WITH
LOAD BANK
VARIABLE
ATTENUATOR
OUTPUT
SPEAKER
FROM AMPLIFIER
ATTENUATOR
TO LIVE
CABINET
SPEAKER
THROUGH
*Specications are subject to change without notice.
Radial Engineering Ltd.
11
Headload Prodigy™ Load Box
Page 15

True to the Music
OUTPUT SIGNAL FLOW
AMP
ATTENUATIONPRODIGY
JDX
SPECIFICATIONS
Audio Circuit Type: ........................................Passive attenuation circuit with active equalization
Frequency response: ...................................... Shaped to emulate a classic guitar cabinet
Gain: ............................................................... -30dB/-42dB
Noise oor: .....................................................-106dBu
Maximum input: .............................................. 130 watts continuous
Total harmonic distortion: ............................... 0.05%
Intermodulation distortion: ............................. 0.05%
Input / output impedance: .............................. 8Ω speaker load
Output level - max - 1KHz: ............................+17dBu
Output level - max - 20Hz: ............................. +14dBu
Size (W, D, H) & weight: .................................6” x 10.25” x 3.75”
........................................................................152mm x 260mm x 95mm
Weight: ...........................................................5.3lbs. (2.4kg)
Power supply: ................................................. +/-15v (400mA) power supply
LOW / HIGH
EQ
HEADPHONE
LEVEL
SPEAKER OUT
100%
SPEAKER OUT
25% OR 50%
UNBAL. OUT
PRE-EQ
JDX BAL. OUT
POST-EQ
JDX UNBAL. OUT
POST-EQ
HEADPHONES
POST-EQ
®
*Specications are subject to change without notice.
Radial Engineering Ltd.
12
Headload Prodigy™ Load Box
Page 16

THREE YEAR TRANSFERABLE LIMITED WARRANTY
RADIAL ENGINEERING LTD. (“Radial”) warrants this product to be free
from defects in material and workmanship and will remedy any such defects free of charge according to the terms of this warranty. Radial will
repair or replace (at its option) any defective component(s) of this product
(excluding nish and wear and tear on components under normal use) for
a period of three (3) years from the original date of purchase. In the event
that a particular product is no longer available, Radial reserves the right
to replace the product with a similar product of equal or greater value. In
the unlikely event that a defect is uncovered, please call 604-942-1001
or email service@radialeng.com to obtain an RA number (Return Authorization number) before the 3 year warranty period expires. The product
must be returned prepaid in the original shipping container (or equivalent)
to Radial or to an authorized Radial repair center and you must assume
the risk of loss or damage. A copy of the original invoice showing date of
purchase and the dealer name must accompany any request for work to
be performed under this limited and transferable warranty. This warranty
shall not apply if the product has been damaged due to abuse, misuse,
misapplication, accident or as a result of service or modication by any
other than an authorized Radial repair center.
THERE ARE NO EXPRESSED WARRANTIES OTHER THAN THOSE
ON THE FACE HEREOF AND DESCRIBED ABOVE. NO WARRANTIES
WHETHER EXPRESSED OR IMPLIED, INCLUDING BUT NOT LIMITED TO, ANY IMPLIED WARRANTIES OF MERCHANTABILITY OR FITNESS FOR A PARTICULAR PURPOSE SHALL EXTEND BEYOND THE
RESPECTIVE WARRANTY PERIOD DESCRIBED ABOVE OF THREE
YEARS. RADIAL SHALL NOT BE RESPONSIBLE OR LIABLE FOR ANY
SPECIAL, INCIDENTAL OR CONSEQUENTIAL DAMAGES OR LOSS
ARISING FROM THE USE OF THIS PRODUCT. THIS WARRANTY
GIVES YOU SPECIFIC LEGAL RIGHTS, AND YOU MAY ALSO HAVE
OTHER RIGHTS, WHICH MAY VARY DEPENDING ON WHERE YOU
LIVE AND WHERE THE PRODUCT WAS PURCHASED.
www.radialeng.com
Radial Engineering Ltd.
1588 Kebet Way, Port Coquitlam BC V3C 5M5
tel: 604-942-1001 • fax: 604-942-1010
info@radialeng.com • www.radialeng.com
Radial® Headload Prodigy™ User Guide - Part #R870 1208 00 / 02-2017
Specications and appearance are subject to change without notice.
 Loading...