

Page 1

®
™
EXTC
500 Series Module
500
True to the Music
User Guide
®
www.radialeng.com
Radial Engineering Ltd.
1588 Kebet Way, Port Coquitlam
British Columbia, Canada, V3C 5M5
tel: 604-942-1001 • fax: 604-942-1010
email: info@radialeng.com
True to the Music
www.radialeng.com
Page 2

Radial® EXTC™ 500 Reamp® User Guide
Table of Contents ......................................................Page
Feature Set .................................................................... 1
Overview ........................................................................ 2
Getting Started ............................................................... 3
Specifi cations ................................................................. 4
Block Diagram ................................................................ 5
Warranty ........................................................... Back cover
Congratulations and thank you for purchasing the Radial EXTC 500 Reamp® module. The
EXTC is a unique 500 series interface designed to allow you to introduce guitar pedals and
effects into the recording world with relative ease while keeping the signal quiet. With the
EXTC in your rig you are now set to add wah to a Hammond, tube distortion to a vocal track
or an envelope fi lter to the snare drum. The EXTC is all about creativity and making sure your
recording stands above the rest.
This manual describes installing and operating your EXTC in the Radial Workhorse or other
500 series module power racks. To take full advantage of the unique features that have been
incorporated into the EXTC, please read through this guide before using it. This user guide
will give you a broader sense of the module’s capabilities. If you have questions that are not
covered in this manual, please visit the FAQ section on our website. This is where we post
answers to questions from users. If you cannot fi nd the answer to your question please feel
free to send an email to info@radialeng.com and we will do our very best to respond as
quickly as possible.
The Radial EXTC 500 module opens creative options to your recording world.
WARNING NOTICE TO USER!
Although preventative safety measures have been designed into Radial 500 series
products we strictly advise against hot-swapping modules or plugging and
unplugging them when the Workhorse or other 500 series rack is powered on. Hot
swapping can cause connection sparks at the card-edge connector that could send
damaging transients to other equipment. This also greatly reduces the life span of the
contacts. Damage due to hot swapping is not covered under warranty. There are no
user serviceable parts inside.
Page 3
True to the Music
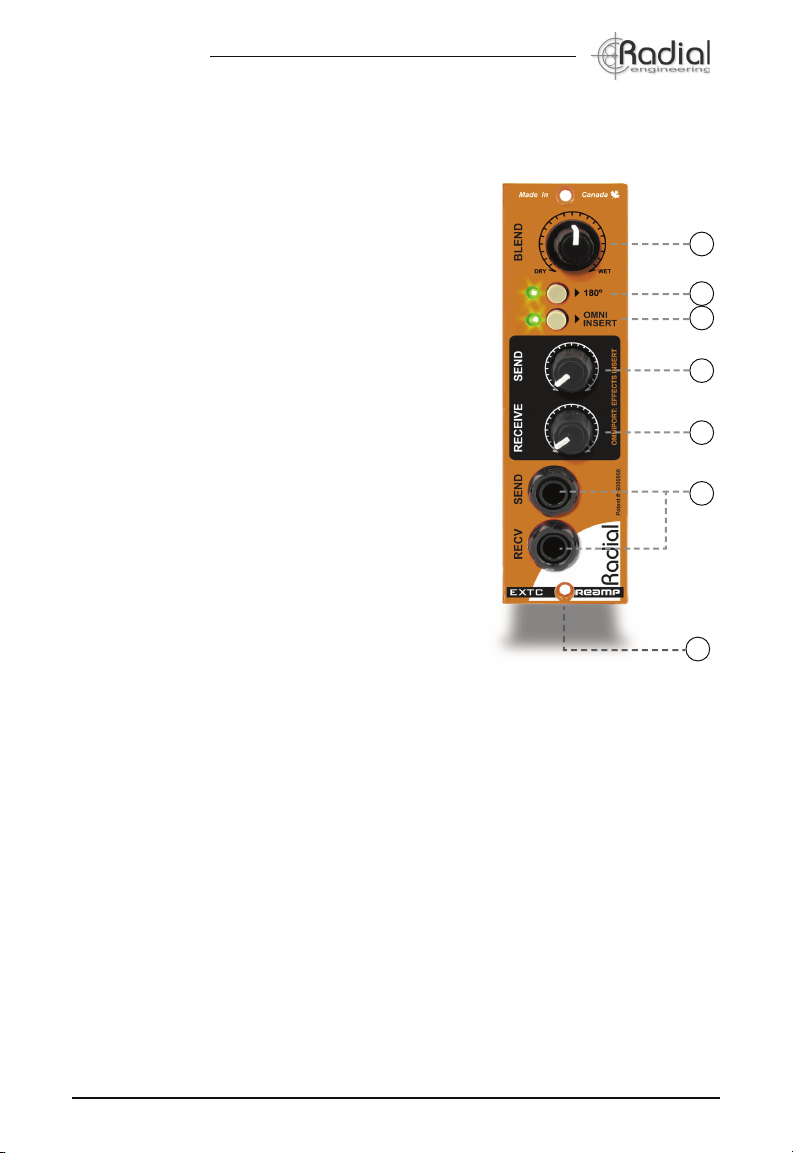
FEATURE SET
1. BLEND - Lets you adjust the wet-dry mix
between the original unprocessed signal
and the EXTC’s effects loop.
®
2. 180º POLARITY REVERSE - Lets you
adjust the polarity of the wet signal path
and bring it into phase with the dry signal
when they are being mixed together.
3. OMNI INSERT (with Workhorse) - Turns on
the Workhorse TRS Omniport insert jack.
This is used to add a second unbalanced
effects insert path, wired in series after the
front-panel loop.
4. SEND LEVEL - Used to adjust the output
level going to the pedals and optimize
signal-to-noise for best performance.
5. RECEIVE LEVEL - Used to set the effects
loop return path level and further optimize
signal-to-noise.
6. ¼” SEND and RECV - Separate send and
receive jacks used to connect guitar pedals
to the EXTC. Front panel mounted to make
connections easy for use on the desktop
and transformer isolated to eliminate hum
and buzz caused by ground loops.
7. OMNIPORT (with Workhorse) - TRS insert
jack lets you connect effects to a second
unbalanced effects insert path, wired in
series after the front-panel insert loop.
Rear Panel
1
2
3
4
5
6
7
Radial Engineering Ltd.
1
EXTC 500 Module
Page 4

®
True to the Music
OVERVIEW
The Radial EXTC is a professional audio interface that takes a balanced line level signal and
converts it to a guitar-level effects loop and then re-converts it back to a balanced line level
for processing. In other words, you send in a balanced signal from your recorder, adjust the
send level that drives the pedals. Set the return level from the pedals as it comes back and
send the resulting sound to your recording system.
EXTC
INPUT SEND RETURN
PEDAL PEDAL PEDAL
OUTPUT
Although simple in principle, the key to the EXTC’s performance is how quietly it does the
task. This is achieved by employing full sized discrete electronic components, class-A circuitry
and transformer isolation to help eliminate the hum and buzz that is common with pedals and
guitars. The other cool ‘trick’ inside the EXTC is the blend control. This mixes the original dry
signal with the newly introduced effects created by the pedals. Something to think about here
is how some effect pedals will reverse the polarity of the signal passing through them. When
you mix a dry signal with a wet signal and one is polarity reversed, you will of course end up
with cancellation. The diagram below illustrates a setup where one pedal “B” is inverting the
polarity creating cancellation where two out-of-phase signals come together.
INPUT
EXTC
NORMAL
PHASE
PEDAL - A PEDAL - B
BLEND
SEND
RETURN
POLARITY REVERSE
PHASE
CANCELLATION
OUTPUT
The 180º polarity reverse switch plays an important role by ensuring both the dry and wet
signals are in phase. The next diagram shows how the 180° switch inverts the signal before
it gets to the offending pedal. Pedal “B” gets tricked into re-inverting the signal back to normal
phase.
INPUT
EXTC
NORMAL
PHASE
POLARITY 180°
PEDAL - A PEDAL - B
BLEND
SEND RETURN
POLARITY REVERSE
NORMAL
PHASE
OUTPUT
Once you get the EXTC hooked up, you will fi nd it to be loads of fun! All of a sudden, you
will be going back into the attic looking for that box of forgotten pedals, dusting them off and
plugging them in. Some will sound fantastic, others will sound bad in a good way. Who knows,
only those brave enough to enter blindly into these cold waters may live to tell the tale.
Radial Engineering Ltd.
2
EXTC 500 Module
Page 5

True to the Music
®
GETTING STARTED
Before making any connections, start by turning off your audio system and turning all
volume levels down. This helps protect equipment from turn-on transients that could damage
loudspeakers and other sensitive equipment. We recommend using a power bar with an onoff switch as this makes it easy to turn on and off the 500 series rack, monitors and so on,
using a single switch. Carefully plug the EXTC into your 500 series rack to avoid stress on the
card-edge connector. Screw the module in to ensure it does not accidentally get dislodged.
Connections between the EXTC and your pedals are made on the front panel while
connections to the recording system are done on the rear panel. Most 500 series racks
are equipped with XLR connectors. When you plug the EXTC into your 500 series rack,
it will automatically route the input and output to the module. With the Workhorse, this is
augmented with ¼” TRS connectors, D-Subs and a signal to feed the Workhorse mixer. It
also activates the Omniport which in this instance (with EXTC) turns the Omniport into a
second effects loop.
Start by setting up the X-amp panel controls as follows:
1. Set the blend control to the wet position (fully-clockwise).
2. Make sure the 180º is off (switch outward) so that everything is in phase.
3. Set the Omniport insert switch to off (switch outward).
4. Set the send and receive level controls at mid-way (12 o’clock).
Connect the output from your recorder to the XLR input on the rear panel. To connect your
pedals, simply plug the ¼” send to your pedal chain and the output of the pedal chain back
to the EXTC receive input. We suggest you start with one pedal fi rst before using a complete
chain. This will make it easier to trouble shoot when setting up the EXTC in your system.
Turn on the effects and play the desired track. You should be able to monitor the return path
in your recording system and hear the effect. Separate send & receive controls make it easy
to adjust the levels to suit. Now, try varying the blend control by rotating it counter-clockwise
towards the dry setting to hear how the effect mixes in with the original track.t If you notice
that the signal is ‘thinning out’ when you are adjusting the mix, the wet and dry signals may
be out-of-phase with each other, thus causing cancellation. Try depressing the 180º polarity
reverse to fi x the problem. If all is well, try adding more pedals.
One of the most common applications for the EXTC is using it to add grit to a vocal track.
This can easily be done with a distortion or overdrive pedal. You will fi nd that the most
realistic effects are created by introducing slight distortion. But you can also have loads of fun
creating Nine Inch Nails type of tones by going crazy. There are no rules, only guidelines.
Adding A Second Loop
If you have a Workhorse, you can use the Omniport to add a second effects loop in series after
the front panel pedal chain. This is ideally suited for studio effects or to connect to a studio
patchbay. The Workhorse TRS jack is wired tip-send, ring-receive following convention. To
turn on, depress the OMNI INSERT switch on the front panel.
EXTC
INPUT
Radial Engineering Ltd.
LOOP-1
FRONT PANEL
LOOP-2
OMNIPORT INSERT
STUDIO EFFECTPEDAL
3
OUTPUT
EXTC 500 Module
Page 6

®
True to the Music
RADIAL EXTC SPECIFICATIONS
Circuit type: Class-A discrete, transformer coupled
Power requirement: 60mA, +/-16VDC
DRY WET
Frequency Response: 20Hz ~ 20kHz +/- 1.5dB 20Hz ~ 10kHz +/- 3.5dB
(-8dB @ 20kHz) Shaped for musical
instruments
Voltage Gain: 0dB 12dB - send & receive at max
6dB - send minimum, receive max
0dB - send & receive set at 12 o’clock
THD+N (1kHz): <0.005% @ 0dBu <0.002% @ 0dBu
Noise: -93dB -84dB
Intermodulation Distortion: <0.003% @ 0dBu input <0.02% @ 0dBu input
Maximum input: +26dBu +20dBu
Effects Loop I/O SEND 1/4” output (front panel) RECEIVE 1/4” input (front panel)
Type: Unbalanced ¼” Unbalanced ¼”
Impedance: 1.5k Ohms 10K ohms
Gain (variable): From -14dB ~ +3dB
(0dB at center point)
From -99dB ~ +9dB
(0dB at center point)
Maximum Gain: +3dB +9dB
Line Level I/O INPUT (500 series rack) OUTPUT (500 series rack)
Type: Rear Panel Input - Balanced XLR
Female
Rear Panel Output - Balanced XLR
Male
Impedance: 15k Ohms 200 Ohms
Headroom:
-
+25dBu
All voltage gain specs with both effect loops bypassed. Insertion of effects units will vary gain somewhat due to
their particular input and output impedances.
CONNECTOR WIRING
XLR Connector
GROUND
Radial Engineering Ltd.
1
3
COLD (-)
HOT (+)
2
TRS ¼” Phone Connector
COLD (-)
HOT (+)
GROUND
4
TS ¼” Phone Connector
HOT (+)
GROUND
EXTC 500 Module
Page 7

True to the Music
®
RADAIAL EXTC BLOCK DIAGRAM
Radial Engineering Ltd.
5
EXTC 500 Module
Page 8

THREE YEAR TRANSFERABLE LIMITED WARRANTY
RADIAL ENGINEERING LTD. (“Radial”) warrants this product to be free from defects in material and
workmanship and will remedy any such defects free of charge according to the terms of this warranty.
Radial will repair or replace (at its option) any defective component(s) of this product (excluding fi nish
and wear and tear on components under normal use) for a period of three (3) years from the original
date of purchase. In the event that a particular product is no longer available, Radial reserves the
right to replace the product with a similar product of equal or greater value. In the unlikely event that
a defect is uncovered, please call 604-942-1001 or email service@radialeng.com to obtain an RA
number (Return Authorization number) before the 3 year warranty period expires. The product must be
returned prepaid in the original shipping container (or equivalent) to Radial or to an authorized Radial
repair center and you must assume the risk of loss or damage. A copy of the original invoice showing
date of purchase and the dealer name must accompany any request for work to be performed under
this limited and transferable warranty. This warranty shall not apply if the product has been damaged
due to abuse, misuse, misapplication, accident or as a result of service or modifi cation by any other
than an authorized Radial repair center.
THERE ARE NO EXPRESSED WARRANTIES OTHER THAN THOSE ON THE FACE HEREOF
AND DESCRIBED ABOVE. NO WARRANTIES WHETHER EXPRESSED OR IMPLIED, INCLUDING
BUT NOT LIMITED TO, ANY IMPLIED WARRANTIES OF MERCHANTABILITY OR FITNESS FOR
A PARTICULAR PURPOSE SHALL EXTEND BEYOND THE RESPECTIVE WARRANTY PERIOD
DESCRIBED ABOVE OF THREE YEARS. RADIAL SHALL NOT BE RESPONSIBLE OR LIABLE
FOR ANY SPECIAL, INCIDENTAL OR CONSEQUENTIAL DAMAGES OR LOSS ARISING FROM
THE USE OF THIS PRODUCT. THIS WARRANTY GIVES YOU SPECIFIC LEGAL RIGHTS, AND
YOU MAY ALSO HAVE OTHER RIGHTS, WHICH MAY VARY DEPENDING ON WHERE YOU LIVE
AND WHERE THE PRODUCT WAS PURCHASED.
This product is intended for professional use only.
The user should be familiar and experienced with
!
the 500 series rack and module format.
®
Radial Engineering Ltd.
1588 Kebet Way, Port Coquitlam, British Columbia, V3C 5M5
tel: 604-942-1001 • fax: 604-942-1010 • email: info@radialeng.com
True to the Music
www.radialeng.com
API, Lunchbox, ProTools and Neve are registered trademarks of their respective owners.
Reamp, Reamper, Reamping and Workhorse are trademarks of Radial Engineering Ltd.
Copyright 2011 Radial Engineering Ltd. All rights reserved.
Specifi cations and appearances subject to change without notice.
Radial® EXTC™ 500 Module User Guide Rev1.0 March 2011 - Part #: R870 1244 00 Printed in Canada
 Loading...