

Page 1
1
FreeLinc®
DualMuff Headset
User Guide
®
Page 2

Page 3

Introduction
. .
. . . . . . . . . . . . . . . . . . . .
– Welcome and Product Overview
DualMu Headset Diagram. . . . . . .
Operating Concepts and Terms. . . .
– Adjusting the Headband
– Charging
– Headset Tones
– Terms
Getting Started. . . . . . . . . . . . . . . . . .
– Using Your Headset for the First Time
Additional Information. . . . . . . . . . .
– Pairing Your Headset with Other Adapters
– Specications
– Frequently Asked Questions
Safety Information. . . . . . . . . . . . . . .
Warranty and FCC Compliance. . . .
Table of Contents
1
3
5
10
13
18
20
Page 4

1
Welcome
Congratulations, and thank you for
choosing FreeLinc products to enhance your
two-way radio communications.
The FreeLinc DualMu Headset uses
cutting-edge Near Field Magnetic Induction (NFMI)
wireless technology. NFMI supports mobility,
freedom-of-motion, exceptional
battery life, audio integrity, ease of use,
durability, secure communications and
comfort. This is the rst technology of its kind to be
implemented into practical voice and audio
solutions for two-way radios.
Introduction
Randy Bailey
President
Page 5

2
Introduction
Product Overview
The FreeLinc DualMu Headset works within a
small area surrounding the user. The size of the
area is determined by the distance between your
headset and the adapter. If your headset and
adapter are close together, the area shrinks in
diameter – just large enough to accommodate the
range of communication between your headset
and adapter. As you increase the distance between
your headset and adapter, the size of the area
surrounding the user expands accordingly, up to
approximately ve feet in diameter.
Package Contents
FreeLinc FDM300 DualMu Headset
Wall charger
Tote bag
Windsock
Page 6
3
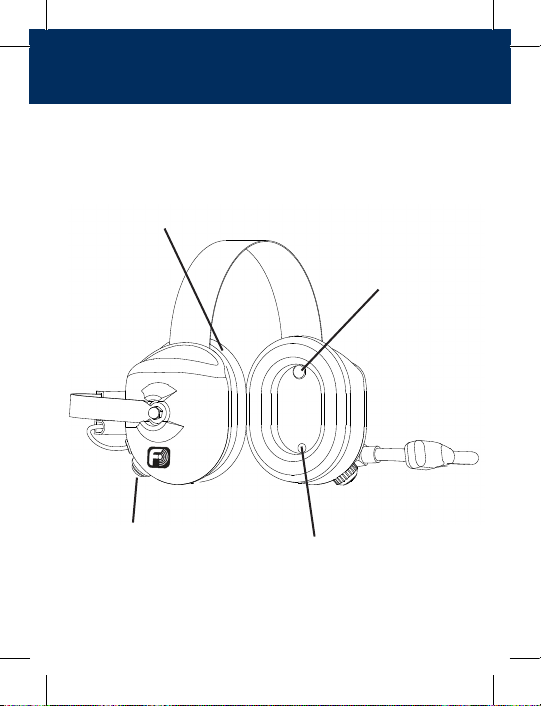
DualMu Headset Diagram
Noise canceling
Michrophone
Replacable Silicon Ear Pads
Push-to-Talk Button
Pairing button/
Status Indicator Light
Charging Indicator Light
Page 7
4
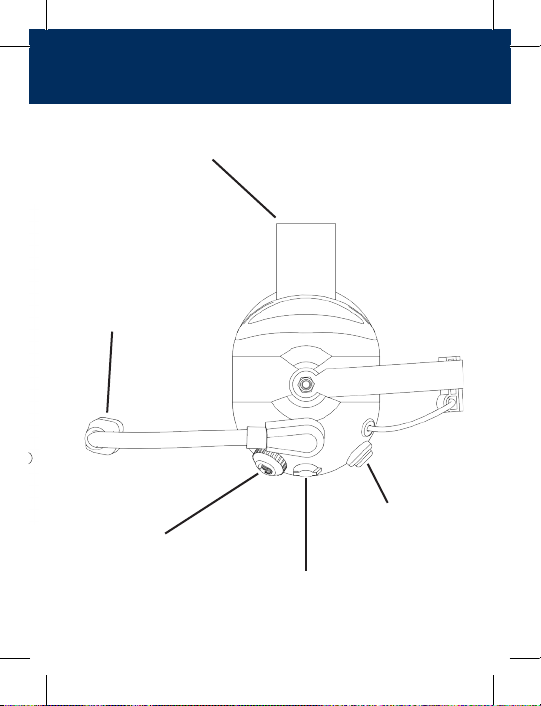
DualMu Headset Diagram
Noise canceling
Michrophone
Adjustable Headband
Push-to-Talk Button
Charge Jack
Vollume on/o Control
Page 8
5
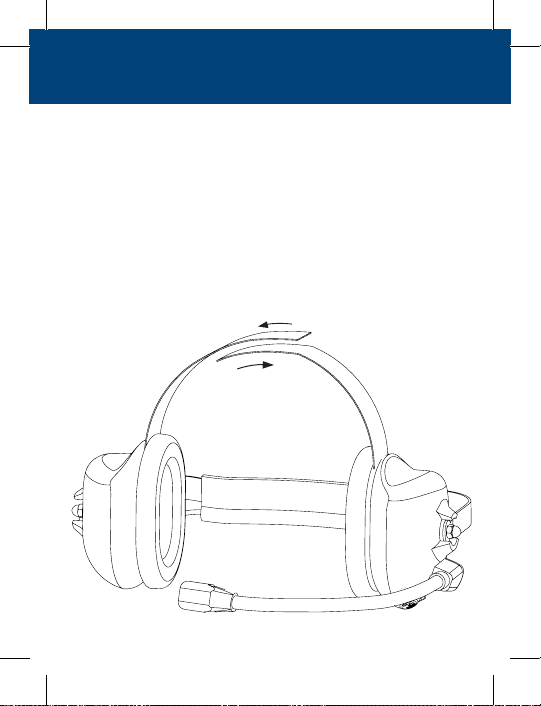
Operating Concepts and Terms
Adjusting the Headband
Velcro Strap
Use the velcro strap to adjust the t of your Headset.
If you are in a noisy environment, to insure optimal
sound quality, pull your hair away from your ears so
the cushions t directly against your head. If you
wear glasses, they too should t closely against your
head to accommodate a good headset t.
Page 9
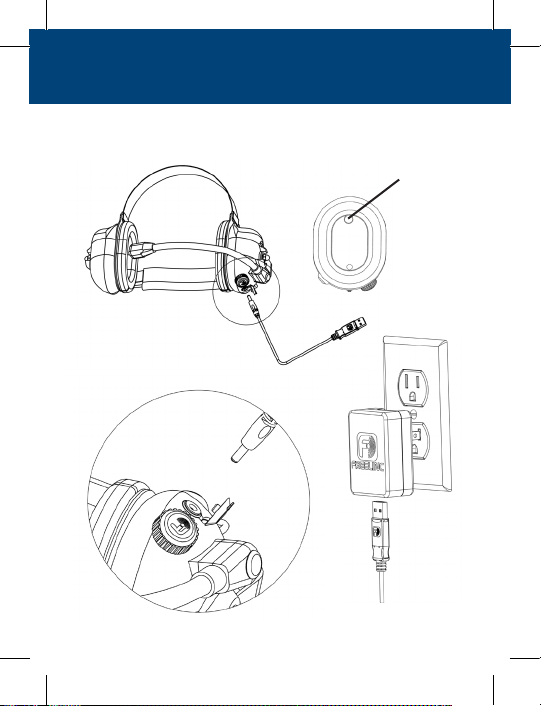
6
Charging
Operating Concepts and Terms
Red/Green
Charge Status
Indicator Light
Page 10

7
Headset Alert Tones
When the link between the FreeLinc DualMu
Headset and the adapter is broken, you will hear the
following alert tones:
Headset Indicator Tones
During operation you will hear the following tones
from your headset:
TONE INDICATION
Three double beeps Link is broken
Continuous series
of beeps
Push-to-Talk button
pressed while the link
is broken
TONE INDICATION
Repeating short tone Low battery
Single tone Pairing achieved
Operating Concepts and Terms
Page 11

8
Operating Concepts and Terms
Pairing
Before your headset can communicate with an
adapter, it must establish a link. To establish a
link, your headset and adapter must exchange a
randomly generated software ID code, which is
stored in each device. This process is called “pairing.”
Your headset and adapter remain paired until you
initiate the manual pairing sequence with a dierent
adapter (see Step Four: Pair Headset to Adapter under
Using Your Headset for the First Time). pg11
Seek Mode
When your headset is trying to establish a link by
searching for an adapter, it will initially enter “Seek
Mode.” If it does not detect the adapter with which
it has been paired, the headset will remain in Seek
Mode for 60 minutes before powering down.
Page 12

9
Linking
After entering Seek Mode and nding the
adapter with which it is paired, your headset will
establish a link, and communication can occur. This
link will remain active until you turn o the adapter
or radio, at which point the headset will return to
Seek Mode.
Turn On/O Your Headset
To turn on/o your headset, Turn Volume knob
clockwise until you feel a click. The Status Indicator
light on the inside of the cup will light Green or Red
when powered on.
Low Battery
When the LiPo Rechargable battery is low, your
headset will sound a repeating short tone every 5
minutes after each transmission is sent, indicating
that the battery should be charged soon.
(10-30hr of talk time remaining). Your headset will
automatically turn o when the battery is fully
discharged.
Operating Concepts and Terms
Page 13

10
Getting Started
Using Your Headset for the
First Time
Step One: Attach Adapter
Attach your FreeLinc adapter to the accessory
interface of your portable radio (see your portable
radio’s user manual if you need assistance locating
the accessory interface). If your adapter has a
mounting clip on top, use the clip and locking
screw to secure the adapter to your radio. If your
adapter does not have a mounting clip, use the
thumb screw to secure it to your radio. When
properly attached, the spring-loaded pins will align
with the contacts on the accessory interface of your
portable radio and the adapter should t securely.
Step Two: Turn On Adapter
Turn on your portable radio and set the toggle
switch to “ON.” This will automatically silence the
speaker on your portable radio and route all
communications to your headset.
Page 14

11
Getting Started
Step Three: Turn On Your Headset
To turn on your headset turn the On/O Volume
Knob clockwise until you feel a click. The On/O
Indicator light will illuminate red indicating your
headset has powered up. Once you turn on your
headset, it automatically enters Seek Mode (see Seek
Mode under Operating Concepts and Terms). pg8
Step Four: Pair Headset to Adapter
When you take your headset out of the box the rst
time, it may be necessary to manually pair it with
an adapter. To initiate manual pairing, turn on your
headset and hold it within 10 inches of the adapter
and press the Pairing button located inside the
cup for three seconds. When you have successfully
paired your headset to the adapter, the adapter
indicator light and the headset Status Indicator Light
will ash green, indicating a successful pairing.
CAUTION: When pairing, make sure that there
are no other FreeLinc products within 6 feet of the
devices being paired.
Page 15

12
Getting Started
Step Five: Establish Link (Automatic)
Once you pair your headset to an adapter, the
two devices establish a communication link. This
occurs automatically after pairing, and the link
persists as long as your headset remains within the
communication area. If you move your headset
outside the dened area, the link is lost and the unit
returns to Seek Mode.
While in Seek Mode, your headset attempts to
locate the adapter to which it is paired. The adapter
indicator light will ash red and will persist until the
unit exits Seek Mode by either:
• Re-establishing the link with the adapter with
which it is paired - when this occurs the adapter
indicator light will ash green.
OR
• Powering down - this occurs when no link is
established for 60 minutes.
Page 16

13
Additional Information
Pairing Your Headset with
Other Adapters
Manually Initiating the Pairing Process
To initiate manual pairing, hold your headset
close to the adapter and press the paring button
in the earcup of your headset for three seconds.
The adapter indicator light will ash solid green
indicating a successful pairing. You can repeat this
process at any time to break the existing pairing
and establish a new pairing with any other adapter.
Keep in mind that your headset can only be paired
with one adapter at a time.
CAUTION: When pairing, make sure that there
are no other FreeLinc products within 6 feet of the
devices being paired.
Page 17

14
Specications
Wireless Technology
Near-Field Magnetic
Induction
Battery Type LiPo 3.7v 2200mAh
Battery Life
Up to 150 hours
talk time
Range Up to 5 feet 1.25m
Operating
Temperature
-20 C to +60 C
-22 F to +140 F
Humidity
95% @ 8 hours
(non-condensing)
Noise Reduction
Rating (NRR)
-25db\SPL
Microphone Noise Canceling
Weight 16.8 oz
Additional Information
Page 18

15
Additional Information
Frequently Asked Questions
What happens if I go out of range and lose the
link between my headset and my adapter?
When your headset is out of range of the adapter,
the headset will beep and the indicator light on
the adapter will blink red. To re-establish the link,
move your headset within range of the adapter. The
adapter indicator light will resume ashing green.
Will my headset communicate with more
than one adapter at a time? No. When your
headset and adapter are paired they exchange a
unique and individual ID. This exchange ensures
that communication occurs only between the
linked headset and adapter.
Page 19

16
Frequently Asked Questions
Do I need to modify my radio in any way for
my headset or adapter to work? No. The only
requirement is that the FreeLinc adapter must t
on your radio model. For a complete list of the
radio models FreeLinc supports, please refer to the
FreeLinc website at www.freelinc.com.
What happens if I lose my headset and need
to use my radio to communicate with others?
Turn the adapter switch to “OFF”. With the adapter
o, your radio functions as if the adapter were not
attached. You have complete functionality of the
radio without having to remove the adapter.
Additional Information
Page 20

17
Additional Information
Tips and Suggestions
For up-to-date troubleshooting information, or to
get help with a specic problem, or to contact a
customer service representative, please visit
www.freelinc.com, and click the “support” link or
call 1-866-467-1199.
Accessories
FreeLinc continually releases new accessories for its
products. Please refer to:
www.freelinc.com to see the latest oerings.
Page 21

18
Saftey Information
Caution: To reduce the risk of re or
injury, please read and follow the
instructions below.
• Do not dispose of product in a re; the battery
cells may explode. Check with local codes for
possible battery disposal instructions.
• Never submerge your product in water or
other liquids.
• Protect your product from spills, excessive rain,
and wet locations.
• Do not use liquid cleaners or aerosol cleaners
as they may damage the product or nish of the
product. Use a dry cloth to clean the external
portions of the product.
Page 22

19
Saftey Information
• Do not stick anything inside the product as this
may damage internal components.
• This product conforms to the following
safety standards:
ANSI/UL 60950-1 1st Ed.
CAN/CSA C22.2 No. 60950-1-03
EN 60950-1 1st Ed.
Page 23

20
Warranty
I. What this warranty covers and for
how long:
a. Radeum, Inc., doing business as FreeLinc
(“FreeLinc”), warrants to Purchaser that its
FreeLinc manufactured products (“Product”) will
substantially conform to FreeLinc’s published
specications, as of the date of the Purchaser’s
purchase of the Product, and for one (1) year from
the date of purchase (the “Warranty Period”).
b. Rechargeable batteries will be replaced during the
warranty period if the battery develops leakage.
c. FreeLinc, at its option, will at no charge either
repair, replace, or refund the purchase price for
warranted Product during the warranty period
provided it is returned in accordance with the
terms of this warranty to the place of purchase.
Repair, at FreeLinc’s option, may include the
replacement of parts or boards with functionally
equivalent reconditioned or new parts or boards.
Replaced parts or boards are warranted only
for the balance of the original Warranty Period.
All replaced parts or Product shall become the
property of FreeLinc.
Warranty and FCC Compliance
Page 24

21
d. This express limited warranty is extended by
FreeLinc to the original end user purchaser only
and is not assignable or transferable to any other
party. This is the complete warranty for Product
manufactured by FreeLinc. FreeLinc assumes no
obligations or liability for additions or modications to this warranty unless made in writing and
signed by an ocer of FreeLinc. Unless made in a
separate written agreement between FreeLinc and
the original end user purchaser, FreeLinc does not
warrant the installation, maintenance or service of
warranted Product.
e. FreeLinc is not responsible in any way for
any ancillary equipment not furnished by FreeLinc
which is attached to or used in connection with
Product, or for operation of the Product with any
ancillary equipment and all such equipment is
expressly excluded from this warranty. Because
each system which may use the Product is unique,
FreeLinc disclaims liability for range, coverage, or
operation of the system as a whole under
this warranty.
Warranty and FCC Compliance
Page 25

22
Warranty and FCC Compliance
II. What this warranty does not cover:
a. Defects or damage resulting from use of the
Product in other than its normal and
customary manner.
b. Defects or damage from misuse, accident, water
or neglect.
c. Defects or damage from improper testing,
operation, maintenance, installation, alteration,
modication, or adjustment.
d. A Product subjected to unauthorized Product
modications, disassemblies, or repairs.
e. Product which has had the serial number removed
or made illegible.
f. Rechargeable batteries if the damage or defect
is caused by charging or using the battery in
equipment or service other than the Product for
which it is specied.
g. Freight costs related to Product returned for
warranty claims.
h. A product which, due to illegal or unauthorized
alteration of the software/rmware in the
Product, does not function in accordance with
FreeLinc’s published specications or the FCC type
acceptance labeling in eect for the Product at the
time the Product was purchased.
Page 26

23
Warranty and FCC Compliance
III. How to get warranty service:
a. Purchaser shall notify FreeLinc of any
nonconformance during the warranty period, and
obtain a written return material authorization
(“RMA”) and an RMA number for the
nonconforming Product from FreeLinc.
b. Purchaser shall return the nonconforming Product
to the place of purchase freight prepaid.
IV. Limitation of Liability:
a. This warranty sets forth the full extent of FreeLinc’s
responsibilities regarding the Product. Repair,
replacement, or refund of the purchase price, at
FreeLinc’s option, is the exclusive remedy.
b. THE FOREGOING WARRANTIES ARE THE SOLE
WARRANTIES, EXPRESS OR IMPLIED, GIVEN BY
FREELINC IN CONNECTION WITH THE PRODUCT,
AND FREELINC DISCLAIMS ALL OTHER
WARRANTIES EXPRESS OR IMPLIED,
INCLUDING WARRANTIES OF MERCHANTIBILITY,
FITNESS FOR A PARTICULAR PURPOSE, AND
NONINFRINGEMENT OF THIRD-PARTY RIGHTS.
Page 27

24
c. FREELINC SHALL NOT BE LIABLE FOR ANY SPECIAL,
INCIDENTAL, OR CONSEQUENTIAL DAMAGES IN
CONNECTION WITH THE PRODUCT, EVEN IF
FREELINC HAS BEEN ADVISED OF THE POSSIBILITY
OF SUCH DAMAGES.
d. EXCEPT FOR CLAIMS FOR BODILY INJURY
(including death) AND CLAIMS FOR DAMAGE
TO REAL PROPERTY AND TANGIBLE PERSONAL
PROPERTY, FREELINC’S LIABILITY FOR ALL OTHER
CLAIMS SHALL NOT EXCEED THE AMOUNT PAID
TO FREELINC FOR THE PRODUCT GIVING RISE TO
FREELINC’S LIABILITY. THIS LIMIT OF LIABILITY
ALSO APPLIES TO OUR MANUFACTURERS AND
DISTRIBUTORS. IT IS THE MAXIMUM AMOUNT FOR
WHICH WE ARE COLLECTIVELY RESPONSIBLE.
Warranty and FCC Compliance
Page 28

25
Warranty and FCC Compliance
FCC Compliance
This device complies with Part 15 of the FCC Rules.
Operation is subject to the following two
conditions: (1) this device may not cause harmful
interference, and (2) this device must accept any
interference received, including interference that
may cause undesired operation.
This equipment has been tested and found to
comply with the limits for a class B digital device,
pursuant to Part 15 of the FCC rules. These limits
are designed to provide reasonable protection
against harmful interference in a residential
installation. This equipment generates, uses
and can radiate radio frequency energy and, if
not installed and used in accordance with the
manufacturer’s instructions, may cause interference
harmful to radio communications. There is no
guarantee however, that interference will not occur
in a particular installation. If this equipment does
cause harmful interference to radio or television
Page 29

26
Warranty and FCC Compliance
reception, which can be determined by comparing
the equipment o and on, the user is encouraged
to try to correct the interference by one or more of
the following measures:
• Reorient or relocate the receiving antenna.
• Increase the separation between the equipment
and receiver.
• Connect the equipment into an outlet on a
circuit dierent from that to which the receiver is
connected.
• Consult your supplier or an experienced radio/TV
technician for assistance.
Warning: Changes or modications to this unit
not expressly approved by the party responsible
for compliance could void the user’s authority to
operate this equipment.
Page 30

®
© 2005, 2006, 2007, 2008, 2009, Radeum Inc.,
DBA FreeLinc. All Rights Reserved.
Protected by one or more of the following
U.S. patents: 7.149.552, 7.254.366, 7.236.741,
7.215.924, 7.142.811, 7.035.608, 6.819.762,
6.459,882, 5.982.764, 5.912.925, 5.771.438
7.732.901, 7.565.187, 7.574.173
The FreeLinc DualMu Headset may not be
authorized for use in some countries.
Engineered in USA
Manufactured in USA
Rev. 0909
 Loading...