

Page 1
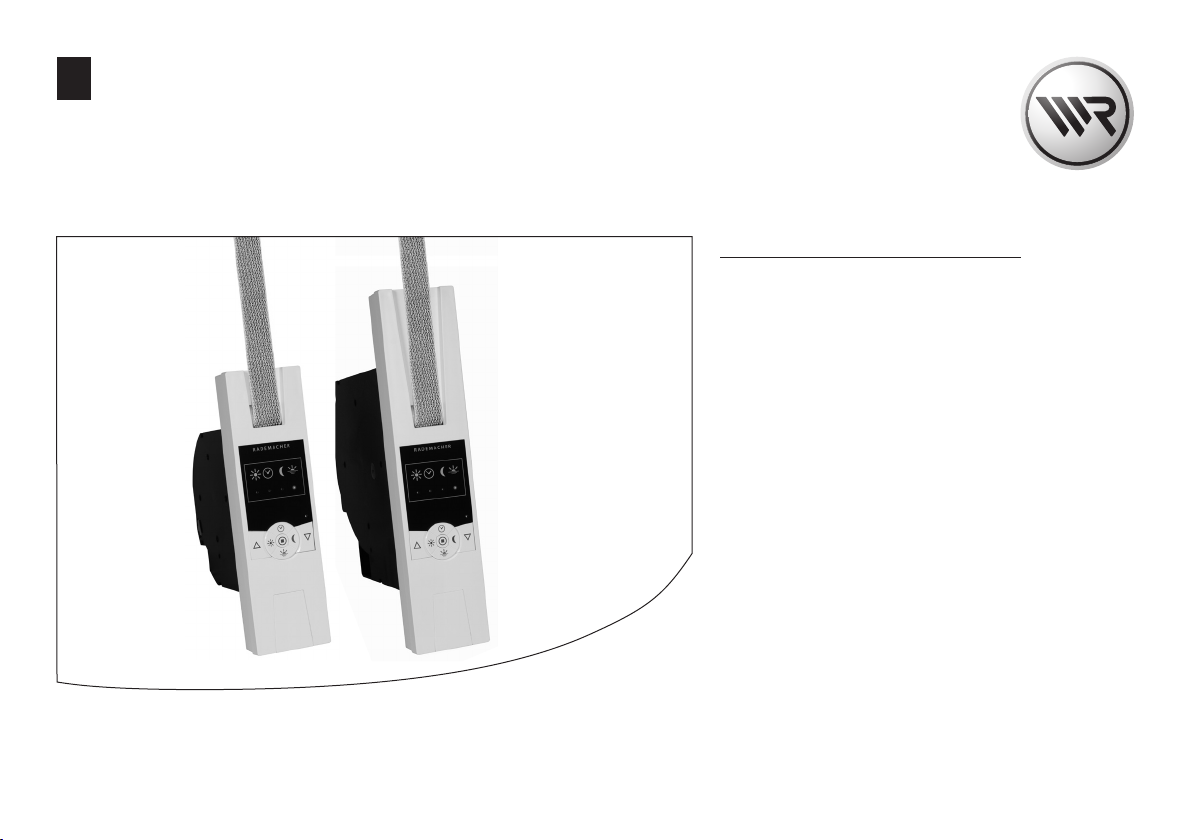
Electronic Roller Shutter Belt Winder RolloTron Standard DuoFern
EN
Operating and Assembly Manual
Item No.:
1423 45 x1
1423 60 11 (Standard DuoFern Plus)
1415 45 11 (Small belt)
VBD 591-2 (05.13)
Page 2
i
Dear Customer,
EN
With your purchase of a RolloTron Standard DuoFern,
you have chosen a quality product manufactured by
RADEMACHER. Thank you for the trust you have placed
in us.
This roller shutter belt winder has been designed both in
order to provide optimal convenience and operability as
well as to ensure solidity and durability. Having applied
uncompromising quality standards, and carried out
thorough testing, we are proud to be able to present you
with this innovative product.
It’s brought to you by all the
highly-qualied personnel here at
RADEMACHER.
These instructions...
...describe how to install the equipment, connect the electrical system and operate your roller shutter belt winder.
Before you begin, please read these instructions through
completely and follow all the safety instructions.
Please store these instructions in a safe place and pass them
on to any future owners.
Damage resulting from non-compliance with these instructions and safety instructions will void the guarantee. We
assume no liability for any consequential damage.
2
Page 3

i
Table of Contents
EN
1. Scope of delivery ................................................................. 4
2. General view.......................................................................... 5
3. Key to symbols ..................................................................... 6
4. General safety information .............................................. 6
5. Proper use .............................................................................. 8
6. Improper use ......................................................................... 8
7. Permissible roller shutter belts ....................................... 9
8. Brief description .................................................................10
8.1 Table 3: DuoFern network function table .....12
9. General assembly instructions .....................................13
9.1 You will need the following tools ..................... 13
9.2 Preparation for installation .................................14
10. Safety instructions for electrical connection ........... 16
10.1 Electrical connection ............................................17
11. Drawing in and fastening the belt ..............................18
12. Mounting the RolloTron Standard DuoFern ............19
13. End point adjustment ...................................................... 20
14. Manual operation .............................................................. 22
15. Logging DuoFern transmitters on/o;
brief description .................................................................23
15.1 Login for DuoFern transmitters ........................24
15.2 Logging o DuoFern transmitters ...................25
15.3 Clearing the DuoFern network .........................26
16. Automatic mode; brief description .............................27
16.1 Switch all automatic functions on/o
simultaneously ........................................................27
17. Setting the position of the sun ..................................... 28
17.1 Switching the automated solar function
on/o .......................................................................... 28
18. Switching the automatic timer on/o .......................29
19. Switching the automatic twilight function
on/o ..................................................................................... 30
20. Switching the automatic dawn function on/o. ....30
21. Set the ventilation position ...........................................31
22. Erase all settings, software reset ..................................32
23. Carry out hardware reset ................................................32
24. Removing the RolloTron Standard DuoFern
(e.g. in the event of a move) .......................................... 33
25. Removing the belt in the event of unit failure ........35
26. What to do if... ? ..................................................................36
27. Information about maintenance and
care of your equipment ...................................................39
28. Technical Specications ..................................................40
29. Tractive force diagrams ...................................................41
30. CE Mark and EC Conformity ...........................................42
31. Accessories...........................................................................42
32. Warranty conditions ......................................................... 43
3
Page 4

i
1. Scope of delivery (item no. 1423 45 x1) *
* also applies to item numbers 1423 60 11 / 1415 45 11
2.
1.
3.
4.
EN
Legend
1. Belt Winder RolloTron Standard DuoFern or Standard
DuoFern Plus
2. 2 x assembly screws (4 x 55 mm)
3. Disengaging bracket (in housing)
4. Connection cable with Euro-plug
5. Reel compartment cover
6. Cover plate
7. Traction relief mechanism including assembly screws
5.
4
6.
7.
Page 5

i
2. General view (item no. 1423 45 x1) *
* also applies to item numbers 1423 60 11 / 1415 45 11
Front cover
Fastening holes
EN
Deection roller
Belt inlet
Sun LED
Clock LED
Twilight LED
Clock key
Up key
Sun key
Cover plate
Dawn LED
Reset key
SET key
Down key
Twilight
key
Dawn
key
Fastening holes
Type plate
Reel
Fastening
hooks
Traction relief
Cable duct
Reel compartment
cover
Disengaging
bracket
Connecting terminals
5
Page 6

i
3. Key to symbols
EN
i
Risk of fatal electric shock.
◆ This sign warns of danger when working on electrical
connections, components, etc. It requires that safety
precautions be taken to protect life and health.
Important
STOP
safety information.
This concerns your safety.
Please pay particular attention and carefully follow all
instructions marked with this symbol.
4. General safety information
Danger due to electric shock when working on all
electrical systems.
◆ The electrical connection and all work on electrical
systems must only be carried out by a qualied electrician in accordance with the connection instructions in
these operating instructions, see page 16.
◆ Carry out all installation and connection work only in
an isolated, de-energised state.
NOTE / IMPORTANT
In this way, we wish to make you aware of the following
content in order to ensure optimal functionality.
The use of defective equipment can lead to personal
injury and damage to property (electric shocks, short
circuiting).
◆ Never use defective or damaged equipment.
◆ Check the device and mains cable beforehand for
damage.
◆ Consult our customer service department (see page
44) in the event that you discover damage to the
equipment.
6
Page 7

i
4. General safety information
EN
Incorrect use may lead to an increased risk of injury.
STOP
◆ Train all persons to use the RolloTron Standard DuoFern
safely.
◆ Avoid allowing persons with limited abilities to operate
the equipment and prevent children from playing with
xed controllers.
◆ Watch the moving roller shutters and keep other
people away from the area to avoid injury in the event
the shutters suddenly slip.
◆ Undertake all cleaning work on the roller shutters with
the equipment disconnected from the mains power.
The mains socket and plug must be easily accessible
at all times.
According to DIN EN 13659, it is necessary to determine that
the movement conditions for the shutters are maintained in
accordance with EN 12045. The displacement must amount
to at least 40 mm on the lower edge in the rolled-out position with a force of 150 N in the upwards direction.
In doing so, it must be ensured that the extending speed of
the shutters for the nal 0.4 m is less than 0.2 m/s.
Exceeding the maximum permissible running time
(KB) can overload and damage the RolloTron Standard
DuoFern.
◆ The maximum permissible running time for a cycle may
not be exceeded when the equipment is in operation.
For this reason, the RolloTron Standard DuoFern has
an automatic running time limit (KB) of four minutes.
◆ If the running time limit is tr iggered, then the
RolloTron Standard DuoFern must be left for at least
12 minutes to cool down. Full operational availability
is re-established after approx. one hour. During
this period, all four LEDs light up successively.
7
Page 8

i
5. Proper use
EN
Only use the RolloTron Standard DuoFern...
... for opening and closing roller shutters with a permissible belt.
Only use original spare parts
from RADEMACHER.
◆ By doing so, you avoid the risk of malfunctions and
damage to your RolloTron Standard DuoFern.
◆ As the manufacturer, we provide no guarantee for the
use of third-party components and accept no liability
for consequential damage resulting from such.
◆ All repairs to the RolloTron Standard DuoFern must be
undertaken by authorised customer service personnel.
Operating conditions
◆ Only operate the RolloTron Standard DuoFern in dry
rooms.
◆ A 230 V / 50 Hz power supply, together with a site-
provided isolating device (fuse, MCB), must be permanently available at the installation location.
◆ An easi ly access ible 230 V / 50 Hz socket must
be available at the installation site if the enclosed
connecting cable with Euro plug is being used.
◆ The roller shutters must run up and down smoothly
and should not stick.
◆ The mounting surface for the RolloTron Standard
DuoFern must be at.
i
◆ The installation and operation of the RolloTron
Standard DuoFern is only permitted for those systems
and devices where a malfunction in the transmitter
or receiver would not cause a danger to personnel or
property or where this risk is already covered by other
safety equipment.
IMPORTANT
Radio systems which transmit on the same frequency
can cause interference.
6. Improper use
Using the RolloTron Standard DuoFern for purposes
other than previously mentioned is impermissible.
◆ Never use the DuoFern radio system and its com-
ponents (e.g. RolloTron Standard DuoFern) for remote
control of devices and systems with heightened safetyrelevant requirements or where there is a heightened
risk of accidents. This shall require additional safety
equipment. Observe the respective statutory regulations for the installation of such systems.
◆ Do not install the RolloTron Standard DuoFern
outside.
8
Page 9

i
7. Permissible roller shutter belts
EN
IMPORTANT
Only use belts of the permissible lengths. The RolloTron
Standard DuoFern can be damaged if it is used to retract
excessively long belts.
NOTE
The specications are intended for guidance only and apply
to an ideal installation situation. The actual values may vary
due to local conditions.
Table 1: Permissible roller shutter belts
RolloTron:
Item No:
Belt width:
15 mm (Small belt) 1.0 mm 7.6 m - - - - - -
23 mm (Standard belt)
Belt thick-
ness:
1.0 mm - - - 7.6 m 15 m
1.3 mm - - - 6.2 m 12 m
1.5 mm - - - 5.2 m 11 m
Standard
DuoFern (Small belt)
1415 45 11
Standard
DuoFern
1423 45 x1
Maximum belt length
Standard
DuoFern Plus
1423 60 11
Table 2: Permissible roller shutter surface area (m2)
Roller shutter type: Weight/m
Plastic roller shutters (4.5 kg/m2) Approx. 6 m
Aluminium and wooden roller shutters (10.0 kg/m2) Approx. 3 m
2
Permissible roller shutter surface area (m2)
2
2
Approx. 6 m
Approx. 3 m
2
2
Approx. 10 m
Approx. 6 m
2
2
9
Page 10

i
8. Brief description
EN
The RolloTron Standard DuoFern is a roller shutter drive
designed for use inside. It is tted as a ush-mounted
device and the power supply is provided via the enclosed
connecting cable with plug or a xed installed lead.
The RolloTron Standard can be controlled individually on
site or it can be integrated into a DuoFern network.
As soon as you integrate your RolloTron Standard DuoFern
into a DuoFern network, you can make use of many functions oered by the corresponding DuoFern controllers.
The DuoFern actuators and transmitters must be
connected to the DuoFern network.
The automatic functions including switching times, dawn
and dusk control, solar functions, etc. are only available
if the RolloTron Standard DuoFern is operated with a
respective controller (e.g. DuoFern central operating unit,
HomePilot®, etc.) (see page 23).
NOTE
You can find a detail ed description of the vario us
functions, configuration options and possible combinations for the DuoFern system at:
http://www.rademacher.de/duofern.
Central control of several RolloTron Standard DuoFern
devices with a single RolloTron Comfort DuoFern.
A DuoFern network generally includes the DuoFern
central operating unit or the HomePilot® (together with
the associated user interface) as the central controllers.
Alternatively, you can control one or more RolloTron
Standard DuoFern devices with a single RolloTron Comfort
DuoFern. In doing so, the automatic functions congured
for the RolloTron Comfort DuoFern are also executed by the
logged-on RolloTron Standard DuoFern.
A single RolloTron Comfort DuoFern controls several
RolloTron Standard DuoFern devices.
10
Page 11

i
8. Brief description
EN
Soft-start / Soft-stop
The RolloTron Standard DuoFern is equipped with a Softstart / Soft-stop function. Gentle starting and stopping
serves to protect the belt winder mechanics and the belt.
Obstacle detection
The movement of the belt is monitored. If the roller shutters
hit an obstacle in the DOWN ( t ) direction, the belt will stop
moving and the belt winder is switched o.
Once the system has switched o, it is no longer
possible to directly operate the drive in the same
direction.
Run the belt winder back in the opposite direction and
remove any possible obstacle. Subsequently it is possible
to operate the drive in the original direction again.
NOTE
Please ensure that the belt winds evenly during its subsequent cycle after the obstacle detection system has
triggered.
Overload cut-o
The RolloTron Standard DuoFern is equipped with an
overload cut-o system.
If the drive jams in the UP ( ▲ ) cycle (for example, due to
ice), the belt winder will also switch o. Once the cause for
the overload has been rectied, the drive is fully operational
in both directions.
11
Page 12

i
8.1 Table 3: DuoFern network function table
Function Value range Factory setting
1. Manual operation Up / Stop / Down -
2. Direct drive to a %-posit ion 0 - 100 % -
3. Manual mode on / o on / o O
4. Timer on / o on / o On
5. Random function - -
6. Automatic dawn function - -
7. Automatic dawn function on / o on / o O
8. Automatic dusk function - -
9. Automatic dusk function on / o on / o O
10. Sun function - -
11. Automatic solar function on / o on / o O
12. Sun position 0 - 100 % 50 %
13. Ventilation position on / o on / o O
14. Ventilating pos ition 1 - 99 % 80 %
15. Connectivity test - -
* The "WR CongTool" software can be downloaded from our website at www.rademacher.de
EN
HomePilot®
DuoFern envi ronmental sensor
DuoFern cen tral operating un it
* WR CongTool with DuoFern central operating unit
RolloTron Comfort DuoFern / Troll Comfo rt DuoFern
DuoFern sta ndard manual tra nsmitter
DuoFern wall controller
● ● ● ●
●
● ● ●
● ● ●
● ● ●
● ● ● ●
● ● ●
● ● ● ●
● ● ●
● ●
● ● ●
● ● ●
● ● ●
● ● ●
● ●
12
Page 13
1
2
3
4
5
i
9. General assembly instructions
EN
i
Poor routing of the belt can cause the belt to fail and
leads to unnecessary loads on the RolloTron Standard
DuoFern.
◆ Install the belt winder so that the belt runs as
straight as possible into the device, in order to avoid
unnecessary friction and wear.
Incorrect installation can lead to
property damage.
◆ Strong forces are exerted during operation of the sys-
tem which require secure installation on a rm base.
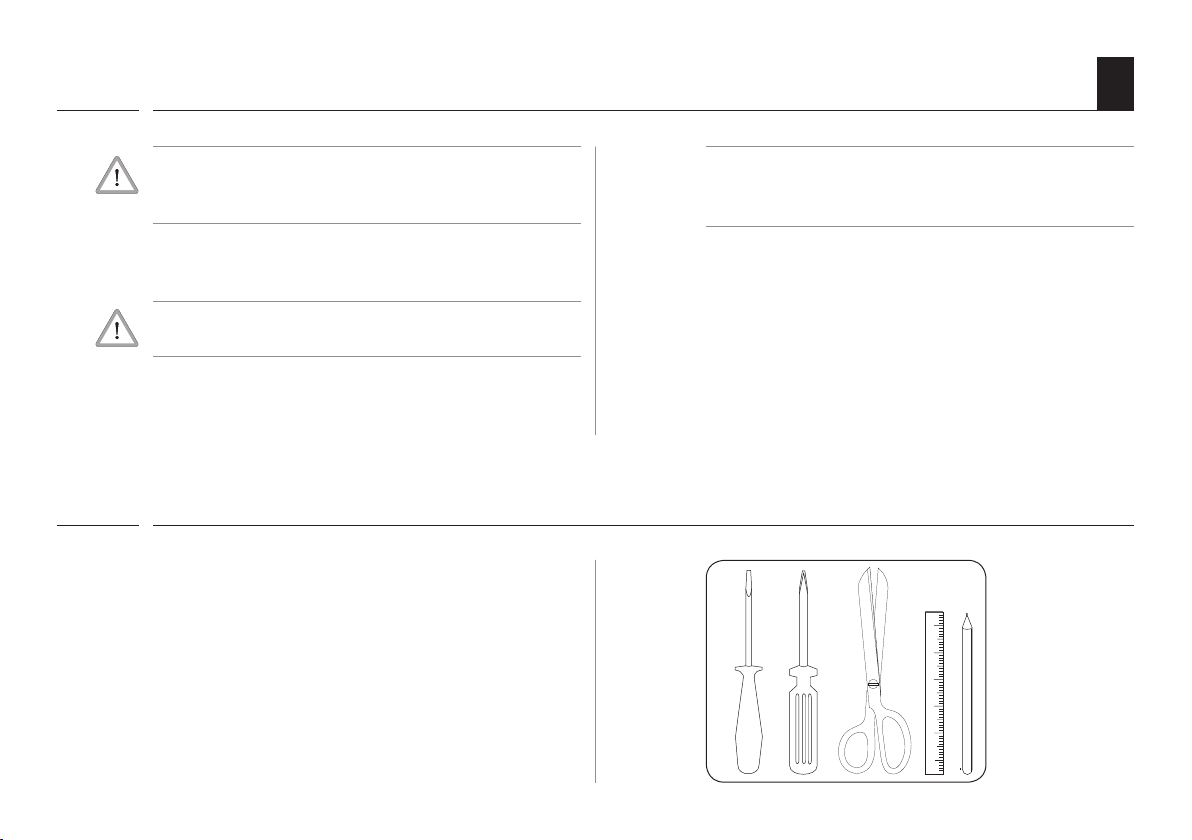
9.1 You will need the following tools
◆ Screwdriver
◆ Scissors
◆ Carpenter's gauge or measuring tape
◆ Pen
NOTE
In order to ensure optimal operation, the RolloTron Standard DuoFern should not be installed near metal objects.
13
Page 14
2
7
1
i
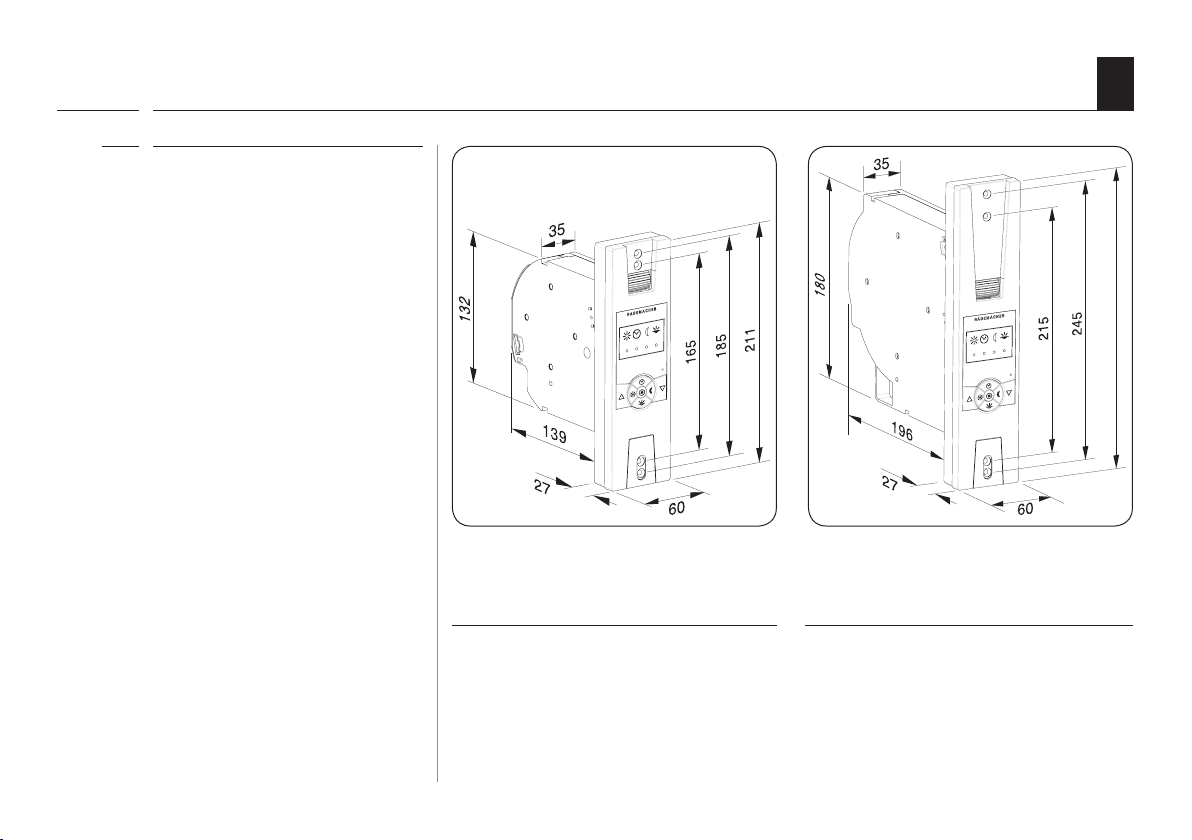
9.2 Preparation for installation
Take measurements.
1.
◆ Check that the belt box has
sucient space to house the
RolloTron Standard DuoFern.
EN
14
All dimensions in mm
RolloTron Standard DuoFern
Item no.:
1415 45 11 (Small belt)
1423 45 x1 (Standard belt)
All dimensions in mm
RolloTron Standard DuoFern Plus
Item no.:
1423 60 11 (Standard belt)
Page 15

i
9.2 Preparation for installation
Remove the old belt winder, if you are carrying out a
2.
conversion to an existing roller shutter system.
◆ Let the roller shutter move fully down, until the slats
are completely closed.
◆ Remove the old belt winder and unreel the belt.
There is a risk of injury from the pre-tensioned
springs on the old belt winder.
◆ The spring unit can suddenly recoil when it is removed.
Hold the spring unit rmly when loosening the belt
and allow it to recoil slowly until the spring unit has
completely unwound.
Prepare the belt.
3.
◆ Cut the belt o approx. 20 cm under the belt box.
◆ Fold the end of the belt over by approx. 2 cm and cut
a short slit in the centre. This enables you to subsequently hook the belt onto the reel.
EN
20 cm
Recommendation
◆ The belt must run as straight and freely as possible.
For sti roller shutters, mount a deection roller on
the belt box. This helps to prevent unnecessary friction
and wear to the belt.
Accessories, see page 42.
15
Page 16

i
10. Safety instructions for electrical connection
EN
Danger due to electric shock when working on all
electrical systems.
◆ The electrical connection and all work on electrical
systems must only be carried out by a qualied electrician in accordance with the connection instructions in
these operating instructions.
◆ Carry out all installation and connection work only in
an isolated, zero-volts state.
◆ Disconnect all phases of the mains power supply cable
and secure it to prevent any reconnection.
◆ Check the system for a zero-voltage status.
◆ Check that the voltage / frequency on the type plate
corresponds to local mains conditions prior to installation.
NOTE
The electrical connection for the RolloTron Standard
DuoFern can be made either with the supplied connecting
cable or via a xed laid cable.
16
Page 17

i
10.1 Electrical connection
Connect the supplied connecting cable.
1.
The colour coding is irrelevant for the installation.
EN
Damaged cables can cause
short circuits.
◆ Pay attention that cables are laid safely.
◆ The connecting cable may not be pinched when
screwing on the belt winder as this could lead to
damage.
Lay the connecting cable safely.
2.
◆ Lay the connecting cable to the RolloTron Standard
DuoFern in a cable duct.
Finally, screw on the traction relief mechanism with the
3.
screws provided.
Traction
relief
Cable duct
RolloTron
Standard DuoFern
Traction relief
RolloTron
Standard DuoFern Plus
17
Page 18

i
11. Drawing in and fastening the belt
Insert the mains plug into the socket.
1.
Press the [UP] key until the fastening hooks
2.
are easily accessible in the reel compartment.
There is a risk of injury
STOP
from the reel.
◆ Never reach into the reel compartment when the
motor is running.
Always remove the mains plug from the socket before
3.
feeding the belt into the top of the RolloTron.
◆ Continue to feed the belt into the device as shown in
the bottom right sectional diagram and subsequently
slide the belt over the fastening hooks from above.
Re-insert the mains plug into the socket.
4.
◆ Press the [UP] key until the belt has wound around the
reel once completely.
◆ Pull the belt tight when winding, so that the deection
roller turns at the same time.
Finally remove the mains plug from the socket again
5.
before replacing the reel compartment cover back onto
the reel compartment.
EN
Belt
Belt
End of belt
Fastening
hooks
18
Belt path in
RolloTron Standard DuoFern
Page 19

i
12. Mounting the RolloTron Standard DuoFern
Mount the RolloTron Standard DuoFern as straight as possible, so that the belt can wind correctly.
Ensure that the RolloTron Standard DuoFern sits freely in
the belt box and that it is not in contact with the masonry,
otherwise noise will be generated during operation.
Slide the RolloTron Standard DuoFern into the belt box
1.
and screw it tight using the screws provided.
IMPORTANT
Ensure that the connecting cable is laid correctly inside
the cable duct, otherwise it can be crushed and damaged
when the cover is screwed in place.
Slide the enclosed cover plate over the lower mounting
2.
holes.
Commissioning
3.
◆ Re-insert the mains plug into the 230 V / 50 Hz socket.
This completes the installation process.
EN
IMPORTANT
The mains socket and plug must be easily accessible at
all times.
19
Page 20

i
13. End point adjustment
IMPORTANT
The end points must be congured in order that the roller shutters stop at the desired upper and lower positions. It is imperative that
both end points are congured, otherwise malfunctions may occur.
◆ If the RolloTron Standard DuoFern is operated without an end point setting, the drive will continue to run for as long as one of
the two control keys is actuated.
◆ The automatic functions remain blocked until the end point setting is congured.
EN
Set the upper end point
20
+
1.
buttons.
2.
Simultaneously press and hold the
+
Release the buttons...
The roller shutters travel up.
NOTE
Tighten the belt slightly, until it is tensioned by the weight of the roller shutters.
...as soon as the roller shutter achieves the
desired position for the upper end point.
The roller shutter stops and the upper end
point is stored.
IMPORTANT
Do not set the upper end point right up to the limit stop.
Release the key promptly and never allow it to extend
beyond the respective end point. Failure to do so can
cause overloading and may damage the roller shutters
and/or drive.
Page 21

i
13. End point adjustment
Set the lower end point
EN
+
3.
buttons.
4.
Simultaneously press and hold the
The roller shutters travel down.
+
Release the buttons...
...as soon as the roller shutter achieves the
desired position for the lower end point.
The roller shutter stops and the lower end
point is stored.
Changing or correcting the end points
Move the roller shutters to the centre position and
5.
congure the respective end point again.
NOTE
After a period of time it may be necessary to recongure
the end points as the belt may elongate during the process of operation.
IMPORTANT
Please ensure that the belt is not excessively slack when
reaching the lower end point.
21
Page 22

14. Manual operation
Manual operation is always possible and has priority over
the programmed automatic functions.
Open the roller shutters.
1.
2.
3.
or
the interim.
Closing the roller shutters.
Briefly pressing the button causes the
roller shutters to move to the upper end
point.
Causes the roller shutters to stop in
Briefly pressing the button causes the
roller shutters to move to the lower end
point.
EN
Controls
22
Page 23

15. Logging DuoFern transmitters on/o; brief description
EN
In order for your RolloTron Standard DuoFern to react to
control signals from the DuoFern network, it is necessary
to log each DuoFern transmitter (e.g. RolloTron Comfort
DuoFern, DuoFern central operating unit, etc.) on to the
RolloTron Standard DuoFern.
To do so, please read the operating instructions for the
respective DuoFern transmitter.
Maximum number of connected devices
You can assign a maximum of 20 DuoFern transmitters
to a single RolloTron Standard DuoFern.
NOTE
◆ A RolloTron Standard DuoFern cannot be connected to
another RolloTron Standard DuoFern device.
◆ Additional information about logging on can be ob-
tained from the login matrix on our website under:
www.rademacher.de
23
Page 24

15.1 Login for DuoFern transmitters
+
1.
Simultaneously press and hold the
buttons for approx. 4 seconds.
Login mode remains active for approx.
60 seconds.
Switch the desired DuoFern
2.
transmitter to login mode.
Pay attention to the timer LED.
3.
Flashes green
green (for 5 seconds)
red
Activate login mode.
The timer LED ashes green:
Login mode is active.
Login was successful.
The login process failed, for example if:
◆ 20 DuoFern transmitters have
already been registered.
◆ An attempt was made to register an
unsuitable device (e.g. other DuoFern actuator).
Register the next DuoFern transmitter
4.
by repeating steps 1 to 2, or quit login
mode.
Cancel registration.
5.
You can cancel the login process at any
time by briey pressing the [SET] key.
EN
24
Page 25

15.2 Logging o DuoFern transmitters
+
1.
Simultaneously press and hold the
buttons for approx. 4 seconds.
Logout mode remains active for approx.
60 seconds.
Switch the desired DuoFern
2.
transmitter to logout mode.
Pay attention to the timer LED.
3.
ashes red
green (for 5 seconds)
red
Activate logout mode.
The timer LED ashes red:
Logout mode is active.
Logout was successful.
The logout process failed, for example if:
◆ An at tempt was made to log -off
a DuoFern transmitter that is not
logged-on.
Logout the next DuoFern transmitter
4.
by repeating steps 1 to 2, or quit logout
mode.
Cancel the logout process.
5.
You can cancel the logout process at any
time by briey pressing the [SET] key.
EN
25
Page 26

15.3 Clearing the DuoFern network
EN
This function enables you to clear all DuoFern transmitters
from the RolloTron Standard DuoFern which are no longer
accessible via radio.
NOTE
◆ Not all battery-operated DuoFern transmitters (e.g.
the DuoFern central operating unit) can be logged
o in this way.
◆ A software reset must be carried out in order to
logout and delete all DuoFern transmitters (see page 32 ).
1.
2.
+ + Activate the clear function.
Simultaneously press and hold
th e butto ns for approx. 4
seconds.
The timer LED ashes red:
The timer LED will light up green as
soon as the clearing process has
completed.
NOTE
You can cancel the clearing process at any
time by briey pressing the [SET] key.
26
Page 27

i
16. Automatic mode; brief description
EN
The RolloTron Standard DuoFern features three automatic
functions:
◆ Automated solar function
◆ Automatic timer
◆ Automatic dusk function
◆ Automatic dawn function
The automatic functions are only available if
the RolloTron Standard DuoFern is operated
with a respective controller (e.g. DuoFern
central operating unit, HomePilot®, etc.) (see
page 23).
All of the automatic functions can be combined as well as
independently activated and deactivated on the RolloTron
Standard DuoFern.
The status of each automatic function is indicated by the
respective LED.
16.1 Switch all automatic functions on / o simultaneously
Press and hold [SET] for approx. 1
1.
second.
All automatic functions will be simultaneously switched
2.
on or o.
Observe the LEDs indicating the status of the automatic
3.
functions.
Once automatic mode is deactivated, it is only possible
4.
to operate the system manually.
27
Page 28

17. Setting the position of the sun
EN
28
You can set an arbitrary position (position of the sun)
which your roller shutters will lower to when the automated
solar function is activated.
/
1.
desired position and stop.
Move the roller shutters to the
2.
17.1 Switching the automated solar function on/o
The automated solar function enables brightness-dependent control of your roller shutters. The control signals for
this function are provided by a light sensor on the DuoFern
network.
When the automated solar function is triggered, your
roller shutters will then lower to the congured position
of the sun.
1.
2.
+
Save the position of the sun.
The solar LED ashes by way of conr mation. Once the key is released, the
automated solar function is activated and
the LED lights up permanently.
Press and hold the solar button for
approx. 1 second.
Observe the solar LED:
OFF
The automatic solar function is switched o.
ON
The automatic solar function is switched on.
Flashing
The automated solar function is active,
the roller shutters will be lowered to the
position of the sun. The LED continues
to ash when the roller shutters are in the
position of the sun.
Page 29

18. Switching the automatic timer on/o
EN
Execution of control signals from the DuoFern network.
If the automatic timer is activated, control signals for opening and closing times will be received from the DuoFern
network and executed by the system.
NOTE
◆ Executing a random function.
If the RolloTron Standard DuoFern receives a control
signal from a DuoFern transmitter with activated
random function (e.g. from a RolloTron Pro Comfort
DuoFern), then it is also able to execute the random
function. The random function generates a random
delay to the switching time.
◆ The random function cannot be switched on/o on
site.
Press the timer key for approx. 1
1.
second.
Pay attention to the timer LED.
2.
OFF
The automatic timer is switched o.
ON
The automatic timer is switched on.
29
Page 30

19. Switching the automatic twilight function on/o
EN
The automatic twilight function causes the roller shutters
to close automatically to their lower end point or the congured ventilation position (see page 31).
The control signals for this function are provided by a DuoFern transmitter on the DuoFern network.
Press and hold the twilight button for
1.
approx. 1 second.
2.
20. Switching the automatic dawn function on/o.
The automatic dawn function causes the roller shutters to
open automatically to the upper end point.
The control signals for this function are provided by a
DuoFern transmitter on the DuoFern network.
Press and hold the dawn button for
1.
approx. 1 second.
2.
Pay attention to the twilight LED.
OFF
The automatic twilight function is
switched o.
ON
The automatic twilight function is
activated.
Pay attention to the dawn LED.
OFF
The automatic dawn function is
switched o.
ON
The automatic dawn function is
switched on.
30
Page 31

i
21. Set the ventilation position
EN
If you do not want the roller shutters to close fully to the
lower end point, you can use this function to congure an
arbitrary position (e.g. as ventilation position).
When closing automatically, the roller shutters will stop at
the ventilation position, however, they can subsequently
be closed completely via manual operation.
The ventilation position can be changed at any time.
/
1.
desired ventilation position and stop.
2.
conrmation.
Revoke the ventilation position.
3.
position, first close the roller shutters
fully and then save the position again. This
will set the ventilation position to the
lower end point.
Move the roller shutters to the
+
Save the ventilation position.
The dawn LED ashes red by way of
+
If you want to revoke the ventilation
31
Page 32

22. Erase all settings, software reset
EN
If necessary, you can erase all of your settings and return
the RolloTron Standard DuoFern system to its original
factory settings.
23. Carry out hardware reset
A hardware reset can be carried out in the event that the
RolloTron Standard DuoFern fails to react to commands.
◆ A hardware reset causes the internal power supply to
the RolloTron Standard DuoFern to be briey interrupted.
◆ All other settings are retained.
IMPORTANT
Never press the reset button when the motor is running,
as otherwise the end points will be modied.
+ + + Simultaneously press and
1.
hold the buttons for 4
seconds.
All of the LEDs ash red by way of conrmation.
2.
Release the buttons...,
3.
◆ ... subsequently all of the settings will be deleted.
(End points / automatic functions / position of the
sun and ventilation position and all registered
DuoFern transmitters).
Press the reset button using a sharp
1.
object (e.g. a paper clip).
32
Page 33

i
24. Removing the RolloTron Standard DuoFern (e.g. in the event of a move)
+ + + Erase all settings.
1.
Fully close the roller shutters.
2.
In doing so, pull out the belt as far as possible from
3.
the top of the RolloTron Standard DuoFern.
Remove the cover plate from the lower mounting
4.
holes.
◆ You can remove the front panel by gripping the
small notch in the lower side of the device.
Subsequently release the fastening screws and pull
5.
the RolloTron Standard DuoFern completely out of
the belt box.
Remove the belt compartment cover.
6.
There is a risk of injury
STOP
from the reel.
◆ Never reach into the reel compartment when the
motor is running. Always remove the mains plug
before touching the reel compartment.
Simultaneously press and
hold the buttons for 4
seconds.
Keep the button held down.
EN
33
Page 34

i
24. Removing the RolloTron Standard DuoFern (e.g. in the event of a move)
Check the position of the fastening hook and move
7.
the hook into an easily accessible position if necessary.
Subsequently remove the mains plug permanently
8.
from the socket.
Release the belt from the fastening hook and pull it out
9.
completely from the front of the RolloTron Standard
DuoFern.
EN
34
Page 35

i
25. Removing the belt in the event of unit failure
EN
In the event that the RolloTron Standard DuoFern unit fails
and the motor no longer runs, you can use the disengaging
bracket provided in order to fully remove the belt from the
belt winder unit, without the need for cutting it.
Remove the mains plug from the socket.
1.
Dismantle the RolloTron Standard DuoFern as previ-
2.
ously demonstrated on page 33.
Release the drive with the help of the supplied disen-
3.
gaging bracket.
ATTENTION
◆ Hold on to the belt tightly, as otherwise the roller shut-
ters may slam shut.
◆ A small amount of resistance must be overcome when
pressing.
Maintain pressure on the disengaging bracket and pull
4.
the belt out of the RolloTron Standard DuoFern as far
as possible.
Release the belt from the fastening hook and pull it
5.
out completely from the RolloTron Standard DuoFern.
Place the disengaging bracket back in its holder.
6.
RolloTron
Standard
DuoFern
RolloTron
Standard
DuoFern
Plus
Drive release
Storage bay
Drive release
35
Page 36

i
26. What to do if... ?
Fault Possible cause / solution
... the RolloTron Standard DuoFern indicates no
functions?
... the RolloTron Standard DuoFern no longer reacts at
the congured switching time?
... the roller shutters no longer stop at the congured
end points?
... the roller shutters stop as soon as the control key is
released?
... an automated function does not work?
... the RolloTron Standard DuoFern rotates in the
wrong direction?
... all of the LEDs ash successively (running light) and
the RolloTron Standard DuoFern fails to operate in
any direction?
Check the power supply including connecting cable and plug.
The end points may not be congured.
Congure the end points, see page 20.
The end points may be displaced due to elongation of the belt.
Re-adjust the end points, see page 20.
The end points are not congured.
Congure the end points, see page 20.
The automatic function may not be activated.
Activate the desired automatic function, see page 27.
Possibly the belt is wrapped around the reel incorrectly, see page 18.
The maximum running time of the drive has been exceeded,
see page 7/40.
The motor is too hot.
The belt winder will be operational again in approx. 1 hour.
EN
36
Page 37

i
26. What to do if... ?
Fault Possible cause / solution
... the roller shutters stop during downward travel?
... the roller shutters stop suddenly during upward
travel?
a) The roller shutters may have hit an obstacle.
Move the roller shutters back up and remove the obstacle.
b) Slats have shifted out of alignment.
If possible, move the roller shutters back up and realign the slats.
c) The roller shutters scrape against the window frame inside the roller
shutter box due to the lack of a pinch roller or insulation material
may have come free and is jamming the roller shutters.
Open the roller shutter box and rectify the fault.
Lubricate any sti areas with gliding wax if necessary.
d) The roller shutters are too light.
Increase the weight of the roller shutters by, for example,
adding a piece of at steel to the bottom slat.
a) The drive may be jammed, for example, due to the roller shutters
freezing up or other obstacles.
b) The roller shutters may not be running suciently smoothly.
Check the roller shutters and roller shutter guides.
d) The roller shutters may be too heavy. The maximum tractive force
of the belt winder has been exceeded, see page 41.
EN
37
Page 38

i
26. What to do if... ?
Fault Possible cause / solution
... the RolloTron Standard DuoFern no longer reacts in
the morning at the congured switching time?
... the RolloTron Standard DuoFern fails to react prop
erly either manually or automatically?
The electronic system switched o the drive after closing the roller
shutters because the deection roller stopped turning.
This is the case if:
a) the [Down] button was pressed for an excessive period of time
during the conguration process for the lower end point. The roller
shutter slats are closed, but the belt continued to wind and is no
longer tight on the deection roller.
b) The lower end point is displaced due to elongation of the belt.
The belt may never be slack.
Recongure the lower end point (see page 21) and ensure that
the belt remains tight to the deection roller.
In doing so, the deection roller must turn evenly.
a)
The RolloTron Standard DuoFern is no longer ready for operation.
Carry out a hardware reset in accordance with page 32.
b) If the RolloTron Standard DuoFern still fails to react after the
hardware reset, carry out a software reset in accordance with the
instructions on page 32. Subsequently test the RolloTron
Standard DuoFern with the default factory settings.
EN
38
Page 39

i
27. Information about maintenance and care of your equipment
EN
Maintenance
Please check your RolloTron Standard DuoFern and all of
your roller shutter components regularly for damage:
◆ The deection roller on the roller shutter box must
move freely.
◆ The belt may not be frayed.
◆ Have damaged components exchanged by a special-
ist rm.
Maintenance
You can clean the RolloTron Standard DuoFern using a
damp cloth. Please do not use aggressive or abrasive
cleaning agents.
39
Page 40

i
28. Technical Specications
Supply voltage: 230 V / 50 Hz; 230 V / 60 Hz
Nominal power: 70 W
Standby power: < 0.6 W
Nominal torque:
- RolloTron Standard DuoFern 10 Nm
- RolloTron Standard DuoFern Plus 14 Nm
Maximum speed:
- RolloTron Standard DuoFern 30 RPM.
- RolloTron Standard DuoFern Plus 24 RPM.
Maximum tractive force: See page 41 (tractive force diagram)
Transient operation: 4 minutes (maximum running time)
Protection class: II
Protection type: IP20 (only for use in dry rooms)
Permissible ambient temperature: 0 - 40 °C
Mains connecting cable: 2 x 0.75 mm2 (H03VVH2-F)
Transmission frequency: 434.5 MHz
Transmission power: 10 mW
Range:
– in the building: 10 to 15 m
Max. number of DuoFern transmitters: 20
Dimensions: See page 14
EN
40
Page 41
i
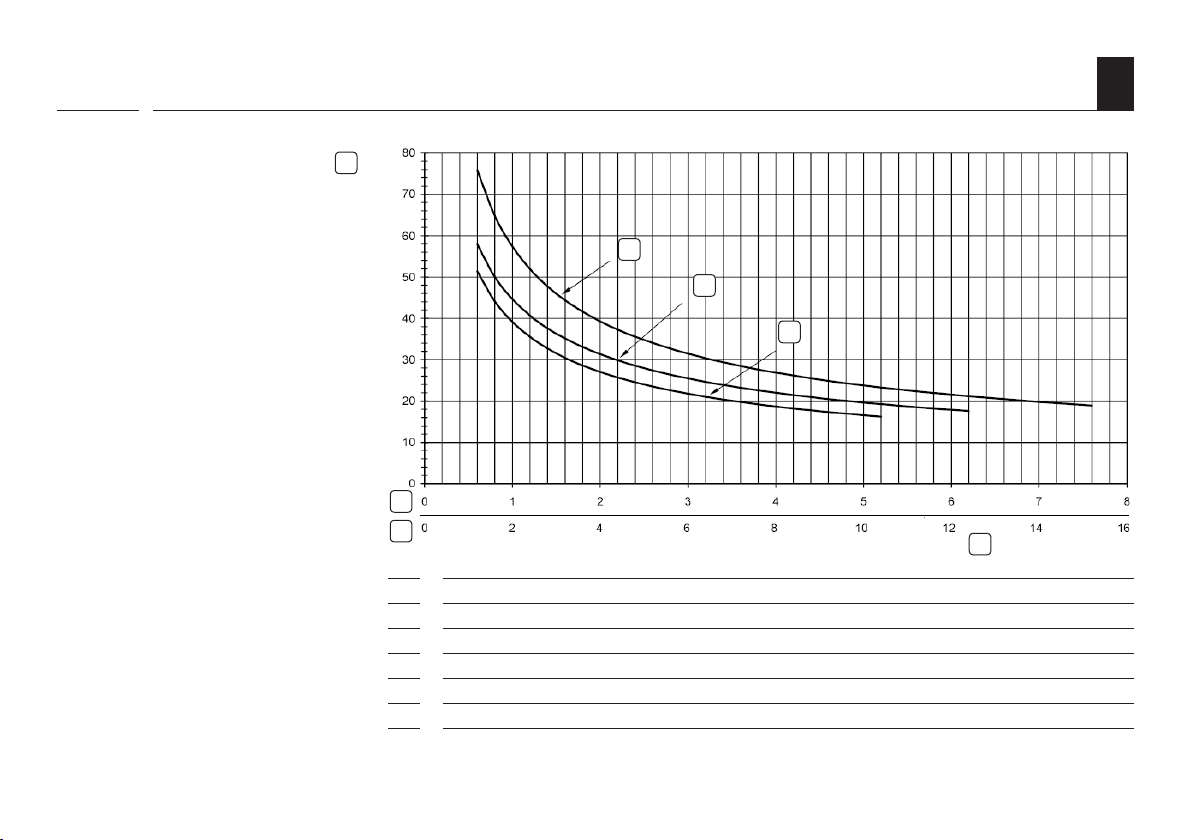
29. Tractive force diagrams
1
EN
Lifting weight kg ]
6
7
Lifting weight [Kg]
1 =
Belt thickness 1.0 mm
2 =
Belt thickness 1.3 mm
3 =
Belt thickness 1.5 mm
4 =
Belt length [m]
5 =
Belt lengths for RolloTron Standard DuoFern
6 =
Belt lengths for RolloTron Standard DuoFern Plus
7 =
2
3
4
Belt length m ]
5
41
Page 42

i
30. CE Mark and EC Conformity
EN
i
The electronic roller shutter belt winder RolloTron
Standard DuoFern (item no.: 1423 45 x1 / 1423 60 11 /
1415 45 11) complies with the requirements of the following European und national directives:
1999/5/EC
R&TTE directive
31. Accessories
A comprehensive range of accessories is available for
customising your RolloTron Standard DuoFern to local
conditions.
Further information about our accessories is available at
the following website:
www.rademacher.de/zubehoer
The conformity has been veried and the corresponding
declarations and documentation are available on le at the
manufacturer’s premises.
RADEMACHER Geräte-Elektronik GmbH & Co. KG
Buschkamp 7
46414 Rhede (Germany)
42
Page 43

i
32. Warranty conditions
EN
RA DE MACH ER Geräte -Elektronik GmbH provide s a
36-month warranty for new systems that have been installed in compliance with the installation instructions. All
construction faults, material defects and manufacturing
defects are covered by the warranty.
The following are not covered by the warranty:
◆ Incorrect tting or installation
◆ Non-observance of the installation and operating
instructions
◆ Improper operation or wear and tear
◆ External inuences, such as impacts, knocks or
weathering
◆ Repairs and modications by third party,
unauthorised persons
◆ Use of unsuitable accessories
◆ Damage caused by unacceptable excess voltages
(e.g. lightning)
◆ Operational malfunctions caused by radio frequency
overlapping and other such radio interference
RADEMACHER shall remedy any defects, which occur within
the warranty period free of charge either by repair or by
replacement of the aected parts or by supply of a new replacement unit or one to the same value. There is no general
extension of the original warranty period by delivery of a
replacement or by repair as per the terms of the warranty.
43
Page 44

RADEMACHER
Geräte-Elektronik GmbH & Co. KG
Buschkamp 7
46414 Rhede (Germany)
info@rademacher.de
www.rademacher.de
Service:
Hotline 01807 933-171*
Fax +49 2872 933-253
service@rademacher.de
* 30 seconds free of charge, subsequently 14 cents / minute from
German xed line networks and max. 42 cents / minute from
German cellular networks.
Subject to technical modications, misprints and errors. Illustrations not binding.
 Loading...