

Page 1

User
Manual
1U Rackmount LCD Keyboard Drawer
S117 / 119 Series
17” / 19” LCD
Optional KVM
● 8, 16 Ports USB Single Console
Page 2

Page 3

Rev. : 1.0 P.1
1. Table Of Content
1. Table of Content P.1
2. Read Before Installation P.2
3. Introduction P.3
4. Features P.3
5. Package Contents P.4
6. Optional Accessories P.5
7. Peripheral Products P.5
8. Important Safeguards P.6
9. Structure Diagram P.7
10. Dimension Diagram
S117-8/1601 P.8
S119-8/1601 P.9
11. LCD Session
LCD Membrane Diagram P.11
LCD OSD Control
Main Menu P.11
Sub Menu P.12-13
Resolution Settings
For Windows P.14
12. KVM Session
Front View P.16
Rear View P.17
Installation Steps P.18
Cascading P.19
13. Start Up P.20
HotKey Command P.20
HotKey Command Operation P.21-22
KVM OSD Operation
Main Controls P.23
Sub Controls P.24-29
14. Keyboard & Key Pad Layout P.30
15. FAQ P.31
16. Technical Specification P.32-33
S117 / S119 User Manual
Page 4
Technical Notes
For Windows 98/98 SE systems
● HID (Human Interface Device) driver must be installed prior to using
the USB KVM switch. To install the HID driver, first connect a USB
keyboard and mice directly to computer (before installing KVM switch)
then follow the Windows installation instructions, this will install the HID
device driver and allow the use of the KVM switch.
● If a mouse recognition error is displayed during system boot:
“Windows did not detect a mouse attached to the computer.You can
safely attach a serial mouse now. To attach a mouse to a PS/2 mouse
port, you must first turn the computer off”
a) Press the Tab key once to select the check box.
b) Press the Space bar once which will place a check in the box
“Do not show this message again”
c) Press the Enter key once and Windows will continue to boot and
will then recognize the mouse.
Operating System Compatibility
● Any USB-enabled operating system such as Solaris®, Windows® 98,
Windows® 98SE, Windows® 2000, Windows® XP or higher.
● Windows® 95 are not recommended because of immature USB
support.
Introduction
Note : Failure to do so may result in Windows not being able to detect
keyboard and mouse.
Rev. : 1.0 P.2
2. Read Before Installation
*All brand names, logo registered trademarks are properties of their respective owners.
S117 / S119 User Manual
Page 5

Rev. : 1.0 P.3
S Solutions is total compatible with Solaris. The LCD screen support SUN
native 1152 x 900 & standard resolutions. SUN-compatible keyboard incorporates SUN system administration commands keys.
It is a combination of keyboard, mouse and monitor into a drawer, with features
such as flip-up design, adjustable brackets, built in LCD OSD to provide effective assistant for an administrator to control SUN/ PC system.
3. Introduction
4. Features
● 1U 17” or 19” TFT LCD screen
● Standard color purple light grey.
● The screen direct support most SUN native resolution, including 1152 x
900 @ 66 or 76Hz
● Hot-key for SUN-Solaris system administration commands including
Help, Stop, Cut, Paste, Compose etc.
● Compatible with SUN, Apple, IBM, DELL, HP and USB server
104-keys SUN-compatible keyboard w/ 3 button trackball supports additional
manipulations such as panning and scrolling.
● Fits all current SUN racks, Fits 24” to 36” rack depths via adjustable
mounting brackets
● 12V, 24V, 48V DC power supply options
● Built-in KVM switch function for easy controlling and monitoring up to 16
residing servers/ platforms
● Support eight characters password protection and search PC server
name
● Auto scan mode for monitoring PCs and flexible scan time from 5~99
seconds
● Hot Pluggable—Add or remove computers without powering down the
switch
Disclaimer
This information is subject to change without notice. The producer of this manual accepts no
responsibility for damage or claims, resulting from misuse or misinterpretation
S117 / S119 User Manual
Page 6
Rev. : 1.0 P.4
5. Package Contents
Before Unpacking
It is very important to locate the LCD Keyboard Drawer in a suitable environment.
● The surface for placing and fixing the LCD Keyboard Drawer should be stable and level
or mounted into a suitable cabinet.
● Make sure the place has good ventilation, is out of direct sunlight, away from sources of
excessive dust, dirt, heat, water, moisture and vibration.
● Convenience for connecting the LCD Keyboard Drawer to the related facilities should be
well considers too.
Unpacking
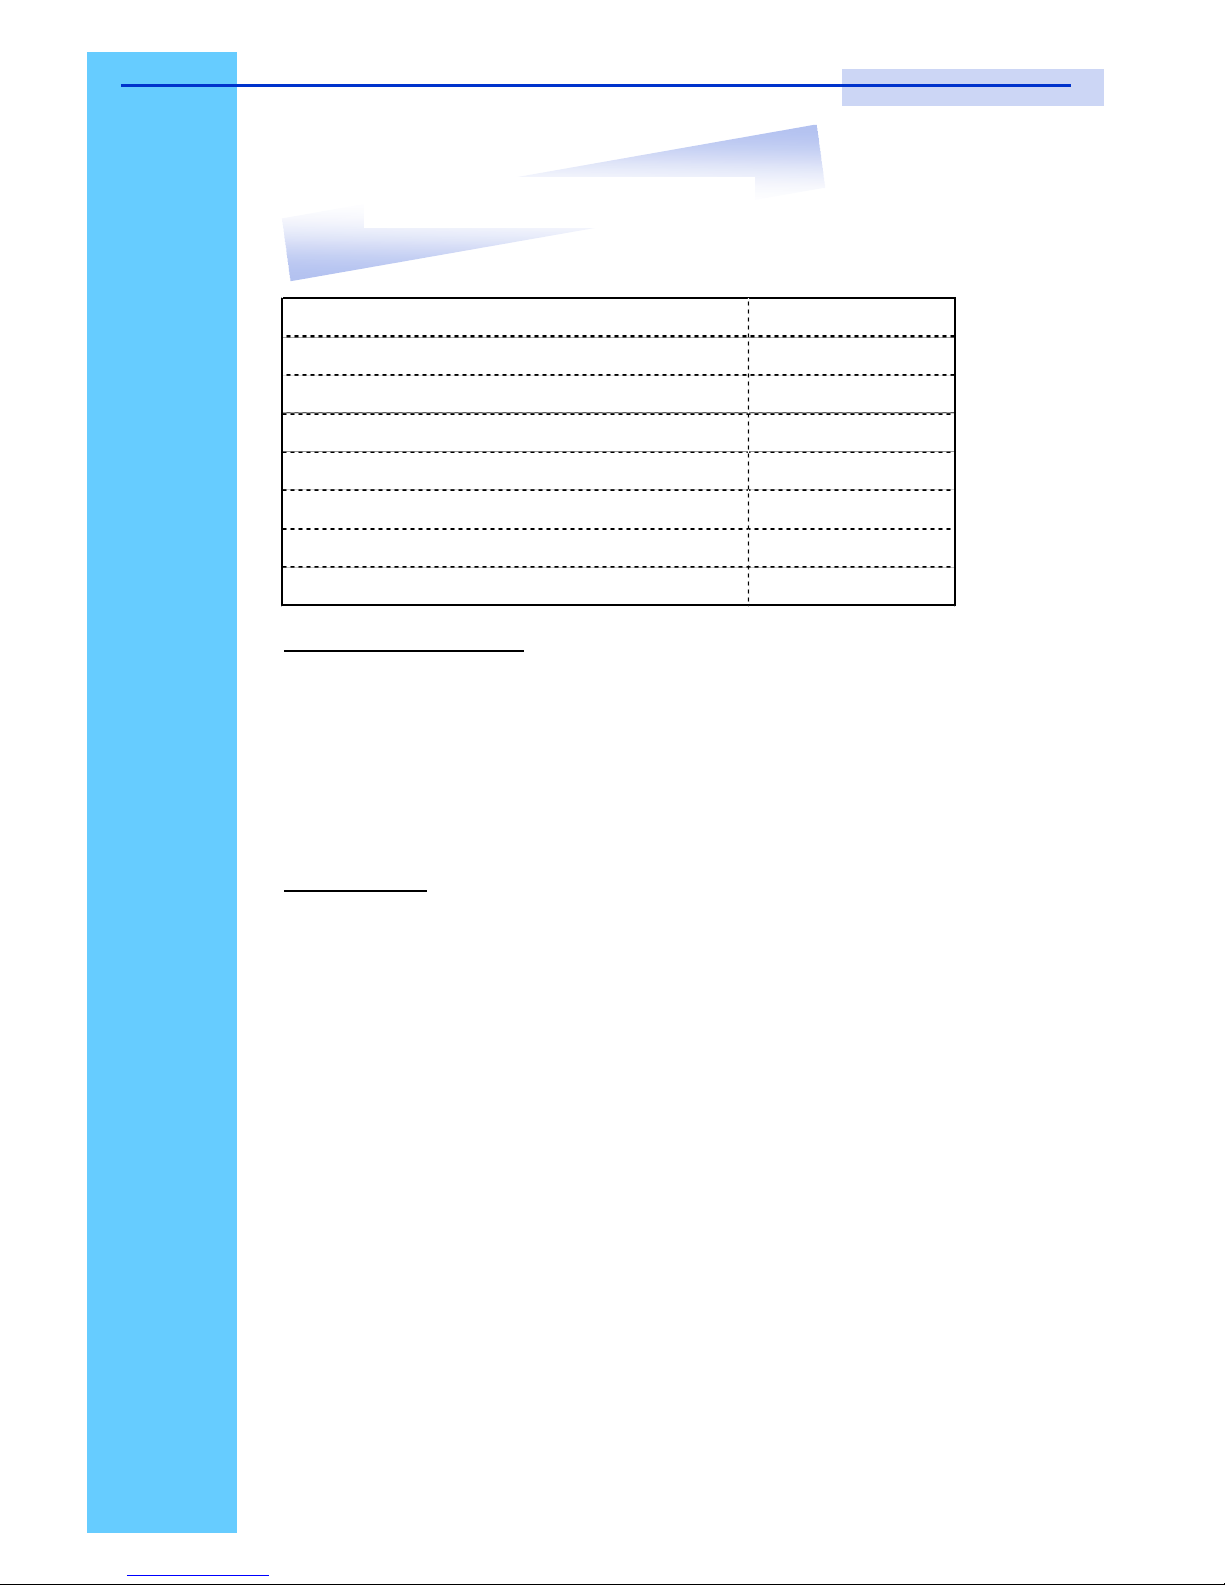
The LCD Keyboard Drawer comes with the standard parts shown as above. Check and make
sure they are included and in good condition. If anything is missing, or damage, contact the
supplier immediately.
LCD Monitor Drawer (optional USB KVM Switch)1 Piece
User Manual1 Piece
DC Power Adapter1 Piece
Power Cord1 Piece
Mounting Bracket1 Pair
Fasteners4 Pieces
CB-6 2-in-1 KVM cable (without KVM)1 Piece
CB-6 2-in-1 KVM cable (with KVM)8 Pieces
S117 / S119 User Manual
Page 7
Rev. : 1.0 P.5
6. Optional Accessories
7. Peripheral Products
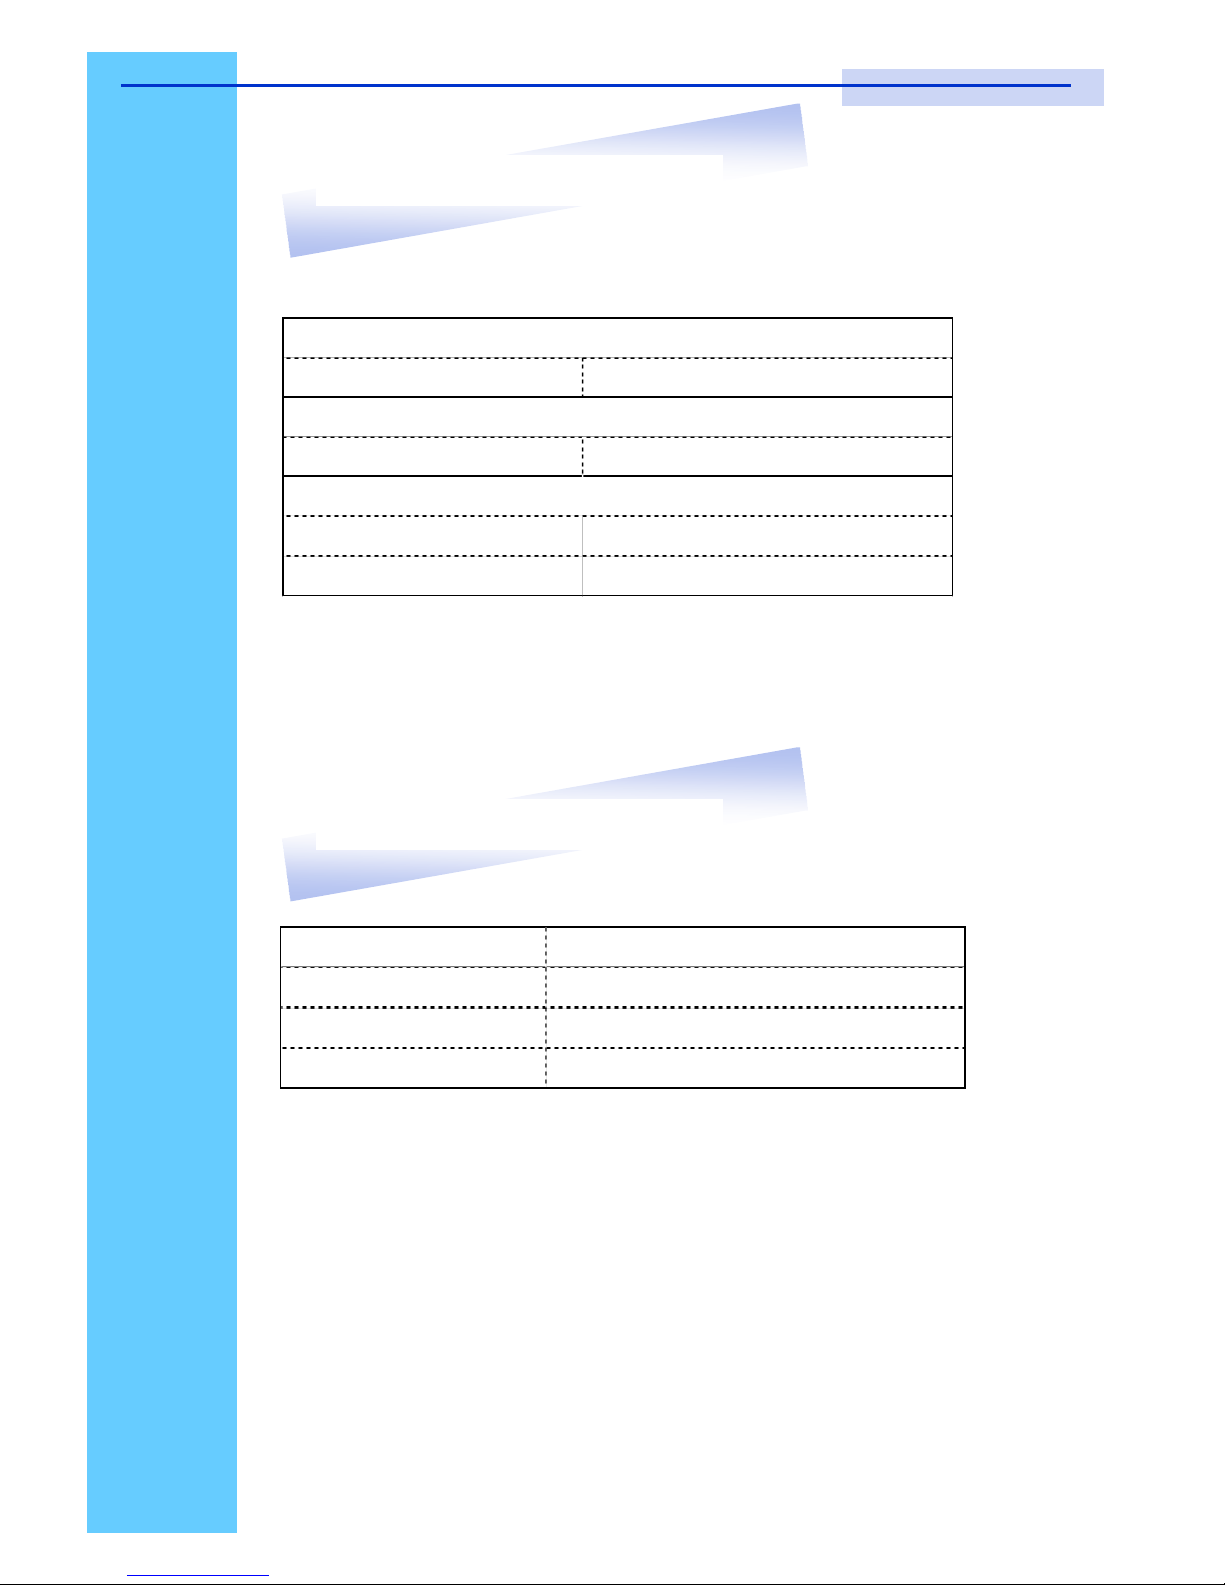
CV-S801 8-Port USB KVM switch
CV-S1601
16-Port USB KVM switch
CV-S1602
16-Port USB two consoles KVM switch
CV-S101 CAT.5 USB KVM extender
CB-6 / 10 / 156ft / 10ft / 15ft USB 2-in-1 cable
6ft USB Cascade cable
Video Input
12V / 24V / 48V DC Power Supply
KVM Cable
Cascade Cable
Others
S117 / S119 User Manual
Page 8

Rev. : 1.0 P.6
Please read all of these instructions carefully before you use the device.
Save this manual for future reference.
● Unplug the LCD Keyboard Drawer from the power outlet before cleaning.
● Do not spray liquid cleaners or aerosol directly on the device. Wet a cloth with a
neutral detergent (e.g. clean water) and squeeze it tight, then clean the screen
slightly with it.
● Do not expose the LCD Keyboard Drawer directly to rain, water, moisture or
sunlight.
● Avoid pressure on the LCD screen to prevent permanent damage to the display.
● Do not attempt to service the device yourself. Improper operation may void your
warranty. Refer all servicing to qualified service personnel.
● Safe storage environment of the LCD Keyboard Drawer is ranging between –20
o
C
and 60oC. Permanent damage could occur if the LCD Keyboard Drawer is stored
outside the safe range.
● Unplug the LCD Keyboard Drawer immediately and call qualified service
personnel under the following conditions:
1. If the monitor has been exposed to rain, liquid or water.
2. If the monitor has been dropped or the casing has been damaged.
What the warranty does not cover
1. Any product, on which the serial number has been defaced, modified or
removed.
2. Damage, deterioration or malfunction resulting from:
a) Accident, misuse, neglect, fire, water, lightning, or other acts of nature,
unauthorized product modification, or failure to follow instructions supplied
with the product.
b) Repair or attempted repair by anyone not authorized by us.
c) Any damage of the product due to shipment.
d) Removal or installation of the product.
e) Causes external to the product, such as electric power fluctuation or failure.
f) Use of supplies or parts not meeting our specifications.
g) Normal wear and tear.
h) Any other causes which does not relate to a product defect.
3. Removal, installation, and set-up service charges.
8. Important Safeguards
S117 / S119 User Manual
Page 9
Rev. : 1.0 P.7
9. Structure Diagram
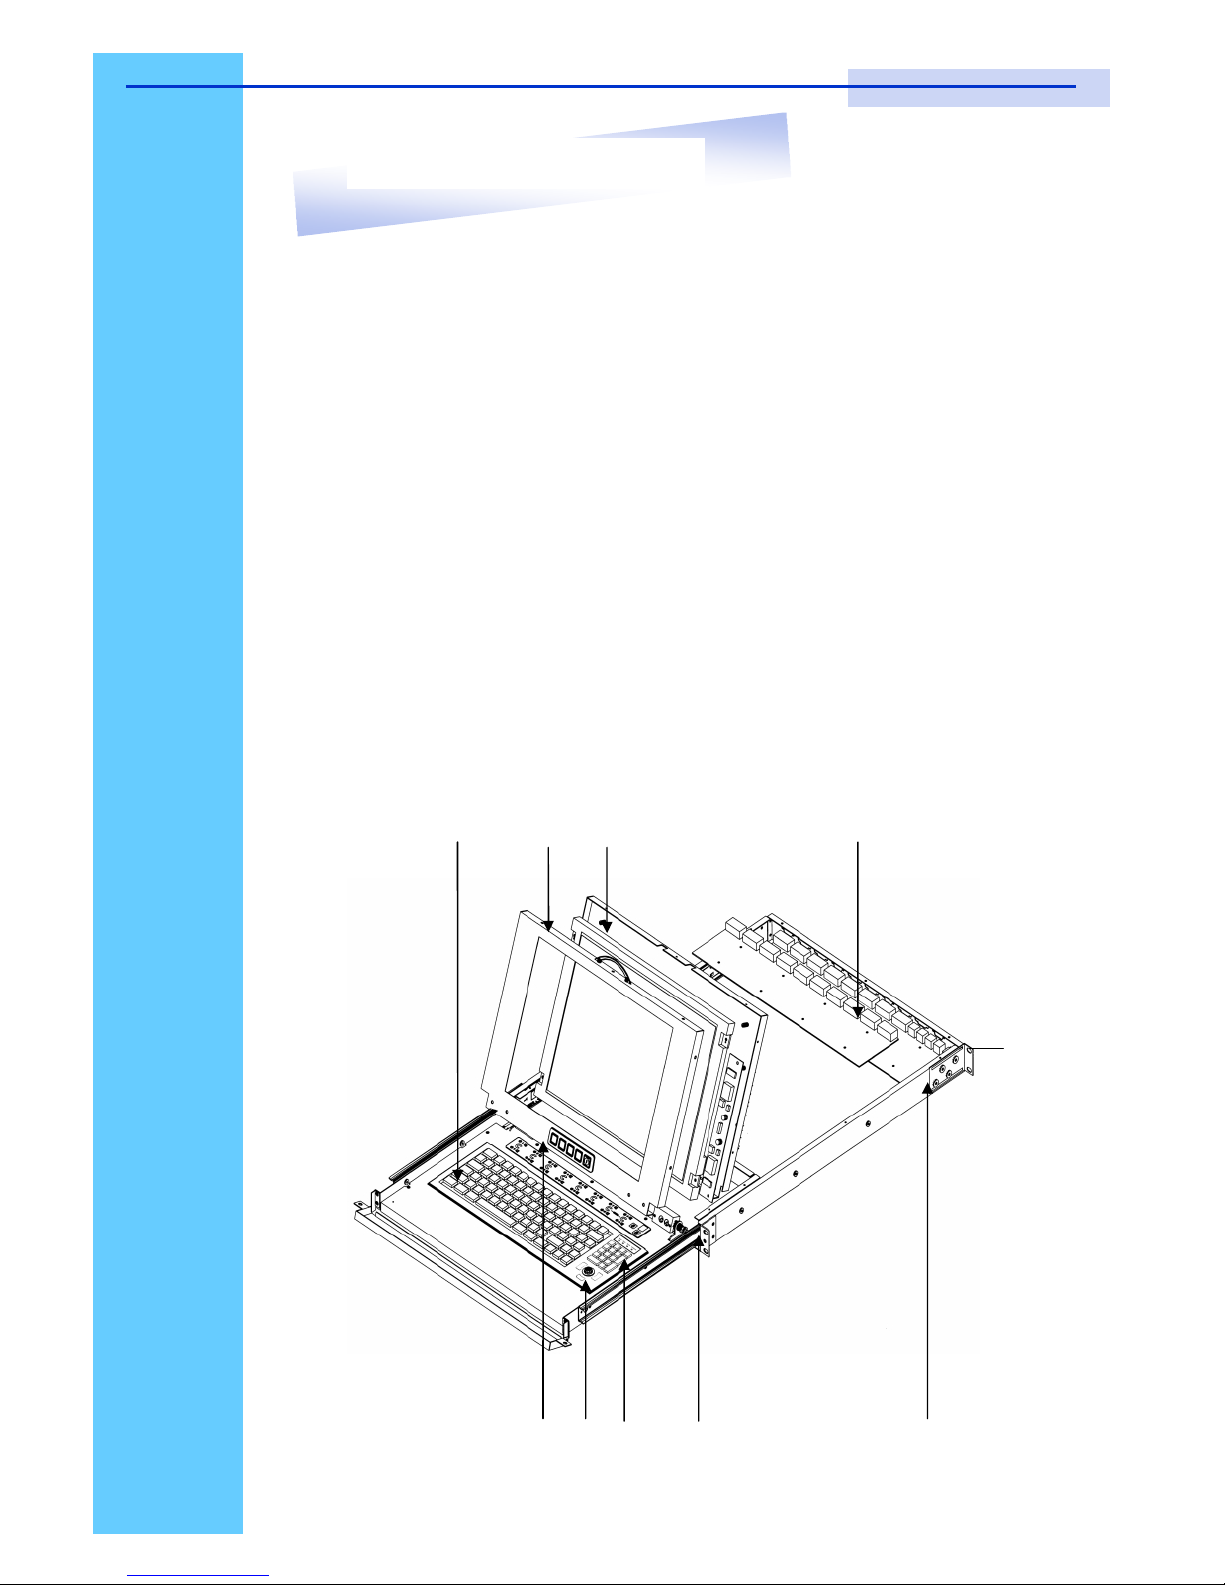
1. USB SUN compatible keyboard
2. 3 Buttons trackball mouse
3. SUN keys
4. Aluminium front panel
5. Class A active matrix TFT LCD panel
6. LCD membrane
7. Ball bearing telescopic slides with stopper
8. Adjustable mounting bracket
9. USB KVM switch ( Optional )
•
‚ ƒ
„ …
‡
ˆ
†
‰
S117 / S119 User Manual
Page 10
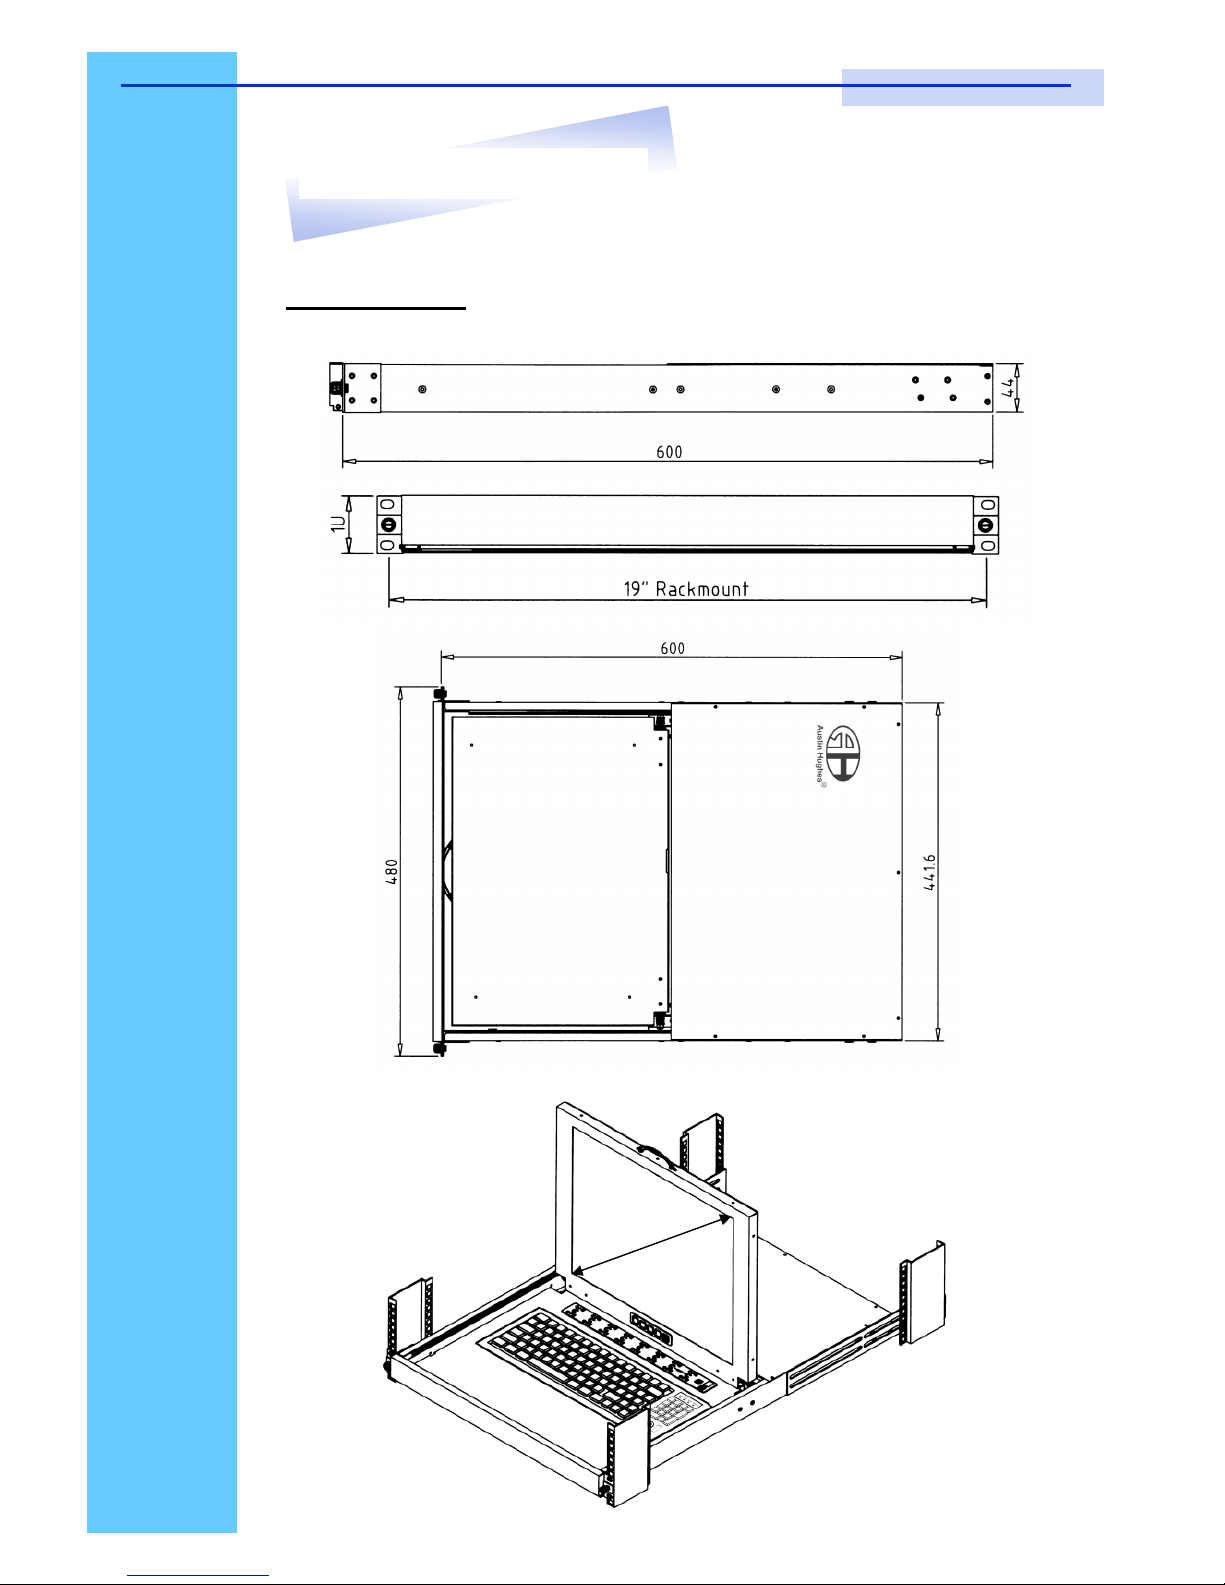
Rev. : 1.0 P.8
S117- 8/1601 1U 17” LCD Keyboard Drawer with USB KVM
10. Dimension Diagram
17” LCD
S117 / S119 User Manual
Page 11
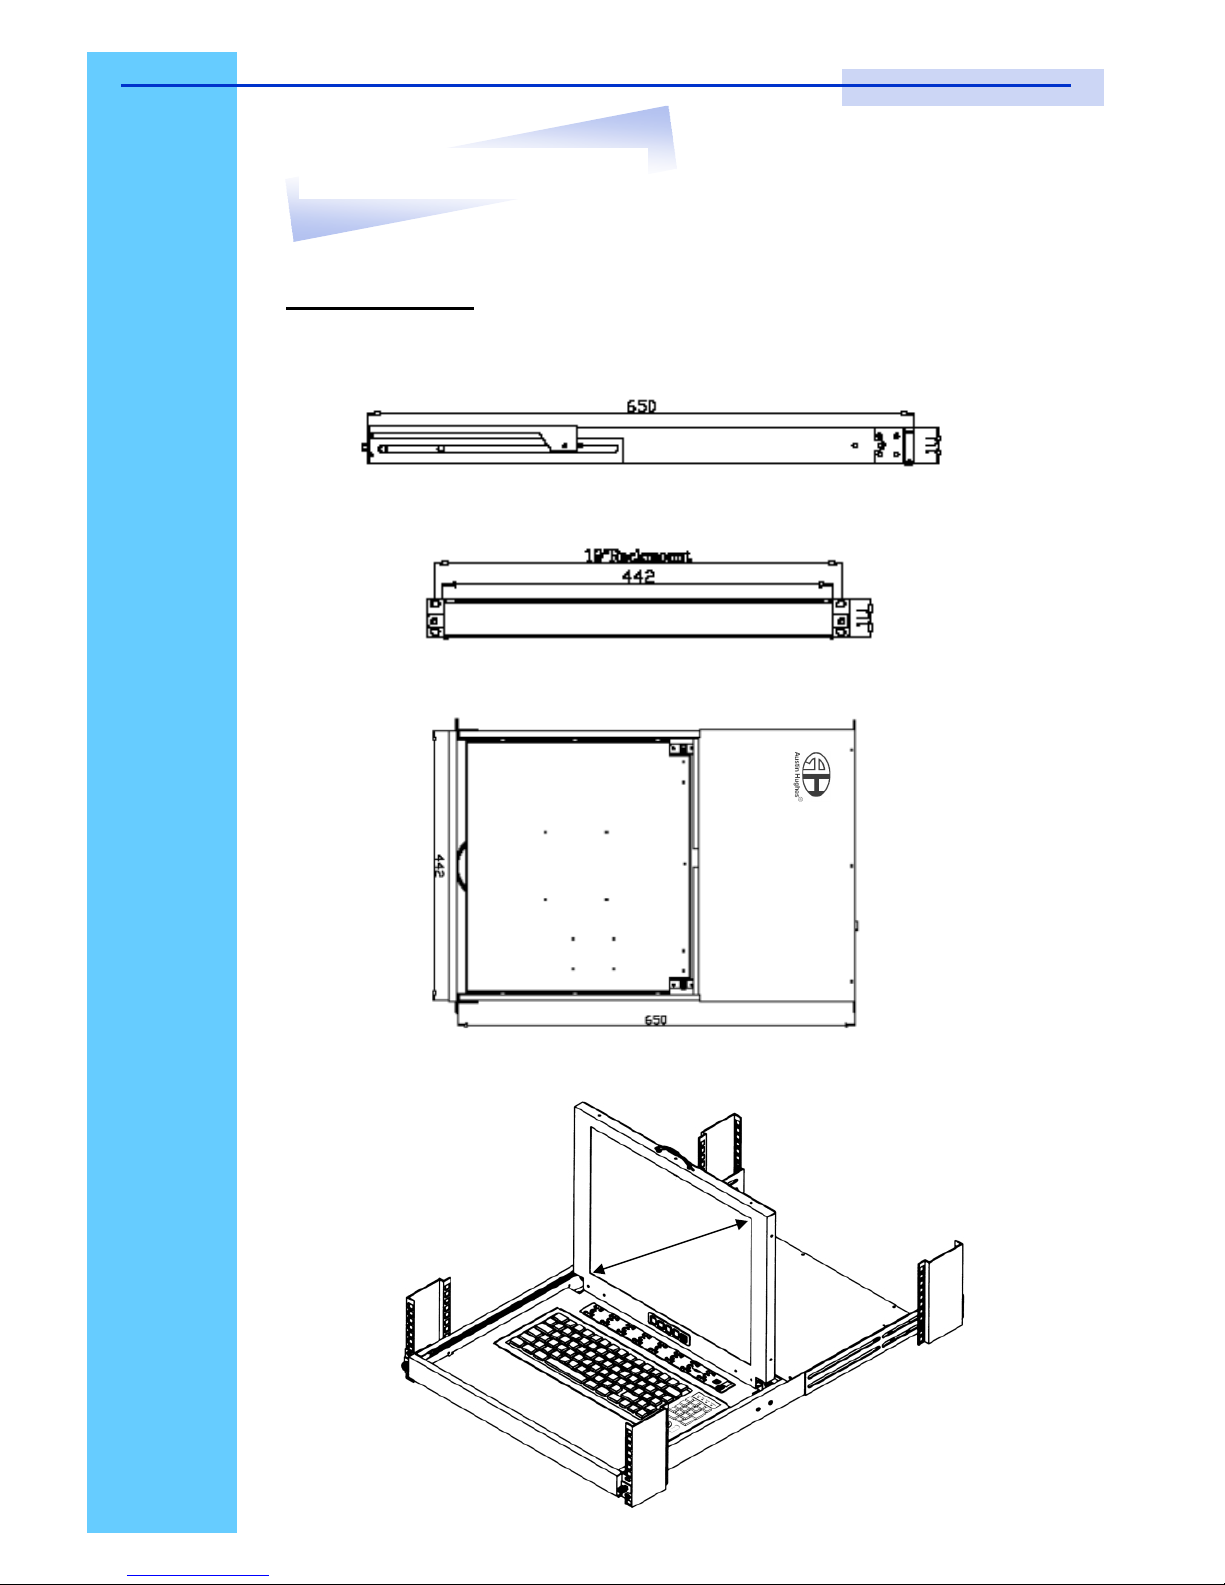
Rev. : 1.0 P.9
S119 - 8/1601 1U 19” LCD Keyboard Drawer with USB KVM
10. Dimension Diagram
19” LCD
S117 / S119 User Manual
Page 12

Rev. : 1.0 P.10
LCD
Session
S117 / S119 User Manual
Page 13
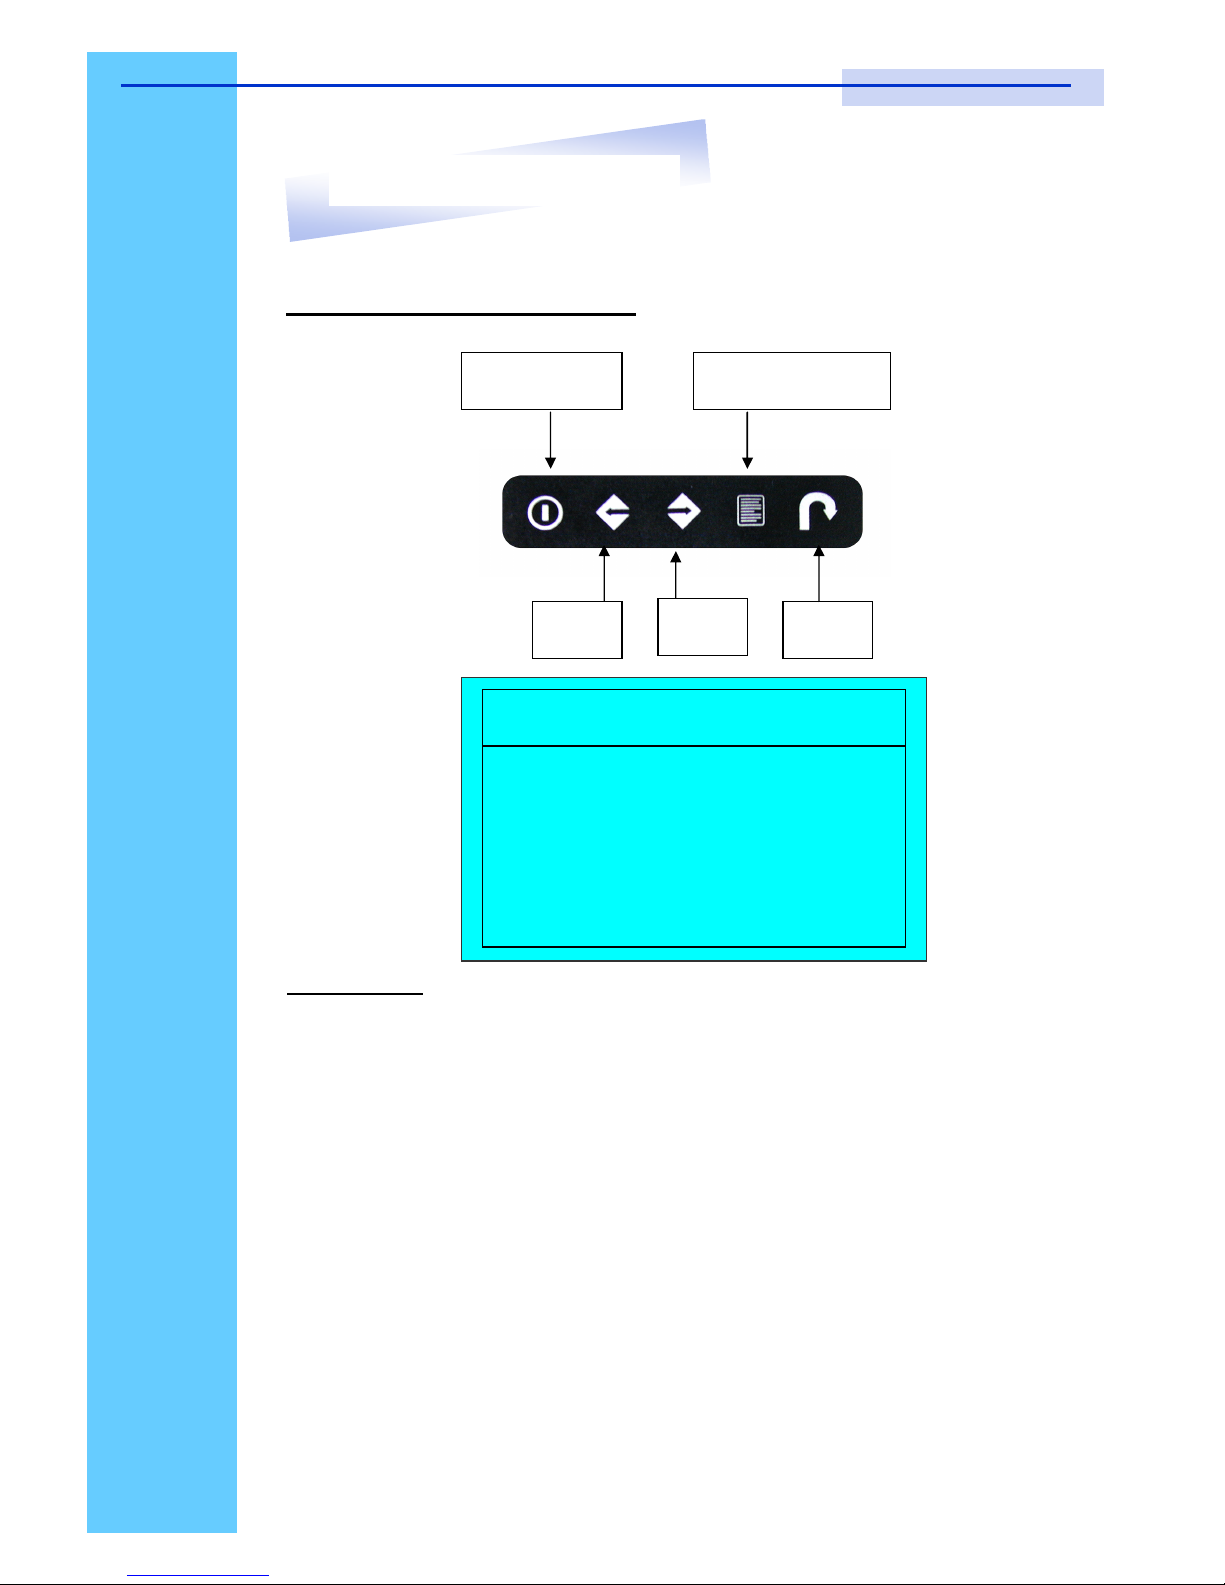
Rev. : 1.0 P.11
LCD Membrane Diagram
Left
Right
Exit
Menu/Selection Power
MAIN MENU
BRIGHT/CONTRAST
AUTO ADJUST
PHASE/CLOCK
H/V POSITION
MISC
RESET
Main Menu
Bright / Contrast
● To enter into the Bright, Black level & Contrast sub-menu
Auto Adjust
● To perform automatic optimisations of all functions
● An “ Adjusting” message is displayed during the process
Phase / Clock
● To enter into the phase & clock sub menu
H/V Position
● To enter into the H/VPosition sub-menu
MISC
● To enter into the MISC sub-menu
Reset
● Reset to the default factory settings
11. LCD Session
S117 / S119 User Manual
Page 14
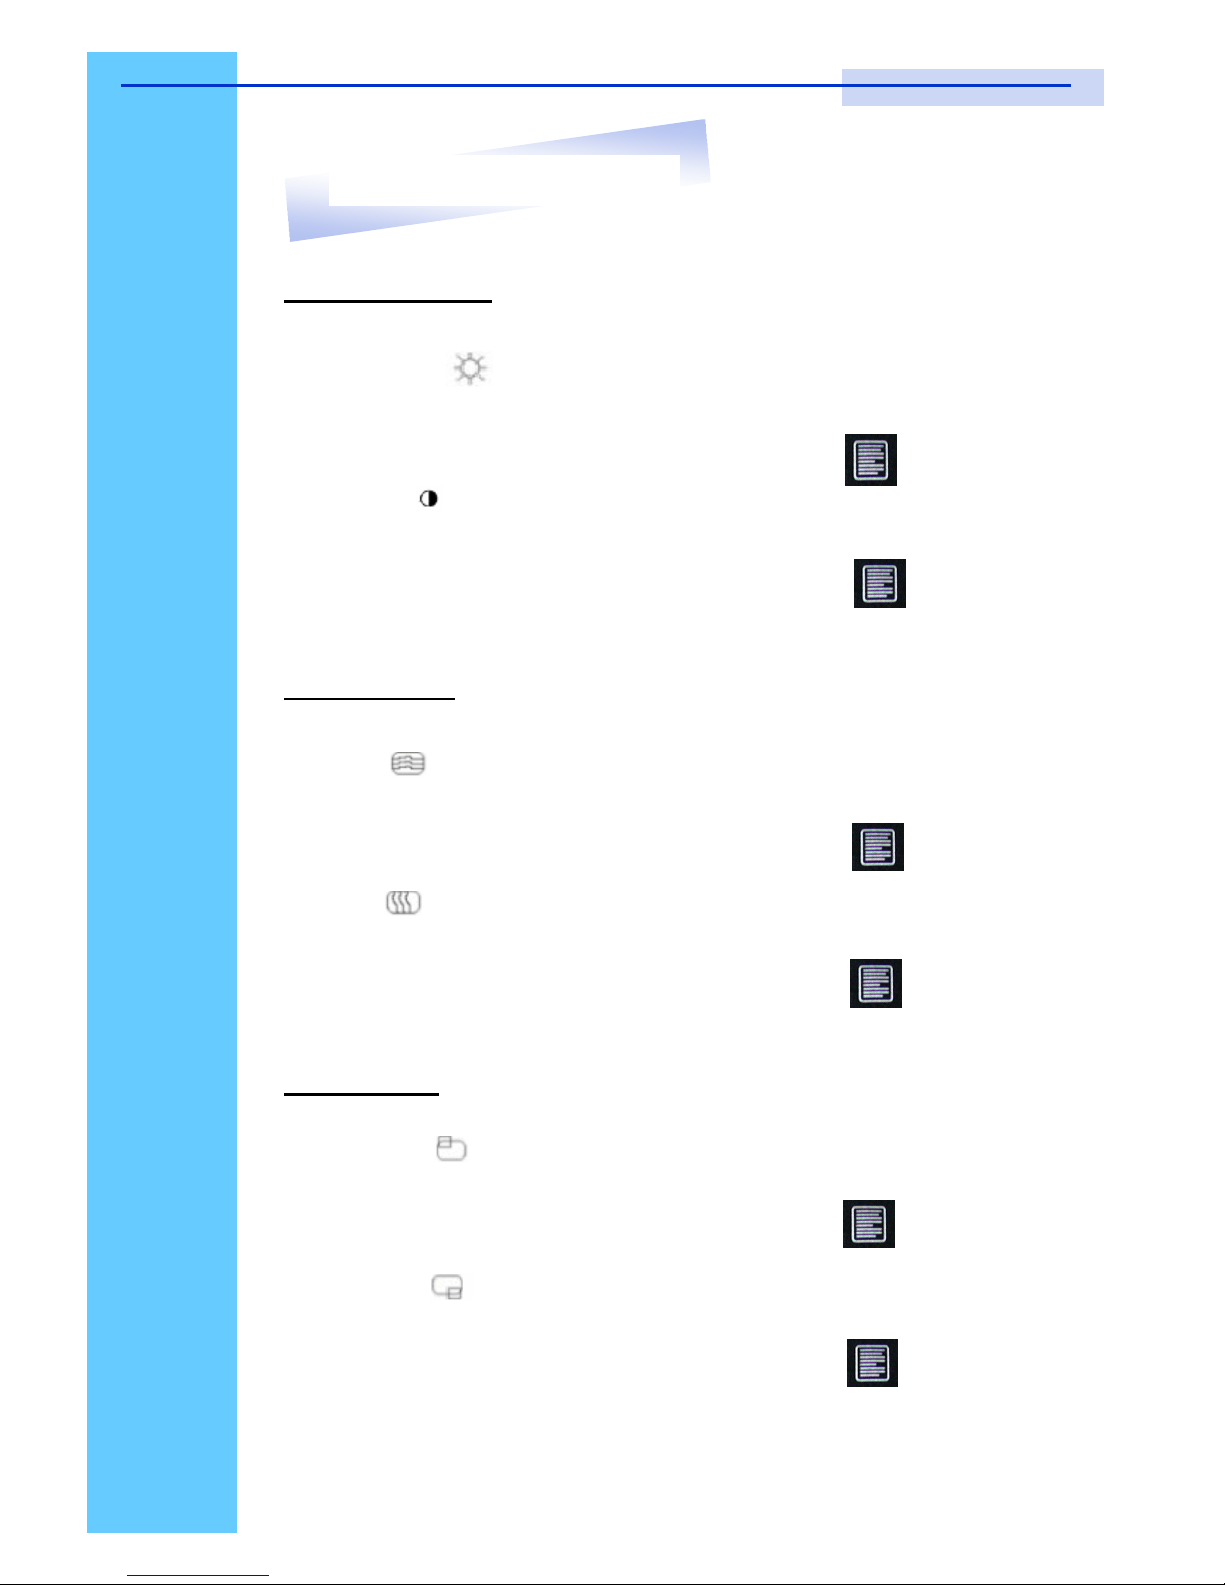
Rev. : 1.0 P.12
Bright / Contrast
1. Brightness
● To perform brightness adjustment of the input RGB signal
● Use the Left & Right button to adjust and button to “Brightness”
2. Contrast
● To adjust the contrast level of the input signal
● Use the Left & Right button to adjust and button to “Contrast”
Phase / Clock
1. Phase
● To adjust input video sampling clock’s phase
● Use the Left & Right button to adjust and button to “Phase”
2. Clock
● To adjust input video sampling clock
● Use the Left & Right button to adjust and button to “Clock”
H/V Position
1. H.Position
● To adjust the horizontal size of the frame
● Use the Left & Right button to adjust and button to “H.position”.
2. V.Position
● To adjust the vertical position of the frame
● Use the Left & Right button to adjust and button to “V.position”.
11. LCD Session
S117 / S119 User Manual
Page 15

Rev. : 1.0 P.13
MISC
1. Information
● The first header row shows the current resolution setup
● The second header row shows the horizontal frequency of the current
input signal
● The third header row shows the vertical frequency of the current input
signal
2. OSD Timer
● To modify the duration of the OSD time-out
3. Color
a) 5500K
● Select Colour Temp at 5500K
b) 6500K
● Select Colour Temp at 6500K
c) 9500K
● Select Colour Temp at 9500K
d) User
● Change Colour Temp by manual
4. Language
● To select the language of OSD menu 7 Languages :
(1) English
(2) Japanese (日本語)
(3) Chinese (中文)
(4) German
(5) Francais
(6) Espanol
(7) Italiano
11. LCD Session
S117 / S119 User Manual
Page 16
Rev. : 1.0 P.14
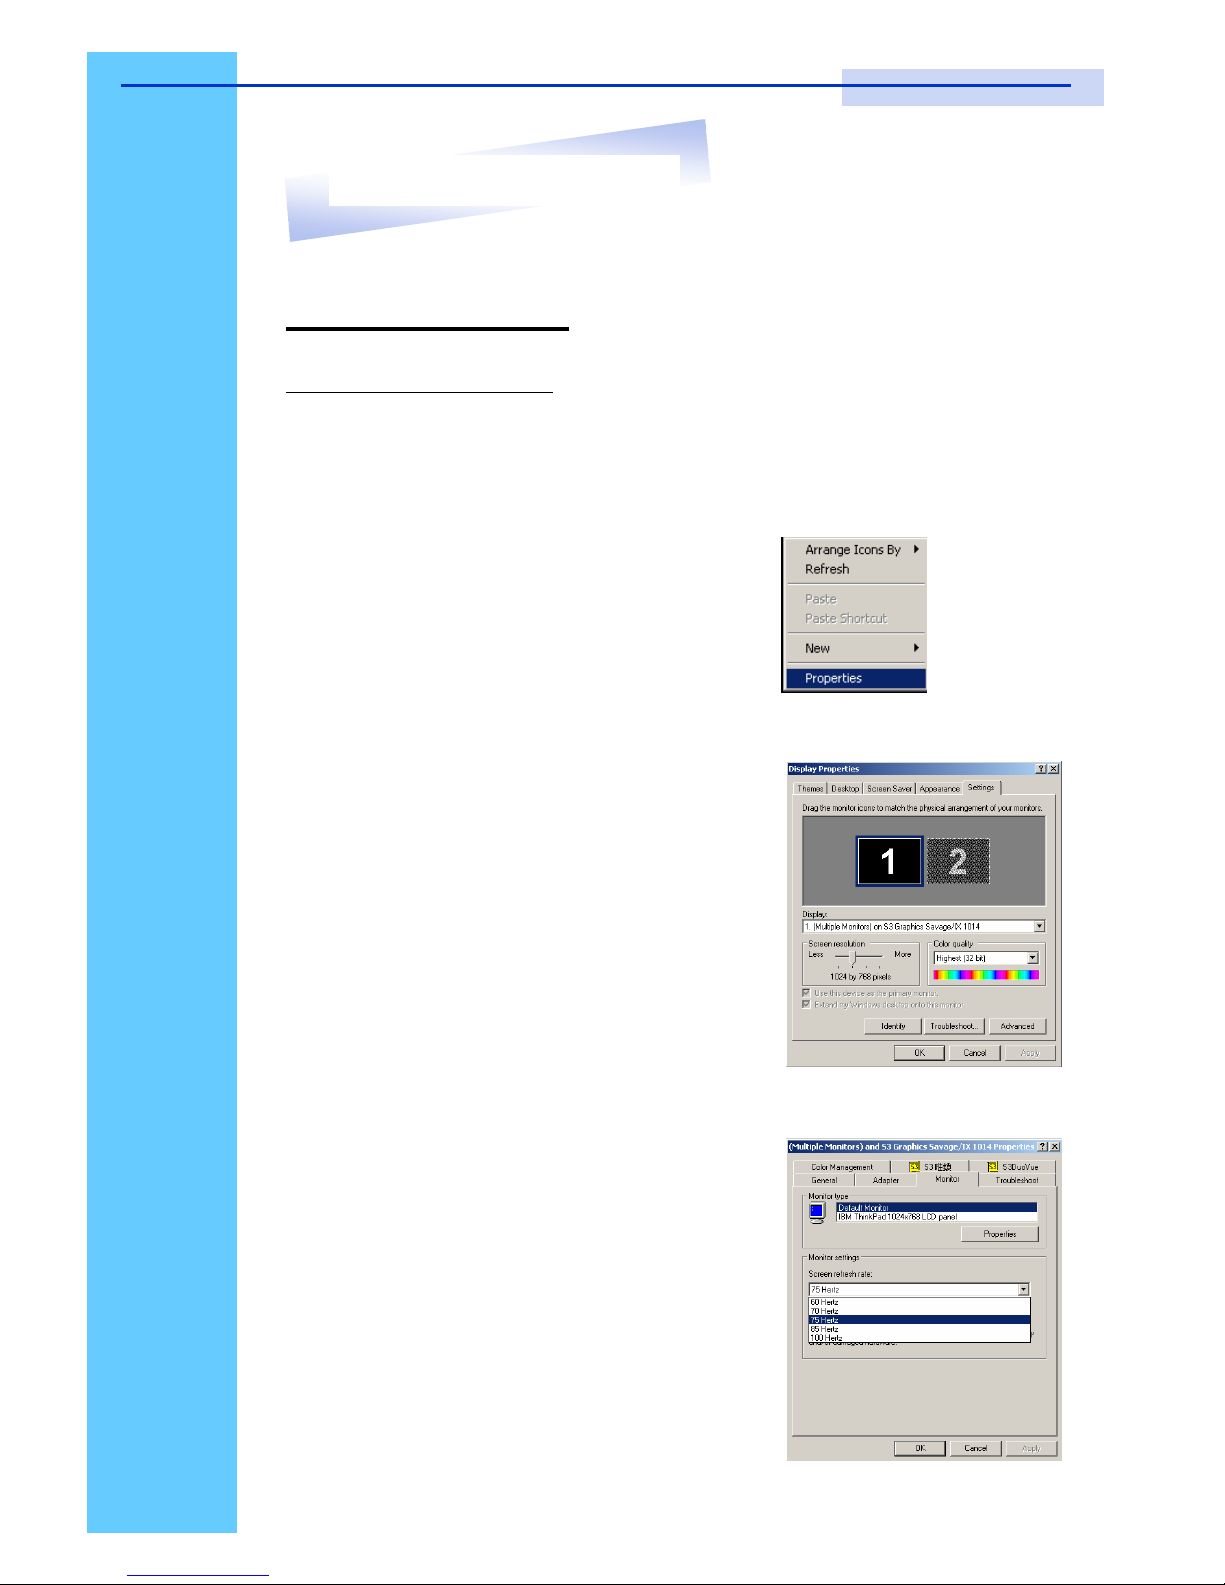
Resolution Settings
For Microsoft Windows
Step 1 – Press right click on the desktop
Step 2 – Choose “Properties”
Step 3 – Change the “Screen Resolution”
Step 4 – Change the “Screen refresh rate”
11. LCD Session
S117 / S119 User Manual
Page 17

Rev. : 1.0 P.15
KVM
Session
S117 / S119 User Manual
Page 18
Rev. : 1.0 P.16
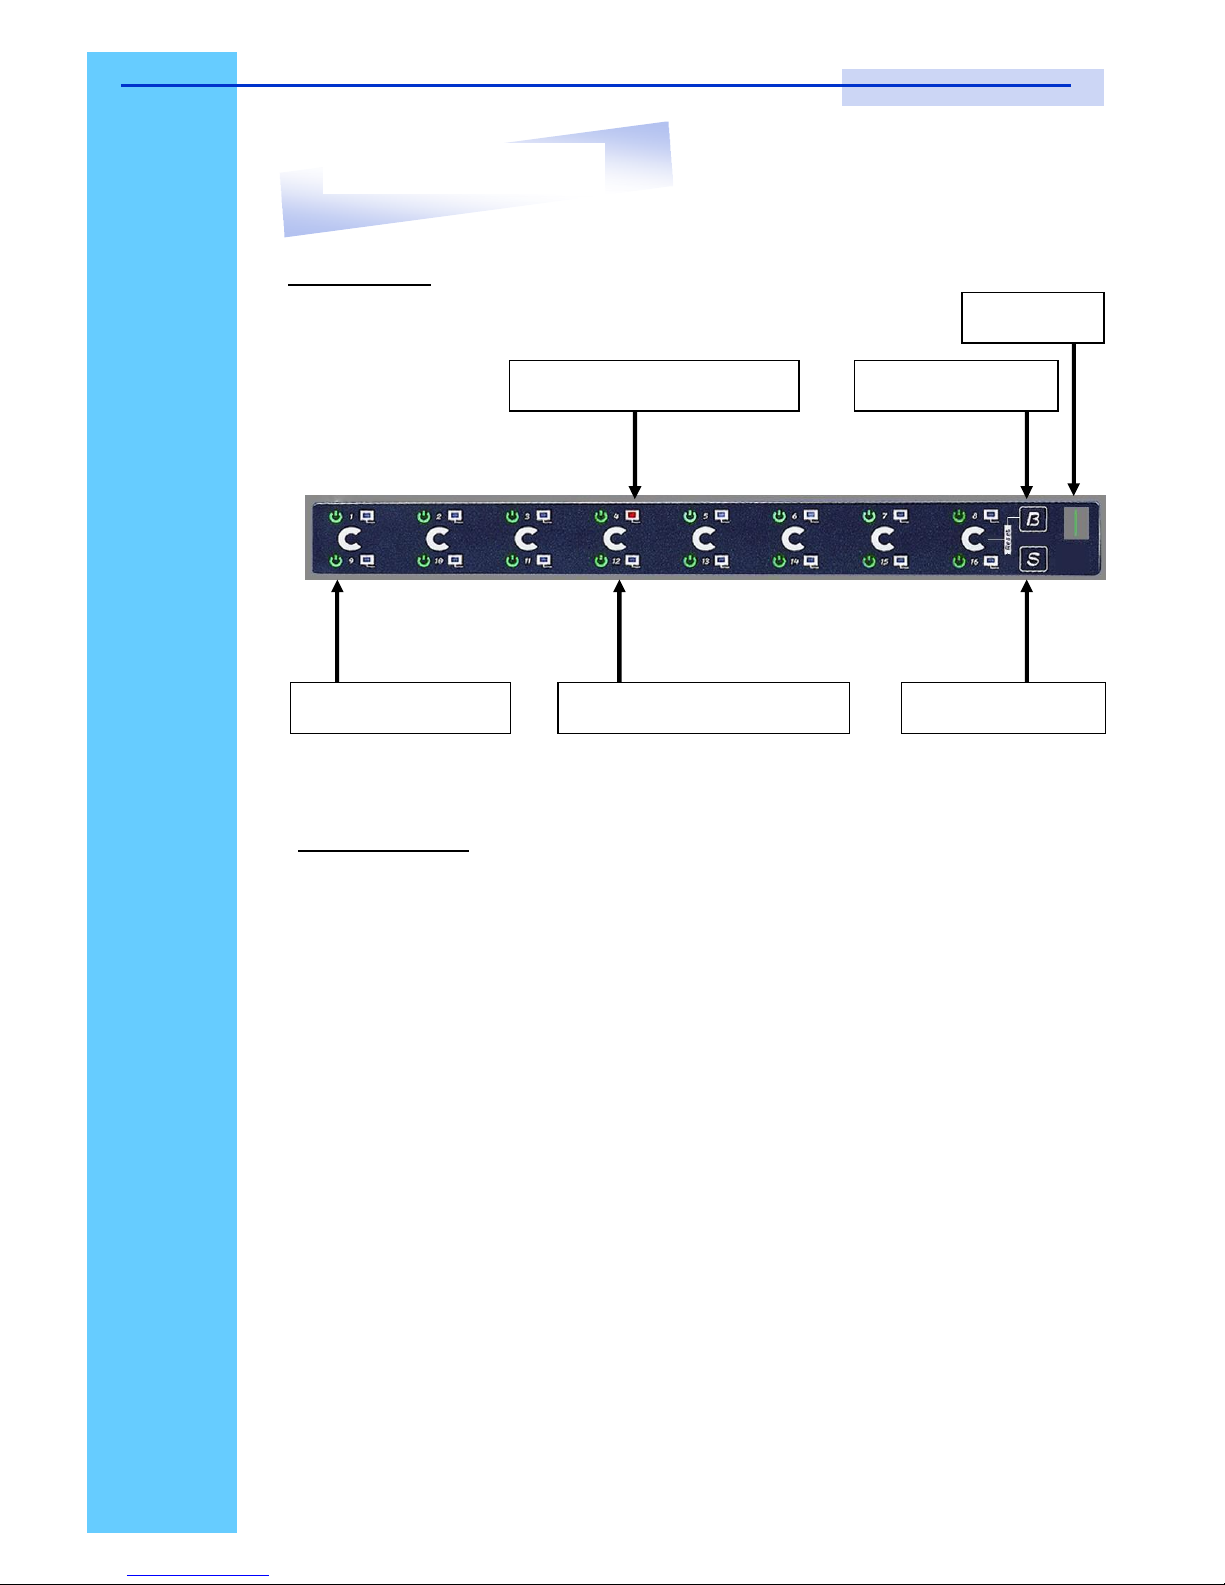
Front View
Channel Select Button
Selected Channel Bank Button
Bank No.
Shift Button Online Channel
LED Indication
Selected Channel - Displayed channel on monitor & red in LED.
Channel select button - Press to select channel from 1 – 8.
Shift button - Press & Hold follow with a channel button
to select channel from 9 – 16.
Online Channel - Green LED state the PC has connected
and power on.
Bank no. - Display the Bank no. from 1 – 8.
Bank button - Select the bank from 1 – 8 (for cascade only).
12. KVM Session
S117 / S119 User Manual
Page 19
Rev. : 1.0 P.17
12. KVM Session
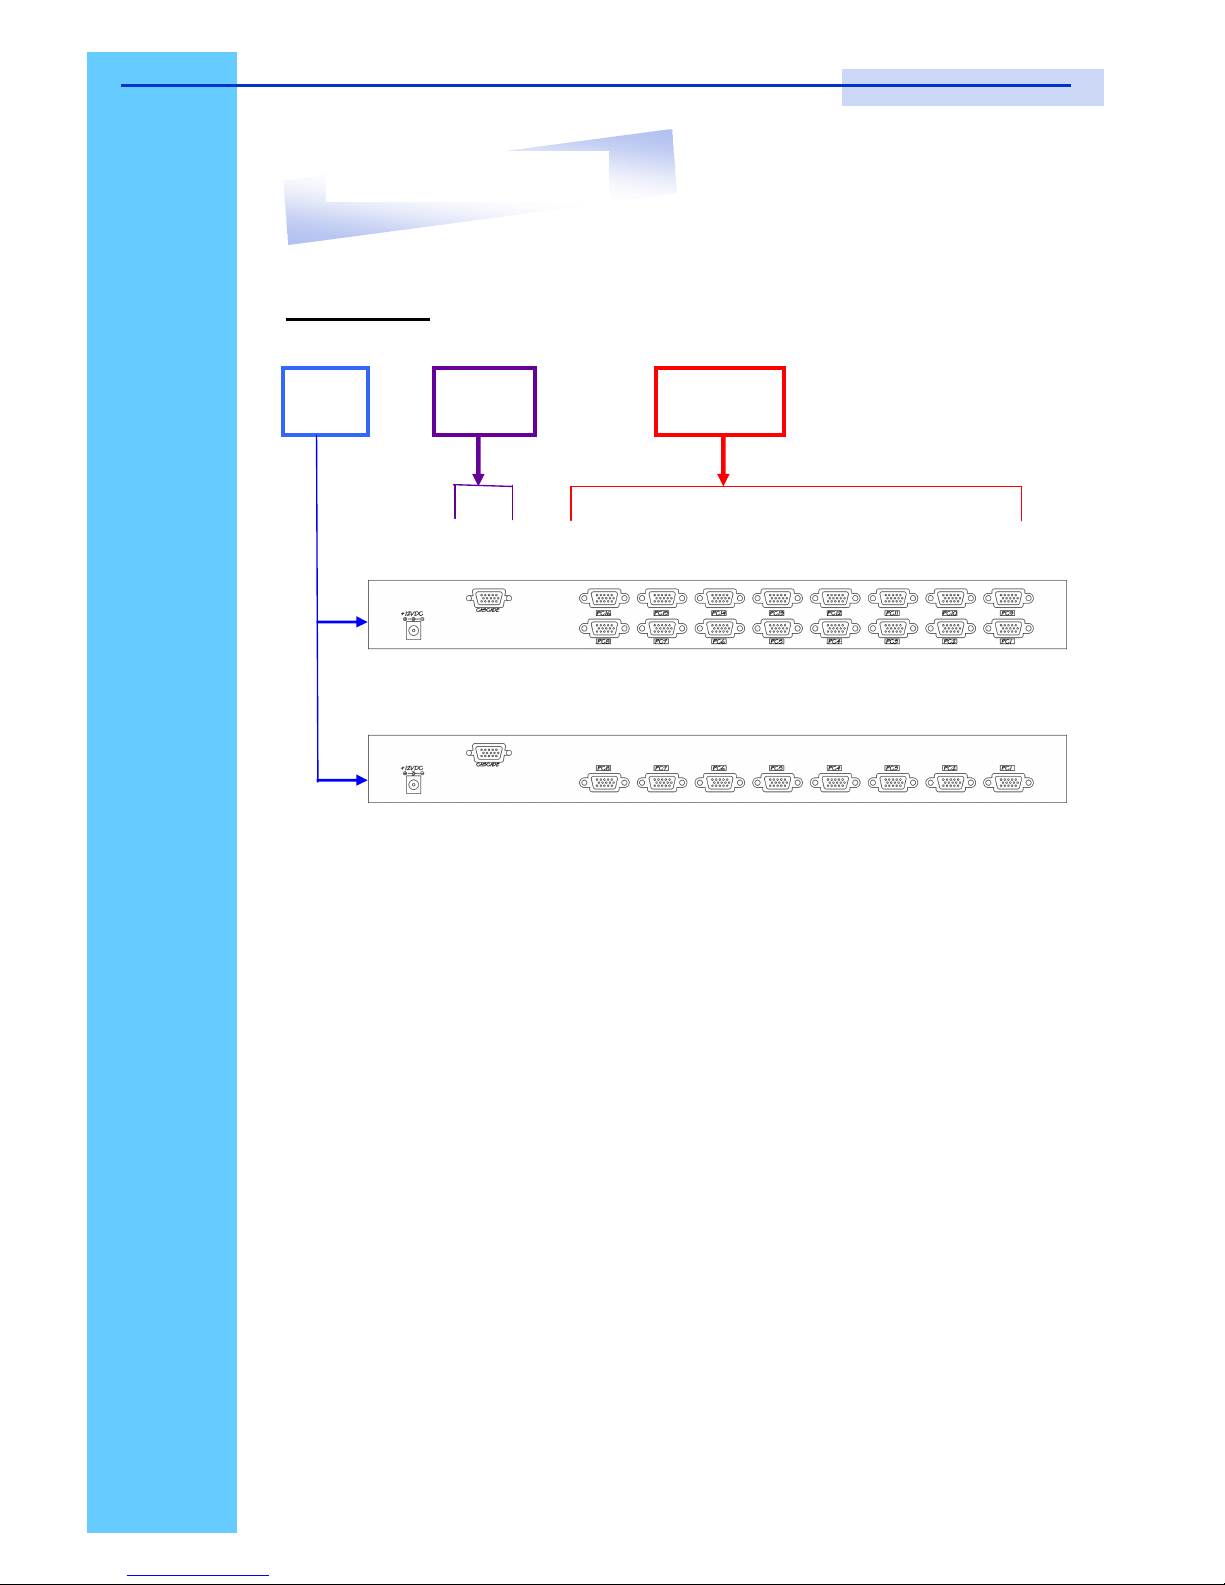
Rear View
Cascade
Port
Channel
Port
DC
Power
RKP1XX-S801
RKP1XX-S1601
DC Power -connect to external 12V DC power adapter.
Cascade Port -
connect to additional KVM switch for channel
expansion.
Console Port - connect to monitor, PS/2 keyboard & mouse.
Channel Port - connect to PC computer with CB-6 2-in-1 KVM cable.
S117 / S119 User Manual
Page 20
Rev. : 1.0 P.18
12. KVM Session
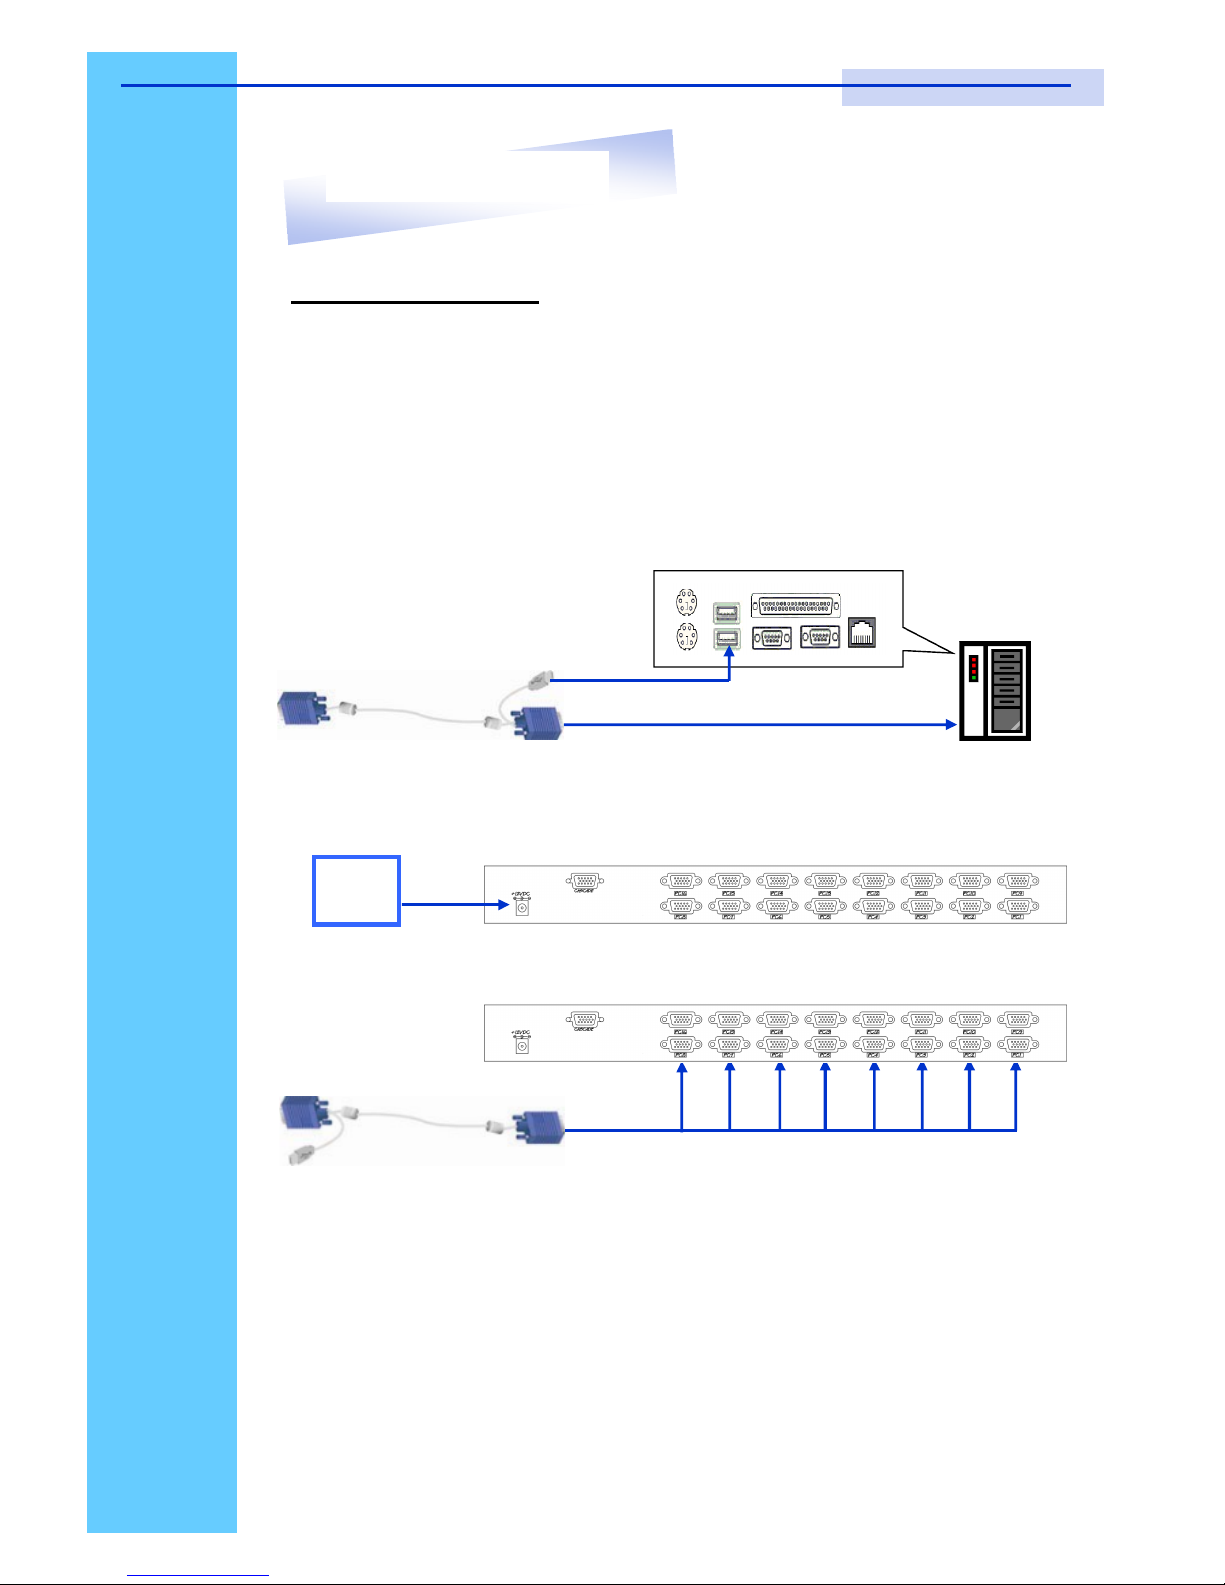
Installation Steps
Before installation, please make sure all computers are turned on and its
operating system are running properly with keyboard and mouse.
1. Connect the 2-in-1KVM cable to the one of your server.
● USB Type A Male connector to the USB Port
● HDDB 15-pin Male connector to the VGA Port
2. Plug the power adapter included to the switch.
3. Connect the another end of the 2-in-1 cable to the USB KVM switch
4. Reset USB KVM Switch by membrane
DC
Power
PC I/O windows diagram
To VGA port
S117 / S119 User Manual
Page 21
Rev. : 1.0 P.19
Cascading
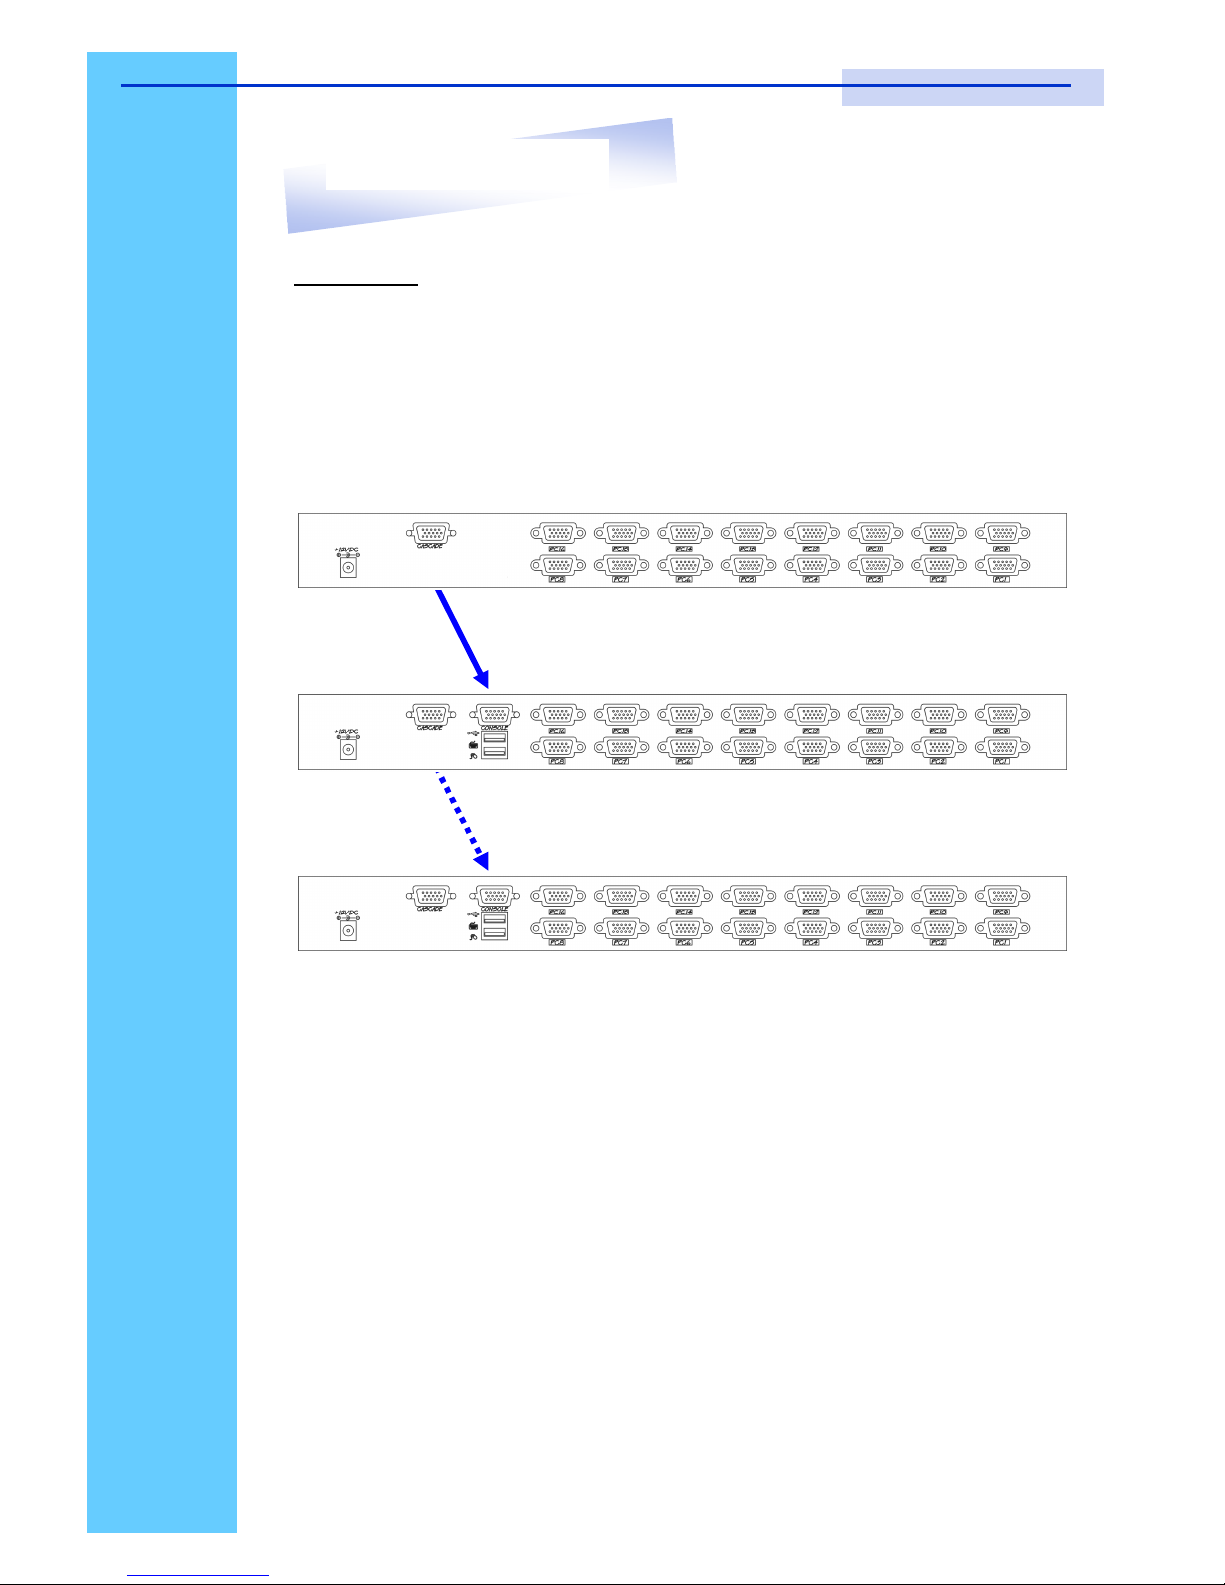
Using a USB KVM cable to connect from Bank 1’s “Cascade port” to Bank
2’s “Console port”. After connected please press “Bank” & “Channel” button
on the front of the USB KVM switch to reset the USB KVM switch.
USB Cascade cable
USB Cascade cable
Bank 1
Bank 2
Bank 8
(Max.)
Cascade level Max. : 8 level
● Max. PC connection is 128 or with additional 122 PCs.
● All USB KVM switch is compatible & can cascade with each other.
● Using USB cascade cable to cascade.
● Normal distance from one USB KVM to another is 15 feet.
12. KVM Session
S117 / S119 User Manual
Page 22

Rev. : 1.0 P.20
1. The channels that have PC connected and it is switch on will have a
green LED on that channel.
2. The red LED will indicate the selected channel.
3. 7 segments LED will display the bank number.
4. Press channel button to select the channel.
5. Enter the password, default is “00000000” eight zeros.
6. Otherwise the keyboard & mouse will be locked.
7. If you forget your password, send back to Manufacturer.
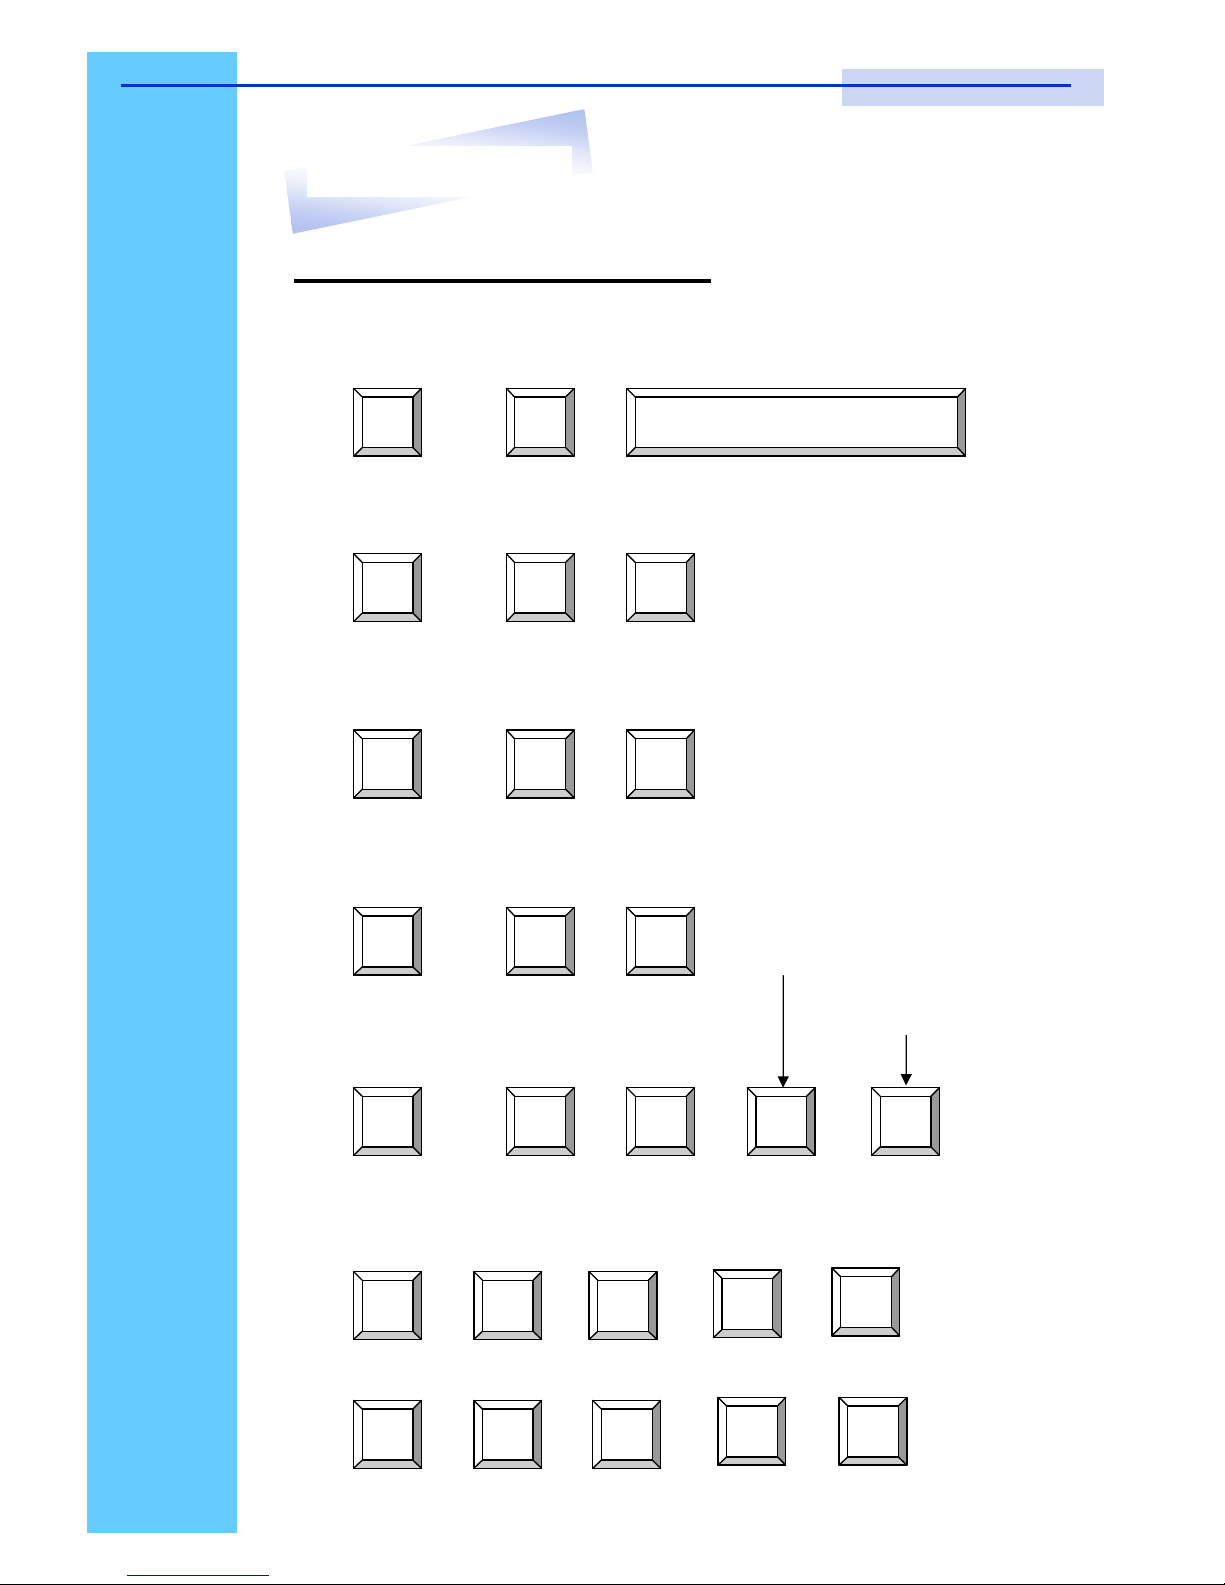
HotKey Command
● Simple key sequence.
● Press “ Scroll Lock” twice within 2 seconds.
● Follow with a beep sound, going into the hot key mode.
● Need to key in the hot key within 2 seconds.
● Go back to Operation System Control state.
13. Start Up
S117 / S119 User Manual
Page 23
Rev. : 1.0 P.21
Hot-key Command Operation
1. Calling OSD Menu
2. Switch to Previous Port (powered on PC only)
3. Switch to Next Power On Port (powered on PC only)
4. Switch to Previous Bank
5. Switch to Specific Port
Example :
a) Bank 1 Port 4
b) Bank 2 Port 16
Bank
1~8
No.
0 or 1
No.
0 - 9
Second
digit of port Num-
1
0
4
Space Bar
+
+
+
+
Scroll
+ +
Scroll
£
Scroll
+ +
Scroll
Scroll
+
+
Scroll
¤
Scroll
+ +
Scroll
Pg
Up
Scroll
+ +
Scroll
Scroll
+ +
Scroll
2
1
6
+
+
Scroll
+ +
Scroll
13. Start Up
First digit of Port Number:
0 for Port 0-9
1 for Port 10-16
S117 / S119 User Manual
Page 24
Rev. : 1.0 P.22
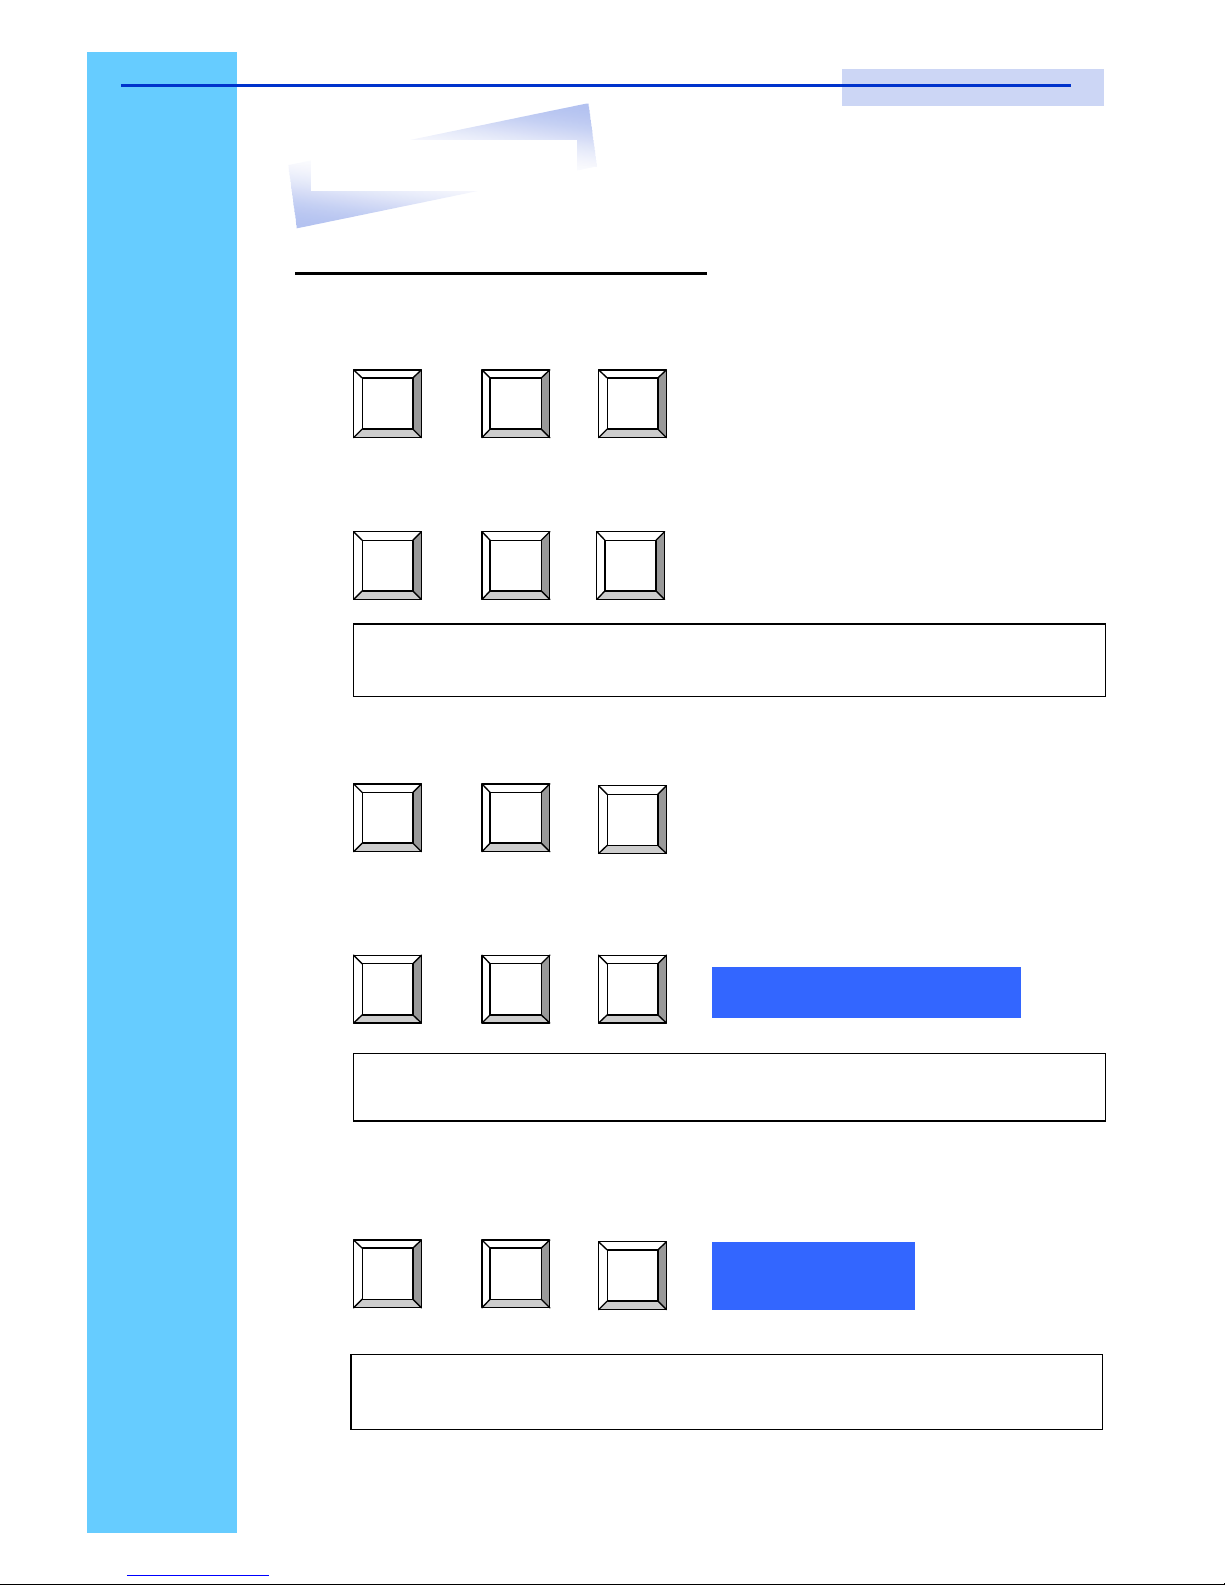
HotKey Command Operation
6. Switch to Next Bank
7. Enable / Disable beeper sound
8. Auto Scan for Powered on PC
9. Reset to factory Default Setting
10. Find Port by name
ROM REFLASH
F I N D : █
Note: The default Beeper function is ON and beeper control is only for
available for Scan Mode.
Note: Not available for password reset.
PgDn
B
S
+
+
Scroll
Scroll
R
F
+
+
Scroll
Scroll
+
+
Scroll
Scroll
+
+
Scroll
Scroll
+
+
Scroll
Scroll
Note: When the above dialogue appear, type the PC name and the OSD
Menu will search PC name starting from 1st powered on PC port.
13. Start Up
S117 / S119 User Manual
Page 25
Rev. : 1.0 P.23
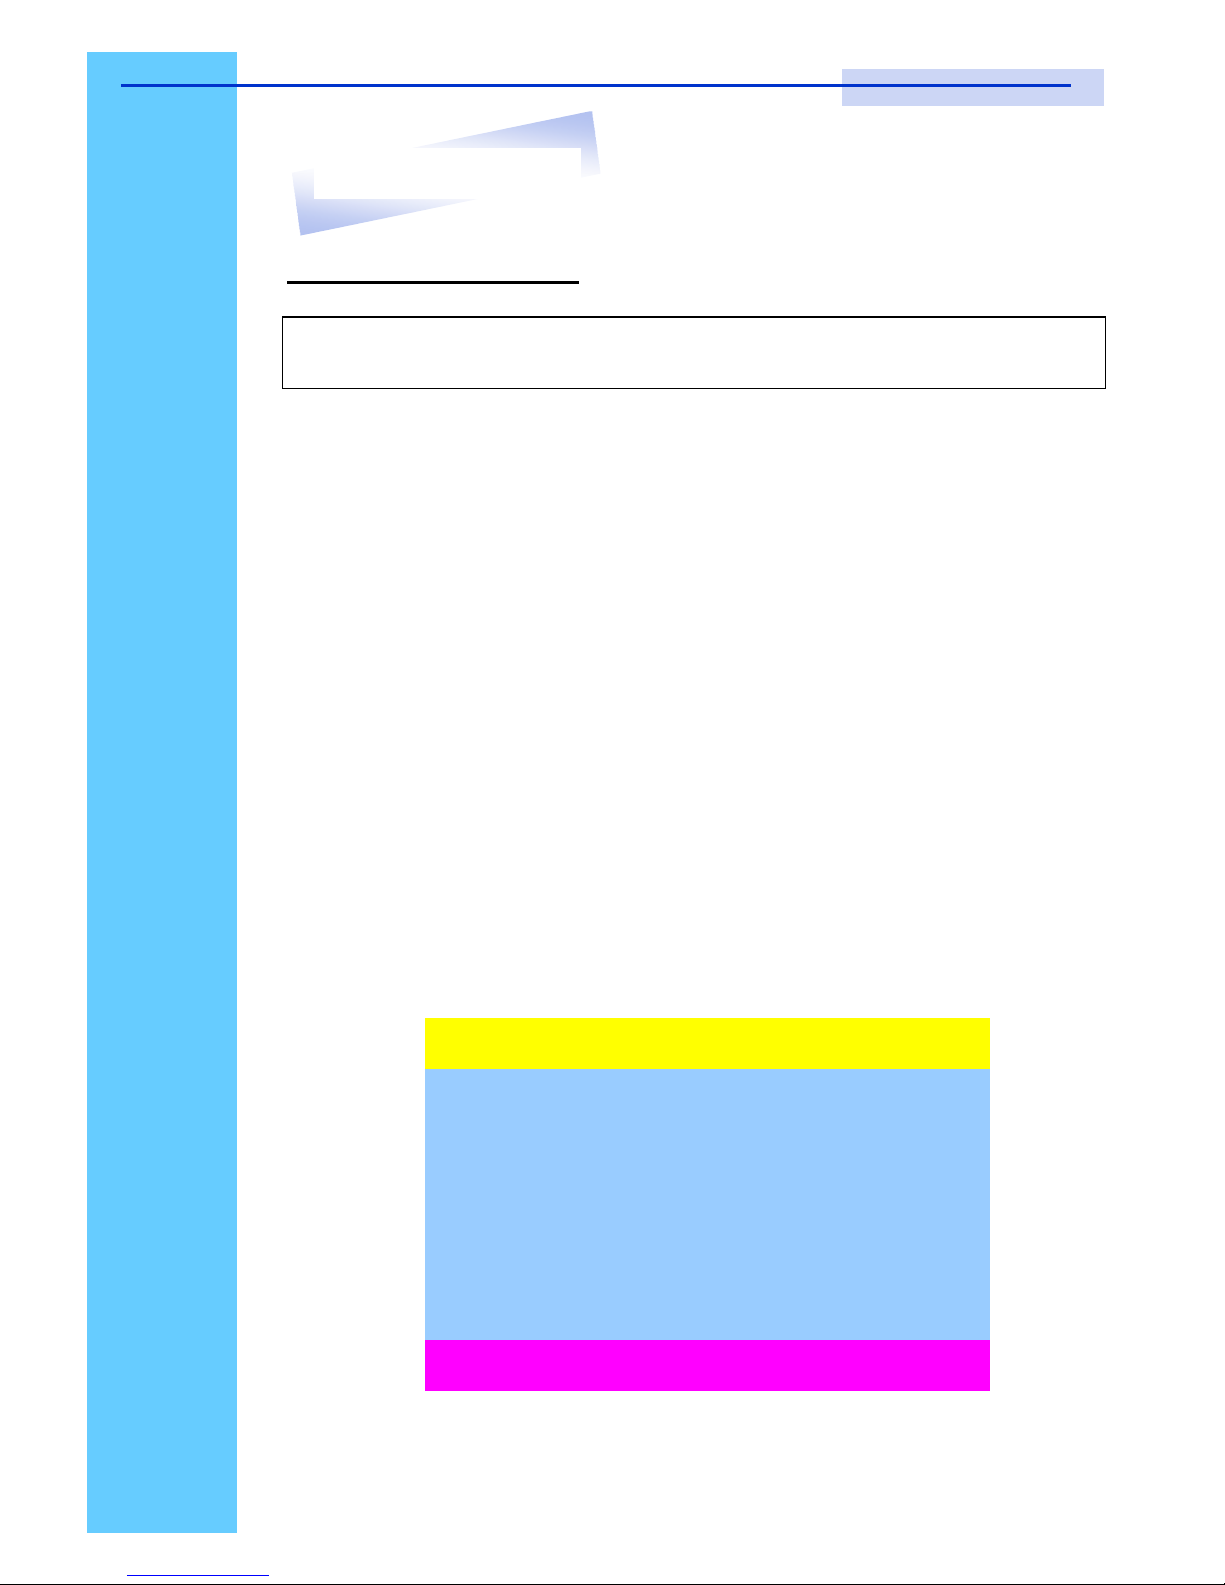
KVM OSD Operation
1. “MAIN CONTROLS” - OSD Menu of USB KVM switch
● To pop up MAIN CONTROLS—OSD menu of USB KVM switch,
please use hot keys command .
● To operate MAIN CONTROLS, please use keyboard and mouse.
◇ Mouse Operating: You may also simply use mouse, twice
clicking left button, to choose a category. Clicking “?” will bring
up HELP window and click “X” for exiting.
◇ Keyboard Operating: In MAIN CONTROLS window, use the
Up “é” or the Down ”ê” Key to select a category and press
“Enter” Key to get into designated option. Pressing “F1” Key
brings up HELP window and Esc key to exit.
● To enter the sub menu e.g. LANGUAGE or PORTNAME, please
use keyboard or mouse to move the highlight bar cursor.
● When you reach the sub menu you want to activate press “Enter” or
double click the highlight bar cursor.
Note: When using the keyboard arrow key to move the cursor, the keypad
arrow key (Up, Down, Right, Left) is unable to work at this menu.
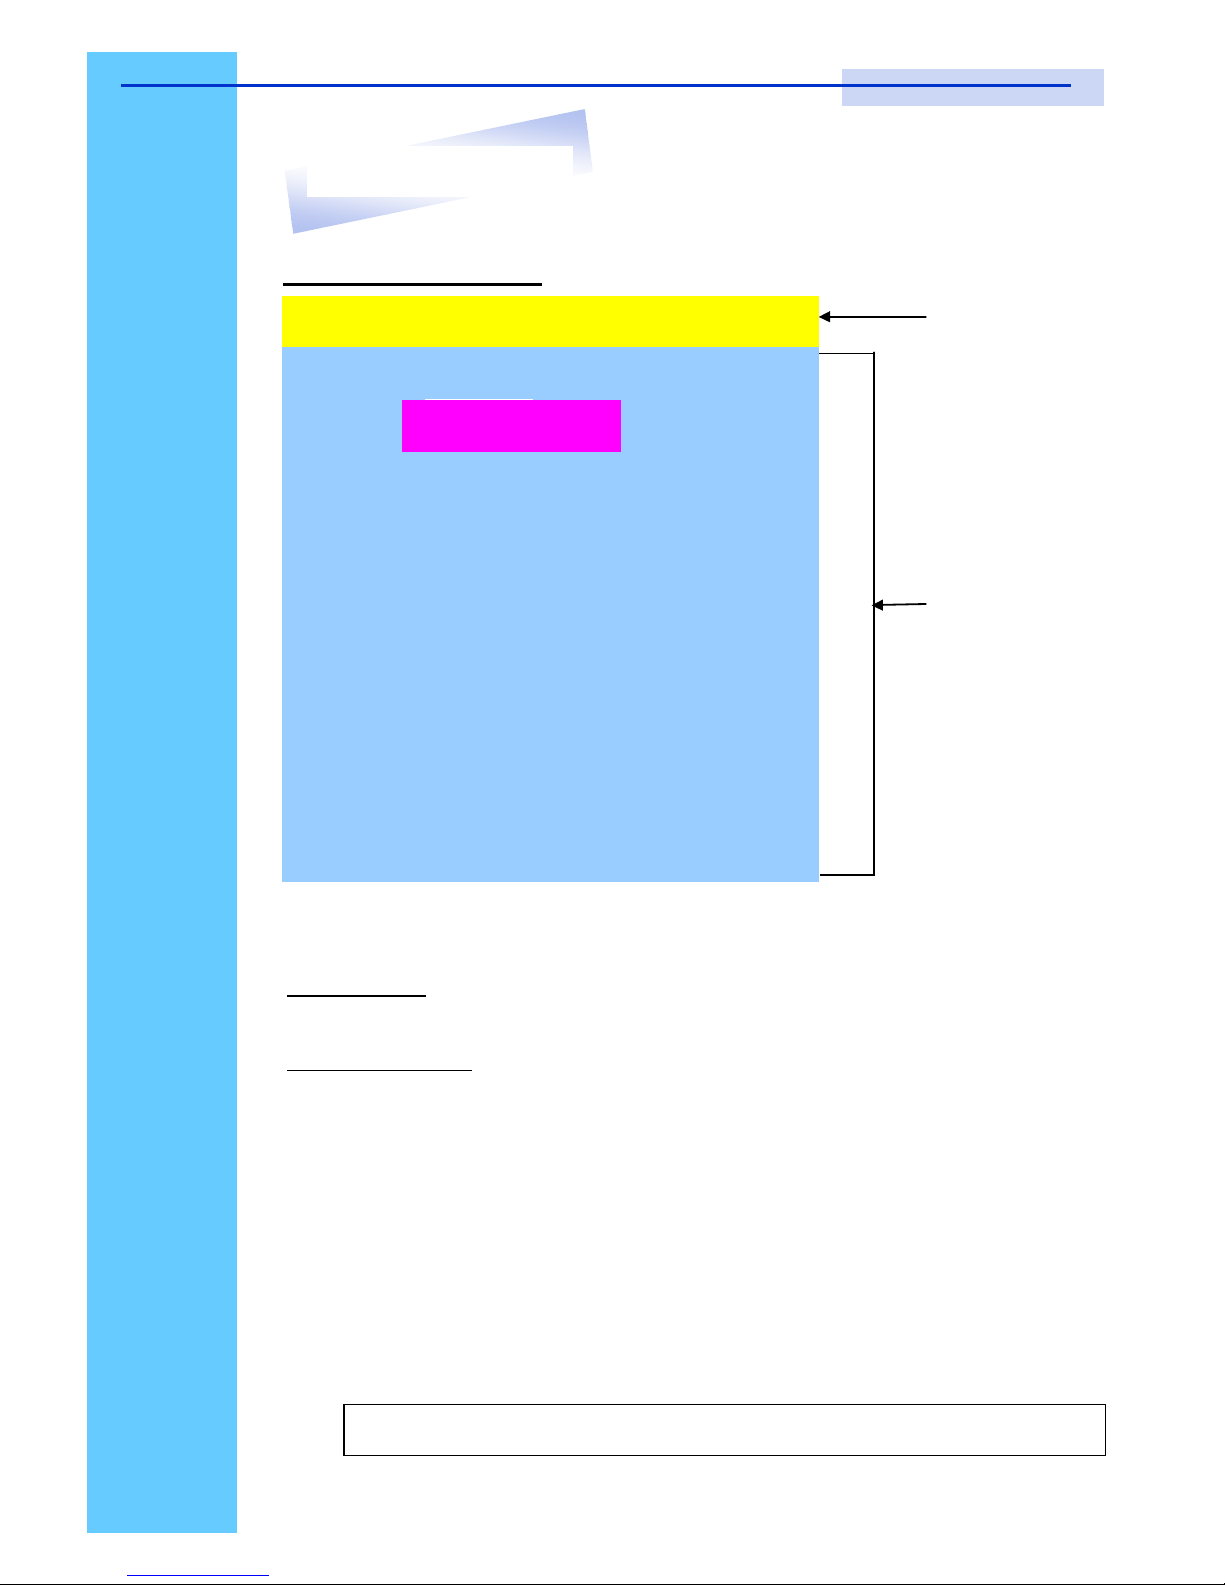
MAIN CONTROLS ?X
ENTER A CHOICE :
01 LANGUAGE
02 PORTNAME
03 TIMEVIEW
04 SECURITY
05 FINDPORT
06 PASSWORD
07 CONSOLE
13. Start Up
S117 / S119 User Manual
Page 26

Rev. : 1.0 P.24
LANGUAGE Menu
LANGUAGE ?X
CHOOSE A LANGUAGE :
01 ENGLISH
Mouse Operation :
● Move mouse and click the left button to choose a language, and click left
key again to save.
Keyboard Operation :
● Press é / ê to choose a language and press ENTER to save.
13. Start Up
S117 / S119 User Manual
Page 27
Rev. : 1.0 P.25
PORTNAME Menu
5
PORTNAME ?X
01
SYSTEM 01
02
05
03
04
06
07
08
09
☼ SYSTEM 02
☼ SYSTEM 03
☼ SYSTEM 04
☼ SYSTEM 05
☼ SYSTEM 06
☼ SYSTEM 07
☼ SYSTEM 08
SYSTEM 09 6
Bank 1
Bank Session
PC Name
Session
Use “Tab” key to select session like Bank, PC, OSD, SCAN, CHANGE PASSWORD, CONSOLE ON/OFF, etc…
Bank Session
Use Page Up & Page Down to switch previous or next bank
PC Name Session
1. “☼” next to the PC name represents the PC system is powered on
Mouse Operation :
1. Click the arrow key “5” or down arrow key “6” to scroll upward or
downward of the PC name list.
2. Right click the highlighted PC name for editing PC
Keyboard Operation :
1. Use up key “é“ or the down key “ê“ from the keyboard to select port
for destination PC name
2. Press “Ins” key or for editing PC name
3. When editing is finished press “Enter”.
Note: PC name should not be more than 8 characters.
13. Start Up
S117 / S119 User Manual
Page 28

Rev. : 1.0 P.26
TIMEVIEW Menu
TIMEVIEW ?X
OSD
10
SEC
SCAN :
10
SEC
1. OSD TIME means the display period of OSD windows or PC system name on
your monitor. You can modify it from 05 sec to 99 sec. The factory default
value is 10 sec...
2. SCAN TIME means the scan interval from one PC port to next PC port. The
default SCAN time is 10 sec and the maximum scan time is 99 sec.
Mouse Operation :
● Click the right button of mouse to select and modify OSD and SCAN
TIME
Keyboard Operation :
● Use "é" and "ê" key or press the “INS” key to select and modify OSD
and SCAN TIME
13. Start Up
S117 / S119 User Manual
Page 29

Rev. : 1.0 P.27
SECURITY Menu
SECURITY ?X
ENTER PASSWORD
_ _ _ _ _ _ _ _
ENTER NEW PASSWORD
_ _ _ _ _ _ _ _
RETYPE NEW PASSWORD
_ _ _ _ _ _ _ _
● To CHANGE PASSWORD for avoiding all PC systems to be intruded by the
others. The default password is 8 digits “ 00000000 “.
● Please follow the steps below to cahnge the password.
1. Enter the factory default password “00000000” in the first row “ENTER
PASSORD” and press the “Enter”.
2. Enter your new password in the second row “ENTER NEW PASWORD”
and press the “Enter”.
3. Retype the new password in last row “RETYPE NEW PASSWORD”
and press the “Enter” for confirmation
Note: The OSD menu will return back to MAIN CONTROLS if the retyped
password matched with the new password
ENTER PASSWORD
••••••••
ENTER NEW PASSWORD
••••••••
RETYPE NEW PASSWORD
••••••••
13. Start Up
S117 / S119 User Manual
Page 30

Rev. : 1.0 P.28
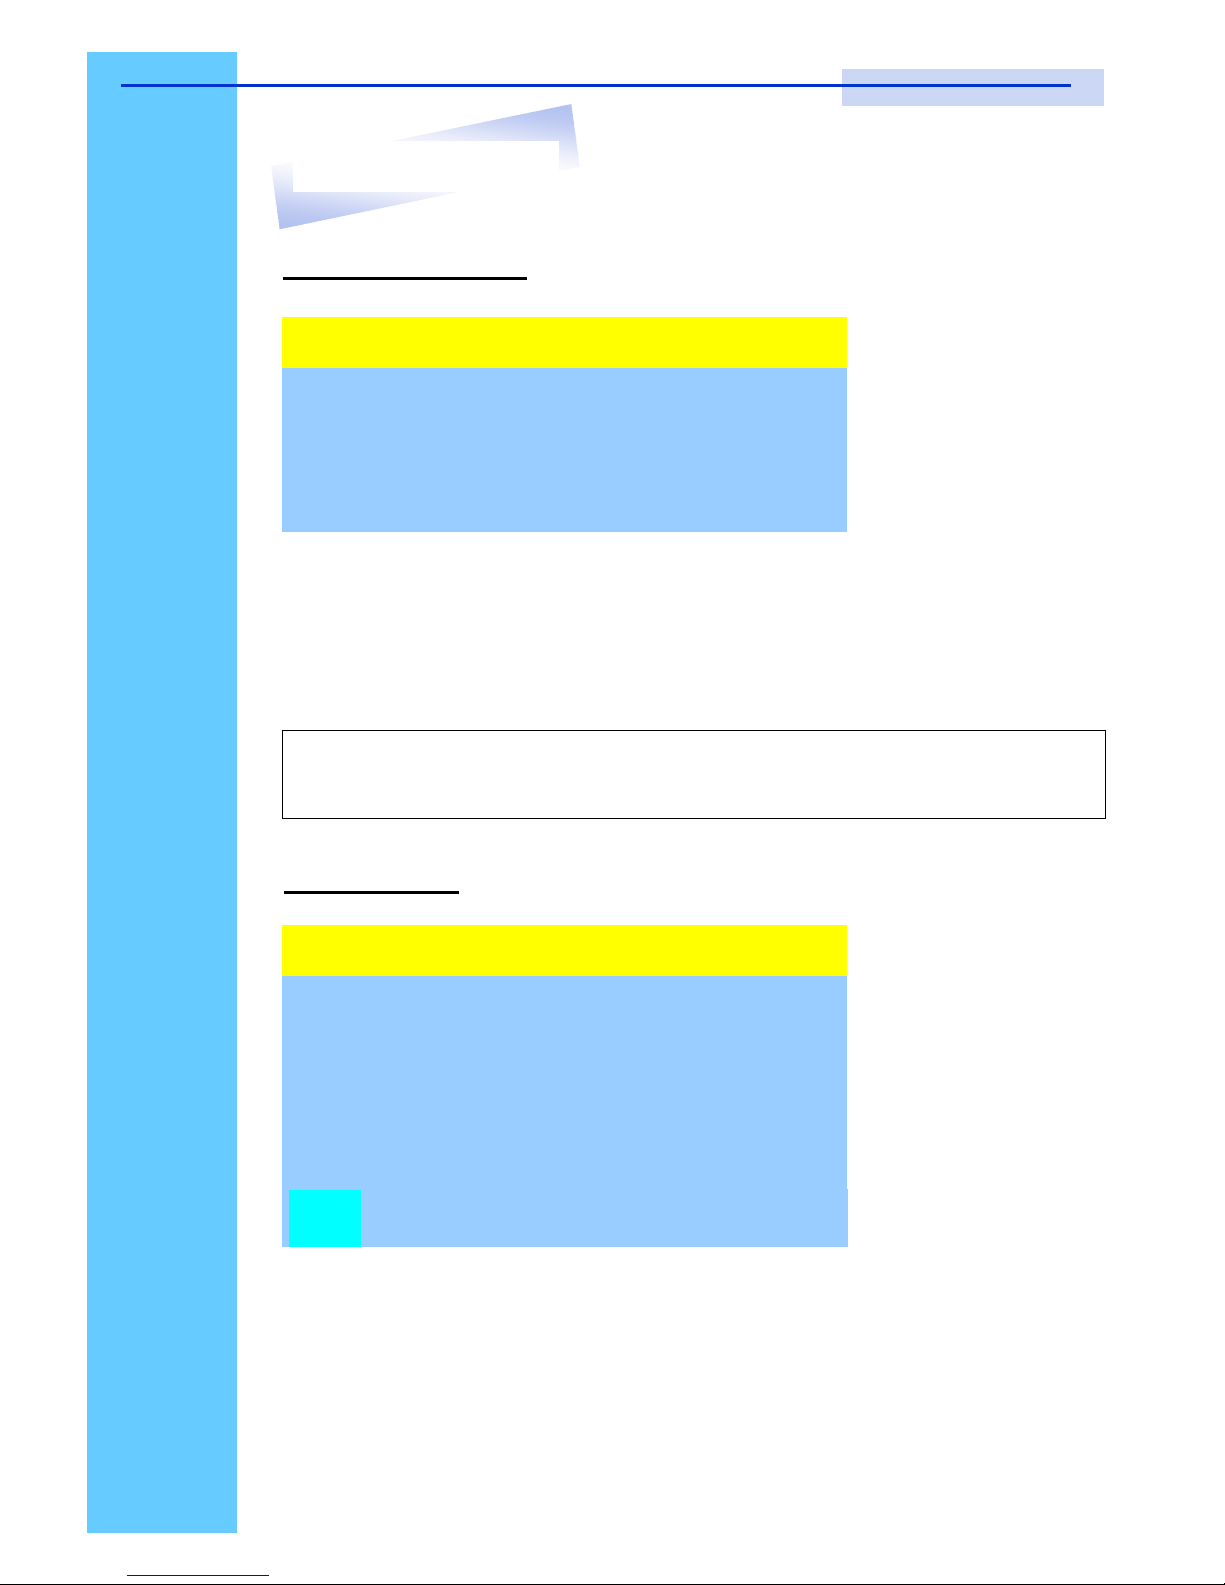
FINDPORT ?X
FINDPORT Menu
ENTER NAME : _ _ _ _ _ _ _ _ _ _
“FINDPORT“ option helps you to find the PC system by its name.
● Enter PC system name and press ENTER, it will search the matching PC
system and given the message for searching result.
Note: PC system name is defined in PORTNAME function.
Example :
a) If you enter a PC name which can be found on the system, the window
will show the PC system name you searched and which BANK it
belongs to.
b) If there is no match PC system name were found, the window will show
“PORTNAME NO FOUND!” message displayed.
Note: Enter wild card “ * “ and combine the other characters from A~Z and 0~9
to search all of system name lists matched the same format .
FINDPORT ?X
BANK : 1
01
SYSTEM 01
FINDPORT ?X
BANK : 1
PORTNAME NO FOUND !
Note: To use “ PgUp “ key or “ PgDn” for searching at the previous or next
Bank.
13. Start Up
S117 / S119 User Manual
Page 31
Rev. : 1.0 P.29
CONSOLE Menu
CONSOLE ?X
ENABLE
DISABLE
● ENABLE – any user can use the console
● DISABLE – user is not allowed to use the console port, unless password
is entered.When password is entered already and pass the KVM switch
authentication, the CONSOLE will be set to ENABLE.
● Default – ENABLE no password is required
Note: After finish the usage of KVM switch, please don’t forget to set up
CONSOLE ENABLE state to DISABLE state.
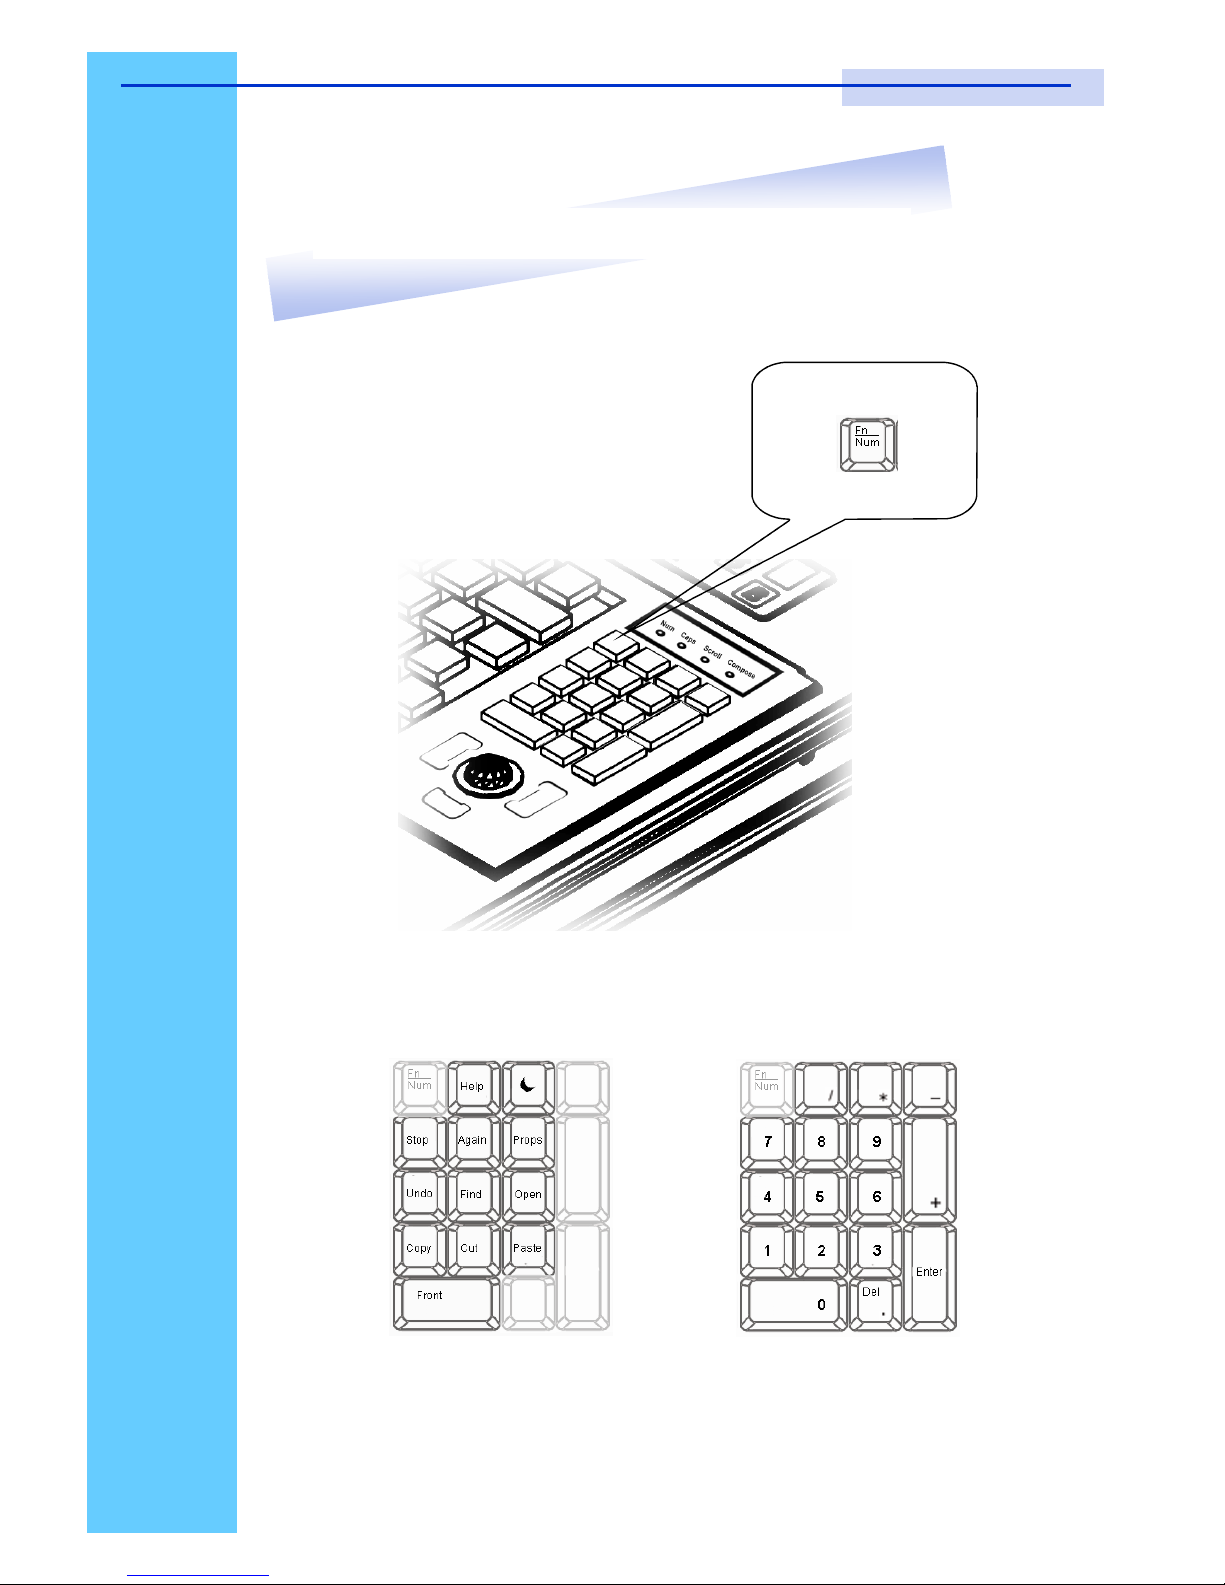
HELP Menu
HELP ?X
ESC : QUIT
ENTER : COMPLETE
INSERT : EDIT
Ç / È / Æ / Å : SELECT
PaUp / PaDn : BANK SELECT
☼ SYSTEM 01
101
● To call the HELP menu, please click the “?” at the right corner of the OSD
● To operate the options in HELP menu by using Esc, Enter, Ins, arrows,
and Page Up / Page Down keys on keyboard.
13. Start Up
S117 / S119 User Manual
Page 32
Rev. : 1.0 P.30
14. Keyboard & Key Pad Layout
S117 / S119 User Manual
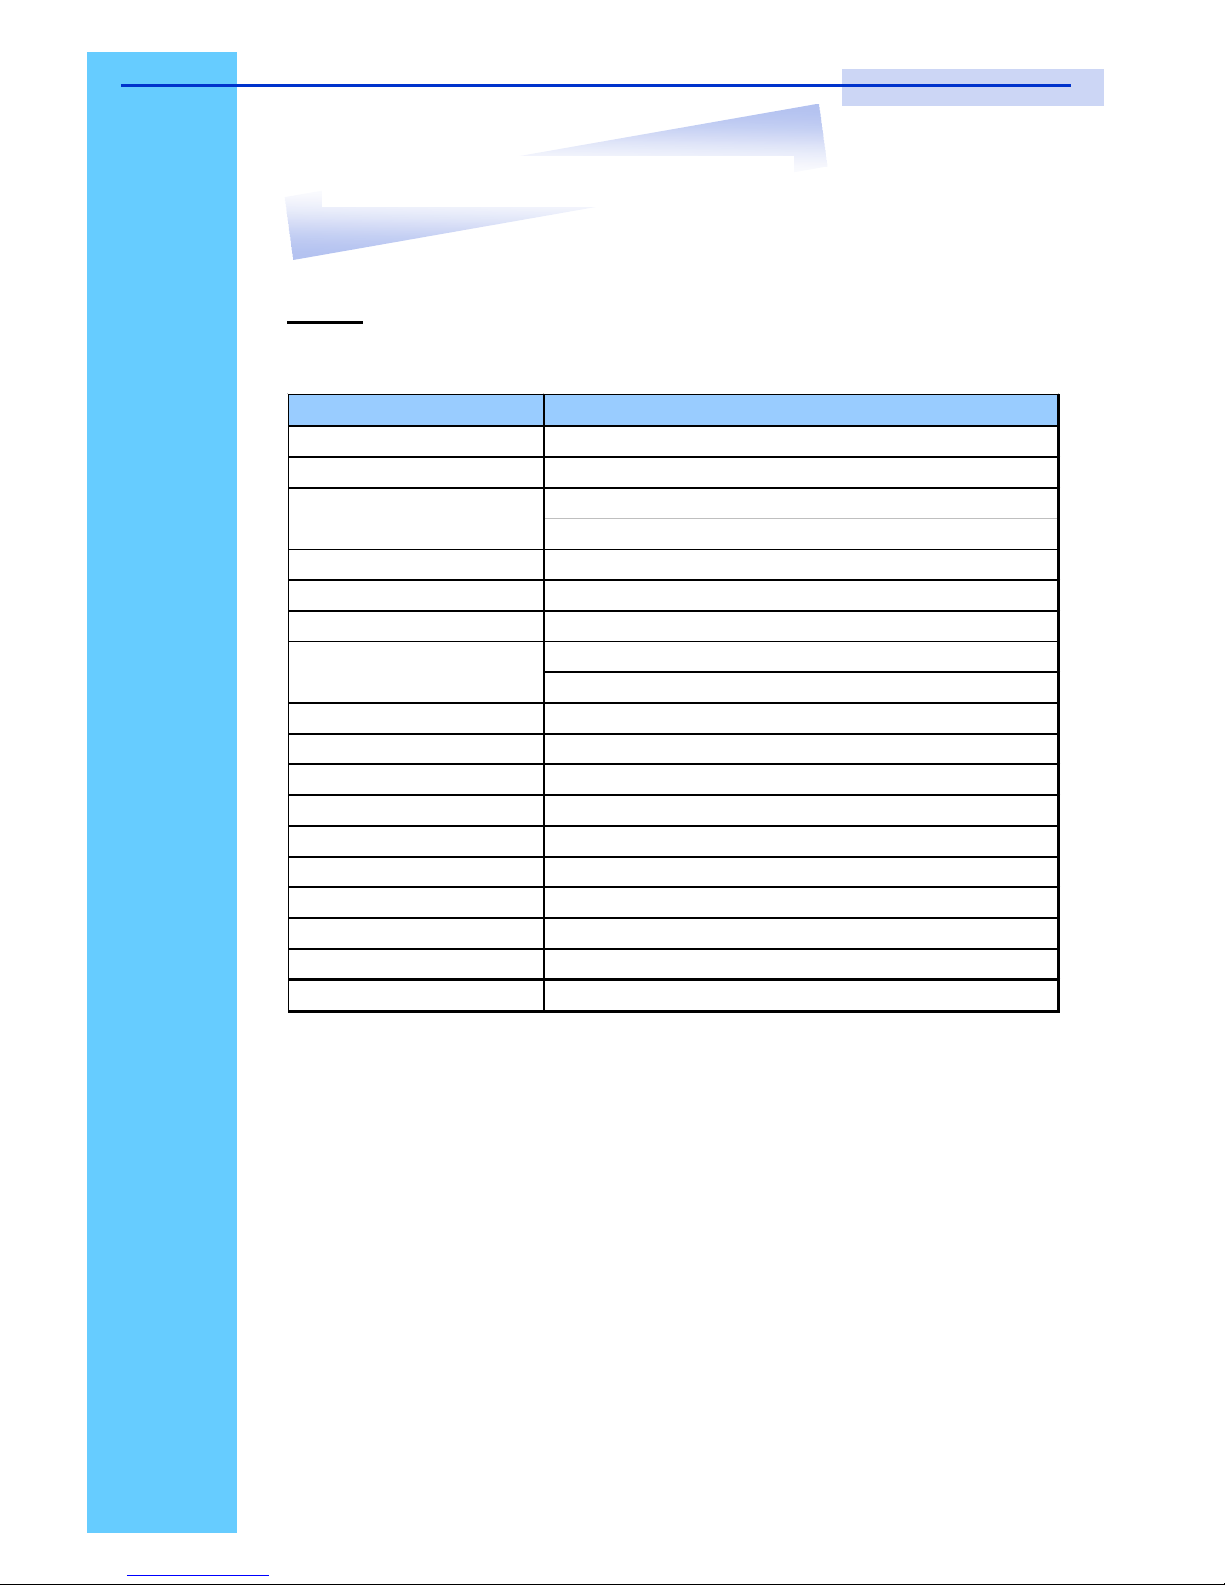
Press the Fn/Num button to switch the
color of Num LED.
The Num LED in Blue color:
The key pad behaves as a SUN Solaris system
administration commands mode below
The Num LED in Green color:
The key pad behaves as a normal key pad mode
below
* Compose LED always off when on or off compose key.
Page 33

Rev. : 1.0 P.31
15. FAQ
1. Keyboard or mouse dose not work or not be compatible with the PC.
Please make sure the keyboard or mouse works when directly plug into the
computer. If the problem persists, please try another keyboard or mouse.
2. Mouse doesn’t work in Auto Scan mode
You can press any key on the keyboard or the front button on the face plate
for returning standard mode and then use the Keyboard or Mouse again.
S117 / S119 User Manual
Page 34
Rev. : 1.0 P.32
16. Technical Specifications
KVM
ItemSpecification
KVM Channel Port
S11X-801: 8 port / S11X-1601: 16 port
KVM Channel Interface HDDB 15 pin Female
USB Port : Type A Female
VGA : HDDB 15pin Female
Cascade Port Connector HDDB 15pin Female
KVM Cable Connection 2-in-1 HDDB 15-pin KVM Cable (CB-6/ 10/ 15)
PC selection On Screen Display, Hot Key & Push Button
1 Bank LED
8 / 16 Online LED (Green) & Selected LED (Red)
On Screen Display Control Yes
Scan Mode Intervals 5~99 Sec.
VGA Resolution 1,920 x 1,440
Bandwidth 200MHz
Cascade MAX. Level 8 levels with addition 120 / 128 PCs connection
Housing Metal
Power Adapter DC 12V 1A
Operation Temperature 0~40
℃
Storage Temperature -20 ~ 60
℃
Humidity 0~80%, Non-Condensing
PC Computer Interface
LED
S117 / S119 User Manual
Page 35
Rev. : 1.0 P.33
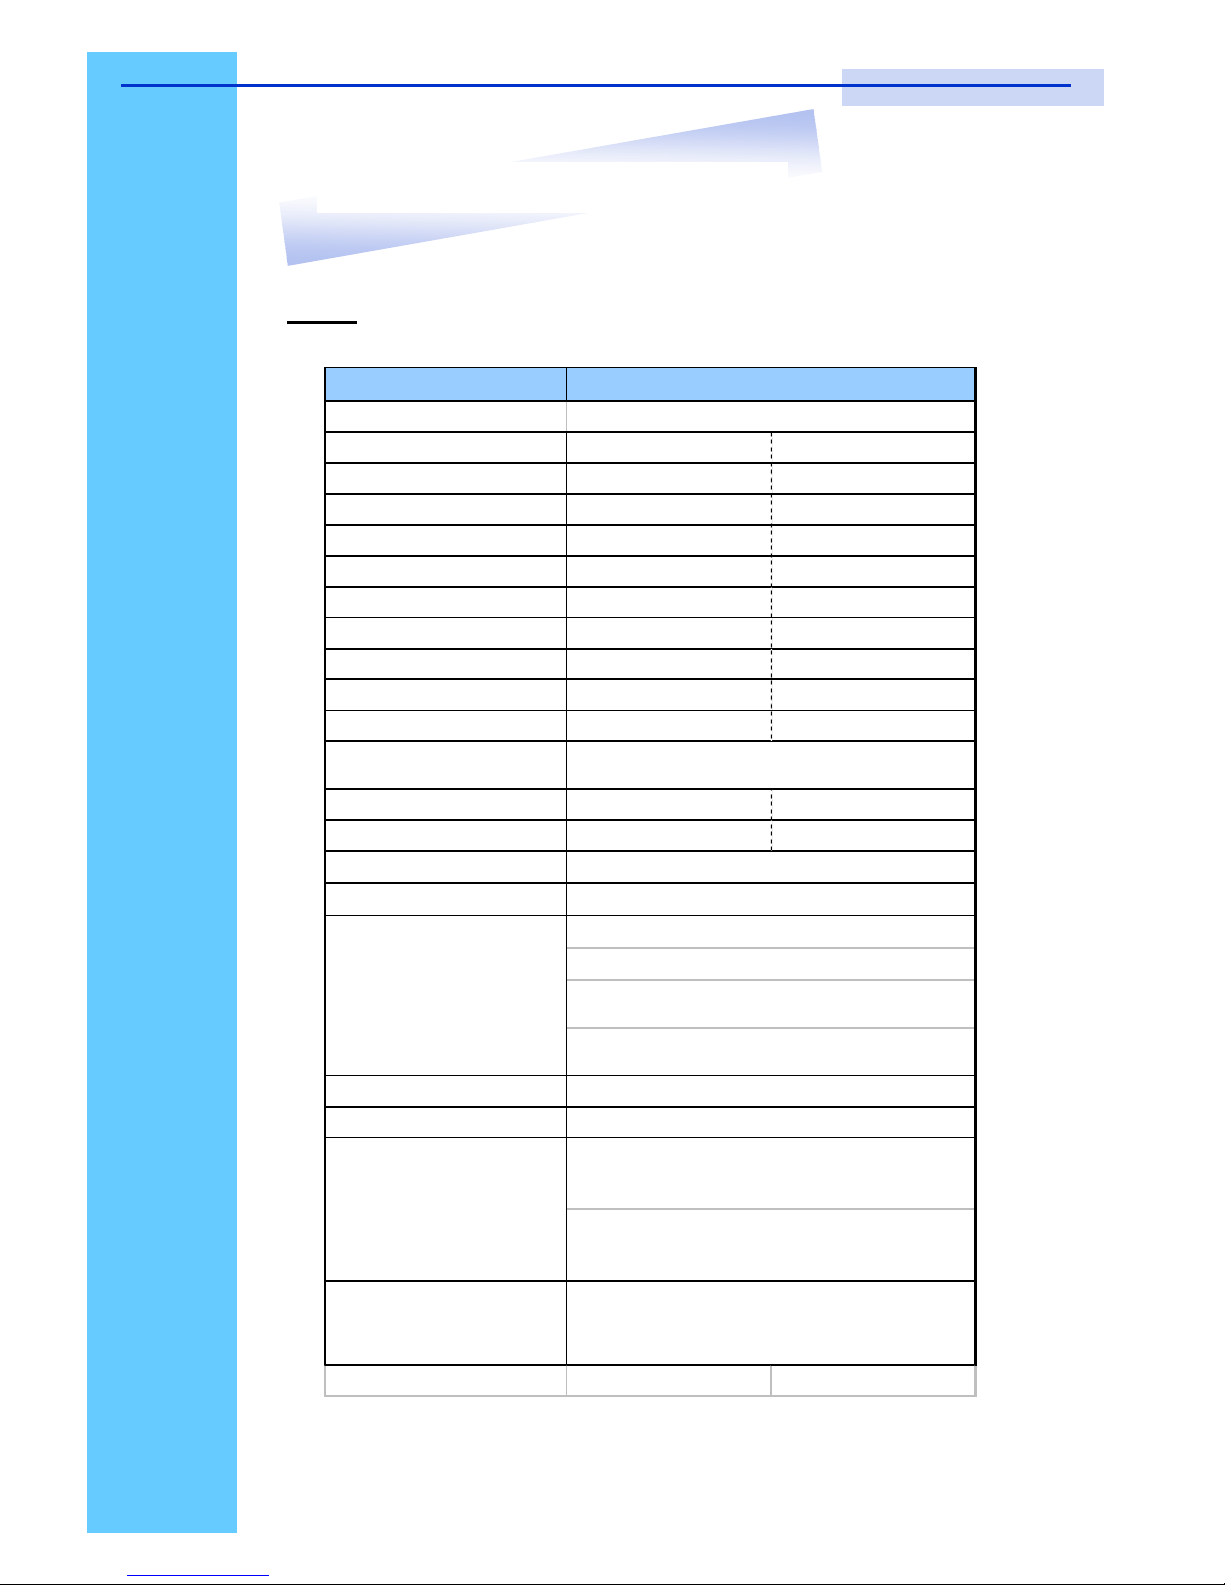
Item
LCD Origin
Panel 17” TFT19” TFT
Resolution
1,280 x 1,0241,280 x 1,024
Brightness
350 cd/m2500 cd/m2
Color
16.2 Million16.7 Million
Contrast Ratio
350:1500:1
Viewing Angle
140° x 120° 170° x 170°
Display Area
337 x 270 mm376 x 301 mm
Pixel Pitch
0.264 mm0.294 mm
Response Time (Tr)
5ms15ms
Response Time (Tf)
20ms10ms
Back Light
Horizontal Sync.
64 ~ 80 kHz64 kHz
Vertical Sync.
60 ~ 75 Hz60 Hz
Input Signal
Power Management
Power Input
Video Input
Weight
S117-8/1601 : 12.0kg
S119-8/1601 : 13.5kg
Description
4 x Cold Cathode Fluorescent Tube
Analog RGB 0.7Vp-p
VESA DPMS
Brightness, Contract, Colour, Clock
H.Position, V.Position, Phase, Scaling
Dimension
OSD Control
S117-8/1601: 439W x 44H x 600D mm
S119-8/1601: 439W x 44H x 650D mm
Auto Config., Input Select, Multi-Window
Clear EEPROM, OSD adjust
12V DC Adapter
15-pin D-Sub Connector
LCD
*All brand names, logo registered trademarks are properties of their respective owners.
16. Technical Specifications
S117 / S119 User Manual
 Loading...