

2500
USER
GUIDE
Setting Your Preferences
Backlight: Select Display light preferences. Options include:
- On When Receive: Display illuminates for 10 seconds when receiving
- On When Key Pressed: Display illuminates for 2 seconds when key is pressed
- Off: No Display illumination
- Always On: Display is continually illuminated
Squelch:
Squelch filters out unwanted noise. Squelch operates as a gate to reduce noisy transmissions.
If the transmission is strong, the gate will open & the transmission will be heard. If the
transmissions is weak or mostly static, the gate will remain closed & the transmission will not be
heard. The User can set Squelch level to LOW, MID or SENSITIVITY.
Programming Your RE2500
Programming: Use this menu option to program, read and delete channels. Channels can be
programmed into the radio by using the methods listed below.
Keypad Entry:
Use the Numeric Key Pad to enter the following information:
Channel Number: Enter car number.
Frequency: Enter a valid frequency by using the Up or Down Navigation Pad. (450-469.9875)
CTCSS/DCS Code: This code is essential for monitoring track/driver channels. CTCSS and DCS
Codes are sub-audio signaling formats designed to prevent interference from other broadcasting
stations sharing the same frequency. When using CTCSS or DCS codes the scanner will only respond
to transmissions carrying the tone. Therefore you only hear the race team’s transmissions.
Up/Down/Left/Right (Navigation Pad) 4-Way Key can adjust CTCSS/DCS code. Left Key can turn
CTCSS Code off and UP Key can increase CTCSS Code number. Right Key can set DCS Code to first
one and UP Key can increase DCS Code number.
Alpha Label: Used to name the channel. This field can be a letter or number. Use the Numeric Key
Pad to enter letter/number in the display. Using Navigation Pad to edit channel’s name, UP or DOWN
Key can switch between ABC, abc, or 123, LEFT or RIGHT Key can move cursor, LEFT Key can delete
entry, and NEXT Key can jump to next channel for programming.
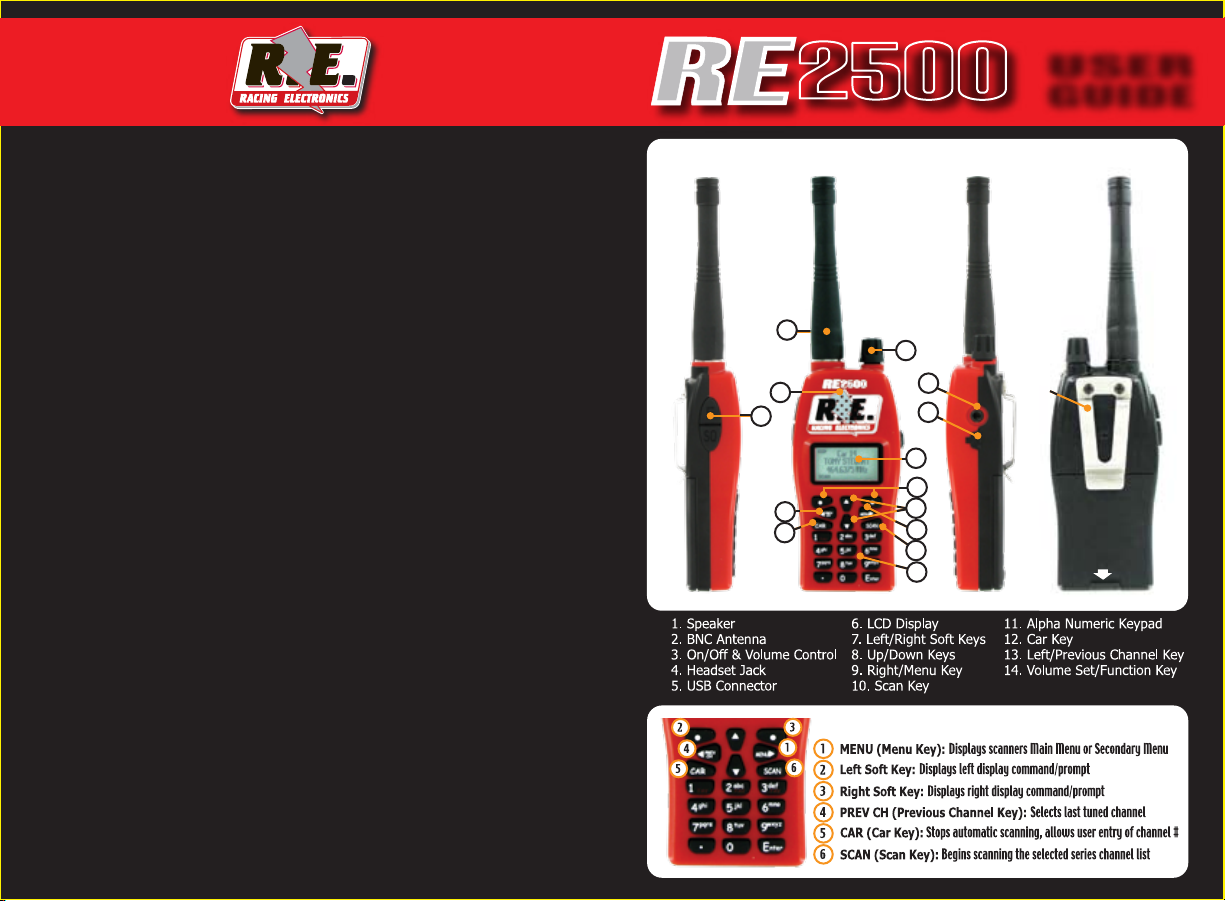
RE2500 Scanner Controls/Features
2
3
1
14
13
12
4
5
6
7
8
9
10
11
RE2500 Keypad: Command Keys
Belt
Clip
Battery
Cover
Battery
Cover Lock
RACING ELECTRONICS | 840 DERITA ROAD | CONCORD, NC | 28027 | 1.800.272.7111 | www.racingelectronics.com
2500
USER
GUIDE
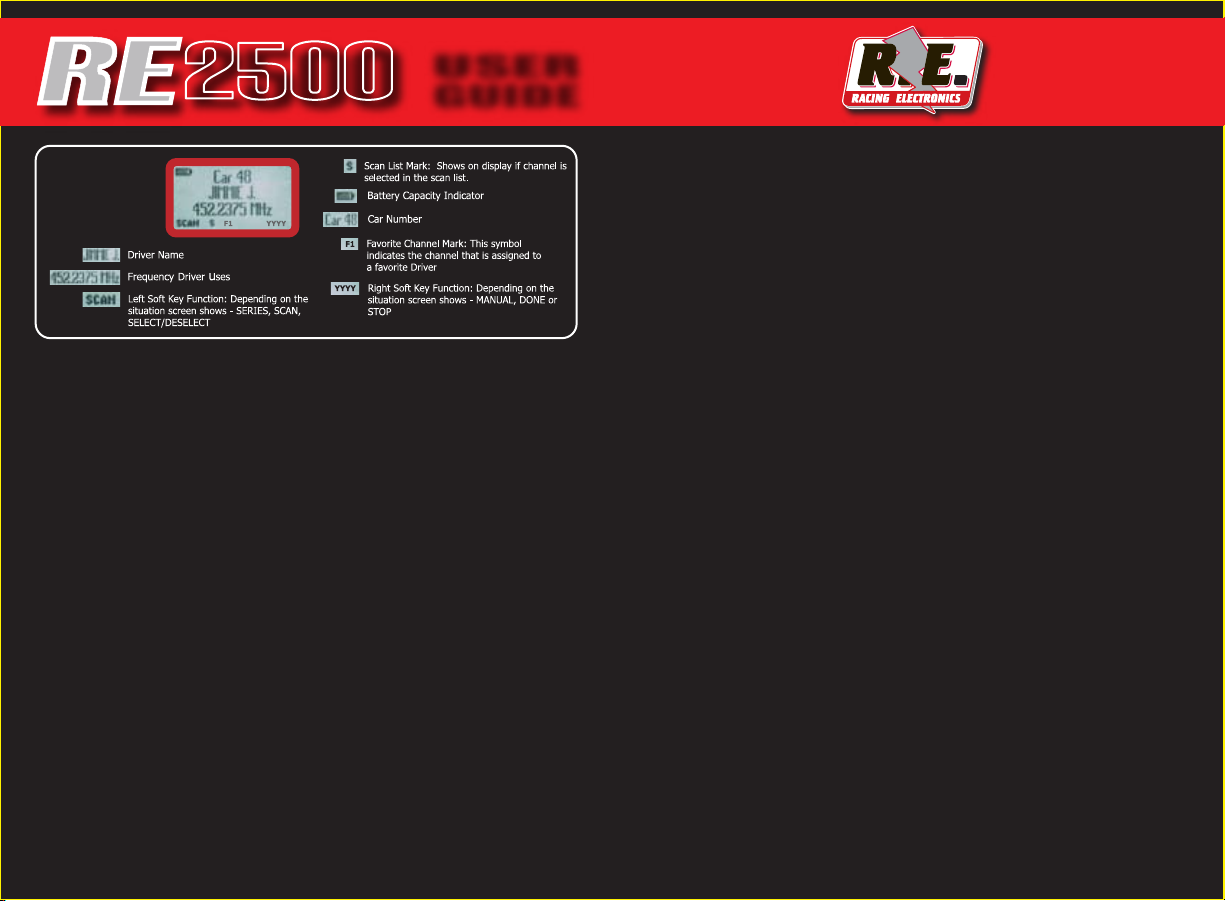
LCD
Display
Features
How to operate your RE2500
Getting started and selecting one of the Race Series.
a. Turn the power switch on. The scanner’s display will illuminate.
b. Press and hold the “SQ” button to adjust the volume to a safe and comfortable level before
b. connecting the headset
c. Press the Left Soft Key/ Right (MENU) Key and select Race Series. Note! Series channels must be
c. programmed and will need to be updated for each race.
d. Use the 4-Way Keys to scroll through series options, the series and start scanning all
d. programmed/selected channels within that series.
To Edit Scan List
a. Select Scan List from the main menu. The channels for the selected series will be displayed.
b. Scroll through driver channels and press the Left Soft Key (SELECT/DESELECT) to select /deselect
b. channels on the scan. There is an arrow mark beside the name to identify that the channel has
b. been selected on the Scan List.
c. Press the Right Soft Key to return to Main Menu .
d. When inside Scan List, press MENU Key to enter Secondary Pop-up Menu.
e. Scroll up and down to Highlight Desired function, press Right (MENU) Key to select.
To Edit Favorite Channel
There are two ways to edit a user’s favorite driver, one is from the Main Menu, and another is on scan
mode.
a. From MAIN MENU:
a. - Select Series (series0, series1, series2 or series3).
a. - Select Favorite Channel from the Main Menu. The programmed channels for the selected series
a. - will be displayed.
a. - Scroll through driver channels and press Left Soft Key (SELECT) to assign a priority to the
a. - selected channel.
a. - Pressing the Left Soft Key repeatedly will scroll through the priority selection (3,2,1).
a. - Press Right Soft Key (DONE) when the priority is assigned.
b. To memorize favorite driver on scan mode
b. - Push CAR Key and enter the desired car number, then push CAR or Enter key to make scanner b.
b. - stay on the desired channel. Push and hold FUNC and Numeric Key (1,2,or 3) for 3 seconds to b.
- b. store favorite driver in that key (1,2,or 3). The previous record will be overwritten after above b.
- procedure is performed.
Two-Step Key (Shortcut Key)
The keys with red letter have other functions when they work with FUNC (Function) button.
FUNC + FAV: The channel that scanner stays on will be memorized to favorite driver when FUNC
Key pressed and held first, then presses FAV (1,2,or 3) for three seconds. Scanner will go to Favorite
Driver directly if FUNC and FAV Keys are pressed.
Main Menu
The RE2500 scanner has five user editable choices in the main menu - Race Series, Scan List,
Favorite Channel, My Preferences, Programming.
• Race Series: Four series of 110 channels each, there are 110 channels per series 00-09, 0, 1-99.
• Car Numbers correspond with the channel number in the selected series.
• Scan List: Operating with two soft keys and 4-Way Keys can select/deselect channels into/from
• Channel List.
• Favorite Channel: Operating with two soft keys and 4-Way Keys can select/deselect channels
• into/from Favorite Driver List.
• My Preferences: There are 2 items: Backlight, Squelch that user sets.
a. - Backlight: Operating with two soft keys and 4-Way Keys can set the backlight to “On When
a. - Receive”, “On When Key Pressed”, “Always On”, or “Off”.
a. - Squelch: Operating with two soft keys and 4-Ways Key can set squelch level to “Low”, “Mid”, or
a. “Sensitive”.
• Programming: There are 5 items: Keypad Entry, Write - Scanner, Read - Scanner,
• Race Series, and Reset Scanner that the user can program on the scanner.
b. a. Keypad Entry: To enter track/driver frequencies, codes and driver names by manual.
a. b. Write - Scanner: To download track/driver frequencies, codes and driver names from PC or a.
c. a. c. source scanner.
b. c. Read - Scanner: To upload/ track/driver frequencies, codes and driver names to PC or
b. d. destination scanner.
b. d. Race Series: To edit banks name.
b. e. Reset Scanner: To delete all data and return to default setting.
Secondary Menu
There are two Secondary Menus, one inside Series and the other one inside Scan List. Secondary
Menus are a submenu associated with a primary Main Menu. They are displayed as a pop-up window
on the display screen.
a. Press the Right (MENU) Key while in stop scanning mode, display shows: SCAN LIST, KEYPAD
SEand MANU in the pop-up windows for user to select the desired option.
b. When inside the SCAN LIST, press MENU Key to enter Secondary Pop-up Menu. Scanner shows
SESELECT ALL, SELECT NONE & MANU for user selection.
 Loading...