


!
!
RACE&NAVIGATOR.COM!
YOUR PERSONAL TRACK ASSISTANT
QUICKSTART*GUIDE*


!
!
Thank you for choosing RN ONE!
Please read this manual before the first use of the device.
Visit the website for more info:
www.race-navigator.com
Release date: 23.09.2014 r.

!
!
TABLE OF CONTENTS
01 · HOME ........................................................................................................................................................... 7
02 · STATUS BAR ............................................................................................................................................ 8
03 · DASHBOARD ............................................................................................................................................ 8
03.1 · DASHBOARD · Panel 1 .......................................................................................................... 8
03.2 · DASHBOARD · Panel 2 ....................................................................................................... 10
03.3 · DASHBOARD · Panel 3 ....................................................................................................... 10
04 · MANUAL RECORDING ..................................................................................................................... 10
05 · RECORDING WITH OBD-II DIAGNOSTIC DATA ................................................................ 12
06 · LAPS HISTORY (LAPS) .................................................................................................................... 12
06.1 · LAP DETAILS ............................................................................................................................ 14
06.2 · REVIEW DRIVE ........................................................................................................................ 14
06.3 · VIDEO PLAYER ........................................................................................................................ 15
07 · EVENTS .................................................................................................................................................... 15
08 · ANALYSIS ................................................................................................................................................ 16
09 · SETTINGS ............................................................................................................................................... 17
10 · DRIVER ..................................................................................................................................................... 18
10.1 · DRIVER · Add ........................................................................................................................... 18
11 · CAR ............................................................................................................................................................. 20
11.1 · CAR · Add .................................................................................................................................... 20
12 · TRACK ....................................................................................................................................................... 21

!
!
12.1 · TRACK VARIANTS .................................................................................................................. 22
13 · EVENT ....................................................................................................................................................... 24
13.1 · EVENT · Trackday .................................................................................................................. 24
13.2 · EVENT · Endurance .............................................................................................................. 25
13.3 · EVENT · Taxi ............................................................................................................................. 26
14 · NETWORK ............................................................................................................................................... 27
15 · DEVICE ..................................................................................................................................................... 28
15.1 · DEVICE · Status ...................................................................................................................... 28
15.2 · DEVICE · Clock ......................................................................................................................... 30
15.3 · DEVICE · Update .................................................................................................................... 30
15.4 · DEVICE · Diagnostics .......................................................................................................... 34
15.5 · DEVICE · RN Reset ............................................................................................................... 35
15.6 · DEVICE · Help .......................................................................................................................... 37
15.7 · DEVICE · Logo .......................................................................................................................... 37
16 · AUTOSTART .......................................................................................................................................... 38
17 · VIDEO ........................................................................................................................................................ 38
18 · EXPORT VIDEO .................................................................................................................................... 39
Right side view

!
!
Delivery scope
Take the Race Navigator ONE out of
the box and check the box’s content:
• Race Navigator ONE
• External GPS antenna
• 12 V car adapter cable and 230 V
charger
• Holder (optional)
The RN ONE’s battery is pre-charged
so you can start using the device
immediately.
Installation
Take the holder and screw it to the RN
ONE. In the vehicle, put the sucker of
the holder below the rear-view mirror
and fasten it tight to the windscreen
with the clamping lever.
Make sure whether the mounted RN
ONE can record videos properly. In
general, the best position is about
5−10‚cm above the dashboard.
Adjust the RN ONE so that the top is
approximately in balance.! Check the
position by recording a test video.
NOTE: Before every ride, check the
adherence of the holder. Incorrectly
installed device might get detached
from the windscreen and get damaged,
cause damage to the car, or serious
injuries to the driver.
Turning on
Turn the RN ONE on by pressing the
Home button for at least 3 s. The
system starts up and the Home screen
is displayed.
Turning off
Turn off the RN ONE by pressing the
Home button for at least 7s. In the next
dialog, click YES to confirm or NO to
abort the operation.

!
!
01 · HOME
This page is the main page of the RN ONE and is
displayed when the system starts.
This view can be opened from any location by
clicking the Device home button under the screen.
Dashboard
Press this button to open the Dashboard.
Laps Analysis (Analyze)
Analyze your laps directly on the RN ONE device.
Laps History (Laps)!
All recorded laps can be found here.
Settings
Here you can specify all the settings of the RN
ONE, e.g. drivers, tracks, network, etc.
Driver Selection
The currently selected driver is displayed here. The
driver can be changed by clicking on the item and
choosing the desired person from the list.
Driver Selection Driver Car Track Name Event Type
Dashboard Laps History
Laps Analysis Settings
Warning Battery
Device Clock Current View Progress
Start/Stop Button

!
!
02 · STATUS BAR
The bar at the top of the screen contains
important information about the RN ONE device
and its current status.
Warning
When the icon shows up, you should check the
device status by clicking on the item. You can also
check the device status in the Settings RN
Device Status.
Video
The icon is displayed, while recorded video file is
being processed.
Progress
The animated icon shows up whenever the RN
ONE device is busy.
GPS
The icon shows up when the GPS signal is lost.
Battery
The icon shows up when the power supply is
disconnected. The color notifies about the battery
charging state.!
03 · DASHBOARD
The Dashboard consists of three panels.
03.1 · DASHBOARD · Panel 1
Panel 1 presents the data for the current lap and the reference lap.
Gap to Reference
This is a time gap between the current lap and the reference lap, calculated for the
current vehicle location on the track.
Device Name GPS
Video

!
!
Gap to Reference Chart
The chart displays the gap for the last 20 seconds.
Green color means the time advantage compared
to the reference lap, the red one means the
opposite.
Reference Lap Selection
The fastest lap is automatically selected as the
reference lap. Different lap can be chosen from the
laps list by clicking on the icon.
Current Speed Current RPM
Gap to Reference Gap to Reference Chart
Panels Current Lap Time
Reference Lap Time Reference Lap Selection
Next Panel

!
!
03.2 · DASHBOARD · Panel 2
Panel 2 presents the laps from the current event.
The best lap of each driver is colored yellow.
Full laps are colored white, while the others are
grey.
Selected reference lap is framed in blue.
03.3 · DASHBOARD · Panel 3
Panel 3 presents all important diagnostic
information about the vehicle. The RN Plug is
required to be plugged into OBD2 port in the car.
There is information about the revolutions per
minute, water and oil temperatures as well as the
throttle position.
04 ·
M
ANUAL RECORDING
Previous
Panel
Recorded Laps
Reference Lap Time Panels

!
!
In addition to the automatic recording possibility,
you can also start and stop recording videos
manually.
Start/Stop B utton
To start recording, press the Start/Stop button
on the right side of the Home Screen.
Press the button again to stop recording.
Start/Stop Button

!
!
05 · RECORDING WITH OBD-II
DIAGNOSTIC DATA
To extend the range of recorded and displayed
data you need to have the RN PLUG and the USB
Bluetooth RN Stick. The RN PLUG can be
purchased for an additional fee.
• Plug the USB Bluetooth RN Stick into the USB
port in you RN ONE.
• Plug the RN PLUG into the OBD-II
diagnostic port in your vehicle (it is usually
located in the driver footwell, under the steering
wheel, on the left side).
• The OBD-II values are gathered from the car while
recording.
• To verify if your car is compatible with the RN
PLUG, record 2 laps manually, each at least 2
minutes long. Check on the Panel 3 of the
Dashboard if the values are available.
06 · LAPS HISTORY (LAPS)
Laps page displays all laps in the selected event. Full laps are colored white while the
others are colored grey, except the best laps of each driver which are colored yellow.

!
!
i
The list can be sorted by the column headers. You
can change the sorting method by clicking on one
of them. Current sorting column is colored red.
Clean up
There are two ways to delete laps:
1. Remove all not complete laps.
2. Remove all laps except the top three of each
driver.
Remove
Clicking on the button removes all selected laps. If
a video file for the lap exists, it is deleted as well.
Change Event
Choose the event from the list and browse its laps.
Show Lap
Display the lap details and the video.
Clean up Remove Change Event Show Lap
!
!
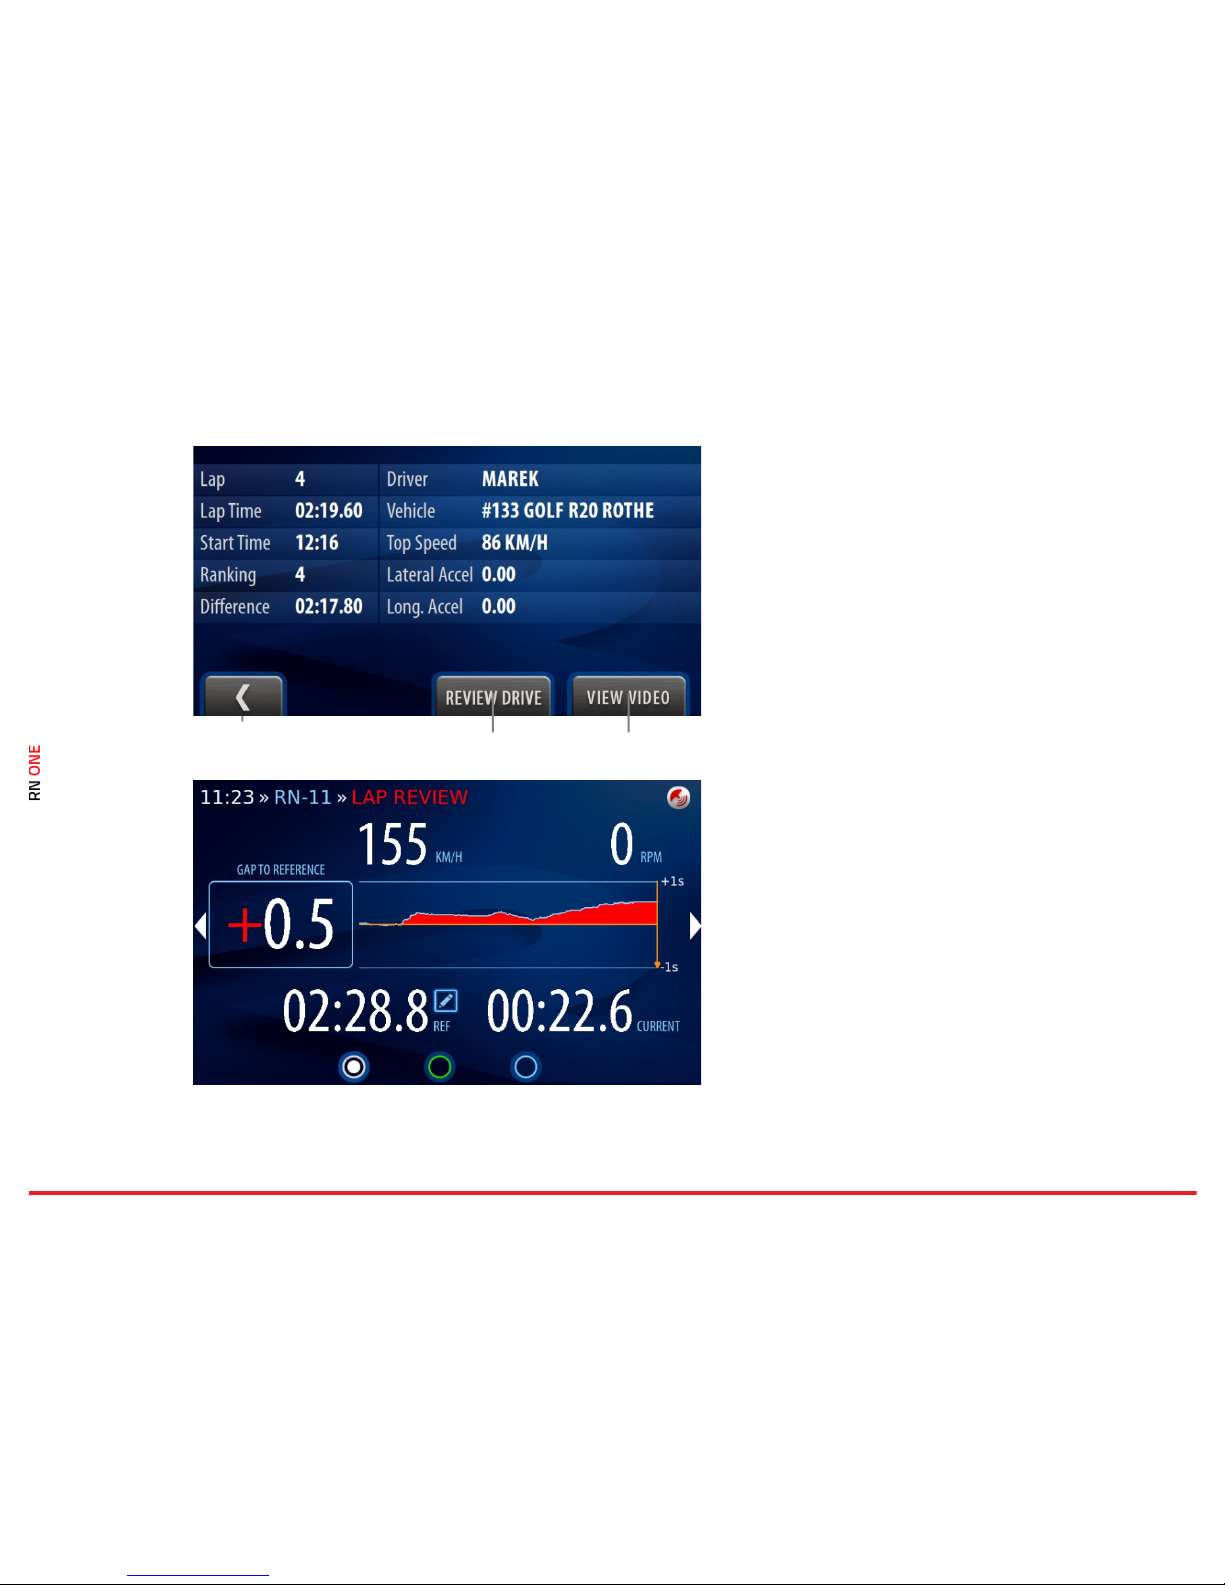
06.1
·
LAP DETAILS
Here you can get all lap details and view the
recorded video.
Back Button
You can go one step back by clicking on the button.
Review Drive
Here you can watch the animation with the lap
data.
View Video
Here you can display the video.
06.2 · REVIEW DRIVE
In Lap Review mode, all lap data is simulated so
that you can observe them as they were displayed
in real time during the lap.
You can stop the review by clicking the Stop
Review Button on the right side of the Home
screen.
06.3
Back Button Review Drive View Video

!
!
· VIDEO PLAYER
In the player you can watch the video of the
selected lap.
Recorded movies consist of both camera views:
outer and inner. Along with the camera views
other lap data is presented like: track name,
current time, lap time, current speed. Bars on the
right and bottom edges of the inner camera view
present the current G-force values.
07 · EVENTS
On this page you can find all events recorded on
the device.
Remove Button
With this button you can remove selected event
and all its data, including video files and not full
laps.
Remove Button

!
!
n
08 · ANALYSIS
On this page you can select two laps and compare
them with each other.
Full laps are colored white and the others are grey.
The best laps of each driver are colored yellow.
Change Event
Change the event to select proper laps for
comparison.
Set Lap B
This button allows for selecting laps A and B.
Select lap A and click on the button, then select lap
B. If lap A is selected, the button shows B and vice
versa. Lap A is colored green and lap B is colored
orange.
Analyze
The chart displays speed series with colors
corresponding to selected laps. The red line can be
moved with a finger. The chart can be enlarged.
The right Plus button zooms in width, the left one
in the height.
Change Event Set Lap B Analyze

!
!
09 · SETTINGS
Here you can specify all device and system
parameters.
Driver
You can select a driver.
Car
You can select a car.
Track
You can select a track variant.
Event
You can select an event type.
Network
You can connect to the network.
Camera
You can check cameras views.
Device
You can modify another settings of the device.
Auto Start
You can set manual or auto recording.
Video
You can set the quality of your videos.
Export Video
You can export your videos to the memory stick.

!
!
10 ·
D
RIVER
Each recorded video is associated with a driver, a
car, a track and an event.
To select a driver, go to the Settings view and click
on Driver. There will be the list of existing users.
Scroll down the list and select the proper one.
Press Set to confirm your selection.
Edit
You can edit an existing driver.
Add
You can add a new driver.
Remove
You can remove a driver.
10.1 · DRIVER · Add
To create a new driver click on the Add button.
Enter the driver’s name using onscreen keyboard
and confirm with OK.
Edit Add Remove

!
!
Now, you can use the cockpit camera of the RN
ONE to take a photo of yourself.
Press Take to take a picture.
Use the Back button to complete the process.
Now, you can find the new driver on the list and
select it. Confirm your selection by pressing the
Set button.

!
!
11 · CAR
To select a car, go to the Settings view and click on
Car. There will be the list of previously added cars.
Scroll down the list and select the proper one.
Press Set to confirm your selection.
Edit
You can edit an existing car.
Add
You can add a new car.
Remove
You can remove a car. The default vehicle cannot
be removed.
11.1 · CAR · Add
To create a new driver click on the Add button.
Enter the race number and the car model’s name
using onscreen keyboard and confirm with OK.
Use the Back button to complete the process.
Now,
you can
Edit Add Remove

!
!
find the new car on the list and select it. Confirm
your selection by pressing the Set button.
12 · TRACK
Here you can find all available tracks and their
variants. Click on the track element to open the
Track Variants view.
You can select one of the available track variants
or create a new one (see 12.1.2).

!
!
12.1 · TRACK VARIANTS
All available variants of the selected track are
enlisted here. Scroll down the list and select one of
them. Press Set to confirm your selection.
Edit
You can edit a track variant.
Add
You can add a new track variant.
Remove
You can remove a track variant.
12.1.1 · TRACK VARIANTS · Edit
Here you can edit the track properties like: name,
track name, total distance, track width.
Enter the proper values using onscreen keyboard
and confirm with OK. Use the Back button to
complete the process.
12.1.2 ·
TRACK VARIANTS · Add
Edit Add Remove

!
!
If you want to add a new track, you need to record
the entire route.
In the first step, enter the track name and press
the Record button.
Place the car exactly on the start line, press S tart
Track Recording and drive.
The RN ONE automatically records the new track.
When you cross the finish line again, the RN ONE
stops recording and the new track is stored.
NOTE: Make sure that the GPS signal is strong
enough. We recommend using an external GPS
antenna.

!
!
13 · EVENT
All available event types are enlisted here. You can
browse the list and select one of them. Available
types are colored white while the unavailable ones
are colored grey. Press Set to confirm your
selection.
Trackday is default event type and is always
available. Other types are optional and can be
purchased for an additional fee.
Start New Event
You can start new event by clicking on the button.
Each event contain its own list of laps.
13.1 · EVENT · Trackday
• It is default event type.
• All data are recorded directly on the device.
• Another movie is prepared for each lap.
• In the auto-recording mode, recording is activated
automatically and deactivated 30s after the
vehicle stops.
Start New Event

!
!
13.2 · EVENT · Endurance
• Endurance is a special mode designed for
"Endurance" events, when it is important to obtain
the video recorded by the Race Navigator to the
memory stick immediately during the pit stop.
• Recording requires the memory stick to be
plugged in. Otherwise, the video is not recorded
and you are informed about missing memory stick.
• The videos and data are recorded directly on the
memory stick.
• In the auto-recording mode, recording is activated
automatically after exceeding the required speed
and deactivated 3s after the vehicle stops.
• When the red diode turns off, you can safely
remove the memory stick.

!
!
13.3 · EVENT · Taxi
• Taxi is a special mode designed for "Taxi" events.
• Recording requires the memory stick to be
plugged in. Otherwise, the video is nor recorded
and you are informed about missing memory stick.
• The videos and data are recorded directly on the
memory stick and can be received immediately
after the vehicle stops.
• In the auto-recording mode, recording is activated
automatically after exceeding the required speed
and deactivated 3s after the vehicle stops.
• When the red diode turns off, you can safely
remove the memory stick.
!
!
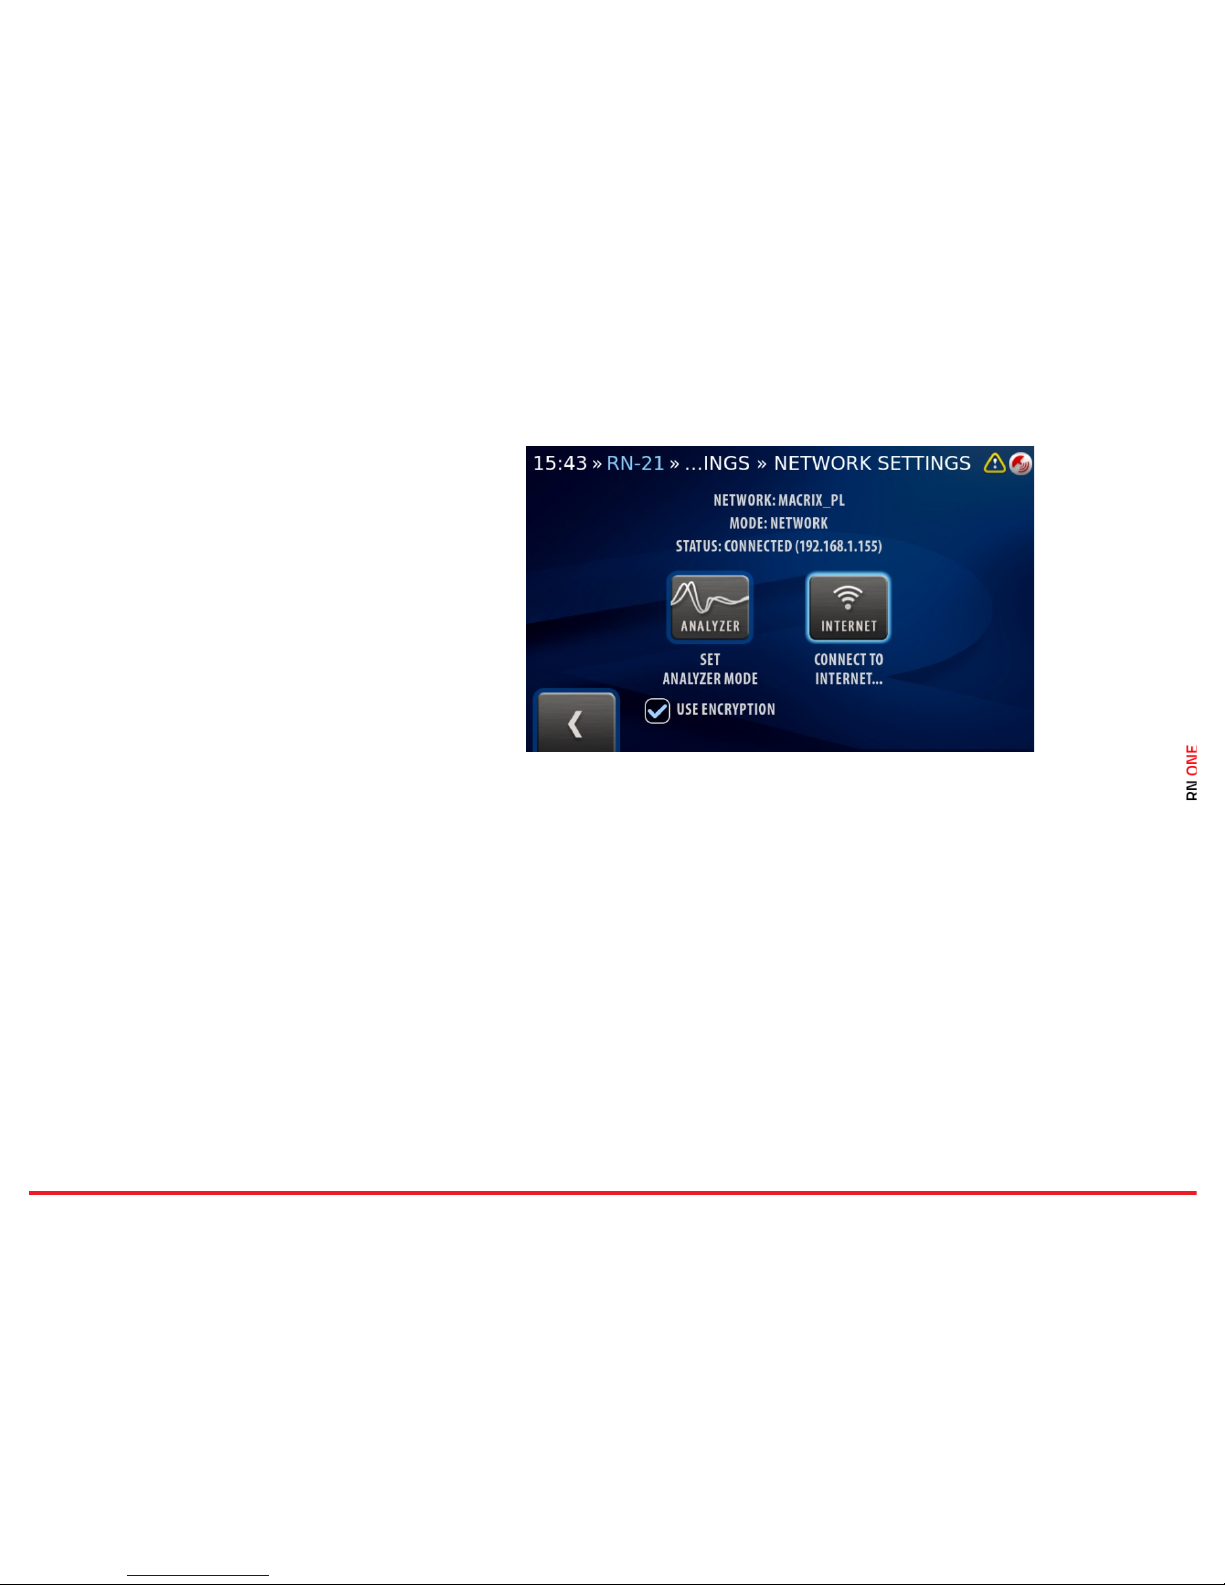
14 · NETWORK
You can select the one of two available connection
modes: internet connection and analyzer mode.
Analyzer Mode
Click on this button to create the access point for
your iPad.
Now, you can download videos and data directly
to your iPad and make more extensive analysis of
your laps with our RN Analyzer app.
You can use the encryption of RN access point
network. The encryption increases the security
and stability of the connection between devices.
Internet
Click on this button to open the list of available
WiFi networks.
If you want to update your device and install the
latest version of the software, you need to
connect to the Internet.

!
!
15 · DEVICE
Here you can specify all device parameters.
Status
You can check the status of the device.
Clock
You can set date and time.
RN Update
You can install the latest version of the software.
Diagnostics
You can download diagnostic data.
RN Reset
You can reset various device settings.
Help
You can read the descriptions of RN ONE
functions.
Video Logo
You can change the video logo.
15.1 · DEVICE · Status
Basic data of the device and its components are presented here.
Edition Name

!
!
Commercial edition name of the software
Device Name
Unique name of the Race Navigator ONE device.
Version
The version of the installed software.
Left SD/HD Video Time
Estimated remaining recording time for SD/HD quality.
Free Disk Space
Free space on the hard drive.
Battery Level
Display percentage value of battery level. When the value
drops to 10% a warning dialog pops up. When the value
reaches 1% the device shuts down.
GPS Signal Strength
The level of the GPS signal.
Video Processing
Indicates whether video files are currently processed
External Memory
Indicates whether the memory stick is plugged in.

!
!
15.2 · DEVICE · Clock
Here you can set the current date and time.
Zones
You can choose the proper time zone or set the
time manually.
Use the Back button to complete the process.
15.3
·
DEVICE · Update
Zones

!
!
You can install the latest version of the RN ONE
software on you device. The connection to the
Internet is required.
Follow the instructions below to install the latest
version.
1. On the Settings page click the RN Device button
and then the U pdate button. Make sure that your
device is connected to the WiFi network (to
connect, go to: Settings > Network > Internet and
choose and connect to your Internet network).
2. On the Updates view click the Download button.
The progress of the downloading is presented by
the progress bar. You can also check details of the
new version by clicking the Details button.

!
!
3. When the download is finished, click the Install
button on the Updates view. Wait for the next
screen.
4. On the next screen click the Start Update
button.

!
!
5. Installing a new version is in progress. It may take
few minutes.
6. The installation is finished with the successful
message. Press the Back button to restart your
device.

!
!
15.4 · DEVICE · Diagnostics
Here you can copy the diagnostic data directly to
the memory stick.
Press Export Data button to start the process.
The memory stick is required to be plugged in.
Otherwise, the Export data button is disabled and
you are informed about missing memory stick.
!
!
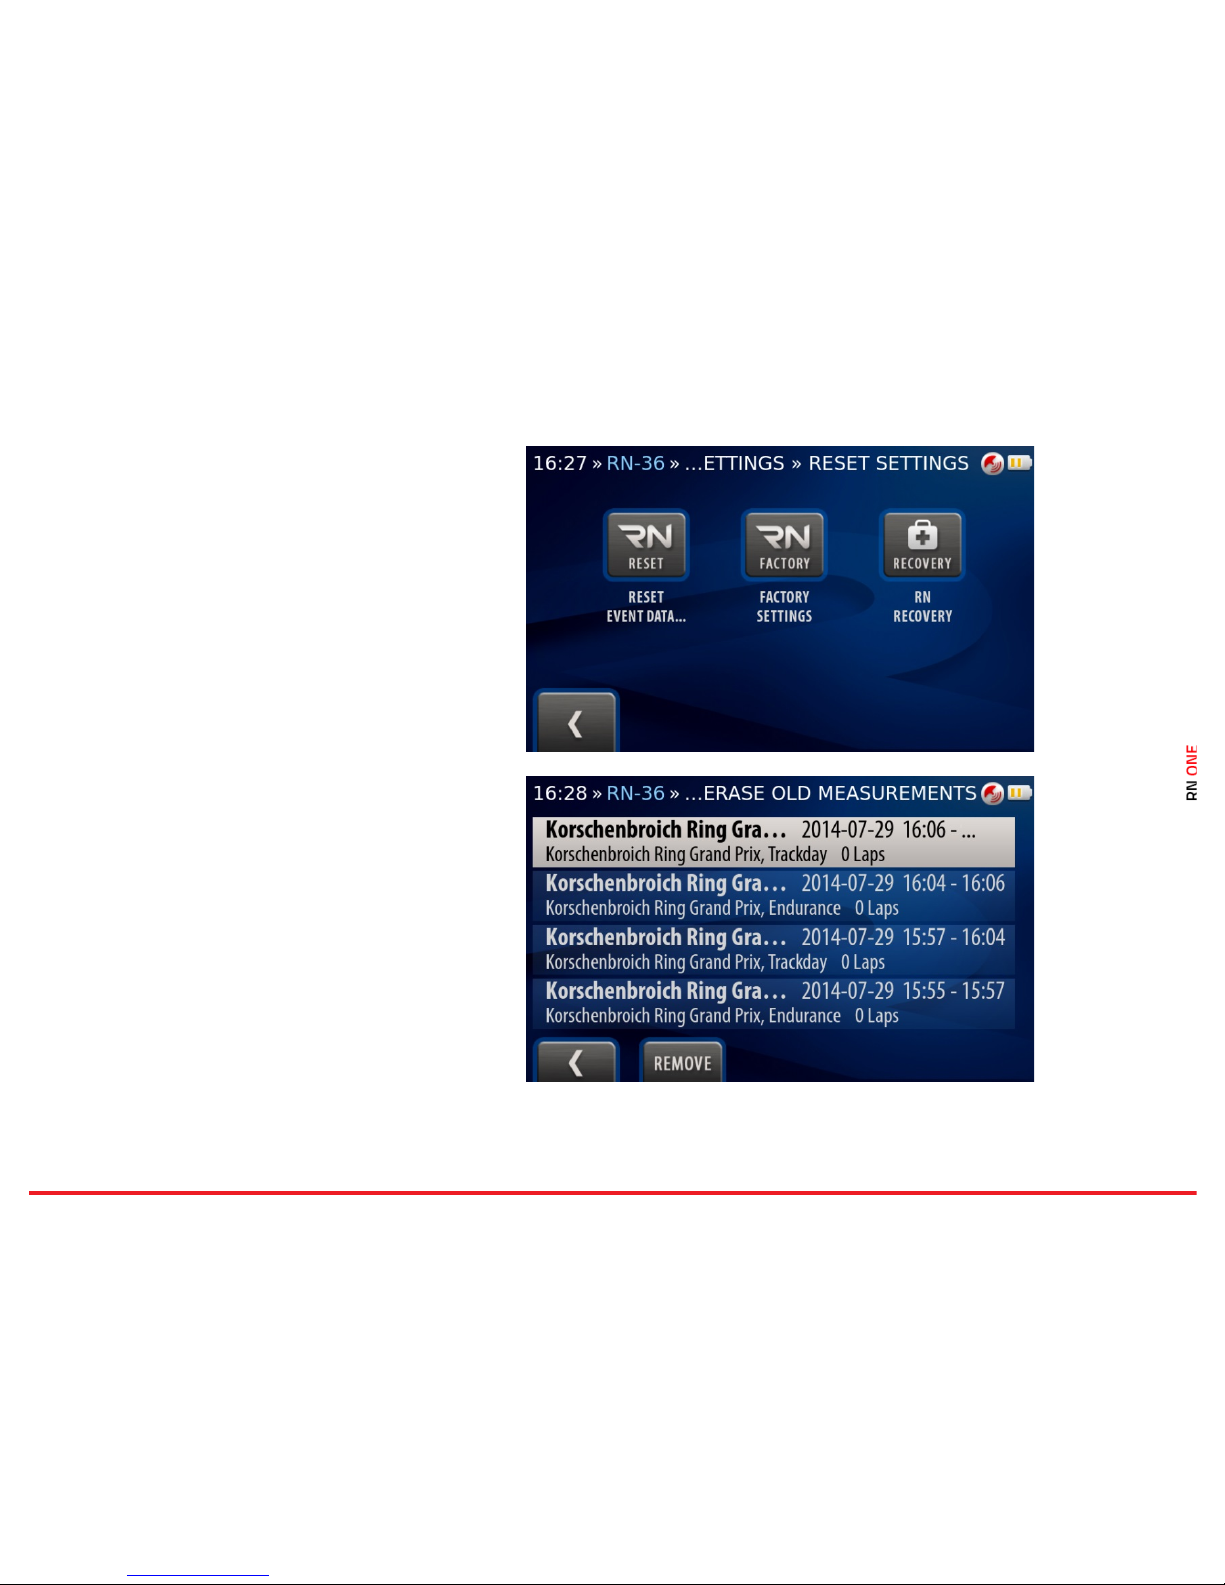
15.5 · DEVICE · RN Reset
Here you can reset various RN ONE settings and
restore the device to the basic installation.
15.5.1 · RN Reset · Reset Event
Data
Press the RN Reset button to display the list of
events. Select particular event and press the
Remove button to reset the event data. The
operation cannot be undone.

!
!
15.5.2 · RN Reset · Factory
Settings
Press the RN Factory button to restore the
device’s software to its original settings.
In the next dialog, click YES to confirm or NO to
abort the operation.
The operation cannot be undone.
15.5.3 · RN Reset · RN Recovery
Press the RN Recovery button to proceed device
recovery to the basic installation. Confirm the
operation by clicking on the Start R ecovery
button. You can keep the data.

!
!
15.6 · DEVICE · Help
The Race Navigator Help Content is presented
here. You can read basic descriptions of the
functions of your device.
15.7 · DEVICE · Logo
All available video logos are enlisted here. You can
browse the list and select one of them. Press S et
to confirm your selection.
You can also import your own logos. When you
plug the memory stick, your logos will be
automatically added to the list.

!
!
16 · AUTOSTART
Different video recording modes are available. You
can start recording manually or it can be activated
automatically after exceeding the required speed:
20 km/h or 40 km/h.
Select the mode by clicking on the proper element.
Use the Back button to complete the process.
17 · VIDEO
Different video quality options are available. The
video can be recorded in:
• SD quality (1280x768, half bitrate)
• HD quality (1280x768, full bitrate).
Select the option by clicking on the proper
element. Use the Back button to complete the
process.

!
!
18 · EXPORT VIDEO
Here you can export the video and data directly to
the memory stick.
The memory stick is required to be plugged in.
Otherwise, the Copy button is disabled and you
are informed about missing memory stick.
Change Event
Change the event to select proper laps for
exporting.
All laps from selected event are enlisted. Full laps
are colored white while the others are colored
grey, except the best laps of each driver which are
colored yellow.
The list can be sorted by the column headers. You
can change the sorting method by clicking on one
of them. Current sorting column is colored red.
You can find the laps on the list and select it.
Confirm your selection by pressing the Set button.
Press the Copy button to start the process.

!
!
MACRIX ONE (1) YEAR LIMITED
WARRANTY
ABSTRACT
MACRIX company guarantees, that during one
year since the purchase of Race Navigator, the
product (hardware) and its accessories are free
from material and production flaws. MACRIX
warranty does not include flaws, that are the
result of normal usage and damages caused by
incorrect use of the device or as a result of an
accident. In case of a repair, please contact
MACRIX or an authorized MACRIX service.
CAUTION: This product complies with EMC
directives and contains components compatible
with peripheral devices, and tested screen cables
used to connect the Race Navigator with
peripheral devices. Make sure that you exclusively
use compatible peripheral devices and screen
cables used to connect the elements of the
system, in order to avoid disruptions of radio or TV
sets, and other electronic devices.
Declaration of compliance with EU norms
Hereby MACRIX confirms, that Race Navigator
meets the requirements laid down by the R & TTE
directive.
WARRANTY
The object of the warranty is a product named
RACE NAVIGATOR, manufactured by MACRIX
Software GmbH, located in Korschenbroich in
Federal Republic of Germany. Macrix Software
GmbH provides warranty for Race Navigator
branded products and accessories, secured in
original “Race Navigator” packaging, including
material and quality flaws appearing during
normal usage in accordance to instructions
published by MACRIX, technical data and other
instructions concerning the Race Navigator
product (see also: www.race-navigator.com). The
warranty is in force for a period of ONE (1) YEAR
since the date of original retail purchase, made by
the purchaser being the end user (“Warranty
period”). Within this warranty, the user can lay
claims to Macrix company, even in case where he
bought the Race Navigator product from another
seller than the Macrix company.
Consumer protection laws
Macrix’s one year warranty is a service provided
voluntarily by the manufacturer. The rights that
are the result of the Macrix’s one year warranty,
supplement (and do not substitute) the rights that
are the result of consumer law. If the product is
flawed, the consumers can choose if they want to
return the product to the service within the
Macrix’s one year warranty, or within the rights
that are the result of consumer law.
Important: Resolutions of the Macrix’s one year
warranty do not apply to claims resulting from
consumer laws. More information on the
consumer law can be obtained in the Office of
Competition and Consumer Protection.
OBJECT OF THE WARRANTY
MACRIX company’s RACE-NAVIGATOR, located at
Macrix Software GmbH’s address in
Korschenbroich in Germany, provides warranty for
the device and Race Navigator – branded products
and accessories, secured in original “Race
Navigator” packaging, including material and
quality flaws appearing during normal usage in
accordance to instructions published by MACRIX,
technical data and other instructions concerning
the Race Navigator product (see also: www.racenavigator.com). The warranty is in force for a
period of ONE (1) YEAR since the date of original
retail purchase, made by the purchaser being the
end user (“Warranty period”). Within this warranty,
the user can lay claims to Macrix company, even in
case where he bought the Race Navigator product
from another seller than the Macrix company.
Caution: any claims concerning the Macrix’s one
year warranty are subject to the resolutions of this
warranty.
Service options depend on the country, where the
service is supposed to be performed. Services for
the Race Navigator ONE can be limited to the
country where the device was purchased. Phone
charges and international shipping charges
depend on the country, where such services are
performed.

!
!
Warranty resolutions and detailed information on
the service are also available on the website:
www.race-navigator.com.
In case of reasonable warranty claims concerning
the Race Navigator, Macrix can fix the device,
replace it or reimburse the customer as the Macrix
company wishes.
The rights resulting from the Macrix’s warranty
are in force, except for the cases of rights resulting
from laws on consumers protection, enclosed in
the civil code.
If you file a warranty claim, you’ll need an
application with a proof of purchase.
WHAT IS COVERED BY THIS WARRANTY?
Macrix warrants the Race Navigator-branded
hardware product and accessories contained in
the original packaging (“Race Navigator”) against
defects in materials and workmanship when used
normally in accordance with Macrix’s published
guidelines for a period of ONE (1) YEAR from the
date of original retail purchase by the end-user
purchaser (“Warranty Period”). Macrix’s published
guidelines include but are not limited to
information contained in technical specifications,
user manuals and service communications.
WHAT IS NOT COVERED BY THIS
WARRANTY?
This warranty does not apply to any non-Race
Navigator branded hardware products or any
software, even if packaged or sold with Race
Navigator hardware. Manufacturers, suppliers, or
publishers, other than Race Navigator, may
provide their own warranties to you but Race
Navigator, in so far as permitted by law, provides
their products “AS IS”. Software distributed by
Macrix with or without the Race Navigator brand
(including, but not limited to system software) is
not covered by this warranty. Please refer to the
licensing agreement accompanying the software
for details of your rights with respect to its use.
Macrix does not warrant that the operation of the
Race Navigator Product will be uninterrupted or
error-free. Macrix is not responsible for damage
arising from failure to follow instructions relating
to the Race Navigator Product’s use.
USER’S RESPONSIBILITIES
IF SOFTWARE, DATA OR OTHER INFORMATION
CAN BE STORED IN A PRODUCT OWNED BY THE
USER, THEN FOR SECURITY MEASURES AND AS A
PROTECTION AGAINST POSSIBLE FAILURES, THE
USER SHOULD PERIODICALLY CREATE BACKUP
COPIES OF SUCH INFORMATION STORED ON THE
MACRIX PRODUCT’S DATA STORAGE.
Before submitting a Macrix product to warranty
repair, the user should create a backup copy of the
data stored on the data storing device, delete all
the personal data and disable all the security
passwords. During the repair, the contents of the
data storage of the Macrix product can be
removed, owerwritten or formatted.
After completing a warranty service, user’s Macrix
product, or a replacement product will be returned
to the user configured in the same way as it was
configured by being purchased by the user,
including proper updates. Within the warranty
service, Macrix can install software updates in the
Macrix product, that will make it impossible to
restore the previous version of the software. As a
result of such update, the third party software
installed in the Macrix product might not be
compatible with the Macrix product, or might not
work with the Macrix product. The responsibility of
reinstalling of all remaining software and restoring
the data and information lies on the user’s side.
This warranty does not include recovery of data or
information, or reinstalling software.
The user can submit the product for repair in a
country different than the country of purchase,
but the country needs to obey all necessary import
and export laws and pay all the custom duties,
VAT tax and all necessary taxes and charges.
CONSIDERATION OF WARRANTY CLAIMS
BY MACRIX
If during the Warranty Period you submit a valid
claim to Macrix, Macrix will, at its option,
(i) repair the Macrix Product using new or
previously used parts that are equivalent to new in
performance and reliability,
(ii) replace the Macrix Product with a product that
is at least functionally equivalent to the Macrix
Product and is formed from new and/or previously
used parts that are equivalent to new in
performance and reliability, or

!
!
(iii) exchange the Macrix Product for a refund of
your purchase price.
When a product or part is replaced or a refund
provided, any replacement item becomes your
property and the replaced or refunded item
becomes Macrix’s property.
A replacement part or product, or a repaired
Macrix product, assume the remaining warranty of
the Macrix Product or ninety (90) days from the
date of replacement or repair, whichever provides
longer coverage for you.
If the product is submitted in a country different
that the country of the Macrix product’s purchase,
the Macrix manufacturer can repair or replace
products or parts with comparable products or
parts, consistent with the standards of the
country.
HOW TO OBTAIN WARRANTY SERVICE
Please contact a Macrix representative or an
authorized Macrix service provider. They will help
determine whether your Macrix Product requires
service and, if it does, will inform you how Macrix
will provide it.
Before providing warranty services, Macrix or
Macrix representatives may require detailed
information from the user, including information
on a proof of purchase, answering questions
facilitating the diagnosis of possible issues, and
complying with Macrix’s procedure concerning
warranty services, for example acting according to
an instruction concerning packaging and shipping
Macrix products, in case of a carry-in service,
according to the description below.
In order to use the service and support based on
this Macrix warranty, the user does not have to
prove, that the issue was present on the day of
delivery, unless it’s inconsistent with the issue’s
character.
WARRANTY SERVICE OPTIONS
Macrix will provide warranty service as they wish
and depending on circumstances, especially
depending on the type of the Macrix product,
through one or more of the following options:
1) Mail-in service.
If Macrix determines that your Macrix Product is
eligible for mail-in service, Macrix will send you
prepaid waybills and if applicable, packaging
material, so that you may ship your Macrix
Product to Macrix. Once service is complete,
Macrix will return the Macrix Product to you.
Macrix will pay for shipping to and from your
location if all instructions are followed.
2) Do-it-yourself (DIY) parts service.
Within the DIY parts service, Macrix will provide
the user with spare product, parts or accessories,
such as external GPS antenna, 12V cable – car
adapter, that can be easily replaced without using
tools.
CAUTION: Macrix is not responsible for any labor
costs you incur relating to DIY parts service.
Should you require further assistance, contact
Macrix at the telephone number listed below.
Macrix reserves the right to change.
If DIY parts service is available in the
circumstances, the following process will apply:
(a) Service where Macrix requires return of the
replaced product or part.
Macrix may require a credit card authorization as
security for the retail price of the replacement
product , accessory or part and applicable shipping
costs. Macrix will ship a replacement product or
part to you with installation instructions, if
applicable, and any requirements for the return of
the replaced product or part. If you follow the
instructions, Macrix will cancel the credit card
authorization, so you will not be charged for the
product or part and shipping to and from your
location. If you fail to return the replaced product
or part as instructed or return a replaced product
or part that is ineligible for service, Macrix will
charge your credit card for the authorized amount.
If you are unable to provide credit card
authorization, DIY parts service may not be
available to you and Macrix will offer alternative
arrangements for service.
(b) Service where Macrix does not require return of
the replaced product or part. Macrix will ship you
free of charge a replacement product or part
accompanied by instructions on installation, if
applicable, and any requirements for the disposal
of the replaced product, accessory or part.
PRIVACY

!
!
Macrix will maintain customer information and use
it according to Macrix Customer Privacy Policy,
available at: www.race-navigator.com.
GENERAL
No Macrix reseller, agent, or employee is
authorized to make any modification, extension or
addition to this warranty.
If any term is held to be illegal or unenforceable,
the legality or enforceability of the remaining
terms shall not be affected or impaired.
This warranty is governed by and construed under
the laws of the country in which the Macrix
product purchase took place.
BATTERY
The lithium-ion battery in Race Navigator should
be replaced only by Macrix or a Macrix Authorized
Service Provider. The batteries should be recycled,
or utilized separate from the domestic waste.
For more information about recycling and battery
replacement services, go to:
www.race-navigator.com.
© 2014 Macrix: All right reserverd.
RaceNavigator ONE is a trademark of
Macrix company.
YOUR PERSONAL TRACK ASSISTANT
 Loading...