

Page 1

PYROLOGIC 2000 SYSTEM
User Manual
Page 2

Disclaimer
This documentation is provided for reference purposes only. While efforts were
made to verify the completeness and accuracy of the information contained in this
documentation, this documentation is provided "as is" without any warranty
whatsoever and to the maximum extent permitted. Pyrologic disclaims all implied
warranties, including without limitation the implied warranties of merchantability,
non-infringement and fitness for a particular purpose, with respect to the same,
Pyrologic shall not be responsible for any damages, including without limitation,
direct, indirect, consequential or incidental damages, arising out of the use of, or
otherwise related to, this documentation or any other documentation.
Notwithstanding anything to the contrary, nothing contained in this documentation or
any other documentation is intended to, nor shall have the effect of, creating any
warranties or representations from Pyrologic.
To the maximum extent permitted by applicable law, in no event shall Pyrologic be
liable for any damages whatsoever (including direct or indirect damages, loss of
business profits, lost savings or other special, incidental, exemplary or consequential
damages whether for breach of warranty, contract, strict liability, tort or otherwise)
arising out of or resulting from the use of or inability to use the products and/or the
enclosed written materials, even if Pyrologic have been advised of the possibility of
such damages or of any claim by any third party. In any event, any liability of
Pyrologic shall be limited to the purchase price of the product.
Warranty
Pyrologic warrants that the product will be free from defects in materials and
workmanship after the date of purchase, for the period of one (1) year. If Pyrologic
receives notice of such defects during the warranty period, Pyrologic will, at its
option, either repair or replace products which prove to be defective. Replacement
products may be either new or equivalent in performance to new.
Pyrologic does not warrant that the operation of Pyrologic products will be
uninterrupted or error free. If Pyrologic is unable, within a reasonable time, to repair
or replace any product to a condition as warranted, you will be entitled to a refund of
the purchase price upon prompt return of the product.
This warranty does not cover products that have been modified, refurbished,
remanufactured, misused, or tampered with in any way.
TO THE EXTENT ALLOWED BY LOCAL LAW, THE ABOVE WARRANTIES
ARE EXCLUSIVE AND NO OTHER WARRANTY OR CONDITION,
WHETHER WRITTEN OR ORAL, IS EXPRESSED OR IMPLIED AND
PYROLOGIC SPECIFICALLY DISCLAIMS ANY IMPLIED WARRANTIES OR
CONDITIONS OF MERCHANTABILITY, SATISFACTORY QUALITY, AND
FITNESS FOR A PARTICULAR PURPOSE.
b
Page 3

The FCC Wants You to Know
This equipment has been tested and found to comply with the limits for a Class B
digital device, pursuant to Part 15 of the FCC rules. These limits are designed to
provide reasonable protection against harmful interference in a residential
installation. This equipment generates, uses and can radiate radio frequency energy
and, if not installed and used in accordance with the instructions, may cause harmful
interference to radio communications. However, there is no guarantee that
interference will not occur in a particular installation. If this equipment does cause
harmful interference to radio or television reception, which can be determined by
turning the equipment off and on, the user is encouraged to try to correct the
interference by one or more of the following measures:
a) Reorient or relocate the receiving antenna.
b) Increase the separation between the equipment and receiver.
c) Connect the equipment to an outlet on a circuit different from that to which the
receiver is connected.
d) Consult the dealer or an experienced radio/TV technician.
FCC Warning
Modifications not expressly approved by the manufacturer could void the user
authority to operate the equipment under FCC Rules.
c
Page 4

Table of Contents
Introduction ................................................................................................................1
Foreword...................................................................................................................1
System Components Definition................................................................................1
General information..................................................................................................1
Basic System Characteristics....................................................................................2
Safety and Operational Instructions.........................................................................3
Getting started ............................................................................................................4
System Components .................................................................................................4
Terminal Unit .......................................................................................................4
Terminal Unit Master Key....................................................................................5
Base Unit ..............................................................................................................5
External PTT ........................................................................................................6
Extension Unit ......................................................................................................6
Remote Controlled Unit .......................................................................................7
Remote Controlled Unit- 16 .................................................................................7
Inserting Batteries.....................................................................................................8
System Layout ..........................................................................................................8
Starting-up the System..............................................................................................9
Navigating the System..............................................................................................9
System Overview ......................................................................................................11
Event Programming................................................................................................11
RCU Setting............................................................................................................12
Event Performing....................................................................................................12
Terminal Unit Menus ...............................................................................................13
Standby Screen .......................................................................................................13
Main Settings Menu Screen....................................................................................13
1. EVENTS CONTROL .........................................................................................14
1.1 SELECT EVENT .........................................................................................14
1.2 PROGRAM EVENT ....................................................................................14
1.3 CLEAR EVENT ...........................................................................................16
1.4 CHOOSE EVENT ........................................................................................16
2. ADD UNITS.......................................................................................................16
2.1 RCU X 1 .......................................................................................................17
d
Page 5

2.2 RCU X 16 .................................................................................................... 17
2.3 Test 1 SEC. .................................................................................................. 17
3. SET UNITS........................................................................................................ 18
3.1 SLEEP.......................................................................................................... 18
3.2 WAKEUP .................................................................................................... 18
3.3 SET ALARM TIME .................................................................................... 18
4. TU SETTINGS .................................................................................................. 19
4.1 INTENSITY................................................................................................. 19
4.2 CLOCK........................................................................................................ 19
4.3 BACKLIGHT .............................................................................................. 20
4.4 PASSWORDS ............................................................................................. 20
Operating the System .............................................................................................. 22
Programming an Event .......................................................................................... 22
Select Event Number ......................................................................................... 22
Program Event Modes ....................................................................................... 23
Setting the XU ....................................................................................................... 25
Setting the RCU devices ........................................................................................ 26
Add Units........................................................................................................... 26
Test RCUs.......................................................................................................... 27
Performing an Event .............................................................................................. 27
When operating with an XU: ............................................................................. 28
Preparations ....................................................................................................... 28
Set RCUs Sleep State and Alarm....................................................................... 28
Select Event Number and Mode ........................................................................ 29
Arm the System ................................................................................................. 30
Fire ..................................................................................................................... 31
Clearing An Event ................................................................................................. 33
Select Event Number and Mode ........................................................................ 33
Clear the Event................................................................................................... 33
Index.......................................................................................................................... 35
Quick Reference Guide ........................................................................................... 36
e
Page 6

Page 7

Introduction
Introduction
Foreword
Congratulations for purchasing the Pyrologic 2000 wireless fireworks shooting
system. We trust you will enjoy the unique features of this unparalleled system. The
following instructions will familiarize you with the features and operation of this
friendly system.
Thank you for choosing Pyrologic.
System Components Definition
• Terminal Unit (TU)
• Terminal Unit Master Key (MK)
• Base Unit (BU)
• Extension Unit (XU)
• External PTT (XPTT)
• Remote Controlled Unit (RCU)
• Remote Controlled Unit for controlling 16 extensions (RCU-16).
General information
Pyrologic 2000 is a wireless fireworks shooting system. Using a central remote
control Terminal Unit (TU), a multitude of Remote Controlled Units (RCUs) are
controlled by a coded Radio Frequency link in order to fire upon command a
firework electrically connected to each RCU of choice.
The TU, either hand-held or installed into a Base Unit (BU), must be operated at a
minimum height of 1.0 meter from ground. The RCU must be installed at a minimum
height of 0.6 meter from ground. Under such conditions the effective range between
the TU and any RCU is 65 meters.
By connecting an Extension Unit (XU) to the BU using a twisted pair 2 wire
telephone cable with RJ11-2/6 connectors, the RCUs are controlled by the TU via
the XU. The XU must be operated at a minimum height of 1.0 meter from ground.
The RCU must be installed at a minimum height of 0.6 meter from ground. Under
such conditions the effective range between the XU and any RCU is 65 meters.
1
Page 8

Introduction
Basic System Characteristics
The normal operating range of the Pyrologic-2000 system is 65 meters from TU to
RCU. This range can be extended by connecting an XU to a BU to which a TU is
mounted. When mounting TU to BU, an XPTT can be attached to the BU. The range
extension is in accordance to the length of the extension cable of the XU connecting
between the BU to the XU. The RCUs are assigned to the TU by individual
programming communicated through the one-way RF link between TU and RCU.
Subsequently the operation of the RCUs is controlled by the TU through a one-way
RF link between TU and RCU, or alternatively by a wired link between the BU onto
which the TU is mounted and the XU, continued by a one-way RF link between XU
and RCU.
The system operates at the 418 MHz frequency and has been designed to comply
with the applicable FCC regulations (pending approval).
2
Page 9

Safety and Operational Instructions
Safety and Operational Instructions
The operation of fireworks or pyrotechnics when using the Pyrologic 2000 system is
identical to operation using appropriate wiring instead of the RF command link. All
applicable laws and regulations regarding fireworks operation must be strictly
adhered.
When you purchase the system the RCUs are in generic state. The RCUs have to be
assigned to a specific TU Master Key according to the instructions detailed in this
manual.
When using the system for the first time and until you have learned to operate the
system correctly, please attach LEDs instead of squibs to the RCU squib connections
and otherwise operate the system according to the standard operation instructions, in
order to verify that you have mastered each and every detail of system operation.
Under no circumstances open or tamper the system components. Warranty will void
if any unauthorized attempt will be done to open or tamper system units.
Coping with External Transmission Disturbances: Pyrologic 2000 is a wireless
system that is designed according to the FCC regulations. Please check the system to
verify that there is no external interference. UNDER NO CIRCUMSTANCES THE
SYSTEM WILL FIRE WITHOUT OPERATOR COMMAND.
3
Page 10
Getting started
Getting started
System Components
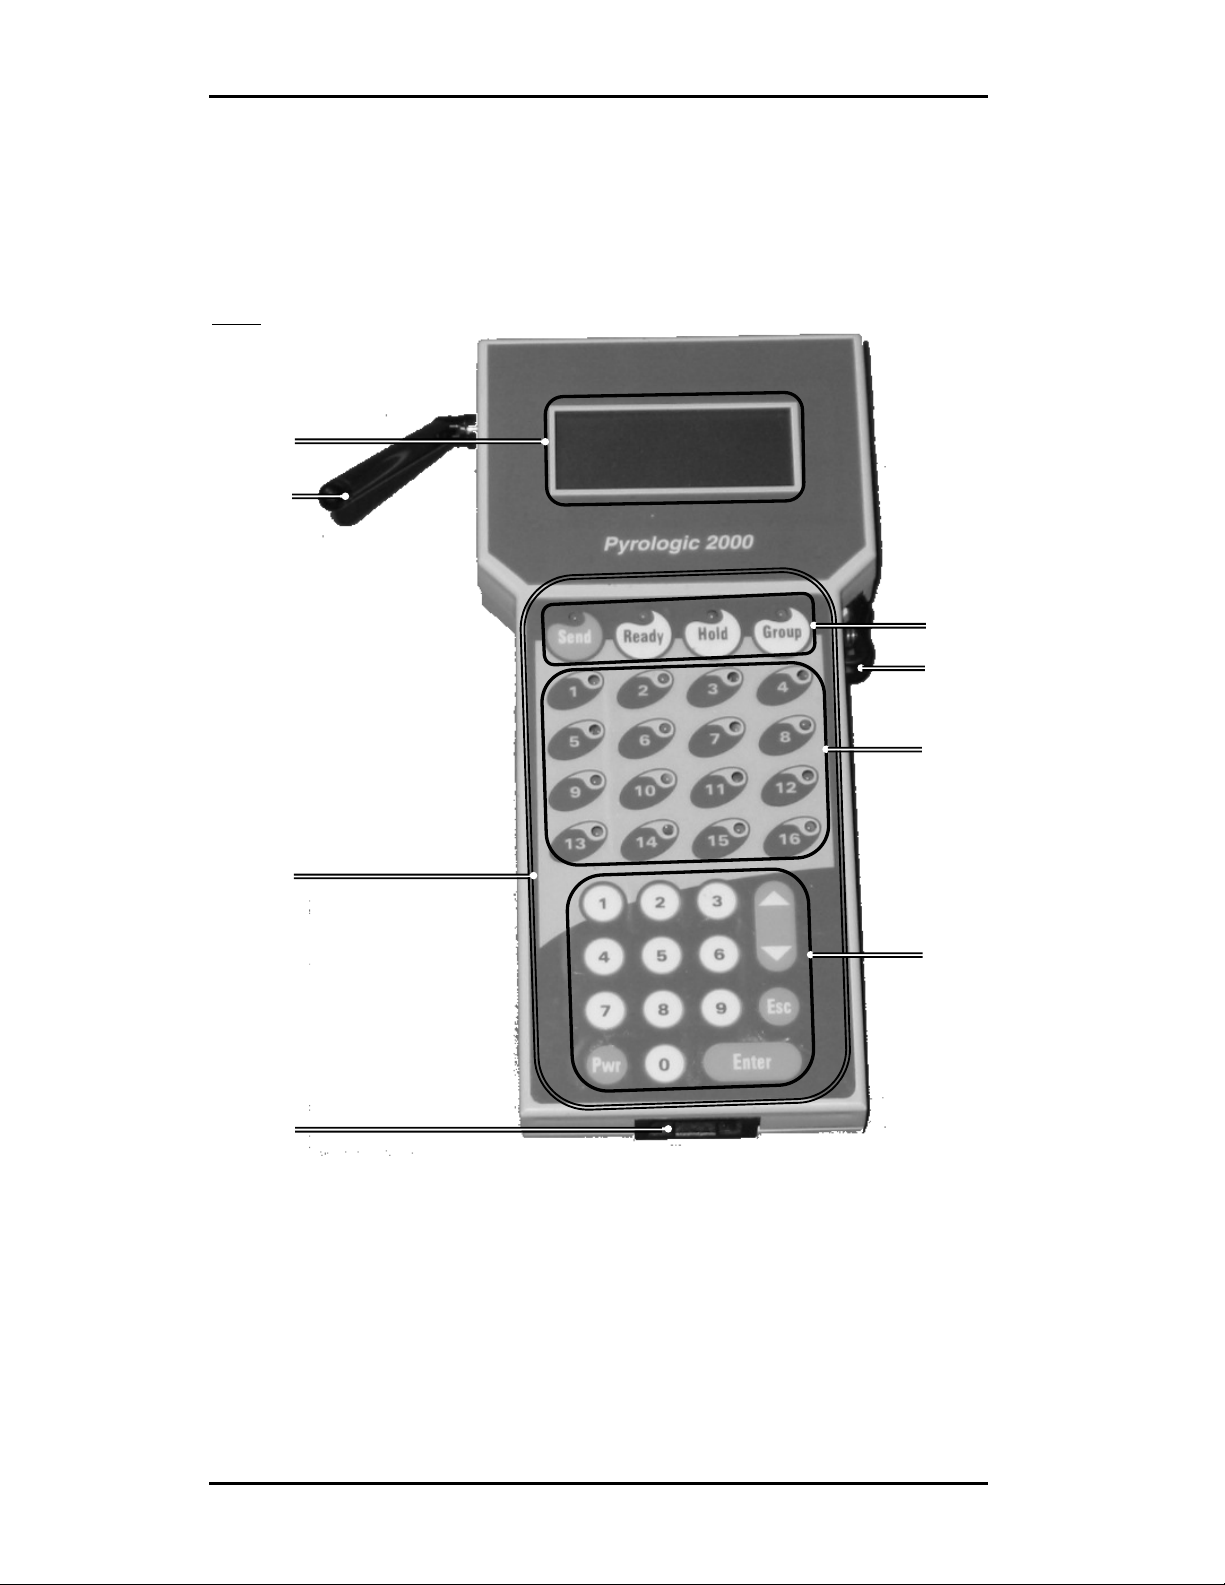
Terminal Unit
:
Front
d
c
h
e
i
g
j
f
c Foldable Antenna - used for wireless communication with the RCUs.
d Display -
e Terminal Unit PTT Switch - this switch must be pressed in order to transmit
from the TU to the RCUs, whether to activate or test them.
f Master Key Socket - here the Master Key, where all the information of the
programmed events is stored, is inserted. The Master Key is transferable between
TUs.
4
Page 11
Getting started
g Terminal Unit Panel - includes the Command keys (h), the Activation keys (i)
and the Programming keys (j).
h Command Keys with Command Key LEDs - these keys are used to perform the
firing.
i Activation Keys with Control LEDs - these keys indicate the RCUs status, i.e.,
if the RCU is programmed in a specified group and event, if it is ready to fire, or
if firing was performed. In manual mode, these keys are also used to fire an
individual RCU. These keys are not used for programming!
j Programming Keys - these keys are used to navigate and input values in the
system. They include: Numeric Keys, and Scrolling, Esc, Enter and Pwr keys).
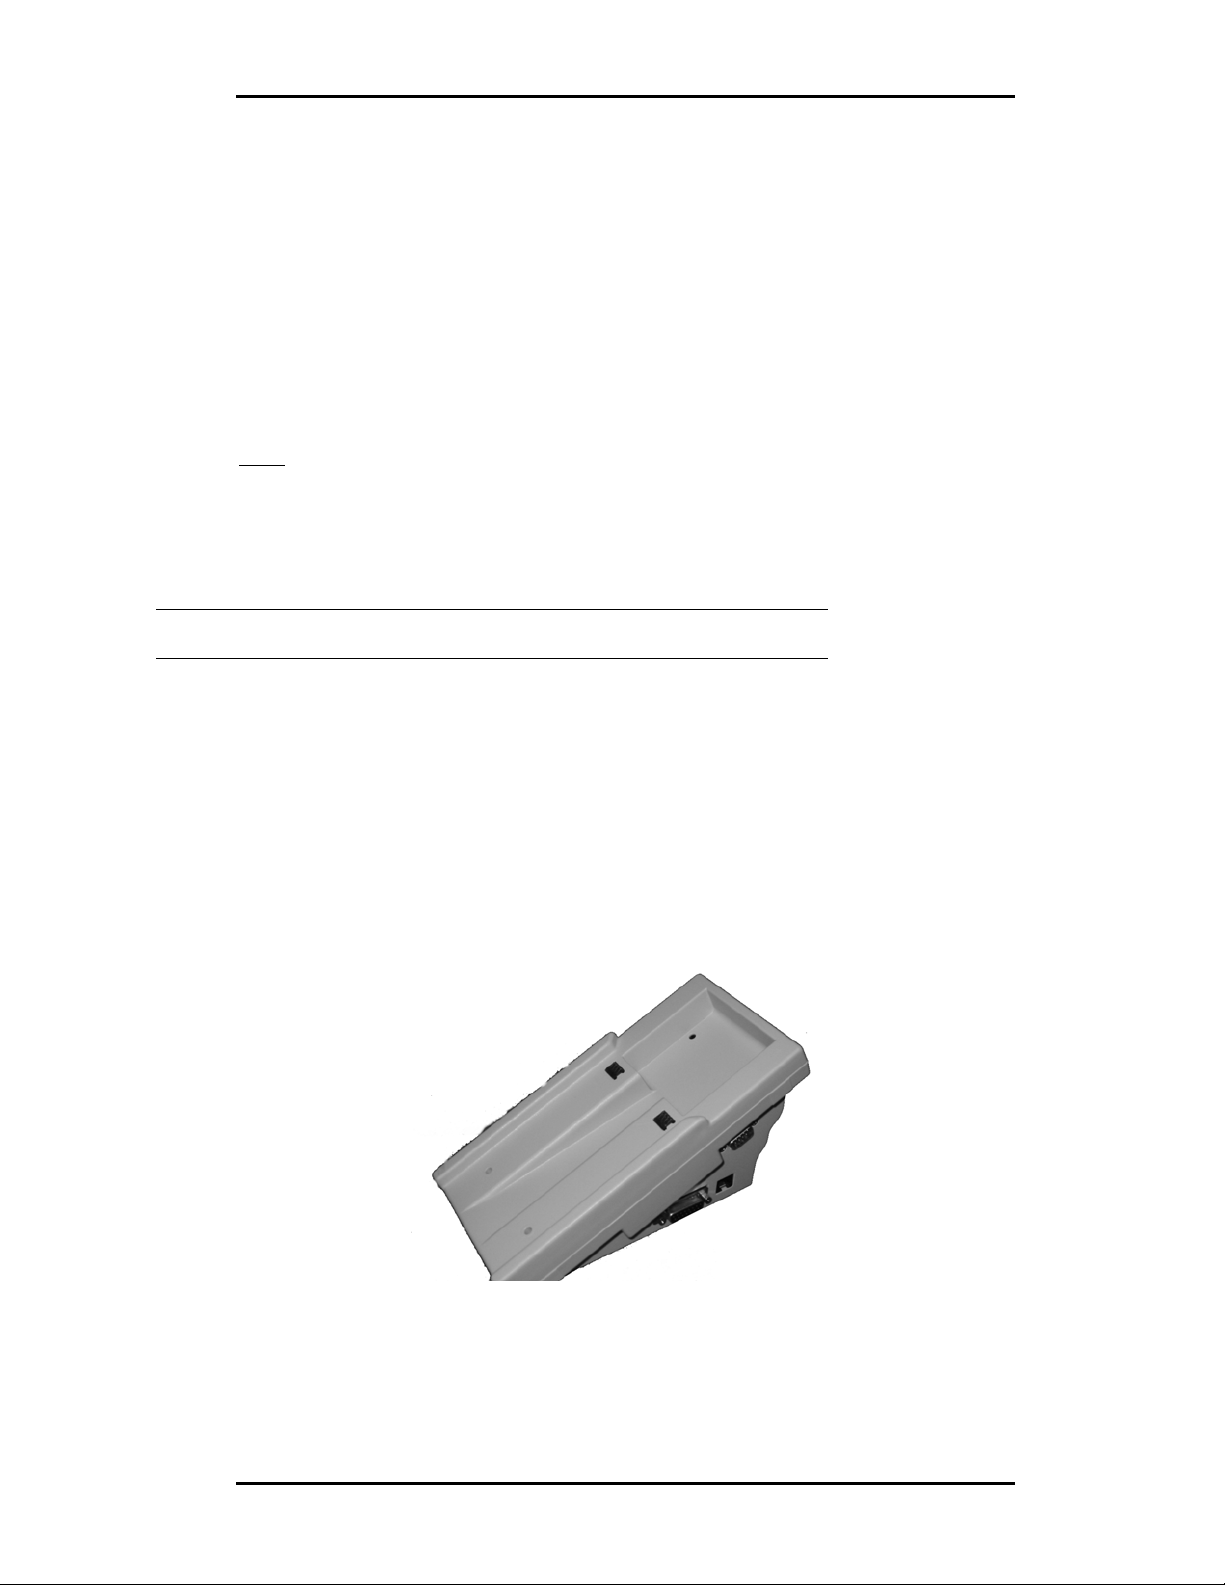
Back
:
z Base Unit Connector - used for communication between the TU and the Base
Unit.
The TU operates with four 1.5 Volt AA Alkaline batteries.
WARNING: Do not operate TU with rechargeable batteries.
The TU can operate as a stand-alone unit or in conjunction with the BU, XPTT and
optionally also XU and external power supply.
Terminal Unit Master Key
The Master Key is were all the information of the programmed events is stored. You
can transfer the Master Key between different TUs.
Base Unit
The base unit accommodates the terminal unit. The communication between the TU
and the Base Unit is through mating connectors on the back of the TU and on the top
of the BU. An external PTT is connectable to the side of the BU. External power can
be connected to the BU by a regulated AC-DC adaptor connected to 120VAC 60 Hz
input, providing to the BU its 7.5 VDC 500mA output.
5
Page 12
Getting started
Connecting an Extension Unit (XU) to the BU is done by using a twisted pair 2 wire
telephone cable with RJ11-2/6 connectors, connected to the telephone sockets in both
units.
Connecting an XPTT and an XU does not affect the function and operation
procedures as described below. In terms of functionality, the XPTT replaces the TU
PTT and the XU is an extension of the TU (transmission made through XU antenna
instead of TU antenna).
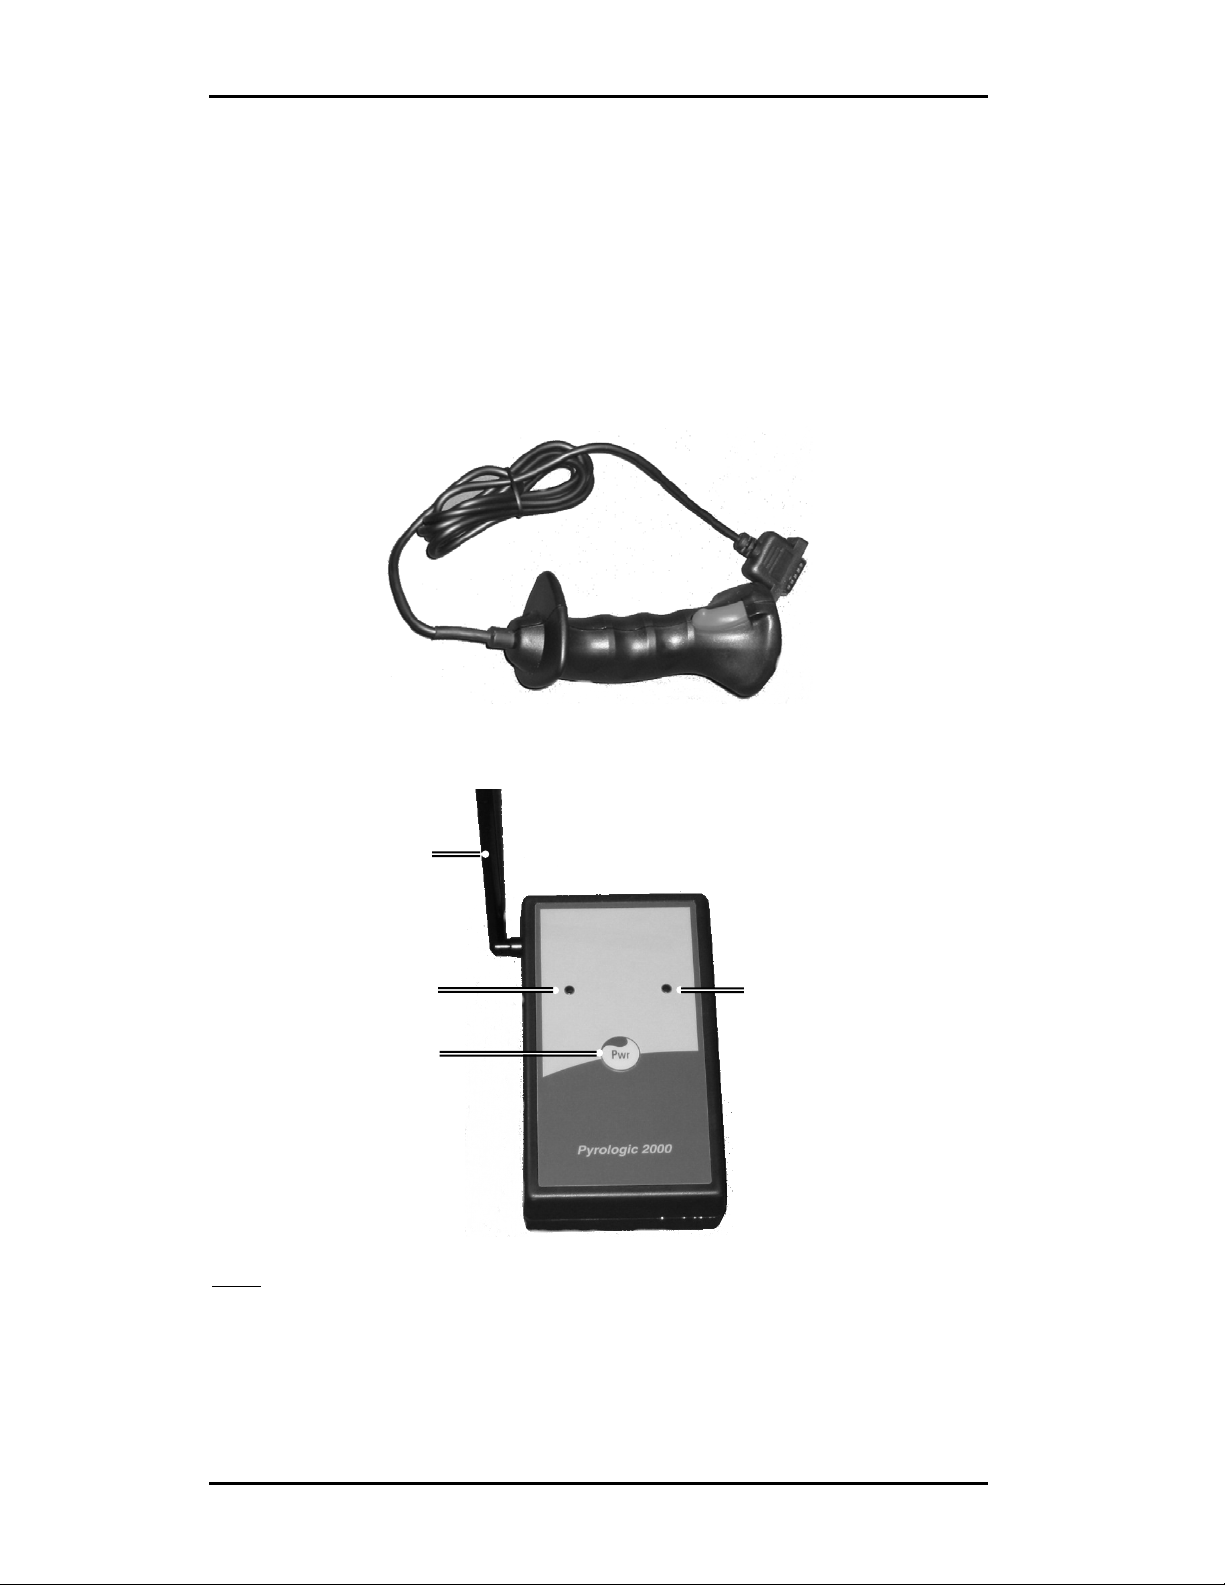
External PTT
The external PTT (XPTT) is a joy-stick connecting to the BU.
Extension Unit
c
d
e
f
Front
:
c Foldable Antenna - used for wireless communication with the RCU's.
d Green LED - together with the Red LED (f), used to indicate the XU state.
e Red LED - together with the Green LED (e), used to indicate the XU state.
f Power Key - used to switch the XU on or off.
6
Page 13
Getting started
Back:
z Battery Bay
z Battery - 9 Volt alkaline battery (Not Included)
When TU is installed onto BU and XU connected to BU, transmission will be done
through the XU antenna only and not through the TU antenna.
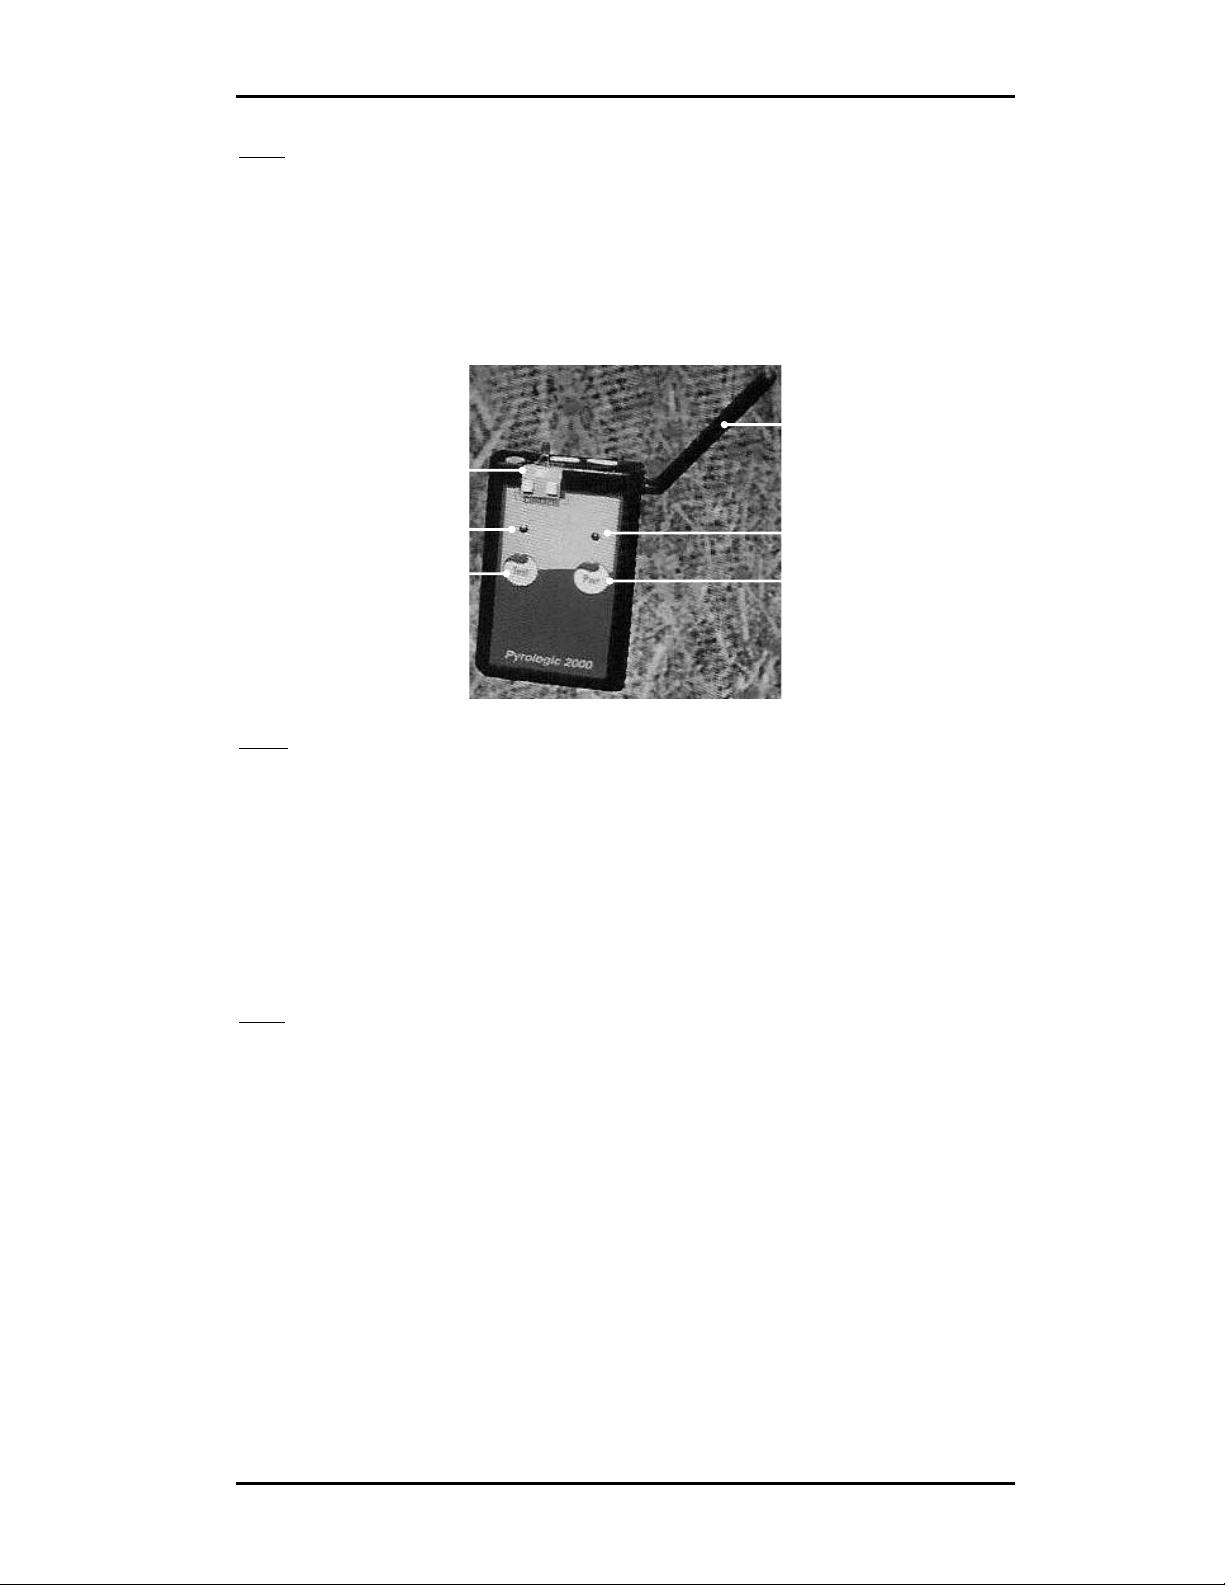
Remote Controlled Unit
d
c
e
g
Front
:
c Squib Contacts - are used to connect the squib to the RCU in order to operate it.
d Foldable Antenna - used for wireless communication with the TU.
e Green LED - together with the Red LED (f), used to indicate the RCU state.
f Red LED - together with the Green LED (e), used to indicate the RCU state.
g Test Key - used to test the RCU, and together with the Power key, to set the RCU.
h Power Key - used to switch the RCU on or off, and together with the Test key, to
set the RCU.
Back
:
z Battery Bay with transparent cover
z Battery - 9 Volt alkaline battery (Not Included)
z Transparent foldable leg
f
h
Remote Controlled Unit- 16
The Remote Control Unit - 16 includes the following elements:
z Front Panel with Green LED and Red LED and Test and Power Keys
z 16 Squib Contacts
z Foldable Antenna
z Battery Bay with transparent cover
z Battery (9 Volt alkaline battery - Not Included)
z Transparent foldable leg
7
Page 14

Getting started
Inserting Batteries
Insert batteries in the TU, in the XU and in the RCUs:
TU: Using screwdriver, open master screw to release cover. Insert 4 x 1.5 Volt AA
Alkaline batteries. Re-install cover and tighten master screw using screw-driver.
XU: Open battery cover. Insert 9 Volt alkaline battery. Re-install battery cover.
RCU: Open transparent battery cover. Insert 9 Volt alkaline battery. Re-install
transparent battery cover.
DO NOT USE RECHARGEABLE BATTERIES!
System Layout
Cable
7.5 VDC
500 mA
TU
AC-DC
Adapter
Base Unit
Extension Unit
RCU RCU RCU
Power Supply
110 VAC
60 Hz
X PTT
8
Page 15

Getting started
Starting-up the System
1. Insert Master Key into the TU.
2. Press the Pwr key on the TU. The standby screen will be displayed and
the Command key LEDs will blink as follows:
Key LED Color
Send Red
Ready Green
Hold Red
Group Green
3. Press Esc. You will be prompted to enter the password:
ENTER PASSWORD
________
Note: The factory default setting for Low level password is
00000000 and for High level password is 11111111. For further
details about passwords, see page 20.
4. Enter the password and press Enter. The main settings menu will be
displayed:
1.EVENTS CONTROL
2.ADD UNITS
3.SET UNITS
4.TU SETTINGS
19:01:57
EVENT:1 GROUP:1
MODE: MANUAL
The system is ready for operation.
Navigating the System
To select a menu item, you can use either the Numeric Keypad or the Scrolling Key.
On the Numeric Keypad, press the number that corresponds to the menu item
number. Or, scroll down or up using the Scrolling Key until the desired menu item
number is highlighted and then press Enter.
To input a value in an entry, you can use either the Numeric Keypad or the
Scrolling Key. On the Numeric Keypad, press the desired number, or use the
Scrolling Key to raise/lower or change the current value. Press Enter to move to the
next entry or Esc to move to the previous entry (if you are in the first entry, pressing
Esc will return you to the previous screen).
9
Page 16

Getting started
When the TU is in the main settings menu screen or the standby screen, pressing Esc
toggles between the two screens.
Main Settings Menu Screen
1.EVENTS CONTROL
2.ADD UNITS
3.SET UNITS
4.TU SETTINGS
Standby Screen
19:01:57
EVENT:1 GROUP:1
MODE: MANUAL
In any other menu screen, pressing Esc will return you to the previous screen.
10
Page 17

System Overview
System Overview
Working with the system consists of three steps:
• Programming an event
• Setting the RCU devices
• Performing an event
The first two steps are independent of each other. You can program an event and
than set the RCU devices, or vice versa. Of course, you have to complete the first
two steps before you can do the third.
Event Programming
You can program in the system up-to 8 events. Each event you can program in three
different modes: manual, semi-automatic or automatic. This means that you can
actually program 24 events – 8 events x 3 modes.
For each event number and mode you can assign up-to 8 groups of 16 Activation
keys, which makes total of 128 Activation keys. Each Activation key can activate
one RCU device or more. In the Terminal Unit (TU) screens, an Activation key is
referred as RCU.
In manual mode, you activate the desired RCU device by selecting the appropriate
group number and pressing the appropriate Activation key.
In semi-automatic mode, each RCU device is activated in the programmed sequence
every time you press the Send key. In this mode, you can also activate an RCU
device manually by selecting the appropriate group number and pressing the
appropriate Activation key.
In automatic mode, each RCU device is activated in the programmed sequence and
timing. In this mode you cannot activate the RCUs manually.
To clear an event, you can use the CLEAR EVENT option on the EVENTS
CONTROL screen.
Note: In order to program or clear an event, you have to log
into the system with High level password. The factory default setting
for High level password is 11111111.
All the events data is stored in the Master Key. After programming all the desired
events, you can transfer the Mater Key to another TU and perform the event from
this TU.
For detailed instructions on programming events, see "Programming an Event" on
page 22.
11
Page 18

System Overview
RCU Setting
Each RCU device has a unique ID which consists of an RCU (Activation key)
number and a GROUP number. The RCU device will be activated by that, and only
by that, combination of RCU number and group numbers, which were programmed
in a specific Master Key.
Note: An RCU device will not
group numbers that were programmed in another Master Key.
You can, though, set more than one RCU device to the same RCU and group
number. In that case, those RCU devices will be activated simultaneously.
For detailed instructions on setting RCU devices, see "Setting the RCU devices" on
page 26.
be activated by the same RCU and
Event Performing
After programming an event (or events) and setting and testing the RCUs, you can
position the RCUs and connect the fireworks or pyrotechnics.
If there is time left until the event, you can set the TU to go off and turn back on at a
desired time, using the SET ALARM TIME option under SET UNITS. You can
also put the RCUs in Sleep mode and wake them up when the time comes. This way
you can extend batteries life.
To start an event, you have to select first the desired event number and mode that you
programmed.
The event is controlled using the Command and Activation keys on the TU panel. A
ready Activation key is indicated by green LED. Any RCU device that was activated,
will be shut down automatically. On the TU, the Activation key LED of any
activated device will turn from green to red.
Note: You must press the PTT in order to transmit from the TU to the
RCUs, whether to activate or test them.
WARNING
When the system is in armed state, pressing the PTT and the Send key or an
active Activation key (depending on the event mode) will cause the system to
fire.
For detailed instructions on performing an event, see "Performing an Event" on page
27.
12
Page 19

Terminal Unit Menus
Terminal Unit Menus
This section describes the functionality, items, and options of all the menus in the
Terminal Unit (TU).
If the TU is turned off, start-up the system as follows:
1. Press the Pwr key on the TU. The standby screen will be displayed.
2. Press Esc. You will be prompted to enter the password.
3. Enter the password and press Enter. The main settings menu will be
displayed.
The system is ready for operation.
Note: For detailed description of the start-up procedure, see
"Starting-up the System" on page 8.
Standby Screen
19:01:57
EVENT:1 GROUP:1
MODE: MANUAL
Menu Options:
EVENT: 1 to 8
GROUP: 1 to 8
MODE: MANUAL, S-
AUTO, AUTO
From this screen, you can start the firing procedure. The EVENT and MODE displayed
on the screen depend on the selections you made in the SELECT EVENT and
CHOOSE EVENT screens. For details, see "Select Event Number and Mode" on page
29.
Pressing Esc toggles between this screen and the main settings menu screen.
Main Settings Menu Screen
1.EVENTS CONTROL
2.ADD UNITS
3.SET UNITS
4.TU SETTINGS
From this screen, you can access all the menus and functions of the system for
programming and setting events, adding and setting RCUs, and setting the system
environment such as passwords, display brightness, clock etc.
Pressing Esc toggles between this screen and the standby screen.
13
Page 20

Terminal Unit Menus
1. EVENTS CONTROL
On the main settings menu, select EVENTS CONTROL to display the EVENTS
CONTROL screen:
1.SELECT EVENT
2.PROGRAM EVENT
3.CLEAR EVENT
4.CHOOSE EVENT
From this screen you can select, program, clear and choose events.
All the event information is stored in the Master Key, which is transferable between
Terminal Units.
1.1 SELECT EVENT
On the EVENTS CONTROL screen, select SELECT EVENT to display the SELECT
EVENT screen:
SELECT EVENT
Choose event
from 1 to 8
1
Menu Options:
1 to 8
In this screen you can select the active event number (1 to 8) for programming,
firing, or clearing. For each event you can program or choose Manual and/or Semiautomatic and/or Automatic mode.
1.2 PROGRAM EVENT
On the EVENTS CONTROL screen, select PROGRAM EVENT. If you logged into the
system with Low level password, you will be prompted to enter the High level
password.
Note: The factory default setting for High level password is
11111111.
After entering high level password, the following screen will be displayed:
1.PROGRAM AUTO
2.PROGRAM S-AUTO
3.PROGRAM MANUAL
14
Page 21

Terminal Unit Menus
In this screen you can select and set the event mode for the active event number you
chose on the SELECT EVENT screen. For each event you can program Manual
and/or Semi-automatic and/or Automatic mode.
1.2.1 PROGRAM AUTO
On the PROGRAM EVENT screen, select PROGRAM AUTO to display the PROGRAM
AUTO screen:
GROUP 1 RCU 01 +
OLD NEW
00 -Min- 00
00.0 -Sec- 01.0
Menu Options:
GROUP: 1 to 8
RCU: 01 to 16
Present: + or –
Min: 00 to 99
In this screen, you can set the firing time of each RCU in a group, in minutes,
seconds and tens of seconds. If it was programmed before, the old values are
displayed under OLD for reference.
Note that in order for the RCU to function, it has to be set to +; otherwise it will not
fire. When set as present (+), the appropriate Command Key LED goes on green.
1.2.2 PROGRAM S-AUTO
On the PROGRAM EVENT screen, select PROGRAM S-AUTO to open the S-AUTO
screen:
GROUP 1
RCU 01
PRESENT +
NUMBER 01
Menu Options:
GROUP: 1 to 8
RCU: 01 to 16
PRESENT: + or –
NUMBER: 1 to 128
In this screen, you can set the order of activation of each RCU in a group.
Note that in order for the RCU to function, it has to be set to +; otherwise it will not
fire. When set as present (+), the appropriate Command Key LED goes on green.
1.2.3 PROGRAM MANUAL
On the PROGRAM EVENT screen, select PROGRAM MANUAL to open the PROGRAM
MANUAL screen:
GROUP 1
RCU 01
PRESENT +
Menu Options:
GROUP: 1 to 8
RCU: 01 to 16
PRESENT: + or –
In this screen, you can set the RCUs that will be fired manually.
15
Page 22

Terminal Unit Menus
Note that in order for the RCU to function, it has to be set to +; otherwise it will not
fire. When set as present (+), the appropriate Command Key LED goes on green.
1.3 CLEAR EVENT
On the EVENTS CONTROL screen, select CLEAR EVENT. If you logged into the
system with Low Level password, you will be prompted to enter the High Level
password.
Note: The factory default setting for High Level Password is
11111111.
After entering high level password, the following screen will be displayed:
Event: 1 MANUAL
ENTER - to clear
ESC - to cancel
Menu Options:
EVENT: 1 to 8
MANUAL, S-AUTO,
AUTO
In this screen you can clear the active event number and mode. The EVENT number
(1-8) and mode (MANUAL, S-AUTO, AUTO) displayed on the screen depend on
the selections you made in the SELECT EVENT and CHOOSE EVENT screens. For
details, see "Select Event Number and Mode" on page 29.
1.4 CHOOSE EVENT
On the EVENTS CONTROL screen, select CHOOSE EVENT to display the CHOOSE
EVENT screen:
1.AUTO
2.S-AUTO
3.MANUAL
In this screen you can select the active event mode (AUTO, S-AUTO or AUTO) for
programming, firing, or clearing. For each event you can program or choose Manual
and/or Semi-automatic and/or Automatic mode.
2. ADD UNITS
On the main settings menu, select ADD UNITS to display the ADD UNITS screen:
1.RCU x 1
2.RCU x 16
3.TEST 1 SEC.
16
Page 23

Terminal Unit Menus
In this screen you can assign an address (group number and RCU number) to each
RCU and also check the communication between the TU and RCUs.
2.1 RCU X 1
On the ADD UNITS screen, select RCU X 1 to display the RCU X 1 screen:
GROUP 1 RCU 01
Menu Options:
GROUP: 1 to 8
RCU: 01 to 16
In this screen, you can assign to each RCU device a GROUP number and an RCU
number. For details, see "Setting the RCU devices" on page 26.
2.2 RCU X 16
On the ADD UNITS screen, select RCU X 16 to display the RCU X 16 screen:
GROUP 1
METHOD:
ALL TOGETHER
Menu Options:
GROUP: 1 to 8
METHOD:
ALL TOGETHER or
ONE BY ONE
In this screen, you can assign to each RCU X 16 device a GROUP number and an
RCU number. The RCU X 16 works as 16 different RCUs in one group.
Further details will be given in a separate manual.
2.3 Test 1 SEC.
On the ADD UNITS screen, select TEST 1 SEC. to display the TEST 1 SEC.
screen:
ONE SECOND TEST
Hit ESC to exit
In this screen, you can test the communication between the TU and the RCUs. For
details see "Test RCUs" on page 27.
17
Page 24

Terminal Unit Menus
3. SET UNITS
On the main settings menu, select SET UNITS to open the SET UNITS screen:
1.SLEEP
2.WAKEUP
3.SET ALARM TIME
In this screen, you can put the RCUs to "sleep", wake them up and set an alarm. For
details, see "Set RCUs Sleep State and Alarm" on page 28.
3.1 SLEEP
On the SET UNITS screen, select SLEEP to display the SLEEP screen:
RCUs to sleep
ENTER active
ESC Exit
In this screen, you can extend batteries life by putting the RCUs into Sleep mode.
3.2 WAKEUP
On the SET UNITS screen, select WAKEUP to display the WAKEUP screen:
Wake up RCUs
ENTER active
ESC Exit
In this screen, you can wake up the RCUs if you put them in Sleep mode.
3.3 SET ALARM TIME
On the SET UNITS screen, select SET ALARM TIME to display the SET ALARM
TIME screen:
Set Alarm
-Hours- -Min 20 12
Alarm Off
Menu Options:
Hours: 00 to 23
Min: 00 to 59
Alarm: On/Off
18
Page 25

Terminal Unit Menus
In this screen, you can set the TU to go off and turn back on at a desired time. When
the TU turns back on, it sends a wakeup command to the RCUs. The RCUs will go
into Standby state, with the red LED blinking.
Note: Before setting the alarm, make sure the system clock is set
properly. For details about setting the system clock, see page 19.
4. TU SETTINGS
On the main settings menu, select TU SETTINGS to display the TU SETTINGS
screen:
1. INTENSITY
2. CLOCK
3. BACKLIGHT
4. PASSWORDS
From this screen you can define TU preferences and settings such as display
intensity, backlight activation, clock setup and passwords.
4.1 INTENSITY
From the TU SETTINGS screen, select INTENSITY to display the INTENSITY
screen:
Choose Level
From 1 to 9
1
Menu Options:
1 to 9
In this screen, you can set the display intensity. Select the desired intensity level
between 1 to 9 and press Enter.
4.2 CLOCK
From the TU SETTINGS screen, select CLOCK to display the SET CLOCK screen:
SET CLOCK
-Hours- -Min-
18 44
Menu Options:
Hours: 00 to 23
Min: 00 to 59
In this screen, you can set the time. Setting the time is particularly important when
setting the alarm.
19
Page 26

Terminal Unit Menus
4.3 BACKLIGHT
From the TU SETTINGS screen, select BACKLIGHT to display the BACKLIGHT
screen:
1.OFF
2.ON PTT OR KEY
3.ALLWAYS
In this screen, you can set when the backlight will be activated.
4.4 PASSWORDS
The system has two levels of passwords, High and Low. The High level password
allows you to access all the menus. With the Low level password you cannot access
the PROGRAM EVENT and the CLEAR EVENT screens.
From the TU SETTINGS screen, select PASSWORDS to display the PASSWORDS
screen:
1.HIGH
2.LOW
In this screen, you can select which password to set, High or Low.
4.4.1 HIGH
From the PASSWORDS screen, select HIGH to display the HIGH PASSWORD
screen:
HIGH PASSWORD
OLD 11111111
NEW ________
In this screen you can set the High level password. The factory default setting for
High level password is 11111111.
4.4.2 LOW
From the PASSWORDS screen, select LOW to display the LOW PASSWORD screen:
LOW PASSWORD
OLD 00000000
NEW ________
20
Page 27

Terminal Unit Menus
In this screen you can set the Low level password. The factory default setting for
Low level password is 00000000. Note that with Low level password you cannot
access the PROGRAM EVENT and the CLEAR EVENT screens.
21
Page 28

Operating the System
Operating the System
Note: Before operating the system, make sure the TU and
RCUs have batteries. For details, see page 8.
If the TU is turned off, start-up the system as follows:
1. Press the Pwr key on the TU. The standby screen will be displayed.
2. Press Esc. You will be prompted to enter the password.
3. Enter the password and press Enter. The main settings menu will be
displayed.
The system is ready for operation.
Note: For detailed description of the start-up procedure, see
"Starting-up the System" on page 8.
Programming an Event
Note: For details about navigating, selecting options and
entering values, see "Navigating the System" on page 9.
Select Event Number
The first step in programming an event is selecting the active event number. This will
be the event number that you will program. There are 8 events available.
1. In the main settings menu, select EVENTS CONTROL. The EVENTS
CONTROL screen will be displayed:
1.SELECT EVENT
2.PROGRAM EVENT
3.CLEAR EVENT
4.CHOOSE EVENT
2. Select SELECT EVENT. The SELECT EVENT screen will be
displayed:
SELECT EVENT
Choose event
From 1 to 8
1
22
Page 29

Operating the System
3. Select an event number (from 1 to 8), and press Enter. The EVENTS
CONTROL screen will be displayed again.
Program Event Modes
After selecting the event number to program, you have to select which of the three
different modes you want to program for the event: manual, semi-automatic or
automatic.
1. Select PROGRAM EVENT.
Note: If you logged into the system with Low Level
password, you will be prompted to enter the High Level password.
The factory default setting for High level password is 11111111. For
further details about passwords, see page 20.
The PROGRAM EVENT screen will be displayed:
1.PROGRAM AUTO
2.PROGRAM S-AUTO
3.PROGRAM MANUAL
2. Select the desired mode you want to program and follow the instructions
below according to your selection.
IMPORTANT: Note that there is no correlation between the events with the same
number belonging to different modes. For example, you might choose to program
RCUs 1, 3, 5 and 8 in Group 1 in Event 1 in Manual mode; RCUs 4, 12 and 15 in
Group 1 in Event 1 in Semi-Automatic mode; and RCUs 4-13, 15 and 16 in Group 1
in Event 1 in Automatic Mode. When performing an event, the TU will send firing
commands only to the RCUs which have been programmed for the specific event.
1. PROGRAM AUTO
If you want to program the automatic mode, select PROGRAM AUTO in the
PROGRAM EVENT screen. The following screen will be displayed:
GROUP 1 RCU 01 +
OLD NEW
00 -MIN- 00
00.0 -SEC- 00.0
Options:
GROUP: 1 to 8
RCU: 01 to 16
PRESENT: + or –
Min: 0 to 99
1. Select the GROUP number, between 1 to 8, and press Enter to move to
the next entry.
23
Page 30

Operating the System
N
2. Select the RCU number, between 1 to 16, and press Enter to move to the
next entry.
3. Select + using the Scroll key. The corresponding Activation key will
blink green. Press Enter to move to the next entry.
4. Set the minutes and press Enter to move to the next entry.
5. Set the seconds and press Enter to move to the next entry.
6. Set the tens of seconds (in intervals of 2) and press Enter. The system
will increment the RCU number by one and will be ready to start programming
the next RCU.
Note: Under OLD, you can see the previously programmed values for
the minutes and the seconds.
When you are done programming all the desired RCUs in that mode, press Esc to
return to the PROGRAM EVENT screen. Now you can program another event mode,
or press Esc again to return to the EVENTS CONTROL screen.
2. PROGRAM S-AUTO
If you want to program the semi-automatic mode, select PROGRAM S-AUTO in the
PROGRAM EVENT screen. The following screen will be displayed:
GROUP 1
RCU 01
PRESENT +
NUMBER 01
Options:
GROUP: 1 to 8
RCU: 01 to 16
PRESENT: + or –
umber: 1 to 128
1. Select the GROUP number, between 1 to 8, and press Enter to move to
the next entry.
2. Select the RCU number, between 1 to 16, and press Enter to move to the
next entry.
3. Select + using the Scroll key. The corresponding Activation key will
blink green. Press Enter to move to the next entry.
4. For NUMBER select a value, between 1 and 128, for the order of
activation in the semi-automatic sequence, and press Enter. The system will
increment the RCU number by one and will be ready to start programming the
next RCU.
When you are done programming all the desired RCUs in that mode, press Esc to
return to the PROGRAM EVENT screen. Now you can program another event mode,
or press Esc again to return to the EVENTS CONTROL screen.
24
Page 31

Operating the System
3. PROGRAM MANUAL
If you want to program the manual mode, select PROGRAM MANUAL in the
PROGRAM EVENT screen. The following screen will be displayed:
GROUP 1
RCU 01
PRESENT +
Options:
GROUP: 1 to 8
RCU: 01 to 16
PRESENT: + or –
1. Select the GROUP number, between 1 to 8, and press Enter to move to
the next entry.
2. Select the RCU number, between 1 to 16, and press Enter to move to the
next entry.
3. Select + using the Scroll key. The corresponding Activation key will
blink green. Press Enter. The system will increment the RCU number by one
and will be ready to start programming the next RCU.
When you are done programming all the desired RCUs in that mode, press Esc to
return to the PROGRAM EVENT screen. Now you can program another event mode,
or press Esc again to return to the EVENTS CONTROL screen.
Setting the XU
Place XU on tripod normally 60 cm above ground, with its front/rear sides in vertical
position, laying on the longer side, with the antenna in upright position.
Press lengthily the Pwr key on the XU. For two seconds you will get one of the
following: green LED will light indicating that battery is OK or if battery is weak
green and red LED's will light, or red LED will light will indicate that you must
replace battery. After replacing battery if necessary, press Pwr key again and repeat
procedure.
Green and red LED's will blink for 3 seconds. This indicates that the XU is in
STANBY state.
During XU operation
The greed LED will blink every 4 seconds. (If there is no communication the red
LED will blink instead the green LED). During XU transmission the red LED will
blink.
XU self-test
:
Press XU Pwr key shortly. The XU will conduct a self test and if XU is in proper
condition the two LED's will light for a shoet time.
For turning XU off, press and hold the Pwr key and wait until the two LED's go on
permanently, then release the Pwr key
:
25
Page 32

Operating the System
Setting the RCU devices
If the TU is turned off, start-up the system as follows:
1. Press the Pwr key on the TU. The standby screen will be displayed.
2. Press Esc. You will be prompted to enter the password.
3. Enter the password and press Enter. The main settings menu will be
displayed.
The system is ready for operation.
Note: For detailed description of the start-up procedure, see
"Starting-up the System" on page 8.
Add Units
To set an RCU device, first you have to select the group and RCU (Activation key)
number in the TU.
1. In the main settings menu screen on the TU, select ADD UNITS. The
following screen will be displayed:
1.RCU x 1
2.RCU x 16
3.TEST 1 SEC.
2. Select RCU X 1. The following screen will be displayed:
GROUP 1 RCU 01
Options:
GROUP: 1 to 8
RCU: 01 to 16
3. Select the GROUP number, between 1-8, and press Enter.
4. Select the RCU number, between 1 and 16 (do not
press Enter yet).
Note: On the RCU device, make sure a 9 volt battery is
installed and that the POWER IS OFF.
5. On the RCU device, press and hold the Test key and press the Pwr key.
First, the Green LED will go on, then the Red LED will go on and then both
LEDs will blink intermittently, indicating that the RCU is in programming
mode.
6. On the TU, press Enter. Both RCU LEDs will blink together for 1
second, and than the RCU device power will go off. The RCU address has been
set.
26
Page 33

Operating the System
7. Write down the address and insert it into RCU battery bay, visible
through transparent cover.
Repeat this procedure for each of the RCUs.
Test RCUs
In order to check proper communication between the TU and the RCUs, and that all
the RCUs are operating properly, perform a test procedure.
1. Place each RCU device in position, normally 60 cm above ground for
full range.
2. Press the Pwr key on the RCU – green LED will light indicating that
battery is OK. (In case that red light is on at Power On, replace battery, press
Pwr key again and repeat procedure). Green LED will go off automatically.
Red light will blink. This indicates that the RCU is in STANBY state.
3. Go to the main settings menu screen in the TU.
4. Select ADD UNIT. The following screen will be displayed:
1.RCU x 1
2.RCU x 16
3.TEST 1 SEC.
5. Select Test 1 SEC..
6. Leave TU in place and check each individual RCU. When Red and
Green LEDs are blinking together, it indicates that there is communication
between the TU and the RCU.
7. After checking that the communication between the TU and RCUs is
OK, go to the TU and press Esc. RCUs will be in STANDBY state with red
light blinking.
Performing an Event
If the TU is turned off, start-up the system as follows:
1. Press the Pwr key on the TU. The standby screen will be displayed.
2. Press Esc. You will be prompted to enter the password.
3. Enter the password and press Enter. The main settings menu will be
displayed.
The system is ready for operation.
Note: For detailed description of the start-up procedure, see "Starting-
up the System" on page 8.
27
Page 34

Operating the System
When operating with an XU:
For System layout see "System Layout" on page 8.
Place XU on tripod normally 60 cm above ground, with its front/rear sides in vertical
position, laying on the longer side, with the antenna in upright position.
Press lengthily the Pwr key on the XU. For two seconds you will get one of the
following: green LED will light indicating that battery is OK or if battery is weak
green and red LED's will light, or red LED will light will indicate that you must
replace battery. After replacing battery if necessary, press Pwr key again and repeat
procedure.
Green and red LED's will blink for 3 seconds. This indicates that the XU is in
STANBY state.
During XU operation
:
The greed LED will blink every 4 seconds. (If there is no communication the red
LED will blink instead the green LED). During XU transmission the red LED will
blink.
XU self-test
:
Press XU Pwr key shortly. The XU will conduct a self test and if XU is in proper
condition the two LED's will light for a shoet time.
For turning XU off, press and hold the Pwr key and wait until the two LED's go on
permanently, then release the Pwr key
Preparations
1. Connect squib/electric match-head to the RCU.
2. Press the Test key on the RCU.
3. If green LED lights, the circuit is OK. If the Red LED lights, circuit is
not functional – change the squib.
4. Connect the squib to the consumer/shell.
Set RCUs Sleep State and Alarm
This step is optional.
Sleep
If there is time left until the event, you can put the RCUs into sleep state to extend
batteries life.
1. At the TU main settings menu, select SET UNITS menu.
2. In the SET UNITS menu, select SLEEP.
28
Page 35

Operating the System
The TU will send the RCUs a SLEEP command. The RCUs will go into sleep state,
with the green and red LEDs blinking together every 5 seconds.
Wakeup
If you want to wake up the sleeping RCUs, and the TU power is not
turned off:
1. At the TU main settings menu, select SET UNITS menu.
2. In the SET UNITS menu, select WAKE-UP.
The TU will send the RCUs a WAKEUP command. The RCUs will go into Standby
state, with the red LED blinking.
If the TU power has been turned off, you will wake up the sleeping RCUs by turning
the TU power on. The TU will send the RCUs a WAKEUP command. The RCUs
will go into Standby state, with the red LED blinking.
Alarm
If there is time left until the event, you can set the TU to go off and turn back on at a
desired time. When the TU turns back on, it sends a wakeup command to the RCUs.
The RCUs will go into Standby state, with the red LED blinking.
Note: Before setting the alarm, make sure the system clock is set
properly. For details about setting the system clock, see page 19.
1. In the TU main settings menu, select SET UNITS.
2. In the SET UNITS screen, select SET ALARM TIME. The following
screen will be displayed:
SET ALARM
-Hours- -Min 00 00
Alarm Off
3. Set the desired alarm time.
Select Event Number and Mode
In order to perform a fireworks/pyrotechnics display, you have to select the desired
event number and mode.
1. On the main settings menu, select EVENTS CONTROL. The EVENTS
CONTROL screen will be displayed:
29
Page 36

Operating the System
1.SELECT EVENT
2.PROGRAM EVENT
3.CLEAR EVENT
4.CHOOSE EVENT
2. Select SELECT EVENT from the EVENTS CONTROL screen. The
SELECT EVENT screen will be displayed:
SELECT EVENT
Choose event
from 1 to 8
1
3. Select the desired event number and press Enter. The EVENTS
CONTROL screen will be displayed again.
4. From the EVENTS CONTROL screen, select CHOOSE EVENT. The
following screen will be displayed:
1.AUTO
2.S-AUTO
3.MANUAL
5. Select the desired event mode for the selected event number.
6. Press Esc three times to display the standby screen.
Arm the System
Press the Ready key. The display will count down 7 seconds. During this time the
command LEDs will blink as follows:
Key LED Color
Send Red
Ready Red
Hold Green
Group Green
After elapsing of the 7 seconds, the command LEDs will blink as follows:
Key LED Color
Send Green
Ready Red
Hold Green
Group Green
This indicates that the TU has sent the arming command to the RCUs. On the RCUs,
the green light will blink. This indicates that the RCUs are in armed state.
30
Page 37

Operating the System
WARNING
The system is in armed state. In semi-automatic or automatic mode, pressing
the PTT and the Send key will cause the system to fire. In manual mode,
pressing the PTT and any of the active 1-16 Activation keys (indicated by
green LED) will cause the system to fire.
Fire
Depending on the event mode you chose on "Select Event Number and Mode" (page
29) – manual, semi-automatic or automatic – perform the following instructions.
Note: You must press the PTT in order to transmit from the TU to the
RCUs.
Manual Mode Firing
1. If you chose manual mode, the display will be as follows:
20:17:10
EVENT:1 GROUP:1
MODE: MANUAL
Options:
EVENT: 1 to 8
GROUP: 1 to 8
2. Choose the desired Group. You can increment the group number by 1 by
pressing the Group key. When current Group number is 8, pressing the Group
key will return the group number to 1.
3. Press the PTT and press any of the active Activation keys (LED green).
The firework will fire. Any activated RCU will be shut down automatically. On
the TU, the Activation key LED of any activated unit will turn from green to
red.
To stop the event press Hold. The TU will send a disarm command to the RCUs.
Any RCU that hasn't received yet a firing command will return to Standby state with
the red light blinking. The command key LEDs will blink as follows:
Key LED Color
Send Red
Ready Green
Hold Red
Group Green
Semi-Automatic Mode Firing
1. If you chose semi-automatic mode, the display will be as follows:
31
Page 38

Operating the System
20:17:10
EVENT:1 GROUP:1
MODE: S-AUTO
Options:
GROUP: 1 to 8
2. Press the PTT and press the Send key. A firework will fire in the preprogrammed order every time you press the Send key. Any activated RCU will
be shut down automatically. On the TU, the Activation key LED of any
activated unit will turn from green to red.
To stop the event press Hold. The TU will send a disarm command to the RCUs.
Any RCU that hasn't received yet a firing command will return to Standby state with
the red light blinking. The command key LEDs will blink as follows:
Key LED Color
Send Red
Ready Green
Hold Red
Group Green
Activation Keys
Automatic Mode Firing
1. If you chose semi-automatic mode, the display will be as follows:
20:17:10
Time from start Time left
GROUP 1 RCU 01
##:##.# ##:##.#
AVAIL: ##
2. Press the PTT and press the Send key. As long as you hold the PTT, the
fireworks will fire in the pre-programmed order and timing. Any activated
RCU will be shut down automatically. On the TU, the Activation key LED of
any activated unit will turn from green to red.
To stop the event, release the PTT and press Hold. The TU will send a disarm
command to the RCUs. Any RCU that hasn't received yet a firing command will
return to Standby state with the red light blinking. The command key LEDs will
blink as follows:
Key LED Color
Send Red
Ready Green
Hold Red
Group Green
Activation Keys
32
Page 39

Operating the System
Clearing An Event
Select Event Number and Mode
In order to clear an event, first you have to select the event number and mode you
want to clear.
1. On the main settings menu, select EVENTS CONTROL. The EVENTS
CONTROL screen will be displayed:
1.SELECT EVENT
2.PROGRAM EVENT
3.CLEAR EVENT
4.CHOOSE EVENT
2. Select SELECT EVENT from the EVENTS CONTROL screen. The
SELECT EVENT screen will be displayed:
SELECT EVENT
Choose event
from 1 to 8
1
3. Select the desired event number and press Enter. The EVENTS
CONTROL screen will be displayed again.
4. From the EVENTS CONTROL screen, select CHOOSE EVENT. The
following screen will be displayed:
1.AUTO
2.S-AUTO
3.MANUAL
5. Select the desired event mode for the selected event number.
6. Press Esc to display the EVENTS CONTROL screen.
Clear the Event
1. Select CLEAR EVENT from the EVENTS CONTROL screen. If you
logged into the system with Low Level password, you will be prompted to
enter the High Level password.
33
Page 40

Operating the System
Note: The factory default setting for High Level Password is
11111111.
The CLEAR EVENT screen will be displayed:
Event: 1 MANUAL
ENTER - to clear
ESC - to cancel
Menu Options:
EVENT: 1 to 8
MANUAL, S-AUTO,
AUTO
2. Press Enter to clear that event number and mode, or Esc to cancel.
34
Page 41

Index
Index
Event
A
Activation Keys.................5
Alarm.............................. 29
Arming............................ 31
B
Base Unit ...........................5
Base Unit Connector .........5
Batteries
Battery Bay..................7
Inserting.......................8
RCU ........................ 7, 8
TU 8
C
Command Keys.................5
Command Keys LEDs9, 31, 32, 33
Components
Activation Keys...........5
Base Unit Connector ...5
Battery (RCU) .............7
Battery Bay..................7
Command Keys ...........5
Display.........................4
Foldable Antenna
(RCU).....................7
Foldable Antenna
(TU)........................4
Foldable Antenna
(XU) .......................6
Green LED.............. 6, 7
Master Key ............. 4, 5
Panel (TU) ...................5
Power Key ...................7
Programming Keys......5
PTT Switch..................4
Red LED................. 6, 7
Remotely Controlled
Unit ........................7
Squib Contacts.............7
Terminal Unit ..............4
Test Key.......................7
Components Definition.....1
D
Disclaimer ........................ ii
Display...............................4
E
Entering a value.................9
Clearing.....................33
Mode ...................23, 30
Performing ..........12, 27
Programming ......11, 22
Programming mode ..23
Selecting mode.......... 30
Selecting number 22, 30
EVENTS CONTROL..... 22
Extension Unit .................. 6
External PTT.....................6
F
Firing...............................31
Automatic mode........ 33
Manual mode ............31
Semi-Automatic
mode .................... 32
Foldable Antenna
RCU ............................ 7
TU 4
XU...............................6
G
Green LED.................... 6, 7
L
LEDs
Activation Keys .......... 5
Command Keys5, 9, 31, 32, 33
Green.......................6, 7
Red ..........................6, 7
M
Main Settings Menu9, 10, 13
Master Key................4, 5, 9
O
Overview.........................11
P
Panel (TU) ........................ 5
Power Key ........................ 7
PROGRAM AUTO ........ 23
PROGRAM EVENT ...... 23
PROGRAM MANUAL.. 25
PROGRAM S-AUTO..... 24
Programming Keys........... 5
PTT Switch ....................... 4
R
RCU...................................7
Adding .......................26
Setting..................12, 26
Sleep ..........................29
Testing .......................27
Wakeup......................29
Red LED........................6, 7
S
Safety.................................3
Screen
ADD UNITS .............16
BACKLIGHT............20
CHOOSE EVENT.....16
CLEAR EVENT........16
CLOCK .....................19
EVENTS
CONTROL ....14, 22
INTENSITY ..............19
Main Settings Menu10, 13
PASSWORDS...........20
PROGRAM AUTO15, 23
PROGRAM
EVENT ..........14, 23
PROGRAM
MANUAL......15, 25
PROGRAM S-
AUTO ............15, 24
RCU X 1....................17
RCU X 16..................17
SELECT EVENT 14, 22
SET ALARM TIME .18
SET UNITS ...............18
SLEEP .......................18
Standby................10, 13
Test 1 SEC.................17
TU SETTINGS..........19
WAKEUP..................18
SELECT EVENT............22
Selecting menu item..........9
Squib Contacts ..................7
Standby screen ..... 9, 10, 13
Start-Up .............................9
System Characteristics......2
T
Test Key ............................7
X
XU
Setting........................25
35
Page 42

Quick Reference Guide
See page
Step 1: Select Event Number 22
1. In the main settings menu, select EVENTS CONTROL.
2. Select SELECT EVENT.
3. Select an event number (from 1 to 8), and press Enter.
Step 2: Program Event Modes 23
1. Select PROGRAM EVENT.
2. Select the desired mode (manual, s-auto, auto) you want to program:
PROGRAM MANUAL PROGRAM S-AUTO PROGRAM AUTO
3. Select GROUP and RCU
numbers.
4. Select +.
Step 3: Add Units 26
1. In the main settings menu screen on the TU, select ADD UNITS.
2. Select RCU X 1.
3. Select the GROUP number and the RCU number.
4. On the RCU device, press and hold the Test key and press the Pwr key.
5. On the TU, press Enter.
6. Write down the address and insert it into RCU battery bay.
Repeat this procedure for each of the RCUs.
Step 4: Test RCUs 27
1. Place each RCU device in position.
2. Press the Pwr key on the RCU.
3. In the main settings menu on the TU Select ADD UNIT.
4. Select Test 1 SEC..
5. Leave TU in place and check each individual RCU.
Step 5: Set RCUs Sleep State and Alarm (optional) 28
Step 6: Select Event Number and Mode 29
1. On the main settings menu, select EVENTS CONTROL.
2. Select SELECT EVENT.
3. Select the desired event number and press Enter. The EVENTS CONTROL menu will be
displayed again.
4. Select CHOOSE EVENT.
5. Select the desired event mode for the selected event number.
6. Press Esc three times to display the standby screen.
Step 7: Arm the System 30
Press the Ready key. The system is in armed state.
Step 8: Fire 31
MANUAL S-AUTO AUTO
1. Press the Group key to
select the desired group.
2. Press the PTT and press
any of the active
Activation keys (LED
green).
3. Select GROUP and RCU
numbers.
4. Select +.
5. Select order of activation
NUMBER.
1. Press the PTT and press
the Send key.
2. A firework will fire in the
pre-programmed order
every time you press the
Send key.
3. Select GROUP and RCU
numbers.
4. Select +.
5. Set the minutes, seconds
and tens of seconds.
1. Press the PTT and press
the Send key.
2. As long as you hold the
PTT, the fireworks will
fire in the preprogrammed order and
timing.
 Loading...