

R2 LANGFORD DC14014, LANGFORD DC14012, LANGFORD DC14013 Fitting Instructions Manual
CLOSE COUPLED PAN & CISTERN
LANDFORD: DC14014 / DC14013 / DC14012
FITTING INSTRUCTIONS
This product must be installed by a qualified fitter or plumber in accordance with and meet the requirements of the Water Supply (Water Fittings) Regulations 1999 and Scottish Byelaws 2004
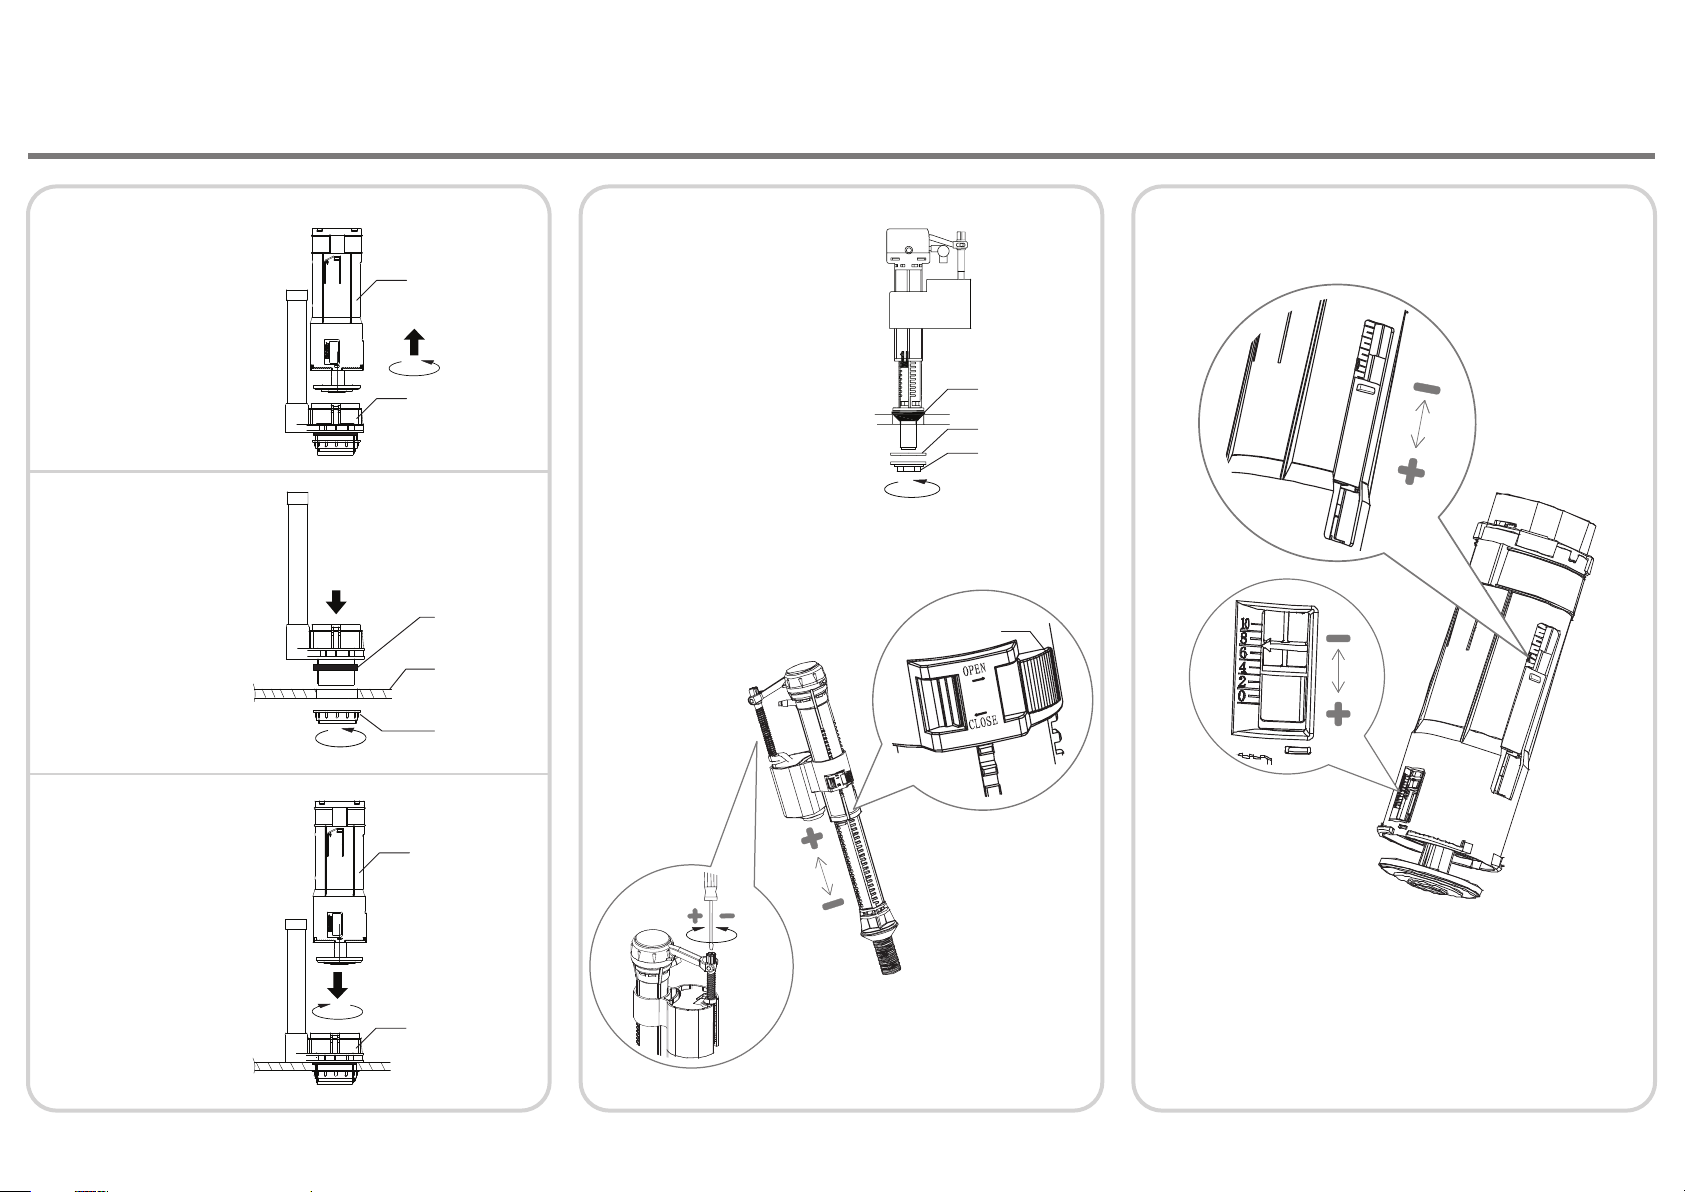
INSTALLATION OF FLUSH VALVE INSTALLATION OF FILL VALVE
Install the fill valve to the tank
body using the rubber seal and
plastic nut. Ensure the float cup
has room to move up and down
freely. The fill valve is pre-set to a
height suitable for the cistern tank
FILL VALVE ADJUSTMENT
The fill valve is factory set but if adjustment is required follow the
instructions below.
Open the stopper to allow the float to
slide up and down. Close stopper once
float is in position.
Turn the flush valve
body anti-clockwise
to part it from the
flush valve seat
Install flush valve seat
and seal as shown
Flush valve body
Flush valve seat
Seal
Cistern tank
Fixing nut
Rubber seal
Washer
Plastic nut
Stopper
FLUSH VALVE ADJUSTMENT
The flush valve is factory set but if adjustment is required see diagram
below.
Reduced flush
adjustment
Flush valve body
Insert flush valve
body into flush valve
seat, turn it
clockwise until you
hear a “click”
Flush valve seat
Brought to you by the Roper Rhodes Group, Brassmill Lane Trading Estate, Bath, BA1 3JF
TEL: 01225 303 900 (R2) | 01225 787 870 (Tavistock)
FINE ADJUSTMENT
Turn screw for fine adjustment of float
height. Anticlockwise to lower float.
Clockwise to heighten float.
Full flush adjustment
IMPORTANT
Flush out all impurities in the cistern prior to installation.
Cistern fittings are suitable for Water pressure: 0.2 - 8 bar
REF: LANGAG0419 | V2.00
CLOSE COUPLED PAN & CISTERN
LANDFORD: DC14014 / DC14013 / DC14012
FITTING INSTRUCTIONS
This product must be installed by a qualified fitter or plumber in accordance with and meet the requirements of the Water Supply (Water Fittings) Regulations 1999 and Scottish Byelaws 2004
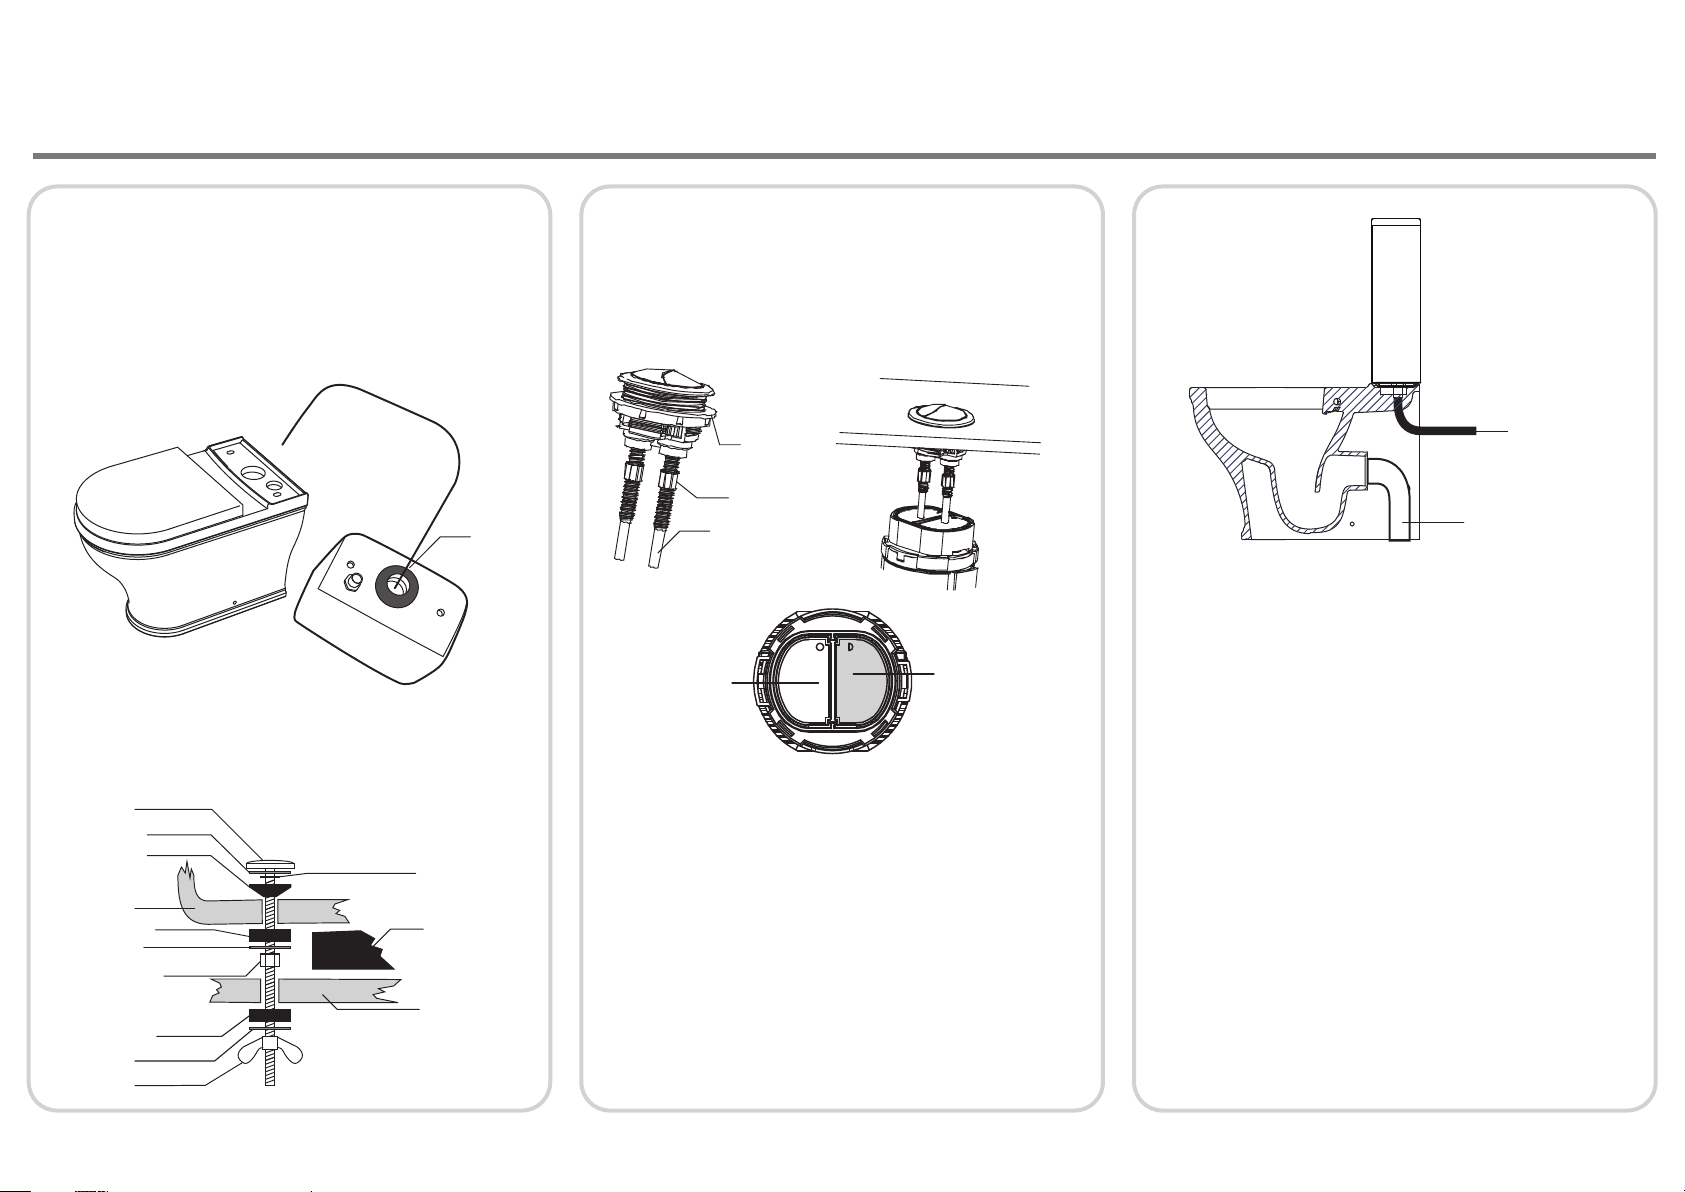
FITTING THE CISTERN TO THE TOILET PAN
With the flush valve and inlet valve fitted and adjusted the cistern
tank can be fitted to the pan.
Fit the gasket around the flush valve outlet on the underside of the
cistern.
When fitting the cistern to the pan take care to ensure the gasket is
properly aligned in the gasket location. Failing to do so could result in
leakage.
Gasket
Insert the cistern fitting bolts arranging the components as shown in
the diagram below.
Firmly tighten the nuts and wing nuts taking care not to overtighten as
this could damage the ceramic.
Fixing bolt
Metal Washer
Rubber Washer
Cistern base
Rubber Washer
Metal Washer
Nut
Rubber Washer
Metal Washer
Wingnut
Small Rubber
Washer
Gasket
Toilet pan
INSTALLING PUSH BUTTON
Fit the push button to the cistern lid using the plastic fixing nut.
Ensure the pins make contact with the flush buttons on the flush
valve. To adjust the length of the rods turn the nut clockwise and
anti-clockwise.
Fixing nut
Nut
Rod
Full Flush
MAKING PLUMBING CONNECTIONS
Connect the soil pipe and ensure it is adequately sealed around the
toilet pan outlet to prevent leakage.
The inlet valve has a threaded connector. It is recommended that this
thread is wrapped in PTFE tape before connecting the water supply.
Do not overtighten the supply to the inlet valve as this could damage
the inlet valve causing leakage.
After connecting the water supply to the inlet valve check that the inlet
valve components do not touch the internal walls of the cistern and
the float can move freely up and down.
Check all connections are secure and a soil pipe is fitted before testing
the flush.
Half Flush
Water supply
connection
Soil pipe
CONNECTION TO WATER SUPPLY
Connect the water supply to the cistern using an approved double
check valve to fluid category 3 in addition to an accessible service
valve.
OPERATION
Press the large button once for a large flush (6 litres factory setting)
Press the small button once for a small flush (4 litres factory setting)
CARE
DO NOT introduce caustic chemical substances (e.g. containing
chlorine compounds or similar). These can damage the valve
components and cause failure.
Brought to you by the Roper Rhodes Group, Brassmill Lane Trading Estate, Bath, BA1 3JF
TEL: 01225 303 900 (R2) | 01225 787 870 (Tavistock)
REF: REF: LANGAG0419 | V2.00
 Loading...