

Page 1

USER MANUAL
QVS HD-ADE
HDMI 2CH/5.1CH Audio Extractor
Table of Contents
1.0 Introduction..........................................................................1
2.0 Specifications.......................................................................1
3.0 Package Contents................................................................2
4.0 Panel Descriptions...............................................................2
5.0 Connection and Operation..................................................3
Page 2

HDMI 2CH/5.1CH Audio Extractor
Inputs/Output Connector
Operating Frequency
Resolutions(HDTV)
Warranty
HDMI 2CH/5.1CH Audio Extractor
For optimum performance and safety, please read these instructions carefully
before connecting, operating or adjusting this product. Please keep this manual
for future reference.
1.0 INTRODUCTION
HDMI integrates audio and video signals together. This integration gives us the
convenience of using only one cable for audio and video. However, that can be a
drawback for those who need separate audio outputs. Fortunately, the QVS
HD-ADE is able to offer HD quality video signal with the choice of audio output.
The HD-ADE can extract the audio signal from the HDMI interface, and transmit
the audio to the display and amplifier receiver by SPDIF or Stereo.
1.1 FEATURES
Supports audio output: SPDIF (Toslink/Coaxial) and Stereo (3.5mm).
Supports audio output through the HDMI to the display
2.0CH/5.1CH audio switch.
Supports the highest video resolution to 1080p.
Supports 225MHz/2.25Gbps per channel (6.75Gbps all channel) bandwidth.
Supports 12bit per channel (36bit all channel) deep color.
Supports HDCP.
Supports uncompressed audio such as LPCM.
Supports compressed audio such as DTS Digital, Dolby Digital.
Support 3D all format, including 1080p@23.98/24Hz,
720p@59.94/60Hz/50Hz, bandwidth up to 225MHz.
2.0 SPECIFICATIONS
Input Connector HDMI Female
Output Connector HDMI Female, Toslink, Coaxial,
3.5mm Stereo
Vertical Frequency Range
Video Amplifier Bandwidth
Interlaced(50&60Hz) 480i,576i,1080i
Progressive(50&60Hz) 480p,576p,720p,1080p
Limited Warranty 1 Year Parts and Labor
50/60Hz
2.25Gbps/225MHz
1
Page 3

HDMI 2CH/5.1CH Audio Extractor
Environmental
Power Requirement
Regulatory Approvals
Accessories Adapter
Operating Temperature
Operating Humidity 10% to 80 % RH (no condensation)
Storage Temperature
Storage Humidity 5% to 90 % RH (no condensation)
External Power Supply 5V DC @2A
Power Consumption (max) 2.5W
Converter Unit FCC,CE
Power Supply UL,CE,FCC
AC Power Adapter US standard, UK standard and so on
User Manual 1 x English
Note: Specifications are subject to change without notice. Weight and dimensions are
approximate.
3.0 PACKAGE CONTENTS
Before attempting to use this unit, please check the packaging and make sure the
following items are contained in the shipping carton:
1) Main unit.
2) 5V DC Power Supply.
3) User’s Manual.
4.0 PANEL DESCRIPTIONS
0℃ to +70℃
-10℃ to +80℃
2
Page 4

HDMI 2CH/5.1CH Audio Extractor
1)Power and Active LED
With a double color LED when supplying power to this unit the light is red and
when it starts to work normally the light is purple(red and blue mixed).
2)DC/5V
Connect this port to power adapter.
3)HDMI In
Connect this port to HDMI source device.
4)2.0CH/5.1CH LED
When 2.0CH is being selected it is off and when 5.1CH is being selected it is on.
5)2.0CH/5.1CH button
Pressing “button” to switch 2.0/5.1CH manually.
6)HDMI Out
Connect this port to HDMI Display.
7)SPDIF Out
Connect Toslink or Coaxial port to Amplifier Receiver.
8)Stereo Out
Connect this port to Amplifier Receiver.
Note:Only when the source supports 5.1CH output (including CD), this
function is effective and it realizes through the 2.1CH/5.1CH buttons. The
product default output is 5.1CH, and LED turns on at the time. Press the
button a time again, the product outputs 2CH audio and the LED turns off. If
the source can only supports 2CH audio output, the “2CH/5.1CH” button will
become invalid, that is, although you press “2CH/5.1CH” button, the
product still outputs 2CH audio and the LED is still on.
3
Page 5
HDMI 2CH/5.1CH Audio Extractor
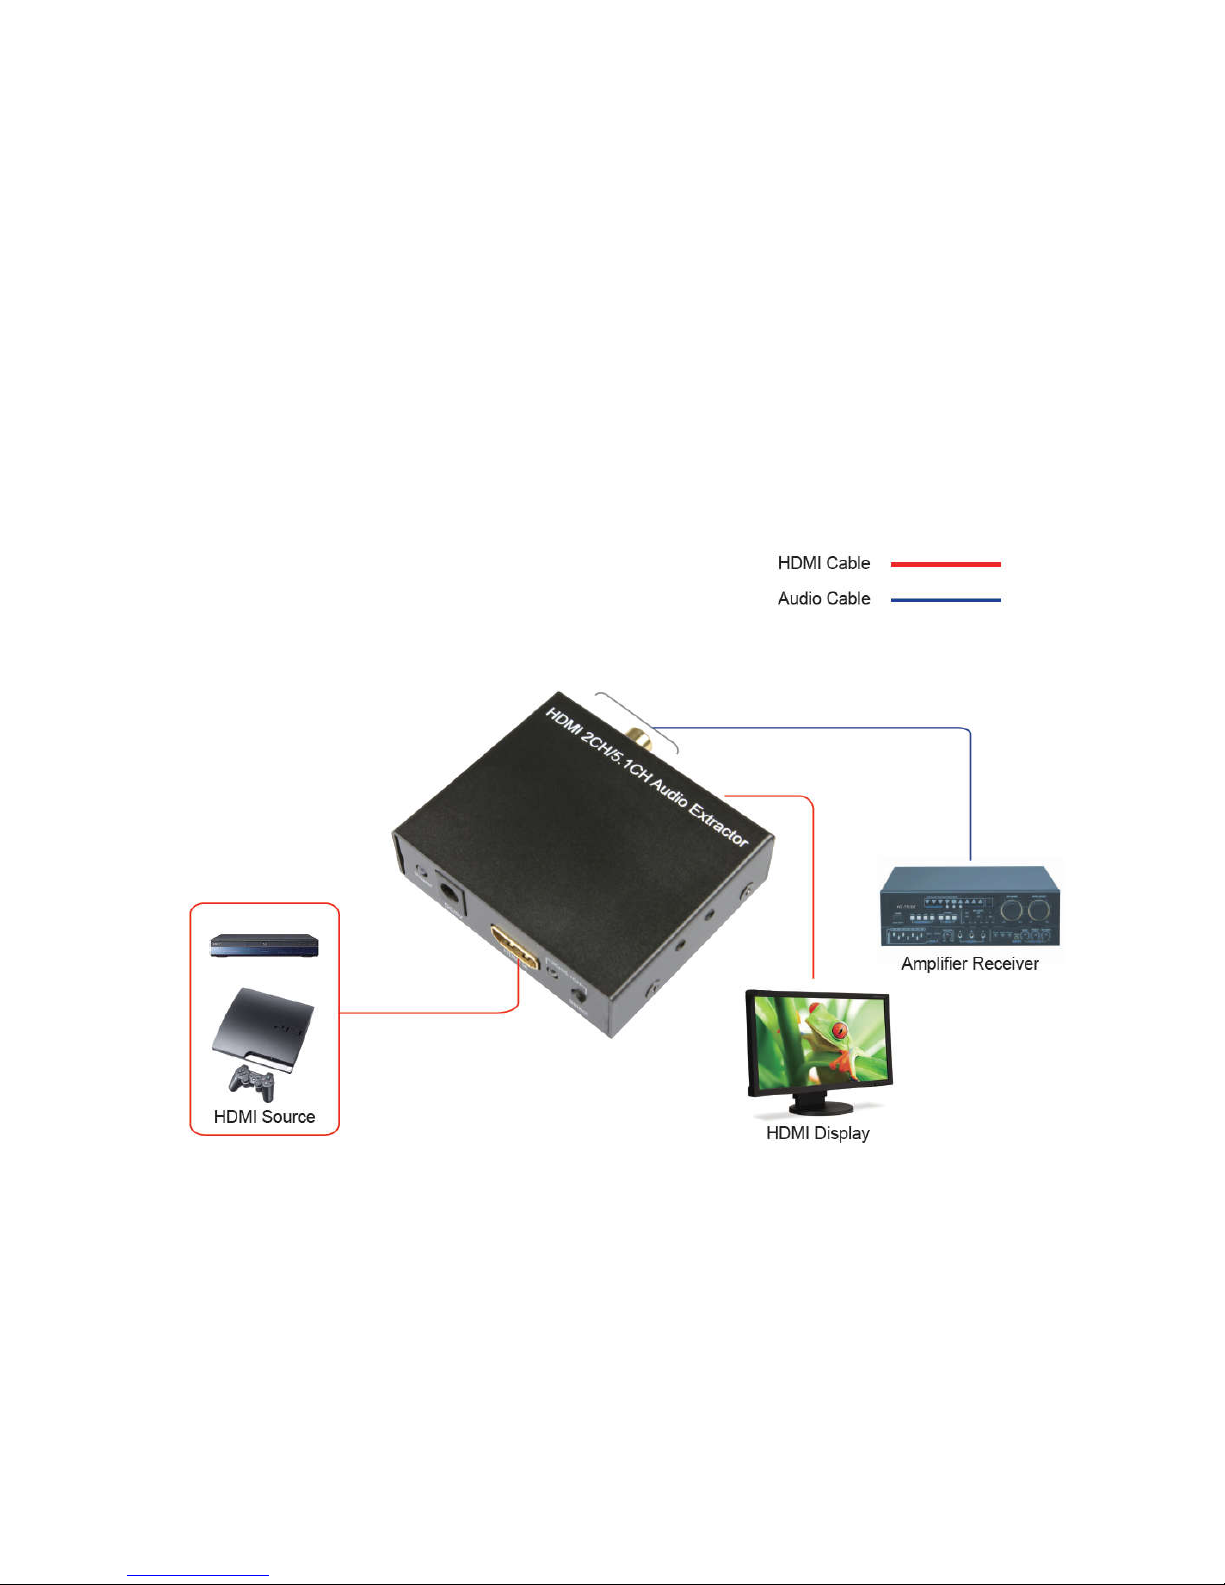
5.0 CONNECTION AND OPERATION
1) Connect the input of this product to HDMI Source.
2) Connect the output of this product to HDMI Display.
3) Connect SPDIF or Stereo port to Amplifier Receiver
4) Insert the DC side of 5V power supply into the unit and then connect the AC
side of the power supply into the wall outlet.
5) Select the Audio output you want through pressing “2CH/5.1CH” button.
5.2 CONNECTION DIAGRAM
4
 Loading...