

Page 1
INSTRUCTIONS FOR ASSEMBLING
AD
11/15/12 - Frame Press Instructions.cdr REV 12
Your "Q.V .P." frame press is unique in that it has
a 6" or 24” high top. This special Gusset box top
gives over twice the height of conventional frame
presses. This means pressing more flat panels at
one time or large curved pieces can be pressed in
place. In addition, unlike others, it is made with
one piece of material with only 8" or 24”of seam
at each corner . This means less chance of failure
due to seam delamination.
Y our Frame Press Includes:
Lifters
VCA6F (VAKuum Connector
THE VAKUUM FRAME PRESS
Polyurethane 6" or 24” top
Aluminum side frames, with adhesive
tape applied.
Corner Brackets
Foam Gasket Material
Instructions
Bleeder V alve
Hinges
T oggle Clamps and screws
Assembly)
IMPORTANT: Your table top must be flat and nonporous or the frame will leak. Unlike a vacuum bag
that only has one or two short sides to seal, the frame
press has a long linear perimeter that must be sealed.
Do not be concerned if your vacuum pump cycles on
and off more often than when using a vacuum bag.
Building the T able Top
A Smooth, FLAT NONPOROUS TABLE TOP IS
ESSENTIAL IN GETTING A GOOD VACUUM
SEAL. You must spend the time to get it flat for
trouble free frame pressing.
The table top should be made from 3/4" or thicker
MDF, plywood or particle board. A single sheet is
best, however, you can splice 2 sheets together for the
larger press. Once the table top is cut to size apply a
single sheet of SMOOTH
plastic laminate to the top (NON MATTE FINISH).
This will make the top nonporous which is very
important. If you need to have a joint, apply a bead of
Silicone II to the joint and push the second piece into
the joint and wipe leaving a slight crown. A slight
hump of silicone where the gasket material touches
the seam is a better seal than a slight valley below the
gasket.
The frame should take about 1 to 2 hours to
assemble depending on its size. Building the
table can take a day or two.. The following chart
is used to size your table top.
Frame Size
I.D.
25” x 25”
54” x 54”
54” x 54”
54” x 102”
54” x 126”
54” x 126”
66” x 102”
66” x 126”
66” x 126”
If you have a special size frame press, add 2.5"
to the inside length and width to determine the
table top size.
T able Top Size
O.D.
27.5” x 27.5”
56.5” x 56.5”
56.5” x 56.5”
56.5” x 104.5”
56.5” x 128.5”
56.5” x 128.5”
68.5” x 104.5”
68.5” x 128.5”
68.5” x 128.5”
CALL 1-800-547-5484 TODAY!
Or visit our site at www.qualityvak.com
TABLE TOP
BOX FRAME
DRAWING A
Quality VAKuum Products, Inc.
BRACKETS
OVER
74 Apsley St. - Hudson, MA 01749
Tel: 978-562-4680 - Fax: 978-562-4681
Page 2

INSTRUCTIONS FOR ASSEMBLING
THE VAKUUM FRAME PRESS
7/11/12 - Frame Press Instructions.cdr Page 2
The key to the top laying flat is the box frame that
supports the top. Straight, dry 2"X6"‘s are
recommended. Joint the edges if necessary to make
them straight. Make the box as shown in DRAWING
A. Use brackets or cleats to hold the table top to the
frame box. Use short screws to attach the brackets to
the underside of the tabletop. Do not puncture the top
surface with a screw as it will cause a leak. This method
is used as it allows for shimming the tabletop to assure
flatness. Level the top with shims if necessary. This is
the most important step in building the table. If it’ s not
flat, you could have leakage. Also, if it’s cupped, you
could press a curve into your piece. Once the tabletop is
completed, it can be used to assemble the frame press.
Applying the SMOOTH Laminate
If you can, purchase a sheet of laminate that will cover
the table in one piece. If you have a seam, apply a bead
of silicone II along the joint and push the second piece
into it, thus filling the seam. Remove the excess. It’s
best to leave a slight crown at the joint rather than a
slight depression. Where the gasket material comes
down on the seal, it will seal better on a slight crown
rather than into a depression.
Assembling the Frame Press
Lay the aluminum frame pieces on the table and
assemble the joints. Place the steel corner brackets
inside the aluminum frame. Slide each joint together.
Screw the frame to the connectors with the 1/4-20
phillips head screws using the pre-drilled holes.
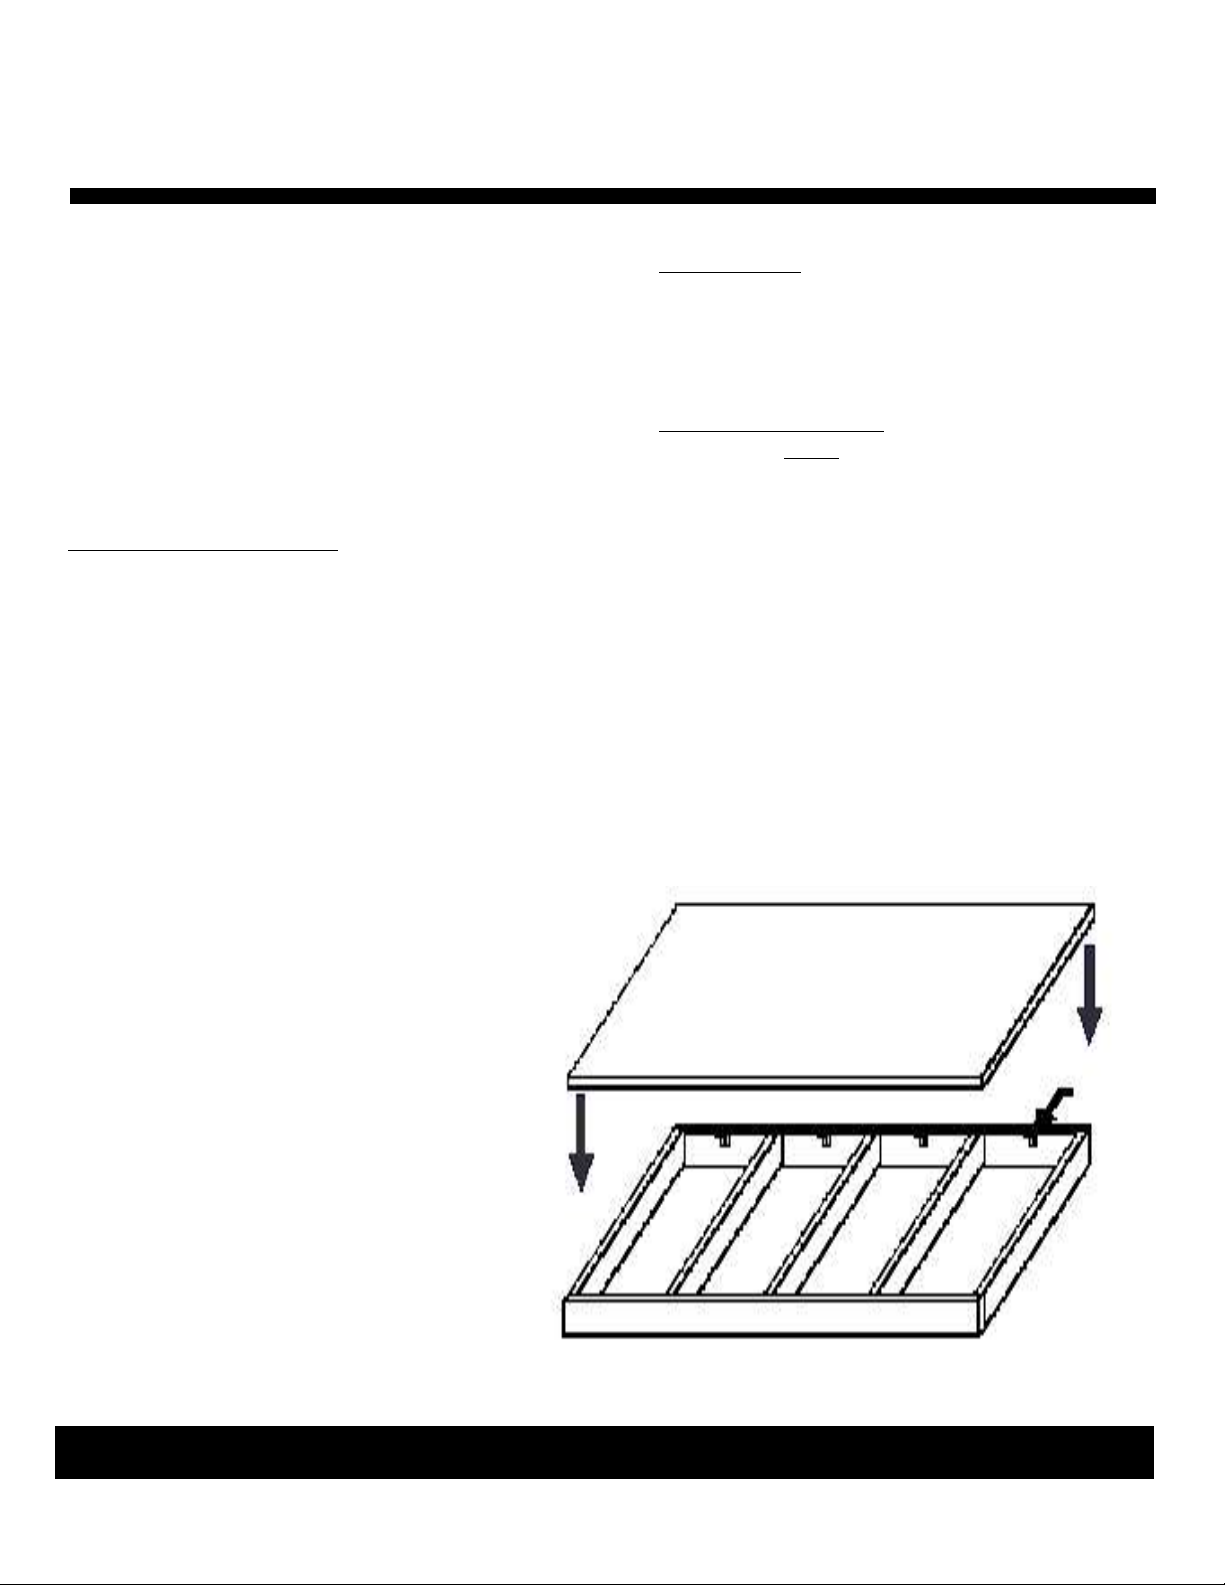
Assembling the T op to the Frame:
To assemble the Gusset Top to the frame, elevate the
frame 6" or more off the table with blocks with the
bottom side (tape) up. This allows you to drop the T op
inside the frame. Hold the top in place with several
spring clamps. The Top will fit inside the frame. The
2 1/2" flange from the Top should sit on the frame
without any bunching or ripples along the frame.
The top is slightly smaller than the frame to eliminate
the possibilities of wrinkles or bunching of the material.
Hold each corner with a spring clamp and make sure the
top is centered.
Note: If you didn't install the frame press when
received, you should re-etch the bag top if it's more than
one week after shipping date as per the packing slip..
Etch the bag flange (the side that will stick to the tape
on the aluminum frame) with PVC pipe cleaner.
Etching will give better adhesion.
Remove about 12" of the backing material from the tape
from the center of one end only. Press the flange in place
as you continue removing the backing from the tape. DO
NOT PRESS THE FLANGE WITH MUCH FORCE
A T THIS TIME. You may have to pull up the flange if
you did not center the top correctly . Do the same for the
other end. The long lengths should be ripple free,
remove the backing material and press the long length in
place. Again starting in the center and working toward
the end. At this point you have the bottom stuck in place.
Once the top is stuck in place, take a dowel or hard roller
and roll around the frame to press the top in place. If you
make a mistake in a short length, you can pull the top and
reset it. Now remove the paper from the side of the frame
and roll the remainder of the flange to the side. Trim
excess.
Applying the Foam Gasket T ape:
Apply the foam gasket tape, to the poly top, around the
outside edge of the bottom of the frame . Drawing B.
Remove about 12 - 18" of backing and start in the center
of the front side and work your way around the frame.
Make a smooth curve at the corners as in Drawing B.
When you come around to the beginning, run the tape to
the inside of the Foam Gasket tape just applied, thus
making the two rows parallel and tight to each other. This
will give you a long joint that will be vacuum tight.
CALL 1-800-547-5484 TODAY!
Or visit our site at www.qualityvak.com
Quality VAKuum Products, Inc.
74 Apsley St. - Hudson, MA 01749
Tel: 978-562-4680 - Fax: 978-562-4681
Page 3

INSTRUCTIONS FOR ASSEMBLING
THE VAKUUM FRAME PRESS
7/11/12 - Frame Press Instructions.cdr Page 3
Making the Baseboard
Y ou must make a baseboard or platen for inside the frame.
It is similar to the baseboard used in a vacuum bag with
saw kerfs 1/8 - 3/16' deep, every 6 to 10" in both
directions. This helps improve the seal and cuts down on
leakage problems. The baseboard dimensions should be
6" less than the inside of the frame, thus giving a
minimum 3" space Around the frame. Since it lays flat
on the tabletop, it can be anywhere from 3/8" to 3/4"
thick. You must round all the edges to eliminate all
sharp corners. Do not screw the Baseboard to your
table top, it will cause leaks, use contact cement or just
let it lay in place.
NOTE: The 3" gap between the baseboard and the
inside of the frame, helps improve the vacuum seal.
Also make sure you push the bag flat on the table
around the perimeter of the baseboard when you are
pulling vacuum. This will improve the seal and prevent
the bag from pulling off the frame.
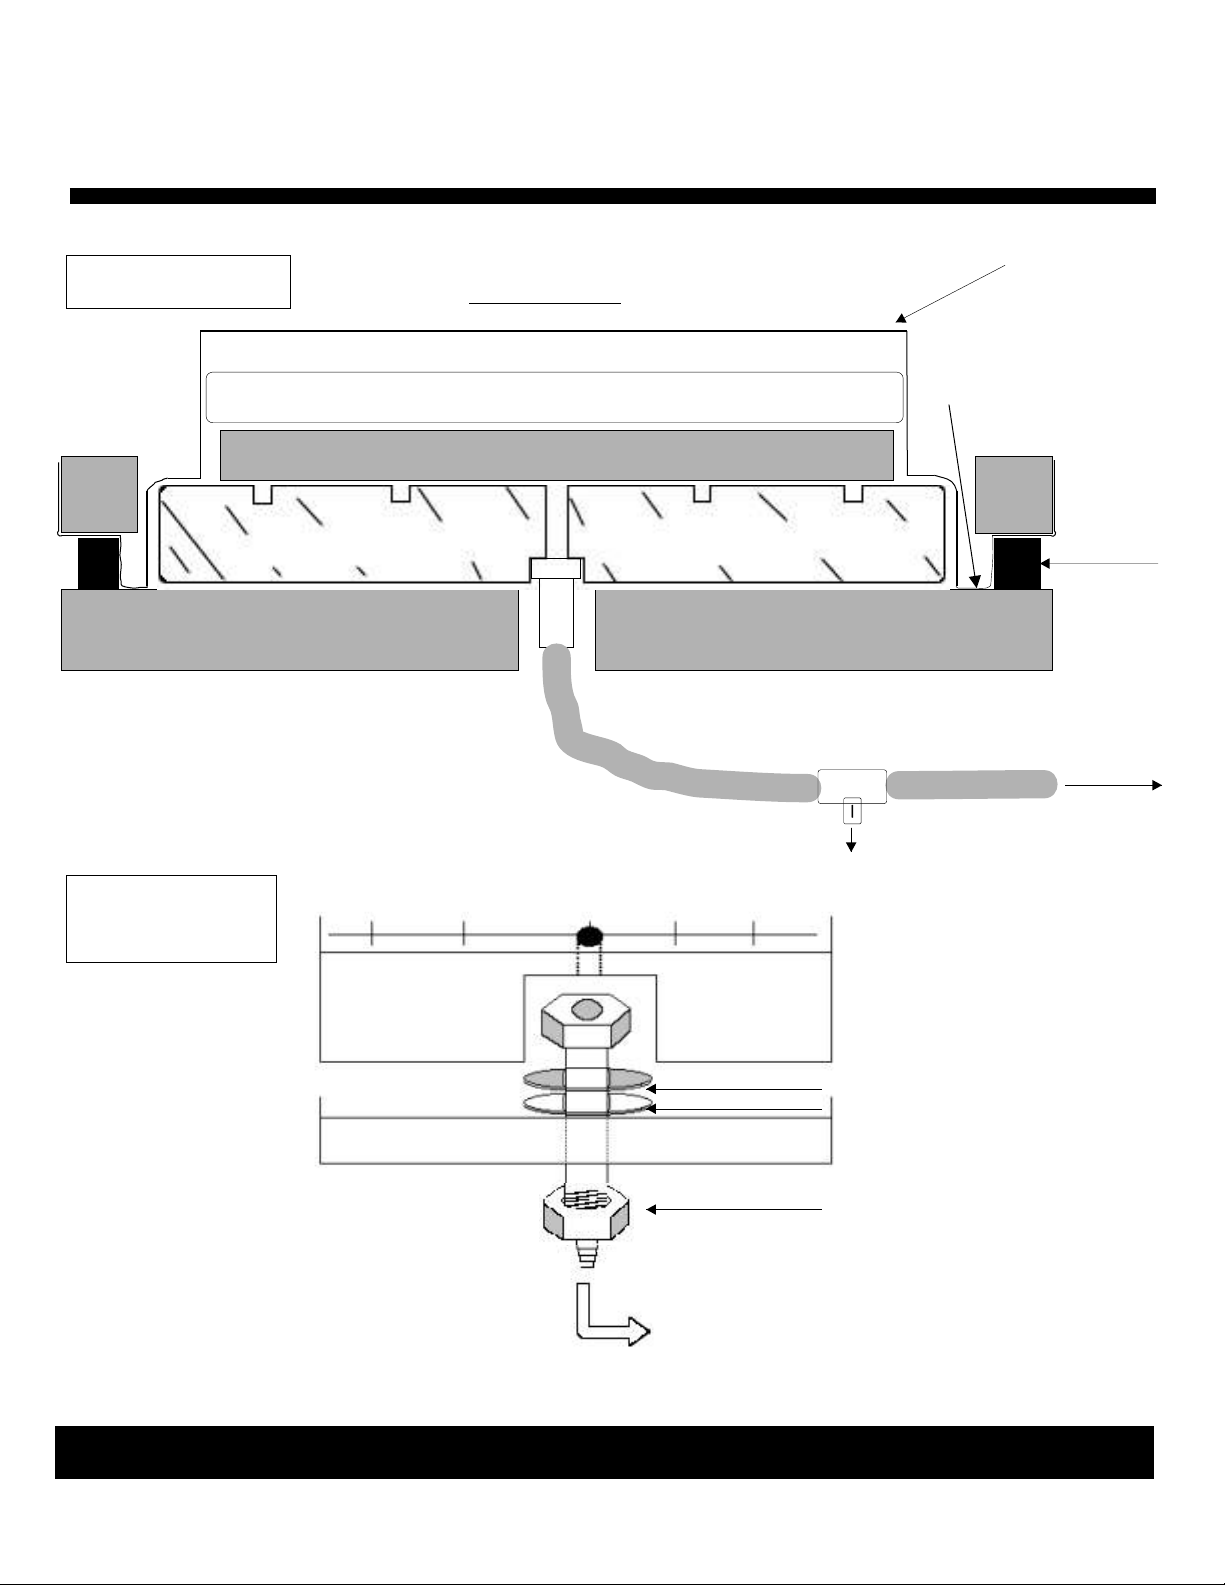
Installing the VCA6F:
You will need to install a VAKuum Connector
Assembly (VCA6F) into your table top as per Drawing
D. Drill a 3/4" hole (check the diameter of your
VCA6F) in your table where you wish to place the
VCA6F. The center of the VCA6F must be below an
intersection of the grid lines (saw kerfs) on your
baseboard.
Countersink a relief hole in the bottom of your
baseboard for the VCA6F bolt head and washers to fit
into. Depending on the thickness of your baseboard,
the top nut on the VCA6F may come completely
through the baseboard. The VCA6F must be slightly
below the baseboard. Also, never let the gusset top
cover the VCA6F as it can seal the vacuum hole.
Always have something on top of the VCA6F
(workpiece, piece of board with all edges rounded,
etc.).
If you use a thick baseboard, you will need to drill a 1/2"
hole through the baseboard that lines up with the
VCA6F. Your hole through the baseboard must be at
the intersection of a saw kerf (DRAWING D). If you
made a mistake and the VCA6F doesn't line up with a
grid line on the top of your baseboard, just cut another
grid line that connects to the existing grid and goes
across the hole.
At this point the Frame Press is ready to use. Use the
rubber snap clamps to hold the frame in place. If you
use mechanical clamps to hold the frame down, you can
have uneven pressure, this will cock the frame and
cause leakage. For those who are going to dedicate the
Frame Press to the table, attach the hinges.
Attaching the Hinges:
The bottom of the hinges have oval slots. The frame
must be able to be squashed down when under vacuum,
thus the bottom screws should be loose. Set the frame
in place on top of the table with hinges hanging down
over the back of the table. When the frame is locked in
place, the gap between the table top and the aluminum
frame should be about 3/16". Put the screws in at the
bottom of the slots, this allows the back of the press to
move down when vacuum is applied.
Warning: Do not attach the hinge at a right angle to
the table top. The frame must be able to compress
the foam, therefore, it must free to float. If the
hinge is on top of the table, the hinge knuckle will
keep the foam from compressing and pr ovide a seal
T oggle Clamps:
The toggle clamps are to help create a seal until vacuum
pressure generates enough force to maintain its own
seal. See diagram on page 7 for placement. See
diagram E for installation.
CALL 1-800-547-5484 TODAY!
Or visit our site at www.qualityvak.com
Quality VAKuum Products, Inc.
74 Apsley St. - Hudson, MA 01749
Tel: 978-562-4680 - Fax: 978-562-4681
Page 4

INSTRUCTIONS FOR ASSEMBLING
THE VAKUUM FRAME PRESS
7/11/12 - Frame Press Instructions.cdr 9/16/06 Page 4
Center the top clip on the aluminum frame (drawing E)
and drill a 5/32 hole. Use the #10 metal screws to attach
the clip to the frame. Hang the toggle on the clip. The top
holes in the toggle plate should be about in the center of
the edge of the MDF table top. Screw in place with 4
wood screws. Adjust the U clamp so that the gasket
compresses slightly and provides a good initial seal to
draw vacuum. Do not over tighten as this could cause
compression set in the gasket material. Drawing E.
Bleeder V alve
Connect the VAKuum hose to the VCA6F , then connect
the bleeder valve (Drawing C). The other side of the
bleeder valve is connected to the VAKuum hose that
goes to your vacuum pump. Just open the bleeder valve
to allow air into the frame when you want to open the
frame.
Note: If your pump does not evacuate the Frame Press
fast enough, you can attach a VAK Pump to the bleeder
valve. The VAK-Pump would only be used during the
initial pump down then could be disconnected for other
uses in the shop
Checking For Leaks:
THERE ARE FOUR SOURCES OF LEAKAGE; THE
GASKET JOINT, THE GUSSET SEAMS, THE
JOINT ON EACH SIDE OF THE FOAM GASKET
TAPE (TO THE TABLE TOP AND THE TOP) and
THE T ABLE TOP/VCA6F.
Checking the Gusset Seam
With the frame down and under vacuum, put some
water inside the frame at each corner. Start at one
corner, if it leaks at the corner seam you will see the
water, in the form of droplets, move along the creases in
the bag and along the frame.
Checking the Foam T ape
Most causes of leakage will be at the interface of the
Foam Gasket tape and tabletop. If you can’t locate the
leak by listening, spray water at the Foam Gasket seam.
Go around the table and look inside the frame for water
bubbling in. If the leak is not at the butt joint, put a C
clamp where the leak is occurring.
CALL 1-800-547-5484 TODAY!
Don’t over tighten the clamp as it could cock the frame
and cause a leak elsewhere. The table may need
shimming as a permanent fix.
Another test is to walk around the frame and press on
the frame every foot or two. Many times you will find
the spot that is not sealing and you can add a snap clamp
or C clamp at this spot.
A frame press (FP) has a very large area to
seal (up to 35') and it tends to cause the
pump to cycle on and off more often than a
bag. Under normal conditions a FP will
cycle every 3 to 5 minutes. Some have
achieved up to a 60 minute cycle by paying
close attention to details and adding a
vacuum tank.
You can improve the seal by applying a
small bead of Silicone II around the inside
edge of the gasket material. The key is not
to have it wider than 1/8” where it touches
your table top. If it's too wide, it can prevent
the gasket from compressing because the
silicone is much denser than the gasket
material. If this happens, the frame doesn't
compress evenly and you could be worse
off. Better to apply a smaller amount and
add more latter than to apply too much.
Drawing G (Page 7)
Also when applying the tape make sure to
butt the 2nd row against the 1st row. (The
gap in this drawing is only to show 2 rows.)
Drawing B
Quality VAKuum Products, Inc.
74 Apsley St. - Hudson, MA 01749
Tel: 978-562-4680 - Fax: 978-562-4681
Page 5
INSTRUCTIONS FOR ASSEMBLING
THE VAKUUM FRAME PRESS
7/11/12 - Frame Press Instructions.cdr 9/16/06 Page 5
Drawing C
Frame Top
CAUL
1 1/4“
x
1 1/4“
Frame
WORK PIECE
BASE BOARD WITH SAW CUTS
Table Table
VCA6F
6“ or 24” High Gusset
Bag Top
Press
bag flat
on table
1 1/4“
x
1 1/4“
Frame
Foam Seal
To VACUUM PUMP
Drawing D
VCA6F or VCAF
Note: If the
threads on the
VCA(6) do not drop
below the table
bottom, remove
some material from
the bottom -NOT
the TOP of the
table.
Bleeder Valve Release
Grooved
Baseboard
Metal Washer
Rubber Washer
Table Top
Nut
To VACUUM PUMP
CALL 1-800-547-5484 TODAY!
Or visit our site at www.qualityvak.com
Quality VAKuum Products, Inc.
74 Apsley St. - Hudson, MA 01749
Tel: 978-562-4680 - Fax: 978-562-4681
Page 6

INSTRUCTIONS FOR ASSEMBLING
THE VAKUUM FRAME PRESS
7/11/12 - Frame Press Instructions.cdr Page 6
Top of aluminum frame
Drawing E
Frame Top
Foam Tape
Table
Drawing F
Allen Head Screw
& Spacer
Lifter
drill a 5/32 hole
Screws Provided by QVP
Wood Screws
Frame Top
Table
Back screw hole
in lifter
Foam Tape
CALL 1-800-547-5484 TODAY!
Or visit our site at www.qualityvak.com
Quality VAKuum Products, Inc.
6 1/2"
End of table top
74 Apsley St. - Hudson, MA 01749
Tel: 978-562-4680 - Fax: 978-562-4681
Page 7

INSTRUCTIONS FOR ASSEMBLING
THE VAKUUM FRAME PRESS
11/14/12 - Frame Press Instructions.cdr Page 7
WARNING: Do not overload the Frame Press or the
force of vacuum will pull the top off the frame or bend
the frame (this is better than ripping the poly top). This
is especially true with large curved work. Close the
frame over the workpiece and pat the plastic on the 3”
space between the frame and baseboard. This prevents
the frame from being pulled in. The plastic top should
go against the workpiece and the table top with no or
very little stretching.
Formica Top: It is very important that the Formica
finish be a smooth and not a matte finish.
Applying paste wax to the perimeter of the table and
gasket will do two things, give a smother finish plus a
better vacuum seal and the wax makes it easier to
remove glue squeeze out from the table top.
Tips from an experienced user: To increase the
holding force of the high tack adhesive tape that holds
the top to the bottom of the frame, apply duct tape
around the inside of the frame and down on to the top.
This not only provides additional holding force but
most importantly also keeps sawdust from getting on to
the high tack tape. If the duct tape is not added, the high
tack adhesive tape will loose it’s adhesive quality and
will need to be replaced periodically depending on the
frequency of use and dust level in the shop.
Duct
Toggle Clamps: Center the top clip on the aluminum
frame (drawing E) and drill a 5/32 hole. Use the #10 metal
screws to attach the clip to the frame. Hang the toggle on
the clip. The top holes in the toggle plate should be about in
the center of the edge of the MDF table top. Screw in place
with 4 wood screws. Adjust the U clamp so that the gasket
compresses slightly and provides a good initial seal to
draw vacuum. Do not over tighten as this could cause
compression set in the gasket material.
Toggle clamp diagram for frame presses 4 x 10 & 5 x 10
34.25” for a 68.5” side 28.25” for a 56.5” Side
Toggle clamp diagram for frame presses 4 x 8 & 5 x 8
34.25” for a 68.5” side 28.25” for a 56.5” Side
Hinges
Center of Rail
42” from end
7” from end
Hinges
Center of Rail
52.5”
Tape
7” from end
Note 1
Toggle clamp diagram for 54“ x 54” Frame Press
Hinges
BASE BOARD
Poly top
2 rows of gasket
material stuck to
poly top (no gap)
Silicone II
TABLE TOP
DRAWING G
Note 1: Press the top to the table top between the frame and baseboard prior to drawing vacuum. This prevents the frame from bending in.
CALL 1-800-547-5484 TODAY!
Quality VAKuum Products, Inc.
Or visit our site at www.qualityvak.com
74 Apsley St. - Hudson, MA 01749
Tel: 978-562-4680 - Fax: 978-562-4681
7” from end
Page 8

INSTRUCTIONS FOR ASSEMBLING
THE VAKUUM FRAME PRESS
7/11/12 - Frame Press Instructions.cdr Page 8
Adding a vacuum tank.
Adding a vacuum tank will significantly increase the
time between cycles and you should consider this
option if you are experiencing cycle times of one to
two minutes. It is very simple to add. Since a
vacuumed down top has very little air space, just a
small amount of leakage will quickly fill this space
and cause the unit to cycle. It’ s a function of the size
of the tank. A 10 gallon tank or larger is suggested.
The tank can expand this space by anywhere from 5
to 10 times in size, thus, 5 to 10 times longer between
cycles.
The drawing shows how to include the tank into your
frame press set-up. It’s a very simple set up, if you
make it yourself, just make sure all your connections
are vacuum tight.
Once the tank is installed and the frame press is
pumped down to vacuum level, the time between
cycles will become longer . When ready to open the
press, shut off the valve to the tank then open the
bleeder valve. This will save the vacuum in the tank
and you will not have to pump it down every time
you press a new piece.
When ready to press again, close the lid, turn on the
pump and then open the valve to the tank.
Frame
Press
Tee
Valve
More than one tank can be added by connecting them
with a TEE.
Pump
Bleeder
V alve
T ANK
1
T ANK
2
T ANK
3
Page 9

BASIC VENEERING
PRINCIPLES
03/08/2007 r1 - Basic Veneering Principles.cdr
FLAT SURF ACES
1. You can either cut the substrate to finished size or
slightly oversized and trim later . Good substrate materials
are; MDF , p article board or plywood. If solid wood is to be
used, a cross ply must be applied and allowed to dry
unless the panel is less than 1/4" thick.
2. Prepare a caul by rounding all edge that will be touched
by the VAK bag. The caul should be approximately 1/2"
larger than the substrate and made from 1/2 to 1" thick
melamine coated particle board. If the caul has too much
of an overhang, it can bow up in the center and you will not
have a good pressing. Any flat material can be used,
however, the coated stock has the advantage of the glue
squeeze out not sticking.
3. Glue one face of the substrate and place the veneer on
the substrate. Do not glue the veneer . Use veneering tape
(not masking tape) to tape the veneer to the substrate on
opposite sides, not on all 4 sides (the veneer has to be able
to move when pressed). The veneer should be about 1/4"
larger than the substrate so that it overhangs the substrate
by approximately 1/8" on all sides, this allows for slight
movement and trimming later .
4. Place the caul on the veneer and tape it in place.
CURVED SURF ACES
1. Build your form with the knowledge that it will see almost
1 Ton/sq.ft. of pressing force. A weak mold will get
crushed. This is also true of curved furniture. Veneering a
hollow round base can be a problem unless the inside is
structurally sound. If you are veneering a curved piece of
finished furniture (like a juke box) that cannot be taken
apart, stuff it with bubble pack. Bubble pack can be stuffed
into every corner and is much better to use than a general
purpose inflatable bladder .
2. Make the mold convex whenever possible and do not
totally close it in. Leave the bottom open or cut some slots
in the bottom so that air is not trapped inside.
3. Assemble your veneer “sandwich” as per the flat panel
instructions. Place it on the form and slide it into the bag.
Hold the assembly on the form as the bag is being pumped
down. Once evacuated, the bag will hold everything
down.
4. Tape the top caul to the assembly only at the front and
bottom edge and not the side edges. If you tape sides, the
inner plies may not slide into their proper radius without
causing a misalignment problem.
5. Slide the whole assembly into the bag.
6. If you want to veneer both sides at the same time, flip the
assembly, at step 3, over and repeat for the second side.
Y ou may want to use a bottom caul for ease of handling. It
can be larger than the substrate since it will be laying flat on
the baseboard and will protect the veneer as you slide the
assembly into the bag.
Top Caul
Substrate
Bottom Caul
Veneer
Base Board
CALL 1-800-547-5484 TODAY!
Or visit our site at www.qualityvak.com
Notes:
A. Always try a dry run to make sure all the pieces fit to
gather and fit in the bag without problems. Go as far as to
pull the maximum vacuum with a new piece or shape.
B. Know your time limits for assembly, glue, and bag
evacuation so that you don't get caught short.
C. For guidelines on building a form go to
https://www.qualityvak.com/tech2.html.
OVER
Quality VAKuum Products, Inc.
74 Apsley St. - Hudson, MA 01749
Tel: 978-562-4680 - Fax: 978-562-4681
Page 10

ADDITIONAL VAKUUM BAG
03/08/2007 r1
VENEERING TIPS
Always dry test the system before trying something new
like a fast setting glue, a large item or a new form. This way
you can be sure that the work piece will fit in the bag and
you have sufficient time to do all that needs to be
accomplished in the time allowed.
If the object in the bag is large, like hollow columns or a
box, you can use a shop vac to evacuate the bulk of the air .
A shop vac moves large volumes of air quickly, however, it
does not get a very high vacuum level needed to supply the
pressing force required for a good bond. Turn the VAK
Pump on, then insert the shop vac in the open end. It will
quickly pull the bag down and tight against the workpiece.
Remove the nozzle and close the bag, this will allow the
V AK Pump to finish the job.
A word of caution about continuously running a shop vac in
a closed system. Any electric motor needs an air flow to
cool it. If it is run continuously while attached to a closed
system, like the bag, the motor can burn out. Running it for
10 - 20 seconds to evacuate the bag is not a problem.
Any time a form is used inside the bag, make sure it is
strong enough to withstand the pressure of 1800 lbs/sq.ft.
Make a dry run!
Also, do not make a form or veneer a piece that has only 2
contact points with the baseboard. For example, think of
an inverted U shaped piece that is 2' wide, 5' across at the
base and 6 - 8" high at the top of the arch. If this were
placed on the baseboard and VAKuum applied, it would
snap most baseboards and possibly cause the bag to
implode (explosion pushes out, implosion pulls in). First,
all the pressure from the top area (2' X 5' = 10 sq ft X 1800
lbs/sq.ft. = 18000 pounds of force) is on the 2 contact
points. Since the base of the inverted U would have less
than 1 sq.ft of surface area to distribute the load, the 18000
lbs is distributed as 9000 lbs on two .5 sq.ft. areas. The
baseboard is seeing 1800 lbs/sq.ft on the underside and
since the top side is only supported by in two small .5 sq.ft.
areas (5' apart) it will snap most baseboards in the center .
Even if the baseboard was strong enough to withstand this
pressure, the bag would not. We have a situation where
the bag gets pushed in, under the arch, (roughly a 6" x 5'
area). The bag will stretch until it hits something or will
burst after a certain point. The open area must be blocked
to prevent the stretching. A strong form to fit under the arch
will not only prevent the bag from stretching but will also
support the arch and baseboard.
If for some reason you are not able to fully protect the bag
from sharp corners or excessive stretching, consider
purchasing an extra sheet of vinyl material and use it as a
protective layer. The double thickness will help extend the
life of the bag.
After the bag has been used and stretched, it will develop
pin holes which will cause leakage. Turn the bag over,
plug the hole and reinstall the VCA (VAKuum Connector
Assembly). The bottom side will be fresh and un-stretched
for the most part. With the top side now on the bottom, it
will be pressed against the bottom of the baseboard.
Since the bottom does not contain any saw cuts, the pin
holes will be sealed when pressed against the baseboard.
Excess glue must be cleaned from the bag as the hard glue
could puncture the bag. To make cleaning easier and to
add protection to the bag, order a length of vinyl material
and use it as a cover over the workpiece. The vinyl sheet
can be removed and easily cleaned. When used it will also
cover pin holes that have been created if the bag has been
overly stretched.
CAUTION: Some glues will stick to the bag: polyurathane
and some epoxies are known to stick to bags. Use wax
paper or some material that will isolate the bag from the
glue.
Avoid, if possible, having the seam pulled tight against the
baseboard as shown below. This can be the cause of the
material ripping at the edge of the seam. This is
different than the seam delaminating. Leave some
space between the bag and the baseboard so that the bag
can flatten out against itself and not put any stress at the
edge of the seam.
Here it can rip due to stress.
Base Board
Seam
The bag flattens out against itself and does
not stress the edge of the seam.
Base Board
Always fully support the bag, do not set-up on saw
horses without complete support.
CALL 1-800-547-5484 TODAY!
Or visit our site at www.qualityvak.com
Quality VAKuum Products, Inc.
74 Apsley St. - Hudson, MA 01749
Tel: 978-562-4680 - Fax: 978-562-4681
 Loading...