

Page 1
M
INSTRUCTIONS FOR ASSEMBLING
VAKUUM B AGS WITHOUT BASEBOARDS
6/19/2000 - Bags Without Baseboards & Curve Info.cdr
When using a bag without a baseboard inside, you
need to make some changes to the setup.
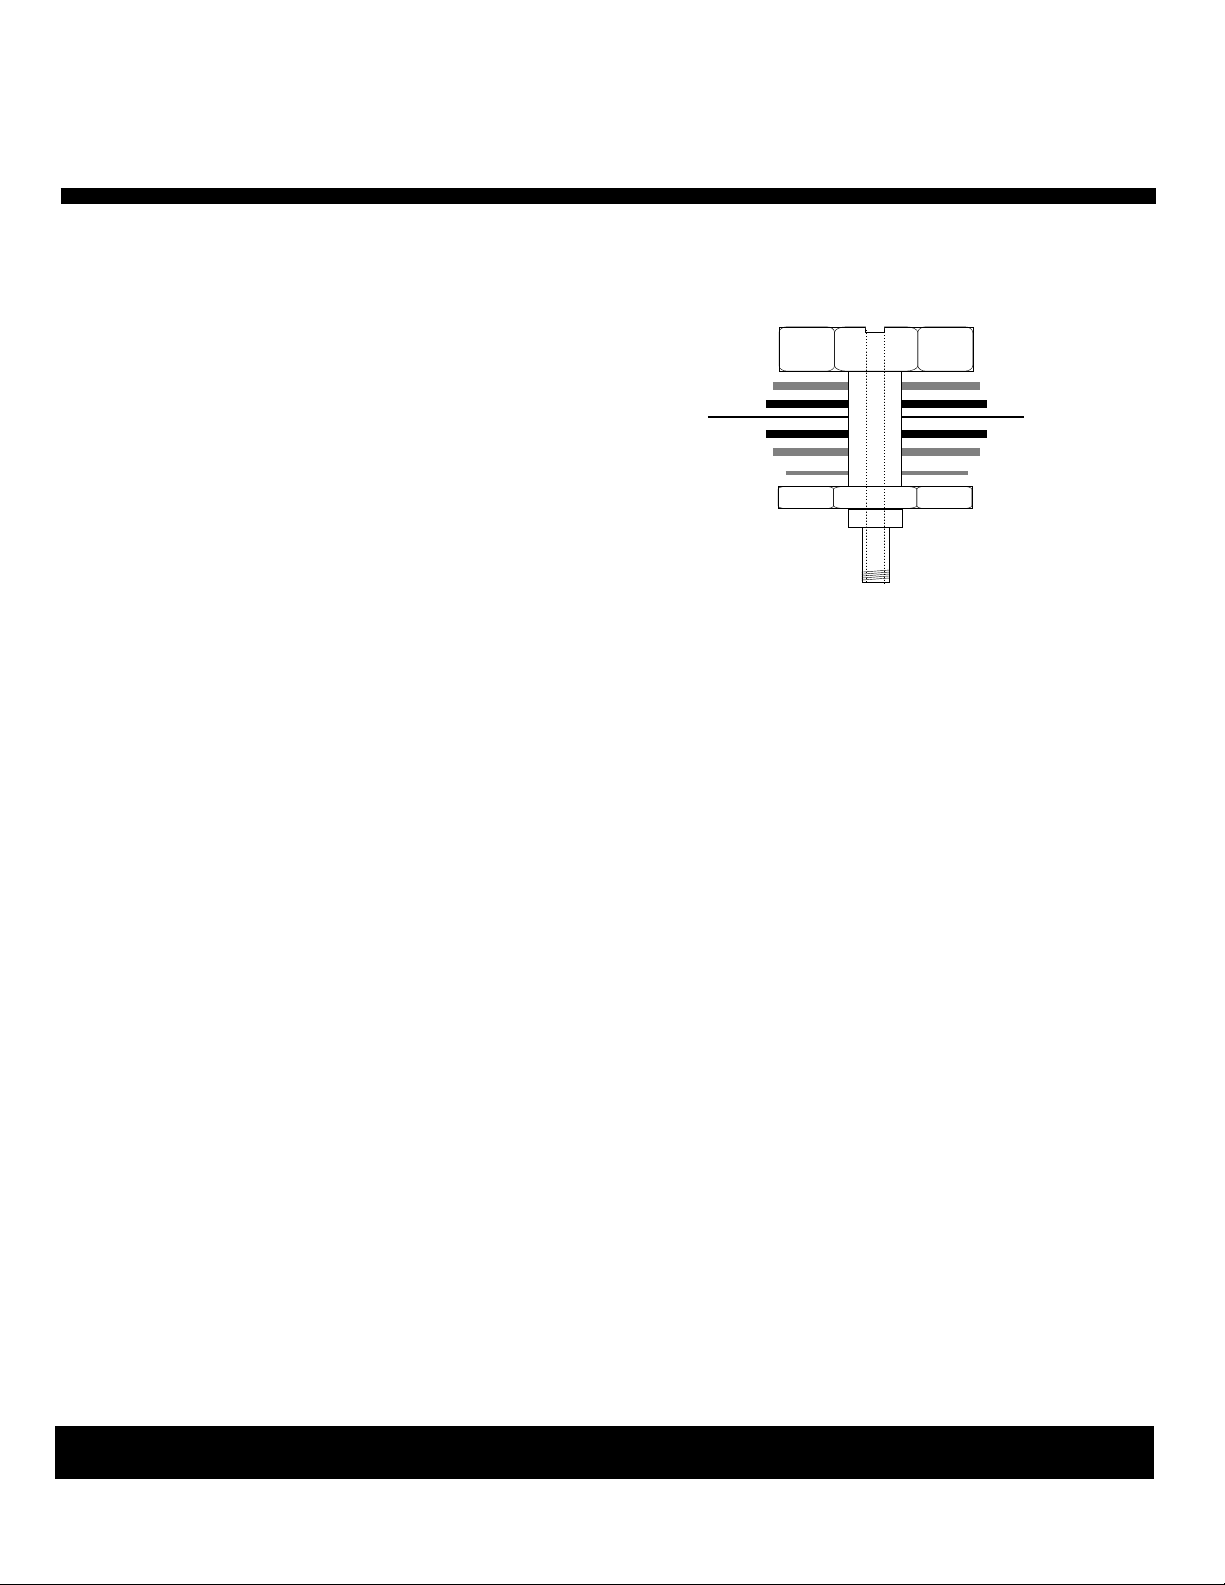
VCA6
The V AKuum Bag Connector (VCA or VCA6) should
have an additional metal washer that goes inside the
bag as shown in Drawing A. If you do not have a
washer to fit the VCA(6), make one out of something
like Formica or a thin piece of wood. Make sure it
does not have any sharp edges!
Decide where you want the connector located.
Normally, 18“ in from the end is a good location for
long narrow bags. Remember, the connector must
butt up against your workpiece and not against the
opposite side of the bag. If it hits the opposite side of
the bag, the vacuum hole will seal itself off and you
will not get full vacuum in the bag.
METAL WASHER
BAG
METAL
WASHERS
RUBBER
WASHERS
Drawing A
For the VCA, cut a 5/8“ dia. hole or a 3/4” hole for the
VCA6 at the point you want the connector located. If
you put the hole in the wrong place, patch it using a
vinyl pool repair kit, but be careful not to glue the bag
together.
Push the connector through the bag so that the
rubber washer is against the bag. Place the other
rubber washer and metal washers over the connector
and snug the nut tight with a wrench. Do not over
tighten.
When using the bag without a baseboard, which has
grooves in it to allow the air to be evacuated through
the vacuum port, you need another method of
allowing the air to flow from one end of the bag to the
VCA(6). A good method is to wrap your workpiece in
nylon window screen material (see our video). The
connector then butts against the window screen
which allows the air to flow through the mesh.
It helps if you cut or file grooves into the top nut. This
allows the air to pass into the vacuum connector at a
faster rate.
NEW VAK-Net
A screen or net material is used inside a bag
without a baseboard in order to allow the air to be
evacuated from the back of the bag. The bag can
seal around the connector on a smooth surface
and seal itself off from the remainder of the bag.
We have recommended plastic window screen
and it can be used. This netting is easier to use
and remove.
The netting is expandable and can slide over a
jamb or stair stringer. If your part is too wide for
the net, just tape it to the top side (away from the
form) of your piece. Make sure that the VCA6
(VAKuum Bag Connector) touches the screen.
Always do a dry run the first time using V AK-Net.
CALL 1-800-547-5484 TODAY!
Or visit our site at www.qualityvak.com
Quality VAKuum Products, Inc.
74 Apsley St. - Hudson, MA 01749
Tel: 978-562-4680 - Fax: 978-562-4681
Page 2
TIPS WHEN PRESSING WITH FORMS
OUTSIDE THE VACUUM BAG.
Whether doing curved staircases or round top windows, the
laminates are glued up, taped, mesh is added and then put in
the bag. The bag is placed over the form and clamped to hold
it to the form. Vacuum is applied and squeezes with 1800
lbs./sq.ft. of even and uniform pressure.
Always do a dry run the first time trying something for
the first time or if you are resetting up the equipment.
Glue: For curved pieces we recommend our VAK-Bond
2000 for several reasons. It has 20 - 30 minutes of open time
and dries with a rigid glue line, thus eliminating or minimizing
spring back. A rigid glue line is developed due to the fact that
the glue cures by a chemical reaction. Most yellow and white
glues cure by the solvent migrating away from the glue joint.
Thus, if the solvent (usually water) comes in contact with the
joint, it softens and weakens. VAK-Bond 2000 has high
water and heat resistance.
After gluing and stacking the laminates, use fiberglass
reenforced tape to wrap them, however, reverse the tape.
The laminates need to slide as they are curved around the
form, thus, reversing the tape prevents sticking and they slide
freely while still being held in place by the tape. T o hold joint s
together, use one or two strips of the same tape across the
joint. Masking tape will break and not hold.
Wrap the laminates in a mesh (plastic window screen is OK).
It should cover at least the side where the VCA is located.
The mesh acts as channels for the air to get out of the far end
of the bag. If the head of the VCA hit s the outer laminate, and
not the mesh, it will seal itself off and the bag will not develop
the full 1800 lbs./sq.ft. of pressure. Apply some tape to hold
the mesh in place. Sometimes it helps if you draw a slight
vacuum on the bag before placing it on the form.
Consider using a female form when doing small radius
arches like window jambs. When the bag is bent around the
male side of the form,
be smooth, however,
ripples on the inside of the arch. On larger radii, this fraction
of an inch of ripple is normally not a problem. On a small
radius, this could be a problem, thus using the inside of the
form will solve this problem.
the bag on the topside of the arch will
notice that the bag will have small
Visit our web site www.qualityvak.com and
view the Q.V.P. Newsletter section to view
Techniques #1 for further instruction.
Page 3

BASIC VENEERING
5/4/98 - Basic Veneering Principles.cdr
PRINCIPLES
FLAT SURFACES
1. Start with cutting the substrate to the finished size.
Good substrate materials are; MDF , particle board or
plywood. If solid wood is to be used, a cross ply must be
applied and allowed to dry unless the panel is less than
1/4" thick.
2. Prepare a caul by rounding all edge that will be touched
by the VAK bag. The caul should be approximately 3/4"
larger than the substrate and made from 1/2 to 1" thick
melamine coated particle board. Any flat material can be
used, however, the coated stock has several advantages.
First, the coating makes it non-porous. With porous
material, the vacuum pulls the air from the pores over a
period of time, this has the effect of breaking the vacuum
prematurely. This causes the VAK Matic Controller to
cycle on and off more often. A coated caul can also be
lightly waxed, this helps keep the excess glue from
sticking.
3. The veneer should be matched and placed face down on
the caul. It should be about 1/4" larger than the substrate
so that it overhangs the substrate by at least 1/8" on all
sides. Tape the veneer to the substrate, however, make
sure that the tape will not touch the substrate when it is
placed on top of the veneer. Y ou do not want to trap t ape
under the veneer.
4. Glue one face of the substrate. Many use the regular
yellow glues unless the workpiece is going in a special
area where it sees some unusual conditions like excessive
heat (fireplace panels) or high moisture. Apply glue to the
top of the substrate and align the top caul, with its taped
veneer, on top of the substrate.
5. Tape the assembly together so it will not move when
placing it in the V AK Bag.
Top Caul
Substrate
Veneer
CURVED SURF ACES
1. Build your mold with the knowledge that it will see almost
1 Ton/sq.ft of pressing force. A weak mold will get
crushed. This is also true of curved furniture. Veneering a
hollow round base can be a problem unless the inside is
structurally sound.
2. Make the mold convexed whenever possible and do not
totally close it in. Leave the bottom open or cut some slot s
in the bottom so that air is not trapped inside.
3. Use the mold as the bottom caul and wax it as with a flat
caul. Tape the bottom veneer to the mold. Glue the
bending ply/substrate and place it over the veneer. The
number of bending plys glued at one time depends on the
size, thickness and stiffness of the ply . Glue several plys if
they are flexible enough to be bent in the bag. In some
cases, you will help the bag by pushing down on the
flexible top caul, as the bag is being evacuated. Once
evacuated, the bag will hold everything down.
4. Lay the top veneer on top of the glued substrate. Tape
the top caul to the assembly only at the points where it
meets the bottom assembly. If you tape it all the way
around, like with the flat panel, the inner plys may not slide
into their proper radius without causing a misalignment
problem.
5. Place a piece of plastic sheet over the top veneer and
tape in place. Place the top caul (bending ply) in position
and tape in place. Slide the completed assembly into the
bag. Start the VAK pump and hold the assembly down
while the reaches the desired vacuum level.
Notes:
A. Always try a dry run to make sure all the pieces fit to
gather and fit in the bag without problems. Go as far as to
pull the maximum vacuum with a new piece or shape.
B. Know your time limits for assembly, glue, and bag
evacuation so that you don't get caught short.
Bottom Caul
Base Board
CALL 1-800-547-5484 TODAY!
Or visit our site at www.qualityvak.com
Quality VAKuum Products, Inc.
OVER
74 Apsley St. - Hudson, MA 01749
Tel: 978-562-4680 - Fax: 978-562-4681
Page 4

ADDITIONAL VAKUUM BAG
VENEERING TIPS
4/7/98 - Electric Bag Instructions.cdr
Always dry test the system before trying something new
like a fast setting glue, a large item or a new form. This way
you can be sure that the work piece will fit in the bag and
you have sufficient time to do all that needs to be
accomplished in the time allowed.
If the object in the bag is large, like hollow columns or a
box, you can use a shop vac to evacuate the bulk of the air .
A shop vac moves large volumes of air quickly, however , it
does not get a very high vacuum level needed to supply the
pressing force required for a good bond. Turn the VAK
Pump on, then insert the shop vac in the open end. It will
quickly pull the bag down and tight against the workpiece.
Remove the nozzle and close the bag, this will allow the
V AK Pump to finish the job.
A word of caution about continuously running a shop vac in
a closed system. Any electric motor needs an air flow to
cool it. If it is run continuously while attached to a closed
system, like the bag, the motor can burn out. Running it for
10 - 20 seconds to evacuate the bag is not a problem.
Any time a form is used inside the bag, make sure it is
strong enough to withstand the pressure of 1800 lbs/sq.ft.
Make a dry run!
Also, do not make a form or veneer a piece that has only 2
contact points with the baseboard. For example, think of
an inverted U shaped piece that is 2' wide, 5' across at the
base and 6 - 8" high at the top of the arch. If this were
placed on the baseboard and VAKuum applied, it would
snap most baseboards and possibly cause the bag to
implode (explosion pushes out, implosion pulls in). First,
all the pressure from the top area (2' X 5' = 10 sq ft X 1800
lbs/sq.ft. = 18000 pounds of force) is on the 2 contact
points. Since the base of the inverted U would have less
than 1 sq.ft of surface area to distribute the load, the 18000
lbs is distributed as 9000 lbs on two .5 sq.ft. areas. The
baseboard is seeing 1800 lbs/sq.ft on the underside and
since the top side is only supported by in two small .5 sq.ft.
areas (5' apart) it will snap most baseboards in the center .
Even if the baseboard was strong enough to withstand this
pressure, the bag would not. We have a situation where
the bag gets pushed in, under the arch, (roughly a 6" x 5'
area). The bag will stretch until it hits something or will
burst after a certain point. The open area must be blocked
to prevent the stretching. A strong form to fit under the arch
will not only prevent the bag from stretching but will also
support the arch and baseboard.
If for some reason you are not able to fully protect the bag
from sharp corners or excessive stretching, consider
purchasing an extra sheet of vinyl material and use it as a
protective layer. The double thickness will help extend the
life of the bag.
After the bag has been used and stretched, it will develop
pin holes which will cause leakage. Turn the bag over,
plug the hole and reinstall the VCA (VAKuum Connector
Assembly). The bottom side will be fresh and un-stretched
for the most part. With the top side now on the bottom, it
will be pressed against the bottom of the baseboard.
Since the bottom does not contain any saw cuts, the pin
holes will be sealed when pressed against the baseboard.
Excess glue must be cleaned from the bag as the hard glue
could puncture the bag. To make cleaning easier and to
add protection to the bag, order a length of vinyl material
and use it as a cover over the workpiece. The vinyl sheet
can be removed and easily cleaned. When used it will also
cover pin holes that have been created if the bag has been
overly stretched.
CAUTION: Some glues will stick to the bag: urea
formaldehyde, polyurathane and resorcinol are known to
stick to bags. Use wax paper or some material that will
isolate the bag from the glue.
Avoid, if possible, having the seam pulled tight against the
baseboard as shown below. This can be the cause of the
material ripping at the edge of the seam. This is
different than the seam delaminating. Leave some
space between the bag and the baseboard so that the bag
can flatten out against itself and not put any stress at the
edge of the seam.
Here it can rip due to stress.
Base Board
Seam
The bag flattens out against itself and does
not stress the edge of the seam.
Base Board
Always fully support the bag, do not set-up on saw
horses without complete support.
CALL 1-800-547-5484 TODAY!
Or visit our site at www.qualityvak.com
Quality VAKuum Products, Inc.
74 Apsley St. - Hudson, MA 01749
Tel: 978-562-4680 - Fax: 978-562-4681
 Loading...