


®
RANGE
CORTEX NVR
INSTALLER’S QUICK SETUP GUIDE
For full instructions see the Users Guide found on the USB pen drive provided with the NVR
More detailed instructions on how to operate
your NVR are included in the Quick Users Guide,
which is on the setup USB pen drive included.
We refrain from printing these large manuals in
an effort to limit our impact on the environment.
BEFORE INSTALLING ANYTHING WE STRONGLY RECOMMEND THAT YOU CONNECT YOUR CAMERAS TO YOUR DVR AND TEST YOUR
SYSTEM FIRST. WE CHECK EVERYTHING TO MAKE SURE IT IS WORKING WHEN IT LEAVES US BUT VERY OCCASIONALLY THINGS FAIL AND
IT IS BETTER TO KNOW NOW THAN AFTER YOU HAVE FITTED EVERYTHING!
NVR Power
Cortex NVR
1. DEVICE CONNECTIONS
STILL NEED HELP?
Then speak to our engaging technical team via our
webchat service found upon our website:
www.adata.co.uk
or if you prefer to call: (023) 92488302
Look for this webchat
bubble on our website
to connect to one of
our technical team
members.
Output to TV or Monitor
Power Adaptor
HDMI/VGA/RCA
Connect the
mouse to the
USB socket
1.
3.
Ethernet Connection
IP Camera
PoE Switch
Ethernet connector
to POE Switch
POE Switch
to NVR
2.
Connect camera’s
ethernet port to ethernet
cable.
Power Adaptor
Power to
POE Switch
Connect camera to POE
switch to provide camera
with power.
4.
Complete Connection
Setup
Connect peripheral
devices to NVR and
provide power.
Connect POE Switch to
ethernet port at the rear
of the NVR.
Ethernet Connection
2. IP CAMERA SETUP
3. CONFIGURING
IP CAMERAS
2.
3.
4.
5.
1.
Once you have successfully setup your CCTV system, the newly installed NVR must be made aware of the IP cameras connected to the
system, in order to record. ‘Plug-n-play’ NVRs will nd the cameras for you without any setup, but there are times where you may need to
manually setup the connected cameras so that they can be found by the NVR on the network. When you have booted up the NVR, you will
eventually see a blank multi-tiled live view interface. Follow the instructions below to manually set up the IP cameras correctly:
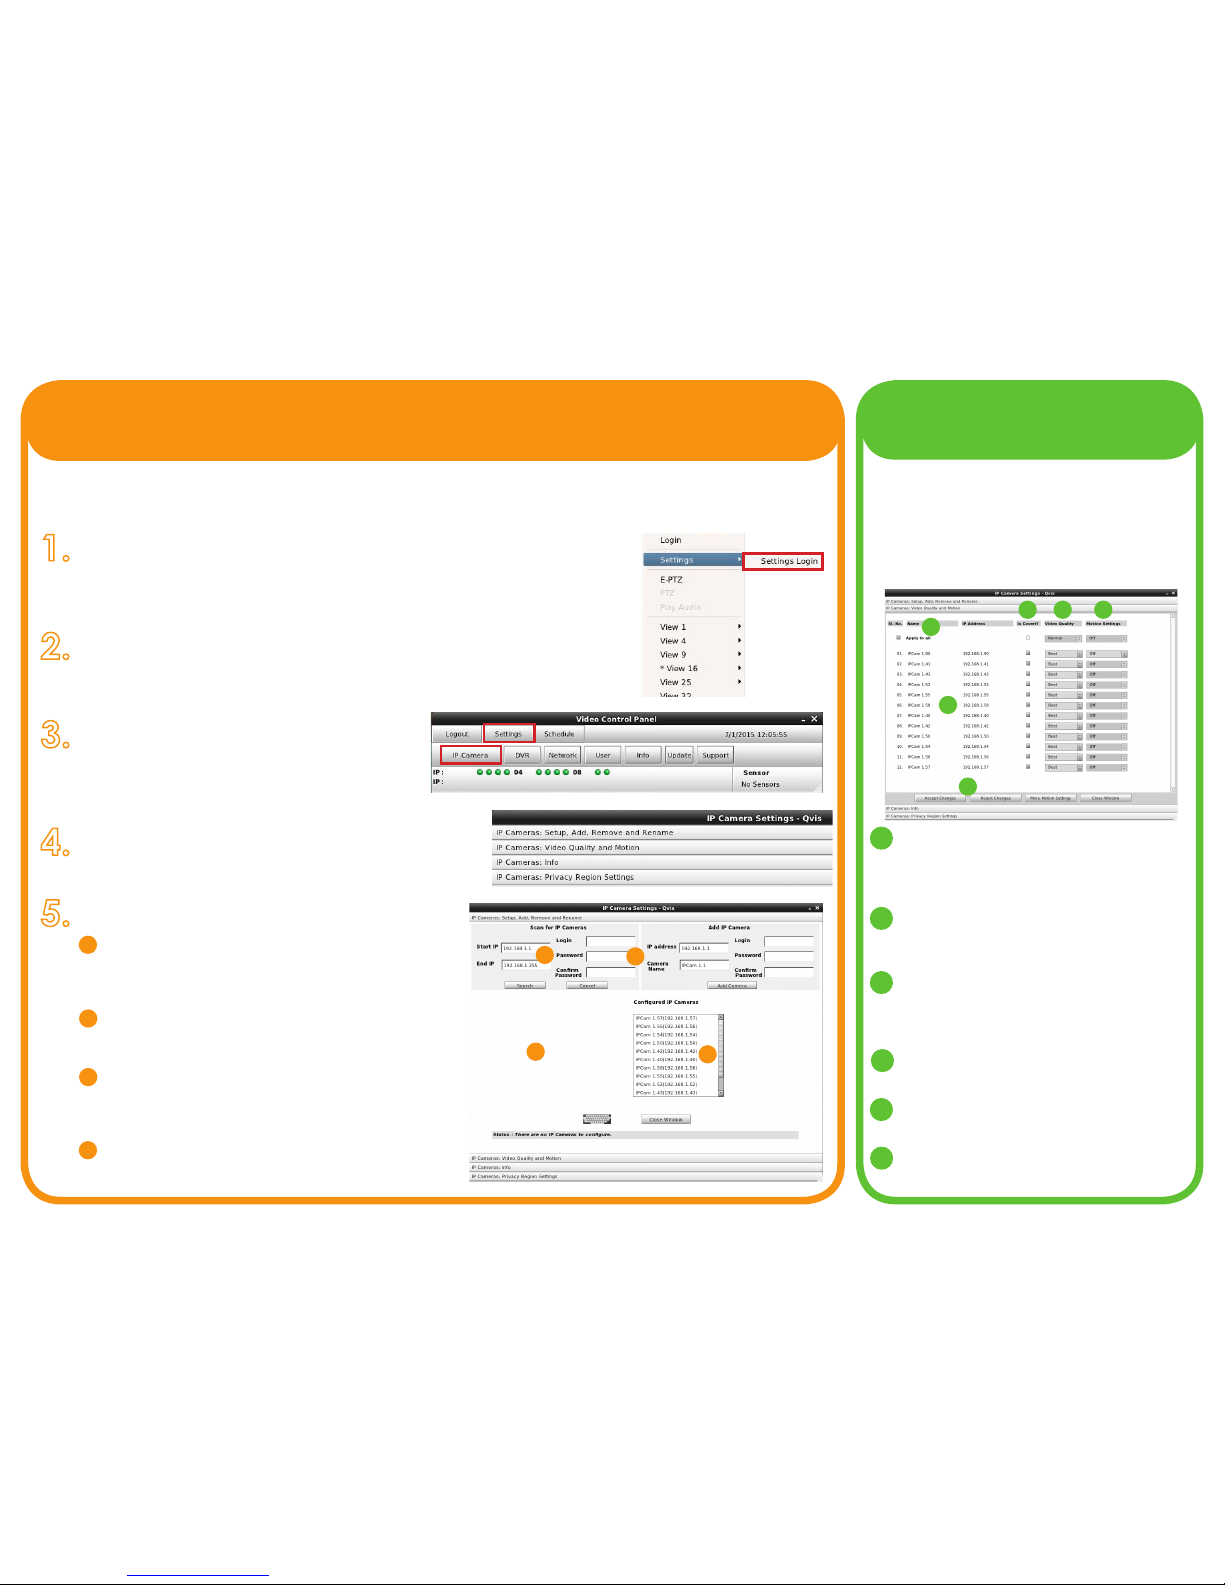
The system ‘Settings’ is where you can modify the NVR’s camera conguration
and parameters, and set them to run your CCTV security system. You can nd the
‘Settings’ (and Schedule setup feature) options by clicking the right mouse button
anywhere within the multi-tiled live view screen, and then selecting the ‘Settings
Login’ on the options list (highlighted on the right by the red box).
You will then see a login screen appear. Type in the default Username and
Password to access the ‘Video Control Panel’.
Default Username: admin Default Password: ad^min
Click on the ‘Settings’ button (highlighted by a red
box in the image to the right), and it will display the
7 menu headings. Then click on the ‘IP Cameras’
option (also highlighted by a red box).
The next window that will appear is the ‘IP Camera Settings’.
Select ‘IP Cameras: Setup, Add, Remove and Rename’.
This menu denes all controls of IP cameras. Follow the
steps to the right to congure IP cameras:
The NVR automatically determines the ‘Start IP’ and
‘End IP’ addresses. If this has not occured then please
consult a local network administrator or use the ‘ipcong’
application on a windows PC.
Generally, leave the ‘Login’ and ‘Password’ elds
blank. Only ll in these elds if any of the IP cameras’
admin passwords have changed from the default.
Click the ‘Search’ button and the IP cameras
should appear in the lower left. Add them individually
by selecting the IP camera and clicking on the ‘Add
Camera’ button (just below login info).
Click on a camera in the list to see further information
about the camera, rename it or remove it.
If you would like to change the video quality
of your IP camera so that less data storage on
your hard drive is used then you can adjust the
levels within the ‘IP Cameras: Video Quality and
Motion’ menu section. At the same time you
can also set the motion sensor settings for each
IP camera (see User’s Manual for more info).
1 If you wish to set all cameras to the same
video quality and motion settings you can
click on the ‘Apply to all’ button under the
‘SI. No.’ and ‘Name’ column titles.
2 The ‘SI. No.’, ‘Name’ and ‘IP Address’
columns will list the details of each IP
camera congured to work with the system.
3 Is Covert?: Check this box if the camera
is a covert camera. Only users with sufcient
privilege will be able to view such cameras.
(See User Guide: Settings - User)
4 Video Quality: You can set any of the as
either BEST, BETTER, NORMAL, GOOD & FAIR.
5 Motion Settings: You can set the motion
sensitivity as either Max, Med, Min or Off
6 Click ‘Accept Changes’ to save selections.
Click ’Reject Changes’ to discard changes.
A
B
C
D
1
2
3 4 5
6
A
B
C
D
 Loading...