


APOHD-PTZ20
1080P HD PTZ Speed Dome
User’s Manual
V1.0 10 / 2013

© Copyright Qvis® All documentation rights reserved.
i

© Copyright Qvis® All documentation rights reserved.
ii
Welcome
Thank you for purchasing the APOHD-PTZ20 Speed Dome.
This user’s manual is designed to be a reference tool for the installation and
operation of your system.
Here you can find information about the corresponding IP camera’s features and
functions, as well as a detailed installation method.
Before installation and operation please read the following safeguards and
warnings carefully!

© Copyright Qvis® All documentation rights reserved.
iii
Table of Contents
1 FEATURES AND FUNCTIONS ................................................................................................ 1
1.1 General Introduction ............................................................................................................................................. 1
1.2 Features .............................................................................................................................................................. 1
1.3 Specifications ....................................................................................................................................................... 2
2 QUICK INSTALLATION SPEED DOME INSTALLATION ......................................................... 4
2.1 Installation Preparation ........................................................................................................................................ 4
2.2 Installation ............................................................................................................................................................ 5
2.2.1 Address and Baud Rate Setup ........................................................................................................................ 5
2.2.2 Install the transparent cover ............................................................................................................................ 6
2.2.3 Install the speed dome ..................................................................................................................................... 7
2.3 Initial Setup .......................................................................................................................................................... 9
2.4 Dial Switch Setup ................................................................................................................................................. 9
2.4.1 Communication protocol and Baud rate .......................................................................................................... 9
2.4.2 Address Setup ............................................................................................................................................... 10
3 BRACKET DIMENSIONS ....................................................................................................... 11
3.1 Wall mount bracket ............................................................................................................................................ 11
3.2 Hanging mount bracket (Multiple Lengths) ........................................................................................................ 12
3.3 Corner mount bracket ........................................................................................................................................ 12
3.4 Pole mount bracket ............................................................................................................................................ 13
4 WALL MOUNT BRACKET INSTALLATION ............................................................................ 14

© Copyright Qvis® All documentation rights reserved.
iv
4.1 Component Installation ...................................................................................................................................... 14
4.2 Installation .......................................................................................................................................................... 14
4.2.1 Installation Requirements .............................................................................................................................. 14
4.2.2 Installation Steps ........................................................................................................................................... 14
5 HANG MOUNT BRACKET INSTALLATION ........................................................................... 16
5.1 Component Installation ...................................................................................................................................... 16
5.2 Installation .......................................................................................................................................................... 16
5.2.1 Installation Requirements .............................................................................................................................. 16
5.2.2 Installation Steps ........................................................................................................................................... 16
6 CORNER MOUNT BRACKET INSTALLATION ...................................................................... 19
6.1 Component Installation ...................................................................................................................................... 19
6.2 Installation .......................................................................................................................................................... 19
6.2.1 Installation Requirements .............................................................................................................................. 19
6.2.2 Installation Steps ........................................................................................................................................... 19
7 POLE MOUNT BRACKET INSTALLATION ................................................................ ............ 21
7.1 Installation .......................................................................................................................................................... 21
7.1.1 Installation Requirements .............................................................................................................................. 21
8 QUICK CONFIGURATION TOOL ........................................................................................... 24
8.1 Overview ............................................................................................................................................................ 24
8.2 Operation............................................................................................................................................................ 24
9 WEB OPERATION ................................................................................................................. 27
9.1 Network Connection ........................................................................................................................................... 27

© Copyright Qvis® All documentation rights reserved.
v
9.2 Login and Logout ............................................................................................................................................... 27
10 APPENDIX ABOUT RS485 BUS ........................................................................................... 30
10.1 RS485 Bus Main Feature ................................................................................................................................... 30
10.2 RS485 Bus Transmission Distance ................................................................................................................... 30
10.3 The Problem in Practical Use ............................................................................................................................ 30
10.4 RS485 Bus FAQ ................................................................................................................................................. 31
6 FAQ ........................................................................................................................................... 32
10.5 Daily Maintenance ............................................................................................................................................ 32
10.6 Problems and Solutions .................................................................................................................................. 32

© Copyright Qvis® All documentation rights reserved.
vi
Important Safeguards and Warnings
1.Electrical safety
All installation and operation here should conform to your local electrical safety codes.
We assume no liability or responsibility for all the fires or electrical shock caused by improper handling or
installation.
We are not liable for any problems caused by unauthorized modification or attempted repair.
2.Transportation Security
No heavy stress, violent vibration or contact with water is allowed during transportation, storage and
installation.
Please use the original packing material (or the material of the same quality) when you ship it back to the
manufacturer.
3.Installation
Do not apply power to the product before completing installation.
Do not put object(s) on the product.
4.Environment
This product should be installed in a cool, dry place away from direct sunlight, inflammable, explosive
substances and etc.
Please keep it away from environments that contain electromagnetic radiation or objects that produce it.
Please keep sound ventilation around the device at all times.
Do not allow the water and other liquid to penetrate into the device if casing has been compromised. This
series product complies with the IP66 standard specified in the Degrees of Protection Provided by
Enclosure.
Please make sure the CCD (CMOS) component is away from the radiation of the laser beam device.
Otherwise it may result in CCD (CMOS) optical component damage.
5. Daily Maintenance
Current series product has no power button. Please unplug all corresponding power cables before your
begin installation or daily maintenance work.
Please keep the dustproof cap back to protect the CCD or CMOS part if the device does not work for a long
time.
Do not touch CCD (CMOS) component. You can use the blower to clean the dust on the surface of the
device. You can use the dry cloth with some alcohol or mild detergent to clear if necessary.
Do not use volatility solvent such as the benzene or thinner, or detergent with strong abradability. It may
result in lens damage or it may adversely affect the device performance.

© Copyright Qvis® All documentation rights reserved.
vii
If there is too much dust, please use the water to dilute the mild detergent first and then use it to clean the
device. Finally use the dry cloth to clean the device.
6. About Accessories
Always use all the accessories recommended by manufacturer.
Before installation, please open the package and check that all the components are included in the package.
Contact your local retailer ASAP if something is missing in your package.

© Copyright Qvis® All documentation rights reserved.
1
1 Features and Functions
1.1 General Introduction
This network camera integrates traditional camera and network video technology. It adopts both audio and video
data collection and transmission simultaneously. Because of inbuilt internal hardware it can connect to a network
directly without any auxiliary device. When you want to access the camera, you can use a web browser running
off the network at the client-end. Due to its multiple functions it allows for various use in many environments
such office, bank, road & traffic monitoring, etc.
This series network camera product uses the latest industry standard H.264 video and G.711a audio
compression technology, which guarantees the best audio and video quality whilst reducing file sizes. Using the
Sony IMX122 digital imaging chipset the camera can record in full 1080P HD resolution so that you can capture
highly detailed widescreen video images. This will allow you to monitor your premises in finer detail and can
interpret incidents caught on camera much quicker.
The PTZ operational functions allows for smooth full 360 degree rotation and 180 degree tilt movements. The
camera’s interface will allow you full control over the image quality and telemetry settings with up to 255 presets
that can be programmed in. You can also be able to program up to 8 tour patterns so that it can perform a fully
customised and extensive scan of the location it is installed within.
It supports real-time monitor and listening at the same time via the inbuilt microphone. If you want to
communicate with a person(s) in view of the camera it also supports dual-way bidirectional talk. The built-in
protection enclosure and waterproof design conforms to the IP 66 level. It has a sound waterproof function
suitable for use in the outdoor environments.
1.2 Features
20x Optical zoom
1/3” 2 Megapixel Exmor CMOS
H.264 & MJPEG dual-stream encoding
Max 25/30fps@1080p resolution
WDR(DWDR), Day/Night(ICR), DNR (2D&3D),Auto iris, Auto focus, AWB, AGC,BLC
Multiple network monitoring: Web viewer, CMS & PSS
Max 400 °/s pan speed, 360° endless pan rotation
Up to 255 presets, 5 auto scan, 8 tour, 5 pattern
Built-in 7/2 alarm in/out
Support intelligent 3D positioning with DH-SD protocol
Micro SD memory
IP67
Easy installation
© Copyright Qvis® All documentation rights reserved.
2
1.3 Specifications
(Continued next page)
CAMERA
Image Sensor
1/3” Exmor CMOS
Effective Pixels
1944(H) x 1092(V), 2 Megapixels
Scanning System
Progressive
Electronic Shutter Speed
1/1 ~ 1/30,000s
Min. Illumination
Colour: 0.05 Lux/ F1.6; B/W 0.005 Lux/F1.6
S/N Ratio
More than 50dB
Video Output
BNC (1.0Vp-p/75 Ω), PAL/NTSC
CAMERA
FEATURES
Day/Night
Auto(ICR) / Colour / B/W
Backlight Compensation
BLC/HLC/DWDR (Digital WDR)
White Balance
Auto/ATW/Indoor/Outdoor/Manual
Gain Control
Auto/Manual
Noise Reduction
2D/3D
Privacy Masking
Up to 24 Areas
Digital Zoom
16x
LENS
Focal Length
4.7mm ~ 94.0mm (20x Optical zoom)
Max Aperture
F1.6 - F3.5
Focus Control
Auto / Manual
Angle of View
H: 55.4°-3.2°
Close Focus Distance
10mm ~ 1000mm
PTZ
Pan/Tilt Range
Pan: 0°-360° endless; Tilt: -2°- 90°,
auto flip 180°
Manual Control Speed
Pan: 0.1° ~300° /s; Tilt: 0.1° ~250° /s
Preset Speed
Pan: 400°/s; Tilt: 300°/s
Preset
80(DH-SD), 255(Pelco-P/D)
PTZ Mode
5 Pattern, 8 Tour, Auto Pan, Auto Scan
Speed Setup
Human-oriented focal length/ speed adaptation
Power Up Action
Auto restore to previous PTZ and lens status after power failure
Idle Motion
Activate Preset/Pan/Scan/Tour/Pattern if there is no command in the
specified period
Time Task
Auto activation of Preset/Pan/Scan/Tour/
Pattern by preset-time
Protocol
DH-SD, Pelco-P/D (Auto recognition)
VIDEO
Compression
H.264 / MJPEG
Resolution
1080P(1920×1080) / 720P(1280×720) / D1(704×576/704×480) /
CIF(352×288/352×240)
Frame Rate
Main Stream
1080P/720P(1 ~ 25/30fps)
Sub Stream
D1/CIF (1 ~ 25/30fps)
Bit Rate
H.264: 56K ~ 8192Kbps, MJPEG: 56K ~ 20480Kbps
AUDIO
Compression
G.711a / G.711u(32kbps) / PCM(128kbps)
Interface
1/1 channel In/Out

© Copyright Qvis® All documentation rights reserved.
3
NETWORK
Ethernet
RJ-45 (10/100Base-T)
Protocol
IPv4/IPv6, HTTP, HTTPS, SSL, TCP/IP, UDP, UPnP, ICMP,
IGMP, SNMP, RTSP, RTP, SMTP, NTP, DHCP, DNS, PPPOE,
DDNS, FTP, IP Filter, QoS, Bonjour
ONVIF
ONVIF Ver. 2.0 conformance
Max. User Access
20 users
Smart Phone
iPhone, iPad, Android, Windows Phone
AUXILIARY
INTERFACE
Memory Slot
Micro SD, Max 32GB
RS485
1
Alarm
7/2 Channel In/Out
GENERAL
Power Supply
AC 24V/3A (±10%)
Power Consumption
12W, 25W (Heater on)
Working Temperature
-40°C—60°C (outdoor) <90% Relative Humidity
Ingress Protection
IP97
Dimensions
222mm x 322mm
Weight
5.0Kg
© Copyright Qvis® All documentation rights reserved.
4
2 QUICK INSTALLATION SPEED DOME INSTALLATION
2.1 Installation Preparation
Check installation space and installation location intension
Please make sure the installation environment has enough space to install the speed dome and its
corresponding bracket. Please also make sure the ceiling, wall and the bracket can support the speed dome and
its corresponding installation component. The location and fixing should be able to safely hold 4 times the weight
of the camera.
Cable information
Please select the cable according to your transmission distance.
The minimum video coaxial-cable requirement is:
75 ohm.
Full cable with copper conductor
95% knitted copper shield
International Model
Max Distance
(Ft\M)
RG59/U
750ft (229m)
RG6/U
1,000ft (305m)
RG11/U
1,500ft (457m)
Setting the dial switch button
Set the dial switch button according to control protocol and speed dome address.
Please keep all package material well for future use
Please keep the speed dome packaging material in case you need to send it back to your local retailer or
manufacturer for maintenance work.
Non-original package material may result in device damage during the transportation.
Check Accessories
Before the installation, please check the accessories one by one according to the packing list. Please make sure
that all parts are included.
IMPORTANT: The quick installation speed dome power is AC 24V/3A.
© Copyright Qvis® All documentation rights reserved.
5
2.2 Installation
The speed dome has several types of installation brackets. You can refer to the following contents for detailed
information. This section will show you how to install the speed dome on to a wall mounted bracket.
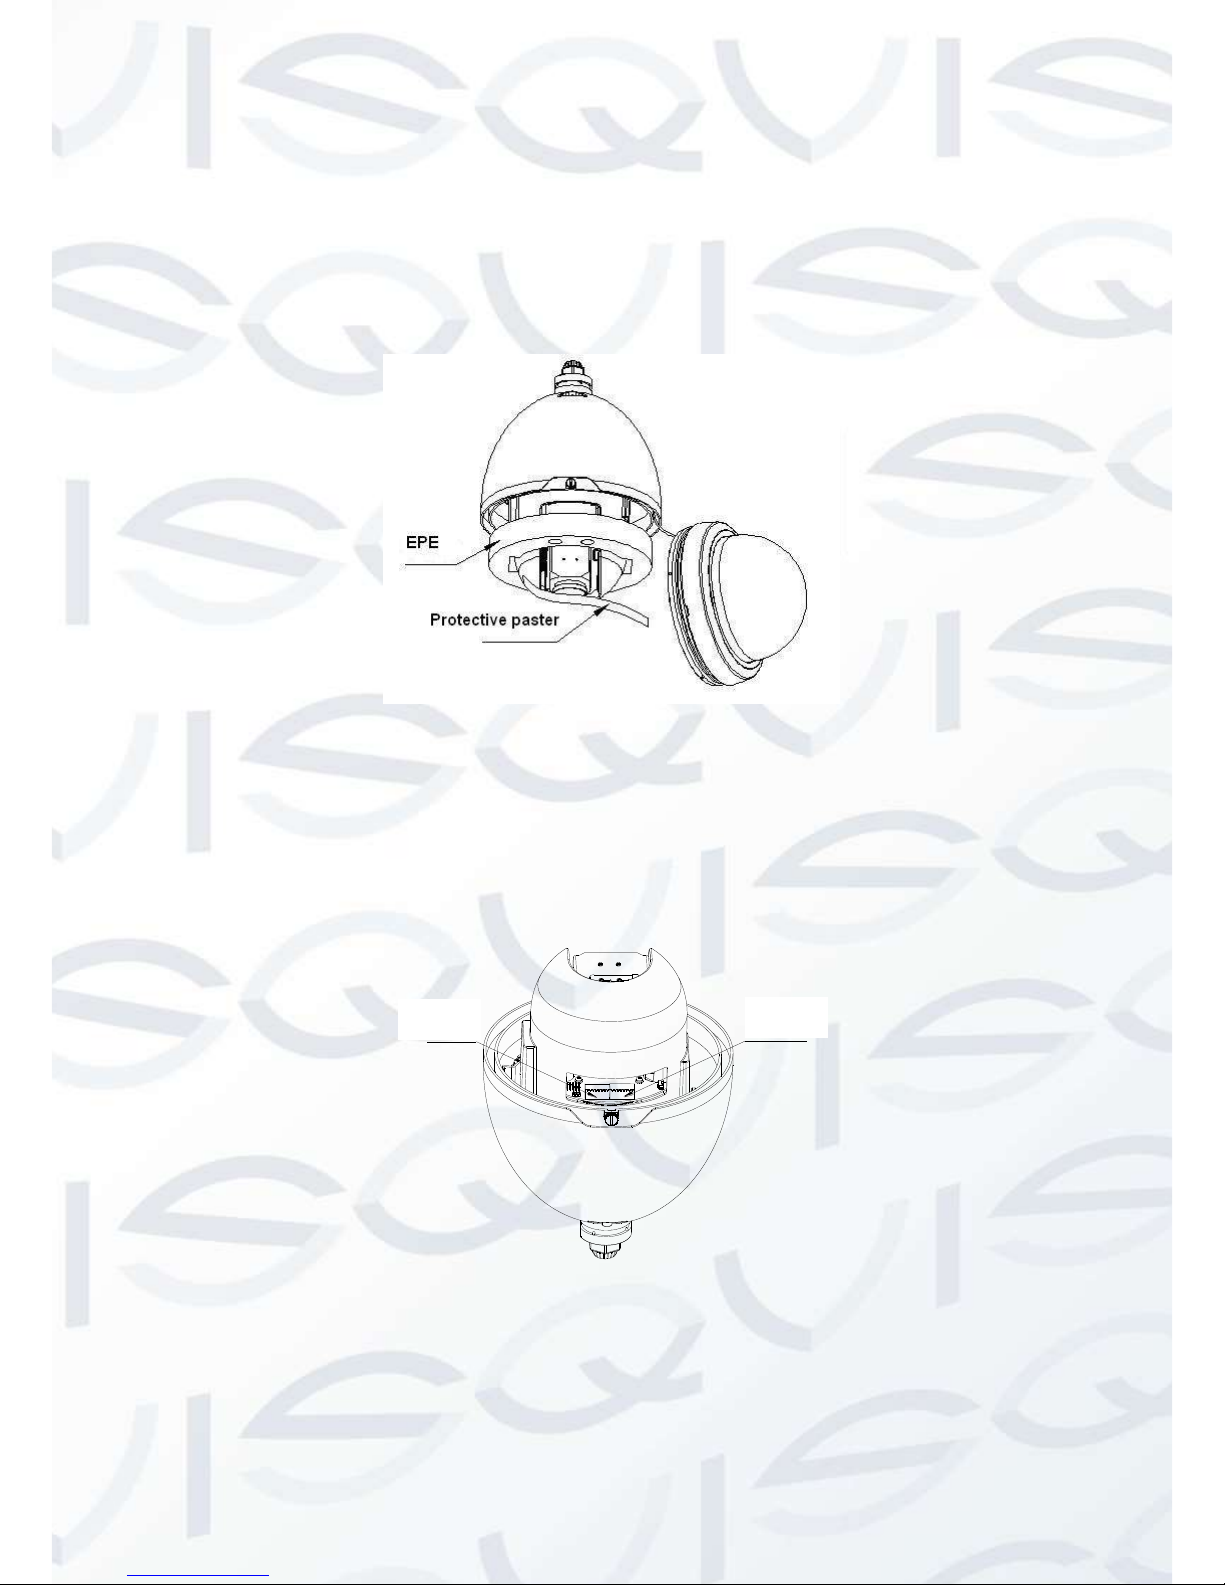
Open the transparent cover and take out the packing material (shown as EPE in the diagram below), which is
around the speed dome driver. Please remove the protective plaster from the driver and take off the camera lens
cap. If you do not do this the motorised camera movements will not work as desired. See Figure 2-1.
Figure 2-1
2.2.1 Address and Baud Rate Setup
Now you can set the quick installation speed dome address and baud rate. The speed dome interface is shown
as below (see Figure 2-2). There are two dial switches: SW1 and SW2. Using these dials you can set the
address, baud rate, communication protocols, etc. Please refer to Chapter 2.4 for detailed information.
Figure 2-2
SW2
SW1

© Copyright Qvis® All documentation rights reserved.
6
2.2.2 Install the transparent cover
1. Firstly you need to check the steel wire of the bracket to see if it is firmly secure or not.
2. Please line up the captive screws to the quadrate groove of the bracket and then push the bracket into
the internal enclosure. Fix these two captive screws in to place. See Figure 2-3.
Figure 2-3
3. Now you can install the quick installation port. Please twist the Teflon tape around the screw thread of
the quick installation port and turn it into the screw thread of the wall mount bracket. Use M4 stainless
screws to secure firmly. See Figure 2-4.
Figure 2-4
4. Now you can begin the cable connection.
5. Connect the steel wire of the quick installation cover to the hook on the quick installation port.
6. Connect the reserved integration cable from the wall mount bracket to the corresponding power cable,
video output cable, RS485 control cable and alarm input/output port (if necessary) of the multiple-

© Copyright Qvis® All documentation rights reserved.
7
function composite cable coming from the quick installation speed dome. Paste the insulating tape in the
connection position to make sure everything is waterproof. See Figure 2-5.
Figure 2-5
Note: The video port is covered by the high ratio heat shrinked tube. After you have completed the cable
connection, please heat the tube to make sure the video port is damp proof and water proof.
2.2.3 Install the speed dome
1. After you complete the above steps, please pull the integration cable and multiple-function composite
cable through to the wall mount bracket.
2. Line up the straight edge, of the internal enclosure within the quick installation speed dome, to the
straight edge of the quick installation port, and then slowly push the speed dome to the bottom of the
port. Use your hands to turn the three stainless steel screws, on the quick installation port, in to the
groove of the speed dome’s internal enclosure. Turn the screws on the straight edge of the quick
installation port to the Ф6.5 hole of the speed dome’s internal enclosure. Use the inner hex tool to fix
these three screws. Installation should now be complete. See Figure 2-6.

© Copyright Qvis® All documentation rights reserved.
8
Figure 2-6
IMPORTANT: After the installation, please make sure:
The three stainless steel screws on the quick installation port are firmly secure.
The quick installation speed dome is fixed into place securely.
The speed dome is straight and leaning at an angle causing the bracket to not sit flush to the installation
surface.
The wiring/cabling is firmly secure.
Once you have completed the installation, the interface should look like the image shown in Figure 2-7.
Figure 2-7

© Copyright Qvis® All documentation rights reserved.
9
2.3 Initial Setup
The default setup is:
Address: 1
Baud rate: 9600
2.4 Dial Switch Setup
The two dial switches found on the speed dome are labeled as SW1 and SW2. These are to specify the speed
dome parameters, which include the protocols, baud rates, addresses, etc. When the button is set to ON, it is 1.
When using the SW1 and SW2 dials, 1 is the lowest bit and the 8 is the highest bit. See Figure 2-8.
Figure 2-8
2.4.1 Communication protocol and Baud rate
Please refer to the protocol sheets for detailed information:
Protocol
Baud rate
Parity
1 2 3 4 5 6 7
8
1 2 3 4 Communication Protocol
OFF
OFF
OFF
OFF
DH-SD ( Compatible with China
industrial standard protocol)
ON
OFF
OFF
OFF
PELCO-D
OFF
ON
OFF
OFF
PELCO-P
X X X X Reserved

© Copyright Qvis® All documentation rights reserved.
10
Please refer to the baud rate sheet for detailed information:
5 6 Baud Rate
OFF
OFF
9600bps
ON
OFF
4800bps
OFF
ON
2400bps
ON
ON
1200bps
Please refer to the parity setup sheet for detailed information:
7 8 Parity
OFF
OFF
NONE
ON
OFF
EVEN
OFF
ON
ODD
ON
ON
NONE
2.4.2 Address Setup
The speed dome address setup interface is shown as below. See Figure 2-9.
Figure 2-9
The encode mode adopts a binary system. 1 to 8 are valid bits. The highest address bit is 255. You can refer to
the following sheet for more information:
Address
1 2 3 4 5 6 7
8
1
OFF
OFF
OFF
OFF
OFF
OFF
OFF
OFF
1
ON
OFF
OFF
OFF
OFF
OFF
OFF
OFF
2
OFF
ON
OFF
OFF
OFF
OFF
OFF
OFF
3
ON
ON
OFF
OFF
OFF
OFF
OFF
OFF
4
OFF
OFF
ON
OFF
OFF
OFF
OFF
OFF
5
ON
OFF
ON
OFF
OFF
OFF
OFF
OFF
6
OFF
ON
ON
OFF
OFF
OFF
OFF
OFF
7
ON
ON
ON
OFF
OFF
OFF
OFF
OFF
8
OFF
OFF
OFF
ON
OFF
OFF
OFF
OFF
……
…………………………………………………………………
254
OFF
ON
ON
ON
ON
ON
ON
ON
255
ON
ON
ON
ON
ON
ON
ON
ON

© Copyright Qvis® All documentation rights reserved.
11
3 BRACKET DIMENSIONS
3.1 Wall mount bracket
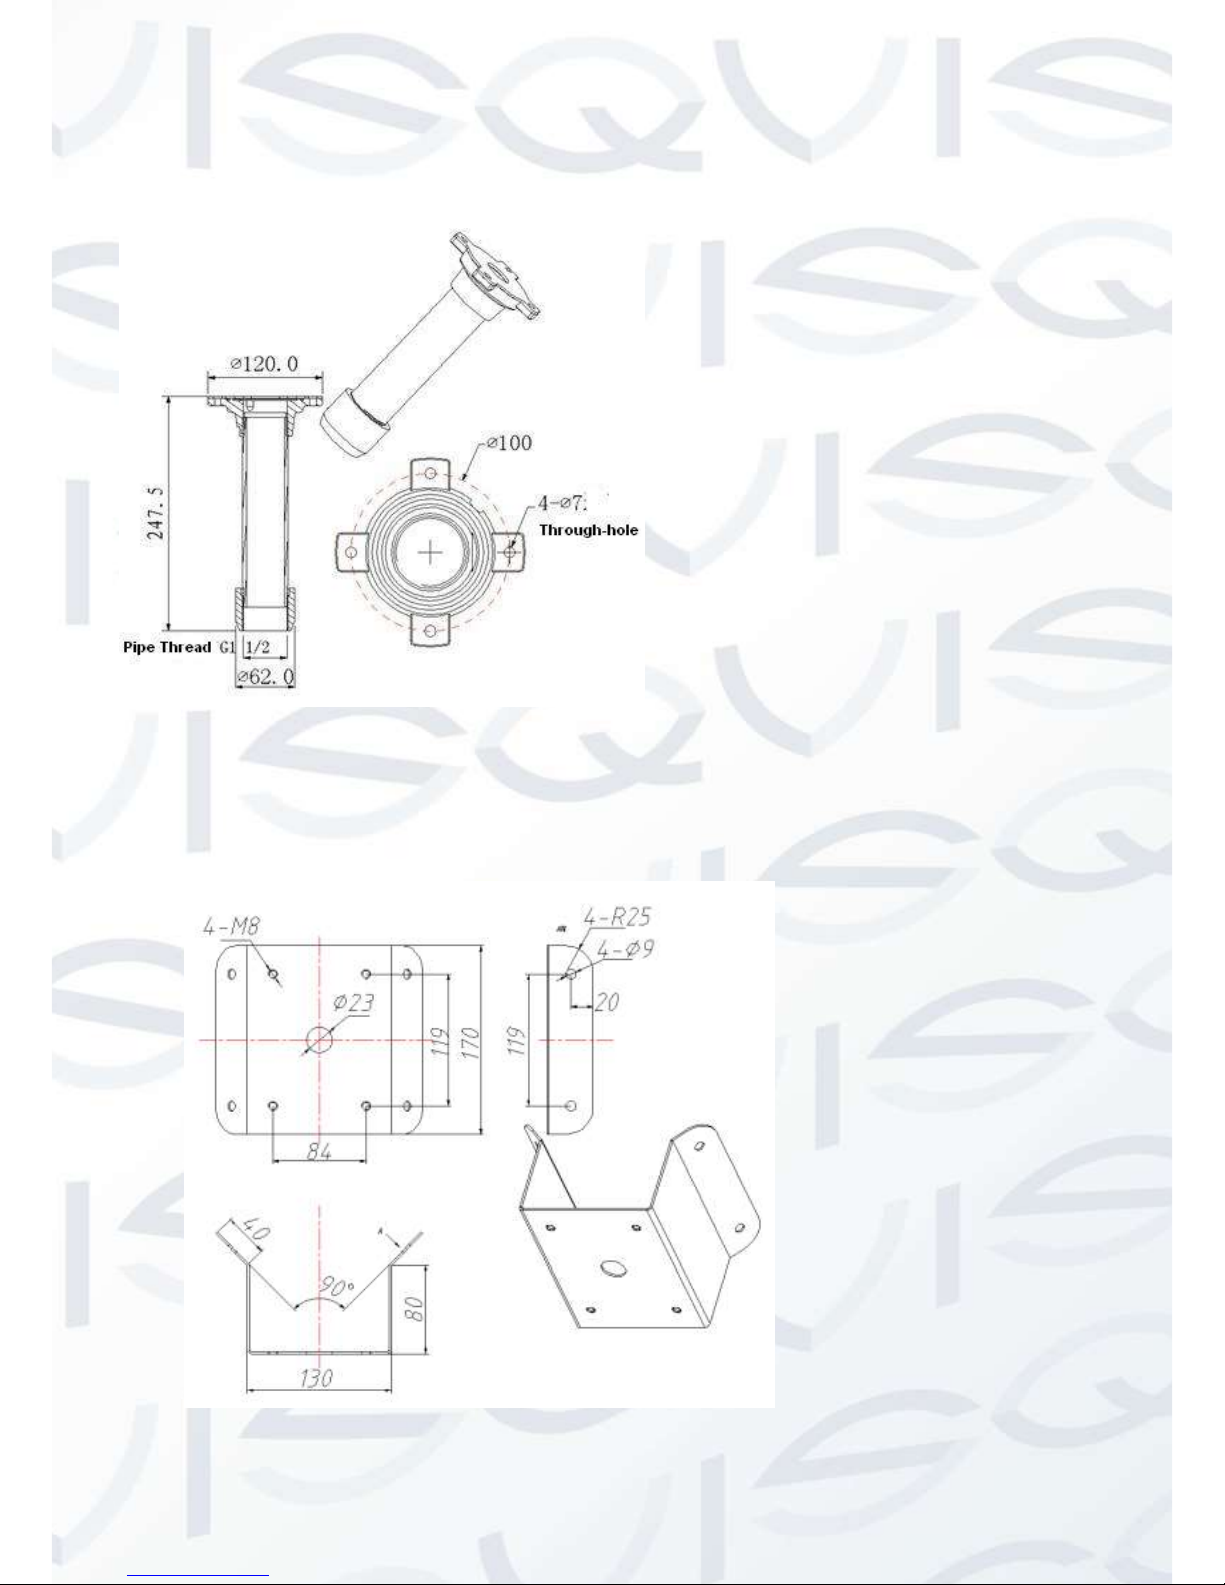
The wall mount bracket dimensions are shown as below. See Figure 3-1.
Figure 3-1
© Copyright Qvis® All documentation rights reserved.
12
3.2 Hanging mount bracket (Multiple Lengths)
The hanging mount bracket is shown as below. See Figure 3-2.
Figure 3-2
3.3 Corner mount bracket
The corner mount bracket is shown as below. See Figure 3-3.
Figure 3-3
The bracket length setup values are:
200mm
300mm
500mm
You just need to replace the
connection pole.
© Copyright Qvis® All documentation rights reserved.
13
3.4 Pole mount bracket
The corner mount bracket is shown as below. See Figure 3-4.
Figure 3-4

© Copyright Qvis® All documentation rights reserved.
14
4 WALL MOUNT BRACKET INSTALLATION
4.1 Component Installation
Wall mount bracket is shown as below. See Figure 4-1.
Figure 4-1
4.2 Installation
4.2.1 Installation Requirements
The wall mount speed dome can be installed onto a hard construction wall in either indoor or outdoor
environments. Before the installation, please make sure:
The wall is thick enough to install the expansion bolt.
The wall can at least sustain the 4x weight of the speed dome.
4.2.2 Installation Steps
Draw 4 points, on to the installation wall, which line up with the screw holes wall mount bracket. Then you can
drill four holes and insert the expansion bolts (not provided). Use four hex bolts and flat washers to fix the
bracket in to the expansion bolts. It should now be fixed into position securely (see Figure 4-2).
Figure 4-2

© Copyright Qvis® All documentation rights reserved.
15
Install the speed dome onto the bracket. See Figure 4-3.
Figure 4-3
Please refer to chapter 2.2 for detailed installation information.

© Copyright Qvis® All documentation rights reserved.
16
5 HANG MOUNT BRACKET INSTALLATION
5.1 Component Installation
Hang mount bracket and its components are shown as below. See Figure 5-1.
Figure 5-1
5.2 Installation
5.2.1 Installation Requirements
The hang mount speed dome can be installed onto a solid construction wall located in either indoor or outdoor
environments. Before the installation, please make sure:
The wall is thick enough to install the expansion bolt.
The wall can at least sustain the 4x weight of the speed dome.
5.2.2 Installation Steps
Loosen the M4 bolt, on the flange side, to separate the flange and sleeve. Pull the integration cable through the
airproof slot at the bottom of the flange and then connect to the centre hole to the flange. Please secure the
flange on the ceiling. See Figure 5-3.
Note: if the speed dome is installed within an outdoor environment, you need to paste silica gel onto the surface
of the flange, on the wall surface and on the cable exit hole.

© Copyright Qvis® All documentation rights reserved.
17
Figure 5-2
Figure 5-3
Pull the cable through the steeve and then secure the steeve to the flange. Fix the M4 bolt into place.
Please note, if the speed dome is installed in an outdoor environment, you need to paste enough Teflon tape at
the top screw thread of the steeve and then turn the steeve onto the flange firmly. Please paste the silica gel on
the steeve connection surface to waterproof it. See Figure 5-4.
Figure 5-4
Draw 4 points, on to the installation wall, which line up with the screw holes wall mount bracket. Then you can
drill four holes and insert the expansion bolts (not provided). Use four hex bolts and flat washer to fix the bracket
in the expansion bolts. See Figure 5-5.
Silica gel
Connect to flange
Teflon tape
M4 bolt
Silica gel

© Copyright Qvis® All documentation rights reserved.
18
Figure 5-5
Please refer to chapter 2.2 for detailed installation information.
Long pole Without pole

© Copyright Qvis® All documentation rights reserved.
19
6 CORNER MOUNT BRACKET INSTALLATION
6.1 Component Installation
Corner mount bracket and its components are shown below. See Figure 6-1.
Figure 6-1
6.2 Installation
6.2.1 Installation Requirements
The corner mount for the speed dome can be installed onto the corner of a solidly constructed wall. Before the
installation, please make sure:
The wall is thick enough to install the expansion bolt.
The wall can at least sustain the 4x weight of the speed dome.
6.2.2 Installation Steps
Draw 4 points, on to the installation wall, which line up with the holes of the corner installation accessories. See
Figure 6-2.
Figure 6-2
Installation hole
© Copyright Qvis® All documentation rights reserved.
20
Then you can drill four holes and insert the M8 expansion bolts. Pull the power cable, video/control cable and
the alarm cable through the centre hole on the bottom of the corner bracket, the waterproof adhesive, and the
centre of the bracket. Please reserve the enough cable connection length and then use the M8 expansion bolt to
secure the corner mount bracket chassis onto the wall. See Figure 6-3.
Figure 6-3
Please refer to chapter 2.2 for detailed installation information.

© Copyright Qvis® All documentation rights reserved.
21
7 POLE MOUNT BRACKET INSTALLATION
Pole mount bracket and its components are shown as below. See
Figure 7-1.
Figure 7-1
7.1 Installation
7.1.1 Installation Requirements
The corner mount speed dome can be installed in the solidly constructed wall in either indoor or outdoor
environments. Please make sure:
Before the installation, please make sure the pole bracket can sustain 4X the weight of the speed dome.
The diameter of the pole structure should comply with the installation dimensions of the clamp. Default
factory clamp is six inches for the column of φ130-152mm. It can work with the pole installation bracket.
You can adjust the diameter and the value (clamp specification) is : φ59-82mm、φ84-108mm、φ103-
127mm, φ130-152mm、φ155-178mm、φ180-203mm,φ194-216mm.
The clamp is shown as in Figure 7-2.
Figure 7-2

© Copyright Qvis® All documentation rights reserved.
22
Please refer to
Figure 7-3 to install clamp and pole bracket.
Pull the cable out of the pole accessories and then use clamp to fix the pole accessories to the pole. Finally, you
can use glass cement to the output hole to waterproof it.
Figure 7-3
After you installed bracket and external cover, loosen the captive screws and open the panel, pull the power
cable through the hanging bracket and then fix the hanging bracket to the wall. Please make sure it is waterproof
between the bracket and the wall. See Figure 7-4.
Clamp and pole bracket connection Pole bracket and the pole connection

© Copyright Qvis® All documentation rights reserved.
23
Figure 7-4
Please refer to chapter 2.2 for detailed installation information.

© Copyright Qvis® All documentation rights reserved.
24
8 Quick Configuration Tool
8.1 Overview
Quick configuration tool can search current IP address and modify IP address. At the same time, you can use it
to upgrade the device.
Please note: the tool only applies to the IP addresses in the same segment.
8.2 Operation
Double click the ‘ConfigTools.exe’ icon and you will see an interface just like the one shown as in Figure 8-1.
In the device list interface, you can view the device’s IP address, port number, subnet mask, default gateway,
MAC address, etc.
Figure 8-1 Search interface
Select one IP address and then right click mouse, you will see an interface like the one shown in Figure 8-2.
Note: You can set the IP address, subnet mask and gateway for the network camera & PC. The network camera
IP address and PC IP address should be in the same network segment if there is no router. Network camera
default IP address is 192.168.1.108. If there is a router, please set the corresponding gateway and subnet mask.
The factory default user name is admin and password is admin. For security reasons, please modify your
password after you first login.
For detailed WEB operation, please refer to the Network Camera Web Operation Manual in the resource
CD.
© Copyright Qvis® All documentation rights reserved.
25
Figure 8-2 Search interface 2
Select the ‘Open Device Web’ item; you can go to the corresponding web login interface (see Figure 8-3).
Figure 8-3 Web login
If you want to modify the device IP address without logging in to the device web interface, you can go to the
configuration tool’s main interface to set.
In the configuration tool’s search interface (Figure 8-1), please select a device IP address and then double click
it to open the login interface. Or you can select an IP address and then click the Login button to go to the login
interface. See Figure 8-4.

© Copyright Qvis® All documentation rights reserved.
26
In Figure 8-4, you can view device IP address, user name, password and port. Please modify the corresponding
information to login. Please note the port information here shall be identical with the port value you set in TCP
port in Web Network interface. Otherwise, you cannot login the device.
If you are using device background upgrade port 3800 to login, other setups are all invalid.
Figure 8-4 Login prompt
After you logged in, the configuration tool main interface is shown as below. See Figure 8-5.
Figure 8-5 Main interface
For detailed information and operation instructions of the quick configuration tool, please refer to the
Quick Configuration Tool User’s Manual included in the resources CD.

© Copyright Qvis® All documentation rights reserved.
27
9 Web Operation
This IP camera product supports the Web access and management using a PC.
Web includes several modules: monitor channel preview, system configuration, alarm, etc.
9.1 Network Connection
Please follow the steps listed below for network connection:
Make sure the network camera has connected to the network properly.
Please set the IP address, subnet mask and gateway of the PC and the network camera respectively.
Network camera default IP address is 192.168.1.108. Subnet mask is 255.255.255.0. Gateway is
192.168.1.1
Use order ping ***.***.***.***(* network camera address) to check connection is OK or not.
9.2 Login and Logout
1. Open web browser and input network camera address in the address bar.
For example, if your camera IP is 192.168.1.108, then please input http:// 192.168.1.108 into the web
browser’s address bar. See Figure 9-1.
Figure 9-1 IP address
2. The login interface is shown as below. See Figure 9-2.
3. Please input your user name and password.
4. Default factory name is admin and password is admin.
Input your IP
© Copyright Qvis® All documentation rights reserved.
28
Note: For security reasons, please modify your password after you first login.
Figure 9-2 Web login
If it is your first time logging in, the system pops up warning information to ask you whether to install the control
‘webrec.cab’ or not, after you have logged in for one minute. Please click OK button, the system can
automatically install the control. When system is upgrading, it can overwrite the previous Web as well.
If you can’t download the ActiveX file, please check whether you have installed the plug-in to disable the control
download. Or you can lower the web browser’s security level. See Figure 9-3.

© Copyright Qvis® All documentation rights reserved.
29
Figure 9-3 IE security level
After you logged in, you can see the main window. See Figure 9-4:
Figure 9-4 Web monitoring window

© Copyright Qvis® All documentation rights reserved.
30
10 APPENDIX ABOUT RS485 BUS
10.1 RS485 Bus Main Feature
RS485 is semi duplex communication cable with an impedance of 120Ω. Its maximum load amount is 32
effective loads (including main control device and the devices that need to be charged).
10.2 RS485 Bus Transmission Distance
When we take a 0.56mm (24AWG) twisted-pair to use as a communication cable, the maximum transmission
distances (theoretically) are listed below (according to different baud rates).
In the following situations, the maximum transmission distance will become shorter according to these three
factors:
The communication cable is a little bit thin;
The surrounding environment has strong electromagnetic interference;
There are too much devices connected to the RS485 bus;
The opposite of these factors will mean the maximum transmission distance will become longer.
10.3 The Problem in Practical Use
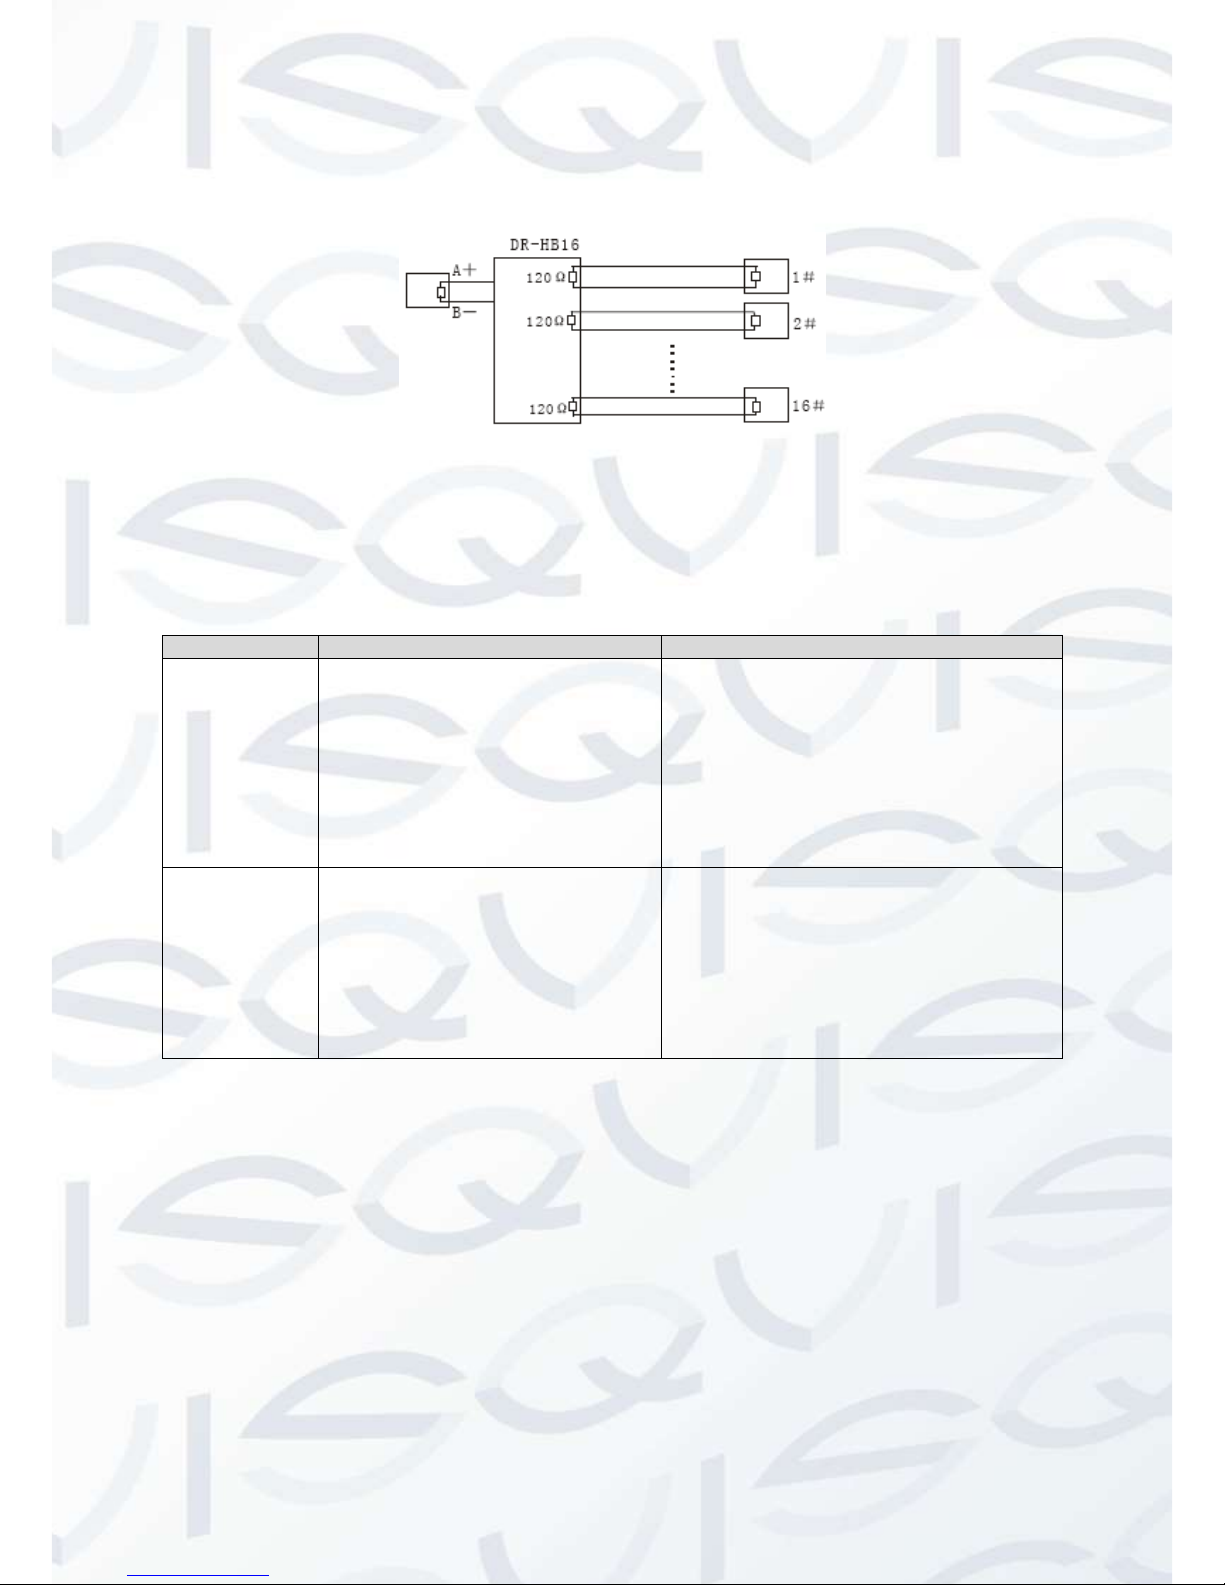
In practical usage, we usually adopt star type connection. The terminal resistance shall connect to the furthest
two devices (Such as device 1# and device 15# in Figure 10-1 ). But this connection method does not conform
to the RS485 Bus standard. When the distances between devices are too long, signal reflection occurs and antijamming decreases, thus the signal reliability becomes very low. You can see that the speed dome is not under
control or the speed dome is running automatically and cannot stop.
Figure 10-1
Baud Rate
Max Distance
2400 BPS
1800M
4800 BPS
1200M
9600 BPS
800M
1#
32#
6#
15#
© Copyright Qvis® All documentation rights reserved.
31
In this situation, we recommend RS485 distributor. This device can turn a star type connection into the
connection that conforms to the RS485 bus industry standard, which can avoid the above mentioned problems
and enhance communication reliability. See Figure 10-2.
Figure 10-2
10.4 RS485 Bus FAQ
Phenomenon
Possible Reasons
Solution
Speed dome
can run selfdiagnosis but
I cannot
control it.
Host address (baud rate) and
speed dome address (baud
rate) do not match;
Positive and negative end of
RS485 Bus are not connected
correctly;
Connection cable is loose;
RS485 Bus connections are cut
off;
Modify host or speed dome setup ;
Switch RS485 positive end and
negative end;
Fix connection cable firmly;
Replace RS485 Bus.
I can control
the speed
dome but the
movement is
not smooth
RS485 Bus connections are
poor;
One of the RS485 buses is
offline;
The distance between host and
speed dome is too far;
Too many speed domes are
connected in parallel.
Connect RS 485 Bus again;
Replace RS485 Bus;
Add terminal matching resistance;
Add RS485 distributor.

© Copyright Qvis® All documentation rights reserved.
32
6 FAQ
10.5 Daily Maintenance
Please clean dome cover regularly to continue receiving clear imagery. Handle the cover with care. Use water to
wash. Don’t use a cloth to clean. Use mild detergent to clean the cover if there is too much dust to just.
Note:
Please take care not to touch plating surface with bare hands or skin, as this might transfer bodily perspiration
upon it and the acidity of the perspiration may erode it. Uncovered hands may also cause nail scratches to the
dome cover when handling. This will result in blurred images and impaired visual monitoring when using the
device.
10.6 Problems and Solutions
SYMPTOM
CAUSE
SOLUTION
No self-diagnosis,
no video signal
when I connect
dome to power.
Red LED is not on.
Your power supplying does
not apply to the power. Or
connection is too loose.
Power off or transformer
problem.
Check power is connected or
properly earthed.
Check power supply condition
or check transformer.
Red LED light on the power
board is on.
Power supplying is low
Something wrong with power
board.
Use a multimeter to check
dome load.
Please contact retailer to
replace power board.
No self-diagnosis.
Camera makes a
noise.
Power supply amount is
inadequate.
Replace power supply.
Mechanical malfunction.
An electrical engineer will be
needed to fix device.
Video signal loss
occurs during high
speed rotation.
Power supply is not sufficient
Replace power supply.
Video signal is not
successive
Circuit connection are too loose.
Connect tightly.
Video switch or power problem
Need electrical engineer help.
Video is not clear.
Focus in manual mode.
Control manually.
Dome cover is dirty.
Wash dome cover
During camera
switch, there is a
tilt movement in
the monitor.
Camera power is not in the same
Phase.
When several domes are
connected to one transformer,
please connect the transformer
output cable to the domes’ same
side.
Note
This manual is for reference only. Slight difference may be found in the user interface.
All the designs and software here are subject to change without prior written notice.
Please visit our website or contact your local service engineer for more information.

© Copyright Qvis® All documentation rights reserved.
33
For more information about our DVRs and available cameras &
accessories, please visit our website:
www.adata.co.uk
Alternatively scan this QR code with your smart phone to be directed
instantly to our website:
 Loading...