

Page 1

TABLE OF CONTENTS
TABLE OF CONTENTS
YOUR DEVICE 3
Front and Back Features 3
Side Features 4
Charging Your Battery 5
Turning Your Device On or Off 7
DEVICE FUNCTIONS 8
Extending Your Battery Life 8
Locking and Unlocking Your Device 9
Creating a New Google Account 10
Setting Up Voicemail 11
Calling Features 12
Contacts 15
Bluetooth 17
Wi-Fi 19
Web Browsing 20
Setting Up Email 21
Messaging 24
Using The Play Store 26
1
Page 2

TABLE OF CONTENTS
Customizing Your Phone 27
Camera & Camcorder 29
GPS Navigation 30
NOTES 32
2
Page 3

YOUR DEVICE
YOUR DEVICE
FRONT AND BACK FEATURES
1
2
1. 3.5 MM HEADPHONE
JACK
10
2. DISPLAY
9
3. HOME KEY
4. MENU KEY
5. MICROPHONE
6. CHARGING PORT
7. BACK KEY
8. MEMORY CARD SLOT*
NOTE: *The memory card slot is
located under the battery
cover.
9. EARPIECE
3
4
5
6
7
8
10. PROXIMITY SENSORS
11. CAMERA LENS
12. EXTERNAL SPEAKER
11 12
3
Page 4

YOUR DEVICE
SIDE FEATURES
1
2
3
1. EXTERNAL SPEAKER
2. VOLUME KEY
3. POWER/LOCK KEY
4
Page 5
YOUR DEVICE
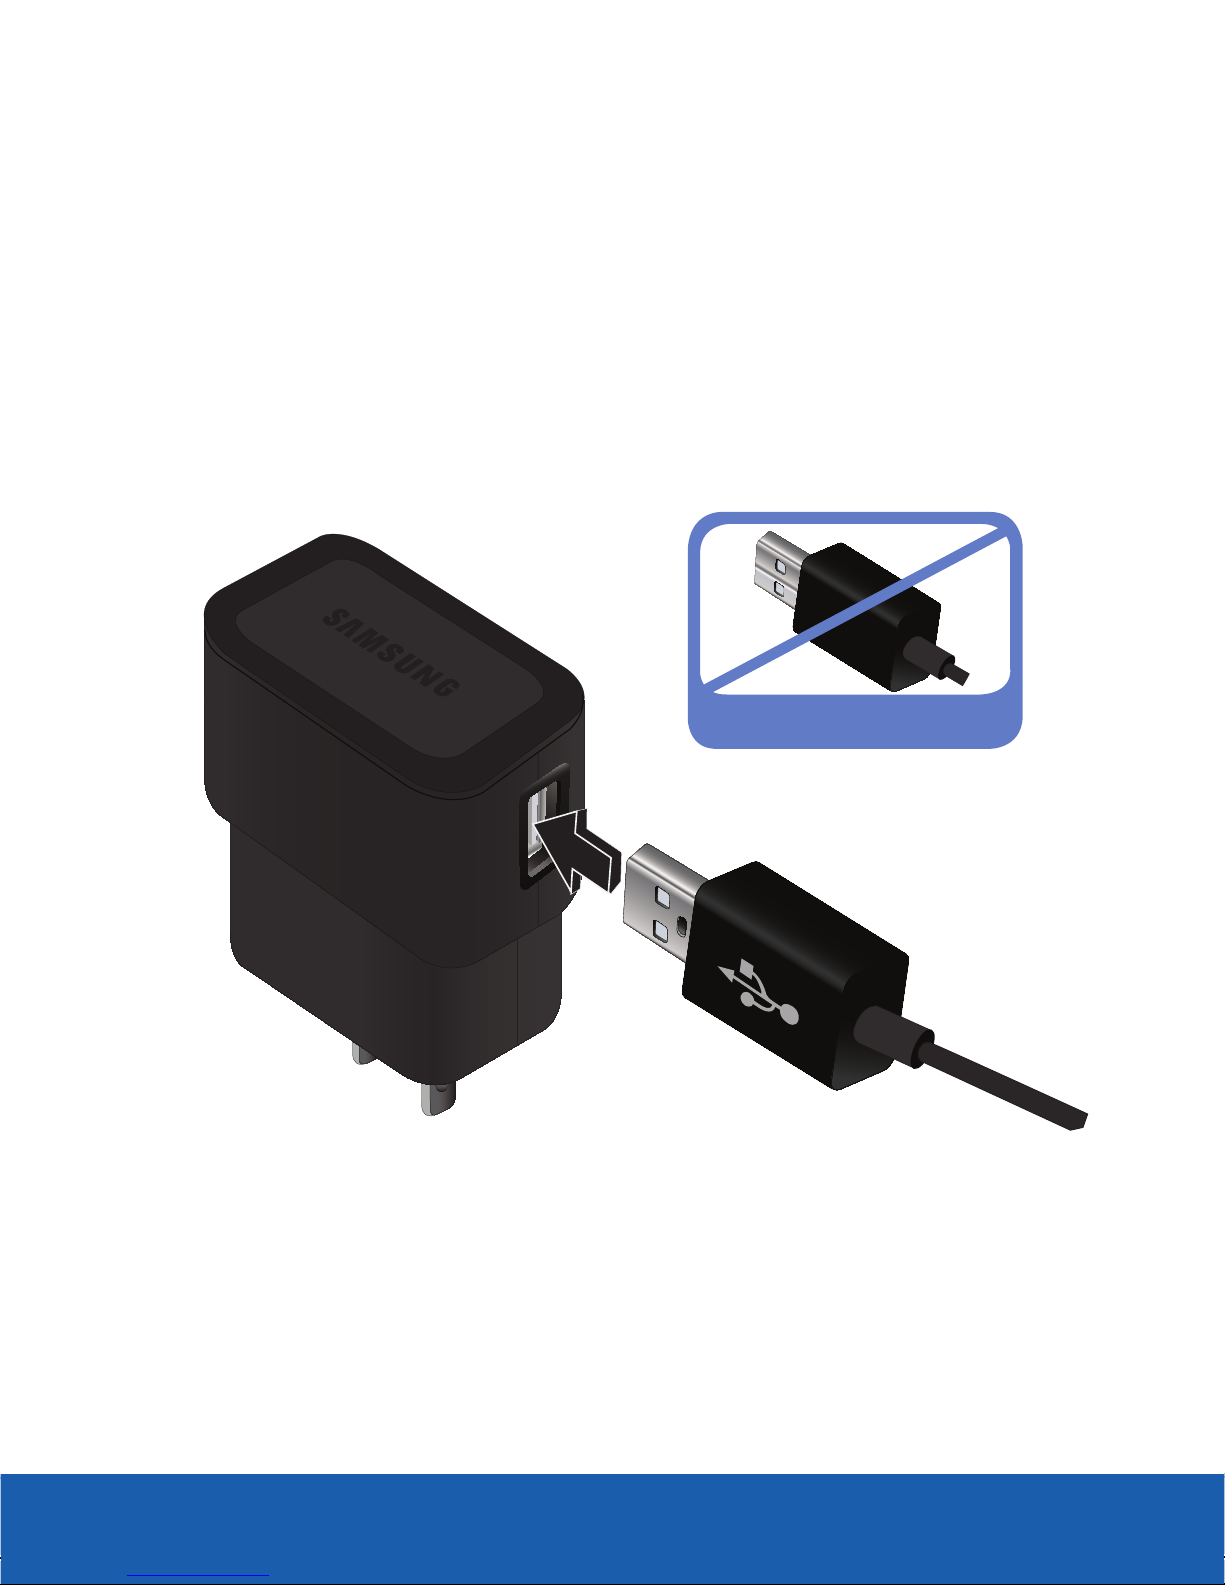
CHARGING YOUR BATTERY
Your device comes with a USB cable and charging head to rapidly
charge your phone from any 120/220 VAC outlet.
NOTE: Although the battery comes partially charged, you must fully charge this battery
before using your phone for the first time.
1. Connect the USB cable to the charging head.
2. Plug the charging head into a standard AC power outlet.
CHARGING HEAD
Incorrect
5
Page 6

YOUR DEVICE
IMPORTANT: Verify that the battery is installed prior to connecting the wall charger. If
both the wall charger is connected and the battery is not installed, the
handset will power cycle continuously and prevent proper operation.
Failure to unplug the wall charger before you remove the battery, can
cause the device to become damaged.
3. Insert the USB cable into the device’s Power/USB connector.
The device turns on with the screen locked and indicates
both its charge state and percent of charge.
4. Once complete, unplug the charging head from the power
outlet and remove the USB cable from the device.
Incorrect
6
Page 7

YOUR DEVICE
TURNING YOUR DEVICE ON OR OFF
IMPORTANT: Before removing or replacing the battery, make sure the device is
switched off.
To power on your device:
X Press and hold (Power/Lock) until the
device turns on.
To power off your device:
1. Press and hold the (Power/Lock) until the
device options screen appears.
2. Tap Power off g OK.
7
Page 8

DEVICE FUNCTIONS
DEVICE FUNCTIONS
EXTENDING YOUR BATTERY LIFE
Active applications, light levels, Bluetooth usage, and GPS
functionality all act to drain your battery. The following is a list of
helpful tips that can help conserve your battery power:
● Reduce your backlight on time.
● Turn Bluetooth® off when not in use.
● Turn Wi-Fi® off when not in use.
● Deactivate the GPS when not needed. Most applications using
this function will periodically query the GPS satellites for your
current location; each query drains your battery.
● Do not wait until your battery is completely depleted before
charging your device. Repeating this process of a complete
discharge and recharge can over time reduce the storage
capacity of any battery.
● Turn off Automatic application sync.
● Use the Power Control Widget to deactivate hardware functions
such as Wi-Fi, Bluetooth, GPS, Synchronization, or LCD
brightness setting.
● Check the Battery use screen to review what features or
functions have been consuming your battery resources.
● Check the Running Services and close any unnecessary
applications.
8
Page 9

DEVICE FUNCTIONS
● Use the Task Manager feature to end/shutdown background
applications that are still running. These minimized applications
can, over time, cause your device to “slow down”.
● Animated wallpapers use processing power, memory, and more
power. Change your Live Wallpaper to a non-animated Wallpaper
gallery or Gallery image.
LOCKING AND UNLOCKING YOUR DEVICE
By default, the device screen locks when the backlight turns off.
To unlock your device from the lock screen:
X With your device turned on, press (Power/
Lock) to wake the display and sliding your finger across the
screen in any direction.
To lock your device screen:
X Press (Power/Lock). The screen goes black.
9
Page 10
DEVICE FUNCTIONS
CREATING A NEW GOOGLE ACCOUNT
You should create a Google™ account when you first use your
device in order to fully utilize the functionality. This account
provides access to several device features such as Gmail™, Google
Maps™, and Google Play™ Store applications. Before you are
able to access Google applications, you must enter your account
information. These applications sync between your device and
your online Google account.
To create a new Google account from your phone:
1. From the Home screen, tap (Play Store).
2. Read the introduction and tap New to begin.
3. Follow the on-screen instructions to create a Google
account.
– or–
If this is not the first time you are starting the device,
tap (Applications) g (Gmail).
To create a new Google account from the web:
1. From a computer, launch a Web browser and navigate to
www.google.com/account.
2. Click Create an account for free.
3. Follow the on-screen prompts to create your free account.
4. Look for an email from Google in the email box you
provided, and respond to the email to confirm and activate
your new account.
10
Page 11
DEVICE FUNCTIONS
SETTING UP VOICEMAIL
Voicemail allows callers to leave voice messages, which can
be retrieved any time. Your device automatically transfers all
unanswered calls to voicemail, even if your device is in use or
turned off.
IMPORTANT: Always use a password to protect against unauthorized access.
1. From the Home screen, tap (Phone) and then touch
and hold until the device dials voice mail. You may
be prompted to enter a password.
2. Follow the prompts in the new user tutorial to setup your
mail box.
Listening to Your Voicemail
1. From the Home screen, tap (Phone) and then touch
and hold until the device dials voice mail. After
connection, you will hear your voice greeting.
2. When connected, follow the voice prompts from the voice mail
center.
Accessing Your Voicemail From Another Phone
1. Dial your wireless phone number.
2. When you hear your voicemail greeting, press the asterisk key
(*) on the dialpad you are using.
3. Enter your passcode.
11
Page 12

DEVICE FUNCTIONS
CALLING FEATURES
Making a Call
1. From the Home screen, tap (Phone).
2. Enter the number you wish to call (using the keypad) and
tap (Send) to place a call.
If you make a mistake while dialing, tap to clear the last
digit. Touch and hold to clear the entire sequence.
Ending a Call
X From within an active call, tap (End Call).
Answering a Call
X Touch and slide (Answer) in any direction to answer
an incoming call.
Reject a Call
X Touch and slide (Reject) in any direction. This action
routes the incoming call to your voicemail system.
12
Page 13

DEVICE FUNCTIONS
Using the Speakerphone
X During an active call, tap (Speakerphone) to switch
between the earpiece and the speakerphone.
Call Waiting
Call Waiting notifies you of incoming calls during a call. You have
the option of answering or ignoring an additional incoming call.
X While in a current call, in a single motion, touch and slide
in any direction to answer the new incoming call.
Your original call is placed on hold and the new call is now
active.
To return to your original call:
X Tap (Swap) to switch to the original call.
To alternate between calls:
X Tap (Swap) calls to alternate between the two calls.
IMPORTANT: The currently active call is displayed on top and shows an adjacent call
length indicator.
13
Page 14

DEVICE FUNCTIONS
Making a Three-way Call
Three-way calling is similar to a conference call with a total of
three people (including yourself). Make a call to two numbers and
connect them together on your device using three-way calling.
1. From the Home screen, tap (Phone).
2. Enter the number you wish to call (using the dialpad) and
tap
(Send).
3. Once connected to the first caller tap (Add call) to
place the first caller on hold and begin your second call.
4. Enter the second party’s phone number and tap
(Send).
5. Once the second party answers, tap (Merge calls) to
connect all three parties.
14
Page 15
DEVICE FUNCTIONS
CONTACTS
Creating a New Contact
1. From the Home screen, tap (Phone).
2. Enter the number using the on-screen dialpad.
3. Press (Menu) and tap Add to contacts g CREATE
NEW CONTACT.
4. Read the Backup prompt and choose either Keep local or
Add account.
NOTE: Contacts can be backed up to external accounts such as Google or Corporate.
5. Enter the desired information into the appropriate fields.
6. Tap DONE to store the new entry.
Adding a Number to an Existing Contact
1. From the Home screen, tap (Applications) g
(People).
2. Tap an entry and from the on-screen list.
3. Press (Menu) and tap Edit from the on-screen menu
to reveal the Contact entry’s details screen.
4. Tap Add new below the previous PHONE number field and
enter a new phone number.
Tap on the on-screen keypad to remove entered phone
number.
5. Tap DONE to complete and store the new entry.
15
Page 16

DEVICE FUNCTIONS
Copying a Contact to the Memory Card
This procedure allows you to copy entry information saved on the
phone’s memory, onto an installed microSD
NOTE: These must be contacts stored on the phone. External entries such as Google,
®
Microsoft
NOTE: The option to Export to SD is only available if you already have a microSD card
installed before beginning the process. Without the card, you will not be shown
this option.
Exchange, etc., cannot be transferred in this manner.
1. From the Home screen, tap (Applications) g
(People).
2. Press (Menu) and then tap Import/export g
Export to storage.
™
card.
3. Tap OK to choose all current phone contact entries.
Sharing a Contact Entry
This procedure allows you to share a selected Contact entry card
with an external recipient.
1. From the Home screen, tap (Applications) g
(People).
2. Tap an entry from the on-screen list.
3. Press (Menu) and then tap Share.
4. Select either Bluetooth, Gmail, or Email and follow the
on-screen instructions to choose the destination and
recipient.
16
Page 17

DEVICE FUNCTIONS
Deleting a Contact
ON
1. From the Home screen, tap (Applications) g
(People).
2. Tap a Contacts entry from your available list.
3. Press (Menu) and then tap Delete g OK.
BLUETOOTH
Bluetooth® is a short-range communications technology that
allows you to connect wirelessly to a number of Bluetooth devices,
such as headsets and hands-free car kits, and Bluetooth-enabled
handhelds, computers, printers, and wireless devices.
Turn Bluetooth On and Off
To turn Bluetooth on:
X From the Home screen, press (Menu) and then tap
System settings.
X In a single motion touch and slide the Bluetooth slider to
the right
the activation status.
● When active, displays in the Status area.
to turn it on. The slider color indicates
17
Page 18
DEVICE FUNCTIONS
To turn Bluetooth off:
1. From the Home screen, press (Menu) and then tap
System settings.
2. In a single motion touch and slide the Bluetooth slider to
the left
OFF
to turn it off. The slider color indicates
the activation status.
Pairing Bluetooth Devices
1. Verify Bluetooth is active.
2. Place the other Bluetooth device in discoverable mode. (See
the device user manual for more information.)
3. From the Bluetooth settings page, press (Menu) and
then tap Visibility timeout and set your value. Your device
must be visible to successfully pair with an external device.
4. Tap SEARCH FOR DEVICES. Your device displays a list of
discovered in-range Bluetooth devices.
5. Tap a device from the list to initiate pairing.
6. Enter the passkey or PIN code, if needed, and tap OK.
7. The external device must accept the connection and enter
your device’s PIN code.
8. Once successfully paired to a headset, displays in the
Status area.
18
Page 19

DEVICE FUNCTIONS
WI-FI
ON
Your device can connect to the Internet using Wi-Fi. Wi-Fi
communication requires access to an existing and accessible
Wireless Access Point (WAP). These WAPs can either be Open
(unsecured) as within most HotSpots, or Secured (requiring
knowledge of the Router name and password).
Turn on Wi-Fi:
1. In a single motion, touch and drag the Status bar down
to the bottom of the screen.
2. Tap Wi-Fi networks available.
– or–
1. From the Home screen, press (Menu) and then tap
System settings.
2. In a single motion touch and slide the Wi-Fi slider to the
right
to turn it on. The slider color indicates
the activation status.
● When active and there is an available open wireless
network,
● When active and communicating, displays in the
Status area.
displays in the Status area.
19
Page 20

DEVICE FUNCTIONS
To turn Wi-Fi off:
1. From the Home screen, press (Menu) and then tap
System settings.
2. In a single motion touch and slide the Wi-Fi slider to the
left
OFF
to turn it off. The slider color indicates the
activation status.
Connect to a Wi-Fi Network
1. From the Home screen, press (Menu) and then tap
System settings g Wi-Fi.
2. Tap the desired network.
3. Enter the password, if necessary,
4. Tap Connect.
WEB BROWSING
Your device is equipped with a Google browser to navigate the
Web.
To open the Browser screen:
X From the Home screen, tap (Browser).
Entering a URL
You can access a website quickly by entering the URL. Websites
are optimized for viewing on your device.
X Tap the URL field at the top of the screen, enter the URL and
tap
Go
.
20
Page 21

DEVICE FUNCTIONS
SETTING UP EMAIL
In addition to Gmail, your device supports the following account
types: POP3, IMAP, and Exchange.
Internet Email Account Set Up
1. From the Home screen, tap (Applications) g
(Email). If you already have email accounts, your accounts
screen is displayed.
2. Enter your email address in the Email address field.
3. Enter your password in the Password field and tap Next.
4. At the Account settings screen, configure your desired
inbox email settings and tap Next.
5. At the Account setup screen, give the new email account
a unique name and enter an outgoing screen name (From
name) to identify yourself to email recipients.
6. Tap Next to store the new account.
21
Page 22

DEVICE FUNCTIONS
Microsoft Exchange Email Set Up
Your device also provides access to your company’s Outlook
Exchange server. If your company uses either Microsoft
Exchange Server 2003 or 2007, you can use this email application
to wirelessly synchronize your email, Contacts, and Calendar
information directly with your company’s Exchange server.
1. From the Home screen, tap (Applications) g
(Email).
2. Enter your Email address and Password information, and
then tap Next.
NOTE: Consult your Network or IT Administrator for further details and support.
®
3. Tap Exchange. The device will try to resolve the email
address and retrieve account information.
4. Enter a Domain (typically inserted on-screen before the
user name) and confirm your Username and Password
information. Review and verify your information, then tap
Next.
5. Overwrite your Server information within the appropriate
field.
Exchange server: Your Exchange Server’s remote email
address. Typically starts with mail.XXX.com. Obtain this
information from your company network administrator.
Do not accept the default entry as this is a guess based on
returned information.
22
Page 23

DEVICE FUNCTIONS
If your network requires SSL encryption, tap the Accept all SSL
certificates field to place a check mark in the box and activate
this additional level.
IMPORTANT: If your Exchange server requires this feature, leaving this field unchecked
can prevent connection.
6. With the new information entered, tap Next.
7. If prompted, tap Edit details to update any information that
might still need to be updated.
IMPORTANT: If you receive a message that your “Setup could not finish”, tap Edit
details to manually configure any remaining exchange account information
that could not be automatically retrieve by the device.
8. If prompted, read the Remote security administration
information and tap OK to accept the service and continue.
9. Adjust the various on-screen configuration fields and tap
Next. It may take a few seconds for the next screen to load.
10. If prompted, read the Activate device administrator?
screen and tap Activate to complete the email setup
process.
11. Identify your new work email account with a unique name
(Ex: Work), then tap Next.
23
Page 24

DEVICE FUNCTIONS
MESSAGING
Accessing Messages
X From the Home screen, tap (Applications) g
(Messaging).
Create and Send a Text Message
1. From the Home screen, tap (Applications) g
g (New message).
2. Within the To field, enter either the recipient’s phone
number or e-mail address.
3. Tap the Type message field and use the on-screen keypad
to enter a message.
4. Review your message and tap (Send).
24
Page 25

DEVICE FUNCTIONS
Create and Send a Multimedia Message
Picture messages are text messages that contain file attachments
like a voice memo, ringtone, image, video, or downloaded melody.
NOTE: You can send a Picture message to up to ten recipients. Enter each recipient’s
address or phone number in a separate To field of the Picture message composer.
1. From the Home screen, tap (Applications) g
g (New message).
2. Within the To field, enter either the recipient’s phone
number or e-mail address.
3. Tap the Type message field and use the on-screen keypad
to enter a message.
4. Tap (Attach) to insert various file types to your
message (such as Pictures, Videos, or Audio).
Select the file and complete the on-screen instructions to insert it
to the current message.
5. Review your message and tap (Send).
25
Page 26

DEVICE FUNCTIONS
USING THE PLAY STORE
The Play Store (also known as Google Play Store) provides
access to downloadable applications and games to install on
your phone. This application might be updated after your initial
setup and connection. Please note that this document describes
this application as it appears by default. If prompted, follow the
on-screen instructions to update the related application icon and
features.
Accessing the Play Store
1. From the Home screen, tap (Play Store).
2. If not already logged in to your Google account,
tap Existing.
3. Enter your Google account information.
4. Tap Sign in and follow the on-screen instructions to
agree to the Store’s terms of service and complete your
connection.
Downloading a New Google Application
To download a new application, you will need to use your Google
account to sign in to the Play Store.
1. From the Home screen, tap (Play Store).
2. Browse through the categories, find an application you’re
interested in, and tap the name.
3. Read the application descriptions.
26
4. Tap Install g Accept & download.
Page 27

DEVICE FUNCTIONS
CUSTOMIZING YOUR PHONE
You can customize the Home screens (panels) to display the
Widgets, Shortcuts, Folders, or Wallpapers.
Manage Shortcuts
NOTE: To move a shortcut from one screen to another, you must carefully touch and hold
the shortcut and slowly drag it to the edge of the screen. As the shortcut turns
light blue, you can begin to move it to the adjacent screen.
If this does not work, delete it from its current screen. Activate the new screen
and then add the selected shortcut.
To add a shortcut from the Applications screen:
1. From the Home screen, select a location (screen) for your
new shortcut by scrolling across your available screens until
you reach the desired one.
2. Tap (Applications) to reveal all your current available
applications.
3. Touch and hold the on-screen icon. The new shortcut then
appears to hover over the current screen.
4. While still holding the on-screen icon, position it on the
current screen. Once complete, release the screen to lock
the shortcut into its new position.
27
Page 28

DEVICE FUNCTIONS
Wallpaper
1. From the Home screen, touch and hold an empty area of
the screen.
2. Choose a source for images:
Gallery: Access the Gallery to choose a picture from an installed
memory card. Tap a picture to select it, then use the crop tool
to resize the picture, if desired. Tap Save to save the picture as
wallpaper.
Live Wallpapers: Choose from pre-loaded interactive animated
wallpapers. Tap a wallpaper to see an example, then tap
Set wallpaper.
Wallpapers: Choose from pre-loaded wallpaper images. Tap a
wallpaper, then tap Set wallpaper.
28
Page 29
DEVICE FUNCTIONS
CAMERA & CAMCORDER
Use your device’s built-in Camera to take pictures and record
video.
Camera
1. From the Home screen, tap (Applications) g
(Camera).
2. Using the display as a viewfinder, compose your shot by
aiming the lens at the subject.
3. Tap to take a picture.
4. After taking your picture, tap (Image Viewer) to view
the image.
Camcorder
1. From the Home screen, tap (Applications) g
(Camera).
2. From the current screen, locate and tap (Camera),
then select (Camcorder) to change the current mode.
3. Using the display as a viewfinder, compose your shot by
aiming the lens at the subject.
4. Tap to start recording.
5. Tap to stop recording.
6. After recording, tap (Image Viewer) and tap to
view the video.
29
Page 30
DEVICE FUNCTIONS
GPS NAVIGATION
Your device is equipped with GPS hardware that supplemented
by positioning information from nearby wireless networks. The
Location and Security settings allow you to set up how the
phone will determine your location and the security settings for
your phone. GPS accuracy is aided by using one or more of the
following technologies: Wireless Networks, GPS Satellites, and
Sensor Aiding.
To enable GPS location:
1. From the Home screen, press (Menu) and then tap
System settings g Location services.
2. Tap GPS satellites. A blue check mark lets apps use GPS
technology to pinpoint your location.
To enable additional GPS location functions:
1. From the Home screen, press (Menu) and then tap
System settings g Location services.
2. Tap Google’s location service to enable location
information using the wireless network.
– or–
Tap Location & Google search to enable Google to use
your location to improve your search results and other
Google services.
30
Page 31

DEVICE FUNCTIONS
Launching the Navigation Application
Get free, turn-by-turn GPS navigation for driving, walking, and
public transit directions.
1. From the Home screen, tap (Applications) g
(Navigation).
2. Read the on-screen disclaimer, tap Accept, and choose
from the following on-screen options:.
● Driving/Walking: tap to configure the method of travel.
Selection of Walking would negate the need to track
traffic jams and obstructions.
● Speak destination: allows you to use the voice
recognition feature to search for matching locations in
your area.
● Type destination: allows you to manually enter a
destination address (via the on-screen keypad).
● Go home: allows you to return to a designated “Home”
location.
● Map: enables the real-time map functionality.
For more information visit:
http://www.google.com/mobile/navigation/
31
Page 32

NOTES
32
 Loading...