

Page 1
Installation guide COMBI E
Before installing read this guide first
Page 2

Introduction
The operation of the Quooker COMBI E
The Quooker COMBI E supplies boiling water and hot water. The tank is vacuuminsulated and is connected to the cold water supply via an inlet combination
valve. Inside the tank the water is heated electrically to approx. 110°C and is
kept at this temperature. When boiling water is drawn off, cold water flows into
the tank at the same time and is heated automatically. If the entire content of
boiling water is used in one go, the heating time is ca. 20 min. Before the water
leaves the tank it is purified by the HiTAC
Activated Carbon). To extend the life of the filter, the water used for mixing
the hot water is not filtered.
In addition to boiling water, the COMBI E also supplies instant hot water.
The Quooker COMBI E supplies hot water by mixing boiling water from the
Quooker tank with cold water from the water mains inside the mixing valve.
A thermostatic control element inside the valve keeps the outgoing water
temperature constant. This temperature can be set between 40°C and 60°C
with the grey knob on the mixing valve. The mixing valve is suitably protected
against a loss in water pressure, preventing any boiling water from flowing out
of the mixer tap.
The grooved handle on the tap lights up when the water is running to warn the
user that the water is boiling. As an additional safety feature, the Nordic single
tap is height-adjustable and the Nordic single tap, the Fusion tap and the Flex
tap are fully insulated.
Despite all the safety features incorporated in the product, anyone using the
Quooker system must keep in mind the risks of using boiling water in general.
Incorrect use can lead to injury. Therefore always read the manual carefully
before use.
®
water filter (High Temperature
Installation, maintenance and warranty
The Quooker can be installed in almost any location provided there is sufficient
space for the tank as well as a 13 amp socket, water supply and waste pipe.
The Quooker tank must be fitted in an upright position. If the tank is to be fitted
in a cabinet with drawers, an optional bracket can be purchased to suspend the
tank from the cabinet wall.
The HiTAC
depending on your water hardness. If you live in a hard water area, lime scale
will collect at the bottom of the tank and will need to be cleaned out by one of
our engineers approximately once a year depending on usage and the quality of
the water in your area. Alternatively, you can install a suitable descaling system.
This system must not reduce the pH level of the water below 7 or remove all the
minerals from the water (reverse osmosis) as this can be harmful to the tank and
would void the warranty. Suitable descaling systems are also available directly
from Quooker as an optional extra.
The warranty period is two years and covers supply of parts only. It does not
cover labour costs or issues resulting from insufficient lime scale maintenance.
®
filter inside the tank should be changed once every 3-5 years
Page 3

Users
The Quooker tap can be used by children above the age of eight and people
with diminished physical, sensory or intellectual abilities provided they are
supervised or have been instructed on the safe use of the device. Inform people
who are unfamiliar with the Quooker system about safe use and the possible
dangers associated with the use of the boiling-water tap. Please note: incorrect
use may result in injury. Prevent children from using the tap as a toy and do not
allow children to clean or maintain the product unsupervised. Keep the plug out
of reach of small children.
The Quooker system is suitable for household use and commercial use such as
in staff kitchens at shops, offices, farms and other business premises and for
use by visitors at hotels, motels, bed & breakfasts and other residential accommodation.
Always follow the installation method described in the manual. Avoid spilling
water on the plug. If defective, the power plug may only be replaced by a
qualified technician. Water may drip from the pressure relief valve. This is
normal. Always leave the grey funnel of the pressure relief valve open.
The inlet combination valve must be serviced regularly to prevent lime scale
build-up and to check that the valve has not blocked up.
Make sure you let the tank cool off adequately before disconnecting it. The fastest way to do this is as follows: turn off the Quooker, but leave the plug in the
socket. Then open the boiling-water tap and turn it off once the water is cold.
You can find a more detailed explanation for disconnecting the tank in chapter F.
Tips for use and the installation manual can also be found on our website:
www.quooker.co.uk
Page 4

Declaration of conformity
Quooker Nederland B.V., Staalstraat 13, 2984 AJ Ridderkerk (The Netherlands)
herewith declares, on our own responsibility, that the product Quooker COMBI E
is in accordance with the conditions of the following directives:
- 2006/95/EC Low voltage Directive,
- 2004/108/EC Electromagnetic Compatibility Directive,
- 2014/68/EU Pressure Equipment Directive
And are in conformity with the following standards:
EN60335-1:2012 + A11:2014
EN60335-2-15:2002 + A1:2005 + A2:2008 + A11:2012
EN62233:2008
EN55014-1:2006 + A1:2009 + A2:2011
EN55014-2:1997 + A1:2001 + A2:2008
EN61000-3-2:2014; EN61000-3-3:2013; EN61000-4-2:2009; EN61000-4-3:2006 +
A1:2008 + A2:2010; EN61000-4-4:2012; EN61000-4-5:2014; EN61000-4-6:2014;
EN61000-4-11:2004
The Netherlands, Ridderkerk, 12-02-2016
Niels Peteri, Director
Page 5

Technical specifications
Tank COMBI E
Voltage 230 V
Wattage* 2200 W
Capacity 7 litres
Heating-up time* 20 minutes
Standby power consumption* 10 W
Tank height 47 cm
Total tank height requirement 55 cm
Tank diameter 20 cm
Min. mains pressure 200 kPa (2 bar)
Max. mains pressure 600 kPa (6 bar)
Max. working pressure 800 kPa (8 bar)
Volume at 40°C* 27 litres
Volume at 60ºC* 15 litres
Temperature regulation thermostatic
Mounting bracket optional yes
Safety features - maximum temperature fuse
pressure relief valve 800 kPa (8 bar)
-
®
HiTAC
*These are average values.
water filter High Temperature Activated Carbon
Energy label
Declared load profile XXS
Water heating energy
efficiency class A
Water heating energy efficiency 36%
Annual electricity consumption 511 kWh/A
Warm water temperature
settings of the water heater 40°C - 60°C
Sound power level - dB
Tap Nordic Fusion, Flex
single tap and mixer tap
Tap hole size 32 mm 35 mm
Recommended temperature
mixing water - 60°C
Tap base plate optional yes yes
Page 6
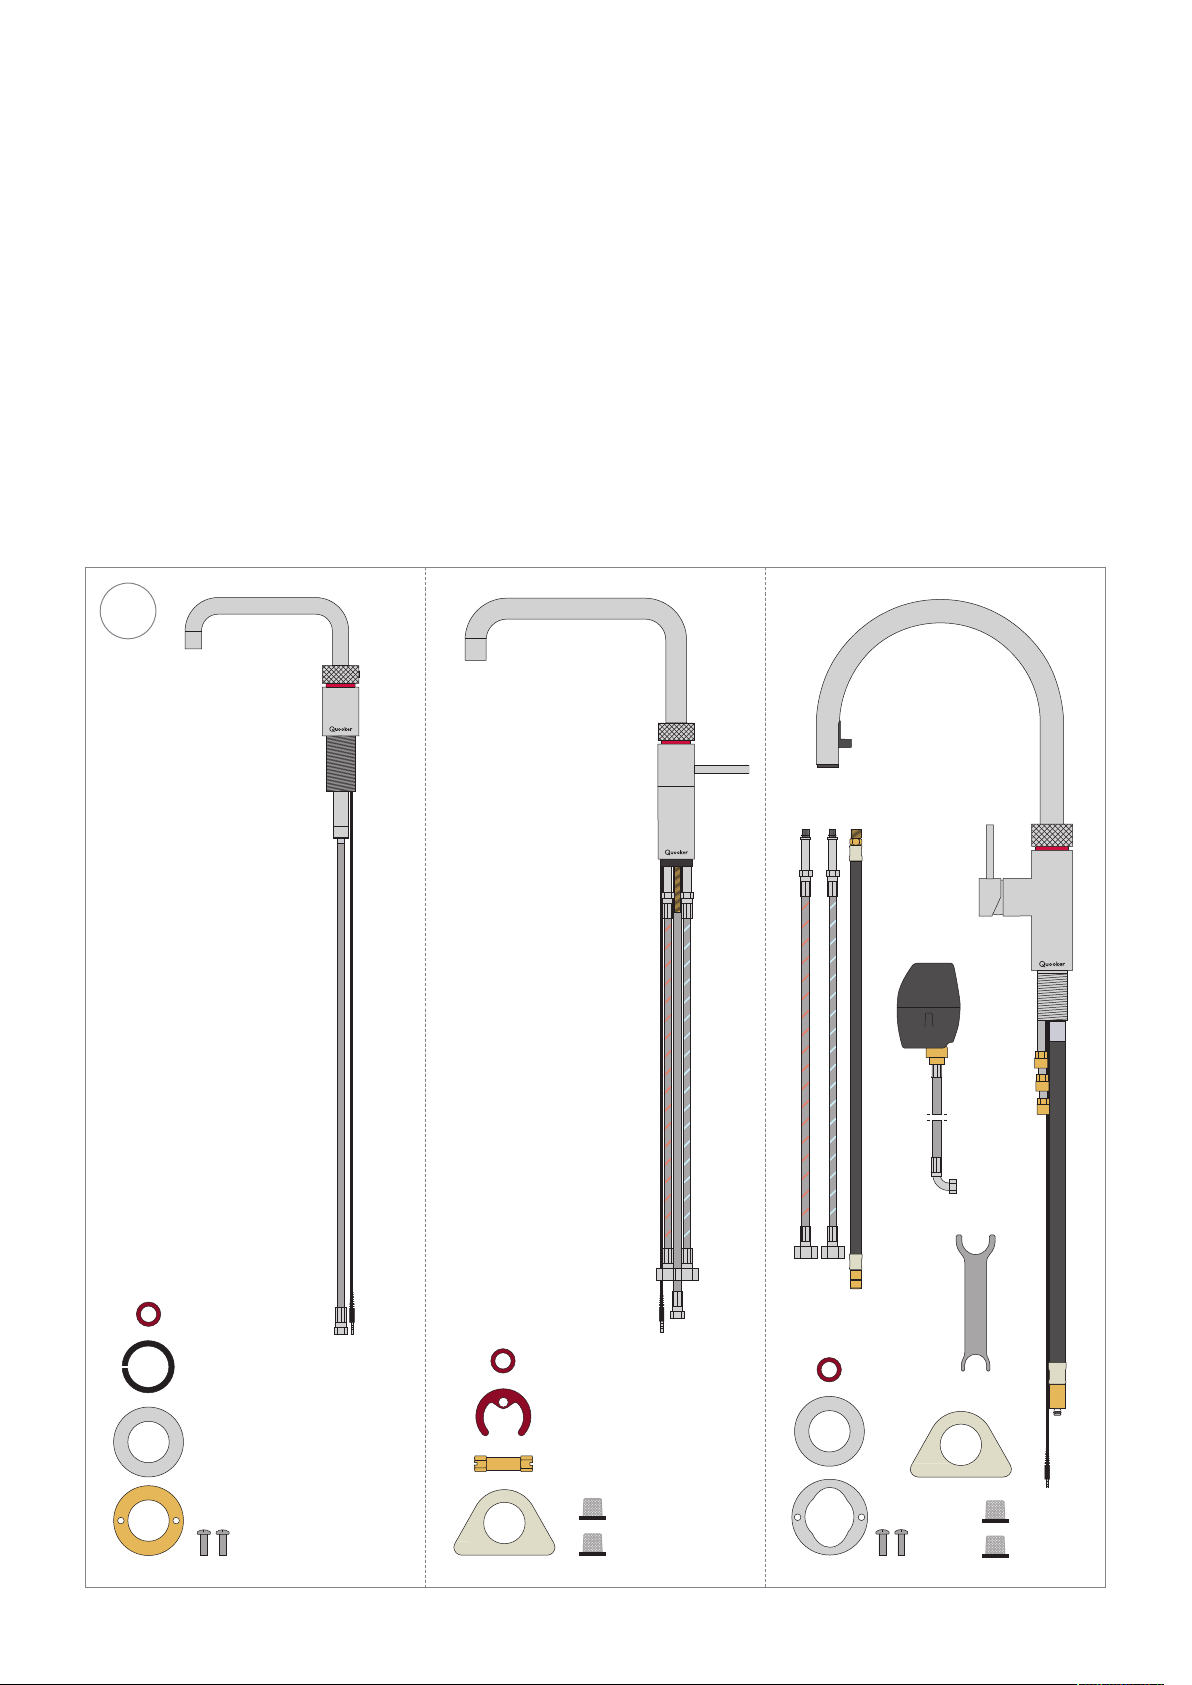
Contents of the pack
1. Nordic single tap, small fibre washer, centring ring, metal washer, threaded
ring and two screws
or Fusion tap, hoses, small fibre washer, brass fixing plate, fixing nut, white
tap support (for thin work tops) and two inlet hose screens
or Flex tap, hoses, small fibre washer, metal washer, threaded ring with two
screws, coupling with boiling water hose, white tap support (for thin work
tops), two inlet hose screens and quick-release tool
1
Nordic single tap
Fusion tap
Flex tap
Page 7
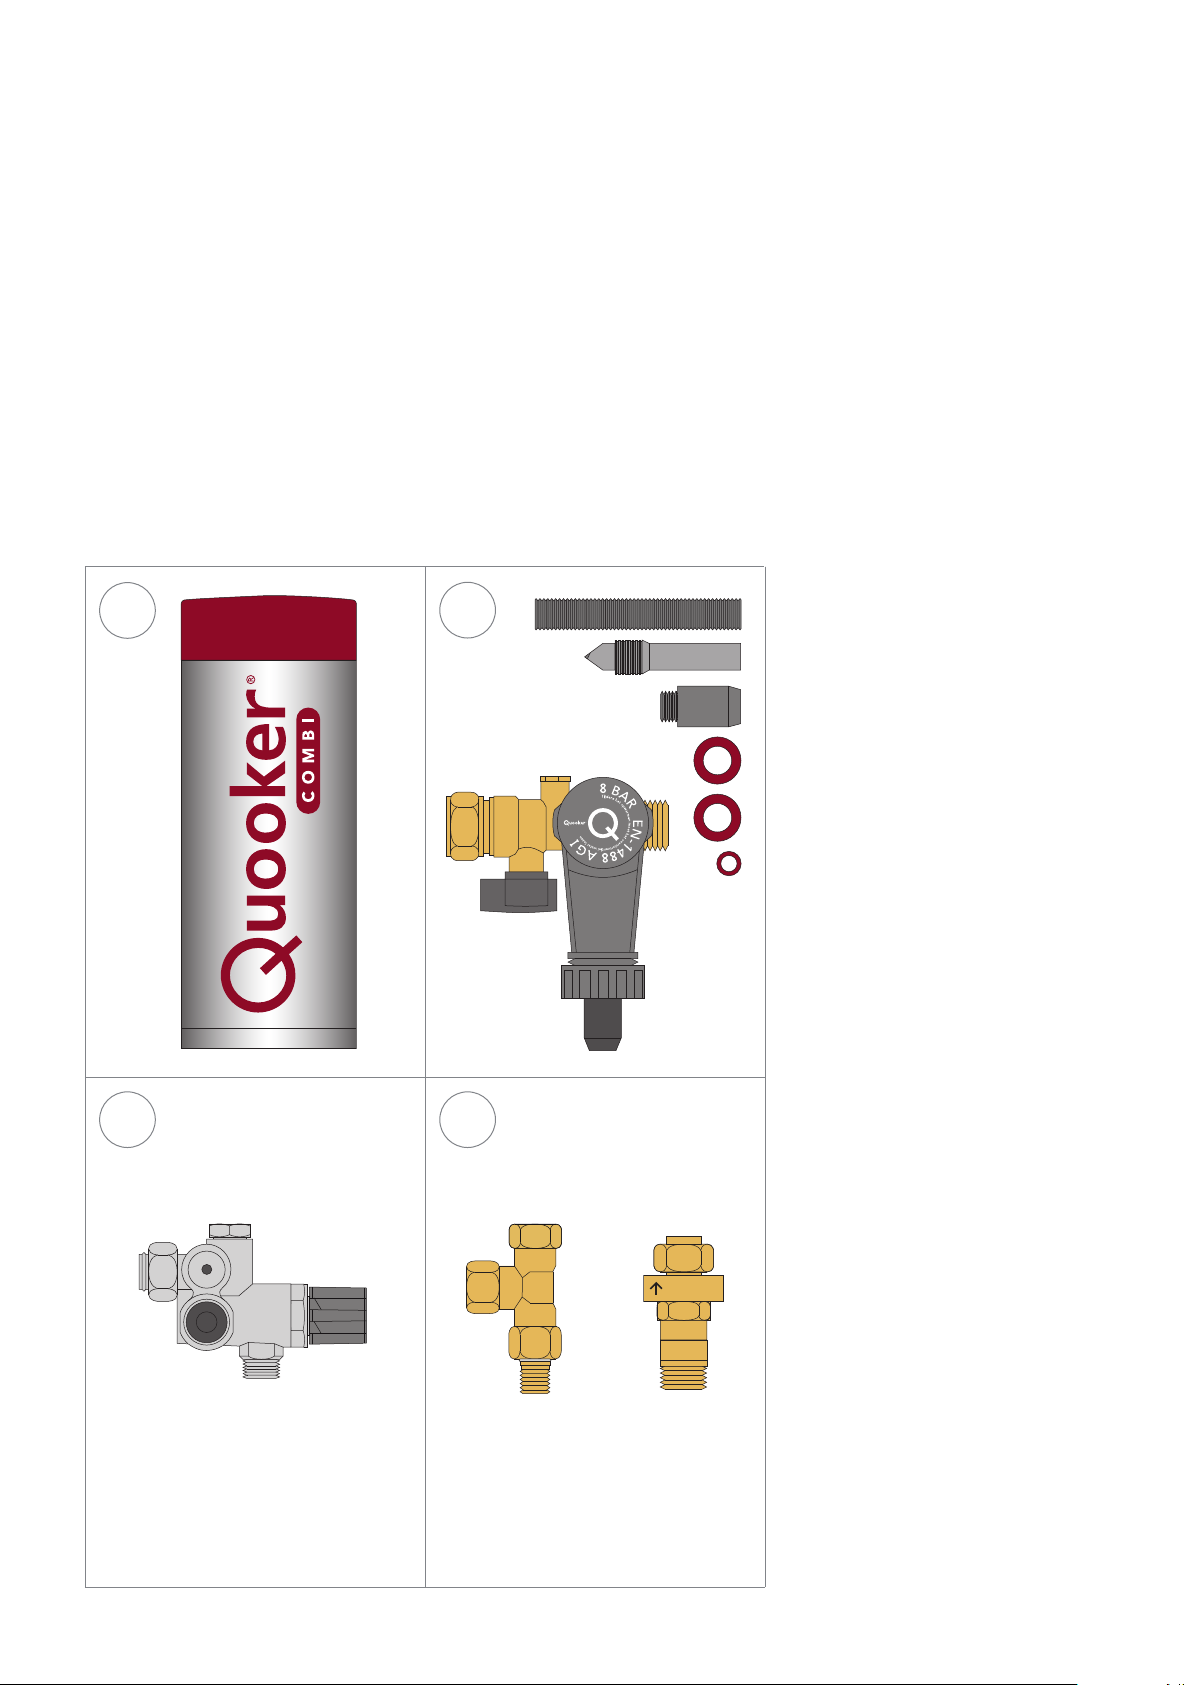
2. COMBI E tank
COLD
3. Quooker inlet combination valve, waste hose, Quooker drill bit, PVC
connector, two large fibre washers (one spare) and one small fibre washer
4. Mixing valve
5. T-joint and pressure reducing valve
- Installation guide and ‘Tips for use’
2
3
4 5
Page 8
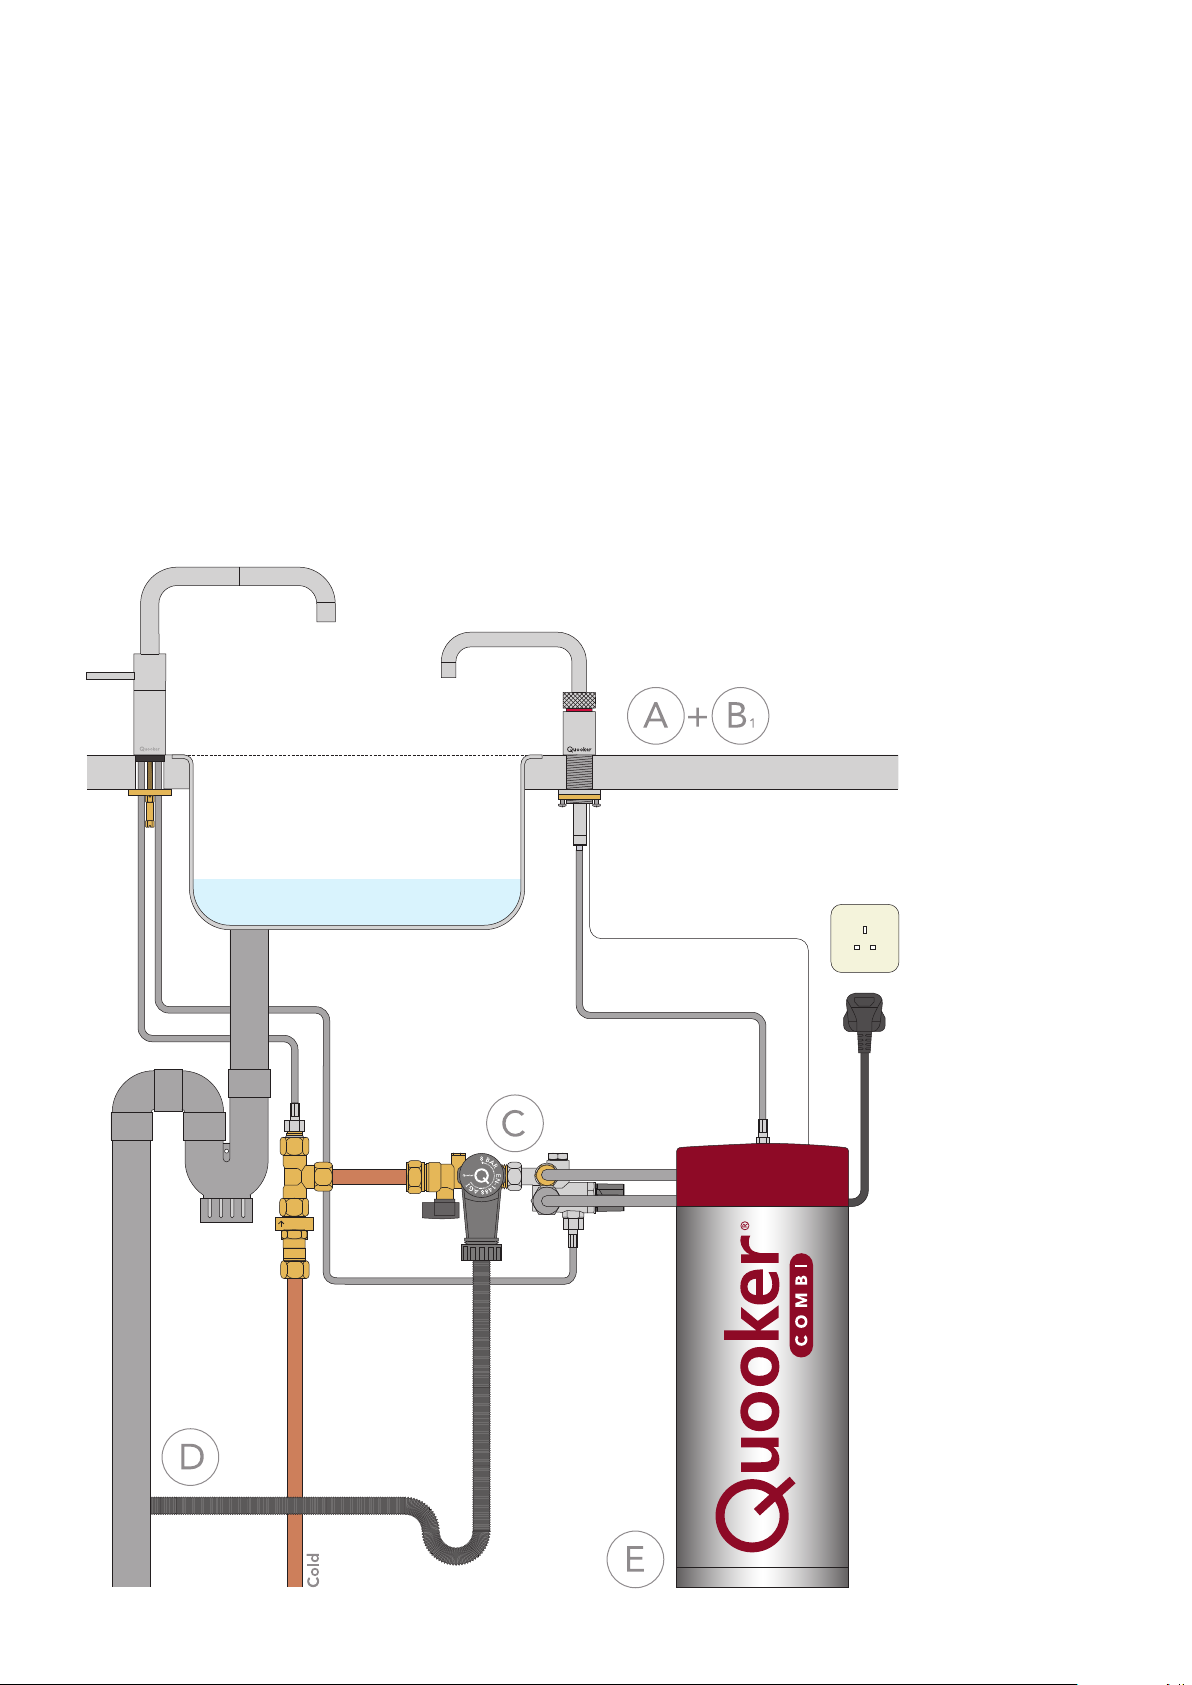
Overview of Nordic tap installation
COLD
It is recommended that you install the Quooker in the following order:
A. Drilling hole
B1. Fitting Nordic single tap
C. Connecting water
D. Connecting waste
E. Connecting tank to Nordic tap
Note: Bear in mind that the tank, inlet combination valve, mixing valve and
socket must remain accessible for servicing.
For an overview of the Fusion tap installation, please refer to the next page
and for the Flex tap to the page after that.
Page 9
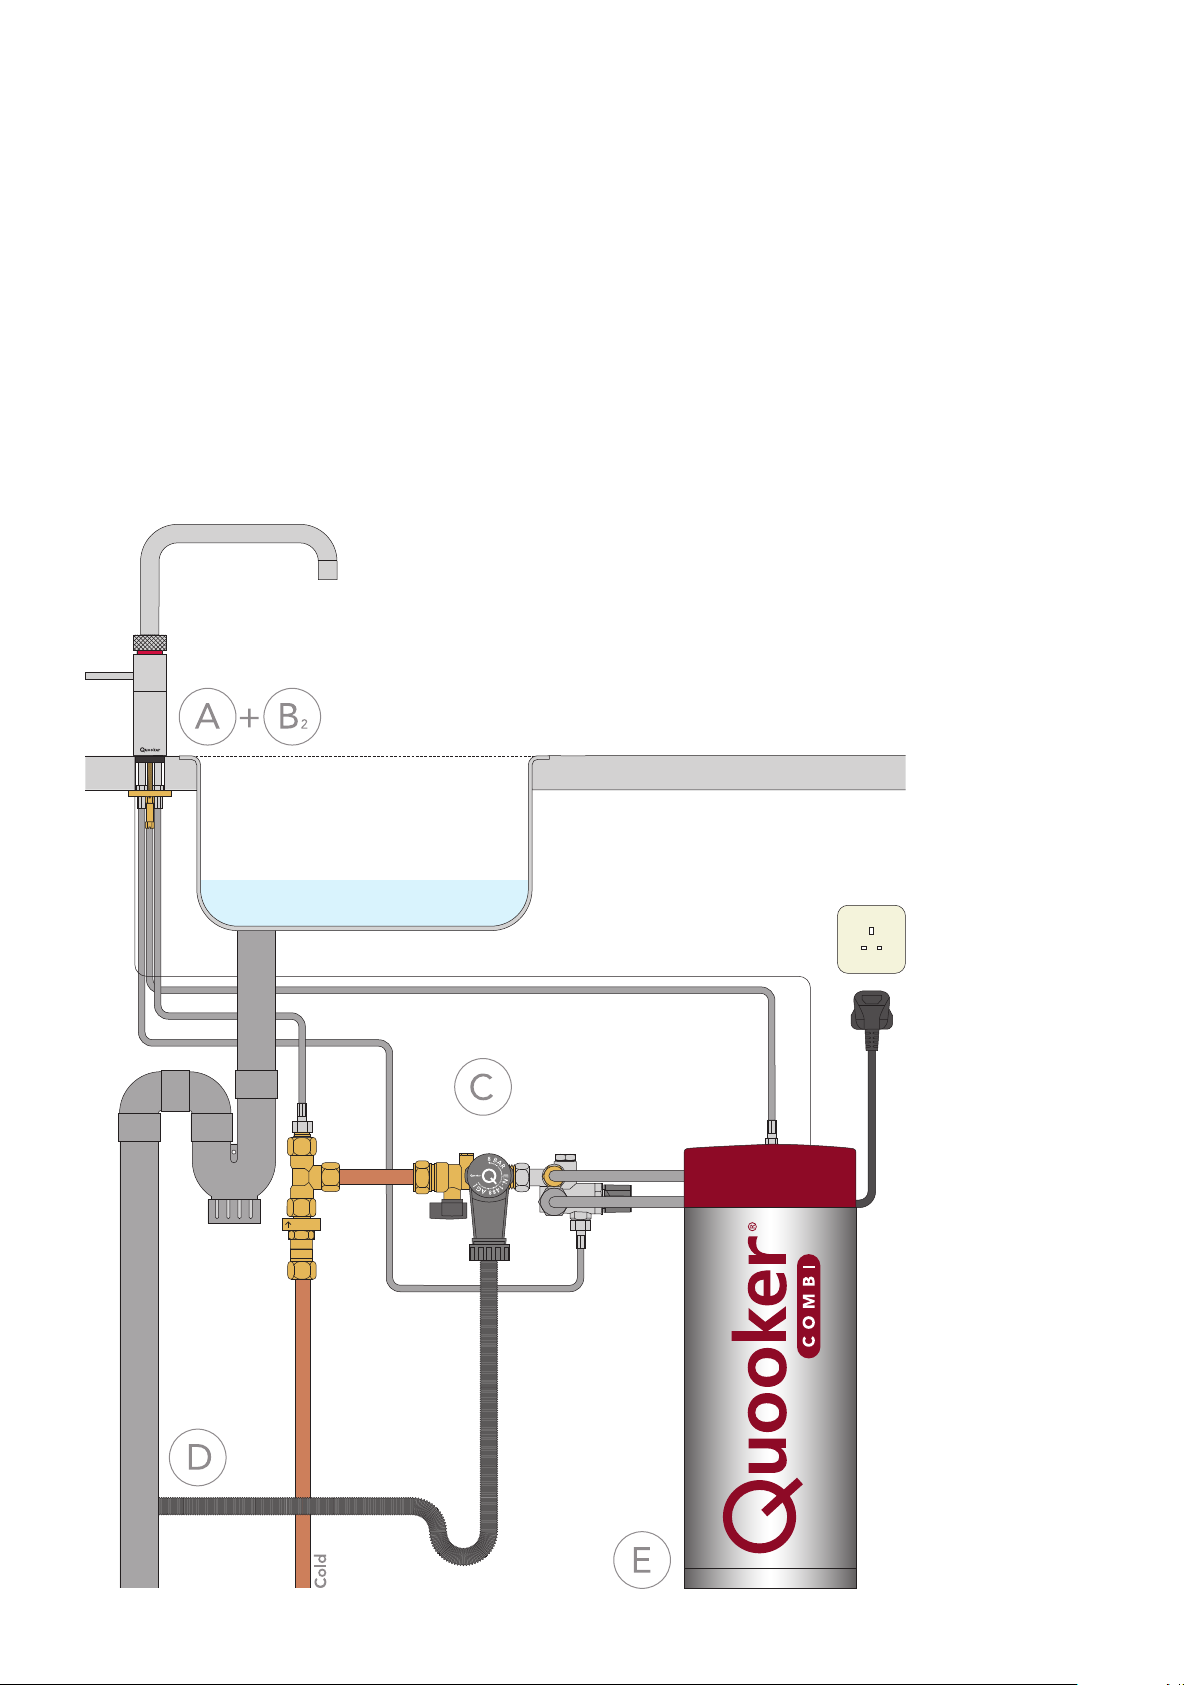
Overview of Fusion tap installation
COLD
It is recommended that you install the Quooker in the following order:
A. Drilling hole
B2. Fitting boiling-water tap
C. Connecting water
D. Connecting waste
E. Connecting tank to Fusion tap
Note: Bear in mind that the tank, inlet combination valve, mixing valve and
socket must remain accessible for servicing.
For an overview of the Flex tap installation, please refer to the next page.
Page 10
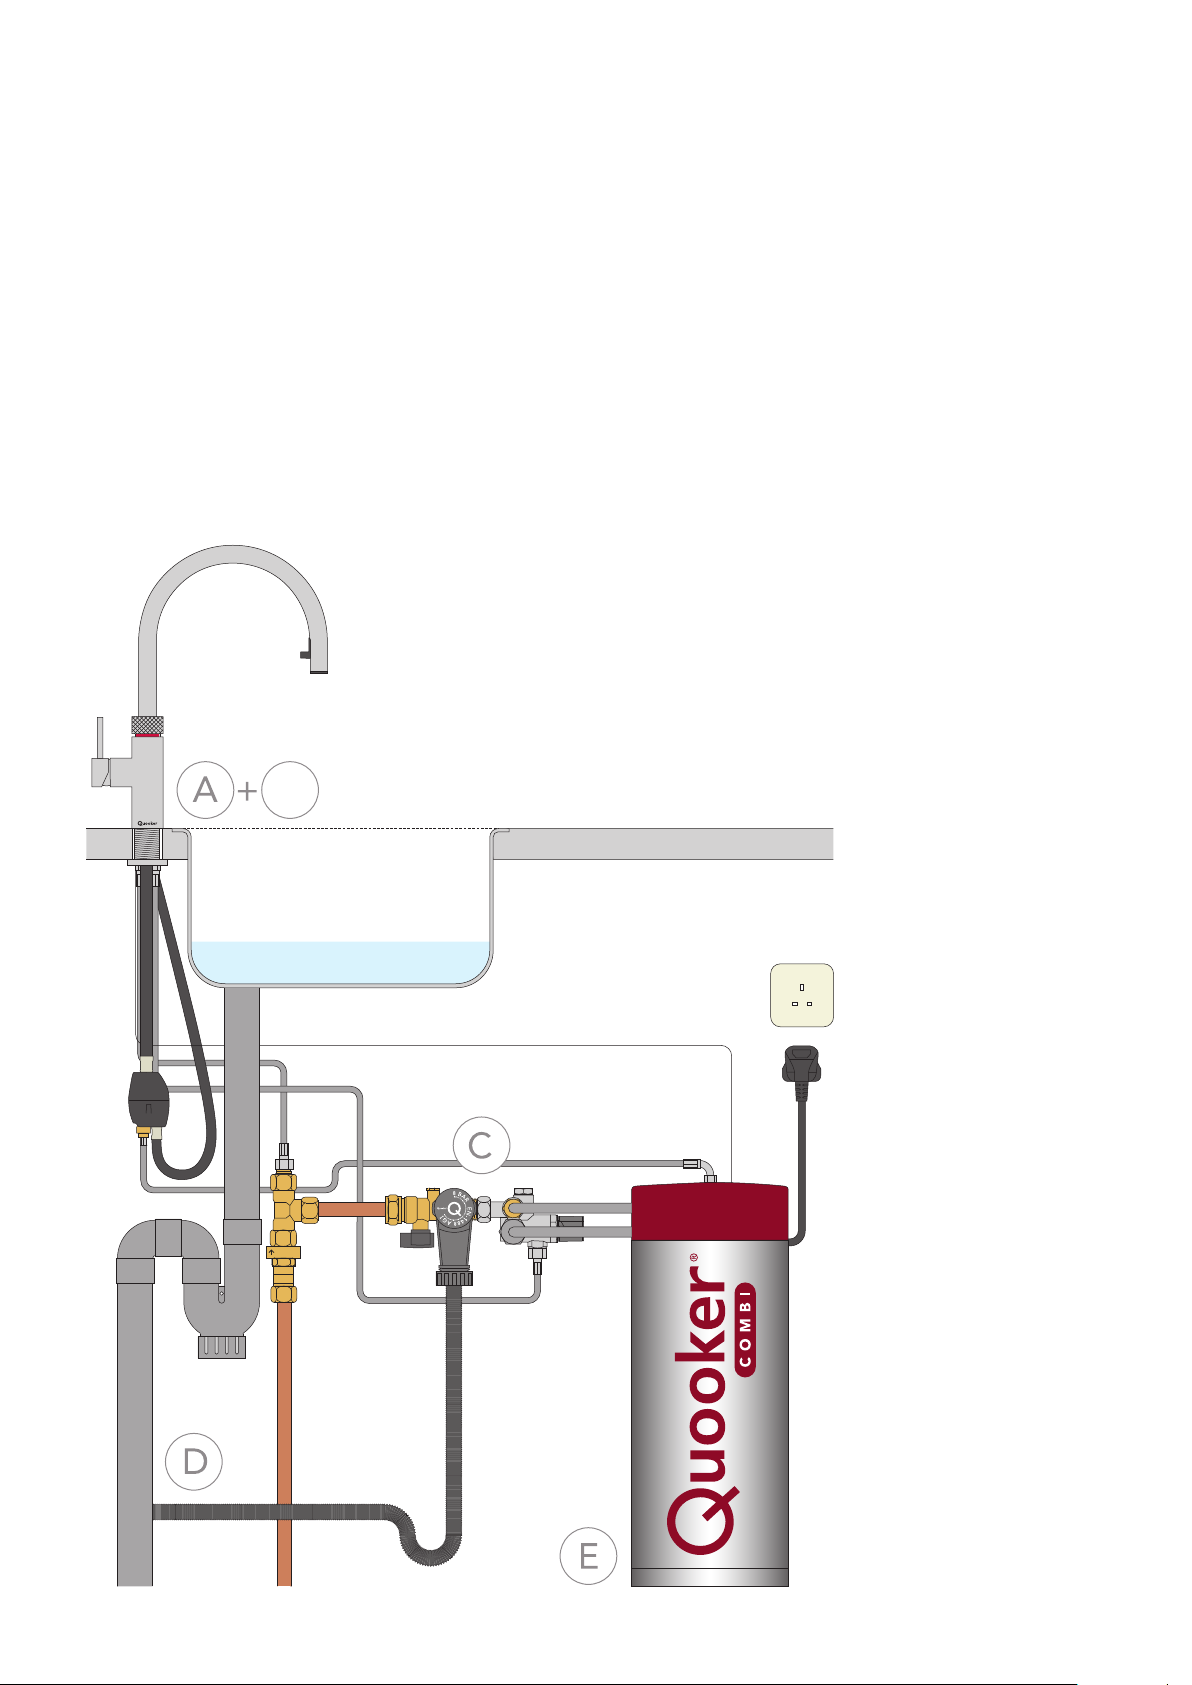
Overview of Flex tap installation
B3
COLD
Cold
It is recommended that you install the Quooker in the following order:
A. Drilling hole
B3. Fitting Flex tap
C. Connecting water
D. Connecting waste
E. Connecting tank to Flex tap
NOTE: Bear in mind that the tank, inlet combination valve, mixing valve and
socket must remain accessible for servicing.
Page 11
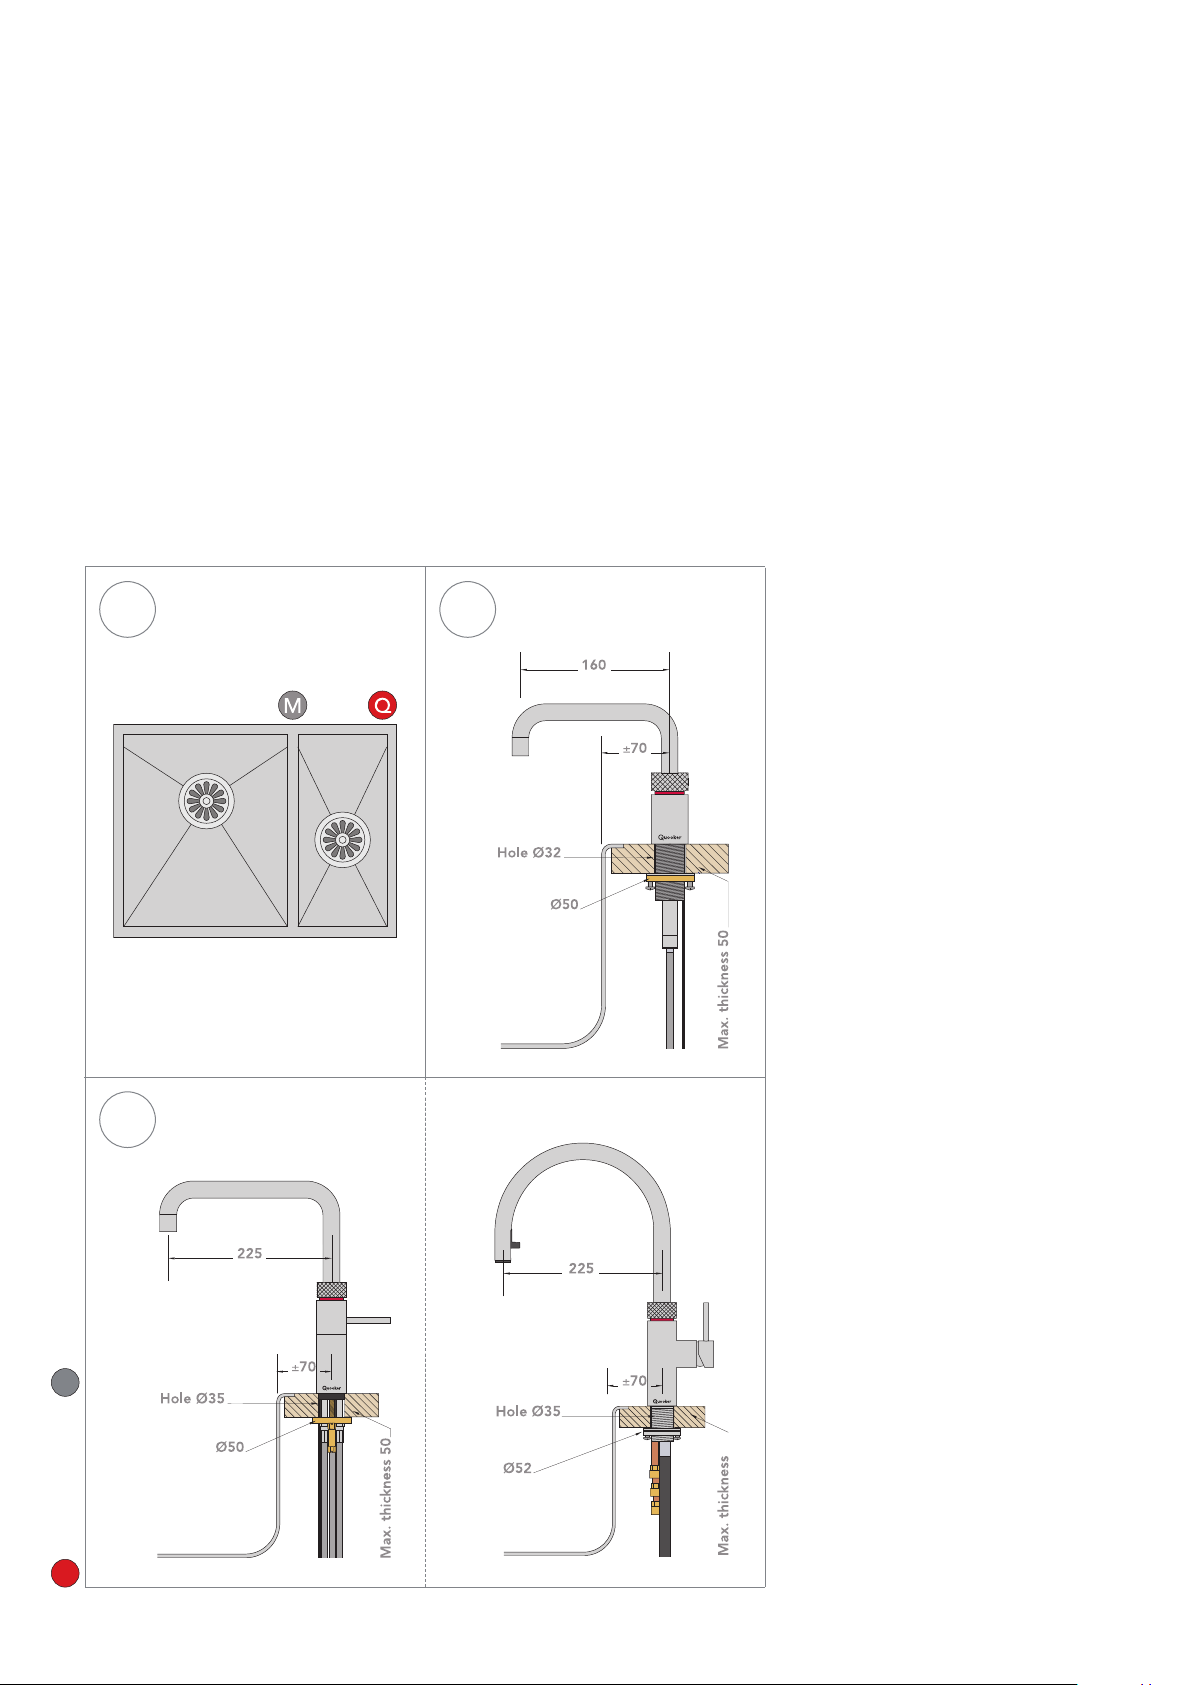
Drilling hole
60
A
•Note: The tap hole for the Nordic single tap should be 32 mm in diameter.
The Fusion, Nordic mixer tap or Flex tap hole should be 35 mm in diameter.
• The Nordic single tap should ideally be positioned at the corner of the sink
to enable use above the sink or the work top.
•Note: It must be possible to move the spout of the Nordic single tap freely up
and down. When the spout is in its lowest position it projects ca. 25 cm below
the work top. Bear this in mind when fitting the inlet combination valve,
sockets and the like.
• Note: The Flex tap coupling must be able to move freely. When the hose is not
withdrawn it hangs approximately 40 cm below the work surface. Make allowances
for this when fitting the inlet combination valve, power sockets and so forth.
1 2
3
1 Select position
single tap
Select a suitable position for the
Nordic single tap based on the type
of sink and position of the mixer tap.
2 Drilling hole for
single tap
Using the correct drill bit, drill a hole
of 32 mm through the work top for
the Nordic single tap.
In the case of a hole of 35 mm or
larger, use the black plastic centring
ring provided to secure the tap in the
Dimensions in mmDimensions in mm
larger hole.
Note: For the Nordic mixer tap please
refer to the separate guide.
Mixer tap
Nordic single tap
M
Q
3 Drilling hole for
Fusion or Flex tap
Select a suitable position for the
Fusion or Flex tap. Using the correct
drill bit, drill a hole of 35 mm through
the work top.
Dimensions in mm
Page 12
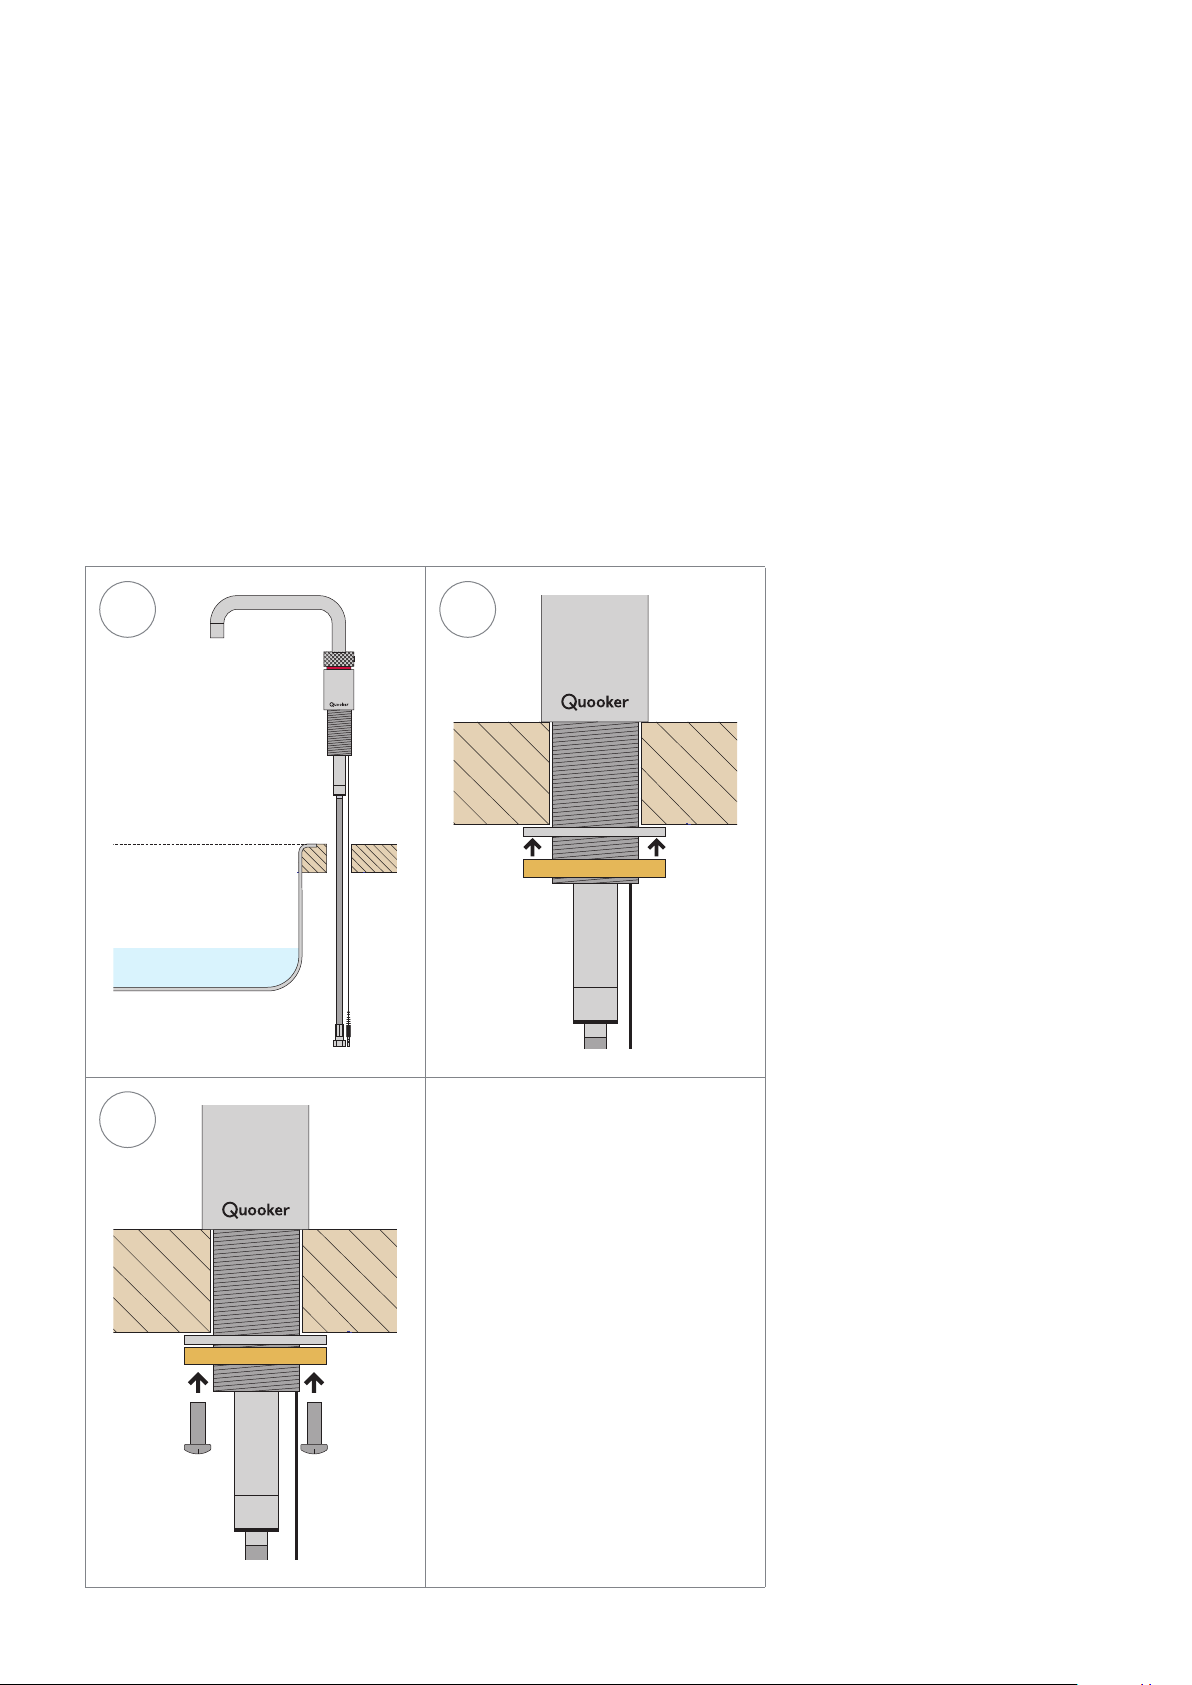
Fitting Nordic tap
B1
•Note: The total length of the hose between the single tap and tank is only
70 cm. The tank must therefore be fitted close to the tap. Extension hoses
are available in different lengths but are not normally required.
•Note: The small fibre washers supplied with the tap rings are not required yet
at this point. One will be used for connecting the tap and tank hose (see section E), the second one is a spare.
1 2
1 Tap through
work top
When fitting the tap in a 35 mm hole
or larger, first attach the black plastic
centring ring to the base of the tap to
centre the tap in the hole.
3
2 Securing the
tap
Set the tap to the desired position
and secure it with the metal washer
and threaded ring supplied.
3 Securing tap
screws
Tighten the threated ring and secure it
with the two screws provided.
Page 13
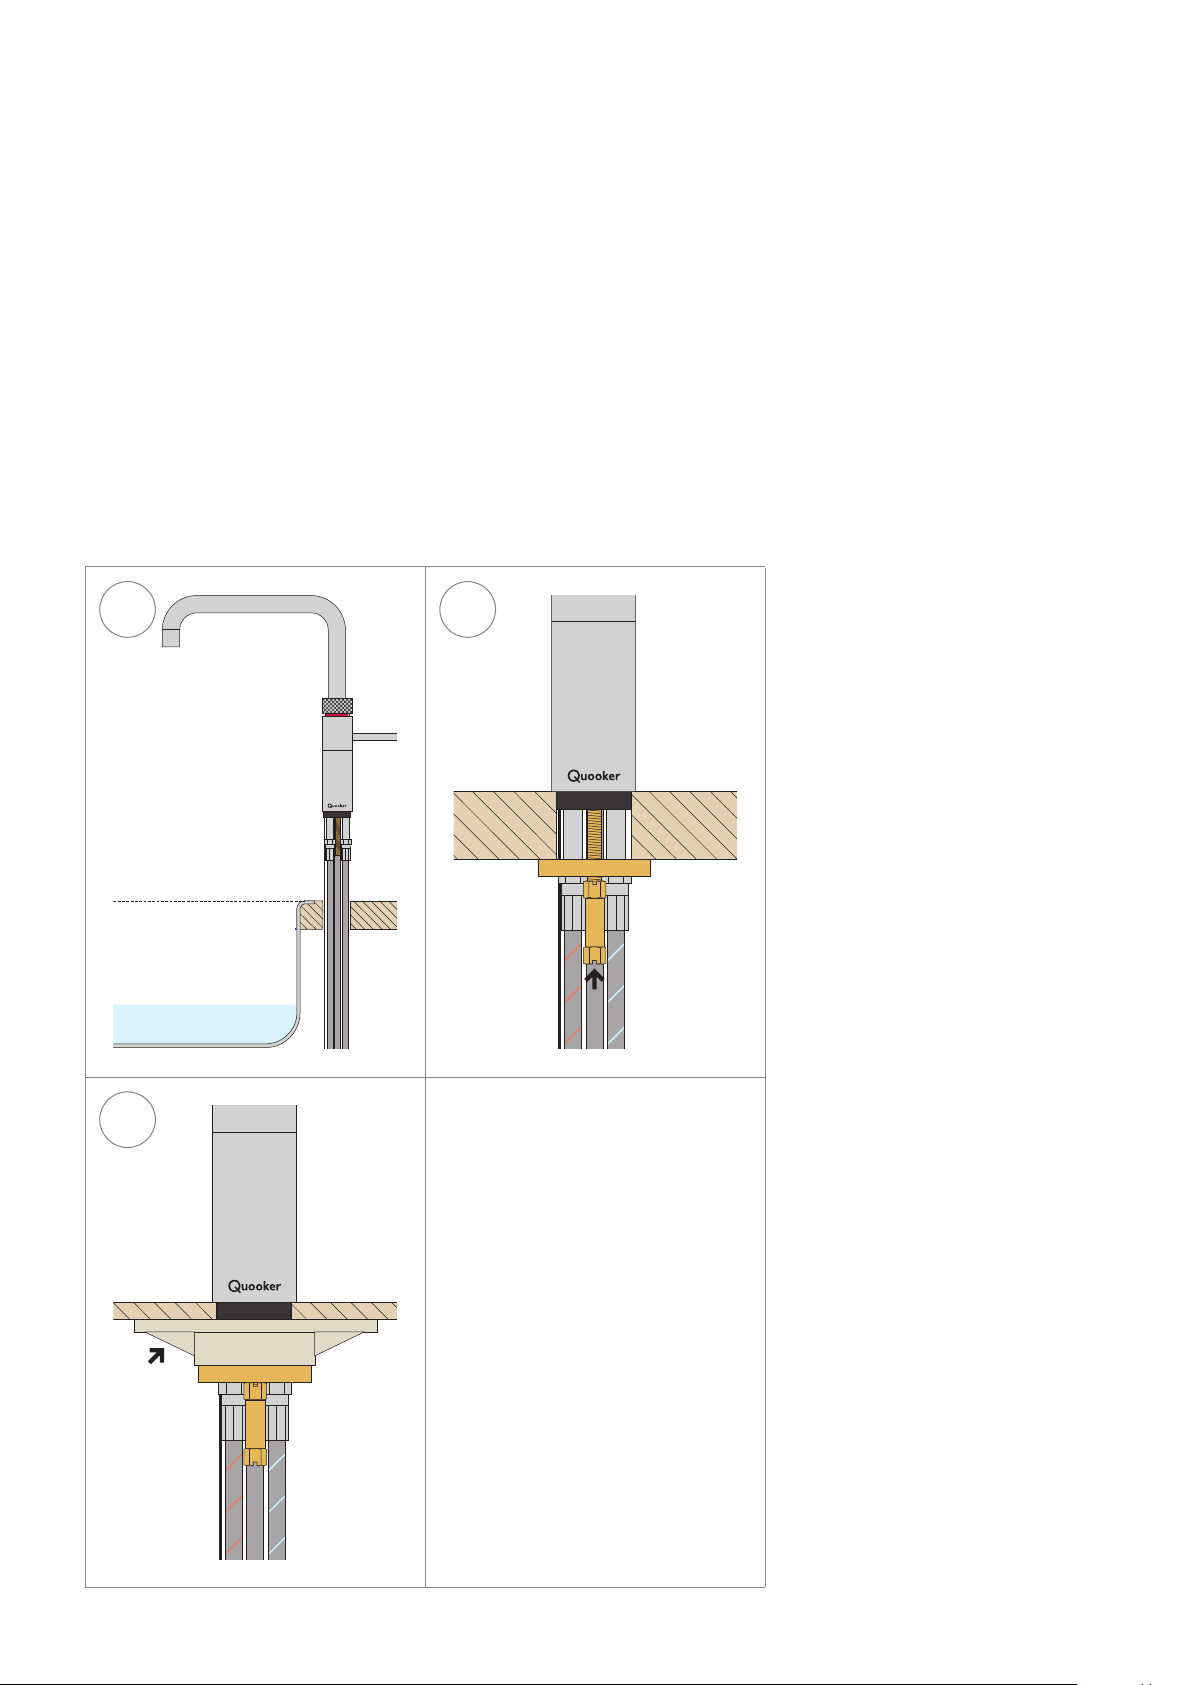
Fitting Fusion tap
B2
•Note: The total length of the hose between the single tap and tank is only
70 cm. The tank must therefore be fitted close to the tap. Extension hoses
for the boiling water hose are available in different lengths but are not
normally required.
•Note: The small fibre washers supplied with the tap rings are not required yet
at this point. One will be used for connecting the tap and tank hose (see section E), the second one is a spare.
1 2
1 Tap through
work top
Push the tap through the hole in the
work top.
2 Securing tap
Position the brass fixing plate around
the hoses. Screw the fixing nut onto
the tap thread. Adjust the position of
the tap to ensure that the Quooker
logo is facing the user. When the
handle is in the cold position, it will
be parallel to the edge of the work
top. Tighten the fixing nut with a pipe
wrench, socket wrench or spanner.
3
3 Fitting to thin
work top
When fitting to a thin work top,
use the white tap support before
fitting the brass fixing plate around
the hoses.
Page 14
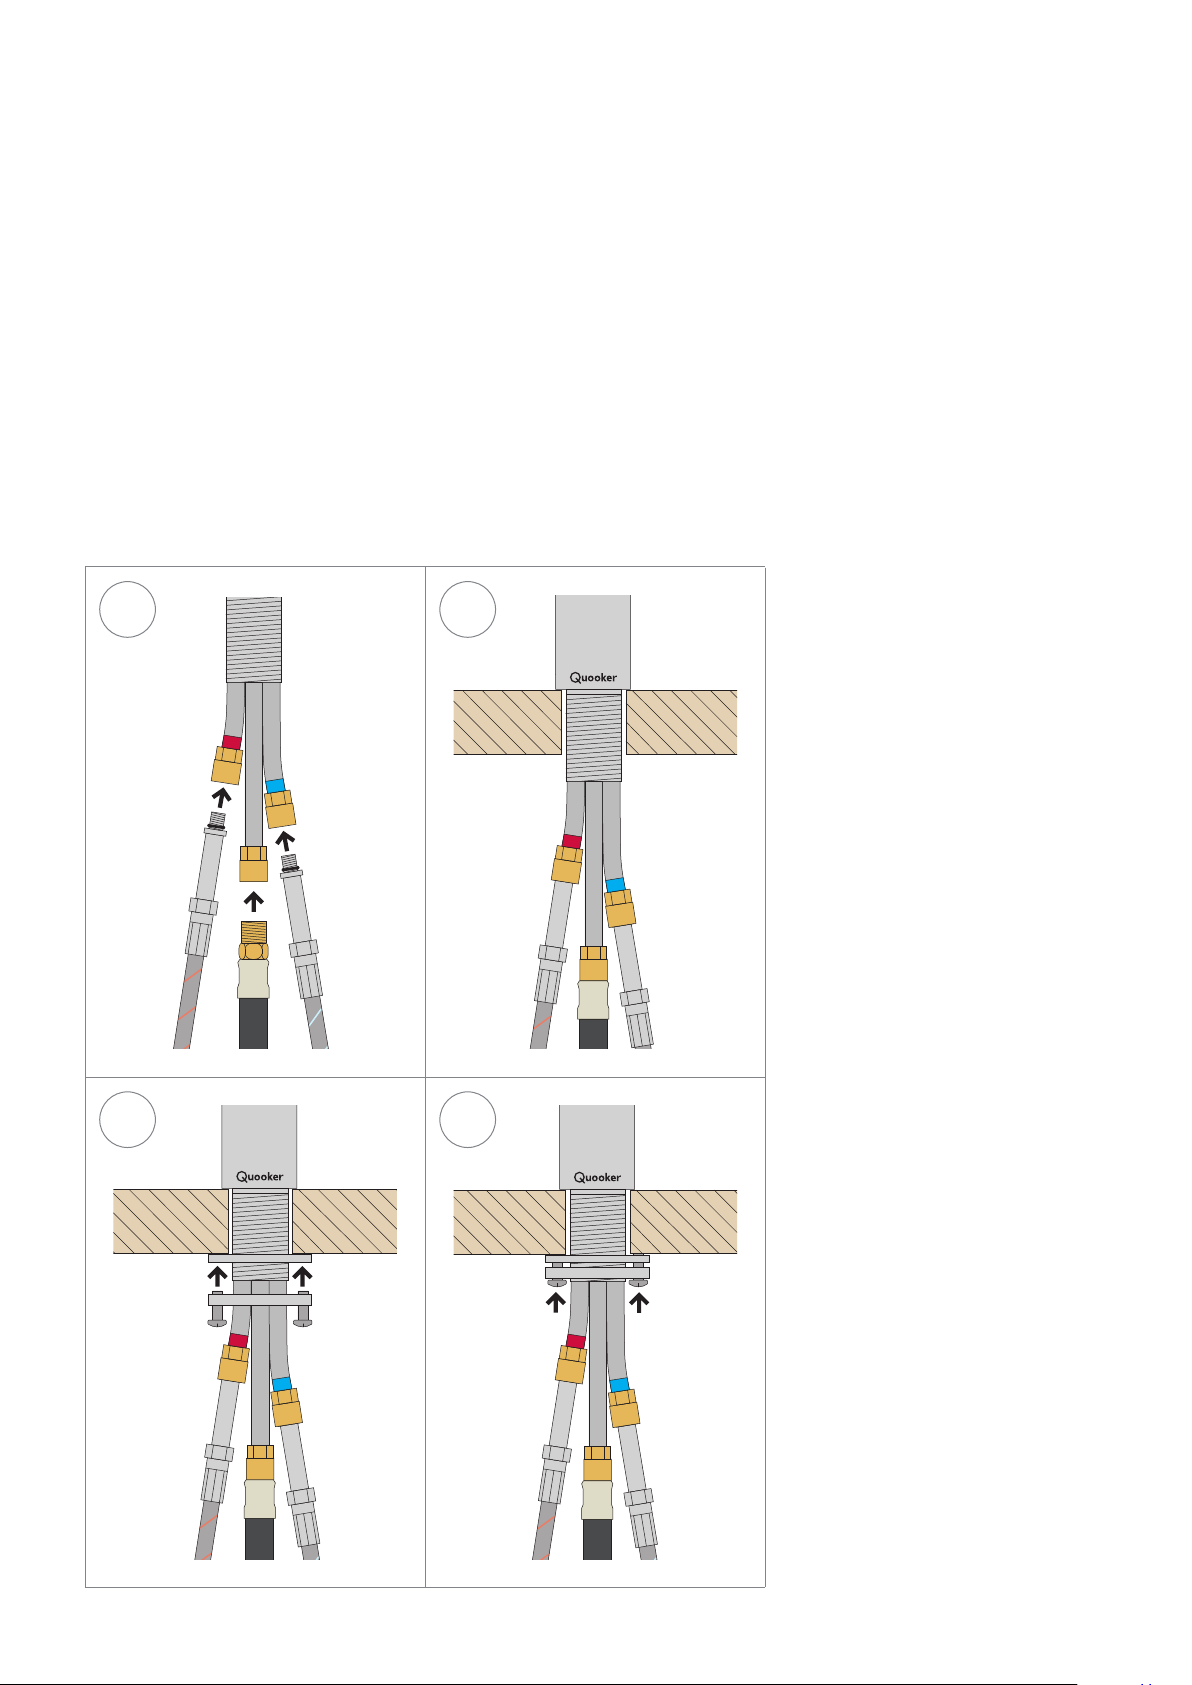
Fitting Flex tap
B3
• When installing the tank it is necessary to take into account that the Flex tap
coupling must be able to move up and down freely.
•Note: When fitting the tap to a thin work top use the white tap support
before placing the metal washer and threaded ring around the hoses.
1 2
1 Fit hoses
Fit the hot, cold and mixer water hoses
to the tap.
2 Tap through
worktop
Push the tap through the hole in the
worktop.
3 4
3 Tighten the
brass plate
Place the metal washer and threaded
ring around the hoses. Adjust the
position of the tap to ensure that the
Quooker logo is facing the user and
fully tighten the metal washer.
4 Securing tap
screws
Tighten the threaded ring and secure
it with the two screws provided.
Page 15
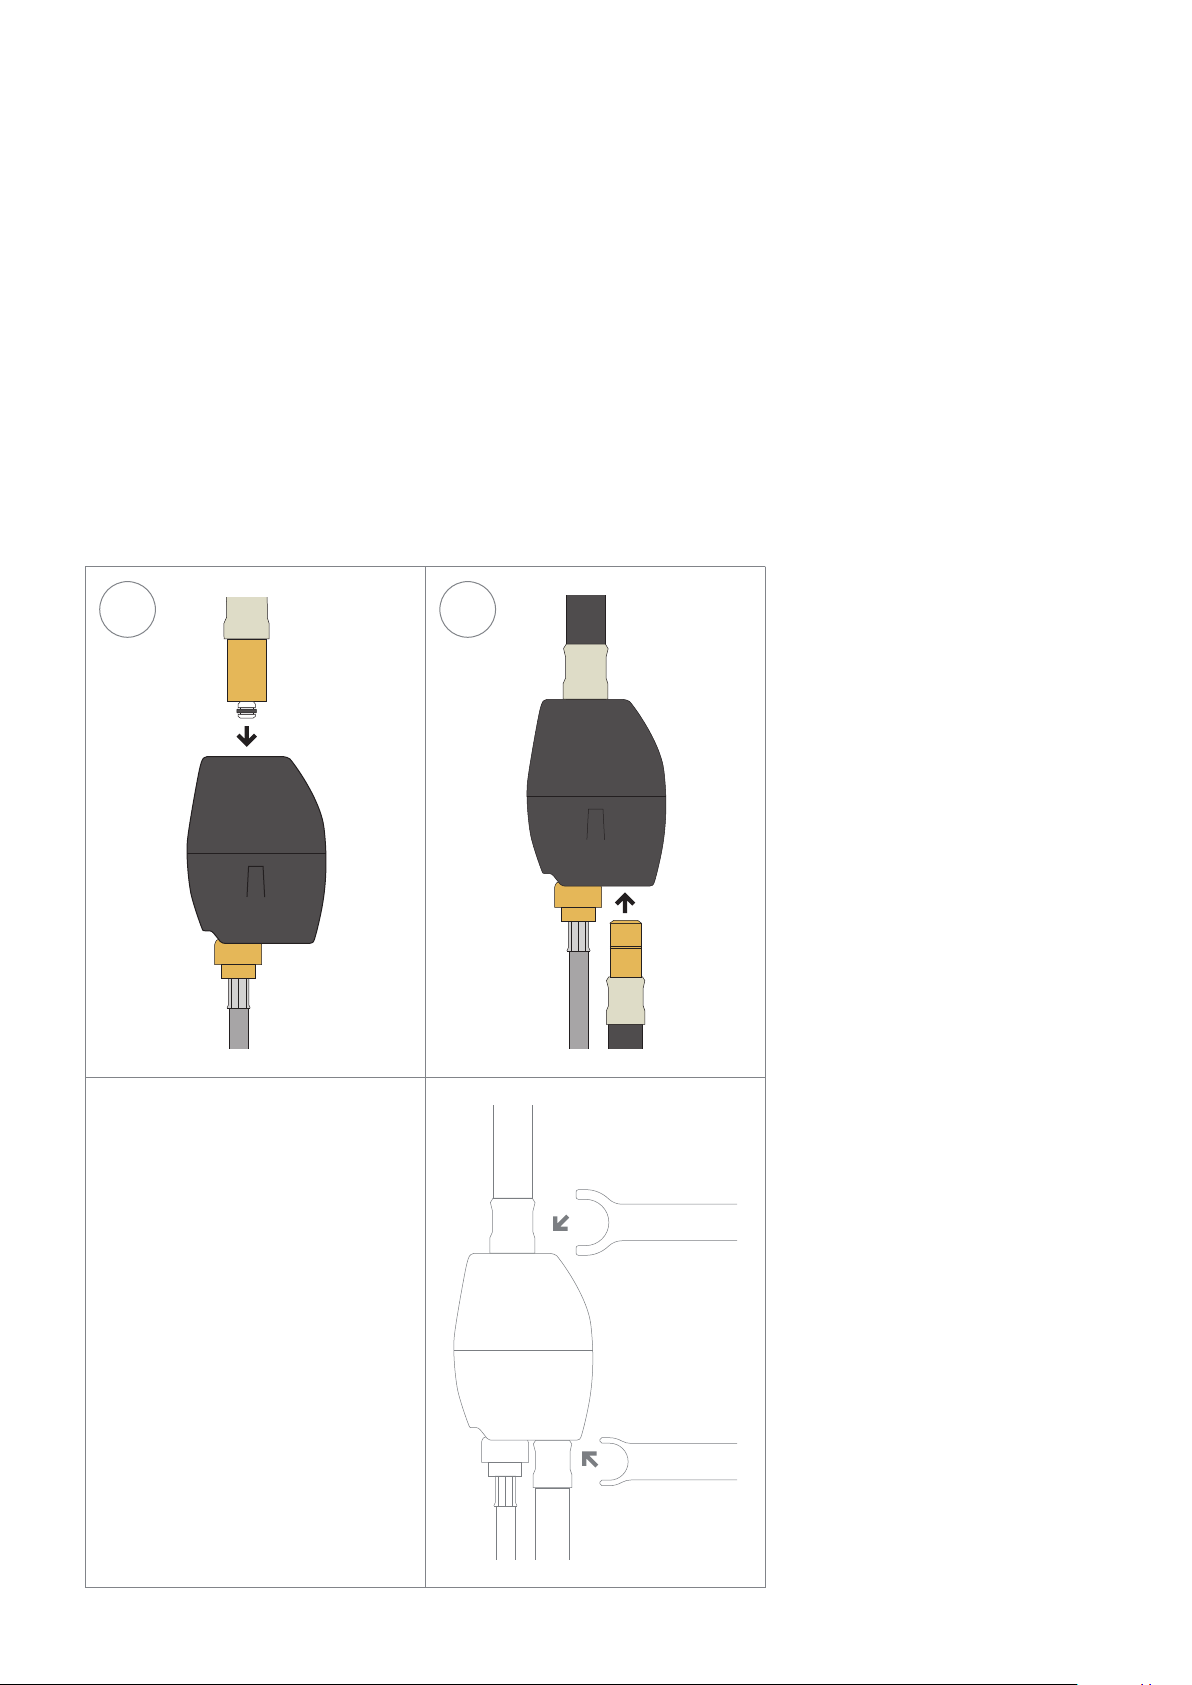
5 6
5 Attach the
coupling
Click the pull-out hose into the
coupling's quick-release fitting while
ensuring that the hose stem is fully
inserted.
6 Fit the mixer
water hose
Click the mixer water hose into the
coupling's quick-release fitting while
ensuring that the hose stem is fully
inserted.
If necessary
Detach coupling. Use the quick-release
tool to detach the mixer water hoses
from the coupling. Press the quick-
release tool flat against the coupling to
hold it still. This enables the hose to be
extracted.
Page 16
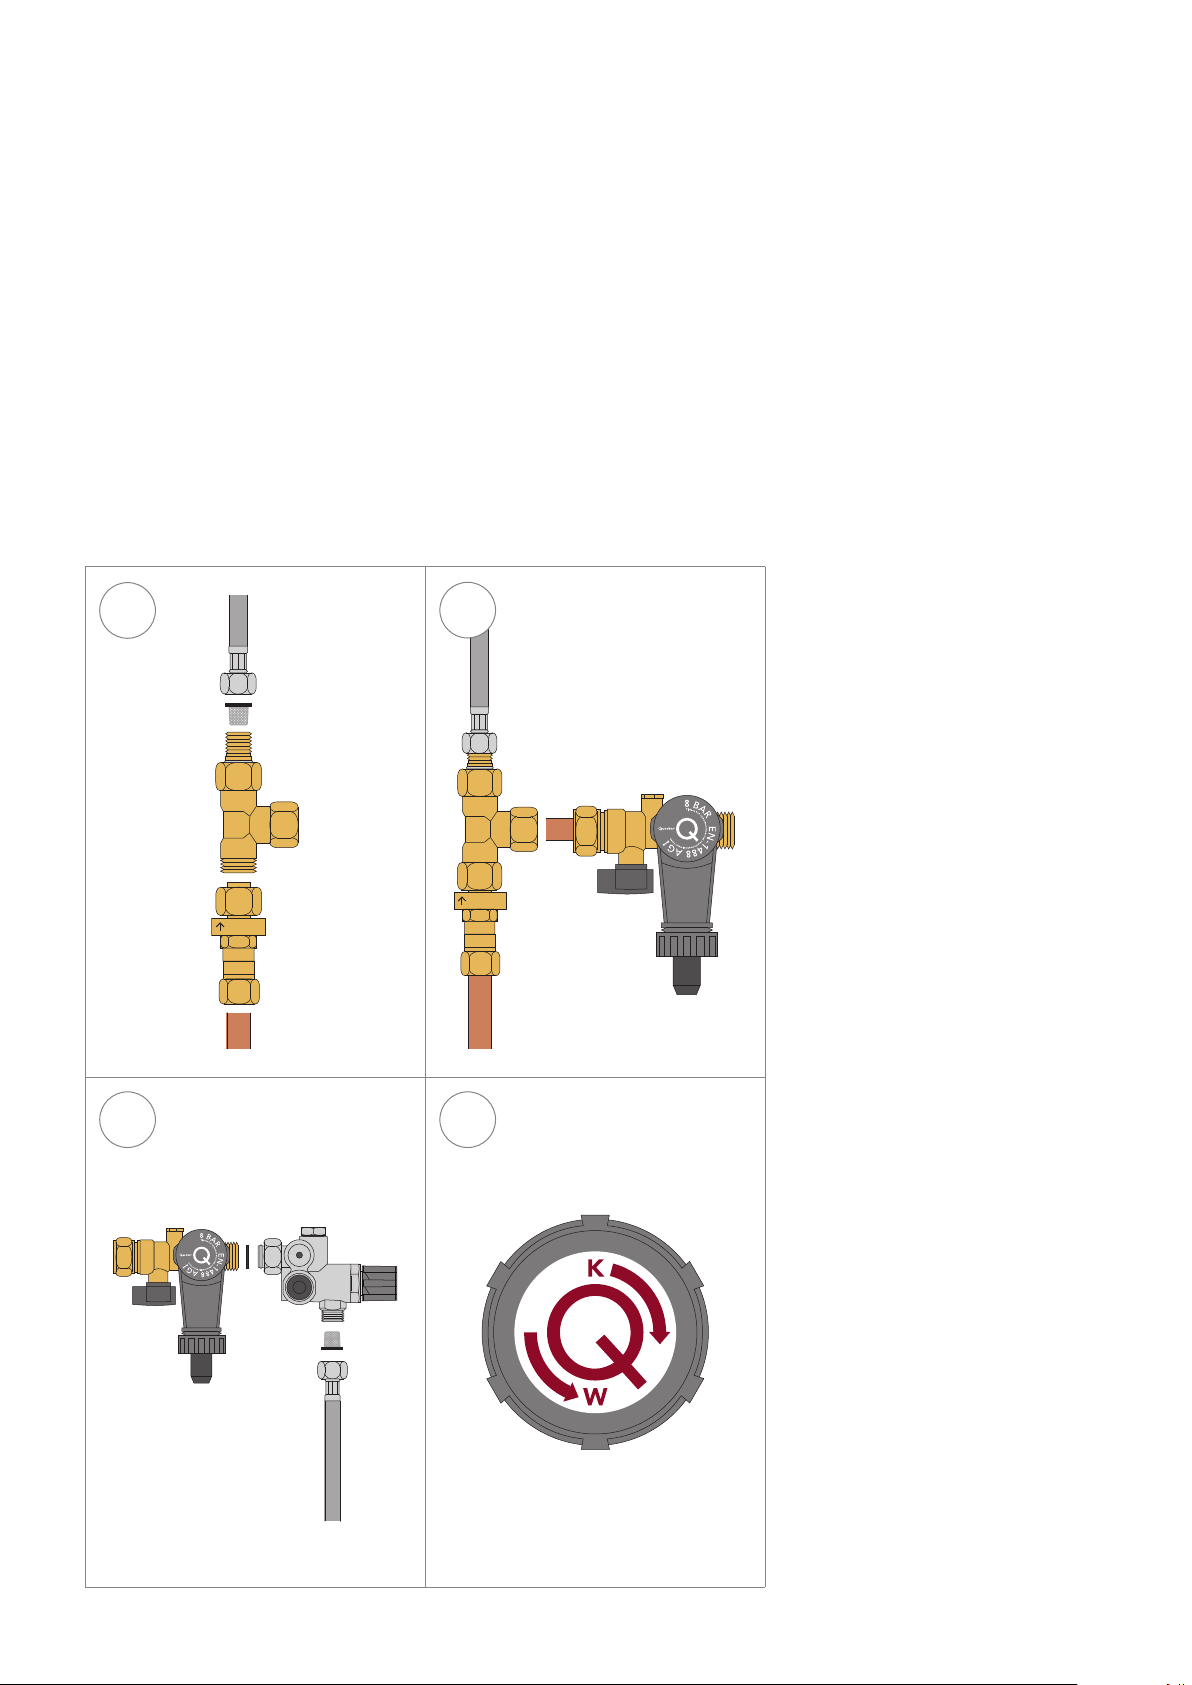
COLD
C
OLD
Connecting water
C
1
•Note: The COMBI E operates under mains water pressure and must always
be fitted with the supplied inlet combination and pressure reducing valves.
• The Nordic single tap, the Fusion or the Flex tap must be installed according
to the locally applicable regulations.
• The inlet combination valve will release drips of expansion water while the
water in the tank is heating up in order to regulate the pressure inside the
tank.
• Position the inlet combination valve as high as possible to create a sufficient
height distance between the valve and the point where the waste hose connects
to the waste pipe. This is necessary to allow the expansion water to flow away
and to prevent water from backing up from the waste pipe (see figure at step D4).
1 Fitting pressure
2
reducing valve
Close the main shut-off valve. Fit the
pressure reducing valve to the T-joint
and subsequently to the cold water pipe
(Ø 15 mm). Note: The pressure reducing
valve must be fitted in the correct direc-
tion . Fit the cold water inlet hose of the
mixer tap the Fusion or the Flex tap to
the T-joint with the inlet hose screen.
3 4
2 Fitting inlet
combination valve
Connect the inlet combination valve
to the pressure reducing valve with a
piece of copper piping (Ø 15mm).
3 Fitting mixing
valve
Connect the mixing valve to the inlet
combination valve with the large fibre
washer supplied. Allow for the tempe-
rature setting knob. Connect the hot
water inlet hose of the mixer tap, the
Fusion or the Flex tap to the mixing
valve with the inlet hose screen.
4 Temperature
setting
Turn the temperature setting knob of
the mixing valve to the temperature
you require (between 40°C and 60°C).
Page 17
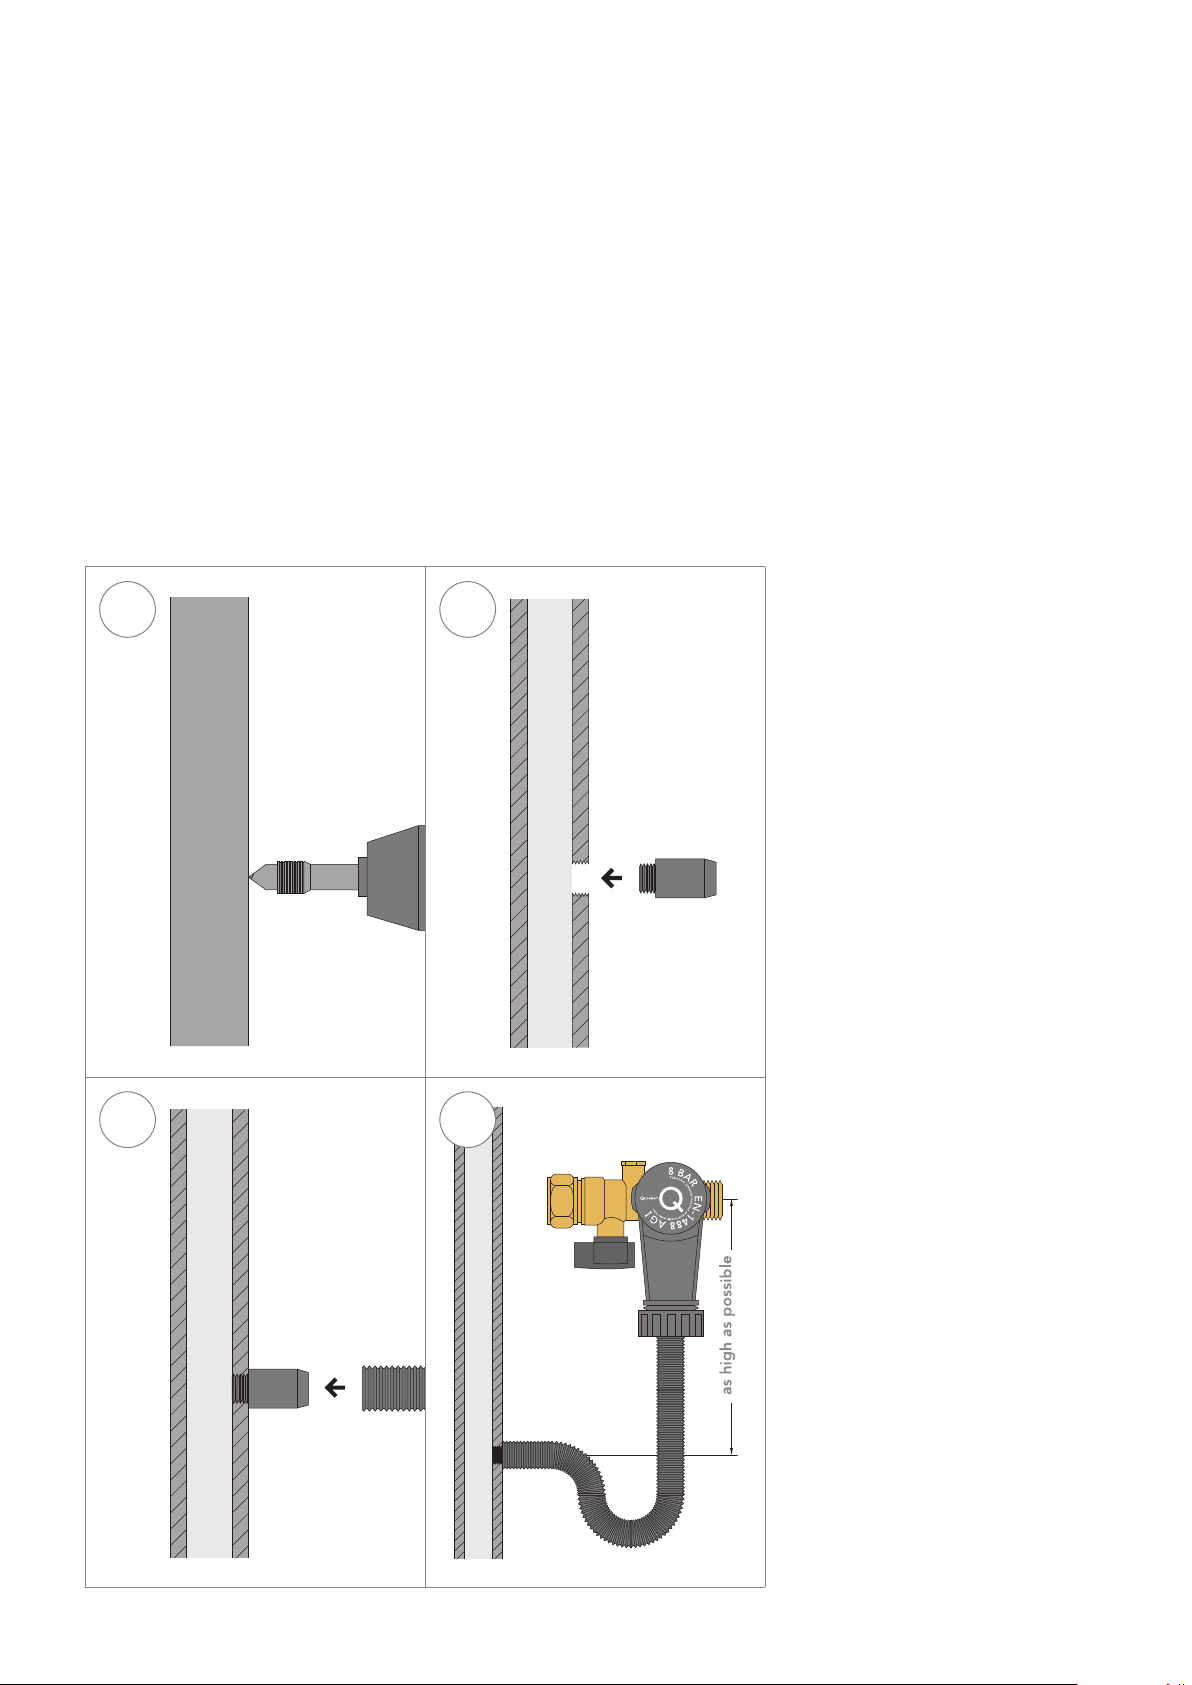
Connecting waste
D
The Quooker tank releases expansion water via the inlet combination valve
which is fed into the grey funnel. The funnel is connected to the waste pipe via
the supplied waste hose. The drilling kit, also supplied, can be used to make a
connection to the waste pipe.
It is important to keep the height distance between the inlet combination valve
and the connection to the waste pipe as large as possible to prevent waste
water from flowing back.
1 2
1 Drilling hole
Using the drill bit supplied, drill and
tap in one operation a threaded hole
in the waste pipe. Drill slowly so that
the PVC does not melt. Turn back anti-
clockwise to preserve the thread.
3 4
2 Fit connector
First try to screw the PVC connector in
the hole before fitting permanently
with PVC glue.
3 Connect hose
to waste pipe
Slide the waste hose over the PVC
connector.
4 Connect hose to
inlet combination
valve
Create a u-bend (or loop) in the hose
and connect it to the funnel of the
inlet combination valve. The u-bend
will create a water lock to block smells
from the waste pipe. As the water is
being heated, the inlet combination
valve will release drips of water into
the grey funnel. The open funnel is
required to prevent pressure build-up.
Page 18
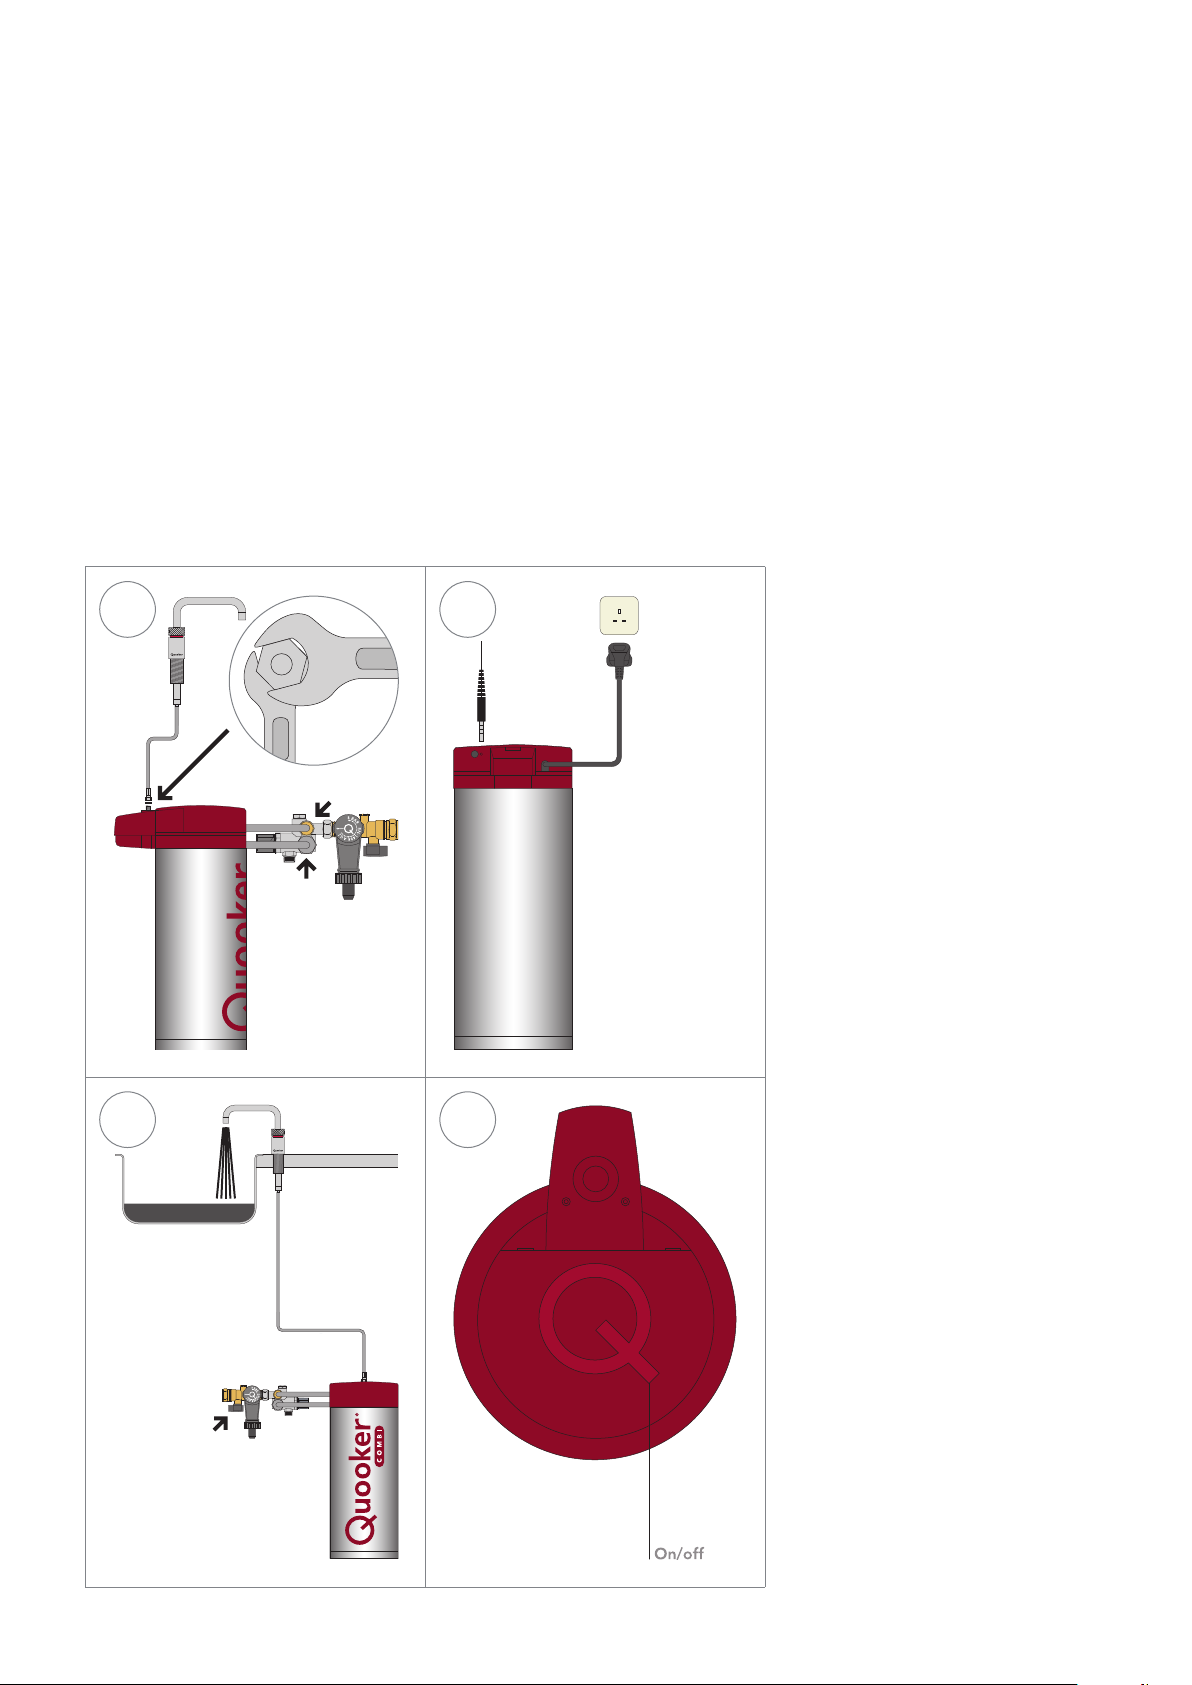
Connecting tank
10
1
4
E
• The Quooker tank is supplied with a UK 3 pin plug and requires a standard
13 amp earthed socket.
• If the mains lead is damaged it should be replaced by the manufacturer, their
agent or a qualified technician to prevent hazard.
• The light ring on the Nordic single tap, the Fusion or Flex tap will light up to
indicate when the water is being heated inside the tank.
• The Q-shaped button on top of the tank is the on/off switch. Once the water
is up to temperature the light on the tank will fade in and out.
• Ensure that the tank has sufficient height clearance to avoid pinching the hose.
• Do not use any washers or sealants other than the ones supplied.
1 2
1 Connecting tank
Place the tank in position and connect
the tank hoses to the mixing valve.
Note: The hoses have flare fittings and
should not be fitted with any seals or
washers. Connect the tap hose to the
fitting at the top of the tank using the
small fibre washer supplied and size 10
and 14 spanners.
3 4
2 Electrical
connection
Connect the tap by plugging the LED
cable into the hole provided at the
back of the tank cover. Plug the tank
into the socket. Switch the socket on
but not the tank yet.
3 Filling tank
Open the boiling-water handle of the
tap and the stop valve on the inlet
combination valve. Check for leaks.
Flush the tank through until the water
is clear. Black water will flow out initially.
This is Norit carbon from the filter and
completely harmless.
4 Switching on tank
Switch on the Quooker. After the water
has heated up, the entire content of
the Quooker must be flushed out once
before use.
Page 19
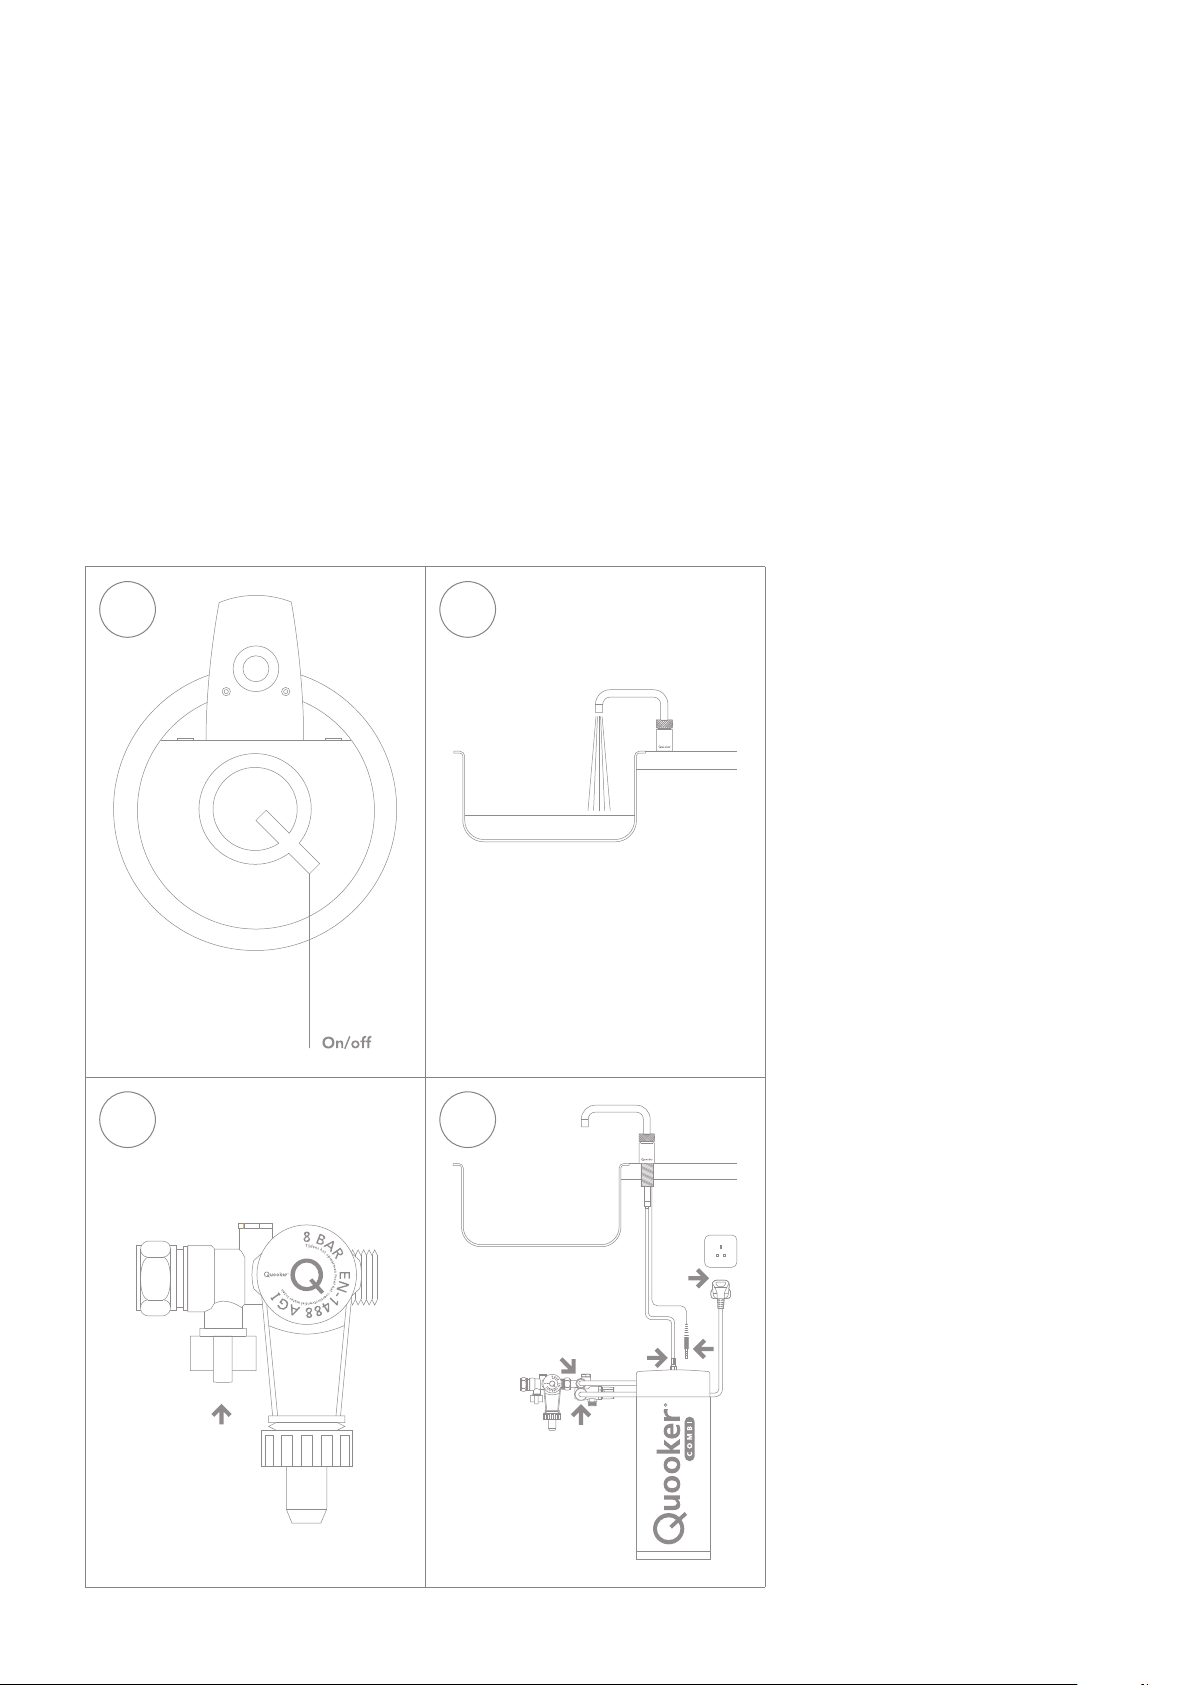
Disconnecting tank
F
• In case of service.
• The Q-shaped button on top of the tank is the on/off switch.
1 2
1 Switching off
Press the on/off switch at the top of
the tank to switch it off. Leave the
socket switched on and do not unplug
the tank from the socket yet.
2 Draining
Open the boiling-water handle of the
tap and leave the water running until
it is cold. Then close the handle again.
3 4
3 Isolating
Close the main shut-off valve or the
stop valve on the inlet combination
valve (small grey knob). Check that the
Quooker is depressurized by opening
the boiling-water handle of the tap
again. If it is depressurized, no water
should flow out of it.
4 Disconnecting
Unplug the tank from the socket and
the LED cable from the back of the
tank cover. Disconnect the tap and
inlet hoses and remove the tank. Drain
the tank into the sink via the hoses.
Page 20
UK | 30.2 26.03 | V15
www.quooker.co.uk
Q U O O K E R U K L T D 3 Waterpark Hall Montpellier Mews Salford M7 4ZY (UK)
 Loading...