

Page 1
6 CORPORATE PARKWAY
GOOSE CREEK SC 29445
www quoizel com
..
,.
ASSEMBLY / INSTALLATION INSTRUCTIONS
1 Before beginning the installation carefully unpack and
.
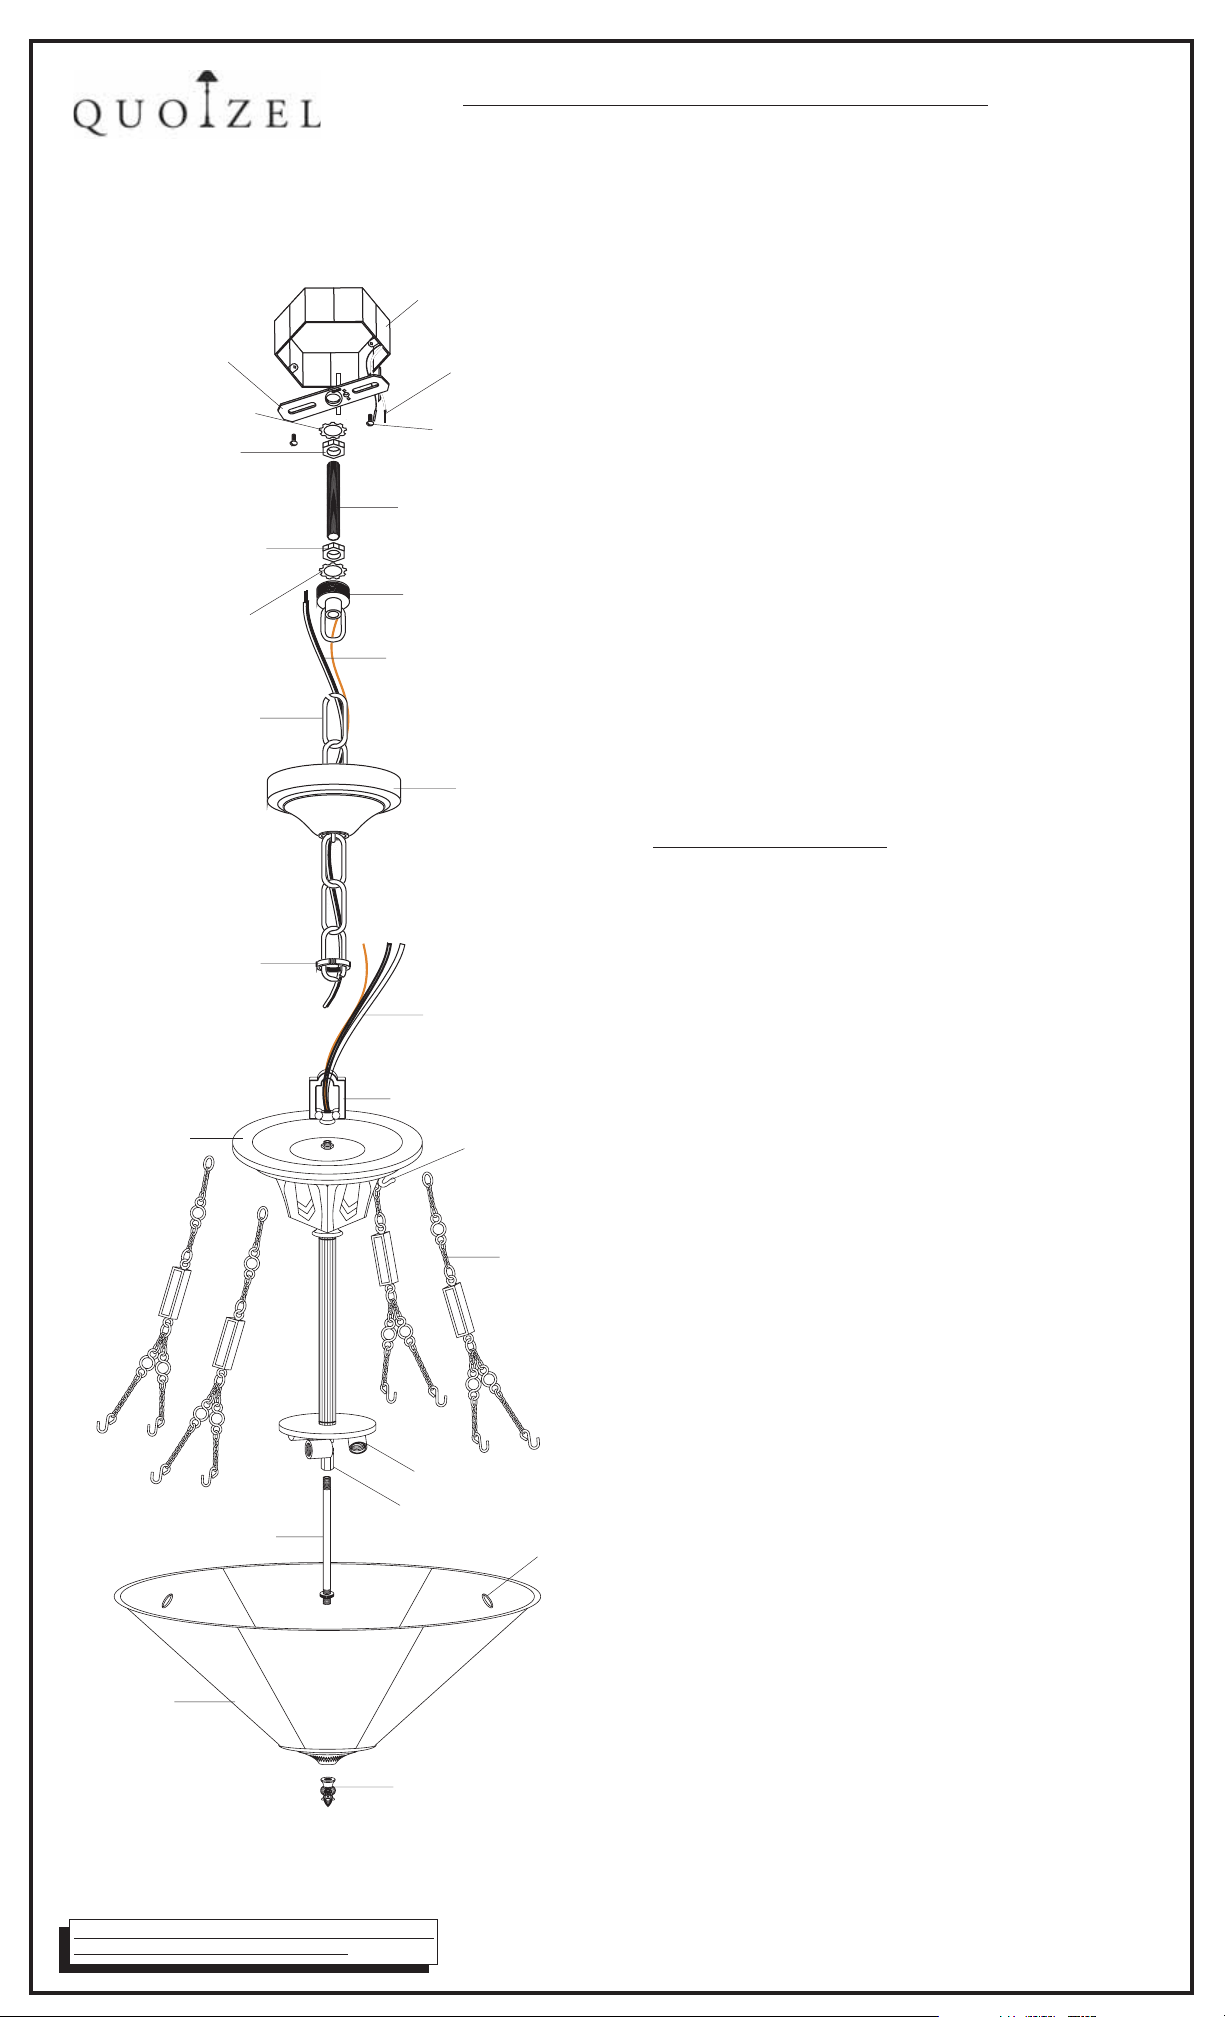
OUTLET BOX
identify all parts referring to the illustration
2 Turn power to the installation point OFF at circuit breaker
..
3 Thread FIXTURELOOP onto the nipple in the top center
.
of FIXTURE CANOPY. Hand tightenuntil snug.
,.
,
CROSSBAR
LOCK WASHER A
LOCK NUT A
LOCK NUT B
LOCK WASHER B
FIXTURE CHAIN
CANOPY LOCK RING
FIXTURE CANOPY
HOUSE SUPPLY and
GROUND WIRES
OUTLET BOX SCREWS
not supplied()
NIPPLE
CANOPY CHAIN LOOP
FIXTURE SUPPLY
and GROUND WIRE
CEILING CANOPY
FIXTURE SUPPLY
and GROUND WIRE
FIXTURE LOOP
HOOK
4 Fasten the CROSSBARto the OUTLETBOX with
.
(2)OUTLET BOX SCREWS(notsupplied). Proceed to
thread LOCK NUTA and LOCK WASHER A onto
the top endof NIPPLE. Thread NIPPLE intothe center of
CROSSBAR. Locate the LOCK NUT B onto the bottom end
of the NIPPLE.TightenLOCK NUT Aagainst CROSSBAR
with plier untilsnug.
5. Locate theFIXTURE CHAIN anddetermine desired
hanging height offixture. Adjust chain by removing links if
needed. Please notethat depending onchain material
thickness, you mightbe required touse chain pliers to
spread links open.Proceed to attachone end ofchain to
FIXTURE LOOP, attached totop of fixture. Pass the
fixture wires throughFIXTURE CHAIN alternatinglinks.
Proceed to passthe fixture wiresthrough the following
mounting components inthis order: 1)CANOPY LOCK
RING; 2)CEILING CANOPY 3 CANOPY CHAIN LOOP
4 SHAKE PROOF WASHERB and LOCK NUT B
);
5 NIPPLE 6 LOCK NUT A and LOCK
);)
WASHER A
6.
Making the connections:
.
;) ;
(2 people recommendedfor the remainingsteps) Position
the fixture underthe ceiling mountedoutlet box. Pass
LOCK WASHERB over theNIPPLE. Thread
CANOPY CHAIN LOOPonto NIPPLE. Thread LOCK NUT
B down the NIPPLE, against the CANOPY CHAIN LOOP
and snug withpliers. Pass the wires throughthe NIPPLE.
Take upwire slack and trim wires so that approx. 6” will
remain inside outletbox. Proceed to attach the top of the
FIXTURE CHAIN tothe bottom of the CANOPYCHAIN
LOOP. Using wire connectors (not supplied) connectthe
HOUSE GROUND WIRE to the FIXTURE GROUND
WIRE connect the HOUSE WHITE WIRE to the
;
FIXTURE SUPPLY WIRE (WHITE or RIBBED SIDE);
connect the HOUSEBLACK (or RED)WIRE to the
FIXTURE SUPPLY WIRE(BLACK or SMOOTH SIDE).
Wrap each connection with approvedelectrical tape.
NIPPLE with
KNURLED NUT
SHADE
DECORATIVE
CHAIN
SOCKET CLUSTER
HEX COUPLING
FINIAL
HANGER
7. With theproper connections made,proceed to pushthe
CEILING CANOPY upward over theOUTLET BOX. Be
sure that allwires are carefullytucked into theOUTLET
BOX cavity.Secure canopy againstceiling bythreading
CANOPY LOCK RING onto theCANOPY LOOP. Tighten
until snug.
8.Locate NIPPLE withKNURLED NUT.Thread top end of
NIPPLE into HEXCOUPLING underside ofSOCKET
CLUSTER. Hand tightenuntil snug.
9.Locate close endsof DECORATIVECHAINS onto the
HOOKS on theside of FIXTURECANOPY. Withanother
person, lift SHADEupward and makethe hole inthe
bottom center ofSHADE over endof NIPPLE. Position
the hooks onthe ends ofDECORATIVE CHAINS ontothe
HANGERS inside ofSHADE.
Please note thatthere are
4 HANGERS and8 HOOKS onthe ends ofDECORATIVE
CHAINS. The hooksneed to doubleup on theHANGERS.
10.Thread FINIAL onto theend of NIPPLEand tighten until
snug to securethe SHADE.
11.Install bulbs referring to fixture markings and/or labels for
maximum wattage.
IF IN DOUBT ABOUT ELECTRICAL INSTALLATION,
CONSULT A LICENSED ELECTRICIAN!
12 Restore powerto the installationpoint ON. Retain this
.
sheet for futurereference.
IS-TFCC2822
2007-02-15
 Loading...