

Page 1

6CORPORATEPARKWAY
GOOSECREEKSC29445
wwwquoizelcom
..
,.
AssemblyInstructionSheet#IS-TFAN2818RS
ForStyleTFAN2818RS
ToolsRequired:Flatheadscrewdriver,Phillipsscrewdriver,pliers,wirecutters,wire
Quoizel,Inc.
strippers,electricaltape,safetyglasses.
6CorporateParkway
GooseCreek,SC
29445
BulbRecommended: (3)MediumBase60WMaximum
EstimatedAssemblyTime: 30-45minutes
Preparation: Identifyandinspectallpartsbeforebeginninginstallation.Checkpackage
CustomerService
Phone631.273.2700
Fax631.231.7102
contentlistanddiagramsbelowtobesureallpartsarepresent.Ifanypartsaremissing
ordamaged,donotattempttoassemble,install,oroperatethefixture.Contactcustomer
serviceforreplacementparts.
www.quoizel.com
WarningsandCautions
Turnoffelectricityatcircuitbreakerormainfuseboxbeforeinstallation.Consultalicensedelectricianifindoubt.
Theseinstructionsareprovidedforyoursafety.Itisveryimportantyoureadthemcompletelybeforeinstalling
thefixture.Westronglyrecommendthatalicensed,professionalelectricianperformtheinstallation.
Disconnectfixturefrompowersourcebeforereplacingbulbs.Makesurebulbsaregivensufficienttimetocool
beforeremoval.Donotsubjectglasspartstoanyshockwhileinoperationorshatteringmayresult.
ThankyouforpurchasingaQuoizelproduct.
Needassistancewithpartsorassembly?CallQuoizelcustomerserviceat1-631-273-2700
2014QuoizelInc. January2014
orvisituson-lineat www.quoizel.com
1of7
Page 2
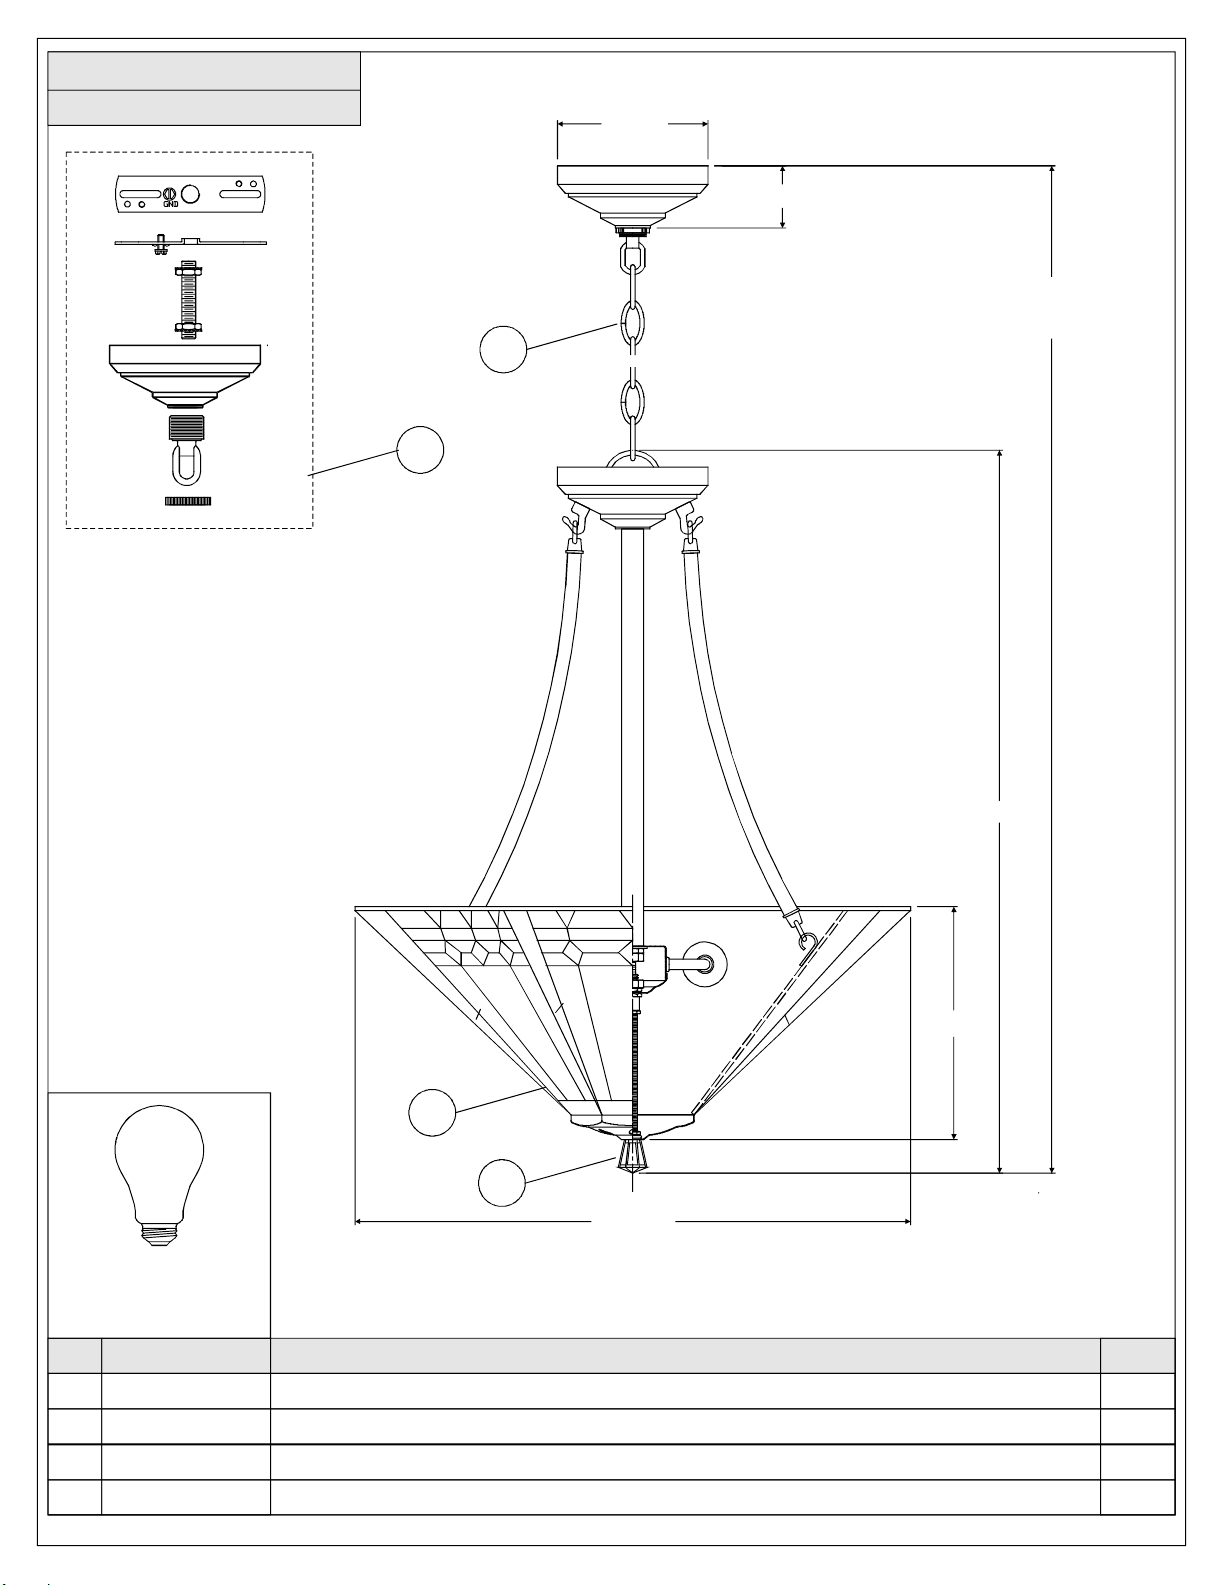
TFAN2818RS
FINISH:RUSSET
5"Dia.
2"
OverallHeight74.5”
(Includes48” Chain)
1
3
(3)60WA19
MediumBaseBulbs
(NotSupplied)
PARTNUMBER
24.5"
8"
4
2
19"Dia.
NOTE:ALLDIMENSIONSAREROUNDEDUPTOTHENEAREST1/2"
REPLACEMENTPARTDESCRIPTION
REQ.NO.
M2291CHRS CHAINRUSSET3.8MMX4'
1
2
3
4
M2260FI
9504KIT MTGHDW/CNPYRUSSET5"D
G2921SH
FINIAL.5"SQX1"H
SHADETIFFANY19"D
1
1
1
1
2of7
Page 3
6CORPORATEPARKWAY
GOOSECREEKSC29445
wwwquoizelcom
..
,.
AssemblyInstructionSheet#IS-TFAN2818RS
ForStyleTFAN2818RS
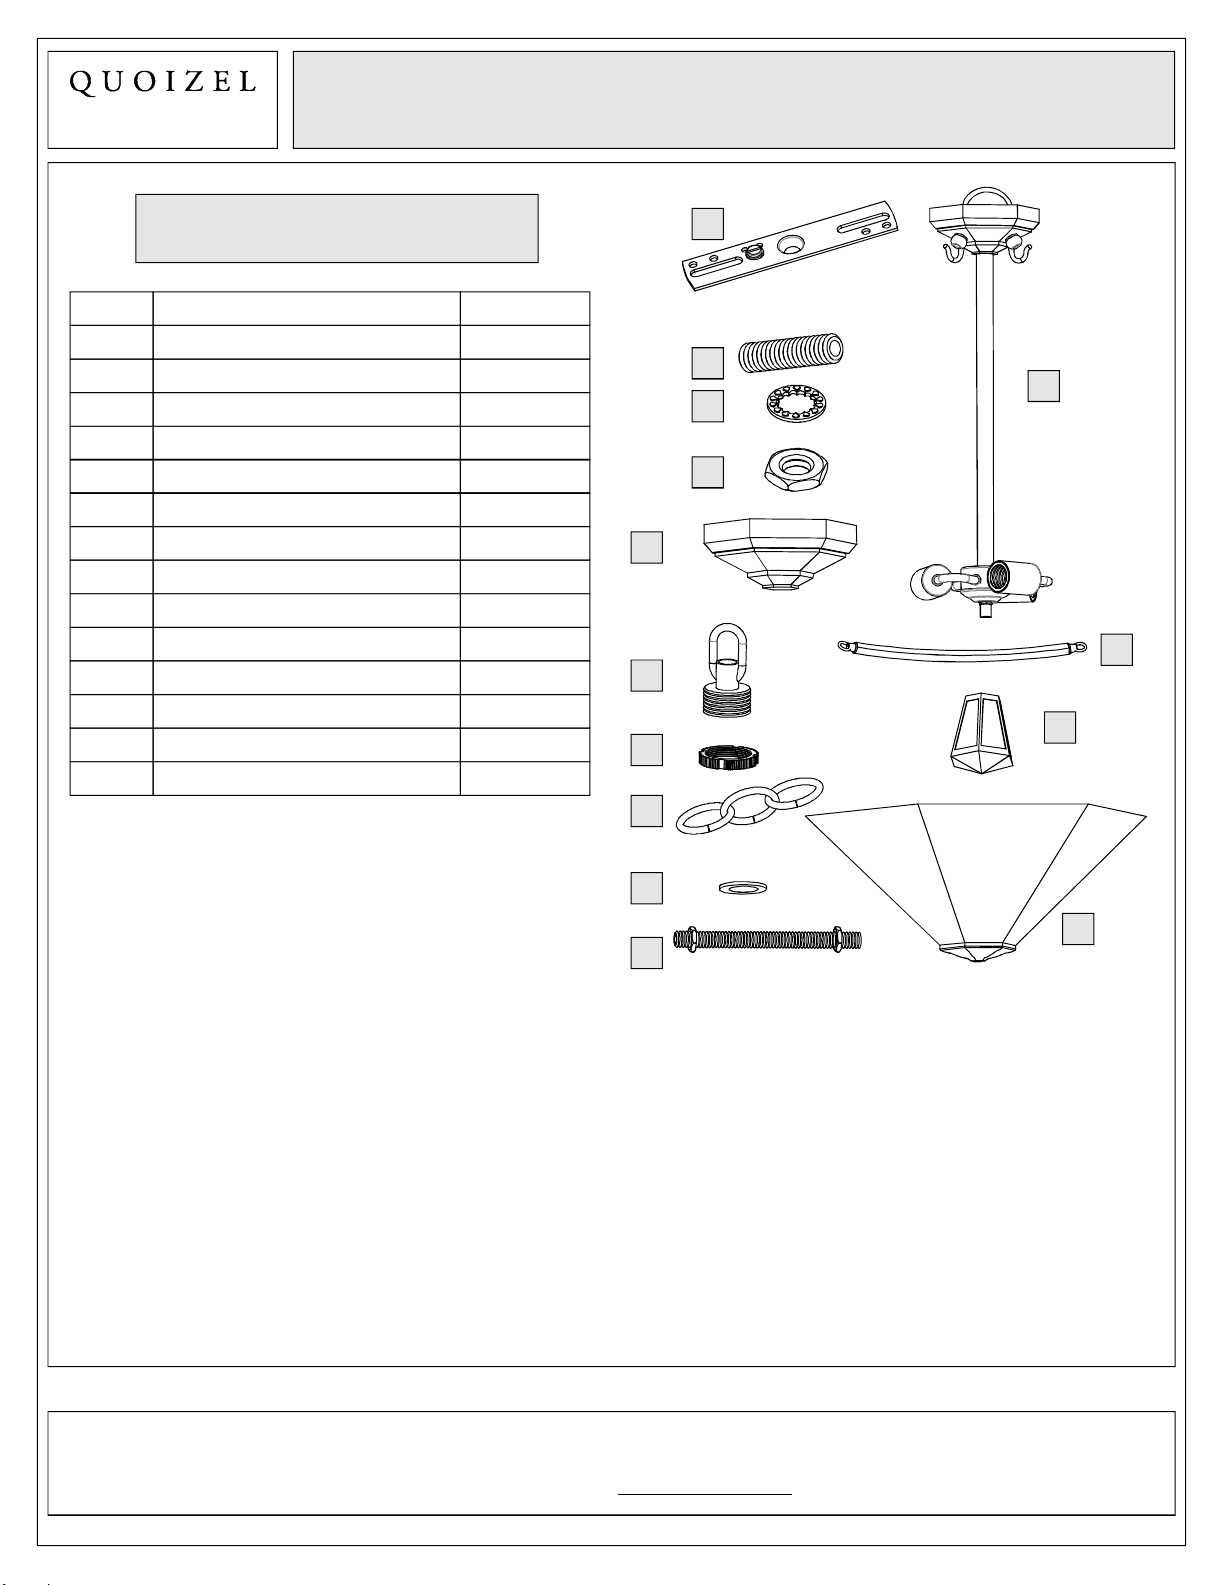
PackageContents
Part Description
A Crossbar
B
C
D
E
F
G
H
J
K
L
M
N
Nipple
LockWasher
HexNut
CeilingCanopy
CanopyChainLoop
CanopyLockRing
FixtureChain
I
FlatWasher
NipplewithHexNut
SocketAssembly
SideArm
Finial
Shade
Quantity
1pc.
1pc.
2pcs.
2pcs.
1pc.
1pc.
1pc.
1pc.
1pc.
1pc.
1pc.
3pcs.
1pc.
1pc.
A
B
K
C
D
E
L
F
M
G
H
I
N
J
ThankyouforpurchasingaQuoizelproduct.
Needassistancewithpartsorassembly?CallQuoizelcustomerserviceat1-631-273-2700
2014QuoizelInc. January2014
orvisituson-lineat www.quoizel.com
3of7
Page 4

6CORPORATEPARKWAY
GOOSECREEKSC29445
wwwquoizelcom
..
,.
AssemblyInstructionSheet#IS-TFAN2818RS
ForStyleTFAN2818RS
STEP1AttachCrossbartoOutletBox-
A.SecuretheCrossbar(A)totheoutletboxwithoutlet
boxscrews(notsupplied).Tightenuntilsnug.
STEP2AttachNippletoCrossbar-
A.ThreadoneHexNut(D)ontothetopendoftheNipple
(B).
B.PlaceoneLockWasher(C)overthetopendofthe
Nipple(B)andthenthreadtheNipple(B)intothecenter
lockholeoftheCrossbar(A).
C.Usingpliers,threadthehexNut(D)againstthe
Crossbar(A)andhandtightenuntilsnug.
Figure1
Mounting
Hole
OutletBox
Crossbar
OutletBox
Screw(not
Supplied)
Crossbar
LockWasher
HexNut
STEP3- AttachCanopyChainLooptoNipple
A.ThreadanotherHexNut(D)ontotheendoftheNipple
(B).
B.PlacetheLockWasher(C)overtheendoftheNipple
(B)andthenthreadtheCanopyChainLoop(F)ontothe
endoftheNipple(B).
C.Usingpliers,threadtheHexNut(D)againstthe
CanopyChainLoop(F)andhandtightenuntilsnug.
Socket
Figure2
OutletBox
Nipple
Crossbar
HexNut
LockWasher
Canopy
ChainLoop
Figure3
ThankyouforpurchasingaQuoizelproduct.
Needassistancewithpartsorassembly?CallQuoizelcustomerserviceat1-631-273-2700
2014QuoizelInc. January2014
orvisituson-lineat www.quoizel.com
4of7
Page 5

6CORPORATEPARKWAY
GOOSECREEKSC29445
wwwquoizelcom
..
,.
AssemblyInstructionSheet#IS-TFAN2818RS
ForStyleTFAN2818RS
STEP4AssembleCeilingCanopy-
A.PushtheCeilingCanopy(E)upwardovertheOutlet
Box.ThreadtheCanopyLockRing(G)ontotheCanopy
ChainLoop(F)andtightenuntilsnugtosecurethe
CeilingCanopy(E).
STEP5AttachFixtureChaintoCanopy
-
ChainLoopandFixtureLoop
A.AdjusttheFixtureChain(H)toyourdesiredlengthby
removingthelinksifneeded.Youmayneedtouseplier
toopenthechainlinks.Ifso,putaclothoverthechain
toprotectthefinishfromthepliers.
B.AttachoneendoftheFixtureChain(H)ontothe
CanopyChainLoop(F)andthenattachtheotherendof
theFixtureChain(H)ontotheFixtureLoop(I).
CeilingCanopy
LockRing
FixtureLoop
OutletBox
CanopyChianLoop
Canopy
Figure4
CanopyChainLoop
FixtureChain
SupplyWireand
GroundWire
Figure5
STEP6PassSupplyWiresthroughFixture
A.PulltheSupplyWiresandGroundWireupthroughthe
FixtureChain(H)alternatinglinks.Pushthewiresup
throughtheCanopyChainLoop(F)intotheoutletbox.
2014QuoizelInc. January2014
-
Chain
ThankyouforpurchasingaQuoizelproduct.
Needassistancewithpartsorassembly?CallQuoizelcustomerserviceat1-631-273-2700
orvisituson-lineat www.quoizel.com
5of7
CanopyChain
Loop
FixtureChain
SupplyWire
andGroundWire
Figure6
Page 6

6CORPORATEPARKWAY
GOOSECREEKSC29445
wwwquoizelcom
..
,.
AssemblyInstructionSheet#IS-TFAN2818RS
STEP7- MakeWireConnections
ForStyleTFAN2818RS
A.Un-threadtheCanopyLockRing(G)andslideCanopyLock
Ring(G)andCeilingCanopy(E)downtheFixtureChain(H).
B.PushallslackfixturewirethroughCanopyChainLoop(F)
intoOutletBox.Trimexcessfixturewireleavingaminimum
of6inch.HangingoutoftheOutletBox.
C.Usestandardwireconnectorstomakeallwireconnections.
(Connectorsarenotincludedwithfixture.)Stripandprepare
wireendsaccordingtoinstructionssuppliedwithconnectors.
D.ConnectWhiteSupplyWirefromtheOutletBoxtoWhite
Wirefromfixture.
E.ConnectBlack(orRed)SupplyWirefromtheOutletBoxto
BlackWirefromfixture.
F.ConnectGroundWirefromtheOutletBoxtoGroundWire
fromfixture.
G.Twistconnectorsuntilwiresaretightlyjoinedtogether.
H.Wrapeachconnectionwithapprovedelectricaltapeand
carefullystuffalltheconnectedwiresintotheOutletBox.
G.Re-attachtheCeilingCanopy(E)asshowninStep5.
Whitewirefromsupply Whitewirefromfixture
Blackwirefromsupply
(orRed)
Blackwirefromfixture
SupplyWireand
GroundWire
SupplyWire
andGround
Wirefrom
OutletBox
CanopyChainLoop
FixtureChain
CeilingCanopy
CanopyLockRing
Groundwirefromsupply Groundwirefromfixture
Figure7
STEP8InstallNipplewithHexNut-
A.ThreadtheoneendofNipplewithHexNut(J)intothe
CouplingundersideoftheSocketCluster.Handtightenuntil
snug.
Figure9
Coupling
Figure8
SocketCluster
Nipplewith
HexNut
ThankyouforpurchasingaQuoizelproduct.
Needassistancewithpartsorassembly?CallQuoizelcustomerserviceat1-631-273-2700
2014QuoizelInc. January2014
orvisituson-lineat www.quoizel.com
6of7
Page 7

6CORPORATEPARKWAY
GOOSECREEKSC29445
wwwquoizelcom
..
,.
AssemblyInstructionSheet#IS-TFAN2818RS
ForStyleTFAN2818RS
STEP9InstallSideArmandShade-
A.PlaceFlatWasher(O),thecenterholeontheShade(N)over
theendoftheNipplewithHexNut(J).
B.WithonepersonholdtheShade(N),anotherpersonattach
theLoopononeendoftheSideArm(L)totheHookonthe
sideoftheFixtureCanopyofSocketAssembly(K).Attachthe
LoopontheotherendoftheSideArm(L)totheHookinside
oftheShade(N).
C.ThreadtheFinial(M)ontotheNipplewithHexNut(J)
undersideoftheShade(N).Handtightenuntilsnug.
FixtureCanopy
Flat
Washer
Finial
Hook
Loop
SideArm
Loop
Hook
Shade
Figure10
STEP10AdjusttheHexNutinsideofShade-
A.ThreadtheHexNutinsideofShadeagainstthebottomofthe
Shade.Tightengentlyuntilsnug.
STEP12InstallBulb-
A.Thisfixtureusesstandardbulbwithamediumscrew
base.Maximum60watts.
B.Insertbulbandscrewsnuglyintoplace.
Yourfixturependantlampisnowassembledandreadyto
use.Enjoy!
Figure11
Shade
Bulb
Socket
HexNut
Figure13
ThankyouforpurchasingaQuoizelproduct.
Needassistancewithpartsorassembly?CallQuoizelcustomerserviceat1-631-273-2700
2014QuoizelInc. January2014
orvisituson-lineat www.quoizel.com
7of7
 Loading...