

Page 1

6CORPORATEPARKWAY
GOOSECREEKSC29445
wwwquoizelcom
..
Quoizel,Inc.
6CorporateParkway
GooseCreek,SC
29445
CustomerService
Phone631.273.2700
Fax631.231.7102
www.quoizel.com
,.
ToolsRequired:Flatheadscrewdriver,Phillipsscrewdriver,pliers,wirecutters,wire
strippers,electricaltape,safetyglasses.
BulbRecommended: (1)T3BiPinBulb50WMaximum(Supplied)
EstimatedAssemblyTime: 20-30minutes
Preparation: Identifyandinspectallpartsbeforebeginninginstallation.Checkpackage
contentlistanddiagramsbelowtobesureallpartsarepresent.Ifanypartsaremissing
ordamaged,donotattempttoassemble,install,oroperatethefixture.Contactcustomer
serviceforreplacementparts.
AssemblyInstructionSheet#IS-TF8156Z
ForStyleTF8156Z
WarningsandCautions
Turnoffelectricityatcircuitbreakerormainfuseboxbeforeinstallation.Consultalicensedelectricianifindoubt.
Theseinstructionsareprovidedforyoursafety.Itisveryimportantyoureadthemcompletelybeforeinstalling
thefixture.Westronglyrecommendthatalicensed,professionalelectricianperformtheinstallation.
Disconnectfixturefrompowersourcebeforereplacingbulbs.Makesurebulbsaregivensufficienttimetocool
beforeremoval.DonotsubjectglasspartstoanyshockwhileinoperationorshatteringOctoberresult.
Donottouchthebulbwithbarehandsuseaclothorglove.
PackageContents
Part Description
A InnerBackplate
B
C
D
E
F
G
H
J
K
MountingBall
FixtureBody
Shade
LockBall
Diffuser
T3Bulb
WallAnchor
I
CordCoverBackplate 2pcs.
CordCover
Quantity
1pc.
2pcs.
1pc.
1pc.
2pcs.
1pc.
1pc.
10pcs.
10pcs.Self-tappingScrew
2pcs.
A
B
C
D
E
F
J
G
H
I
K
Needassistancewithpartsorassembly?CallQuoizelcustomerserviceat1-631-273-2700
2013QuoizelInc.
ThankyouforpurchasingaQuoizelproduct.
orvisituson-lineat www.quoizel.com
1of6
October2013
Page 2
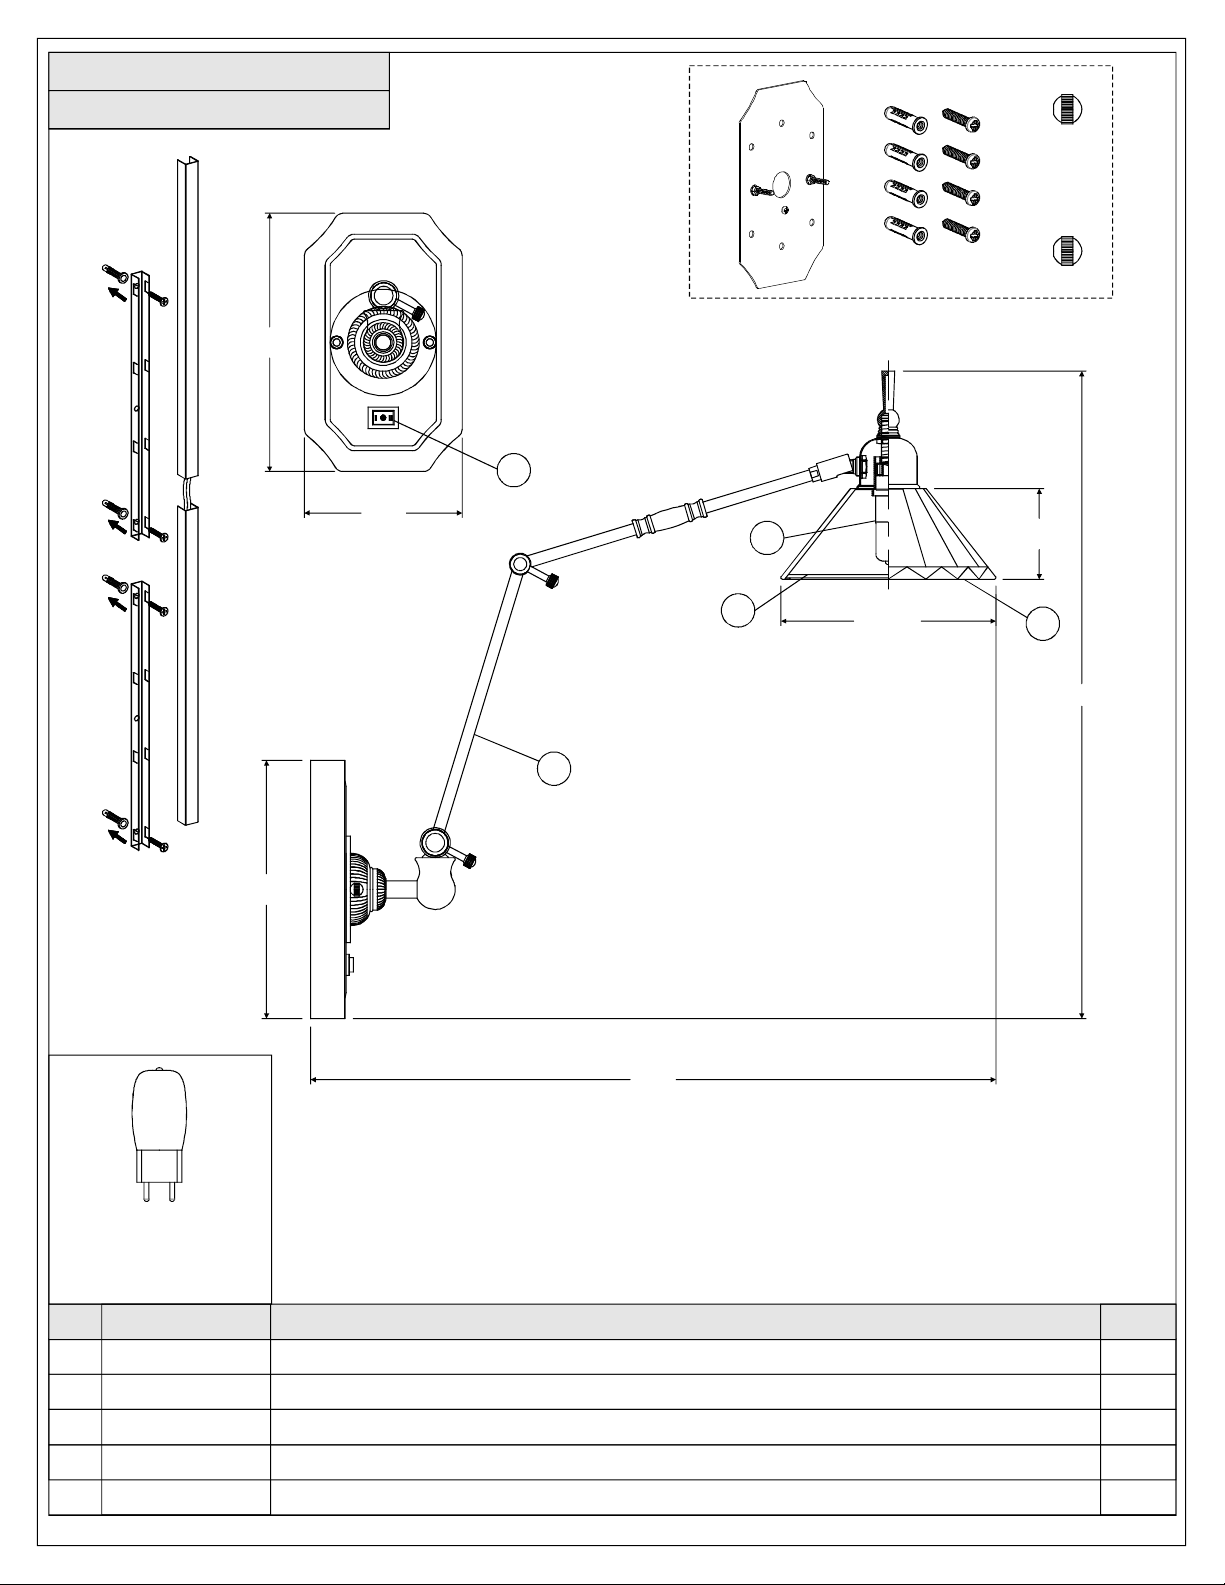
TF8156Z
FINISH:MEDICIBRONZE
7”
4.5”
5
2
2.5”
7”
1
19”
4
6” Dia.
3
18”
(1)50WT3BI
PINBULB
(Supplied)
PARTNUMBER
1
2
3
4
5 K729SWK SWITCHREPLACEMENTTf7110 1
98156ZTF
I816SC
G6220SH1
G262LEX
BASEHALOGENWALLLIGHTBRONZE
BULB50W120VHALOGNGY6.35CLEAR
GLASSTIFFANYTASKW/TABS
LENSGLASS4-7/8X1/8SAFETY
NOTE:ALLDIMENSIONSAREROUNDEDUPTOTHENEAREST1/2"
REQ.NO. REPLACEMENTPARTDESCRIPTION
2of6
1
1
1
1
Page 3

6CORPORATEPARKWAY
GOOSECREEKSC29445
wwwquoizelcom
..
,.
ForWallMountPortable
AssemblyInstructionSheet#IS-TF8156Z
ForStyleTF8156Z
STEP1MarkPointsontheWall-
A.AttachtheInnerBackplate(A)ontothedesiredlocation
onthewallsurface.Markfourpointsonthewallsurface
fromtheholesontheInnerBackplate(A)thatyou
wouldliketopassSelf-tappingScrews(I).
STEP2InstallInnerBackplate-
A.DrillproperholesforWallAnchors(H)onthemarked
pointsonthewallsurface.
B.InserttheWallAnchors(H)intothedrilledholesonthe
wallsurface.AttachtheInnerBackplate(A)ontothe
wallsurface.SecurebythreadingSelf-tappingScrews
(I)intotheWallAnchors(H).Handtightenuntilsnug.
Mark
Mark
Figure1
WallAnchor
InnerBackplate
Self-tapping
Screw
InnerBackplate
Self-tapping
Screw
STEP3- AttachFixtureBodytoMounting
Screw
A.PlacetheBackplateoftheFixtureBody(C)overthe
MountingScrewsontheInnerBackplate(A)andsecure
withMountingBalls(B).Handtightenuntilsnug.
ThankyouforpurchasingaQuoizelproduct.
Needassistancewithpartsorassembly?CallQuoizelcustomerserviceat1-631-273-2700
2013QuoizelInc.
orvisituson-lineat www.quoizel.com
Figure2
Figure3
InnerBackplate
Mounting
Screw
MountingBall
Backplate
October2013
3of6
Page 4

6CORPORATEPARKWAY
GOOSECREEKSC29445
wwwquoizelcom
..
,.
AssemblyInstructionSheet#IS-TF8156Z
ForStyleTF8156Z
STEP4AttachCordCoverBackplateand
-
CordCover
A. LocatetheCordCoverBackplate(K)TopositiontheCord
CoverBackplate(J)measureapprox12 ½ inchesdown
fromthebaseoftheBackplateMarkthepointsfromthe
holesontheCordCoverBackplate(J)forWallAnchors(H).
B.Usingaportablehanddrill,drillproperholesfromthemarks
inthewallsurfacefortheWallAnchors(H)Locatethe
WallAnchors(H)andplaceintotheholesinthewallsurface
C.PlacetheCordCoverBackplate(J)andmatchtheholeswith
theWallAnchors(H)SecureitbythreadingtheSelf-tapping
Screws(I)intotheWallAnchors(H)Handtightenuntilsnug.
D.PositiontheSupplyWireinsideoftheCordCoverBackplate
(J)sothatitwillnotbepinched.LocatetheCordCover(K)
andsecureittotheCordCoverBackplate(J)bypressingit
overtheBackplate.
.
.
."
.
.
.
.
WallAnchor
Backplate
Figure4
Self-tappingScrew
CordCover
STEP5- InstallShade
A.AttachtheShade(D)totheSocketAssembly.Passthe
BoltsontheSocketAssemblythroughtheSmallHoles
onthebottomoftheShade(D).Securebythreadingthe
LockBalls(E)ontotheBolts.Handtightenuntilsnug.
CordCoverBackplate
SupplyWire
withPlugEnd
Figure5
SocketAssembly
Bolt
SmallHole
Shade
LockBall
Needassistancewithpartsorassembly?CallQuoizelcustomerserviceat1-631-273-2700
2013QuoizelInc.
ThankyouforpurchasingaQuoizelproduct.
orvisituson-lineat www.quoizel.com
4of6
October2013
Page 5

6CORPORATEPARKWAY
GOOSECREEKSC29445
wwwquoizelcom
..
,.
AssemblyInstructionSheet#IS-TF8156Z
ForStyleTF8156Z
STEP6- InstallBulb
A.ThisfixtureusesT3BiPinbulb.Maximum50watts.
B.Insertbulbandpushsnuglyintoplace.
IMPORTANT:
aclothorglove.
Donottouchthebulbwithbarehandsuse
STEP7InstallDiffusertoShade-
A.
PasstheGapsontheDiffuser(I)overtheTabsonthe
Shade(G)andthenrotatetheDiffuser(I).Donotfree
yourhandsuntilthediffuserisseatedontothetabs.
Yourfixtureisnowassembledandreadytouse.
Enjoy!
Tab
Gap
Figure6
Socket
Bulb
Figure7
Shade
Diffuser
ForFixedWallMount
STEP8InstallInnerBackplate-
A.vertheOutletBox
AttachtheInnerBackplate(A)oon
thewallsurface.Markfourpointsonthewallsurface
fromtheholesontheInnerBackplate(A)thatyou
wouldliketopassSelf-tappingScrews(I).
B.DrillproperholesforWallAnchors(H)onthemarked
pointsonthewallsurface.
C.InserttheWallAnchors(H)intothedrilledholesonthe
wallsurface.AttachtheInnerBackplate(A)ontothe
wallsurface.SecurebythreadingSelf-tappingScrews
(I)intotheWallAnchors(H).Handtightenuntilsnug.
ThankyouforpurchasingaQuoizelproduct.
Needassistancewithpartsorassembly?CallQuoizelcustomerserviceat1-631-273-2700
2013QuoizelInc.
orvisituson-lineat www.quoizel.com
5of6
Mark
WallAnchor
OutletBox
InnerBackplate
Self-tapping
Screw
Figure8
October2013
Page 6

6CORPORATEPARKWAY
GOOSECREEKSC29445
wwwquoizelcom
..
,.
AssemblyInstructionSheet#IS-TF8156Z
ForStyleTF8156Z
STEP9MakeWireConnections-
A.PullouttheSupplyWirewithPlugEndandcutdownit,
left6”cordfortheWireConnection.
B.Usestandardwireconnectorstomakeallwire
connections.(Connectorsarenotincludedwithfixture.)
Stripandpreparewireendsaccordingtoinstructions
suppliedwithconnectors.
C.ConnectWhiteSupplyWirefromtheOutletBoxto
Ribbedsidefromfixture.
D.ConnectBlack(orRed)SupplyWirefromtheOutletBox
toSmoothsidefromfixture.
E.Twistconnectorsuntilwiresaretightlyjoinedtogether.
F.Wrapeachconnectionwithapprovedelectricaltapeand
carefullystuffalltheconnectedwiresintotheOutletBox.
Figure9
SupplyWire
withPlugEnd
Whitewirefromsupply
Blackwirefromsupply
(orRed)
Ribbedside
fromfixture
Smoothside
fromfixture
Figure10
STEP10 - AttachFixtureBodytoMounting
Screw
A.PlacetheBackplateoftheFixtureBody(C)overthe
MountingScrewsontheInnerBackplate(A)andsecure
withMountingBalls(B).Handtightenuntilsnug.
B.AssemblyShadeasstep5.
C.Installbulbasstep6.
D.InstallDiffuserasstep7.
Yourfixtureisnowassembledandreadytouse.
Enjoy!
InnerBackplate
Backplate
Needassistancewithpartsorassembly?CallQuoizelcustomerserviceat1-631-273-2700
2013QuoizelInc.
MountingScrew
ThankyouforpurchasingaQuoizelproduct.
orvisituson-lineat www.quoizel.com
6of6
MountingBall
Figure11
October2013
 Loading...