

Page 1
6CORPORATEPARKWAY
GOOSECREEK,SC.29445
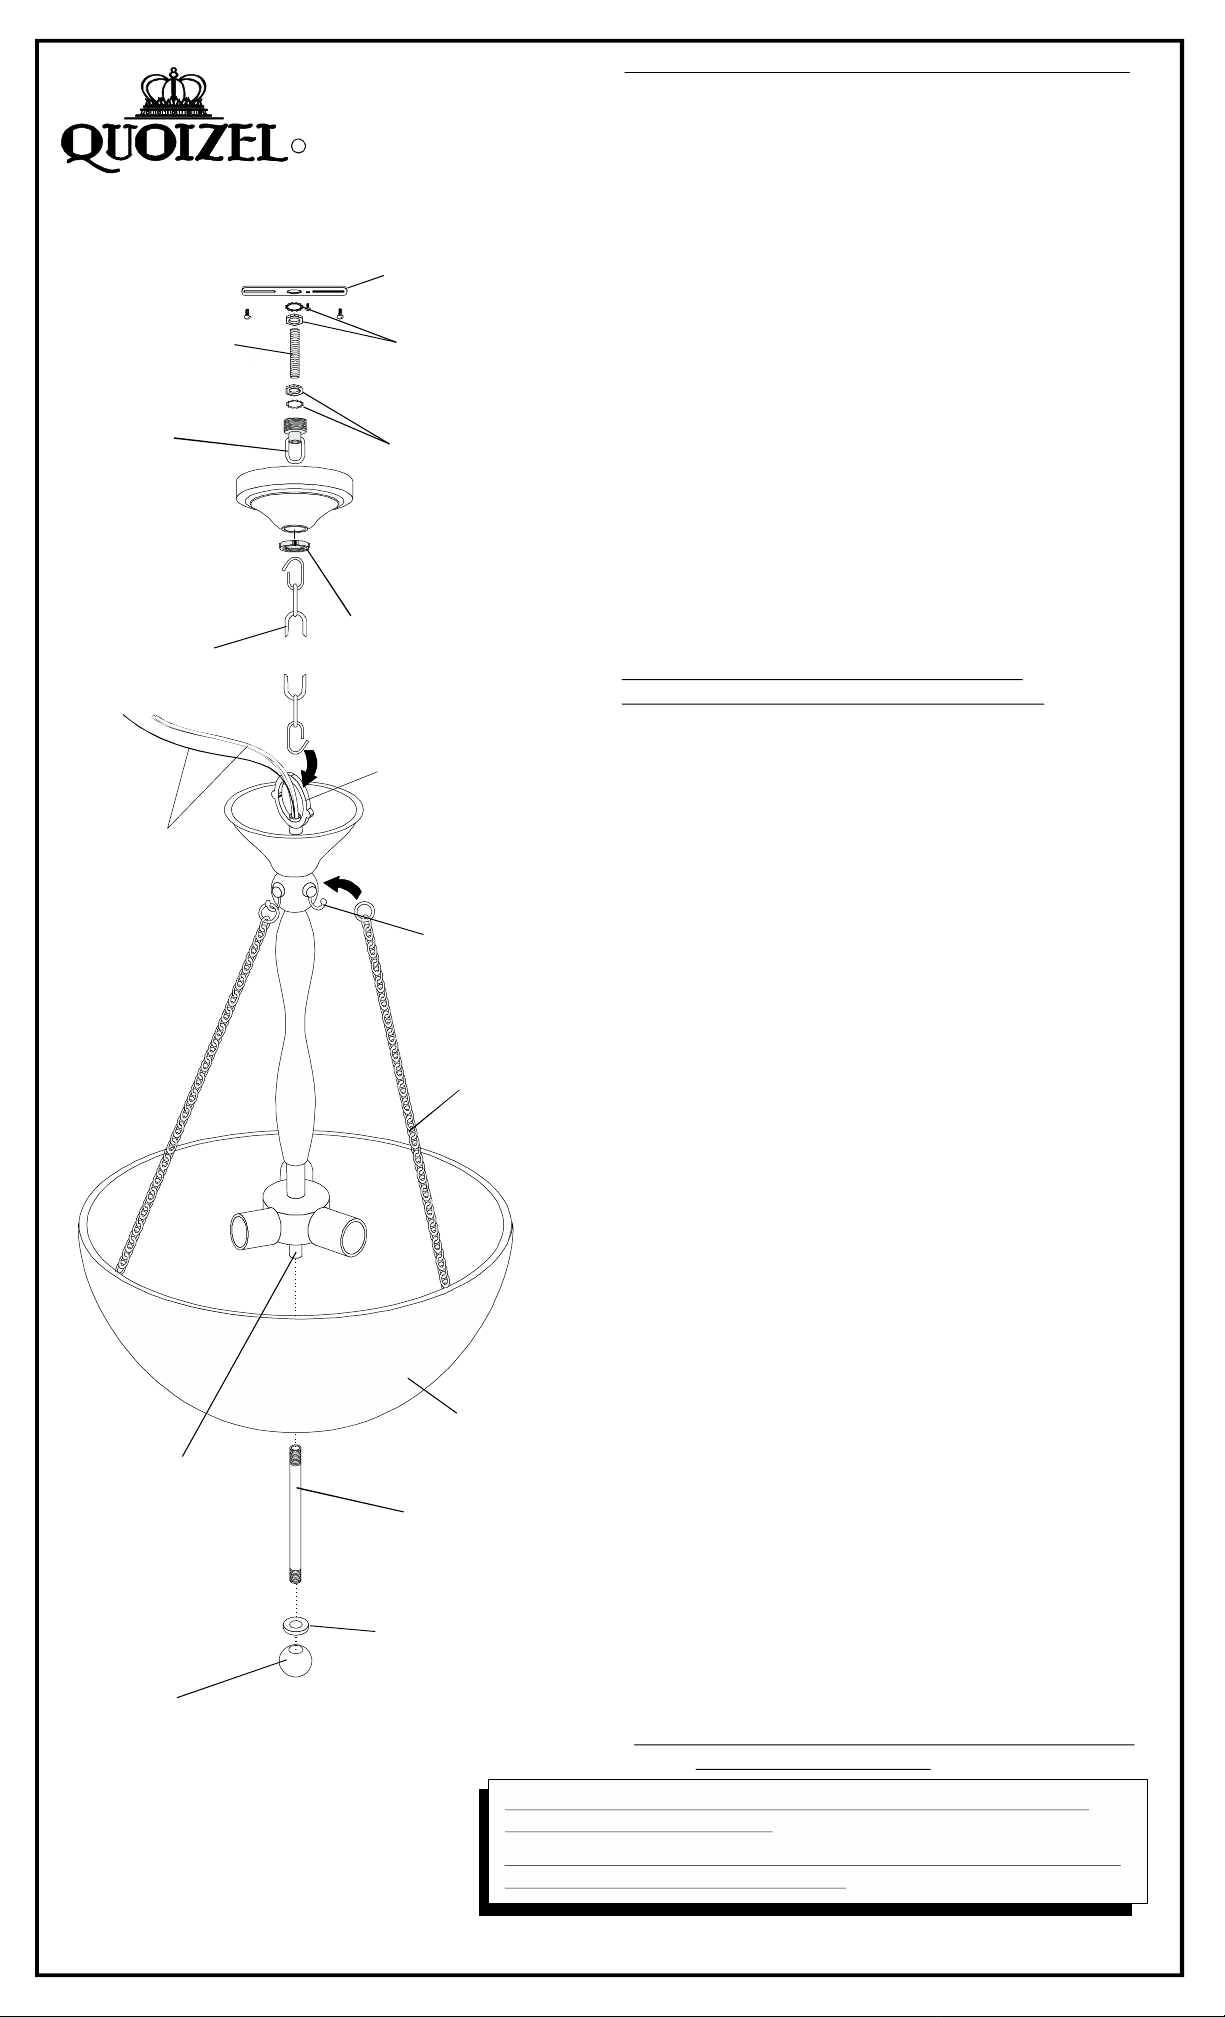
NIPPLE
(TUBERÍACON
ELHILO)
CANOPY
CHAIN
LOOP
(PRESILLADEL
DOSEL)
FIXTURE
CHAIN
(LACADENA)
FIXTURESUPPLY
andGROUND
WIRES
(LOSALAMBRESDE
SUMINISTROYTIERRA)
COUPLING
(ACOPLADOR)
Note:Genericillustration.
Nota:Lailustraciónparcial
genérica
FINIAL
(BOTONDECORATIVO)
ASSEMBLY/INSTALLATIONINSTRUCTIONS:
1.Beforebeginningassembly/installation,carefully
R
CROSSBARwith
GREENGROUND
SCREW
(LATRANCAconEL
TORNILLODETIERRA
VERDE)
LOCKNUTA
withSHAKEPROOF
WASHERA
TUERCAAYARANDELA
LOCKNUTB
withSHAKEPROOF
WASHERB
TUERCAAYARANDELA
CEILINGCANOPY
(ELDOSEL)
CANOPY
LOCKRING
(ELANILLODE
LACERRADURA)
FIXTURE
LOOP
(PRISILLA)
HOOK
(ELGANCHO)
SIDE
SUPPORT
CHAIN
(LACADENADE
APOYOLATERAL)
SHADE
(SOMBRA)
STEM
(TUBO
METALICO
ENROSCADO)
LOCKNUT
(ELANILLO)
unpackandidentifyallparts,referringtothe
illustration.
2.Turnpowertotheinstallationpoint.
OFF
3.LocatetheFIXTURECHAIN,CEILINGCANOPY,
CANOPYCHAINLOOP,CANOPYLOCKRINGand
SHAKEPROOFWASHERB.Unravelandpassthe
SUPPLYWIREandGROUNDwiresthroughinthe
followingorder:1)AlternateloopsintheFIXTURE
CHAINandattachbottomofchaintotopof
FIXTURELOOP.Compressendofchainwithpliers
tosecure.2)CANOPYLOCKRING.3)CANOPY
CHAINLOOP.4)SHAKEPROOFWASHERB
5)CEILINGCANOPY.
4.
LocatetheCROSSBARwithGREENGROUND
SCREWandattachtoceilingmountoutletbox
with(2)OUTLETBOXSCREWS.TreadLOCKNUT
AwithSHAKEWASHERAontotopendof
NIPPLE.
Threadintotheundersidethecenterofthe
CROSSBAR.ThreadLOCKNUTAwithSHAKE
PROOFWASHERAupnipple.Tightenagainstthe
undersideofCROSSBARwithpliers.Thread
LOCKNUTBontobottomofNIPPLE.
5.
Makethewiringconnections:(Quoizel
recommends(2)peoplefornext3steps)
PositionthefixtureunderneaththeCEILING
MOUNTEDOUTLETBOX.andpassSUPPLYand
GROUNDWIREthroughthecenterofNIPPLE.
ConnecttheHOUSEGROUNDwireandthe
FIXTUREGROUNDwiretoUNIVERSAL
CROSSBARusingGROUNDSCREW(green).
Usingwireconnectors(notsupplied),connectthe
HOUSEWHITEWIREtotheFIXTUREWHITE
(orRIBBEDSIDE)WIRE;connecttheHOUSE
BLACK(orRED)WIREtotheFIXTUREBLACK
(orSMOOTHSIDE)WIRE.Makesure
therearenoexposedwiresandwrapall
connectionswithapprovedelectricaltape.
6.CarefullytuckinallwiringintotheOUTLETBOX
andthreadtheCANOPYCHAINLOOPontothe
bottomofNIPPLE.ThreadLOCKNUTBand
SHAKEPROOFWASHERBontotopofCANOPY
CHAINLOOP.Tightenwithpliers.Locatethe
CEILINGCANOPYovertheCEILINGMOUNTED
OUTLETBOXandsecureagainstceilingby
threadingtheCANOPYLOCKRINGontothe
CANOPYCHAINLOOP.Proceedtoattachthetop
ofFIXTURECHAINtotheCANOPYCHAINLOOP.
CarefullycompressendofFIXTURECHAINto
secure.
7.
LocatetheSTEMandthreadtopintothe
COUPLINGontheundersideofSOCKET
CLUSTER.Handtightenuntilsnug.
8.
LocatetheSHADEandwiththehelpofanother
person,alignandpassthebottomcenterholeinthe
shadecapoverthebottomoftheSTEM.Attach
thetopsofSIDESUPPORTCHAINS(amount
dependsonstylepurchased)
totheHOOKS,
whichareattachedtosideoffixturebelow
FIXTURECANOPY.
9.
LocatetheLOCKNUTandFINIAL.Threadthe
LOCKNUTontoendofstemprotrudingfrom
shadecap.Handtightenuntilsung.Threadthe
FINIALontoendofstemandhandtightenuntil
snugtosecureshade.
10.
InstallBULBSreferringtofixturemarkingsand/
orlabelsformaximumwattage.Restorepowerto
Nota:Latraducciónenespañolestaenlaparte
posteriordeestahoja.
IFINDOUBTABOUTELECTRICALINSTALLATION,CONSULT
ALICENSEDELECTRICIAN!
SIHAYDUDASOBRELAINSTALACIÓNELÉCTRICA,CONSULTE
AUNELECTRICISTAAUTORIZADO!
IS-751
5/00
Page 2

INSTRUCIONDEENSAMBLAJE/INSTALLACION:
1.Antesdeempezarlaensambladura/instalacion,Cuidadosamentedesempacareidentificarlaspartes
refiriendosealailustración.
2.Apagarenergiaelectricaantesdelainstalación.
3.LocaliceCADENAdeLALAMPARA,elDOSEL,laPRESILLADELDOSEL,elANILLODELA
PRESILLAyArandelaB.DesenredeypaseelALAMBREyELALAMBREDETIERRAsuministradoenel
siguienteorden.1)Alternandoenlacadenaentretejalosdosalambres,acegurandolaparte
inferiordelacadenaalapartesuperiordelaPRESILLAdelaLAMPARA.Comprimireslabonconunos
alicatesparaasegurar/afianzar.2)Anillo delapresilla3)PresilladelDosel4)ArandelaB5)ElDoseldel
techo.
4.LocalicelaTRANCAconelTORNILLOdeTIERRAVERDEymontealacajadel
techoconlosTORNILLOSdelaCAJAdelTOMACORRIENTE.EnhebrarTuercaAyArandelaA
sobreELHILO.
AyArandelaBalaparteinferiordetrancaconlosalicates.
5.Hagalaconexión:(Quoizelrecomiendadospersonasparalossiguientestrespasos).Ubicarla
lamparaalineandolaalacajatomacorriente.Luegoprocedaapasarlosalambreyelsuministrode
tierraenelorificiodelTUBOMETALICOCONHILO.ProcedaaconectarelALAMBRE
TIERRADELACASAconelALAMBREDESUMINISTROYTIERRADELALAMPARA.Procedaa
conectarlosdosalaTRANCAconelTORNILLOdeTIERRAVERDE.Usandoconectoresdealambre,
ateelALAMBREBLANCODELACASAaelALAMBREBLANCODELALAMPARA(oelLADO
TEXTURACUADRADADEELALAMBRE).ConnectarelalambreNEGRO/(orojo)DELACASAconel
alambreNEGRODELALAMPARA(oelLADOLISODEELALAMBRE).Envuelvaengrupotodaslas
dosconexionesconlacintaeléctricaaprovada.
EnhebrarLaTUBERIACONELHILOenelcentrodelaTRANCA.ApretarseTuerca
6.Cuidadosamenteprocedaametertodoelalambradoenlacavidaddelacajatomacorriente,y
enhebreLAPRESILLADELDOSELdentrodelaparteinferiorDELTUBOMETALICO.EnhebreTuercaB
yArandelaBhacialacimadePresilladedoselApriéteseconlosalicates.Colocar
ELDOSELsobrelacajayasegureapoyandocontraeltechoenebrandoelANILLOdela
PRESILLA,asegurandoelDOSELalacaja.CuidadosamentecomprimirESLABONpara
asegurar/afianzarlacadena.
7.LocaliceelTUBOMETALICOyENRROSQUELOenelACOPLADORenlaparteinferiordela
cajadeENCHUFE.Apretaramanohastaasegurarpiesa.
8.LocalicelaSOMBRAyconelayudadeotrapersona,alinearypasarporelagujerodelcentrodela
SOMBRAelTUBOMETALICOENROSCADO,atarlasCADENASdeAPOYOLATERALES(lacantidad
decadenadependedeestilocomprado)alosGANCHOSenlaparteinferiordelDOSEL.
9.LocaliceelANILLOyBOTONDECORATIVO.EnhebreelANILLOenlaparteinferiordelTUBO
quesedestacaenlaparteinferiordelasombra.Apretaramanohastaasegurarpiesa.
EnhebreelBOTONDECORATIVOhaciaelextremodelTUBOyaprietehastaasegurarla
sombra.
10.InstalelasBOMBILLASrefieriendosealaetiquetaparalapotenciaenvatiosmáximo.
Restaureelpoderelectrico.Retengaestahojaparaelreemplazodelaspartesy/oservicio.
IS-751
5/00
 Loading...