

Page 1
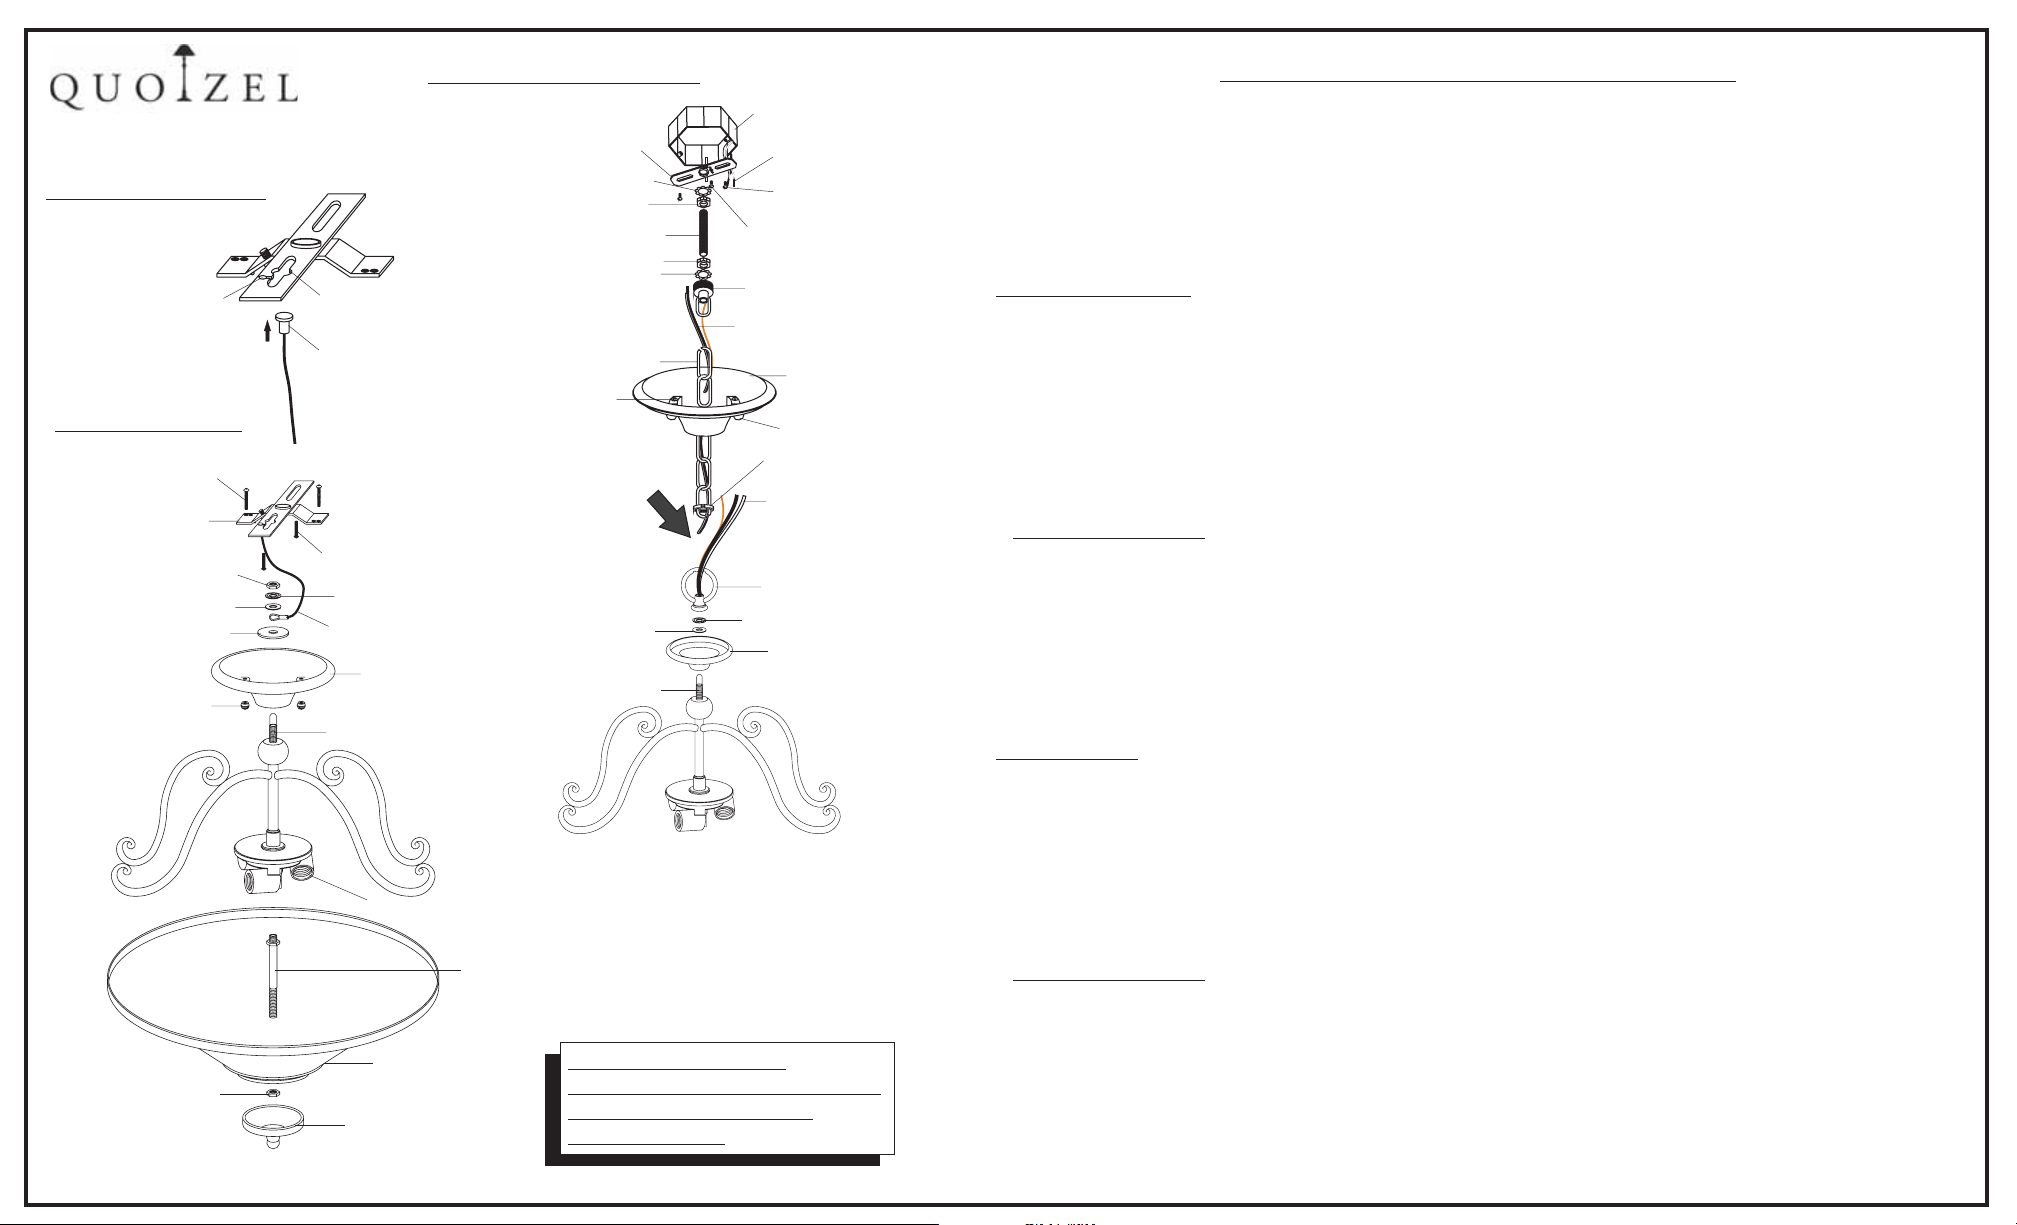
Chain-Hung Mounting
ASSEMBLY/INSTALLATION INSTRUCTIONS
6 CORPORATE PARKWAY
GOOSE CREEK SC 29445
www quoizel com
..
,.
Safety Cable Detail
HOLE B
Direct Mounting
(2)MOUNTING
SCREWS
SWIVEL
CROSSBAR
HEX NUT
PLAIN WASHER
SEATRING
(2)MOUNTING
BALLS
SHAKE PROOF WASHER A
SHAKE PROOF WASHER B
HOLE A
SAFETY CABLE HEAD
(2)OUTLET BOX
SCREWS(not supplied)
SHAKE PROOF WASHER
SAFETY CABLE
LARGE CANOPY
NIPPLE
CROSSBAR
LOCK NUT A
LOCK NUT B
FIXTURE CHAIN
()2 PAN HEAD
PLAIN WASHER
NIPPLE
NIPPLE
OUTLET BOX
HOUSE SUPPLY and
GROUND WIRES
OUTLET BOX SCREWS
not supplied()
GREEN GROUND SCREW
CANOPY CHAIN LOOP
FIXTURE SUPPLY
and GROUND WIRE
LARGE CANOPY
()2 MOUNTING BALLS
CANOPY LOCK RING
FIXTURE SUPPLY
and GROUND WIRE
FIXTURE LOOP
SHAKE PROOF WASHER
SMALL CANOPY
1.Before beginning theinstallation, carefully unpack and identify all parts, referring to theillustrations.
2.Turn the power to the installation point OFF at circuitbreaker.
3.Locate NIPPLE withHEX NUT. Thread top end of NIPPLE into couplingundersideof SOCKET CLUSTER and tighten
until snug. Useplier, thread HEX NUT against coupling and tighten until snug.
4.Position SHADE overend of NIPPLE and secure by threading HEX NUT onto the end of NIPPLE. Tighten until snug.
Proceed to threadFINIALonto the end of NIPPLE and tighten untilsnug.
5.Determine hanging method[chain or direct]:
Chain-Hung Mounting
:
a) Locate SMALL CANOPY, PLAIN WASHER and SHAKE PROOF WASHER over theNIPPLE on the top end of fixture.
Thread FIXTURE LOOP onto the NIPPLE and hand tighten until snugtosecure them.
b)Fasten the CROSSBARto the OUTLET BOX with (2)OUTLET BOXSCREWS(not supplied). Proceed to thread LOCK
NUTA and SHAKE PROOFWASHERAonto the end of NIPPLE.Thread NIPPLE into the center of CROSSBAR. Locate
the LOCK NUT B onto the bottom end of NIPPLE.Tighten LOCK NUTA against CROSSBAR withplier until snug.
c)Locate the FIXTURECHAIN and determine desired hanging height of fixture. Adjust chain by removing links if needed.
Please note thatdepending on chain material thickness, you might be required touse chain pliers to spread links open.
Proceed to attachone end of chain to FIXTURE LOOP, attachedto top of fixture. Pass the fixture wires throughFIXTURE
CHAIN alternating links.Proceed to pass the fixture wires through the following componentsin this order: (1)CANOPY
LOCK RING; (2)CEILINGCANOPY.
d) :(2 people recommendedfor the remaining steps)
Make the connections
Position the fixtureunder the ceiling mounted outlet box. Pass SHAKE PROOF WASHERB over the NIPPLE. Thread
CANOPY CHAINLOOP onto the NIPPLE. Thread LOCK NUT B down the NIPPLE, against the CANOPY CHAIN LOOP
and snug withplier. Pass the wiresthrough the NIPPLE. Take up wire slack andtrim wires so that approx. 6” will remain
inside outlet box.Use wire connectors(not supplied) attach the FIXTURE GROUND WIRE tothe FIXTURE GROUND
WIRE; connect theHOUSE WHITE WIRE to the FIXTURE WHITE (or RIBBED) WIRES;connect the HOUSE BLACK
(or RED) WIREto the FIXTURE BLACK (or SMOOTH) SIDE. Wrapeach connection with approved electrical tape.
e)With the properconnection made, proceed to push the CEILING CANOPYupwardover the OUTLET BOX. Be sure that
all wires arecarefully tucked into the OUTLET BOX cavity. Secure CANOPYagainst ceiling by threading CANOPY
LOCK RING ontothe CANOPY LOOP. Hand tighten untilsnug.
Direct Mounting
:
HEX NUT
SOCKET CLUSTER
SHADE
FINIAL
NIPPLE with
HEX NUT
IF IN DOUBT ABOUT
ELECTRICAL INSTALLATION,
CONSULT A LICENSED
ELECTRICIAN!
a)Remove the SMALL CANOPY and use the LARGECANOPY. Position LARGE CANOPY, SEAT RING, SAFETYCABLE,
PLAIN WASHER and SHAKE PROOF WASHER overthe NIPPLE on the top end of fixture. Secure themby threading
HEX NUTonto the NIPPLE. Hand tighten until snug.
b)Locate (2)MOUNTING SCREWSand thread them into the back of SWIVEL CROSSBAR, make sure that they match
the holes onthe LARGE CANOPY.Use (2)OUTLET BOX SCREWS(not supplied), fasten theSWIVELCROSSBAR
to the OUTLET BOX.
c)Refer to , make theSAFETY CABLE HEAD over HOLE A and guide wiresinto the HOLE B.
SAFETY CABLE DETAIL
The base ofSAFETY CABLE HEAD will lock into round endof HOLE B. This cable will assist in holding up thefixture
while you makethe wire connections.
d) :
Make the connections
Use wire connectors(notsupplied) attach the FIXTURE GROUND WIRE to the FIXTURE
GROUND WIRE; connectthe HOUSE WHITE WIRE to the FIXTURE WHITE (or RIBBED)WIRES; connect the HOUSE
BLACK (or RED)WIRE to the FIXTURE BLACK (or SMOOTH) SIDE. Wrap each connection with approved electrical
tape.
e)Carefully tuck allof the wiring up into the outlet box and fitthe LARGE CANOPY over the MOUNTING SCREWS. Secure
the LARGE CANOPY to the ceiling with (2)MOUNTING BALLS, making surethat the balls are fully threaded onto the
MOUNTING SCREWS beforetightening.
6. Install bulbsreferring to fixture markings and/or labels for maximum wattage.
7.Reture the powerto the installation point ON. Retain this sheet for futurereference.
Revised 2006-12-20
IS-TF1040
 Loading...