

Page 1
6CORPORATEPARKWAY
GOOSECREEKSC29445
wwwquoizelcom
..
Quoizel,Inc.
6CorporateParkway
GooseCreek,SC
29445
CustomerService
Phone631.273.2700
Fax631.231.7102
www.quoizel.com
,.
AssemblyInstructionSheet#IS-RDY1714CS
ForStyleRDY1714CS
ToolsRequired:Flatheadscrewdriver,Phillipsscrewdriver,pliers,wirecutters,wire
strippers,electricaltape,safetyglasses.
BulbRecommended: (3)CandelabraBase60WMaximum
EstimatedAssemblyTime: 20-30minutes
Preparation: Identifyandinspectallpartsbeforebeginninginstallation.Checkpackage
contentlistanddiagramsbelowtobesureallpartsarepresent.Ifanypartsaremissing
ordamaged,donotattempttoassemble,install,oroperatethefixture.Contactcustomer
serviceforreplacementparts.
WarningsandCautions
Turnoffelectricityatcircuitbreakerormainfuseboxbeforeinstallation.Consultalicensedelectricianifindoubt.
Theseinstructionsareprovidedforyoursafety.Itisveryimportantyoureadthemcompletelybeforeinstalling
thefixture.Westronglyrecommendthatalicensed,professionalelectricianperformtheinstallation.
Disconnectfixturefrompowersourcebeforereplacingbulbs.Makesurebulbsaregivensufficienttimetocool
beforeremoval.DonotsubjectglasspartstoanyshockwhileinoperationorshatteringNovemberresult.
A
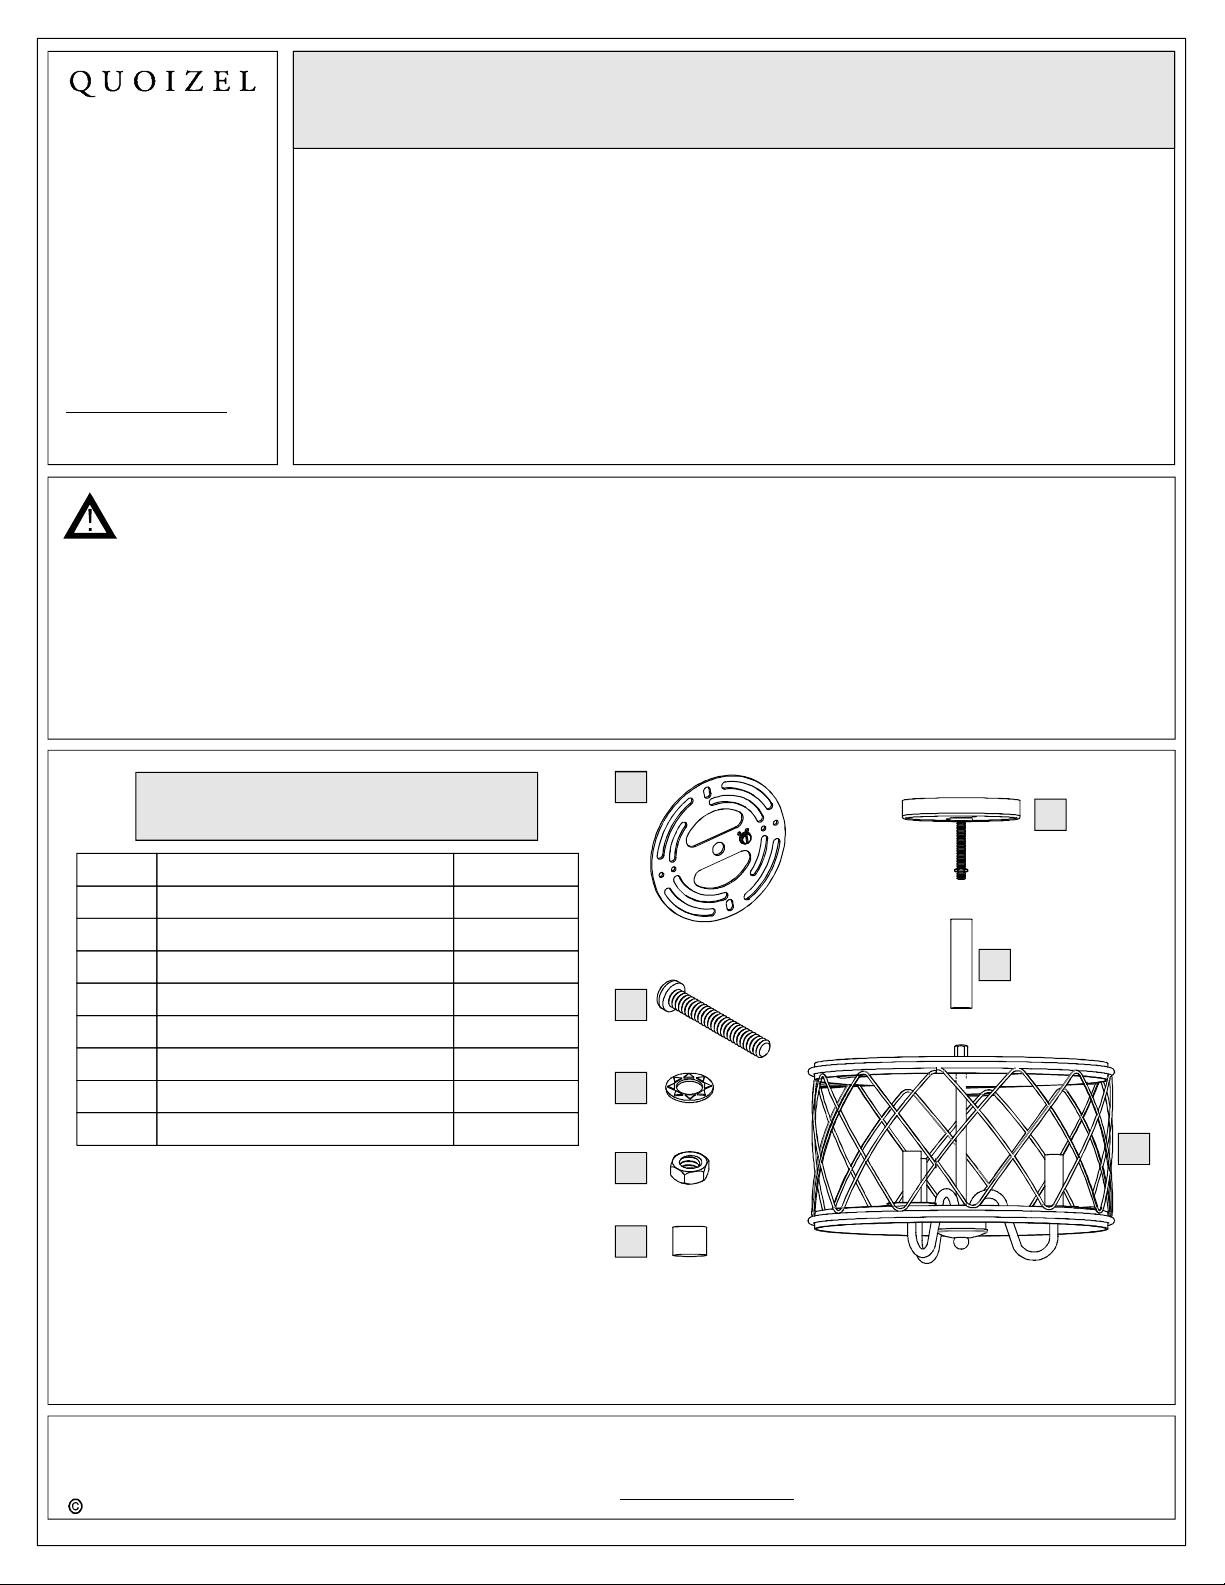
PackageContents
Part Description
A Crossbar
B
C
D
E
F
G
H
MountingScrew
LockWasher
HexNut
MountingBall
CeilingCanopywithNipple
SpacerTube
SocketAssembly
Quantity
1pc.
2pcs.
2pcs.
2pcs.
2pcs.
1pc.
1pc.
1pc.
B
C
D
E
F
G
H
Needassistancewithpartsorassembly?CallQuoizelcustomerserviceat1-631-273-2700
2013QuoizelInc.
ThankyouforpurchasingaQuoizelproduct.
orvisituson-lineat www.quoizel.com
1of5
November2013
Page 2
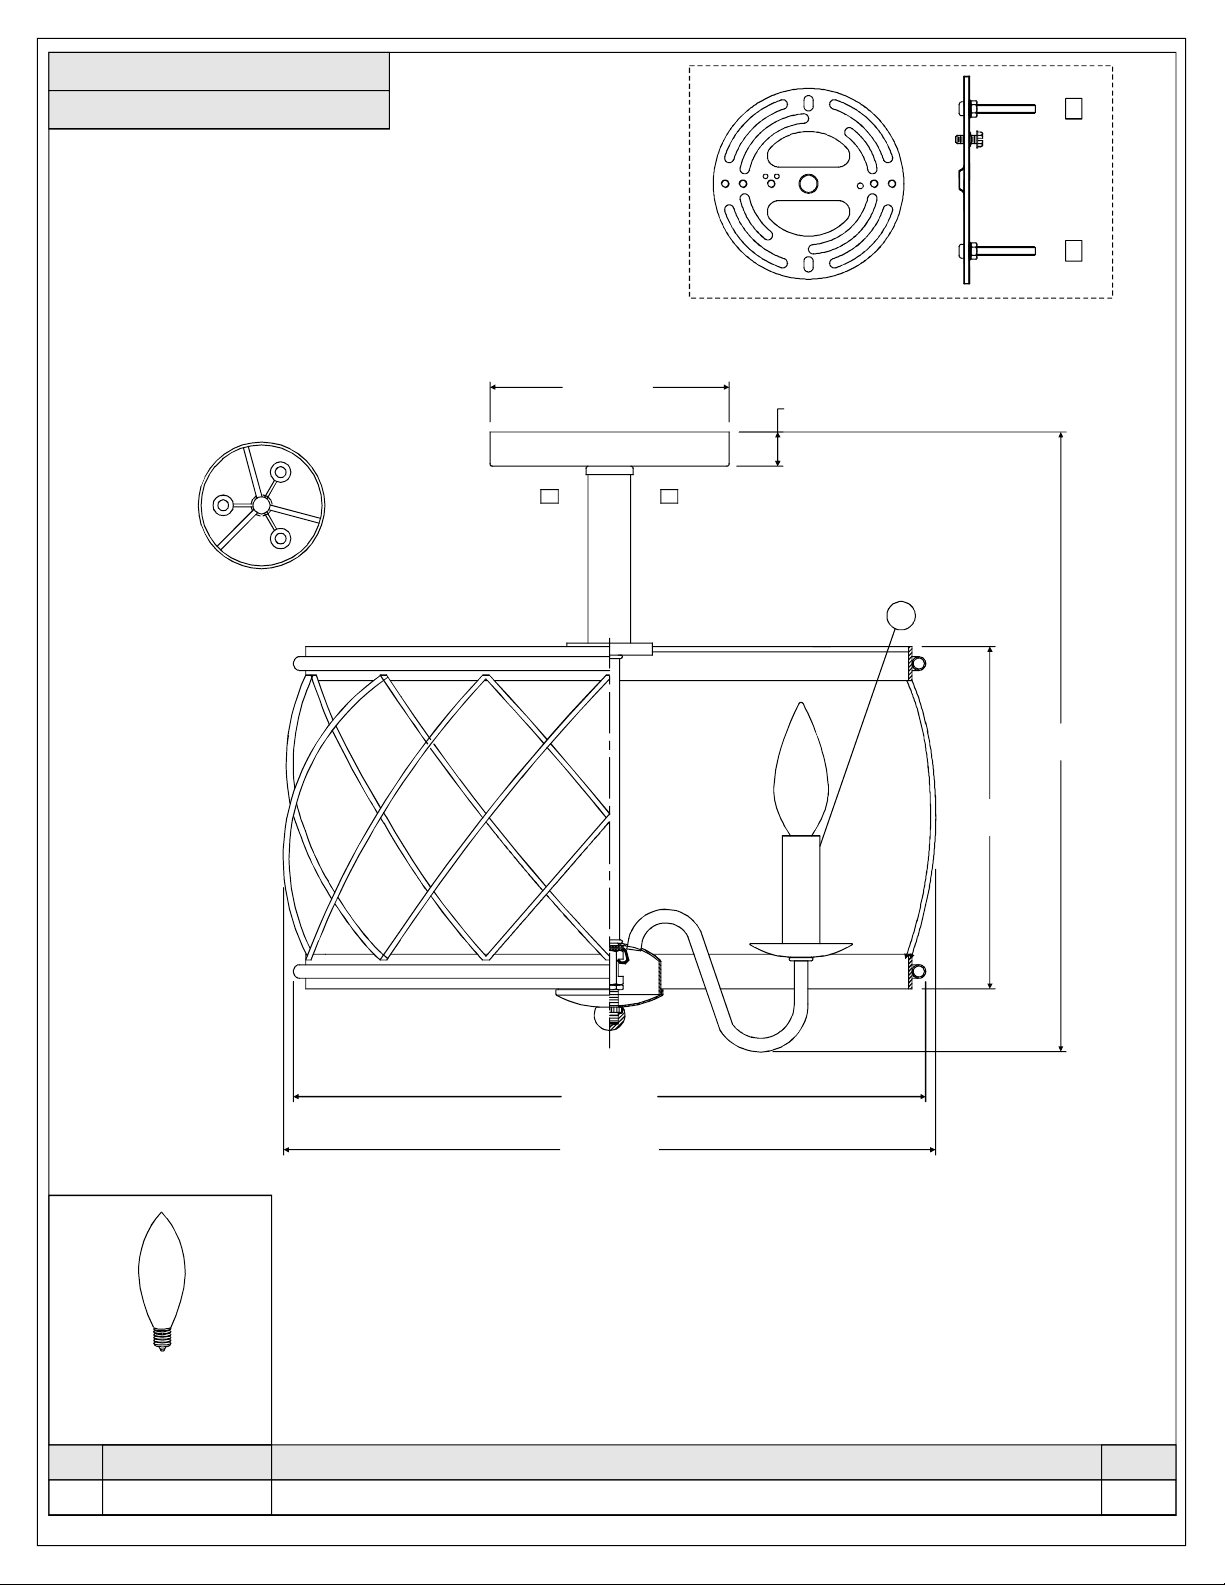
RDY1714CS
FINISH:CENTURYSILVERLEAF
5.5” Dia.
GND
1”
2.4mm
13Ga
QUOIZEL
R
1
14.5” Dia.
15” Dia.
14”
8”
(3)60WCandelabra
BaseBulbs
(NoSupplied)
PARTNUMBER
NO.
1
J1176CC
NOTE:ALLDIMENSIONSAREROUNDEDUPTOTHENEAREST1/2"
REPLACEMENTPARTDESCRIPTION
CANDLECOVERPLASTIC0.86"Dx2.5"L
2of5
REQ.
3
Page 3

6CORPORATEPARKWAY
GOOSECREEKSC29445
wwwquoizelcom
..
,.
AssemblyInstructionSheet#IS-RDY1714CS
ForStyleRDY1714CS
STEP1InstallCeilingCanopywithNipple-
A.PlacetheSpacerTube(G)overtheHexCouplingonthe
topcenteroftheSocketAssembly(H).PasstheCeiling
CanopywithNipple(F)throughtheSpacerTube(G).
ThreadtheNippleintotheHexCouplingandhandtighten
untilsnug.
STEP2- AttachMountingScrews,Lock
WashersandHexNutstoCrossbar
A.LineupasetofholesontheCrossbar(A)andHoleson
theCeilingCanopy.
B.ThreadMountingScrews(B)intotheholesonthe
Crossbar(A),passLockWashers(C)andthreadHexNut
(D)ontotheMountingScrews(B).Handtightenuntil
snug.
MountingScrew
LockWasher
Ceiling
Canopy
CeilingCanopy
withNipple
SpacerTube
HexCoupling
Socket
Assembly
Figure1
Crossbar
HexNut
Needassistancewithpartsorassembly?CallQuoizelcustomerserviceat1-631-273-2700
2013QuoizelInc.
Figure2
ThankyouforpurchasingaQuoizelproduct.
orvisituson-lineat www.quoizel.com
3of5
November2013
Page 4

6CORPORATEPARKWAY
GOOSECREEKSC29445
wwwquoizelcom
..
,.
AssemblyInstructionSheet#IS-RDY1714CS
ForStyleRDY1714CS
STEP3- AttachCrossbartoOutletBox
A.AttachtheCrossbar(A)toOutletBoxandsecureby
threadingOutletBoxScrews(notsupplied)intothe
MountingHolesontheOutletBox.Tightenuntilsnug.
STEP4MakeWireConnections-
A.Usestandardwireconnectorstomakeallwire
connections.(Connectorsarenotincludedwithfixture.)
Stripandpreparewireendsaccordingtoinstructions
suppliedwithconnectors.
B.ConnectWhiteSupplyWirefromtheOutletBoxtoWhite
Wirefromfixture.
C.ConnectBlack(orRed)SupplyWirefromtheOutletBox
toBlackWirefromfixture.
D.ConnectGroundWirefromtheOutletBoxtoGround
Wirefromfixture.
E.Twistconnectorsuntilwiresaretightlyjoinedtogether.
F.Wrapeachconnectionwithapprovedelectricaltapeand
carefullystuffalltheconnectedwiresintotheOutletBox.
Figure3
Outlet
Box
Crossbar
Mounting
Hole
OutletBox
Screw
Figure4
Whitewirefromsupply Whitewirefromfixture
Blackwirefromsupply
(orRed)
Groundwirefromsupply Groundwirefromfixture
Blackwirefromfixture
Figure5
ThankyouforpurchasingaQuoizelproduct.
Needassistancewithpartsorassembly?CallQuoizelcustomerserviceat1-631-273-2700
2013QuoizelInc.
orvisituson-lineat www.quoizel.com
4of5
November2013
Page 5

6CORPORATEPARKWAY
GOOSECREEKSC29445
wwwquoizelcom
..
,.
AssemblyInstructionSheet#IS-RDY1714CS
ForStyleRDY1714CS
STEP5- AttachCeilingCanopytoMounting
Screw
A.PlacetheCeilingCanopy(F)overtheMountingScrews
(B)andsecurewithMountingBalls(E).Handtighten
untilsnug.
STEP6InstallBulb-
A.Thisfixtureusesstandardbulbwithastandardscrewbase.
Maximum60watts.
B.Insertbulbandscrewproperlyintoplace.
Ceiling
Canopy
Bulb
Figure6
Mounting
Screw
MountingBall
Figure7
Yourfixtureisnowassembledandreadytouse.
Enjoy!
Socket
Needassistancewithpartsorassembly?CallQuoizelcustomerserviceat1-631-273-2700
2013QuoizelInc.
ThankyouforpurchasingaQuoizelproduct.
orvisituson-lineat www.quoizel.com
5of5
November2013
 Loading...