

Page 1
6CORPORATEPARKWAY
GOOSECREEKSC29445
wwwquoizelcom
..
Quoizel,Inc.
6CorporateParkway
GooseCreek,SC
29445
CustomerService
Phone631.273.2700
Fax631.231.7102
www.quoizel.com
,.
ToolsRequired:Flatheadscrewdriver,Phillipsscrewdriver,pliers,wirecutters,wire
strippers,electricaltape,safetyglasses.
BulbRecommended: (12)G9BasefrostedG9Xenonbulb,40WMaximum
EstimatedAssemblyTime: 20-30minutes
Preparation: Identifyandinspectallpartsbeforebeginninginstallation.Checkpackage
contentlistanddiagramsbelowtobesureallpartsarepresent.Ifanypartsaremissing
ordamaged,donotattempttoassemble,install,oroperatethefixture.Contactcustomer
serviceforreplacementparts.
AssemblyInstructionSheet#IS-RBN2823C
ForStyleRBN2823C
WarningsandCautions
Turnoffelectricityatcircuitbreakerormainfuseboxbeforeinstallation.Consultalicensedelectricianifindoubt.
Theseinstructionsareprovidedforyoursafety.Itisveryimportantyoureadthemcompletelybeforeinstalling
thefixture.Westronglyrecommendthatalicensed,professionalelectricianperformtheinstallation.
Disconnectfixturefrompowersourcebeforereplacingbulbs.Makesurebulbsaregivensufficienttimetocool
beforeremoval.DonotsubjectglasspartstoanyshockwhileinoperationorshatteringJuneresult.
Donottouchthebulbwithbarehandsuseaclothorglove.
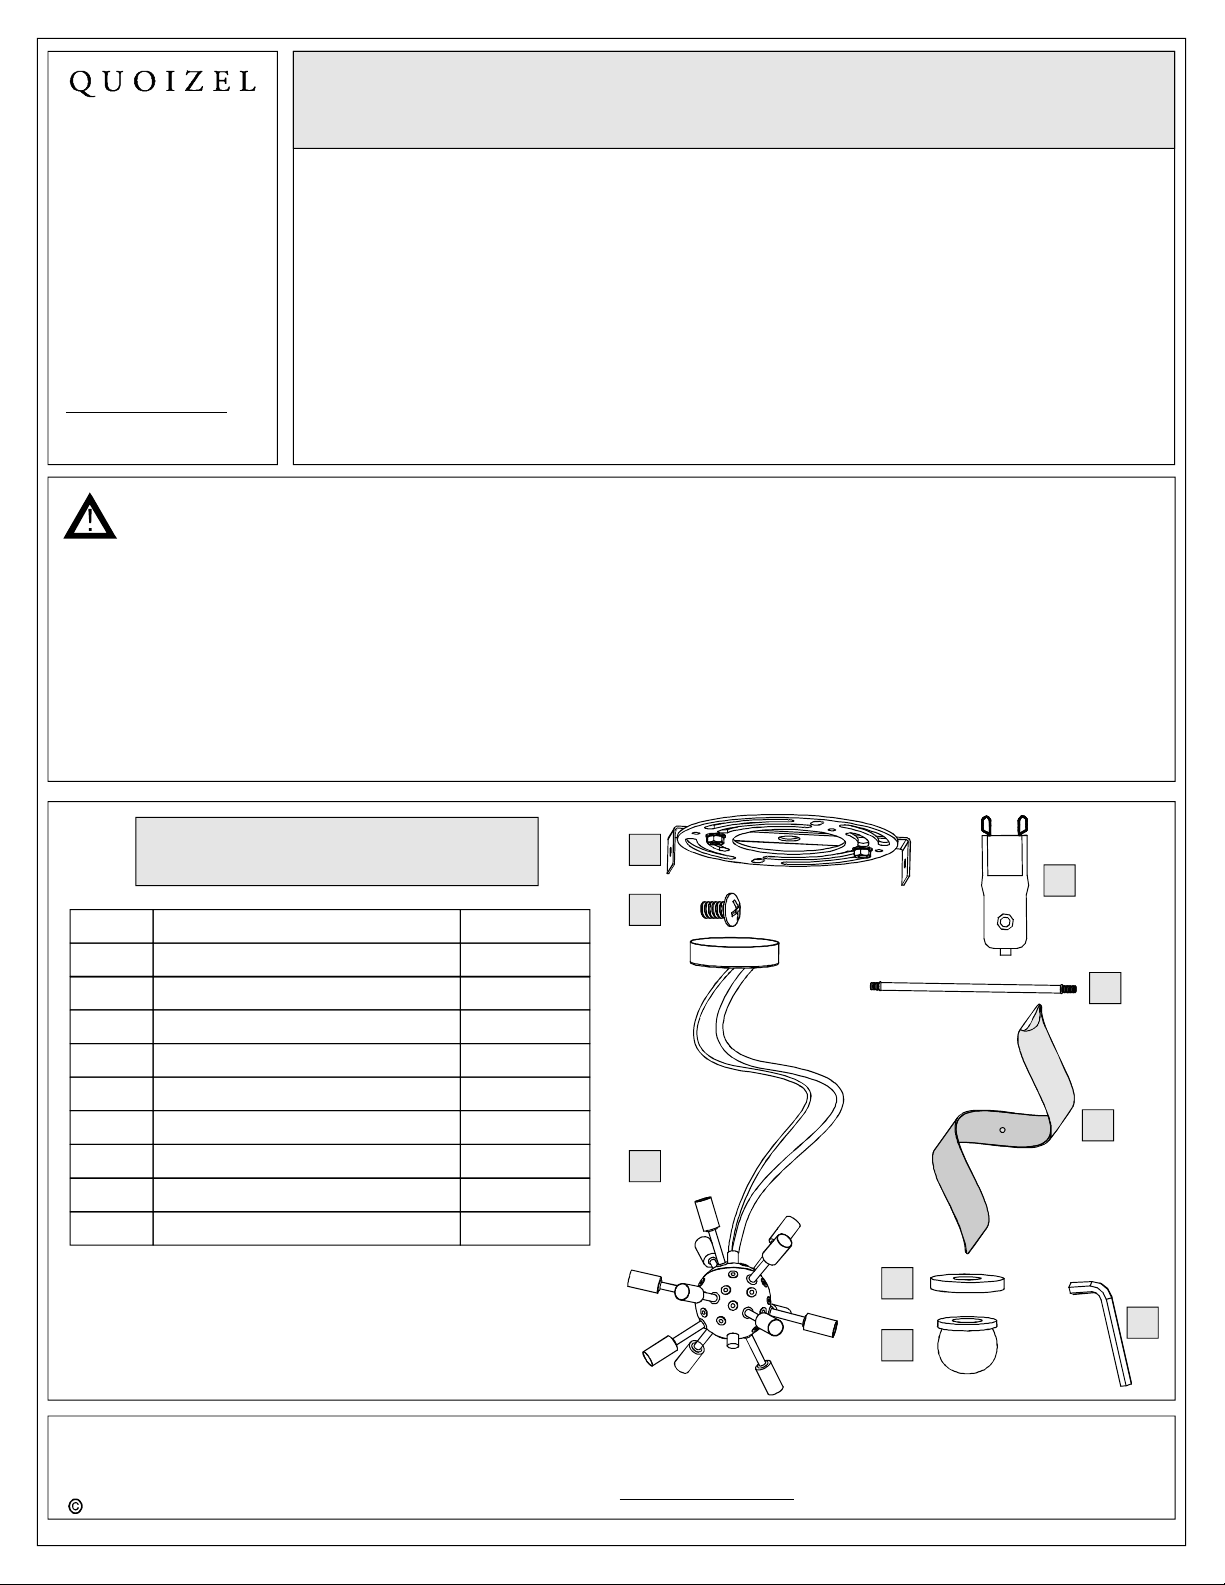
PackageContents
Part Description
A Crossbar
B
C
D
E
F
G
H
I AllenWrench
MountingScrew
FixtureBody
Bulb
Stem
Trimming
RubberWasher
LockBall
Quantity
1pc.
2pcs.
1pc.
12pcs.
27pcs.
27pcs.
54pcs.
27pcs.
1pc.
A
D
B
E
F
C
Needassistancewithpartsorassembly?CallQuoizelcustomerserviceat1-631-273-2700
2014QuoizelInc.
ThankyouforpurchasingaQuoizelproduct.
orvisituson-lineat www.quoizel.com
1of4
G
I
H
June2014
Page 2
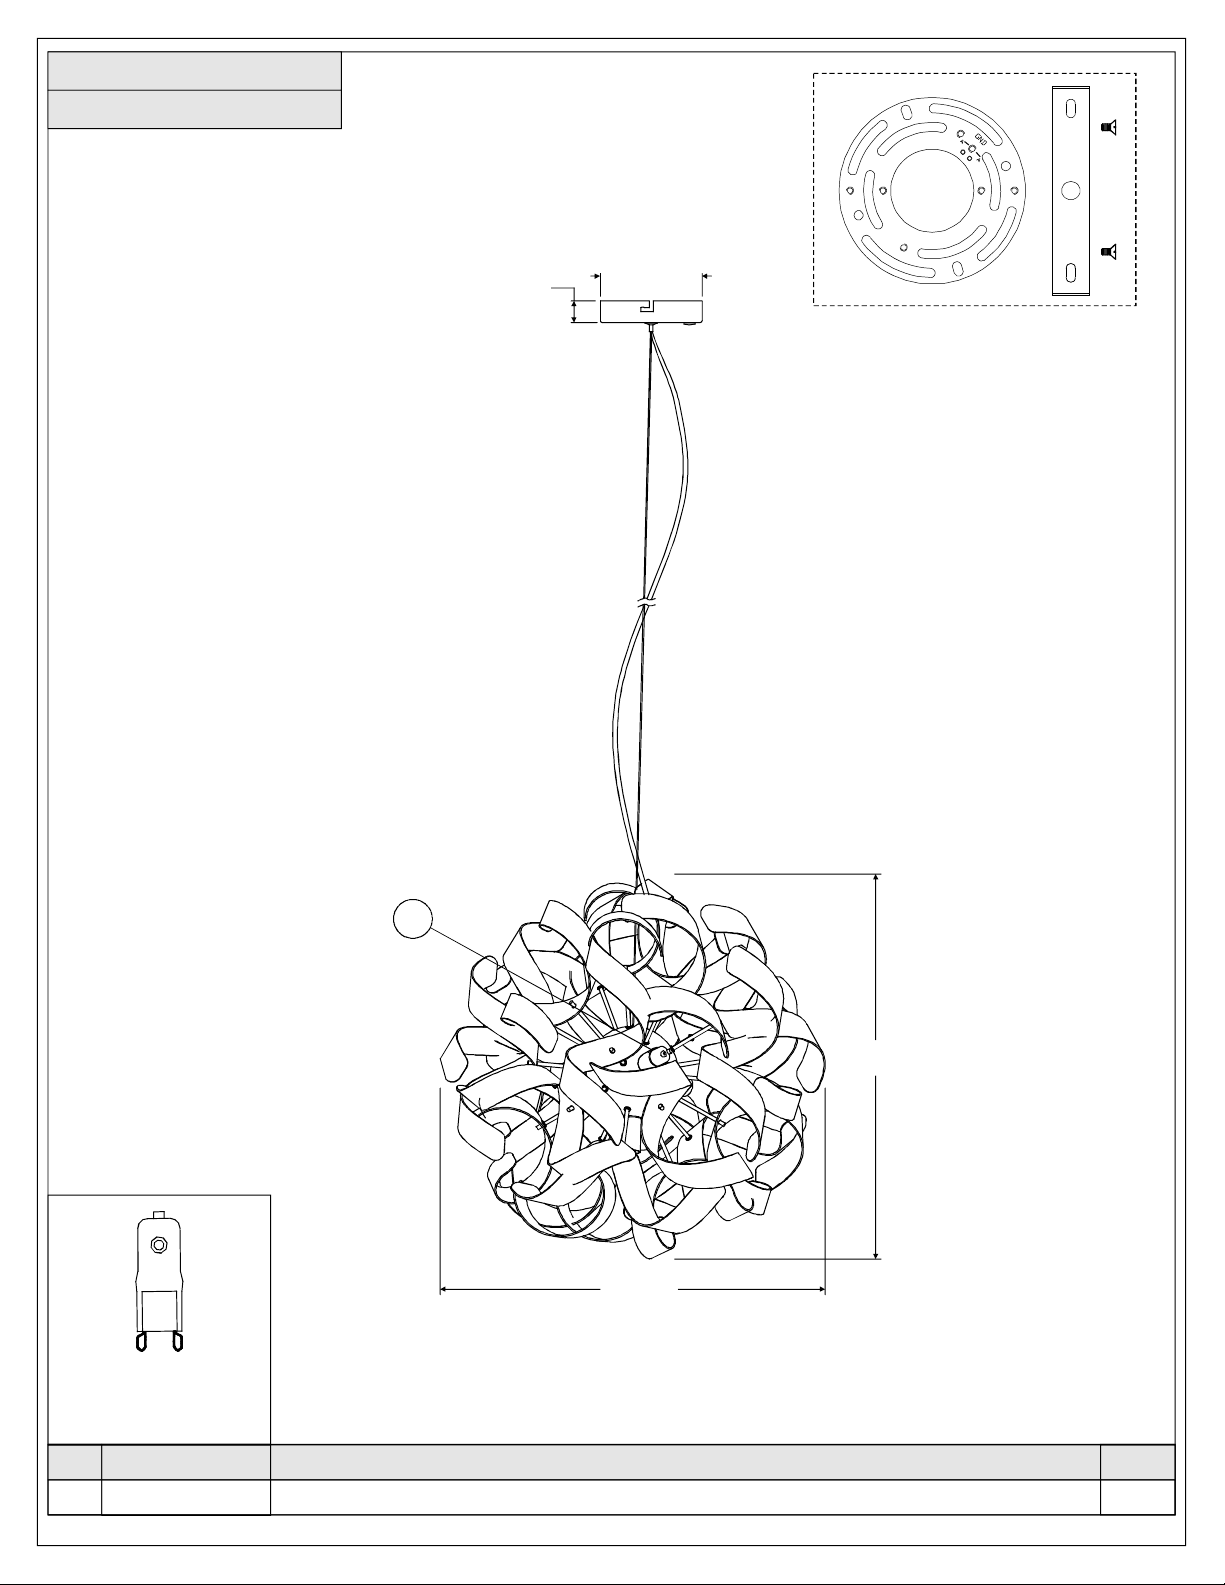
RBN2823C
FINISH:POLISHEDCHROME
1”
4.5” Dia.
(12)40W
frostedG9Xenon
NO.
1
Maximum
(Supplied)
PARTNUMBER
I1203SF BULB40WXENONG9FROSTED 12
1
23”
23” Dia.
NOTE:ALLDIMENSIONSAREROUNDEDUPTOTHENEAREST1/2"
REPLACEMENTPARTDESCRIPTION
REQ.
2of4
Page 3

6CORPORATEPARKWAY
GOOSECREEKSC29445
wwwquoizelcom
..
,.
AssemblyInstructionSheet#IS-RBN2823C
ForStyleRBN2823C
STEP1AdjusttheFixtureBody-
A.PushtheButtonandpulltheWireRopetoadjustthe
lengthofWireRopetoachieveyourdesiredfixture
height.ThenadjusttheWireClaspAtouchtheNipplein
theCanopy,securebyusingIthreadthe
AllenWrench()
InnerHexagonScrewintotheWireClaspA,tighten
untilsung.
B.RemovetheScrewtoopentheWireClaspB.
adjustthe
lengthofWiretoachieveyourdesiredfixtureheight.
SecurebyreinstallingtheScrew,LoosenClaspBprior
toStepAifNecessary.
STEP2- AttachCrossbartoOutletBox
A.AttachtheCrossbar(A)toOutletBoxandsecureby
threadingOutletBoxScrews(notsupplied)intothe
MountingHolesontheOutletBox.Tightenuntilsnug.
STEP3MakeWireConnections-
Wire
ClaspA
Nipple
Button
WireRope
OutletBox
Screw
InnerHexagon
Screw
AllenWrench
Screw
Wire
ClaspB
Wire
Outlet
Box
Crossbar
Figure1
Figure2
Mounting
Hole
A.Usestandardwireconnectorstomakeallwireconnections.(Connectorsarenotincludedwithfixture.)Strip
andpreparewireendsaccordingtoinstructionssuppliedwithconnectors.
B.Iftheelectricalwireisgoingtobecutshorterthanprovidedyouwillneedtoidentifythe"L"linewireandthe"N"
wirebeforeyoucuttheexcesswireoff.OneislabeledNandtheotherlabeledL.Thethirdwirehasagreen
stripeonit.Todothisstripbacktheclearwirecoveringthe3fixturewiresasfarasyouneedto.Thiswill
exposeeachfixturewireindividually.Separatethe"L"wirefromtheothertwoandre-labelthewirenearwhere
youwanttomakethecut.Besuretomarkthewireonthesideofthefixtureandnotontheexcesswirebeingcut
andremoved.Dothesamelabelingwiththe"N"wire.
C.ConnectWhiteSupplyWirefromtheOutletBoxtoWireLabeled"N"fromfixture.
D.ConnectBlack(orRed)SupplyWirefromtheOutletBoxtoWireLabeled"L” fromfixture.
E.ConnectGroundWirefromtheOutletBoxtoGreenStripedWirefromfixture.
F.Twistconnectorsuntilwiresaretightlyjoinedtogether.
G.WrapeachconnectionwithapprovedelectricaltapeandcarefullystuffalltheconnectedwiresintotheOutlet
Box.
Whitewirefromsupply WireLabeled"N"fromfixture
Blackwirefromsupply
(orRed)
Groundwirefromsupply GreenStripedwirefromfixture
Figure4
WireLabeled"L"fromfixture
Figure3
Needassistancewithpartsorassembly?CallQuoizelcustomerserviceat1-631-273-2700
2014QuoizelInc.
ThankyouforpurchasingaQuoizelproduct.
orvisituson-lineat www.quoizel.com
3of4
June2014
Page 4

6CORPORATEPARKWAY
GOOSECREEKSC29445
wwwquoizelcom
..
,.
AssemblyInstructionSheet#IS-RBN2823C
ForStyleRBN2823C
STEP4- AttachCeilingCanopytoCrossbar
A.ThreadtheMountingScrew(B)intoMountingHoleon
theCrossbar(A)tightenuntilsung.,
B.PasstheGapsontheCeilingCanopyoverthe
MountingScrew(B)andthenrotatetheCeilingCanopy.
DonotfreeyourhandsuntiltheCeilingCanopyis
seatedontotheCrossbar.
STEP5-InstallBulb
A.ThisfixtureusesFrostedG9XenonBulbs.Maximum40
watts.
B.Insertbulbandseatproperlyintoplace.
IMPORTANT:
aclothorglove.
Donottouchthebulbwithbarehandsuse
Figure5
Crossbar
Mounting
Screw
Gap
Ceiling
Canopy
Figure6
Bulb
STEP6- InstallTrimmingtoFixture
Figure7
A.ThreadtheShortNippleendofStem(E)intotheFixture
Body(C),handtightenuntilsnug.
B.PeeloffProtectiveFilmsonTrimmings(F).
Note:Glovesarerequiredtoavoidleavingfingerprints
ProtectiveFilm
orscratchesonTrimmings(F).
C.PlacetheTrimming(F)andRubberWasher(G)overthe
otherendofStem(E).SecurebythreadingLockBall
Stem
(H)ontotheStem(E).Handtightenuntilsnug.
Yourfixtureisnowassembledandreadytouse.
Enjoy!
RubberWasher
Trimming
Lock
Ball
RubberWasher
CAUTIONFORBULBREPLACING
A.Whenreplacebulb,turnoffpowerandallowlamptocool.Forsafetypurpose,wearglovesandeyeprotection.
B.Ifbulbisscratchedorcracked,DONOTusethelamptoavoidbreakageduringuseorinstallation.
C.Useonlyinfixturesratedforlampswattageandvoltage.
D.Preventthebulbfromcontactingliquidorcombustiblematerials.
ThankyouforpurchasingaQuoizelproduct.
Needassistancewithpartsorassembly?CallQuoizelcustomerserviceat1-631-273-2700
2014QuoizelInc. June2014
orvisituson-lineat www.quoizel.com
4of4
 Loading...