

Page 1
AssemblyInstructionSheet#IS-PCCS2824
ForStylesPCCS2824C,PCCS2824C1
Quoizel,Inc.
6CorporateParkway
GooseCreek,SC29445
CustomerService
Phone631.273.2700
Fax631.231.7102
ToolsRequired:Flatheadscrewdriver,Phillipsscrewdriver,pliers,wirecutters,wirestrippers,electricaltape,
safetyglasses.
BulbRecommended: (5)MediumBase60WMaximum,Alternatebulb(5)13WCFL
EstimatedAssemblyTime:
Preparation:
Identifyandinspectallpartsbeforebeginninginstallation.Checkpackagecontentlistanddiagrams
30-45minutes
belowtobesureallpartsarepresent.Ifanypartsaremissingordamaged,donotattempttoassemble,install,or
operatethefixture.Contactcustomerserviceforreplacementparts.
www.quoizel.com
WarningsandCautions
Turnoffelectricityatcircuitbreakerormainfuseboxbeforeinstallation.Consultalicensedelectricianifindoubt.
Theseinstructionsareprovidedforyoursafety.Itisveryimportantyoureadthemcompletelybeforeinstallingthefixture.Westrongly
recommendthatalicensed,professionalelectricianperformtheinstallation.
Disconnectfixturefrompowersourcebeforereplacingbulbs.Makesurebulbsaregivensufficienttimetocoolbeforeremoval.Donotsubject
glasspartstoanyshockwhileinoperationorshatteringmayresult.
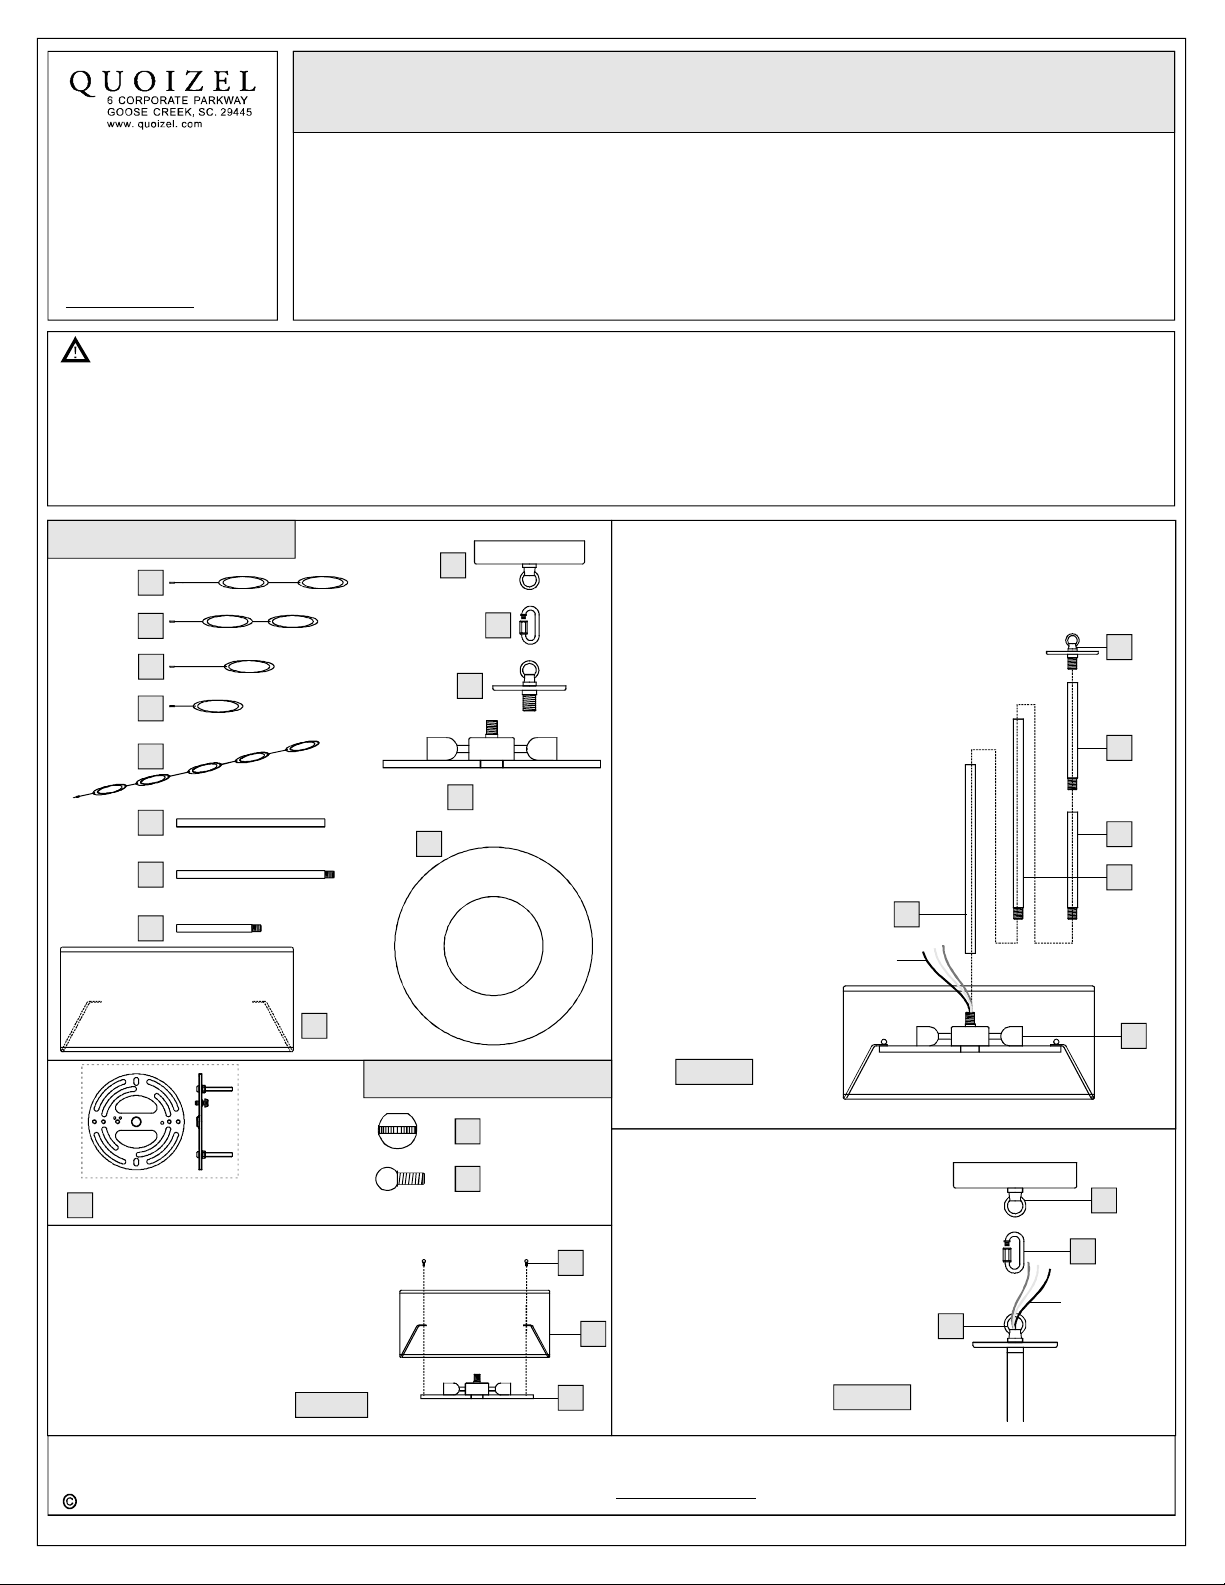
PackageContents
StringA
StringB
StringC
StringD
StringD
Rod12”
RodWith
Nipple
Rod6”
x1
x3
x6
x9
x5
x1
x1
x2
A
B
C
D
E
F
G
H
Ceiling
Canopy
x1
QuickLink
LoopAssembly
x1
Diffuser
x1
M
I
x1
K
L
J
Socket
Assembly
x1
STEP2AssembletheRodsandtheLoop-
Assembly
A.DeterminetheRods(F/G/H)tobeassembledto
theSocketAssembly(L)accordingtoyour
hangingheight.
B.Passthesupplywiresandgroundwirethrough
thechosenrods(F/G/H)andtheSocket
(K).ThreadtheSocketAssembly(K),the
chosenRods(E/F/G)andtheLoop
Assembly(J)togetherasshown.
Handtightenuntilsnug.
SuggestedrodsforCeilingheight:
8’ceiling:use(1)6”rodand(1)12”
rods
9’ ceiling:use(1)6” rodand(2)12”
rods
F
SupplyWiresand
GroundWire
K
H
H
G
N
2.4mm
13Ga
QUOIZEL
R
GND
CrossbarAssembly
AA
x1
STEP1-InstallShade
A.AttachtheShade(N)totheSocket
Assembly(L)andsecurewiththeLock
Screws(CC).Handtightenuntilsnug.
Figure1
Needassistancewithpartsorassembly?CallQuoizelcustomerserviceat1-631-273-2700
2014QuoizelInc.
Shade
x1
HardwareContents
LockBall
BB
x2
LockScrew
CC
x3
ThankyouforpurchasingaQuoizelproduct.
orvisituson-lineatwww.quoizel.com
Figure2
STEP3-AttachQuickLink
A.PasstheSupplyWiresandGround
WirethroughtheQuickLink(J)andthe
CeilingCanopy(I).ConnecttheLoop
Assembly(L)totheCeilingCanopy(I)
CC
withtheQuickLink(J).
N
L
1of3
Figure3
L
I
J
SupplyWires
andGround
K
Wire
April2014
Page 2
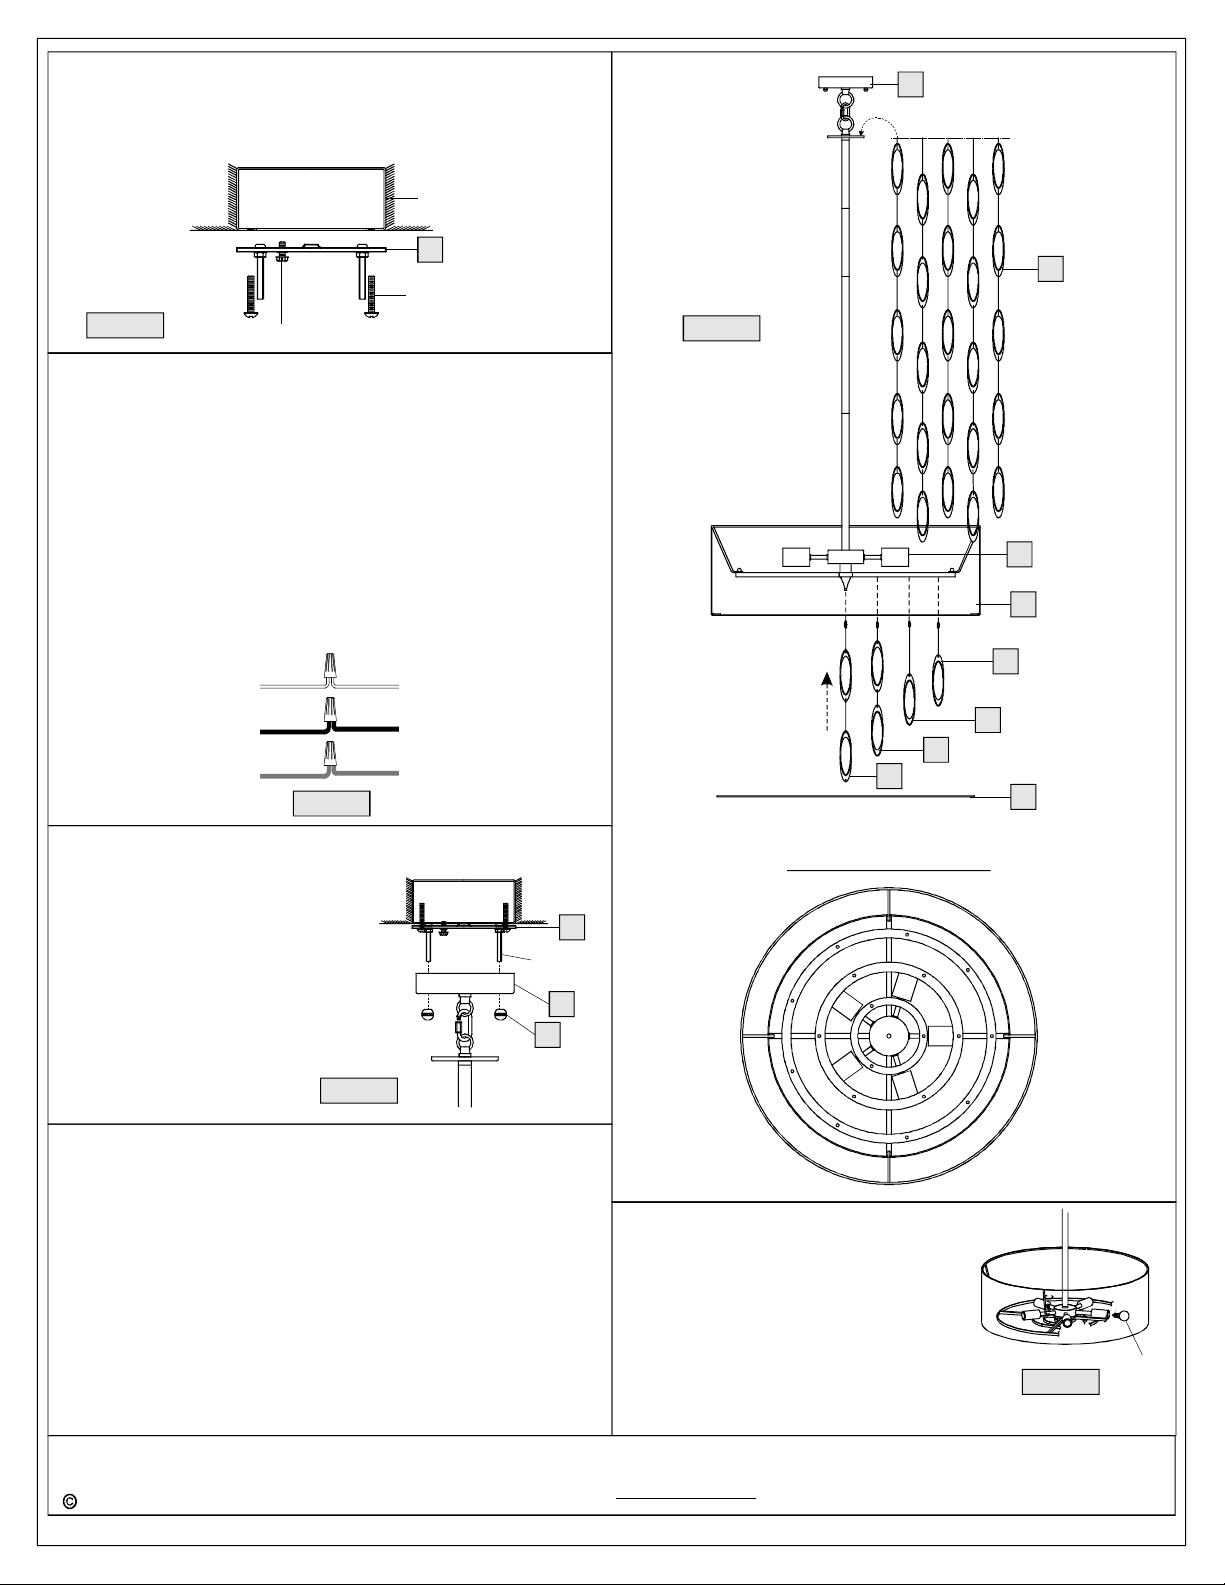
STEP4InstallCrossbar-
A.AttachtheCrossbarAssembly(AA)totheOutletBoxwiththehead
oftheGreenGroundScrewfacingyou.SecureitwithOutletBox
Screws(notincluded)Tightenuntilsnug
..
OutletBox
I
AA
OutletBoxScrew
(notincluded)
Figure4
STEP5-WireConnections
A.Usestandardwireconnectors(notincluded)tomakeallwire
connections.(Connectorsarenotincludedwithfixture.)Stripand
preparewireendsaccordingtoinstructionssuppliedwith
connectors.
B.ConnectWhiteSupplyWirefromtheOutletBoxtoRibbedsideWire
fromfixture.
C.ConnectBlack(orRed)SupplyWirefromtheOutletBoxtoSmooth
sideWirefromfixture.
D.ConnectGroundWirefromtheOutletBoxtoGroundWirefrom
fixture.
E.Twistconnectorsuntilwiresaretightlyjoinedtogether.
F.Wrapeachconnectionwithapprovedelectricaltapeandcarefully
stuffalltheconnectedwiresintotheOutletBox.
fromsupply
Blackwirefrom
supply(orRed)
Groundwire
fromsupply
GreenGroundScrew
Whitewire
Ribbedsidewire
fromfixture
Smoothsidewire
fromfixture
Groundwire
fromfixture
Figure5
Figure7
A
E
L
B C D
N
D
C
B
A
M
STEP6AttachCeilingCanopyto
A.PlacetheCeilingCanopy(I)overthe
-
MountingScrew
MountingScrewsandsecurewith
LockBalls(BB).Handtightenuntil
snug.
Figure6
STEP7-AttachCrystalPendants
A.AttachStringsE(E)totheholesontheLoopHas
shown.
B.InserttheStringA(A)tothebottomcenteroftheSocketAssembly
(L).InserttheStringsB(B)totheholesonthelocationsBonthe
bottomcenteroftheSocketAssembly(L).InserttheStringsC(C)to
theholeonthelocationsAonthebottomcenteroftheSocket
Assembly(L).InserttheStringsD(D)totheholeonthelocationsD
onthebottomcenteroftheSocketAssembly(L).
C.InserttheDiffuser(M)insideoftheShade(N)andattachtotheTabs
inthebottomedgeoftheShade(N).
Assembly()
AA
Mounting
Screw
I
BB
STRINGSDISTRIBUTION
D
D
C
D
C
D
STEP8-InstallBulb
A.Thisfixtureusesstandardbulbwith
mediumbase.Maximum60watts.
B.Insertbulbandscrewsnuglyintoplace.
Yourfixtureisnowassembledandready
touse.Enjoy!
D
CC
B
A
B
B
C
D
D
D
C
D
Figure8
Bulb
2014QuoizelInc.
Needassistancewithpartsorassembly?CallQuoizelcustomerserviceat1-631-273-2700
ThankyouforpurchasingaQuoizelproduct.
orvisituson-lineatwww.quoizel.com
2of3
April2014
Page 3

PCCS2824C|PCCS2824C1
FINISH:POLISHEDCHROME
4.5” Dia.
2
1
(2)6” AND(2)12” RODS
NOTE:ONELIGHTSHOWNFOR
ILLUSTRATIONPURPOSEONLY.
(5)60W
NO.
1
2
4
3
3
Medium
Bulbs
Base
(NotSupplied)
PARTNUMBER
9008EXC
9007EXC
NOTE:ALLDIMENSIONSAREROUNDEDUPTOTHENEAREST1/2"
REPLACEMENTPARTDESCRIPTION
RODEXTENSIONPOLISHEDCHROME12"LX0.63"D
RODEXTENSIONPOLISHEDCHROME6"LX0.63"D
S1624DI WHITELINENHARDBACKDIFFUSER23.5"D
S1611BK
SHADEBLACKW/SILVERINSIDE24"D
S1612WH SHADEWHITEW/SILVERINSIDE24"D
OVERALLHEIGHT
59”
INCLUDES
8”
20”
23.5”Dia.
REQ.
2
2
1
1
1
3
4
ITEMNUMBER
PCCS2824C
PCCS2824C1
PCCS2824C
PCCS2824C1
2014QuoizelInc.
Needassistancewithpartsorassembly?CallQuoizelcustomerserviceat1-631-273-2700
ThankyouforpurchasingaQuoizelproduct.
orvisituson-lineatwww.quoizel.com
3of3
April2014
 Loading...