

Page 1
6 CORPORATE PARKWAY
GOOSE CREEK SC 29445
www quoizel com
..
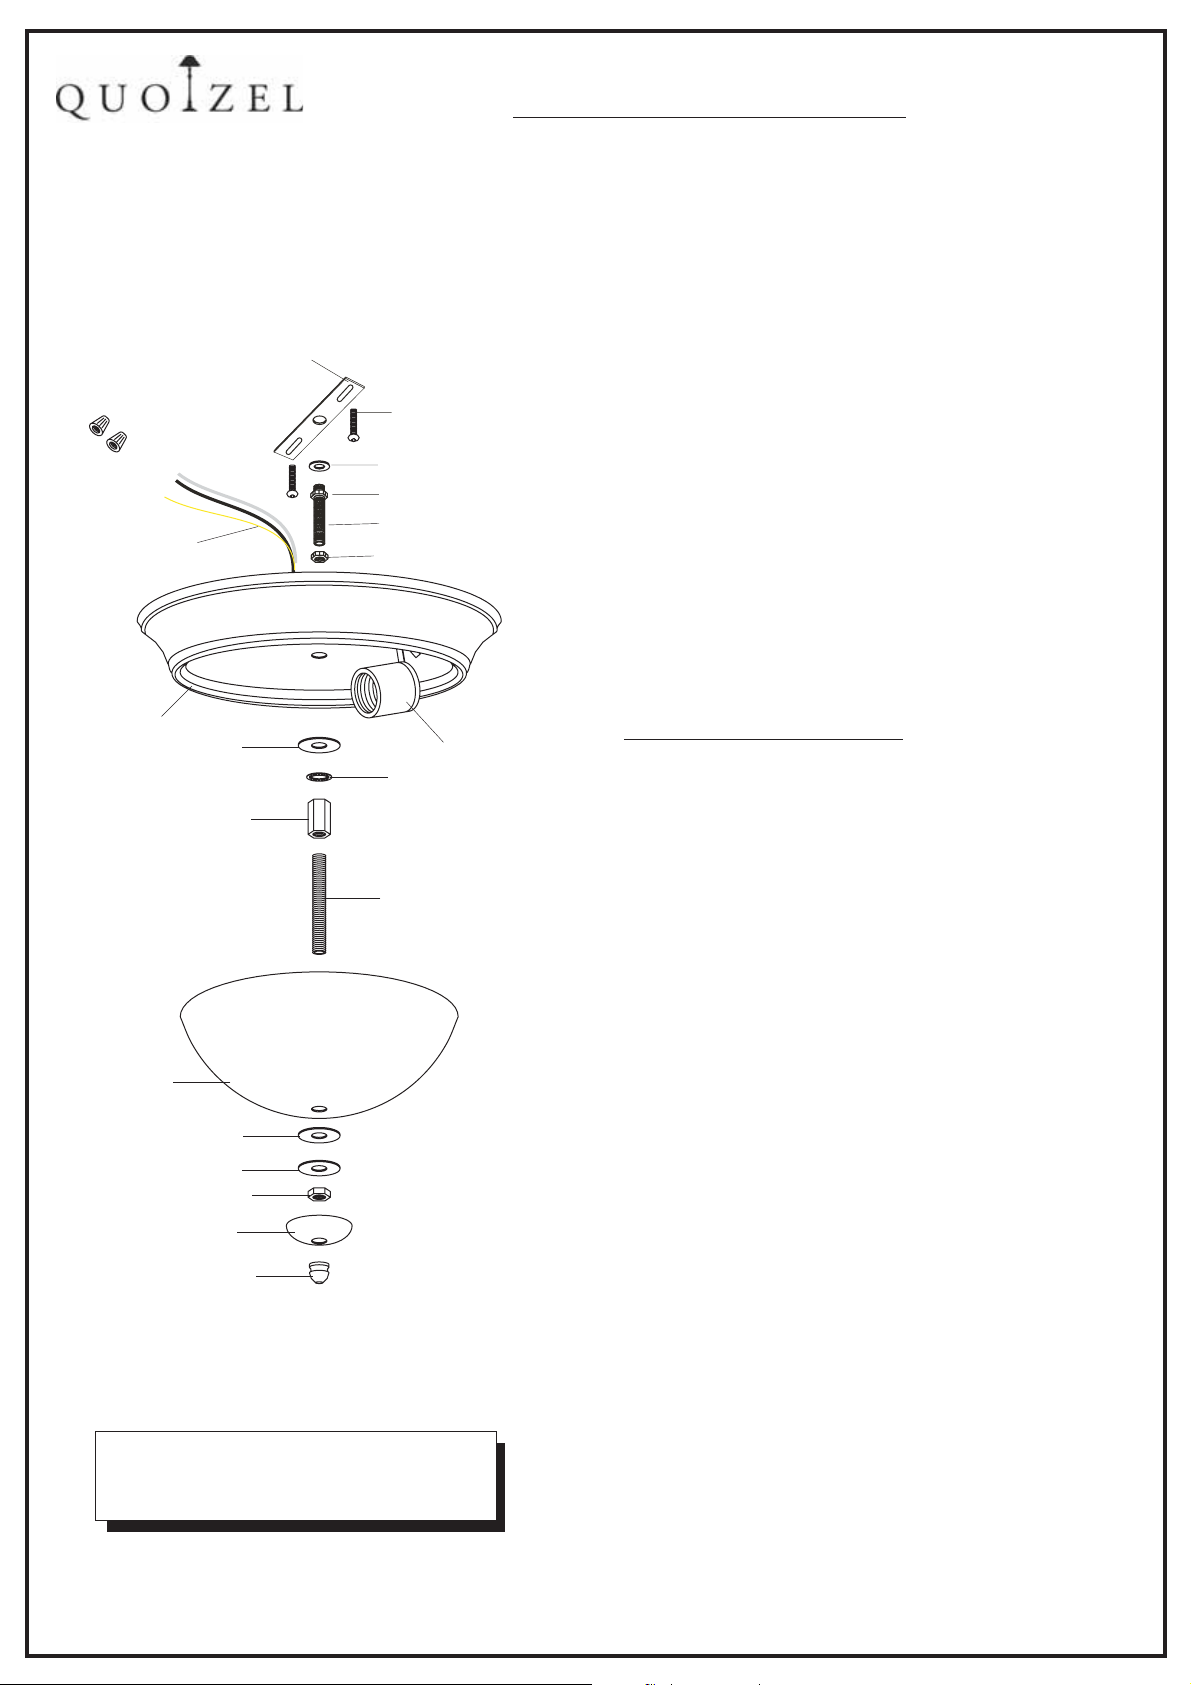
WIRE
CONNECTORS
not supplied()
SUPPLY WIRE and
GROUND WIRE
,.
CROSSBAR
INSTALLATION INSTRUCTIONS
()
2 OUTLET BOX
SCREWS not supplied
LOCK WASHER
HEX NUT
SHORT NIPPLE
HEXNUT
()
1 Before beginning the installation carefully unpack and
.
identify all parts referring to the illustration This instruction
sheet covers one, two and three light luminaries, even though
a one light is shown.
2 Turn power OFF to the installation point at circuit breaker.
.
3. Locate the CROSSBAR and attach it to the OUTLET BOX
using 2 OUTLET BOX SCREWS not supplied Locate
() ( ).
the shorter NIPPLE and thread one HEX NUT onto it about
half way. SlipaLOCKWASHER onto it and thread one end
of the short NIPPLE into the center hole of the CROSSBAR
Position the FIXTURE PAN over the outlet box, passing the
MOUNTING HOLE in the center of the FIXTURE PAN over
the end of NIPPLE AdjusttheNIPPLEso approx 3 8
inch of the NIPPLE is protruding from the MOUNTING
HOLE. This adjustment may take a few tries. When this
length is achieved, remove the FIXTURE PAN and tighten
the HEX NUT up against the underside of the CROSSBAR
with pliers. Next, thread another HEX NUT onto the other
end of the nipple. Thread this HEX NUT on just enough so
the inside surface of the pan rests against it. You may have
to trial fit the FIXTURE PAN one more time to insure this
distance also. This HEX NUT is needed here to prevent you
from crushing down the center of the FIXTURE PAN in Step 4.
,.
../"
,
.
FIXTURE PAN
FLATWASHER
HEX COUPLING
SHADE
PLASTIC WASHER
PLAIN WASHER
HEX NUT
CAP
FINIAL
LOCK WASHER
LONG NIPPLE
SEE NOTE
}
SOCKET
*
3
.
MAKING THE CONNECTIONS:
Position the FIXTURE PAN over the outlet box Using
wire connectors not supplied connect the HOUSE
GROUND WIRE to the FIXTURE GROUND WIRE
connect the HOUSE WHITE WIRE to the FIXTURE
SUPPLY WIRE WHITE SIDE connect the HOUSE
BLACK or RED WIRE to the FIXTURE SUPPLY WIRE
().
electrical tape and carefully stuff all of the connected wires
into the OUTLET BOX
4 Secure the FIXTURE PAN to ceiling by passing the
.
NIPPLE through the MOUNTING HOLE then slip on the
FLAT WASHER and the LOCK WASHER and then thread
the HEX COUPLING to the bottom end of the NIPPLE
Snug down assembly until the FIXTURE PAN is flush
against the ceiling Be sure that there are no trapped or
pinched wires along the edge of the pan. Next, thread the
longer NIPPLE into the HEX COUPLING for the SHADE
installationinStep6.
5 Install the correct bulb s referring to fixture markings
.
and or labels for the maximum wattage
6 Next, position the SHADE under the FIXTURE PAN and
.
align the center hole at the bottom of the SHADE with the
LONG NIPPLE. Pass the SHADE over the LONG NIPPLE
and secure the SHADE with the CAP/FINIALprovided.
Hand tighten CAP/FINIALuntilsnug.
()
BLACK SIDE Wrap each connection with approved
/.
()
();
.
,
.
()
.
;
.
IF IN DOUBT ABOUT ELECTRICAL
INSTALLATION, CONSULT A
LICENSED ELECTRICIAN!
IS-1621
2007-02-02
PLEASE NOTE: DEPENDING ON THE STYLE PURCHASED,
*
YOUR FIXTURE MAY OR MAY NOT HAVE THE SHADE
MOUNTING PARTS PICTURED. DUE TO THE NUMBER OF
STYLES AVAILABLE, THIS INSTRUCTION SHEETMAYSHOW
PARTS YOU MAY OR MAY NOTNEEDFORSHADE
SECUREMENT. SEE ILLUSTRATION TO JUSTIFY THE
PARTS YOU MAY HAVE IN YOUR PARTS BAG.
7 Restore power to the installation point ON Keep this
..
sheet for future reference
.
EXACT
 Loading...