

Page 1
6CORPORATEPARKWAY
GOOSECREEKSC29445
wwwquoizelcom
..
,.
AssemblyInstructionSheet#IS-MCLG337RC
ForStyleMCLG337RC
ToolsRequired:Flatheadscrewdriver,Phillipsscrewdriver,pliers,wirecutters,wire
Quoizel,Inc.
strippers,electricaltape,safetyglasses.
6CorporateParkway
GooseCreek,SC
29445
BulbRecommended: (3)MediumBase100WMaximum
EstimatedAssemblyTime: 20-30minutes
Preparation: Identifyandinspectallpartsbeforebeginninginstallation.Checkpackage
CustomerService
Phone631.273.2700
Fax631.231.7102
contentlistanddiagramsbelowtobesureallpartsarepresent.Ifanypartsaremissing
ordamaged,donotattempttoassemble,install,oroperatethefixture.Contactcustomer
serviceforreplacementparts.
www.quoizel.com
WarningsandCautions
Turnoffelectricityatcircuitbreakerormainfuseboxbeforeinstallation.Consultalicensedelectricianifindoubt.
Theseinstructionsareprovidedforyoursafety.Itisveryimportantyoureadthemcompletelybeforeinstalling
thefixture.Westronglyrecommendthatalicensed,professionalelectricianperformtheinstallation.
Disconnectfixturefrompowersourcebeforereplacingbulbs.Makesurebulbsaregivensufficienttimetocool
beforeremoval.Donotsubjectglasspartstoanyshockwhileinoperationorshatteringmayresult.
Needassistancewithpartsorassembly?CallQuoizelcustomerserviceat1-631-273-2700
2014QuoizelInc.
ThankyouforpurchasingaQuoizelproduct.
orvisituson-lineat www.quoizel.com
January2014
1of7
Page 2
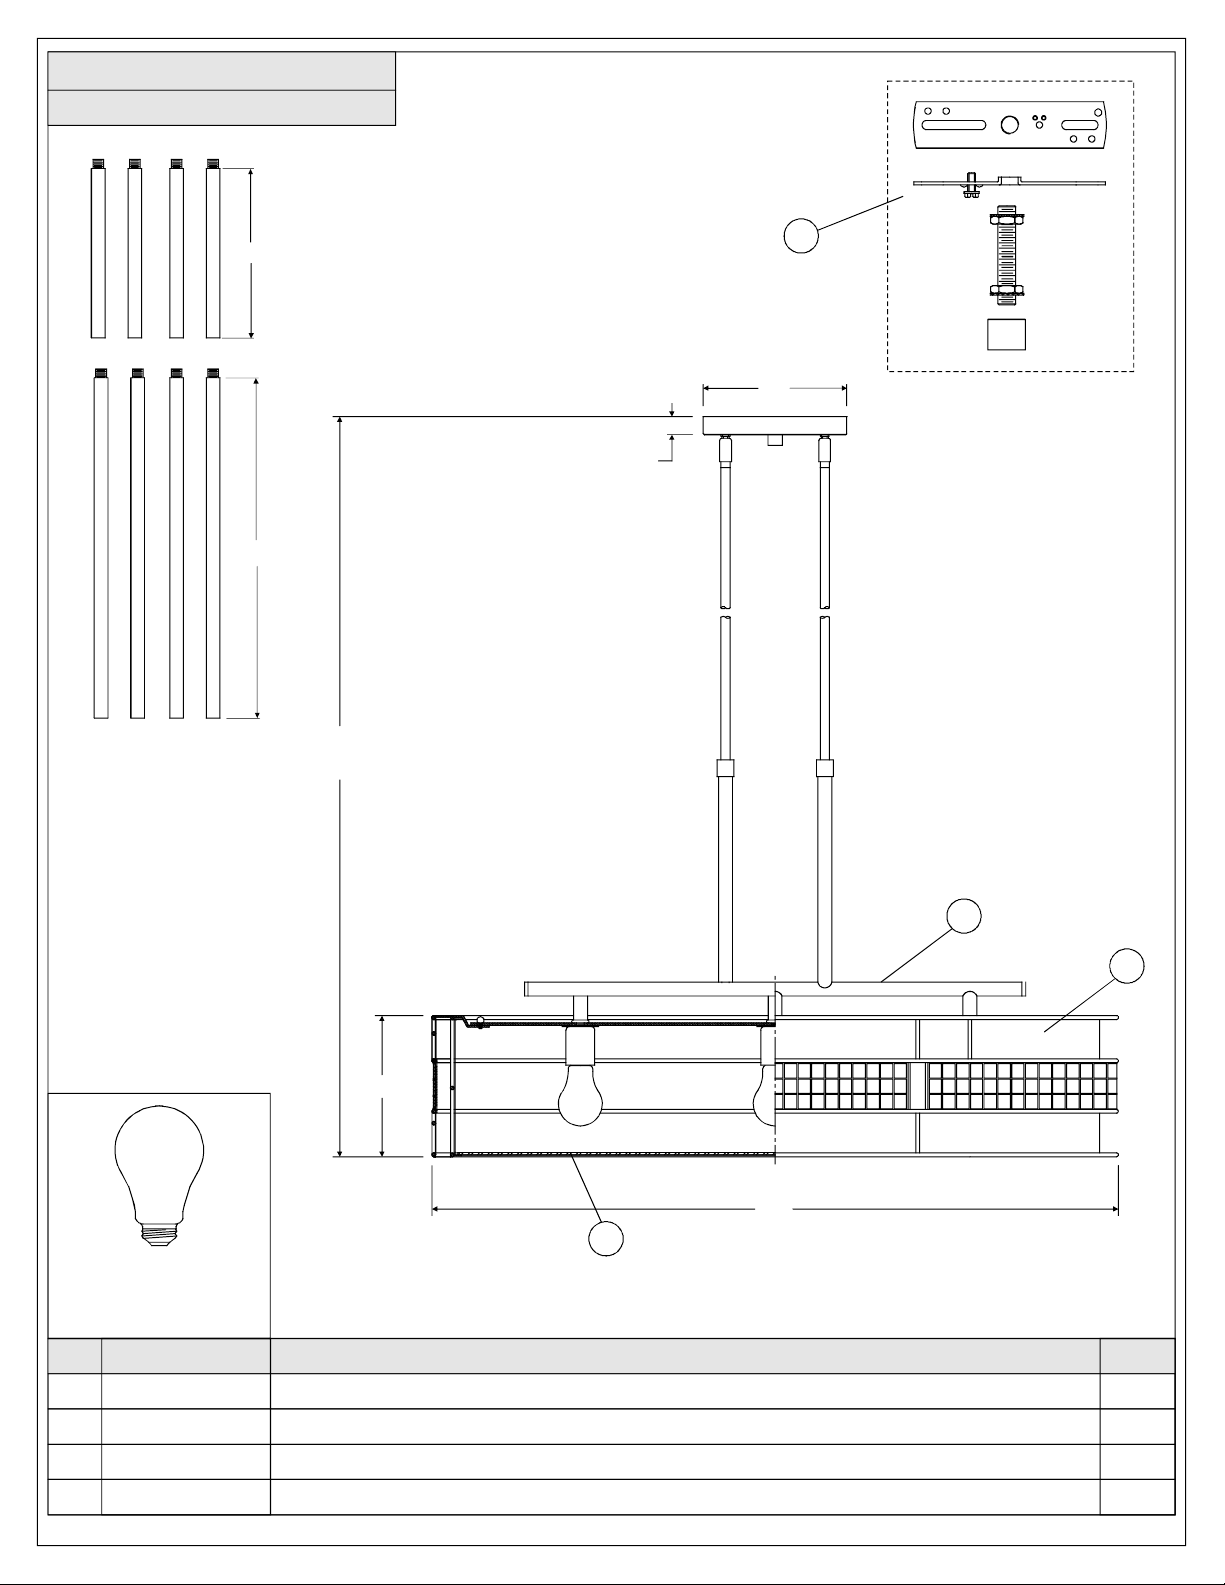
MCLG337RC
FINISH:RENAISSANCECOPPER
QUOIZEL
GND
R
6”
12”
OverallHeight60.5"
include(4)6” and(4)12” Rods
3
8”
1”
(3)100WMedium
BaseBulbs
(NotSupplied)
PARTNUMBER
NO.
1337RCMCLG
1
2
3
4
G3289DI
9551KIT
S1368MC
7.5”
37”
2
NOTE:ALLDIMENSIONSAREROUNDEDUPTOTHENEAREST1/2"
REPLACEMENTPARTDESCRIPTION
BASEMCLG337RC
DIFFUSER
MOUNTINGHARDWARERENAISSANCECOPPER4”D
SHADEMICA
2of7
1
4
REQ.
1
1
1
1
Page 3
6CORPORATEPARKWAY
GOOSECREEKSC29445
wwwquoizelcom
..
,.
AssemblyInstructionSheet#IS-MCLG337RC
ForStyleMCLG337RC
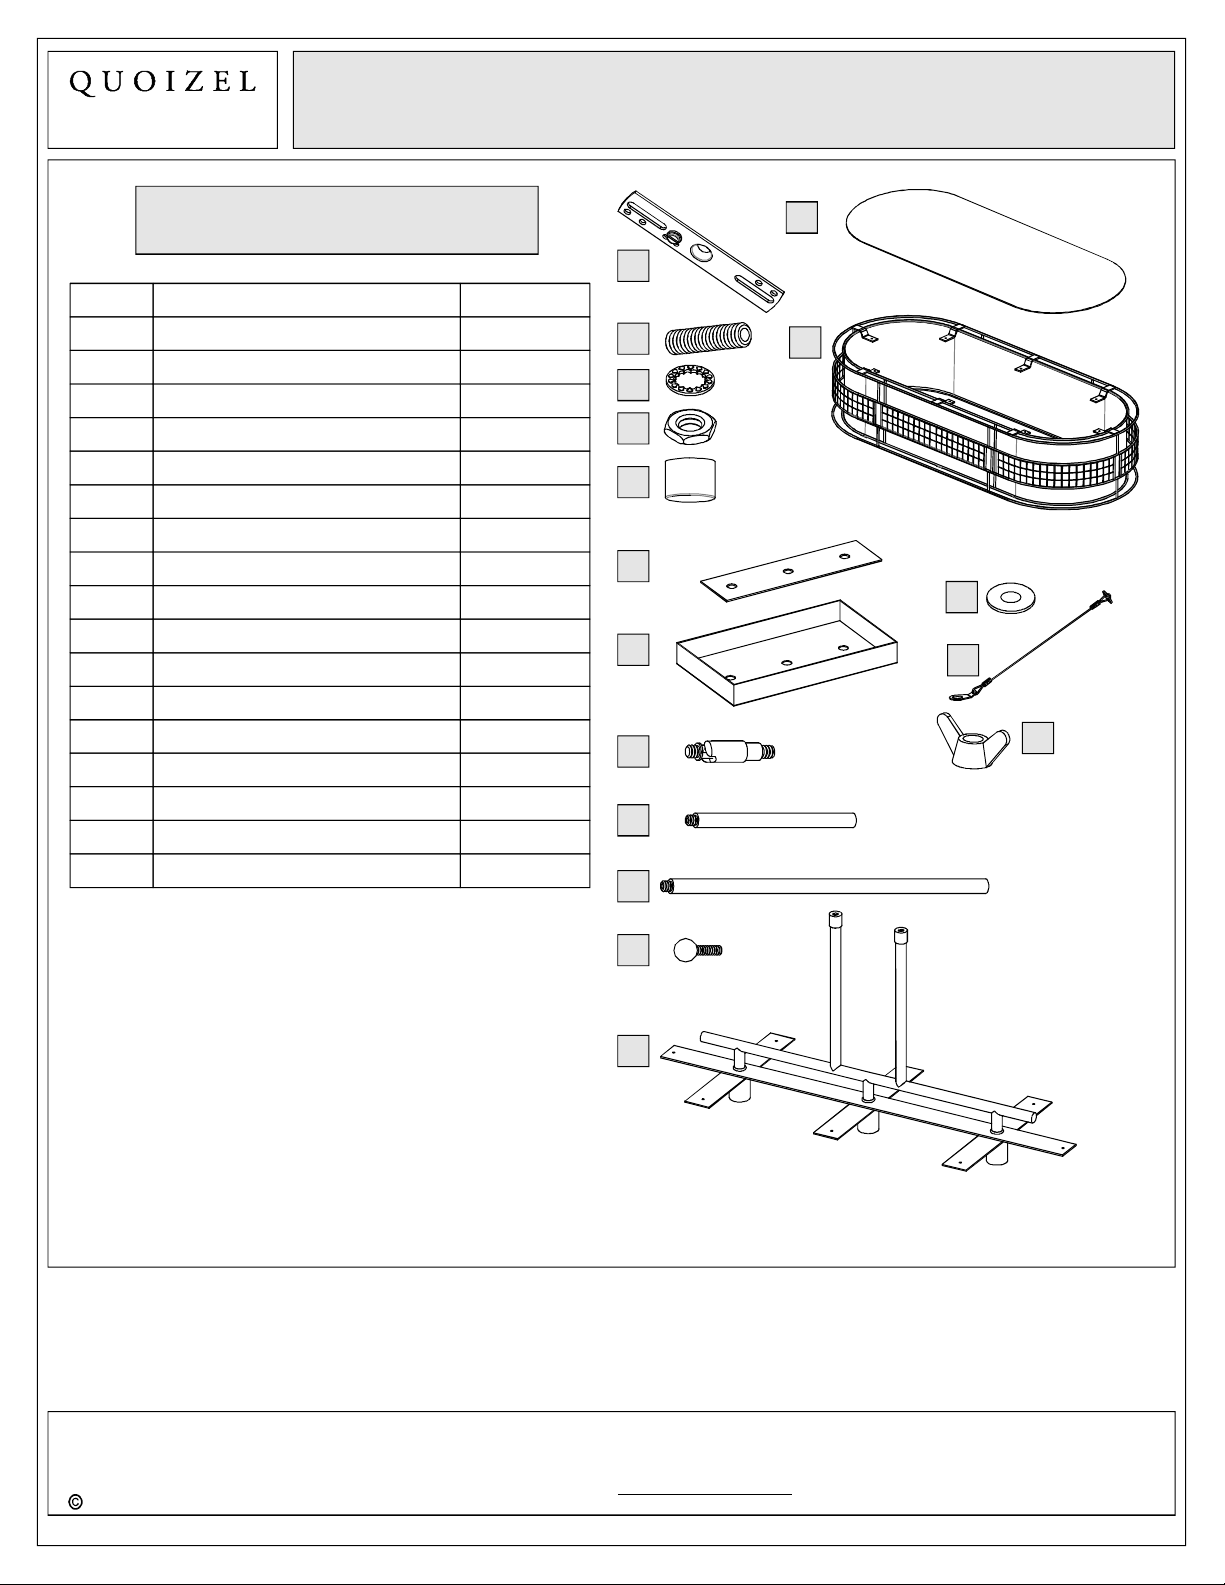
PackageContents
Part Description
A Crossbar
B
C
D
E
F
G
H
J
K
L
M
N
O
P
Q
Nipple
LockWasher
HexNut
LockBall
ReinforcedPlate
CeilingCanopy
Swivel
I
6” Rod
12” Rod
LockScrew
SocketAssembly
Diffuser
Shade
FlatWasher
Lanyard
WingNut
Quantity
1pc.
1pc.
2pcs.
2pcs.
1pc.
1pc.
1pc.
2pcs.
4pcs.
4pcs.
8pcs.
1pc.
1pc.
1pc.
3pcs.
1pc.
2pcs.
A
B
C
D
E
F
G
H
J
M
N
O
P
Q
I
Needassistancewithpartsorassembly?CallQuoizelcustomerserviceat1-631-273-2700
2014QuoizelInc.
K
L
ThankyouforpurchasingaQuoizelproduct.
orvisituson-lineat www.quoizel.com
January2014
3of7
Page 4

6CORPORATEPARKWAY
GOOSECREEKSC29445
wwwquoizelcom
..
,.
AssemblyInstructionSheet#IS-MCLG337RC
ForStyleMCLG337RC
STEP1AssembleRods-
A.DeterminetheRods(I/J)tobeassembledtotheSocket
Assembly(L)accordingtoyourhangingheight.
C.PassSupplyWiresthroughthechosenRods(I/J)andthen
threadthechosenRods(I/J)andtheSocketAssembly(L)
together.Handtightenuntilsnug.
Figure1
6” Rod
6” Rod
12” Rod
12” Rod
SupplyWire
Socket
Assembly
STEP2AttachCeilingCanopytoRods-
A.PassthesupplywiresthrougtheSwivel(H),theCeiling
Canopy(G),theReinforcedPlate(F),oneFlatWasher(O)
andoneWingNut(Q)inturn.
B.ThreadtheSwivels(H)intothetopendsoftheUpper
Rods.Handtightenuntilsnug.
C.PlacetheCeilingCanopy(G),theReinforcedPlate(F),t
Lanyard(P)theFlatWashers(O)
theSwivels(H)asshown.SecurebythreadingheWing
Nuts(D)ontoSwivels(H).Handtightenuntilsnug.
andoverthenippleon
t
he
HexNut
FlatWasher
Lanyard
Figure2
Reinforced
Plate
Ceiling
Canopy
Swivel
UpperRod
Needassistancewithpartsorassembly?CallQuoizelcustomerserviceat1-631-273-2700
2014QuoizelInc.
ThankyouforpurchasingaQuoizelproduct.
orvisituson-lineat www.quoizel.com
January2014
4of7
Page 5

6CORPORATEPARKWAY
GOOSECREEKSC29445
wwwquoizelcom
..
,.
AssemblyInstructionSheet#IS-MCLG337RC
ForStyleMCLG337RC
STEP3AssembleShadeandDiffuser-
A.LocatetheShade(N)ontoaflatworkingsurface.Place
theDiffuser(M)insideoftheShade(N),sitontothelip
oftheshadeframeforsupports.
B.PlacetheSocketAssembly(L)ontotheShade(N).
MatchholesontheBarsandmountingholesonthe
Tabs.SecuretheSocketAssembly(L)andtheShade
(N)togetherwithLockScrews(K).Handtightenuntil
snug.
Frame
Shade
Bar
Figure3
LockScrew
SocketAssembly
Diffuser
Tab
STEP4- AttachCrossbartoOutletBox
A.SecuretheCrossbar(A)totheoutletboxwithoutlet
boxscrews(notsupplied).Tightenuntilsnug.
STEP5AttachNippletoCrossbar-
A.ThreadoneHexNut(D)ontothetopendoftheNipple
(B).
B.PlaceoneLockWasher(C)overthetopendofthe
Nipple(B)andthenthreadtheNipple(B)intothecenter
lockholeoftheCrossbar(A).
C.Usingpliers,threadtheHexNut(D)againstthe
Crossbar(A)andhandtightenuntilsnug.
Figure4
Mounting
Hole
Figure5
OutletBox
Crossbar
OutletBox
Screw(not
Supplied)
Crossbar
LockWasher
HexNut
Nipple
Needassistancewithpartsorassembly?CallQuoizelcustomerserviceat1-631-273-2700
2014QuoizelInc.
ThankyouforpurchasingaQuoizelproduct.
orvisituson-lineat www.quoizel.com
January2014
5of7
Page 6

6CORPORATEPARKWAY
GOOSECREEKSC29445
wwwquoizelcom
..
,.
AssemblyInstructionSheet#IS-MCLG337RC
ForStyleMCLG337RC
STEP6AttachLanyard-
A.Thepurposeofthelanyardistoprovidetheinstallera
meanstosupportthefixturefromthejunctionboxwhile
connectingtheelectricalwires.Thisenablesthefixture
tohangfromthejunctionboxandyourhandsarefreeto
makethewireconnections.
B.TurntheButtonStopsoitmaybeinsertedintothe
crossbarslot.MakesuretheButtonStopiscompletely
insidethecrossbar.Slowlyreleasethefixturetomake
sureitissupportedbytheButtonStop.Proceedtothe
wiringsteps.Onceyouarecompletewiththewiring
thereisnothingtodowithLanyard.TheLanyardwill
pushintothejunctionboxwhenthefixtureisplacedfor
finalmounting.
Crossbar
Slot
ButtonStop
Lanyard
Figure6
STEP7MakeWireConnections-
A.Usestandardwireconnectorstomakeallwire
connections.(Connectorsarenotincludedwithfixture.)
Stripandpreparewireendsaccordingtoinstructions
suppliedwithconnectors.
B.ConnectWhiteSupplyWirefromtheOutletBoxtoWhite
Wirefromfixture.
C.ConnectBlack(orRed)SupplyWirefromtheOutletBox
toBlackWirefromfixture.
D.ConnectGroundWirefromtheOutletBoxtoGround
Wirefromfixture.
E.Twistconnectorsuntilwiresaretightlyjoinedtogether.
F.Wrapeachconnectionwithapprovedelectricaltapeand
carefullystuffalltheconnectedwiresintotheOutletBox.
Whitewirefromsupply Whitewirefromfixture
Blackwirefromsupply
(orRed)
Blackwirefromfixture
Figure7
Groundwirefromsupply Groundwirefromfixture
Figure8
ThankyouforpurchasingaQuoizelproduct.
Needassistancewithpartsorassembly?CallQuoizelcustomerserviceat1-631-273-2700
2014QuoizelInc.
orvisituson-lineat www.quoizel.com
6of7
January2014
Page 7

6CORPORATEPARKWAY
GOOSECREEKSC29445
wwwquoizelcom
..
,.
AssemblyInstructionSheet#IS-MCLG337RC
ForStyleMCLG337RC
STEP8InstallCeilingCanopy-
A.AttachtheCeilingCanopy(G)andtheLockWasher(C)
overtheendoftheNipple(B)andsecurewiththeHex
Nut(D).Handtightenuntilsnug.
B.ThreadtheLockBall(E)ontotheendoftheNippleand
handtightenuntilsnug.
STEP9InstallBulb-
A.Thisfixtureusesstandardbulbwithastandardscrew
base.Maximum100watts.
B.Insertbulbandscrewproperlyintoplace.
Socket
Bulb
Lock
Washer
Nipple
Hex
Nut
LockBall
Figure9
Crossbar
Ceiling
Canopy
Figure10
Yourfixtureisnowassembledandreadytouse.Enjoy!
Needassistancewithpartsorassembly?CallQuoizelcustomerserviceat1-631-273-2700
2014QuoizelInc.
ThankyouforpurchasingaQuoizelproduct.
orvisituson-lineat www.quoizel.com
January2014
7of7
 Loading...