

Quoizel LWS3565A Installation Instruction
124
2016 QuoizelInc.
Model#
LWS3565A
Item# 0809787
1
Español p. 13
Français p. 7
Warnings And Cautions
Tools Required
Helpful tools
Bulb Recommended:
Estimated Assembly Time
Preparation
Quoizel Customer Service
(not included): Flathead screwdriver, Phillips screwdriver, Pliers, Wire
cutters, Electrical tape, Safety goggles, Ladder
: Wire Strippers
(4) 100W Type-A medium base bulbs,Alternate (4) LED bulbs.
: 30 - 60 minutes
:
Identify and inspect all parts before beginning installation
Check package contents list and diagrams below to be sure all parts are included.
If any parts are missing or damaged, do not attempt to assemble, install or operate
the fixture.
Contact for replacement parts.
·
·
·
·
·
·
·
Turn off electricity at circuit breaker or main fuse box before installation. Consult a licensed electrician if in
doubt.
These instructions are provided for your safety. It is very important you read them completely before installing
fixture. We strongly recommend that a licensed, professional electrician perform the installation.
Disconnect fixture from power source before replacing bulbs.
- Make sure bulbs are given sufficient time to cool before removal.
- Do not subject glass parts to any shock while in operation or shattering may result.
6 Corporate Parkway
Goose Creek
SC 29445
Customer Service
Toll Free Phone
E-mail
:
1-844-564-3055
:
cs@quoizel.com
For the quickest
response, please visit
and
click on .
Quoizel.com
Contact Us
Thankyou for purchasing aQuoizel product.
Needassistance with parts orassembly?
CallQuoizel Customer Service tollfree at 1-844-564-3055;
send us an email atcs@quoizel.com or visitus online atwww.quoizel.com
10.1.2016
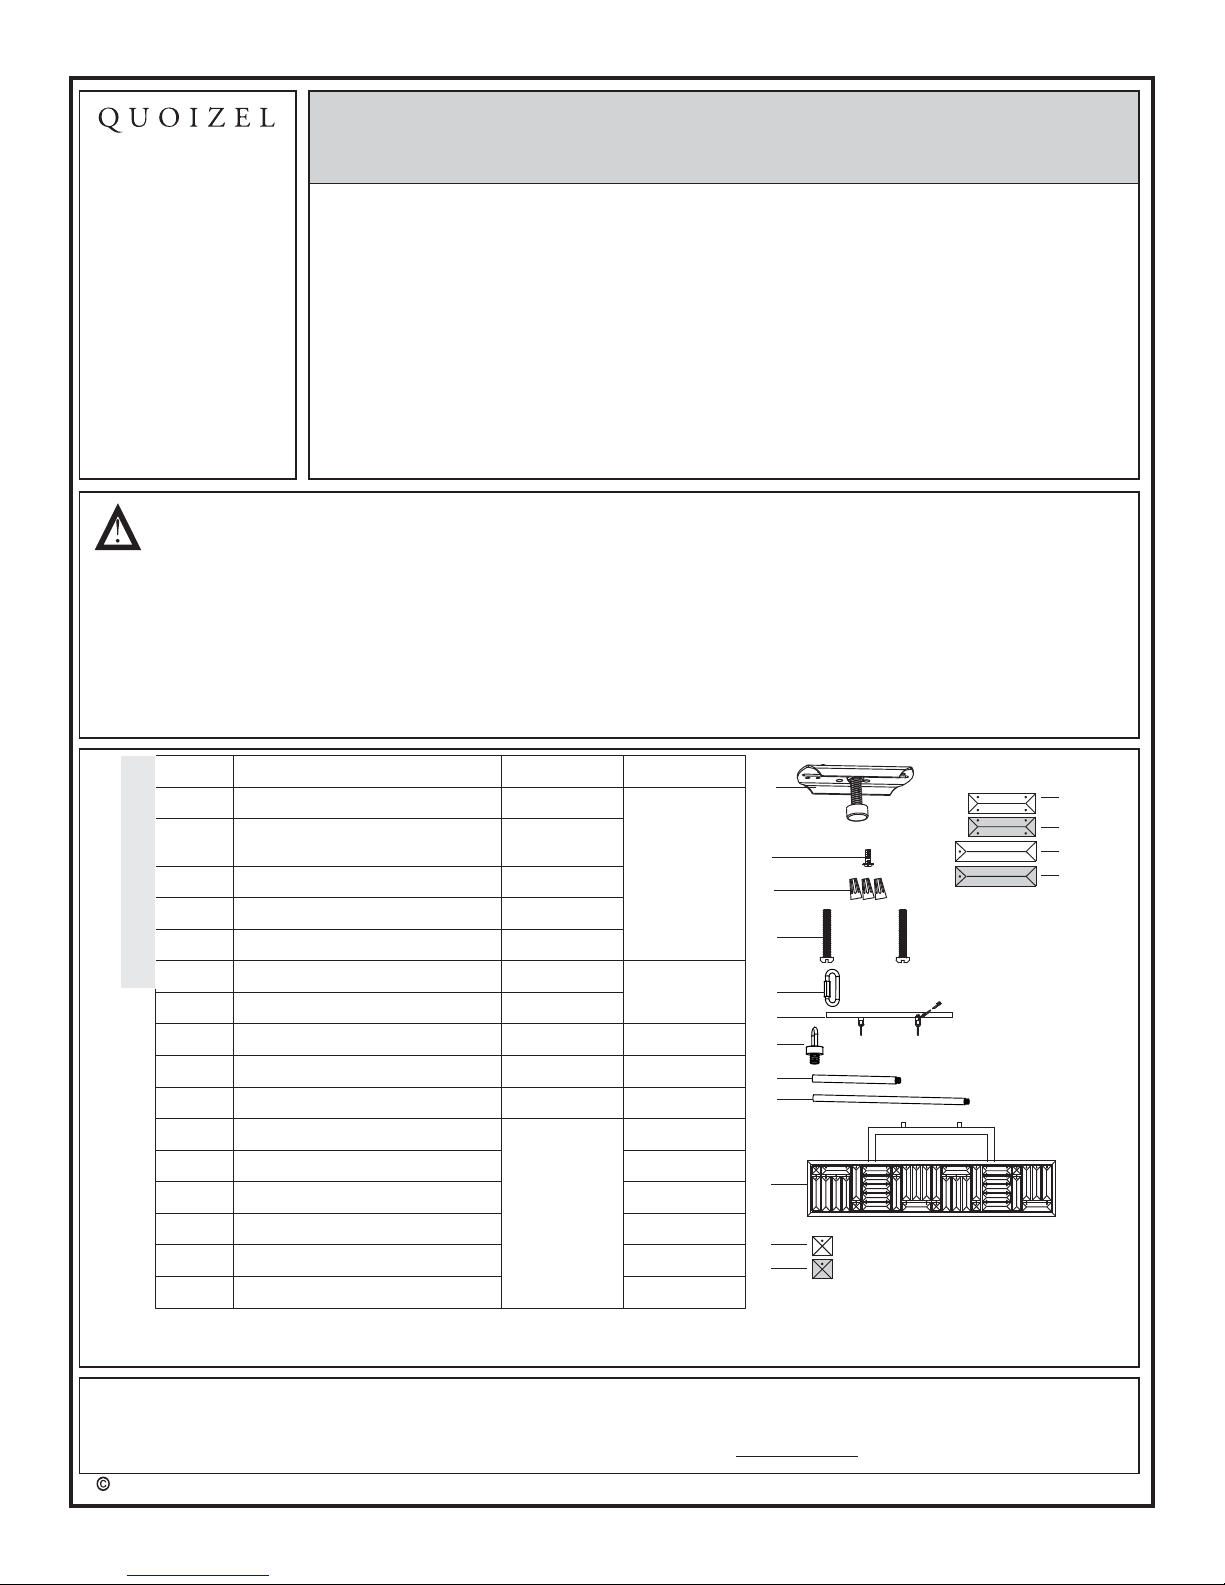
4pcs
8pcs
1pc
Ceiling Canopy
F
G
H
J
I
Fixture Loop
1pc
Fixture
12” Rod
6” Rod
PART
DESCRIPTION
QUANTITY
A Crossbar Assembly
1pc
1pc
3pcs
2pcs
Green Ground Screw
()Pre-assembled to Crossbar
Wire Connector
Outlet Box Screw
Quick Link
B
C
D
E
2pcs
2pcs
Package Contents
Stock Part#
913014KIT
N/A
A
B
C
D
E
F
G
H
I
N/A
J
9012EXS25
K
K
9006EXS25
L
M
N
O
P
L
Clear crystal
G13015CR
M
Amber crystal
G13144CR
N
Short Clear crystal
G13016CR
O
Short amber crystal
G13145CR
P
G13017CR
G13146CR
Long Clear crystal
Long amber crystal
(1pc spare part
provided)
:
Pre-assembled
to shade
Note
NOTE: ALLDIMENSIONS ARE ROUNDED UP TO THE NEAREST 1/2"
2
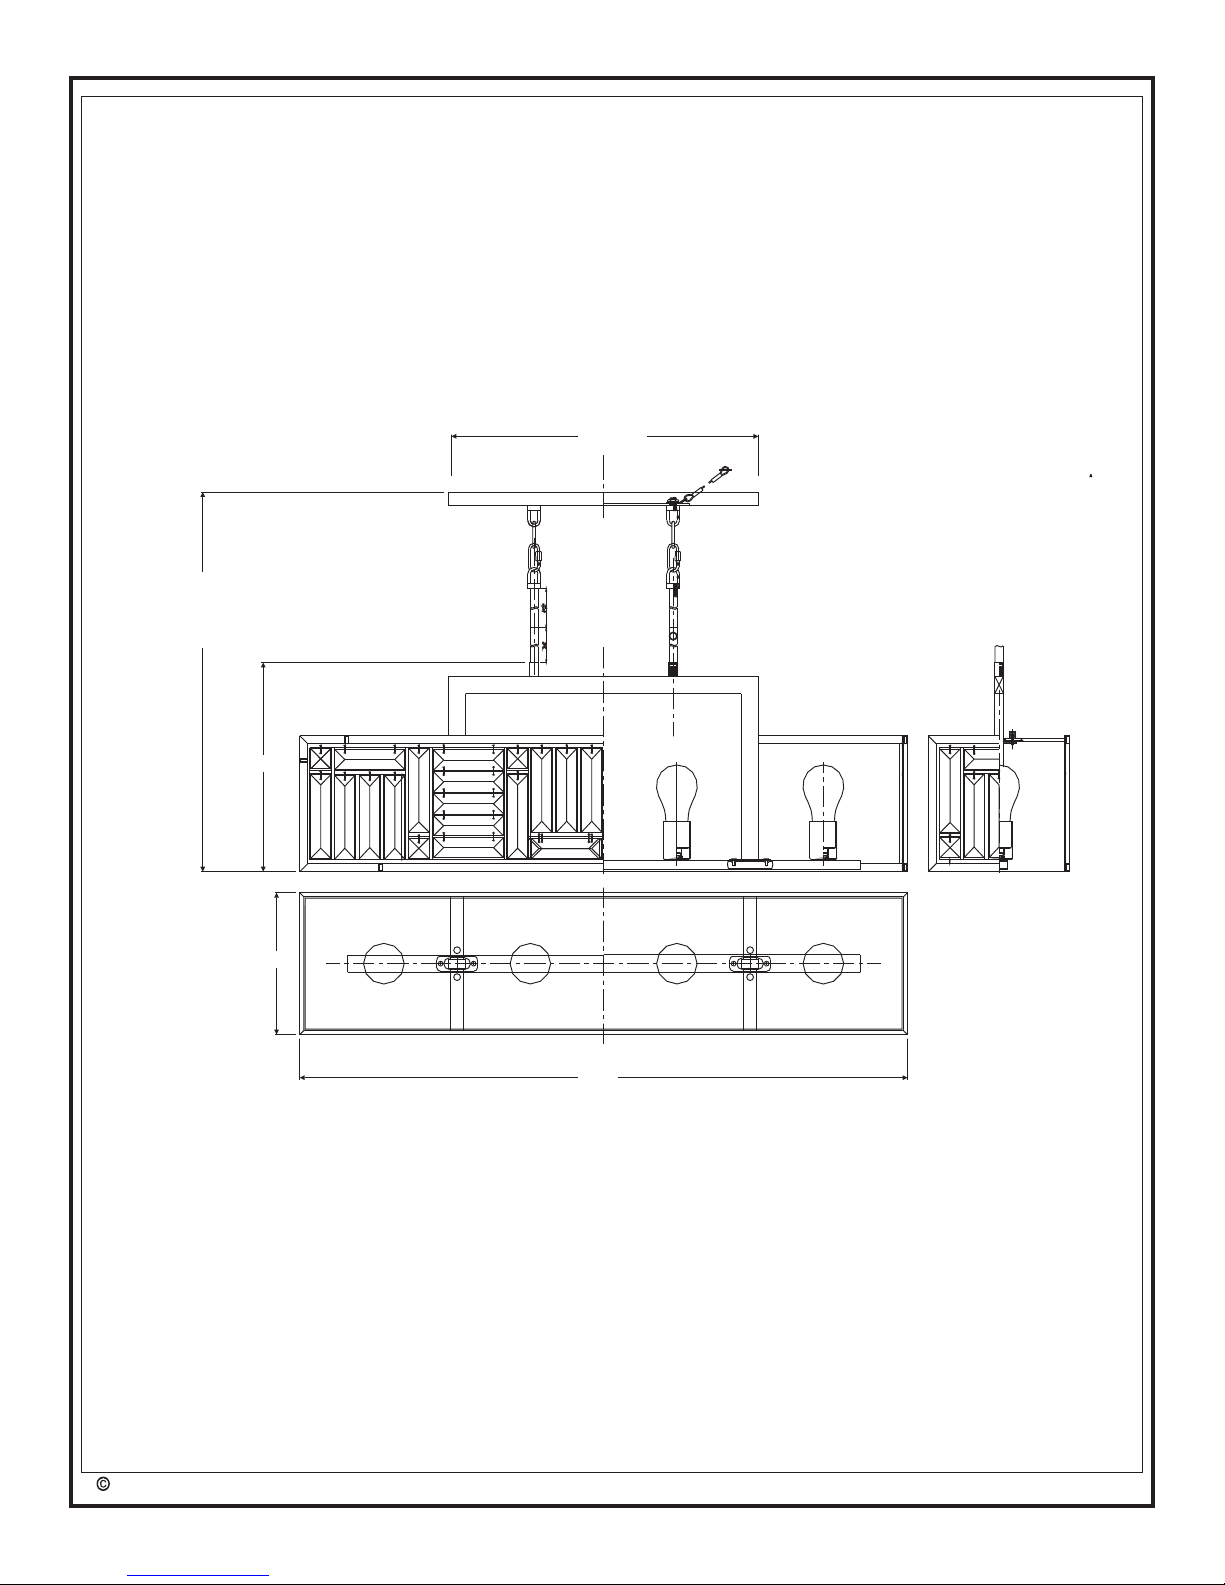
2016 QuoizelInc.
8.25”
124
6,5
35.25”
12.25”
74.75”
OVERALL HEIGHT INCLUDES
(4) 6” AND (8) 12” RODS
18” x 4.5”
3
2016 QuoizelInc.
Crossbar Assembly
Outlet Box Screw
Outlet Box
6” Rod
12” Rod
Fixture
Fixture Loop
Rod
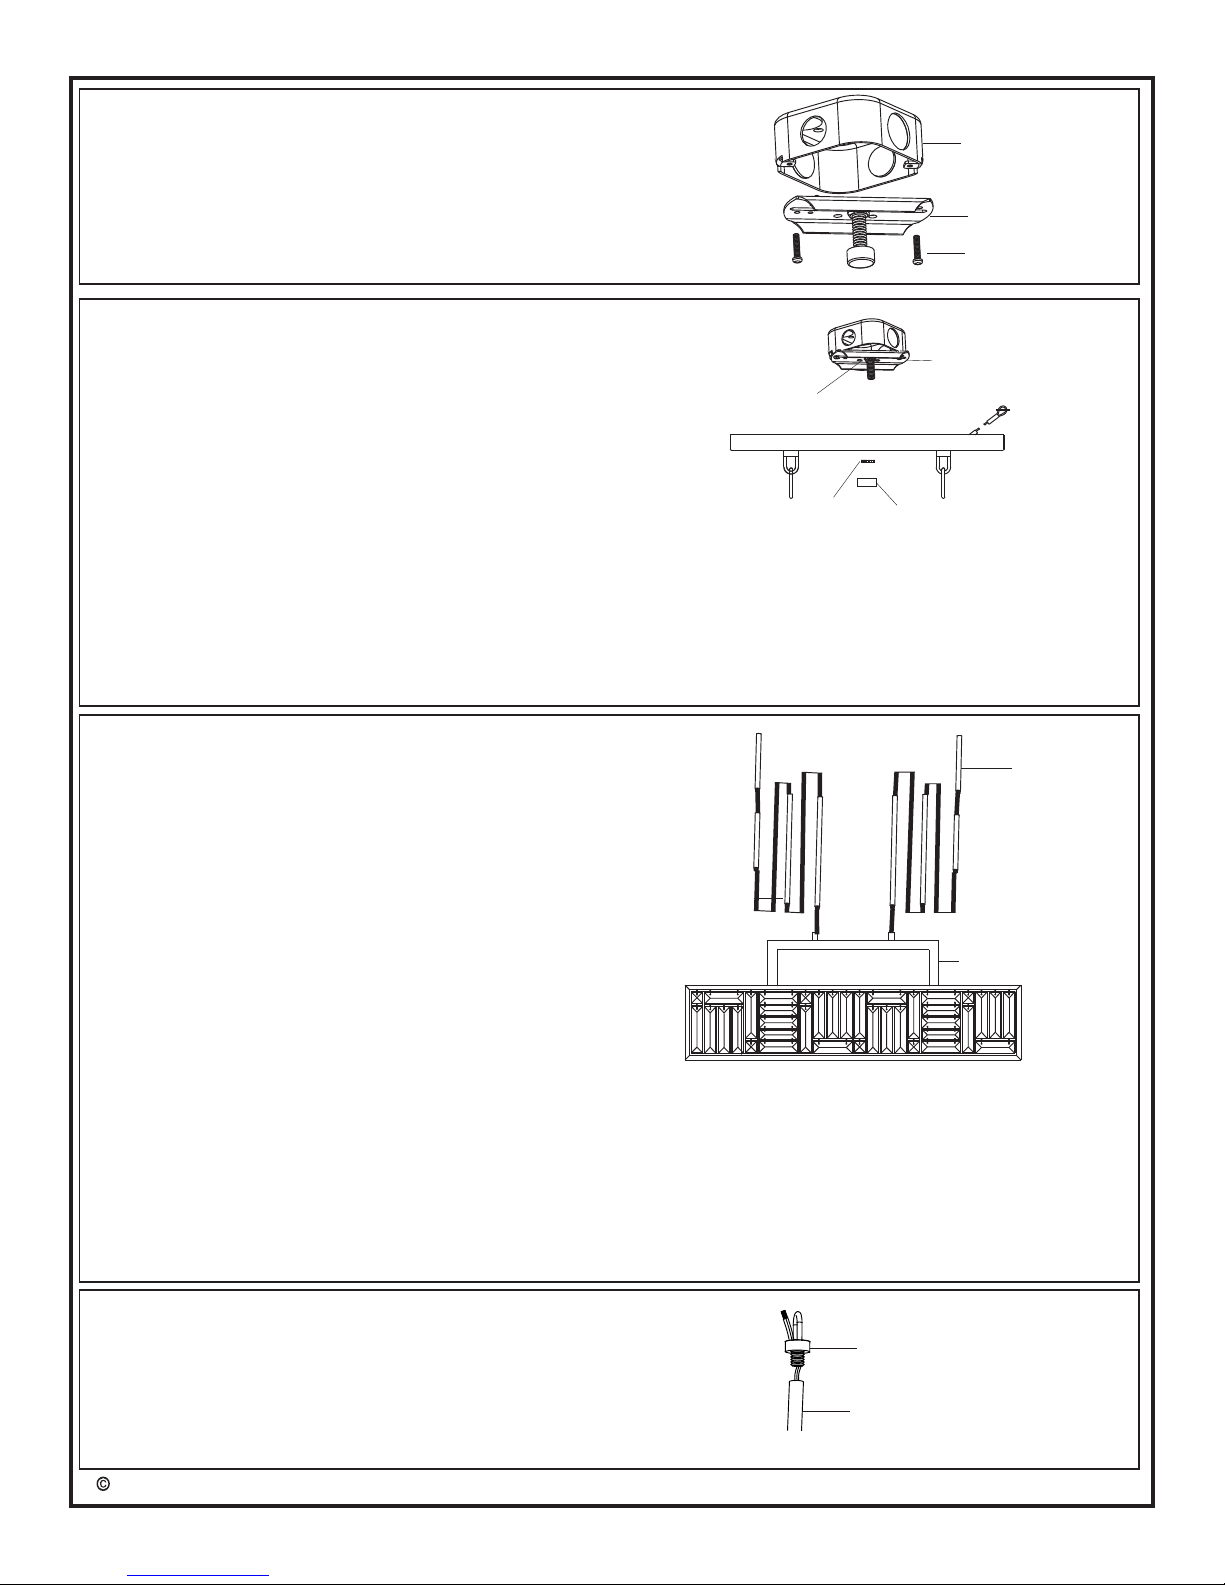
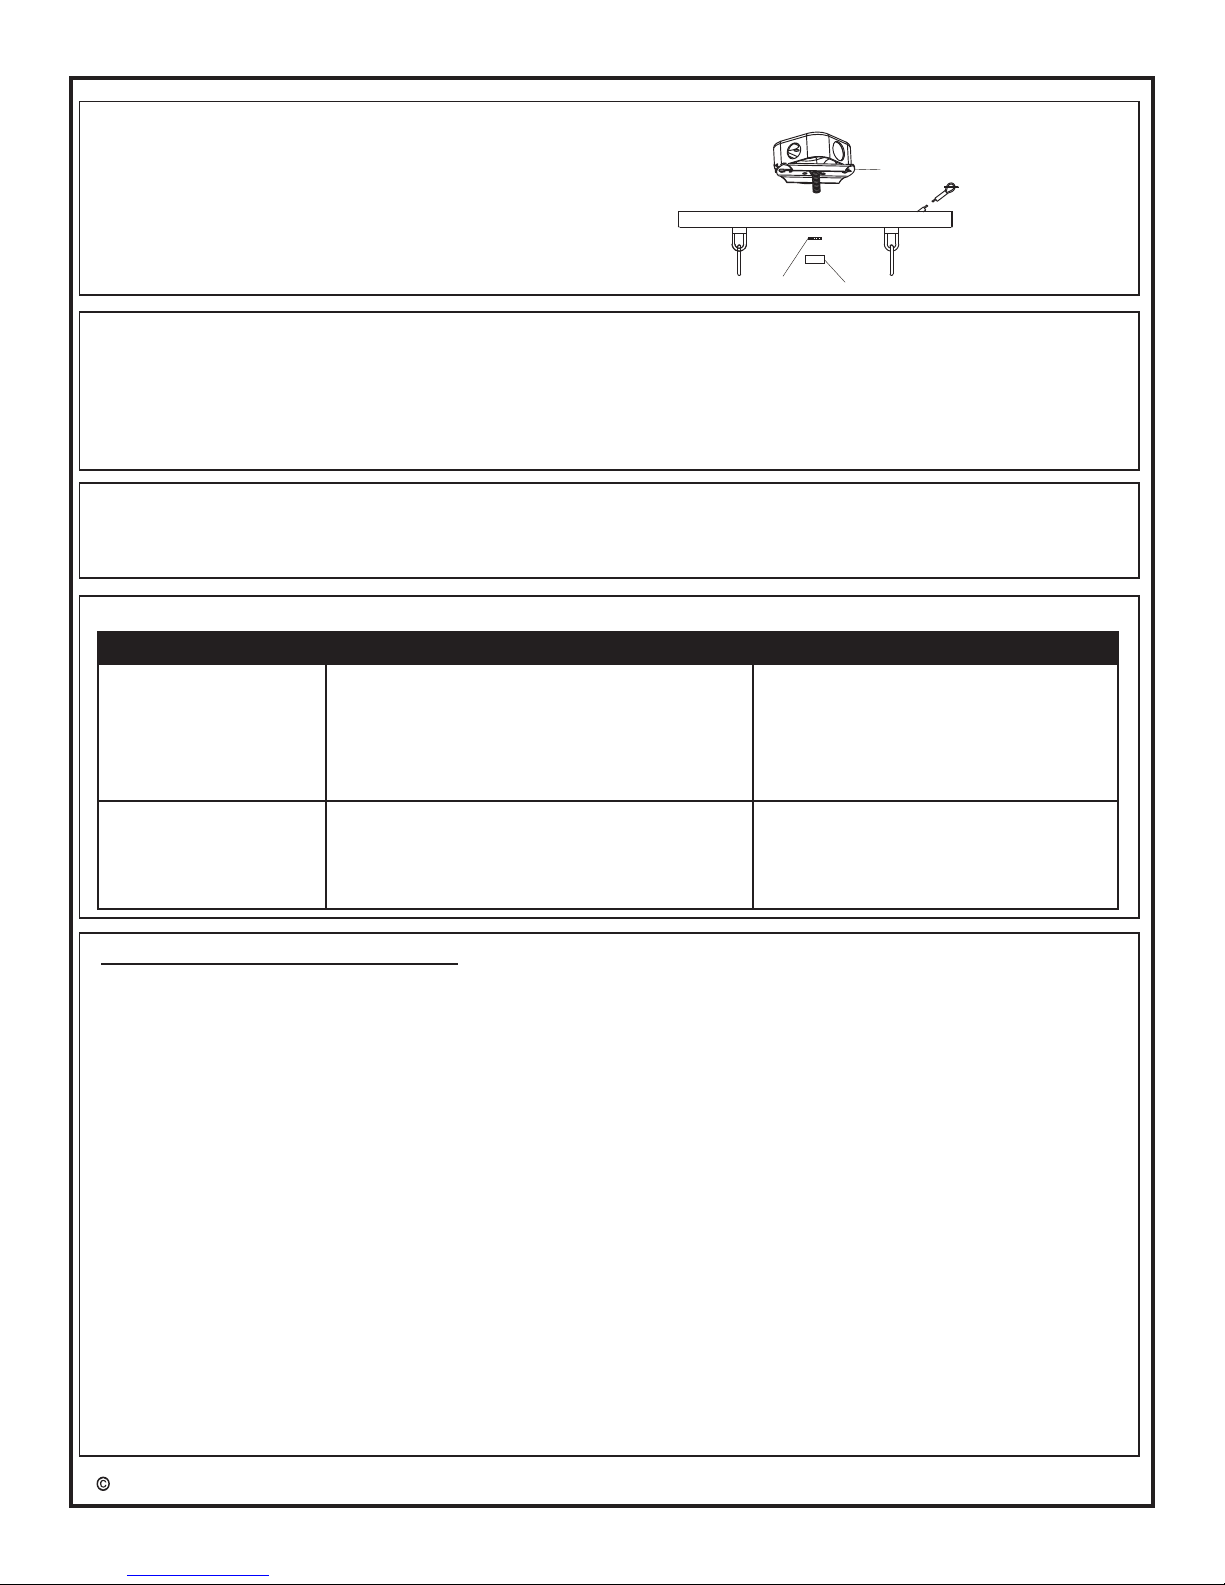
STEP 1:
a. Secure the crossbar to the outlet box (not included) with
outlet box screws.
b. Tighten until snug.
: The preassembled mounting nipple on the
crossbar should protrude outward.
Note
STEP 3:
a. Choose desired hanging length for the light fixture.
Suggested mounting height over a table or island is 30
inches from the table/island top to the bottom of the
fixture.
b. Assemble the necessary rods using the 6 inch rod(s)
and/or 12 inch rod(s).
c. Pass supply wires and ground wires through the rod
assembly.
d. Attach the rod assembly to fixture.
e. Hand- tighten until snug.
- Assemble one rod at a time.
- Pass the ground wire through the rod first.
- Then, pass the supply wire through the rod.
- Thread the rod by hand until snug.
Suggested rod length to hang fixture 30 inches above
table top:
- 8 ft. ceiling (2) 12 inch rods + (2) 6 inch rods
- 9 ft. ceiling (4) 12 inch rods + (2) 6 inch rods
- 10 ft. ceiling (6) 12 inch rods + (2) 6 inch rods
: If mounting over an Island, subtract 6 inches
from the lengths listed above.
Note
STEP 2:
a. Remove lock ball and from crossbar
assembly.
b. Fit ceiling canopy over the nipple on crossbar assembly
and secure with lock ball.
: The ceiling canopy should be snug against the
ceiling and the lock ball.
If not, adjust the length of the nipple on the crossbar
assembly by unscrewing the preassembled hex nut.
Then, screw the nipple in or out of the crossbar until
the desired length is achieved.
Once the ceiling canopy is secure, remove the lock ball
and ceiling canopy and proceed to Step 3.
Note
?
?
?
kunrled nut
lock ball
Kunrled Nut
Crossbar Assembly
Hex Nut and
Lock Washer
STEP 4:
a. Pass supply wires and ground wire through the fixture
loop.
b. Thread the fixture loops to the end of each rod.
c. Hand- tighten until snug.
124
STEP 6:
a. The lanyard is provided as a means to support the
fixture from the junction box while connecting the
electrical wires. This enables the fixture to hang from
the junction box and your hands are free to make the
wire connections.
b. Turn the button stop so it may be inserted into the
crossbar slot. Make sure the button stop is completely
inside the crossbar.
c. Slowly release the fixture to make sure it is supported
by the button stop.
Crossbar Assembly
Button Stop
Lanyard
Slot
Fixture Loop
STEP 5:
a. Connect the fixture loops to the chain links on the
underside of the ceiling canopy by using quick links.
Quick Link
Chian Links
4
2016 QuoizelInc.
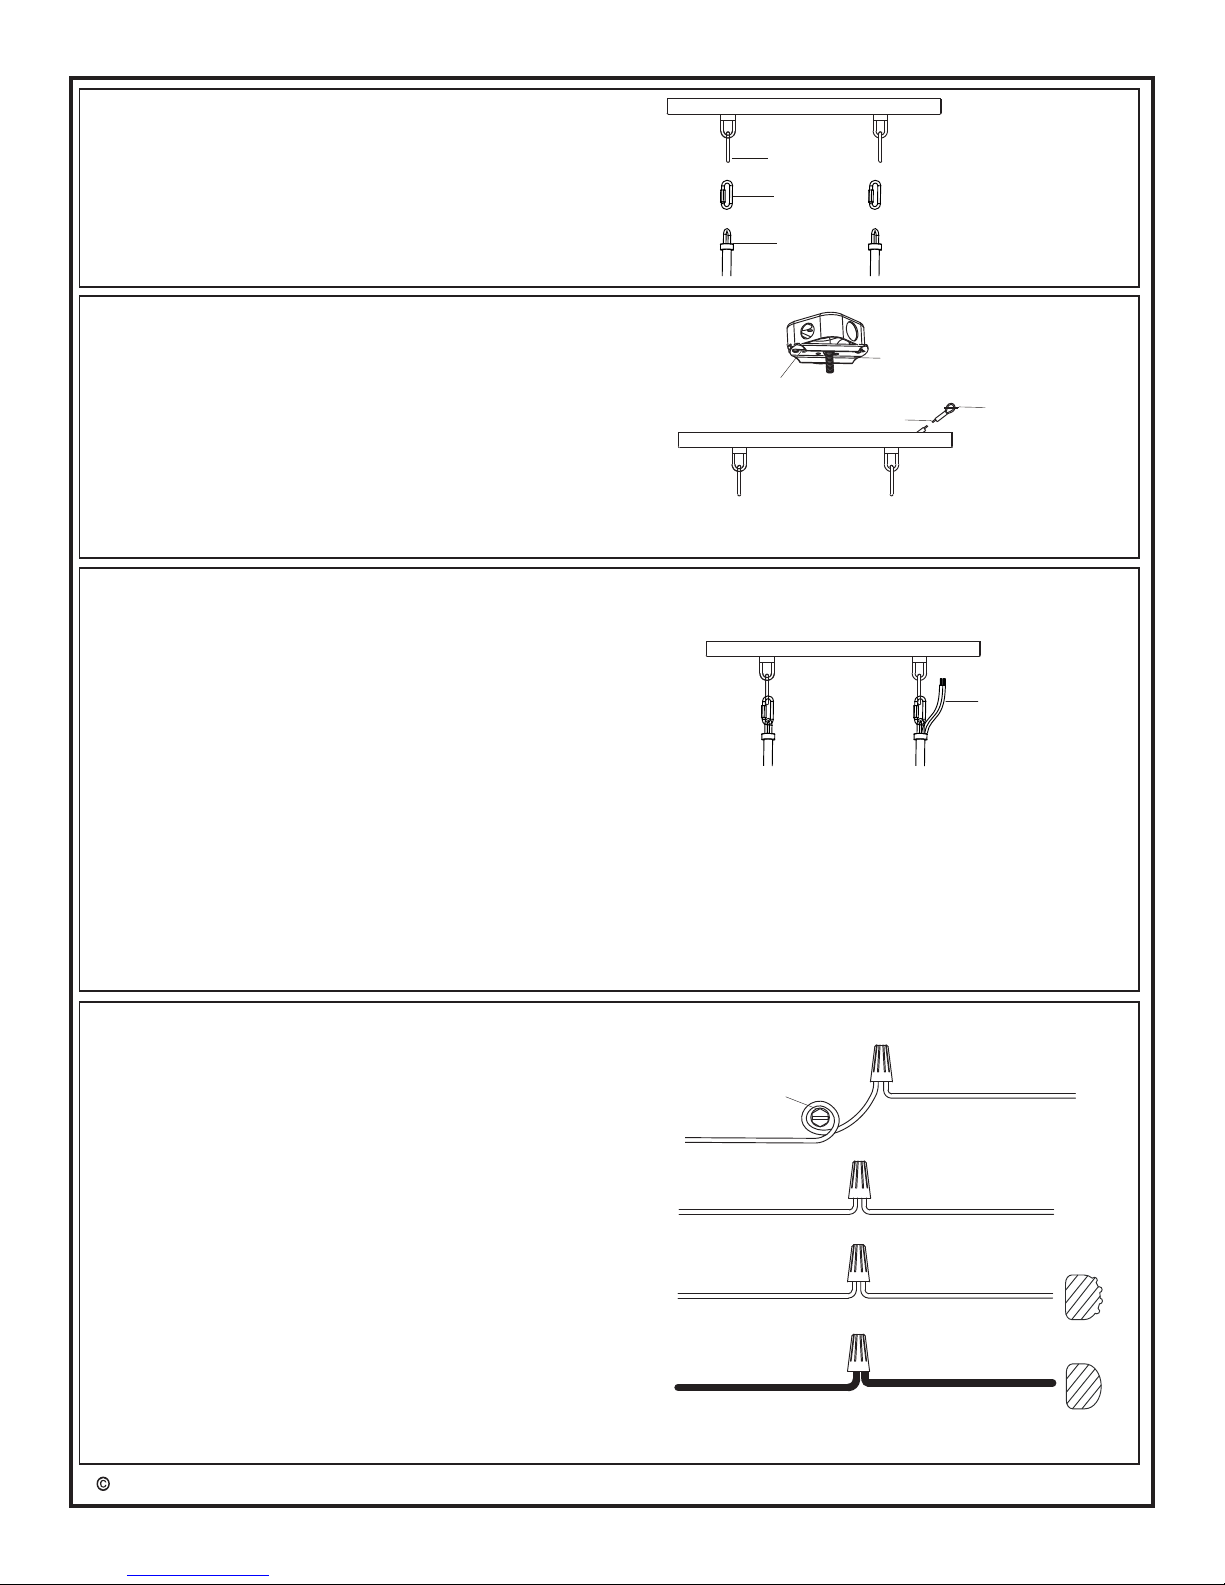
STEP 7:
a. Confirm that the mounting height is acceptable. Refer to STEP 3 if
changes are required.
: To make the next step easier, cut the supply wire and
ground wire 24 inches longer than the distance from the fixture
loop to the ceiling.
: Please pay attention to the polarity (wires labels L &
N) when cutting wires. Wire identification will be needed in STEP
8.
b. Pass supply wires and ground wire through the quick link and the
ceiling canopy and remove any remaining slack in the wire.
c. Trim excess fixture wire leaving a minimum of 6 inches extending
beyond the edge of the ceiling canopy.
d. Separate the smooth side and ribbed side of the supply wire to
about 3 inches from the end.
e. Using wire strippers, strip each wire ½ inch from the end.
Note
Important
Supply Wires
and Ground Wire
STEP 8:
* Use Wire Connectors (supplied) to connect the wires.
ground wire green ground screw
ground screw
ground wire supply ground
house white wire fixture supply
wire (ribbed sided)
house black (or red) wire fixture
supply wire (smooth side)
outlet box
a) Ground Wire:
1. Wrap supply around
on mounting bracket, no less than 2 in. from the end of
the wire. Tighten .
2. Connect fixture green to
wire with wire connector.
b) Supply Wire:
1. Connect the to the
from fixture identified with the label
“N”.
2. Connect the to the
from fixture identified with
the label “L”.
3. Wrap each connection with approved electrical tape
and carefully stuff all of the connected wires into the
.
WHITE OR RIBBED
BLACK (OR RED) WIRE
FROM HOUSE
FROM HOUSE
RIBBED SIDE OF WIRE
FIXTURE
FROM
IDENTIFIED
SMOOTH SIDE OF WIRE FROM
FIXTURE IDENTIFIED
WITH THE LABEL “N”
WITH THE LABEL “L”
GROUND WIRE
GROUND WIRE
FROM SUPPLY
FROM FIXTURE
GREEN GROUND SCREW
GROUND WIRE
GROUND WIRE
FROM SUPPLY
FROM FIXTURE
OR
5
2016 QuoizelInc.
QUOIZEL LIMITED WARRANTY
Thank you for purchasing product(s) from Quoizel, Inc.
Quoizel is a respected lighting manufacturer and distributor since 1930.
Quoizel has always been dedicated to providing our customers with an outstanding lighting experience.
Our comprehensive product coverage is reflective of our commitment to our consumers' ongoing satisfaction.
Quoizel warrants that its products will be free from defects in material and workmanship and subject to certain
conditions and exclusions. Quoizel products have the following warranties applied from the date of purchase:
Electrical Components - 10 Years
Finish (Indoor & Outdoor) - 3 Years
All Outdoor “Armour” finishes (Coastal and Seaside ) - 5 Years
All warranties are applicable to the Original Purchaser, the original installation of Quoizel products and are not
transferrable
Please save your store receipt as proof of purchase, as our Limited Warranty only applies to products that were
purchased from an authorized Quoizel store or dealer.
Quoizel will repair, replace or correct any defects that are found occurring from normal use within the time
period set above and subject to the following conditions and exclusions that follow.
?
?
?
©
.
Proof of Purchase:
What is Covered:
CARE AND MAINTENANCE
Wipe clean using soft, dry cloth or static duster. Always avoid using harsh chemicals and abrasives to clean
fixture as they may damage the finish.
TROUBLESHOOTING
PROBLEM POSSIBLE CAUSE CORRECTIVE ACTION
Bulbs will not light.
Fuse blows or the
circuit breaker trips
when light is turned
on.
1. Bulb is burned out.
2. Power is off.
3. Faulty wire connection.
4. Faulty switch.
Crossed wires or power wire is
grounding out.
1. Replace light bulb.
2. Make sure power supply is on.
3. Check wiring.
4. Test or replace the switch.
Check wire connection.
STEP 9:
a. Re-attach the ceiling canopy to the crossbar assembly.
The lanyard will push into the junction box when the
ceiling canopy is attached to the ceiling.
b. Secure with the previously removed hex nut.
c. Then, attach the lock ball over the round ceiling canopy.
lock ball
Crossbar Assembly
Hex nut
STEP 10:
a. Install correct bulbs referring to fixture markings and/or labels for maximum wattage.
Your installation is completed now. Restore electricity. Retain this sheet for future reference.
6
2016 QuoizelInc.
What is Not Covered?
The Requirements of this Warranty do notApply To:
Warranty Does Not Apply If:
Exclusions on Outdoor Finishes:
To Obtain Warranty Service:
If you experience a problem with your Quoizel product, please contact
your place of purchase or your local lighting dealer to submit your warranty request.
?
?
?
?
?
?
?
?
?
?
?
?
Labor Costs Related to removal or reinstallation of product is not covered
Shipping Charges to Quoizel
Any and all Light Bulbs (Lamps)
Products used in commercial applications
Products with scratches or abrasions due to the use of paints or abrasive cleaning chemicals/solvents
Products that are misused or abused by lack of care or subjected to improper environmental conditions
Original bill of sale, the delivery date or product number cannot be verified
Defective item is not returned to Quoizel if so requested
Product is not in the possession of the Original Purchaser
Product was purchased from liquidation, consignment or third-party retailers or any non-authorized Quoizel
retailer.
Any outdoor product that is within 10 miles of the ocean coast or shoreline. (This exclusion does not apply to
“Armour” finishes.)
Any claim for discoloration, patina or tarnishing is not applicable on painted or metal outdoor finishes that
have faded over time.
At Quoizel, our goal is to provide you with exceptional product and service. We have worked for over 85 years
training employees in your market.
Although Quoizel does not sell directly to consumers, if your place of purchase is closed or no longer in
business, you can submit your warranty request by contacting us:
For fastest response:
Please contact us at www.quoizel.com “Contact Us”
(Http://www.quoizel.com/contactus.aspx)
In writing: Quoizel, Inc.
Attn: Customer Service Department
590 Old Willets Path, Hauppauge, NY 11788
Email: cs@quoizel.com
?
?
?
?
Call Toll Free: 1-844-564-3055 - Customer Service
 Loading...