

Quoizel LNA5003K User Manual

AssemblyInstructionSheet#IS-LNA5003K
6CORPORATEPARKWAY
GOOSECREEKSC29445
wwwquoizelcom
..
Quoizel,Inc.
6CorporateParkway
GooseCreek,SC29445
CustomerService
Phone631.273.2700
Fax631.231.7102
www.quoizel.com
WarningsandCautions
Turnoffelectricityatcircuitbreakerormainfuseboxbeforeinstallation.Consultalicensedelectricianifindoubt.
Theseinstructionsareprovidedforyoursafety.Itisveryimportantyoureadthemcompletelybeforeinstallingthefixture.Westrongly
recommendthatalicensed,professionalelectricianperformtheinstallation.
Disconnectfixturefrompowersourcebeforereplacingbulbs.Makesurebulbsaregivensufficienttimetocoolbeforeremoval.Donotsubject
glasspartstoanyshockwhileinoperationorshatteringmayresult.
,.
ForStyleLNA5003K
ToolsRequired:Flatheadscrewdriver,Phillipsscrewdriver,pliers,wirecutters,wirestrippers,electricaltape,
safetyglasses.
BulbRecommended: (3)CandelabraBase60WMaximum,Alternatebulb(3)13WCFL
EstimatedAssemblyTime: 30-45minutes
Preparation:Identifyandinspectallpartsbeforebeginninginstallation.Checkpackagecontentlistanddiagrams
belowtobesureallpartsarepresent.Ifanypartsaremissingordamaged,donotattempttoassemble,install,or
operatethefixture.Contactcustomerserviceforreplacementparts.
PackageContents
FixtureLoop
A
x1
CrystalPendant
FinialwithCrystal
C
x1
x3
B
HardwareContents
Crossbar
AA
x1
LockWasher
BB
x2
HexNut
CC
x2
Nipple
DD
x1
FixtureBody
E
x1
CanopyChainLoop
EE
x1
CanopyLockRing
FF
x1
FixtureChain
GG
x1
QuickLink
HH
x2
CeilingCanopy
II
x1
D
Shade
x3
STEP2InstallCrossbar-
A.AA)AttachtheCrossbar(totheOutletBoxwiththeheadofthe
GreenGroundScrewfacingyou.SecureitwithOutletBoxScrews
(notincluded)Tightenuntilsnug..
OutletBox
AA
OutletBoxScrew
(notincluded)
GreenGroundScrew
STEP3InstallCanopyChainLoopandNipple-
* Pliersisrequiredforthisstep.
A.ThreadoneHexNut(CC)tooneendoftheNipple(DD)untilitisat
least0.25” fromtheend.PassoneLockWasher(BB)overtheendof
theNipple(DD)andthreadtheCanopyChainLoop(EE)ontothe
Nipple(DD).Byusingpliers,threadtheHexNut(CC)againstthe
CanopyChainLoop(EE)andhandtightenuntilsnug.
B.ThreadanotherHexNut(CC)tothemiddleoftheNipple(DD).Place
anotherLockWasher(BB)overtheNipple(DD)andthenthreadthe
Nipple(DD)intotheCrossbar(AA)untiltheNipple(DD)isabout
0.375” abovetheCrossbar(AA).
C.RemovetheCanopyLockRing(FF)fromtheCanopyChainLoop
(EE).PlacetheCeilingCanopy(II)overtheCanopyChainLoop(EE)
againsttheceilingtodeterminethecorrectpositionoftheNipple
AA
DD
BB
CC
StepB
Figure2
STEP1InstallFixtureLoop-
A.ThreadtheFixtureLoop(A)ontothe
nippleonthetopcenteroftheFixture
Body(E).Handtightenuntilsnug.
Needassistancewithpartsorassembly?CallQuoizelcustomerserviceat1-631-273-2700
2014QuoizelInc.
Figure1
A
E
ThankyouforpurchasingaQuoizelproduct.
orvisituson-lineatwww.quoizel.com
1of3
CC
EE
FF
BB
StepA
II
Figure3
January2014
(DD).ThreadtheCanopyLockRingontotheCanopyChainLoop
(EE).AdjusttheNipple(DD)toallowtheCeilingCanopy(II)torest
againsttheceilingwhenheldinplacebytheCanopyLockRing(FF).
D.RemovetheCanopyLockRing(FF)andtheCeilingCanopy(II).
TightentheHexNut(CC)againsttheCrossbar(AA)tosecurein
place.
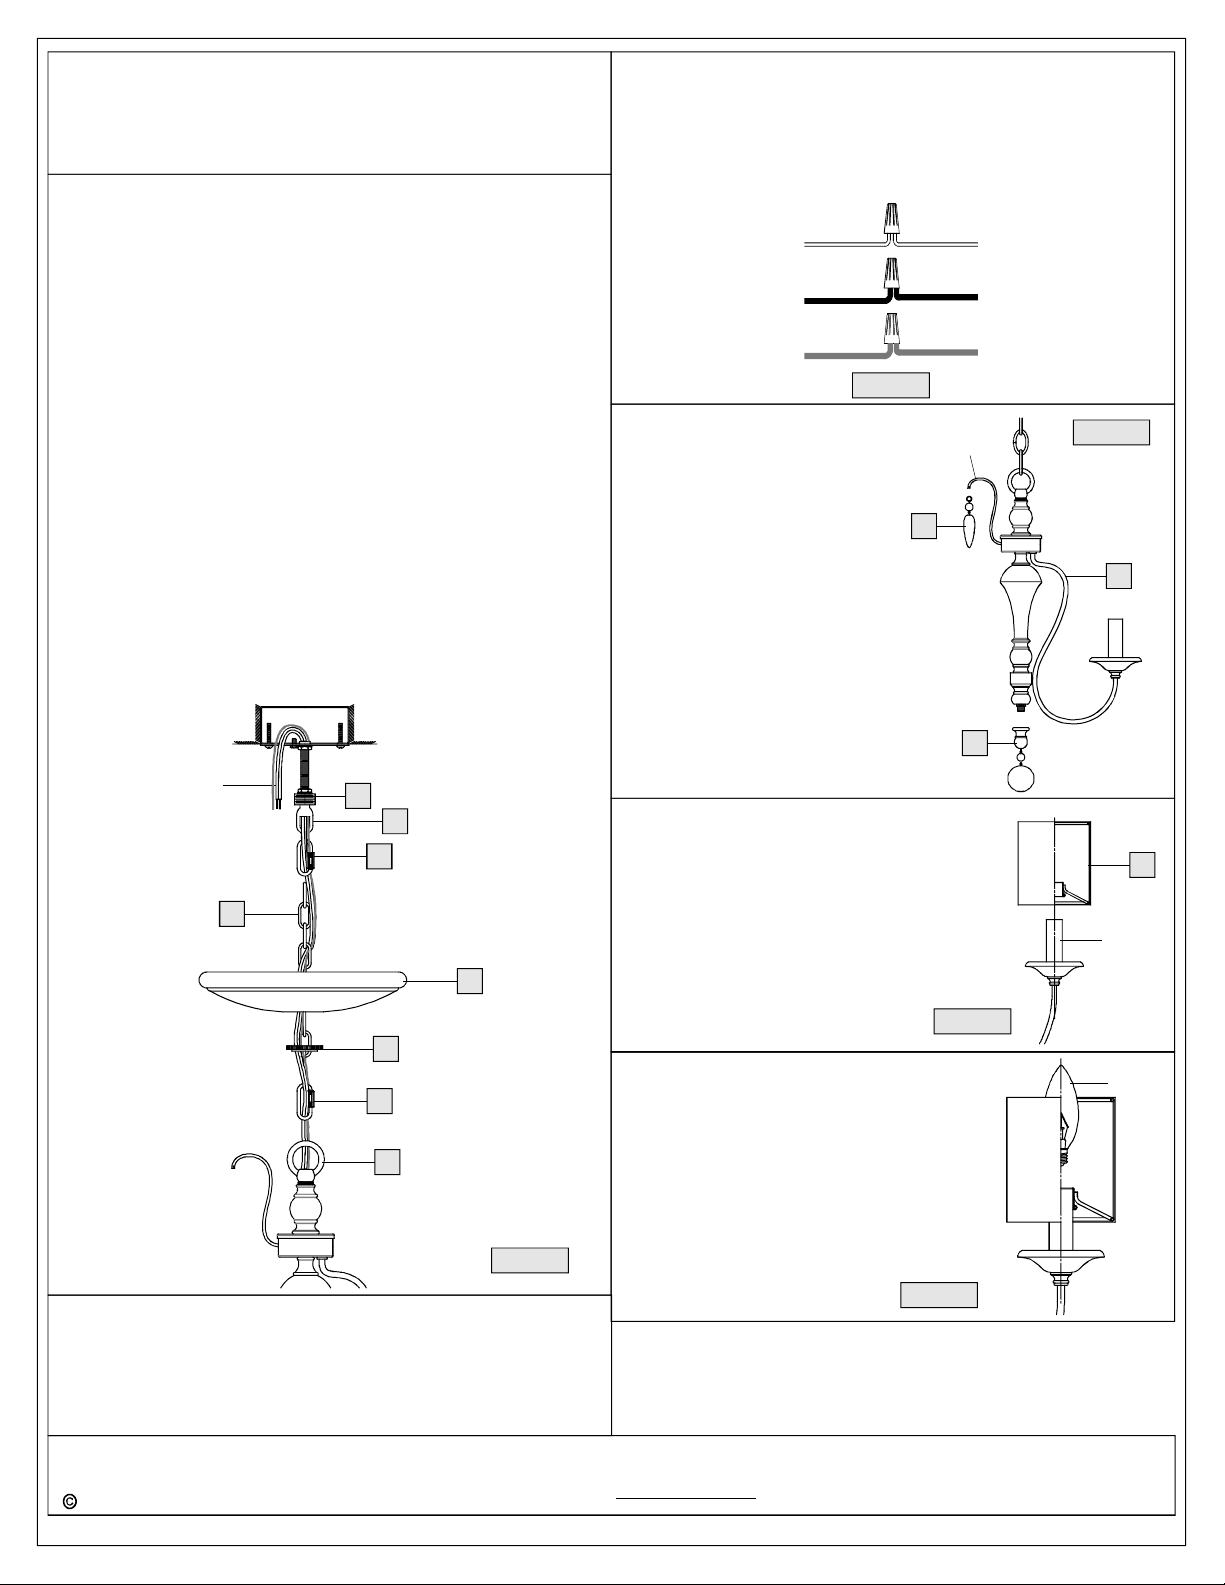
STEP4-InstallFixtureChainandCeilingCanopy
fromfixture.
C.ConnectBlack(orRed)SupplyWirefromtheOutletBoxtoSmooth
sideWirefromfixture.
D.ConnectGroundWirefromtheOutletBoxtoGroundWirefrom
fixture.
E.Twistconnectorsuntilwiresaretightlyjoinedtogether.
F.Wrapeachconnectionwithapprovedelectricaltapeandcarefully
stuffalltheconnectedwiresintotheOutletBox.
A.AdjusttheFixtureChain(GG)toyourdesiredlengthbyremoving
thelinksifneeded.
Pliersisrequiredforthisstep.
*
B.WiththeFixtureChain(GG)notattachedtotheFixtureLoop(A)and
theCanopyChainLoop(EE),pullthesupplywiresthroughthe
FixtureChain(GG)alternatinglinks.Afterthewiresarethroughthe
FixtureChain(GG),pulltheSupplyWiresandtheGroundWire
throughtheCanopyLockRing(FF)andtheCeilingCanopy(II)in
order.
C.AttachoneendoftheFixtureChain(GG)totheFixtureLoop(A)with
oneQuickLink(HH).LiftthefixtureandFixtureChain(GG)upAnd
AttachtheotherendoftheFixtureChain(GG)ontotheCanopy
ChainLoop(EE)withanotherQuickLink(HH).Thefixturewillnow
hangsafely.ClosethechainloopattheCeilingCanopyLoop(EE).
D.FeedtheSupplyWiresandGroundWirethroughtheCanopyChain
Loop(EE)andNipple(DD)intotheOutletBox.Cutthewiresleaving
approximately8”ofwireextendingfromtheOutletBox.
E.RefertoStep5forwireconnections.
F.RaisetheCeilingCanopy(II)andCanopyLockRing(FF)upthe
FixtureChain(GG)andovertheCanopyChainLoop(EE).Tighten
theCanopyLockRing(FF)ontotheCanopyChainLoop(EE)until
tight.
SuggestedchainlengthforCeilingheight:
8’ceiling:use10linksofchainand2quicklinks
9’ ceiling:use20linksofchainand2quicklinks
10’ ceiling:use30linksofchainand2quicklinks
SupplyWires
andGroundWire
DD
EE
HH
Whitewire
fromsupply
Blackwirefrom
supply(orRed)
Groundwire
fromsupply
Figure5
STEP6-AttachCrystalPendants
andFinialwithCrystalto
FixtureBody
A.AttachCrysalPendants(B)tothe
BranchesontheFixtureBody
(E).
B.ThreadtheFinialwithCrystal(C)
ontothenippleonthebottom
centeroftheFixtureBody(E)
andhandtightenuntilsnug.
STEP7-InstallShade
A.AttachtheShade(D)ontotheCandleCover
asshown.
Branch
B
Ribbedsidewire
fromfixture
Smoothsidewire
fromfixture
Groundwire
fromfixture
Figure6
E
C
D
GG
II
FF
HH
A
Figure4
STEP5-WireConnections
A.Usestandardwireconnectors(notincluded)tomakeallwire
connections.(Connectorsarenotincludedwithfixture.)Stripand
preparewireendsaccordingtoinstructionssuppliedwith
connectors.
B.ConnectWhiteSupplyWirefromtheOutletBoxtoRibbedsideWire
Needassistancewithpartsorassembly?CallQuoizelcustomerserviceat1-631-273-2700
2014QuoizelInc.
ThankyouforpurchasingaQuoizelproduct.
orvisituson-lineatwww.quoizel.com
STEP8-InstallBulb
A.Thisfixtureusescandelabrabulbwith
standardscrewbase.Maximum60watts.
B.Insertbulbandscrewsnuglyintoplace.
Yourfixtureisnowassembledandreadyto
use.Enjoy!
2of3
Candle
Cover
Figure7
Bulb
Figure8
January2014
 Loading...