

Page 1

6CORPORATEPARKWAY
GOOSECREEKSC29445
wwwquoizelcom
..
,.
INSTRUCTIONSHEETIS-KD5015
STYLENUMBER:KD5015MM
ISSUED02-2010 REVISED2014-03-24PACKAGECONTENTS
PART DESCRIPTION
A Crossbar
B
C
D
E
F
G
H
I
J
K
L
M
N
O
P
Q
R
GreenGroundScrew
HexNut
Nipple
LockWasher
CanopyChainLoop
CanopyLockRing
FixtureChain
CeilingCanopy
FixtureLoop
SupportPart
FixtureCover
FixtureAssembly
ShortNipple
LockScrew
Shade
CandleCover
78mmCrystalPendant
QUANTITY
1pc
1pc
2pcs
1pc
2pcs
1pc
1pc
1pc
1pc
1pc
1pc
1pc
1pc
1pc
3pcs
15pcs
15pcs
19pcs
A
H
I
L
B
C
D
E
F
G
J
K
N
O
P
Q
R
M
WARNINGSANDCAUTIONS
WARNING:
● Beforebeginningtheinstallation,turnoffelectricityatthecircuitbreakerboxorthemainfuseboxbyswitching
offthecircuitbreakerorremovingthefuse.
CAUTION:
● Theseinstructionsareprovidedforyoursafety.Itisveryimportantthattheyarereadcompletelybeforethe
installationofyourfixture.Westronglyrecommendthataprofessionalelectricianinstallthefixture.
● Disconnectfixturefromthepowersourcebeforereplacingthebulb(s),makingsurethatbulb9s)hadsufficient
timetocooldown.DONOTsubjectthelamptoanyshockwhilelitasshatteringoflampmayresult.
1OF5
Page 2
PREPARATION
STYLENUMBER:KD5015MM
● Beforebeginninginstallationofproduct,makesureallpartsarepresent.Comparepartswithpackagecontents
listanddiagramabove.Ifanypartismissingordamaged,donotattempttoassemble,installoroperatethe
product.Contactcustomerserviceforreplacementpart.
● EstimatedAssemblyTime:30-45minutes
● ToolRequiredforAssembly(notincluded):Flatheadscrewdriver,Phillipsscrewdriver,Pliers,Electricaltape,
Wirecutter,Safetyglassesand(15)60WType-Amediumbasebulbs
.
● HelpfulTools(notincluded):Wirestrippers.
INSTALLATIONINSTRUCTIONS
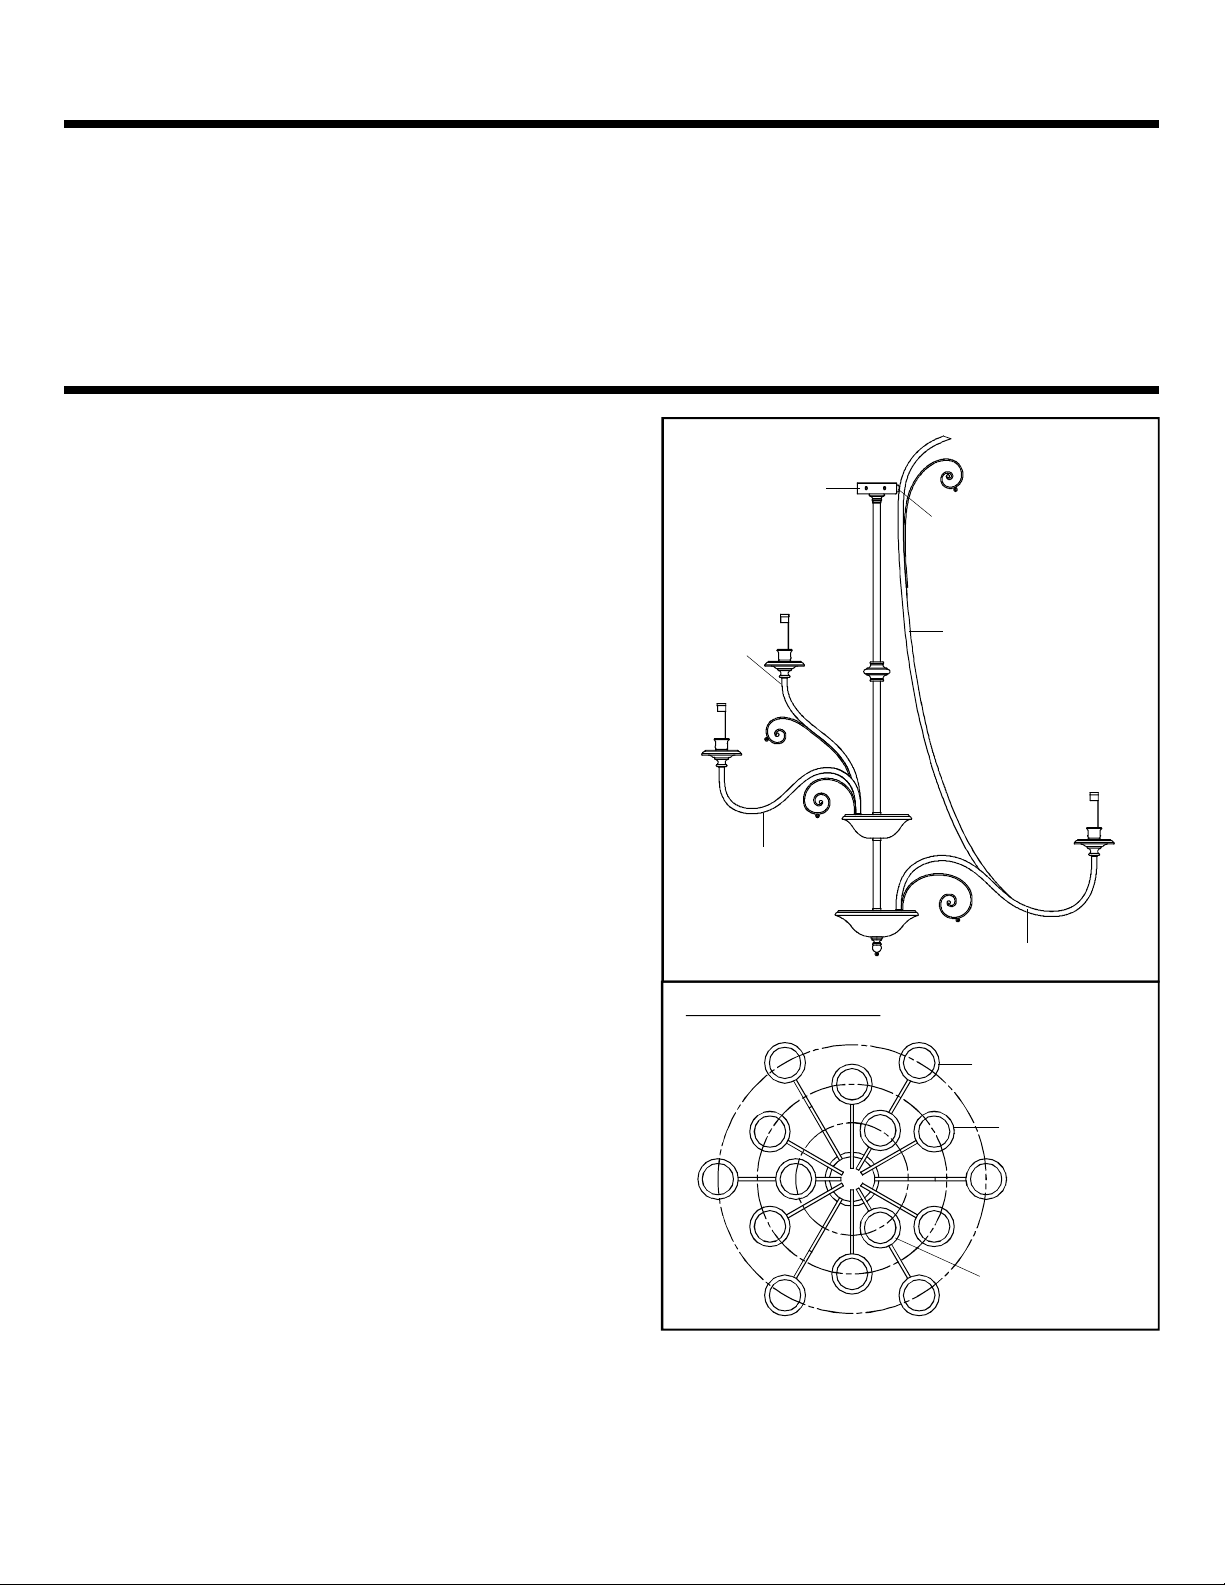
STEP1:
a.UnfoldSupportArmstoproperlocationsaccordingto
theillustrationShadeDistribution.Pleaseattachthe
BeadonthetopendoftheBottomSupportArmtothe
holeonthesideoftheFixtureBodyafterunfolding.
FixtureBody
Upper
Tier
SecondTier
ShadeDistribution
Bead
BottomSupportArm
BottomTier
2OF5
BottomTier
Second
Tier
UpperTier
Page 3

INSTALLATIONINSTRUCTIONS
STEP2:
STYLENUMBER:KD5015MM
a.ThreadLockScrewsintotheBeadonthetopofthe
bottomSupportArm.Hand-tightenuntilsnug.
STEP3:
a.ScrewtheShortNippleintotheHexCouplinginsideof
theFixtureBody.Tightenuntilsnug.
b.PlacetheFixtureCoverandtheSupportPartoverthe
ShortNipple.SecurethembythreadingtheFixture
LoopontothetopendoftheShortNipple.Hand-tighten
SupportArm
FixtureBody
Short
Nipple
LockScrew
Bead
FixtureLoop
SupportPart
FixtureCover
HexCoupling
STEP4:
a.SecuretheCrossbarontotheOutletBoxwithOutlet
STEP5:
Pliersisrequiredonthisstep.
a.ThreadoneHexNutontotopendoftheNipple.
b.PlaceoneLockWasheroverthetopendoftheNipple
andthenthreadtheNippleintothecenterlockholeof
theCrossbar.
c.Usingpliers,threadtheHexNutagainsttheCrossbar
andhand-tightenuntilsnug.
d.ThreadanotherHexNutontothebottomendofthe
Crossbar
OutletBox
Crossbar
OutletBox
Screw
LockWasher
HexNut
Nipple
3OF5
HexNut
Page 4

INSTALLATIONINSTRUCTIONS
STEP6:
a.AdjusttheFixtureChaintoyourdesiredlengthby
removingthelinksifneeded.
Pleasenotethatdependsonchainmaterial
thickness,youmightberequiredtousechainpliersto
spreadlinksopen.
b.PullthesupplywiresthroughtheFixtureChain
alternatinglinks.Andthenpullthewiresthroughthe
followingcomponentsinturn:
CanopyLockRing,CeilingCanopy,CanopyChain
Loop,LockWasher,andNipple.
c.PlaceLockWasherovertheendoftheNippleand
threadtheCanopyChainLoopontotheendofthe
Nipple.
d.Usingpliers,threadtheHexNutagainsttheCanopy
ChainLoopandtightenuntilsnug.
e.AttachoneendoftheFixtureChainontotheFixture
Loopandattachtheanotherendofthechainontothe
CanopyChainLoop.
f.RefertoSTEP7-WireConnectionstoconnectwires.
g.PushtheCeilingCanopyupwardovertheOutletBox.
h.ThreadtheCanopyLockRingontotheCanopyChain
LoopandtightenuntilsnugtosecuretheCeiling
Canopy.
STYLENUMBER:KD5015MM
Nipple
HexNut
LockWasher
CanopyChainLoop
Ceiling
Canopy
FixtureChain
FixtureLoop
CanopyLockRing
STEP7:
UseWireConnectors(notsupplied)toconnectthe
wires.
a.ConnecttheHouseGroundWiretotheFixtureGround
Wire.
b.ConnecttheHouseWhite(orRibbed)Wiretothe
FixtureSupplyWire(BlackorSmoothSide).
c.ConnecttheHouseBlack(orRed)WiretotheFixture
SupplyWire(BlackorSmoothSide).
d.Wrapeachconnectionwithapprovedelectricaltape
andcarefullystuffalloftheconnectedwiresintothe
OutletBox.
WHITEORRIBBED
FROMHOUSE
BLACK(ORRED)WIRE
FROMHOUSE
GROUNDWIRE
FROMHOUSE
WHITEORRIBBED
FROMFIXTURE
BLACKORSMOOTH
FROMFIXTURE
GROUNDWIRE
FROMFIXTURE
4OF5
Page 5

INSTALLATIONINSTRUCTIONS
STEP8:
a.PlacetheCandleCoverovertheSocket.Thenplace
theShadeontothetopendoftheCandleCover.
STYLENUMBER:KD5015MM
Shade
CandleCover
Socket
STEP9:
a.Attach78mmCrystalPendantsontothehangersonthe
SupportArmsandthebottomcenterofthefixture.
78mmCrystal
Pendant
SupportArm
78mmCrystal
Pendant
78mmCrystal
Pendant
STEP10:
a.Installcorrectbulbsreferringtofixturemarkingsand/orlabelsformaximumwattage.
5OF5
 Loading...