

Page 1
AssemblyInstructionSheet#IS-HC1612IB
ForStyleHC1612IB
Quoizel,Inc.
6CorporateParkway
GooseCreek,SC29445
CustomerService
Phone631.273.2700
Fax631.231.7102
www.quoizel.com
ToolsRequired:Flatheadscrewdriver,Phillipsscrewdriver,pliers,wirecutters,wirestrippers,electricaltape,
safetyglasses.
BulbRecommended:
EstimatedAssemblyTime:
Preparation:
belowtobesureallpartsarepresent.Ifanypartsaremissingordamaged,donotattempttoassemble,install,or
operatethefixture.Contactcustomerserviceforreplacementparts.
Identifyandinspectallpartsbeforebeginninginstallation.Checkpackagecontentlistanddiagrams
(2)MediumBase60WbulbsMaximum,Alternatebulb(2)13WCFLMaximum.
20-30minutes
WarningsandCautions
Turnoffelectricityatcircuitbreakerormainfuseboxbeforeinstallation.Consultalicensedelectricianifindoubt.
Theseinstructionsareprovidedforyoursafety.Itisveryimportantyoureadthemcompletelybeforeinstallingthefixture.Westrongly
recommendthatalicensed,professionalelectricianperformtheinstallation.
Disconnectfixturefrompowersourcebeforereplacingbulbs.Makesurebulbsaregivensufficienttimetocoolbeforeremoval.Donotsubject
glasspartstoanyshockwhileinoperationorshatteringmayresult.
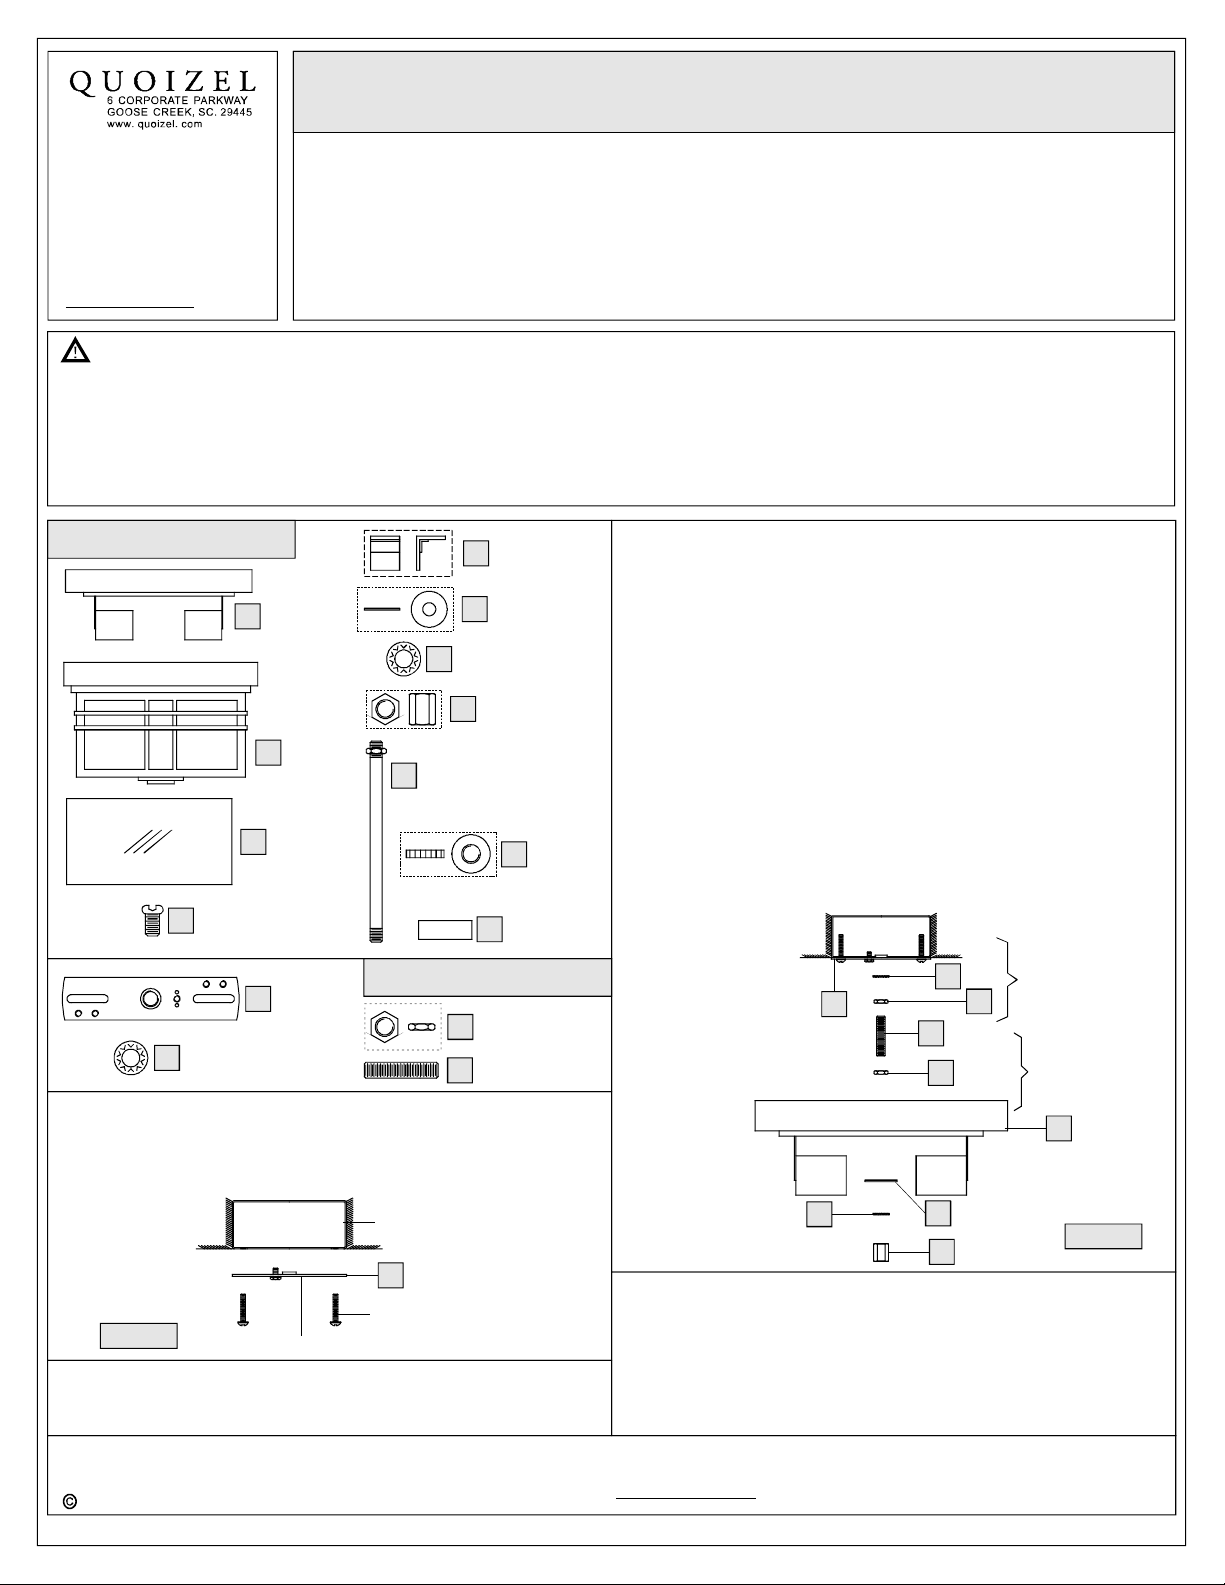
PackageContents
A
B
C
LockScrew
D
x8
Ceiling
Canopy
x1
Cage
x1
Glass
Panel
x4
G
Stemwith
HexNut
I
x1
Tab
E
x8
FlatWasher
F
x1
LockWasher
x1
HexCoupling
H
x1
Knurled
Nut
J
x1
Finial
K
x1
A.ThreadoneHexNut(CC)tothemiddleoftheNipple(DD).Placethe
LockWasher(BB)overtheNipple(DD)andthenthreadtheNipple
(DD)intotheCrossbar(AA)untiltheNipple(DD)isabout0.375”
abovetheCrossbar(AA).
B.PositionthecenterholeoftheCeilingCanopy(A)overtheendofthe
Nipple(DD).AdjusttheNipple(DD)soapprox0.375” oftheNipple
(DD)isprotrudingfromthemountingholeontheCeilingCanopy(A).
Thisadjustmentmaytakeafewtries.
C.RemovetheCeilingCanopy(A)andthentightentheHexNut(CC)
againsttheCrossbar(AA)tosecureinplace.
D.ThreadanotherHexNut(CC)ontotheendoftheNipple(DD).
ThreadthisHexNut(CC)onjustenoughsotheinsidesurfaceofthe
CeilingCanopy(A)restsagainstit.*Youmayhavetotrialfitthe
CeilingCanopy(A)onemoretimestoinsurethisdistancealso.This
HexNut(CC)isneededheretopreventyoufromcrushingdownthe
centeroftheCeilingCanopy(A).
E.RefertoStep3forwireconnections.
F.AttachtheCeilingCanopy(A),theFlatWasher(F)andoneLock
Washer(BB)overtheendoftheNipple(DD)asshown.Secureby
threadingtheHexCoupling(H)ontotheNipple(DD)andtightenuntil
snug.
Crossbar
AA
x1
LockWasher
BB
x1
STEP1InstallCrossbar-
A.AA)AttachtheCrossbar(totheOutletBoxwiththeheadoftheGreen
GroundScrewfacingyou.SecureitwithOutletBoxScrews(not
included)Tightenuntilsnug..
Figure1
STEP2InstallNippletoCrossbar-
* Pliersisrequiredforthisstep.
2014QuoizelInc.
GreenGroundScrew
Needassistancewithpartsorassembly?CallQuoizelcustomerserviceat1-631-273-2700
HardwareContents
HexNut
CC
x2
Nipple
DD
x1
OutletBox
AA
OutletBoxScrew
(notincluded)
ThankyouforpurchasingaQuoizelproduct.
orvisituson-lineatwww.quoizel.com
BB
AA
DD
CC
BB
STEP3-WireConnections
A.Usestandardwireconnectors(notincluded)tomakeallwire
connections.(Connectorsarenotincludedwithfixture.)Stripand
preparewireendsaccordingtoinstructionssuppliedwith
connectors.
B.ConnectWhiteSupplyWirefromtheOutletBoxtoRibbedsideWire
fromfixture.
1of2
F
H
StepA
CC
StepD
A
Figure2
March2014
Page 2
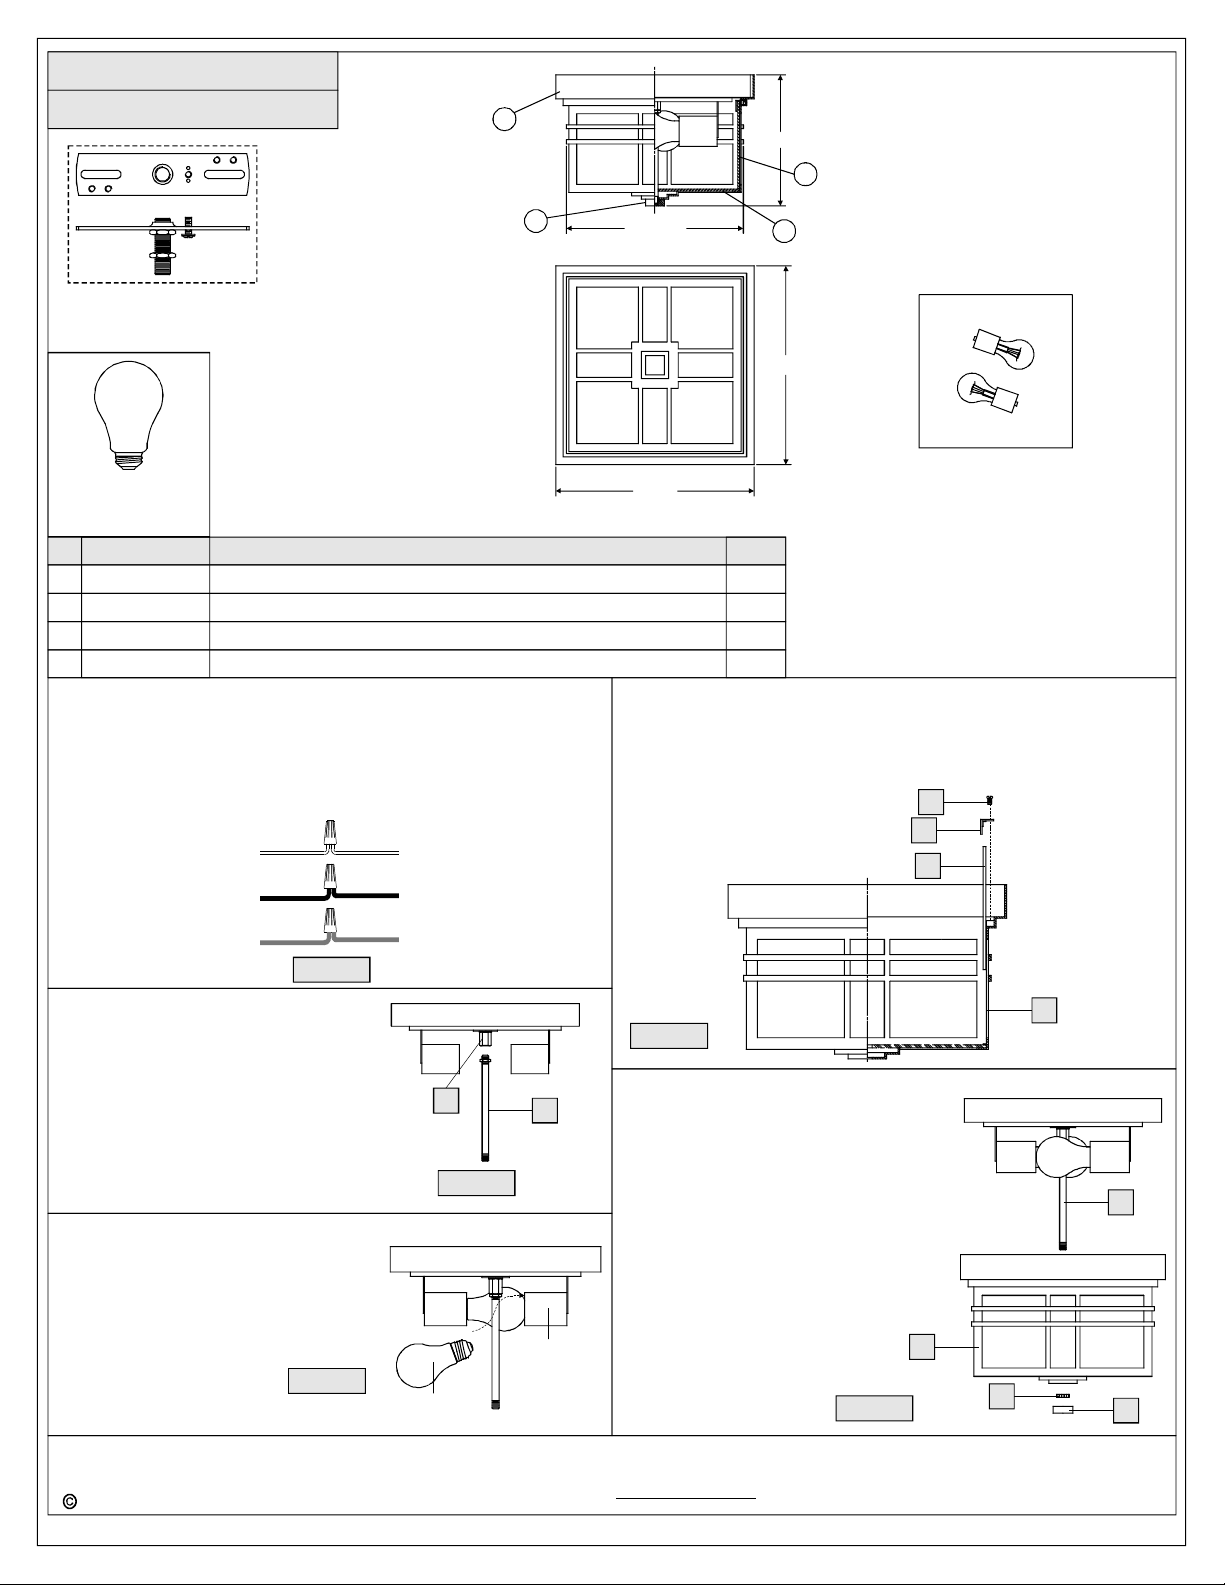
HC1612IB
FINISH:IMPERIALBRONZE
ONELIGHTSHOWNFOR
ILLUSTRATIONPURPOSEONLY.
1
8”
4
3
(2)60W
NO.
1
2
3
4
C.ConnectBlack(orRed)SupplyWirefromtheOutletBoxtoSmooth
D.ConnectGroundWirefromtheOutletBoxtoGroundWirefrom
E.Twistconnectorsuntilwiresaretightlyjoinedtogether.
F.Wrapeachconnectionwithapprovedelectricaltapeandcarefully
Medium
Bulbs
Base
(NotSupplied)
PARTNUMBER
11612IBH
G1422PA
M1033FIIB
G1421PA
sideWirefromfixture.
fixture.
stuffalltheconnectedwiresintotheOutletBox.
Whitewire
fromsupply
Blackwirefrom
supply(orRed)
Groundwire
fromsupply
NOTE:ALLDIMENSIONSAREROUNDEDUPTOTHENEAREST1/2"
REPLACEMENTPARTDESCRIPTION
BASEIMPERIALBRONZEFLUSHMOUNT
BOTTOMPANEL9-3/4"SQX3/8"D
FINIAL0.37HX1.12""IMPERIALBRONZE
SIDEPANEL5-1/8"HX9-3/4"
Ribbedsidewire
fromfixture
Smoothsidewire
fromfixture
Groundwire
fromfixture
Figure3
10” SQ.
11.5”
STEP6-InstallGlassPanels
A.InserttheGlassPanels(C)intotheCage(B).AttachtheTabs(E)to
thetopedgeoftheGlassPanels(C)andsecurewiththeLock
Screws(D).Handtightenuntilsnug.
2
11.5”
REQ.
1
1
1
4
D
E
C
STEP4-InstallStemwithHexNut
A.ThreadtheHexNutendoftheStem(I)
intotheHexCoupling(H).Byusing
pliers,threadtheHexNutagainstthe
HexCoupling(H)andhandtightenuntil
snug.
STEP5-InstallBulb
A.Thisfixtureusesstandardbulbwith
mediumbase.Maximum60watts.
B.Insertbulbandscrewsnuglyintoplace.
Figure5
Needassistancewithpartsorassembly?CallQuoizelcustomerserviceat1-631-273-2700
2014QuoizelInc.
Figure6
H
Figure4
Bulb
ThankyouforpurchasingaQuoizelproduct.
orvisituson-lineatwww.quoizel.com
I
Socket
STEP7-InstallCage
A.PlacetheCage(B)overtheendofthe
Stem(I)andsecurewiththeKnurledNut
(J).Handtightenuntilsnug.
B.ThreadtheFinial(K)ontotheendofthe
Stem(I)andhandtightenuntilsnug.
Yourfixtureisnowassembledandready
touse.Enjoy!
2of2
Figure7
B
I
B
J
K
March2014
 Loading...