

Page 1
6 CORPORATE PARK WAY
GOOSE C RE EK ,S C. 2944 5
www. qu oizel . com
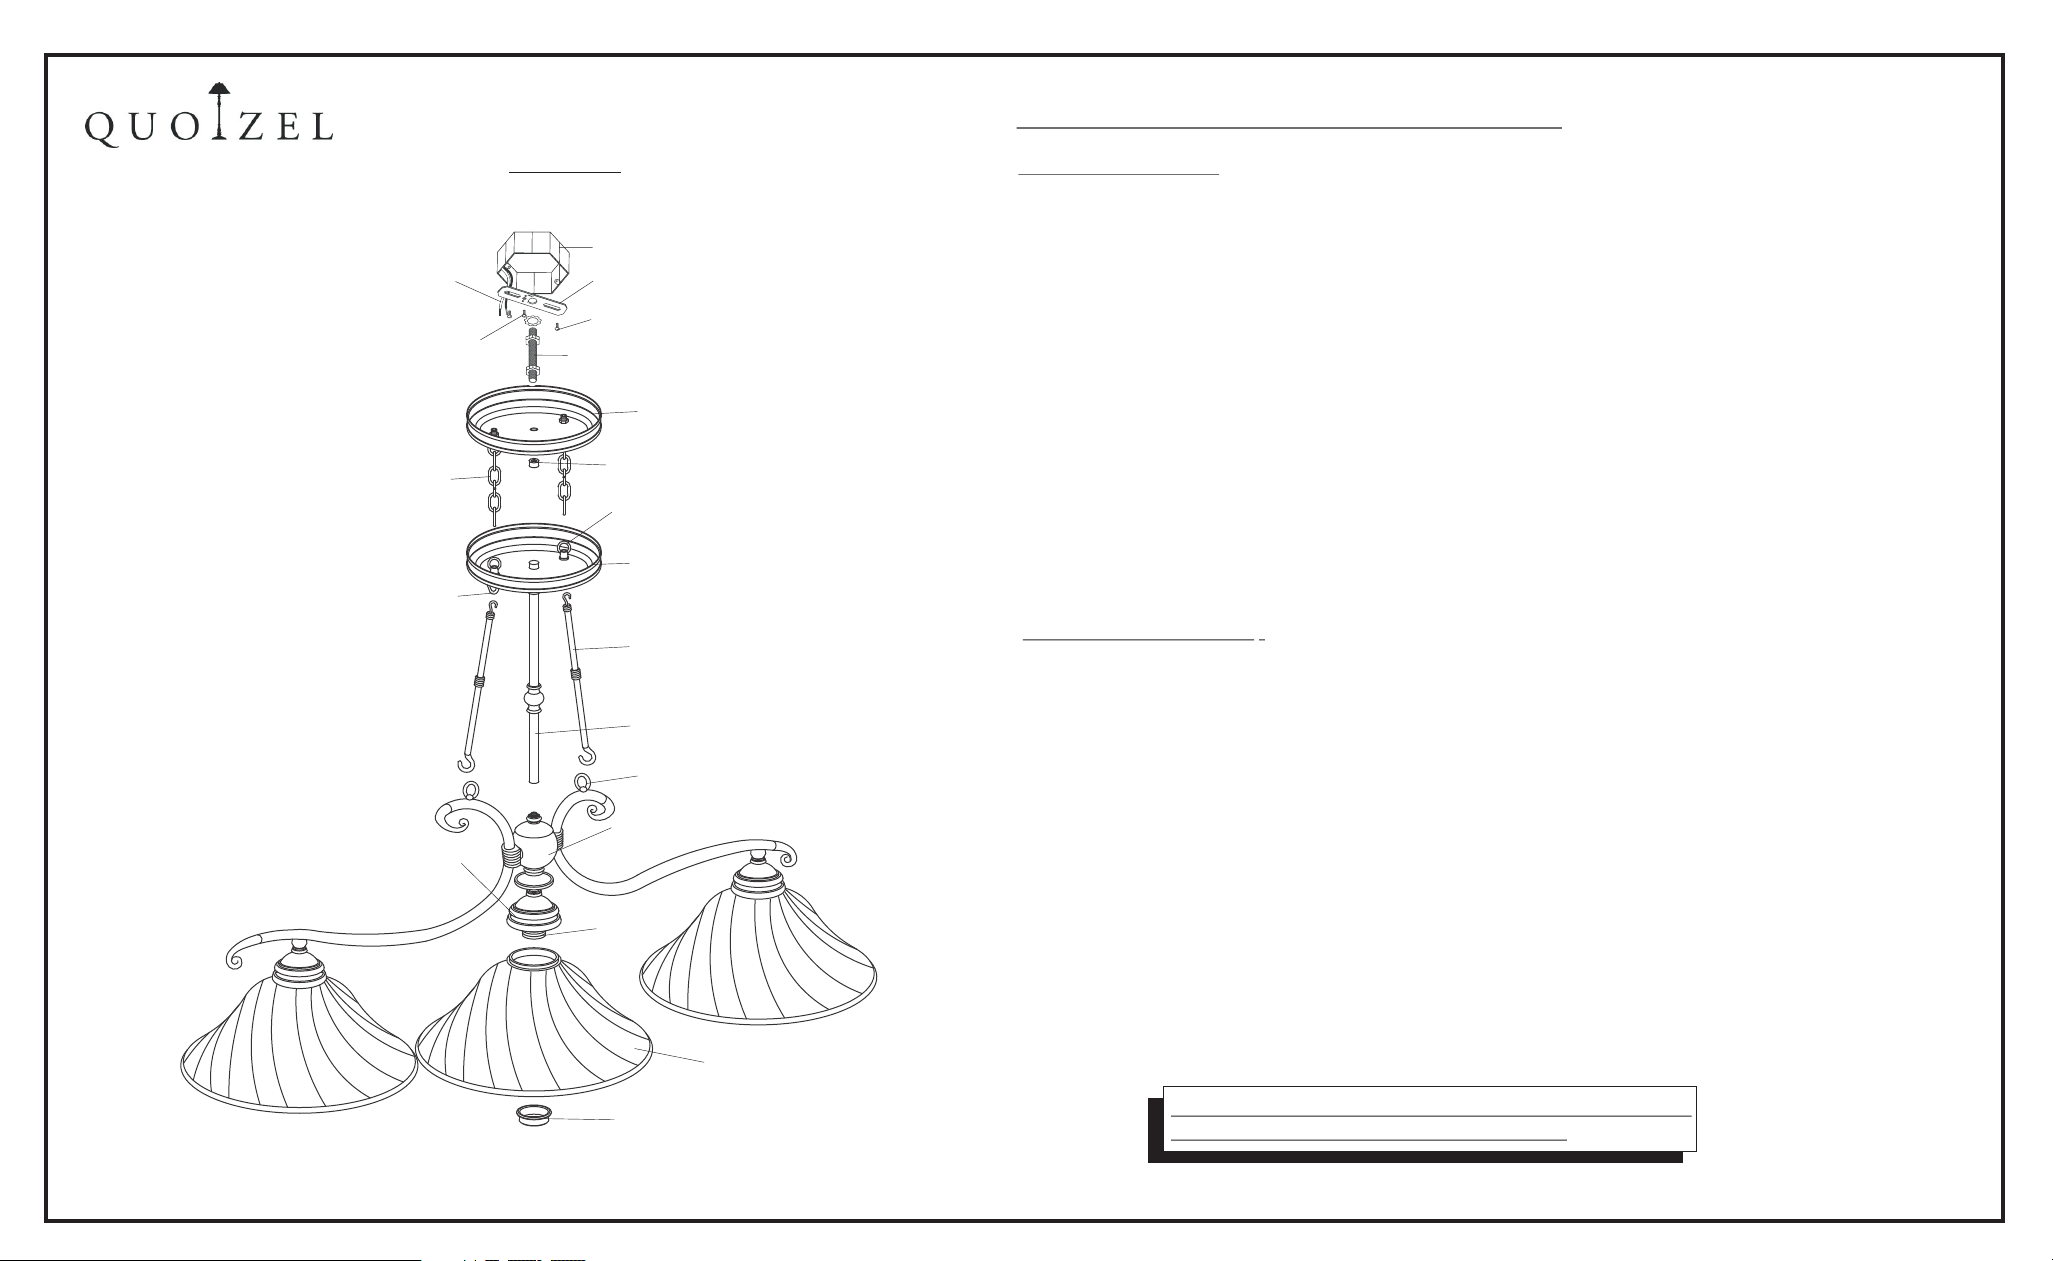
FI GURE 1
ASSEMBLY/INSTALLATION INSTRUCTIONS:
Tool s require d fo r insta ll ation: Sl ot ted scr ew driver, P li ers, Wi re C utters, W ir e conne ct or s and Ele ct rical t ap e.
HOUSE SUPPLY and
GROUND WIERS
GREEN GROUND SCREW
FIXTURE CHAIN
HOOK
SHADE HOLDER
OUTLET BOX
CROSSBAR
(2)OUTLET BOX SCREWS
(not supplied)
NIPPLE
CEILING CANOPY
KNOB
FIXTURE LOOP
FIXTURE CANOPY
SUPPORT RODS
CENTER STEM
RING
JUNCTION BOX
1.Caref ully unpac k all parts re ferring to i llustrat ion FIGURE 1 for parts id entification.
2.Turn power to the installation point OFF at circuit breaker.
3.Thread the end of the CENTER STEM onto nipple on the top center of JUNCTION BOX. Hand tighten
until snug. Proceed to locate the top ends of the SUPPORT RODS onto HOOKS and locate the other
ends onto the RINGS.
4.Locate the ends of FIXTURE CHAIN onto the FIX TURE LOOPS . Depending on the chain
material, you might need pliers to spread the links.
5.Locate the CROSSBAR and attach to ceiling mounted outlet box using (2)OUTLET BOX SCREWS
(not supp lied). Locate the NIPPLE with HEX NUTS and SHAKE PROOF WASHER. Pass the SHAKE
PROOF WASHER over th e end of the NIP PLE and thre ad NIPPLE in to the cente r of the CROSS BAR.
Using pliers, tighten HEX NUT against CROSSBAR to secure NIPPLE.
6.Make th e connecti ons: Quoiz el recomme nds a minimu m of (2)people for the next (2)steps. Trim
the FIXTU RE SUPPLY and GROUND WIRES to approx. 6" in the length from where the wires exit
CEILING C ANOPY. Tr im back wire j acketing a pprox. 3/4". Position the fixture under the OUTLET
BOX. Usin g wire connectors(no t supplied )connect t he HOUSE GRO UND WIRE to FI XTURE
GROUND WI RE; connec t the HOUSE WH ITE WIRE to th e FIXTURE SU PPLY WIRE(RIB BED
SIDE); connect the HO USE BLACK (o r RED)WIRE to the FIXTURE SUPPLY WIRE(SMOOTH SIDE).
Wrap each connection with approved ele ctrical ta pe.
7.With th e connecti ons proper ly made, car efully tuc k all wires into OUTLET BO X. Pass the MO UNTING
HOLE in the u nderside of the CEILING CANOPY over the NIPPLE, attach to CROSSBAR. Thread
HEX NUT onto the end of the NIPPLE. Hand tighten HEX NUT to secure fixture against the ceiling.
Proceed to thread the FINIAL onto the end of the NIPPLE and hand tighten until snug.
SOCKET
SOCKET COLLAR
SHADE
8.Locate SHADES over SOCKETS onto SHADE HOLDERS. Secure by threading SOCKET
COLLARS onto SOCKETS and hand tighten until snug. Install bulbs referring to fixture markings
and/or la bels for max imum watta ge.
9.Resto re power to in stallati on point ON. K eep this she et for futur e referenc e.
IF IN DOUBT ABOUT ELECTRICAL INSTALLATION,
CONSULT A LICENSED ELECTRICIAN!
IS-GE 35 1
12.05
 Loading...