

Page 1
ASSEMBLY / INSTALLATION INSTRUCTIONS:
6 CORPORATE PARKWAY
GOOSE CREEK SC 29445
www quoizel com
..
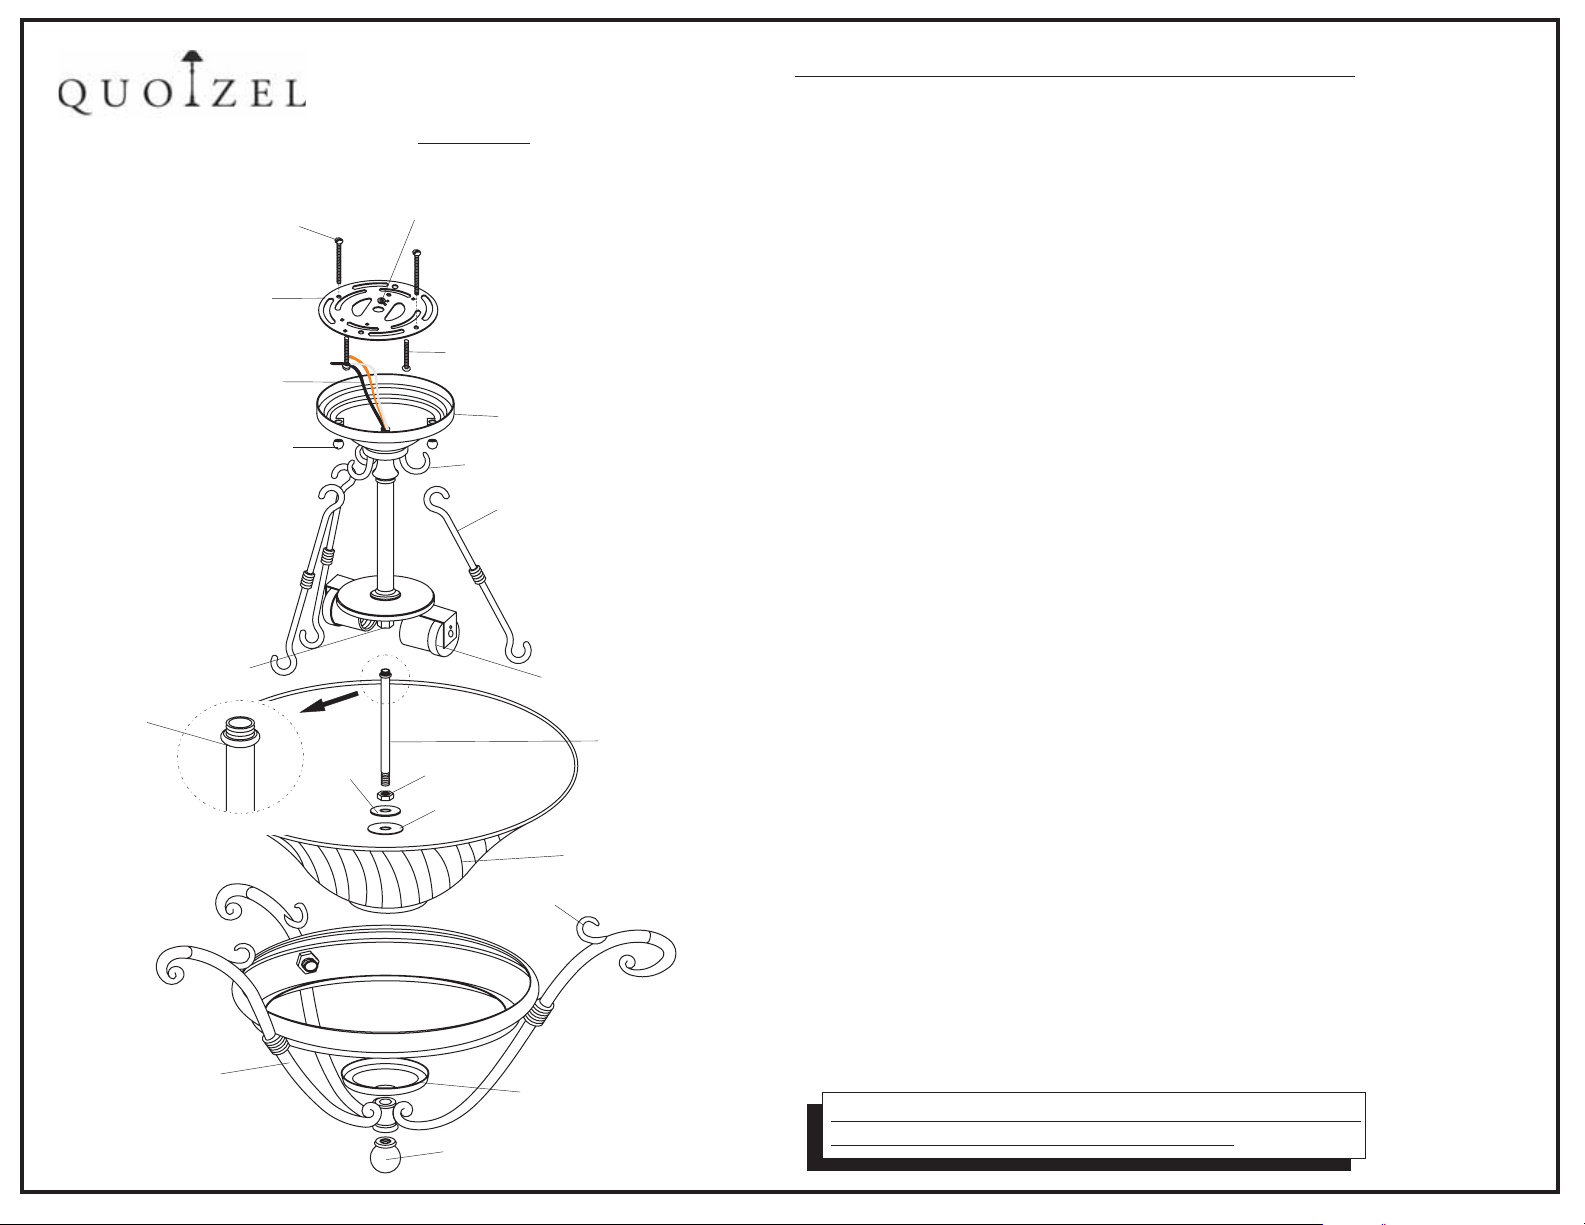
()2 MOUNTING SCREWS
SUPPLY WIRE
and GROUND WIRE
()2 MOUNTING BALLS
HEX COUPLING
BEADED
END
,.
UNIVERSAL
CROSSBAR
PLANE
WASHER
FIGURE1
GREEN GROUND SCREW
()
2 OUTLET BOX
SCREWS not supplied
HEX NUT
PLASTIC
WASHER
()
FIXTURE CANOPY
HOOK
POTHOOK
SOCKET
CLUSTER
SHADE
HOOK
CENTER STEM
., ,
1 Before beginning installation carefully unpack and identify all parts
referring to illustration (FIGURE 1
. .
2 Turn the electrical power to installation point OFF at circuit breaker
.
3 Thread BEADED END of CENTER STEM into HEX COUPLING and tighten
until snug Proceed to thread HEX NUT onto end of CENTER STEM and make
sure there ocate the following part in
this order SHADE COVER
DECORATION PART Secure them together by threading FINIAL onto end
.
is enough length for rest components L
PLANE WASHER PLASTIC WASHER
:, ,,,
.
of CENTER STEM and tighten until snug Locate one end of POTHOOK
onto HOOKS on the bottom side of FIXTURE CANOPY Proceed to locate
another end of POTHOOK onto HOOKS on DECORATION PART
.
4 Locate the 2 MOUNTING SCREWS and thread them into the back of the
UNIVERSAL CROSSBAR making sure that they match the holes in the
FIXTURE CANOPY Using 2 OUTLET BOX SCREWS not supplied
()
,
.() ( ),
fasten the UNIVERSAL CROSSBAR to the OUTLET BOX
Making the wire connections
.
5 Using wire connectors not supplied
connect the HOUSE GROUND WIRE to the FIXTURE GROUND WIRE
connect the HOUSE WHITE WIRE to the FIXTURE SUPPLY WIRE WHITE
or RIBBED SIDE connect the HOUSE BLACK or RED WIRE to the
FIXTURE SUPPLY WIRE BLACK or SMOOTH SIDE Wrap each
); ( )
().
connection with approved electrical tape
.,
6 Carefully tuck all of the wiring up into the outlet box and fit the FIXTURE
CANOPY over the MOUNTING SCREWS Secure the FIXTURE CANOPY
to the ceiling with the 2 MOUNTING BALLS making sure that the balls
() ,
are fully threaded onto the MOUNTING SCREWS before tightening
).
.
.
.
.
.
:()
;
(
.
.
.
DECORATION PART
FINIAL
COVER
.
7 Install bulbs referring to fixture markings and or labels for maximum
wattage
..
8 Restore power to installation point ON Retain this sheet for future
reference
.
.
/
IF IN DOUBT ABOUT ELECTRICAL INSTALLATION,
IS GE1723
CONSULT A LICENSED ELECTRICIAN!
-
Revised 06 02 23
//
 Loading...