

Page 1
6CORPORATEPARKWAY
GOOSECREEKSC29445
wwwquoizelcom
..
Quoizel,Inc.
6CorporateParkway
GooseCreek,SC
29445
CustomerService
Phone631.273.2700
Fax631.231.7102
www.quoizel.com
,.
ToolsRequired:Flatheadscrewdriver,Phillipsscrewdriver,pliers,wirecutters,wire
strippers,electricaltape,safetyglasses.
BulbRecommended: (1)T3RSC150WMaximum
EstimatedAssemblyTime: 20-30minutes
Preparation: Identifyandinspectallpartsbeforebeginninginstallation.Checkpackage
contentlistanddiagramsbelowtobesureallpartsarepresent.Ifanypartsaremissing
ordamaged,donotattempttoassemble,install,oroperatethefixture.Contactcustomer
serviceforreplacementparts.
AssemblyInstructionSheet#IS-EL1284CB
ForStylesEL1284CB
WarningsandCautions
Turnoffelectricityatcircuitbreakerormainfuseboxbeforeinstallation.Consultalicensedelectricianifindoubt.
Theseinstructionsareprovidedforyoursafety.Itisveryimportantyoureadthemcompletelybeforeinstalling
thefixture.Westronglyrecommendthatalicensed,professionalelectricianperformtheinstallation.
Disconnectfixturefrompowersourcebeforereplacingbulbs.Makesurebulbsaregivensufficienttimetocool
beforeremoval.Donotsubjectglasspartstoanyshockwhileinoperationorshatteringmayresult.
Donottouchthebulbwithbarehandsuseaclothorglove.
A
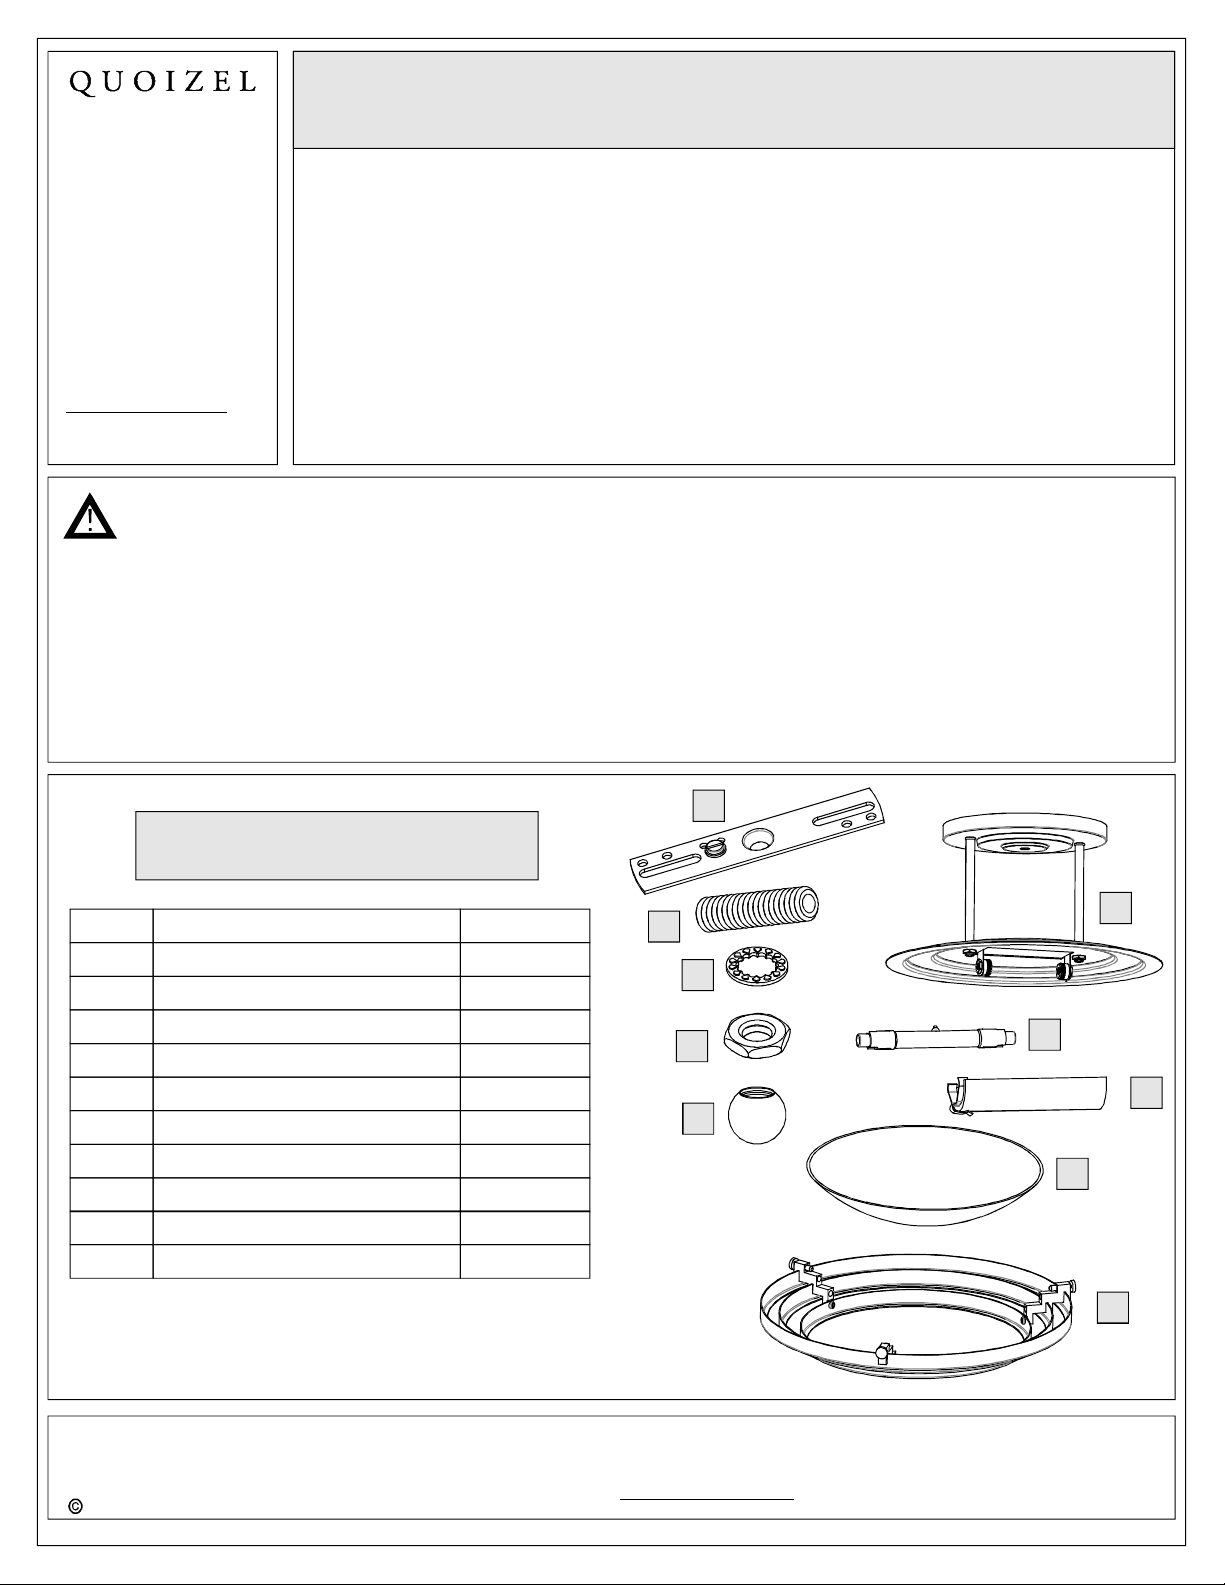
PackageContents
Part Description
A Crossbar
B
C
D
E
F
G
H
J
Nipple
LockWasher
HexNut
MountingBall
FixtureBody
T3Bulb
BulbShield
Shade
I
ShadeHolder
Quantity
1pc.
1pc.
1pc.
1pc.
1pc.
1pc.
1pc.
1pc.
1pc.
1pc.
B
C
D
E
G
F
I
H
Needassistancewithpartsorassembly?CallQuoizelcustomerserviceat1-631-273-2700
2014QuoizelInc.
ThankyouforpurchasingaQuoizelproduct.
orvisituson-lineat www.quoizel.com
1of6
J
January2014
Page 2
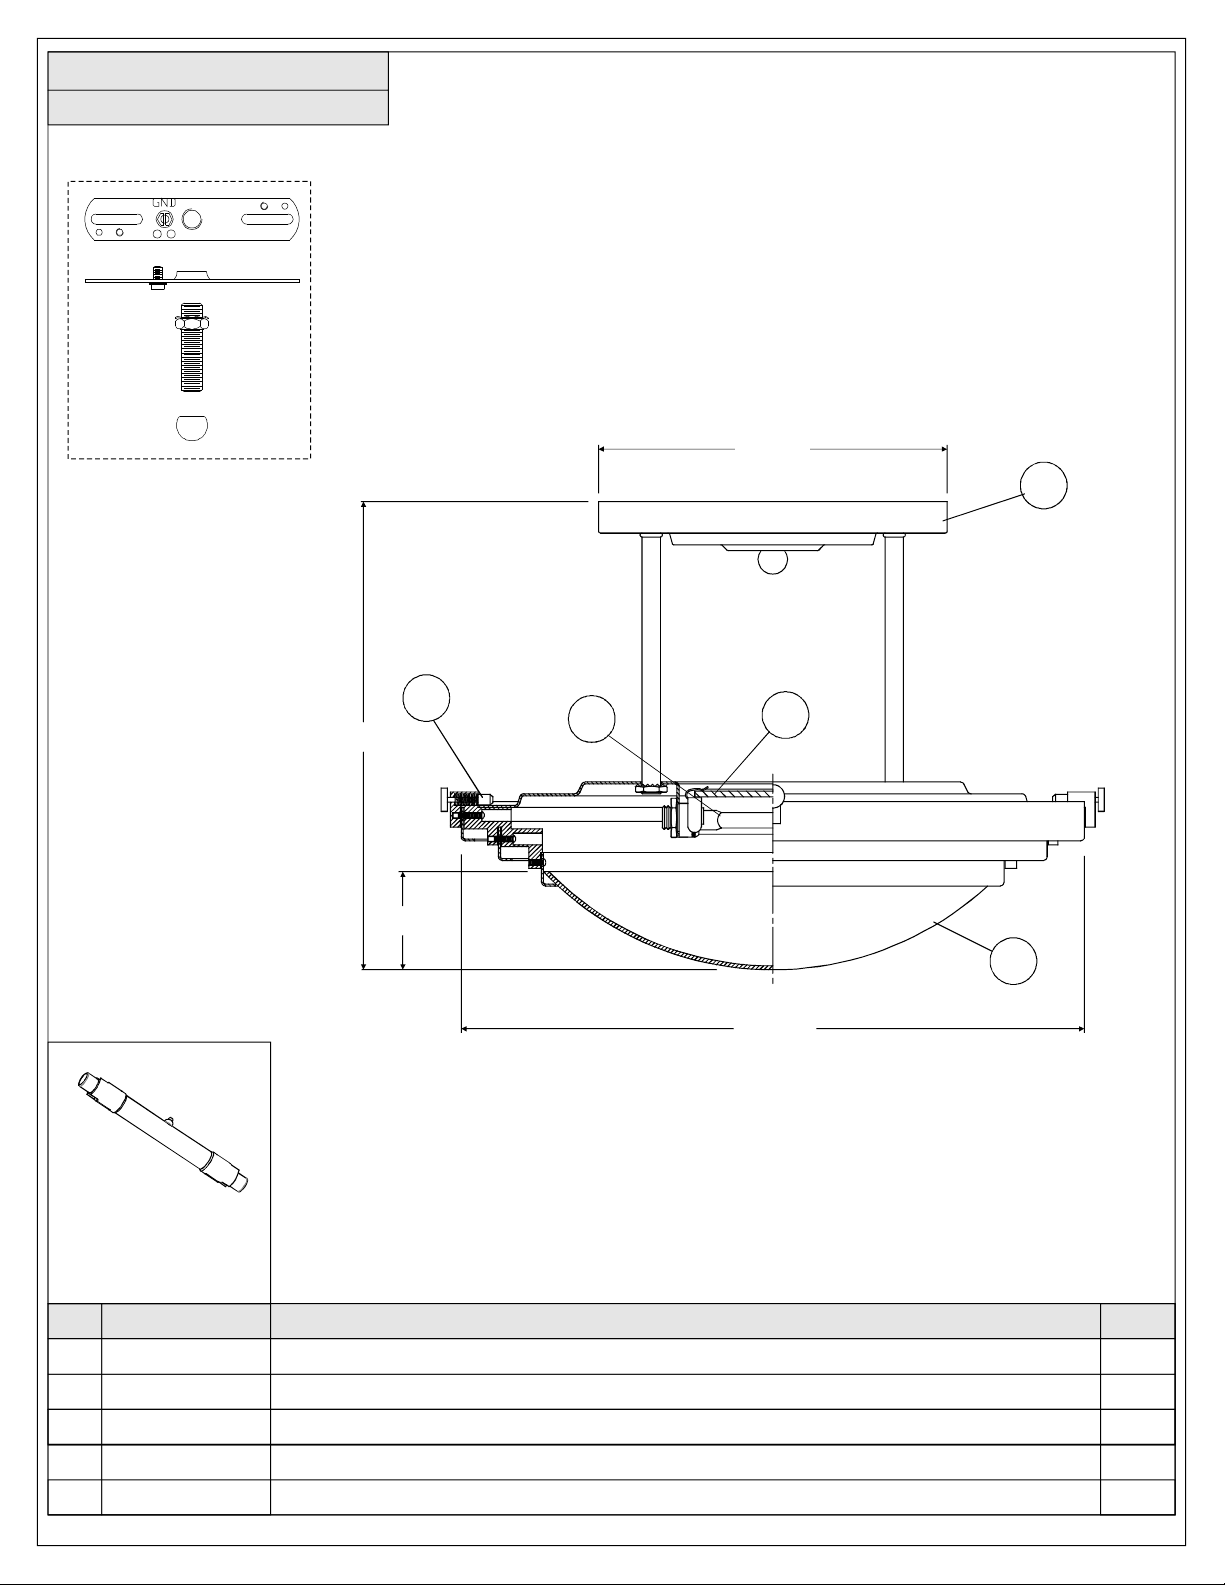
EL1284CB
FINISH:BRUSHEDCHROME
Dia.7”
1
(1)150W
T3RSCBulb
(Supplied)
5
9.5”
2
2”
4
3
Dia.13”
NOTE:ALLDIMENSIONSAREROUNDEDUPTOTHENEAREST1/2"
PARTNUMBER
11284CEL BASEBRSSLV1LSEMI-FLUSH 01
2
3
4
5
I805DC
G1284SM
G862LEX
M2079SP
REPLACEMENTPARTDESCRIPTION
BULB150WHLGNDBLENDED
GLASREPLEl1284 1
LENS3.5"HEAT
SPRINGPINFORELSERIES
2of6
REQ.NO.
1
1
1
Page 3

6CORPORATEPARKWAY
GOOSECREEKSC29445
wwwquoizelcom
..
,.
AssemblyInstructionSheet#IS-EL1284CB
ForStylesEL1284CB
STEP1- AttachCrossbartoOutletBox
A.SecuretheCorssbar(A)totheoutletboxwithoutlet
boxscrews(notsupplied).Tightenuntilsnug.
STEP2AttachNippletoCrossbar-
A.ThreadoneHexNut(D)ontothetopendoftheNipple
(B).
B.PlaceoneLockWasher(C)overthetopendofthe
Nipple(B)andthenthreadtheNipple(B)intothecenter
lockholeoftheCrossbar(A).
C.Usingpliers,threadthehexNut(D)againstthe
Crossbar(A)andhandtightenuntilsnug.
Mounting
Hole
OutletBox
Crossbar
OutletBox
Screw(not
Supplied)
Figure1
Crossbar
LockWasher
HexNut
Socket
Figure2
Needassistancewithpartsorassembly?CallQuoizelcustomerserviceat1-631-273-2700
2014QuoizelInc.
ThankyouforpurchasingaQuoizelproduct.
orvisituson-lineat www.quoizel.com
3of6
January2014
Page 4

6CORPORATEPARKWAY
GOOSECREEKSC29445
wwwquoizelcom
..
,.
AssemblyInstructionSheet#IS-EL1284CB
ForStylesEL1284CB
STEP3MakeWireConnections-
A.Usestandardwireconnectorstomakeallwire
connections.(Connectorsarenotincludedwithfixture.)
Stripandpreparewireendsaccordingtoinstructions
suppliedwithconnectors.
B.ConnectWhiteSupplyWirefromtheOutletBoxtoWhite
Wirefromfixture.
C.ConnectBlack(orRed)SupplyWirefromtheOutletBox
toBlackWirefromfixture.
D.ConnectGroundWirefromtheOutletBoxtoGround
Wirefromfixture.
E.Twistconnectorsuntilwiresaretightlyjoinedtogether.
F.Wrapeachconnectionwithapprovedelectricaltapeand
carefullystuffalltheconnectedwiresintotheOutletBox.
Whitewirefromsupply Whitewirefromfixture
Figure3
Blackwirefromsupply
(orRed)
Groundwirefromsupply Groundwirefromfixture
Blackwirefromfixture
Figure4
STEP4- AttachFixtureBodytoOutletBox
A.PushtheCeilingCanopyoftheFixtureBody(F)
upwardovertheOutletBox.ThreadtheMountingBall
(E)ontotheNipple(B)andhandtightenuntilsnugto
securetheCeilingCanopy.
MountingBall
Figure5
Outlet
Box
Nipple
Ceiling
Canopy
Needassistancewithpartsorassembly?CallQuoizelcustomerserviceat1-631-273-2700
2014QuoizelInc.
ThankyouforpurchasingaQuoizelproduct.
orvisituson-lineat www.quoizel.com
4of6
January2014
Page 5

6CORPORATEPARKWAY
GOOSECREEKSC29445
wwwquoizelcom
..
,.
AssemblyInstructionSheet#IS-EL1284CB
ForStylesEL1284CB
STEP5- InstallBulb
A.ThisfixtureusesT3bulb.Maximum150watts.
B.HoldtheBulb(G)withclothortissue,carefullypress
oneendoftheBulb(G)intotheLampholder.Repeatthe
processfortheotherside.
IMPORTANT:
Donottouchthebulbwithbarehands
useaclothorglove.
STEP6AttachBulbShield-
A.PresstheTabontheLampholderup,slidethefreeend
oftheBulbShield(H)undertheTabontheLampholder.
LocatetheothersideoftheBulbShield(H)ontothe
anotherLampholder.PresstheTabbackontoengage
theBulbShield(H).
Lampholder
Tab
Bulb
Lampholder
Figure6
BulbShield
STEP7InsertShadeintoShadeHolder-
A.InserttheShade(I)intotheShadeHolder(J).
Lampholder
Figure7
Shade
Shade
Holder
Figure8
Needassistancewithpartsorassembly?CallQuoizelcustomerserviceat1-631-273-2700
2014QuoizelInc.
ThankyouforpurchasingaQuoizelproduct.
orvisituson-lineat www.quoizel.com
5of6
January2014
Page 6

6CORPORATEPARKWAY
GOOSECREEKSC29445
wwwquoizelcom
..
,.
AssemblyInstructionSheet#IS-EL1284CB
ForStylesEL1284CB
STEP8- AssembleShadeHolderwith
ShadetoFixtureBody
A.AttachtheShadeHolder(J)withShade(I)tothe
FixtureBody(F)byplacingthetwoFixed
SupportPinsoftheShadeHolder(J)ontopof
thebottomlipofthePan.Placetheotherendof
theShadeHolder(J)ontothePanandlockitin
placewiththeAdjustableSupportPin.
Yourfixturesemi-flushlampisnowassembled
andreadytouse.Enjoy!
Pan
Adjustable
SupportPin
ShadeHolder
Figure9
Fixed
Support
Pin
Needassistancewithpartsorassembly?CallQuoizelcustomerserviceat1-631-273-2700
2014QuoizelInc.
ThankyouforpurchasingaQuoizelproduct.
orvisituson-lineat www.quoizel.com
6of6
January2014
 Loading...