

Page 1
6CORPORATEPARKWAY
GOOSECREEKSC29445
wwwquoizelcom
..
,.
INSTRUCTIONSHEETIS-DW1506
STYLENUMBER:DW1506C
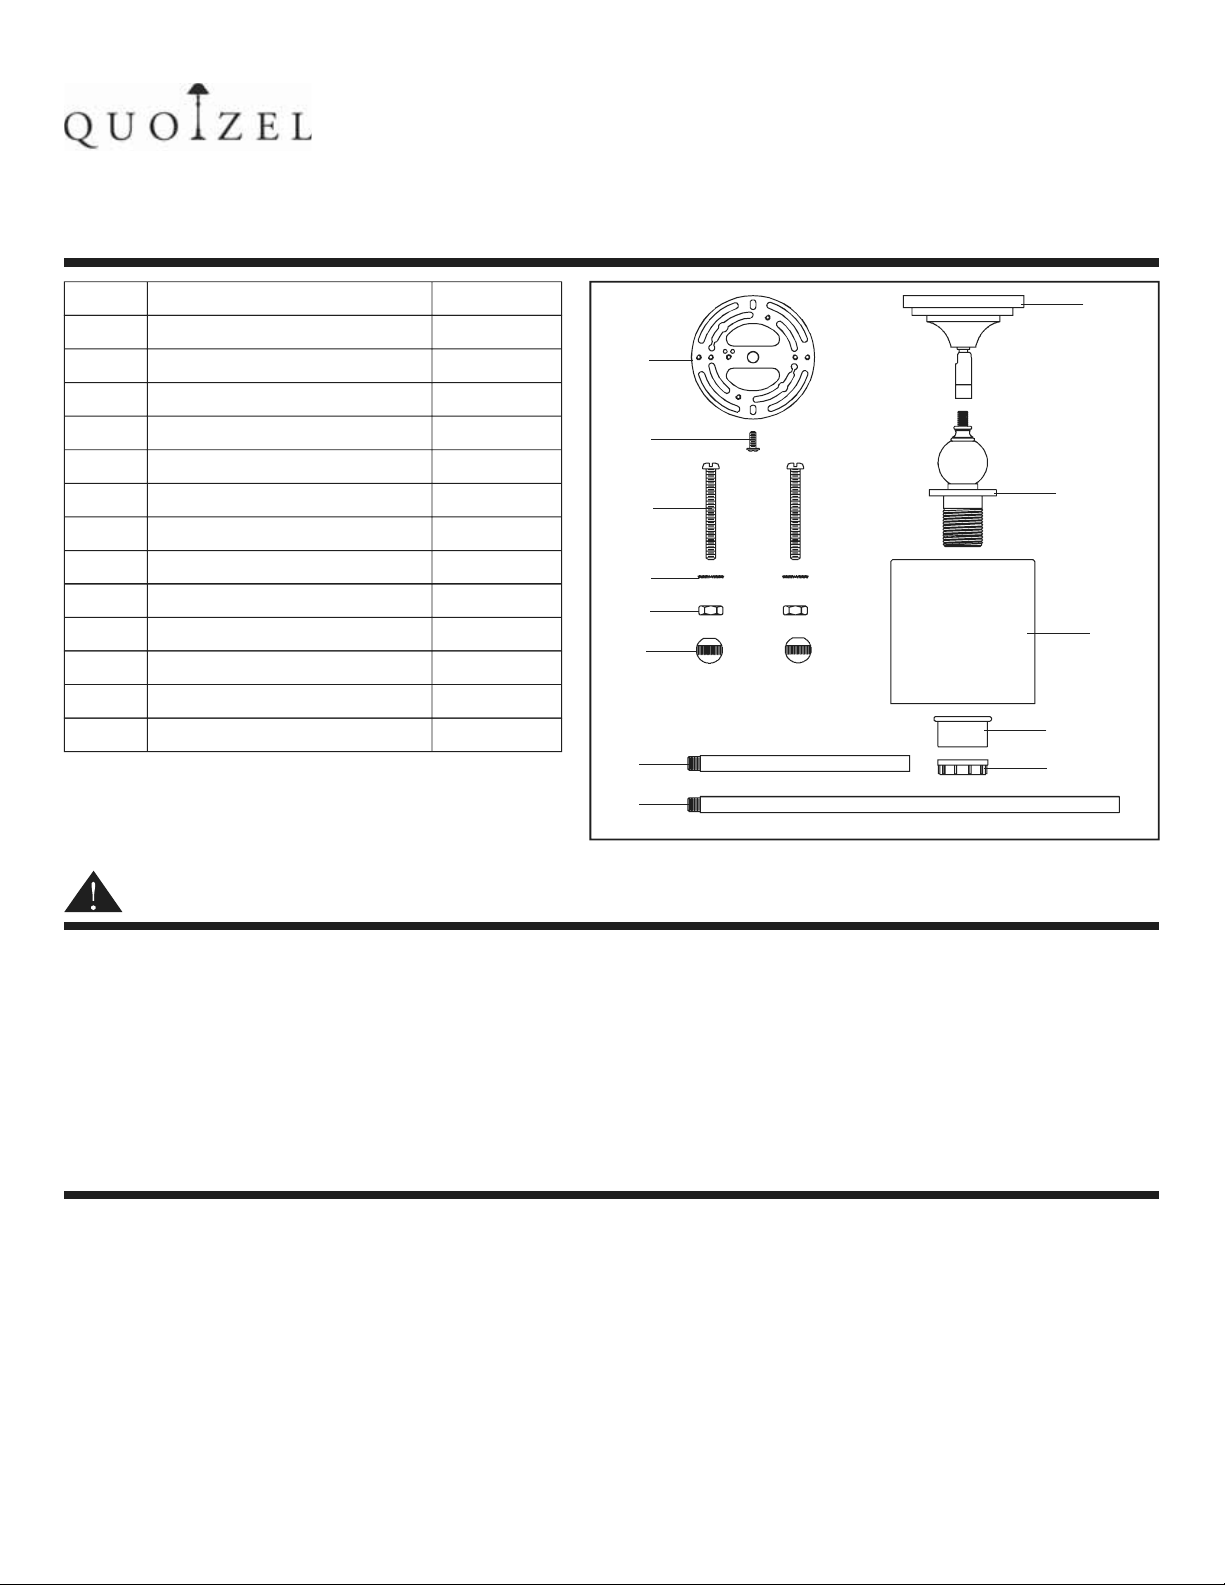
REVISED2014-01-06PACKAGECONTENTS
PART DESCRIPTION
ACrossbar
B
C
D
E
F
G
H
I
J
K
L
M
GreenGroundScrew
MountingScrew
LockWasher
HexNut
MountingBall
6” Rod
12” Rod
CeilingCanopy
SocketAssembly
Shade
SteelCollar
SocketCollar
QUANTITY
1pc
1pc
2pcs
2pcs
2pcs
2pcs
2pcs
2pcs
1pc
1pc
1pc
1pc
1pc
I
A
B
C
D
E
F
G
H
J
K
L
M
WARNINGSANDCAUTIONS
WARNING:
● Beforebeginningtheinstallation,turnoffelectricityatthecircuitbreakerboxorthemainfuseboxbyswitching
offthecircuitbreakerorremovingthefuse.
CAUTION:
● Theseinstructionsareprovidedforyoursafety.Itisveryimportantthattheyarereadcompletelybeforethe
installationofyourfixture.Westronglyrecommendthataprofessionalelectricianinstallthefixture.
● Disconnectfixturefromthepowersourcebeforereplacingthebulb(s),makingsurethatbulb(s)hadsufficient
timetocooldown.DONOTsubjectthelamptoanyshockwhilelitasshatteringoflampmayresult.
PREPARATION
● Beforebeginninginstallationofproduct,makesureallpartsarepresent.Comparepartswithpackagecontents
listanddiagramabove.Ifanypartismissingordamaged,donotattempttoassemble,installoroperatethe
product.Contactcustomerserviceforreplacementpart.
● EstimatedAssemblyTime:20-30minutes
● ToolRequiredforAssembly(notincluded):Flatheadscrewdriver,Phillipsscrewdriver,Pliers,Electricaltape,
Wirecutter,Safetyglassesand(1)100WA19mediumbasebulb
● HelpfulTools(notincluded):Wirestrippers.
.
1OF5
Page 2
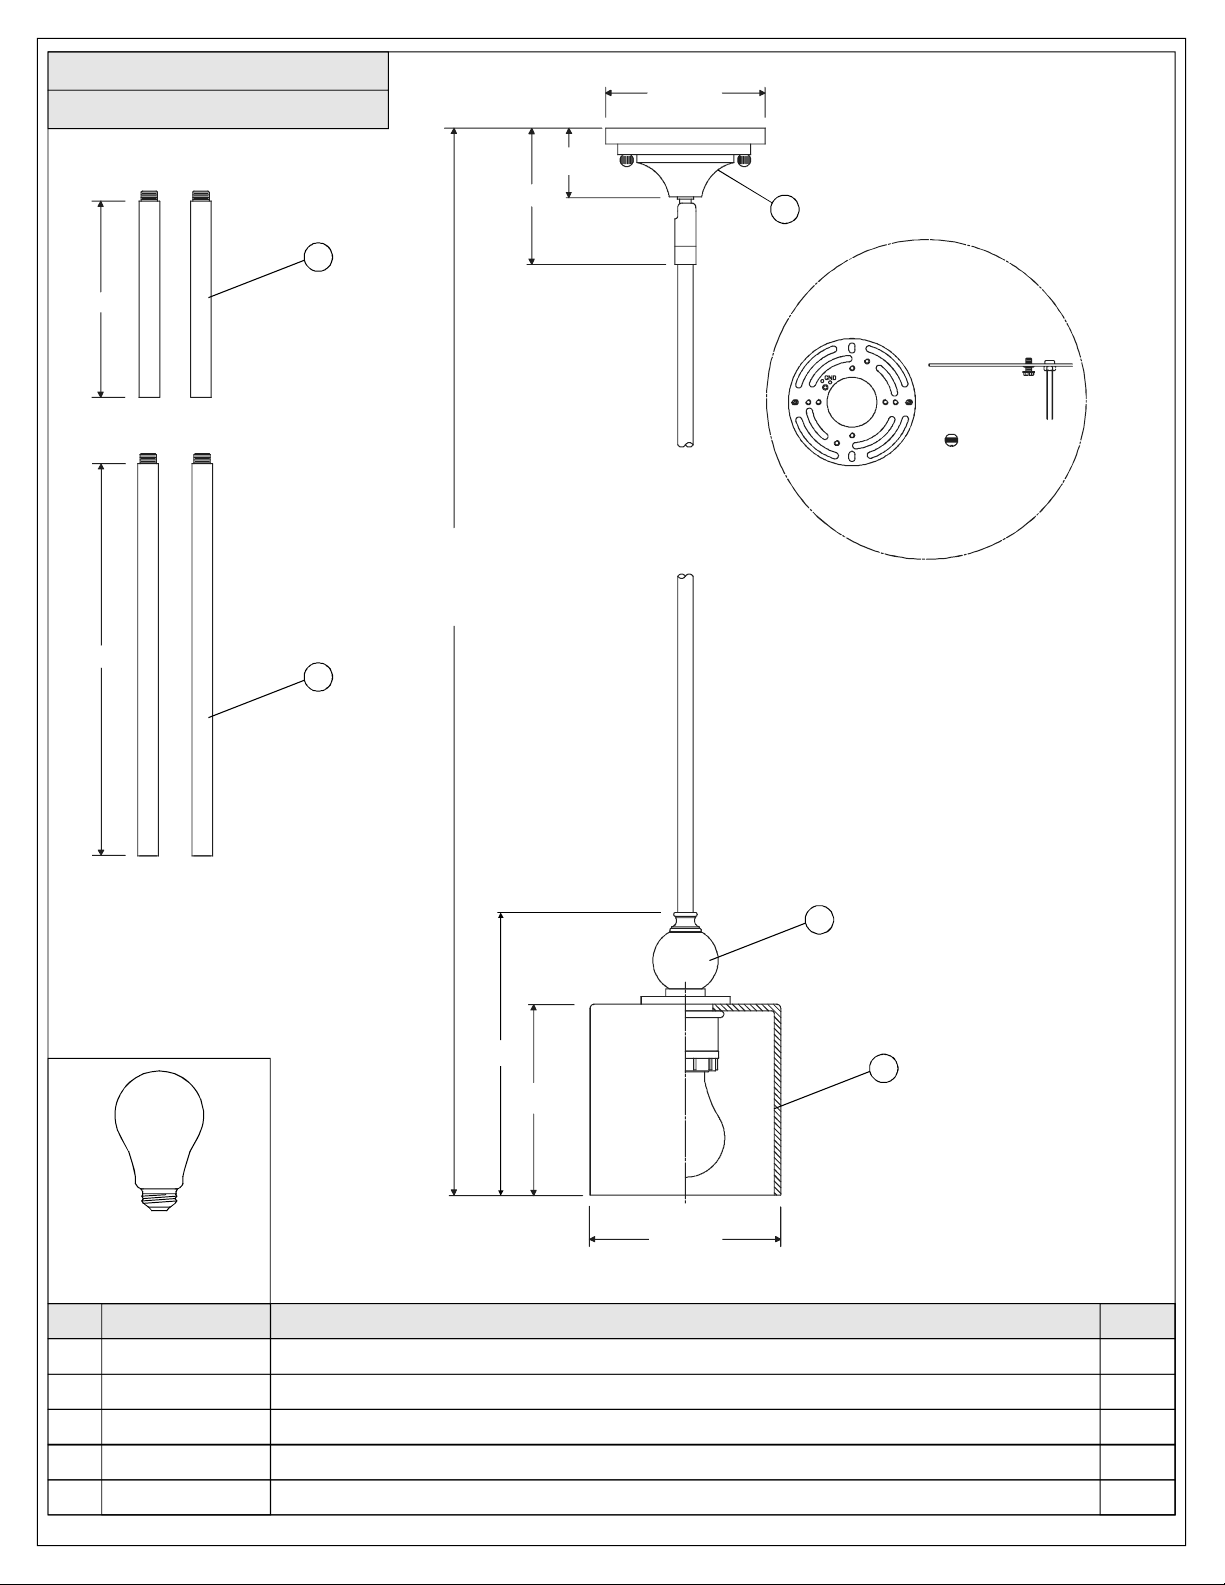
DW1506C
FINISH:POLISHEDCHROME
4
6”
OVERALLHEIGHTINCLUDES
(2)6”AND(2)12” RODS
48.5”
4”
5” Dia.
2”
2
12”
3
1
8.5”
5.5”
5
(1)100WMedium
BaseBulb
(NotSupplied)
PARTNUMBER
11506CDW BASEPOLISHEDCHROMEDW1506C
1
2
3
4
5
G2641BS
9012EXC
9006EXC
G595WL
6” Dia.
NOTE:ALLDIMENSIONSAREROUNDEDUPTOTHENEAREST1/2"
REPLACEMENTPARTDESCRIPTION
MOUNTINGHARDWAREPOLISHEDCHROME5”D
RODEXTENSIONPOLISHEDCHROME12”Lx0.5”D
RODEXTENSIONPOLISHEDCHROME6”Lx0.5”D
SHADEOPALETCHED5.5”Hx6”D
2of5
REQ.NO.
1
1
2
2
1
Page 3

INSTALLATIONINSTRUCTIONS
STEP1:
a.DeterminetheRodstobeassembledaccordingtoyour
desiredhangingheight.
b.PasstheSupplyWireswithGroundWirethroughthe
chosenRodsandthenthreadRodsandSocket
Assemblytogetherasshown.Hand-tightenuntilsnug.
STYLENUMBER:DW1506C
6”Rod
6” Rod
12” Rod
12” Rod
STEP2:
a.PasstheSupplyWireswithGroundWirethroughthe
SwivelandCeilingCanopy.
b.ThreadtheSwivelontothetopendoftheUpperRod.
Hand-tightenuntilsnug.
SupplyWireswith
GroundWire
SocketAssembly
CeilingCanopy
Swivel
SupplyWirewith
GroundWire
UpperRod
35OF
Page 4

INSTALLATIONINSTRUCTIONS
STEP3:
a.ScrewtheMountingScrewsintotheCrossbar,place
theLockWashersovertheMountingScrewsand
threadtheHexNutsontotheMountingScrewsas
shown.SecurethepositionoftheMountingScrewsby
tighteningtheHexNutsagainsttheCrossbar.
b.SecuretheCrossbartotheOutletBoxwithOutletBox
Screws.
STEP4:
UseWireConnectors(notsupplied)toconnectthe
wires.
a.ConnecttheHouseGroundWiretotheFixtureGround
Wire.
b.ConnecttheHouseWhite(orRibbed)Wiretothe
FixtureSupplyWire(WhiteorRibbedSide).
c.ConnecttheHouseBlack(orRed)WiretotheFixture
SupplyWire(BlackorSmoothSide).
d.Wrapeachconnectionwithapprovedelectricaltape
andcarefullystuffalloftheconnectedwiresintothe
OutletBox.
WHITEORRIBBED
FROMHOUSE
BLACK(ORRED)WIRE
FROMHOUSE
GROUNDWIRE
FROMHOUSE
STYLENUMBER:DW1506C
OutletBox
MountingScrew
Crossbar
OutletBoxScrew
LockWasher
HexNut
WHITEORRIBBED
FROMFIXTURE
BLACKORSMOOTH
FROMFIXTURE
GROUNDWIRE
FROMFIXTURE
STEP5:
a.PlacetheCeilingCanopyovertheMountingScrews
andsecurewithMountingBalls.Hand-tightenuntil
snug.
OutletBox
Mounting
Screw
Ceiling
Canopy
MountingBall
45OF
Page 5

INSTALLATIONINSTRUCTIONS
STEP6:
a.PlacetheShadeandtheSteelCollarovertheSocket
asshown.SecurebythreadingtheSocketCollaronto
theSocket.Handtightenuntilsnug.
STYLENUMBER:DW1506C
Socket
Shade
SteelCollar
SocketCollar
STEP:7
a.Installthecorrectbulbreferringtofixturemarkingsand/orlabelsformaximumwattage.
Yourinstallationiscompletednow.Restoreelectricity.Retainthissheetforfuturereference.
55OF
 Loading...