

Page 1
6CORPORATEPARKWAY
GOOSECREEKSC29445
wwwquoizelcom
..
,.
INSTRUCTIONSHEETISDH5105
STYLENUMBERDH5105AN,DH5105PN
:
-
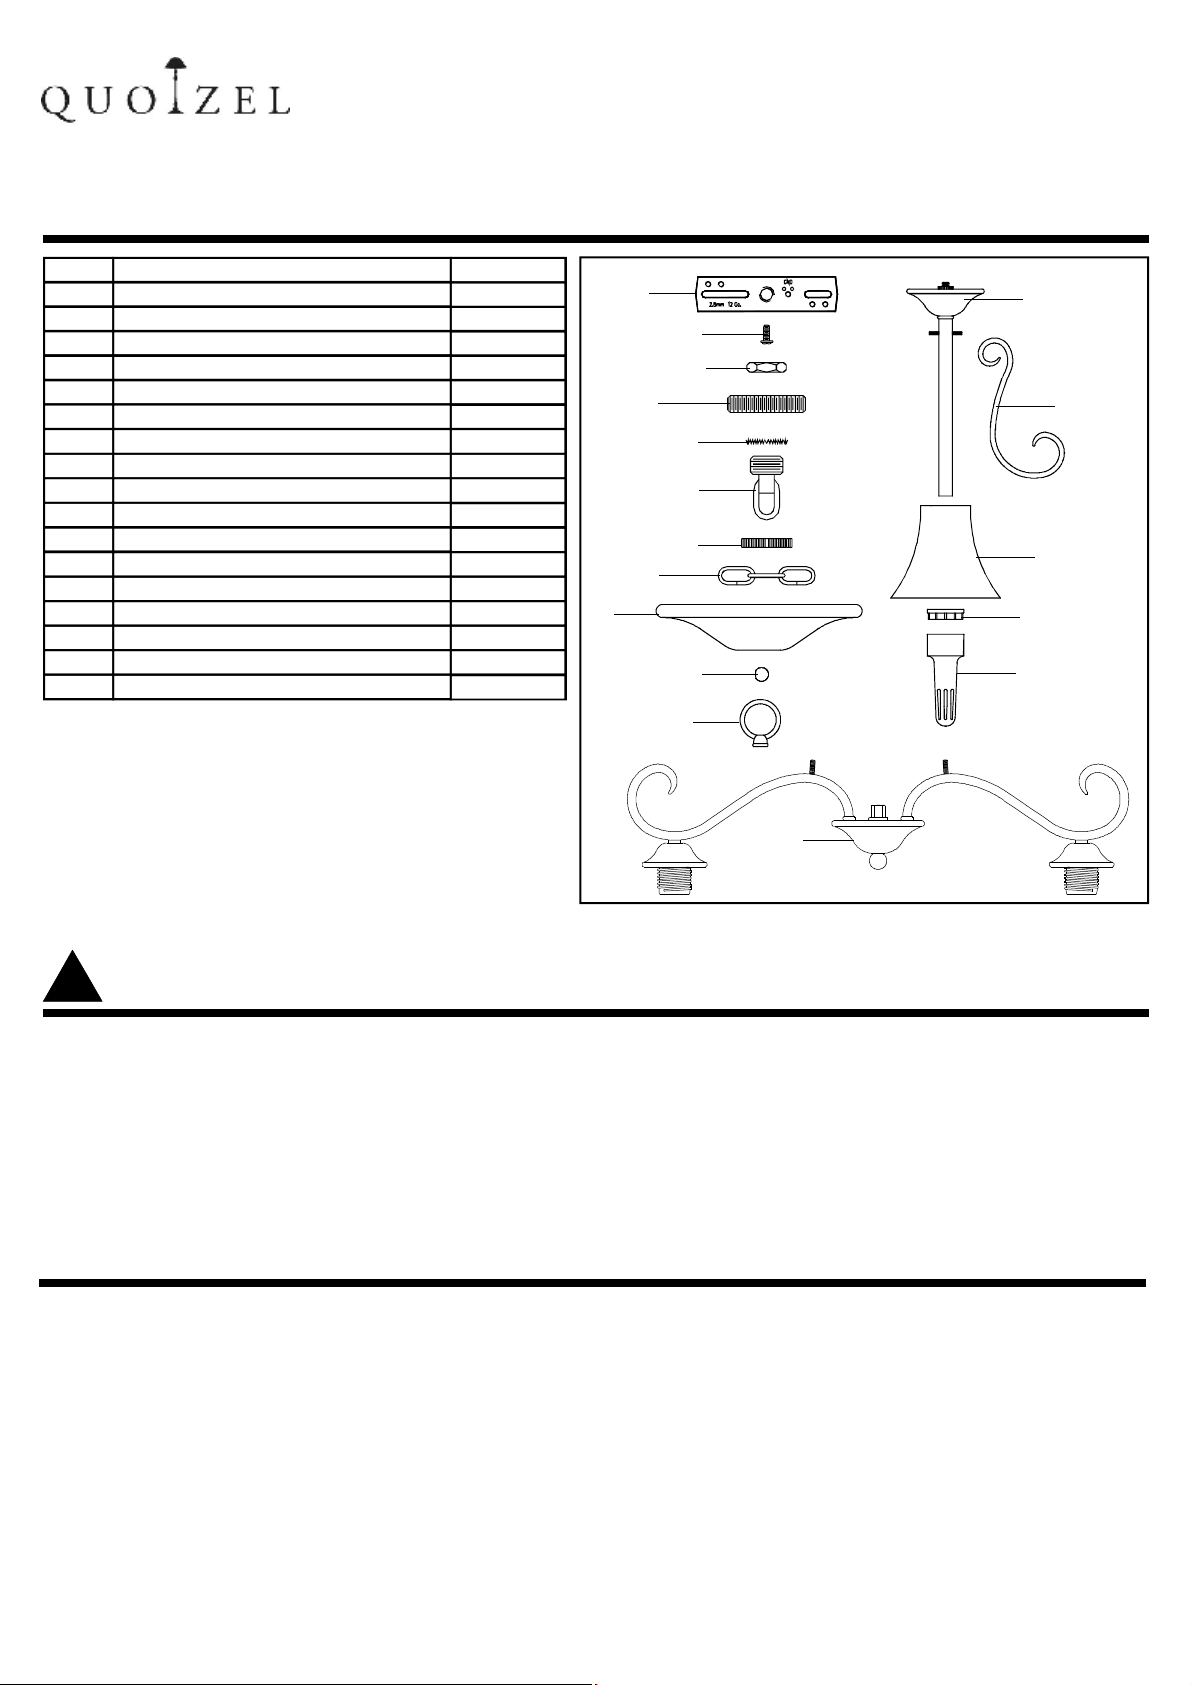
PACKAGECONTENTS
Part
A
B
C
D
E
F
G
H
I
J
K
L
M
N
O
P
Q
Crossbar
GreenGroundScrew
HexNut
Nipple
LockWasher
CanopyChainLoop
CanopyLockRing
FixtureChain
CeilingCanopy
LockBall
FixtureLoop
SocketAssembly
CenterStemAssembly
SideArm
Shade
SocketCollar
SocketCollarTool
Description
Quantity
1pc
1pc
2pcs
1pc
2pcs
1pc
1pc
1pc
1pc
10pcs
1pc
1pc
1pc
5pcs
5pcs
5pcs
1pc
A
D
H
I
ISSUED01-2010 REVISED2013-12-09
M
B
C
N
E
F
G
J
K
O
P
Q
!
WARNINGSANDCAUTIONS
WARNING:
● Beforebeginningtheinstallation,turnoffelectricityatthecircuitbreakerboxorthemainfuseboxby
switchingoffthecircuitbreakerorremovingthefuse.
CAUTIONS:
● Theseinstructionsareprovidedforyoursafety.Itisveryimportantthattheyarereadcompletelybefore
theinstallationofyourfixture.Westronglyrecommendthataprofessionalelectricianinstallthefixture.
● Disconnectfixturefromthepowersourcebeforereplacingthebulb(s),makingsurethebulb(s)had
sufficienttimetocooldown.DONOTsubjectthelamptoanyshockwhilelitasshatteringoflampmay
result.
PREPARATION
● Beforebeginninginstallationofproduct,makesureallpartsarepresent.Comparepartswithpackage
contentslistanddiagramabove.Ifanypartismissingordamaged,donotattempttoassemble,installor
operatetheproduct.Contactcustomerserviceforreplacementpart.
● EstimatedAssemblyTime:3045minutes
● ToolsRequiredforAssembly(notincluded):FlatheadscrewdriverPhillipsscrewdriver,pliers,electrical
tape,wirecutters,safetyglasses&(5)100WA19MediumBaseBulbs.
● HelpfulTools(notincluded):WireStrippers.
L
,
1OF4
Page 2
INSTALLATIONINSTRUCTIONS
STEP1:
aUnfoldtheSupportArmstoproperlocations.
.
bThreadtheendoftheCenterStemintotheHexCoupling
.
onthetopcenteroftheSocketAssembly.Pleaselineup
theBoltsonthesideoftheCenterStemAssemblyand
SupportArmsbeforeyoutightenthemtogether.
STYLENUMBERDH5105AN,DH5105PN
Bolt
:
CenterStem
Assembly
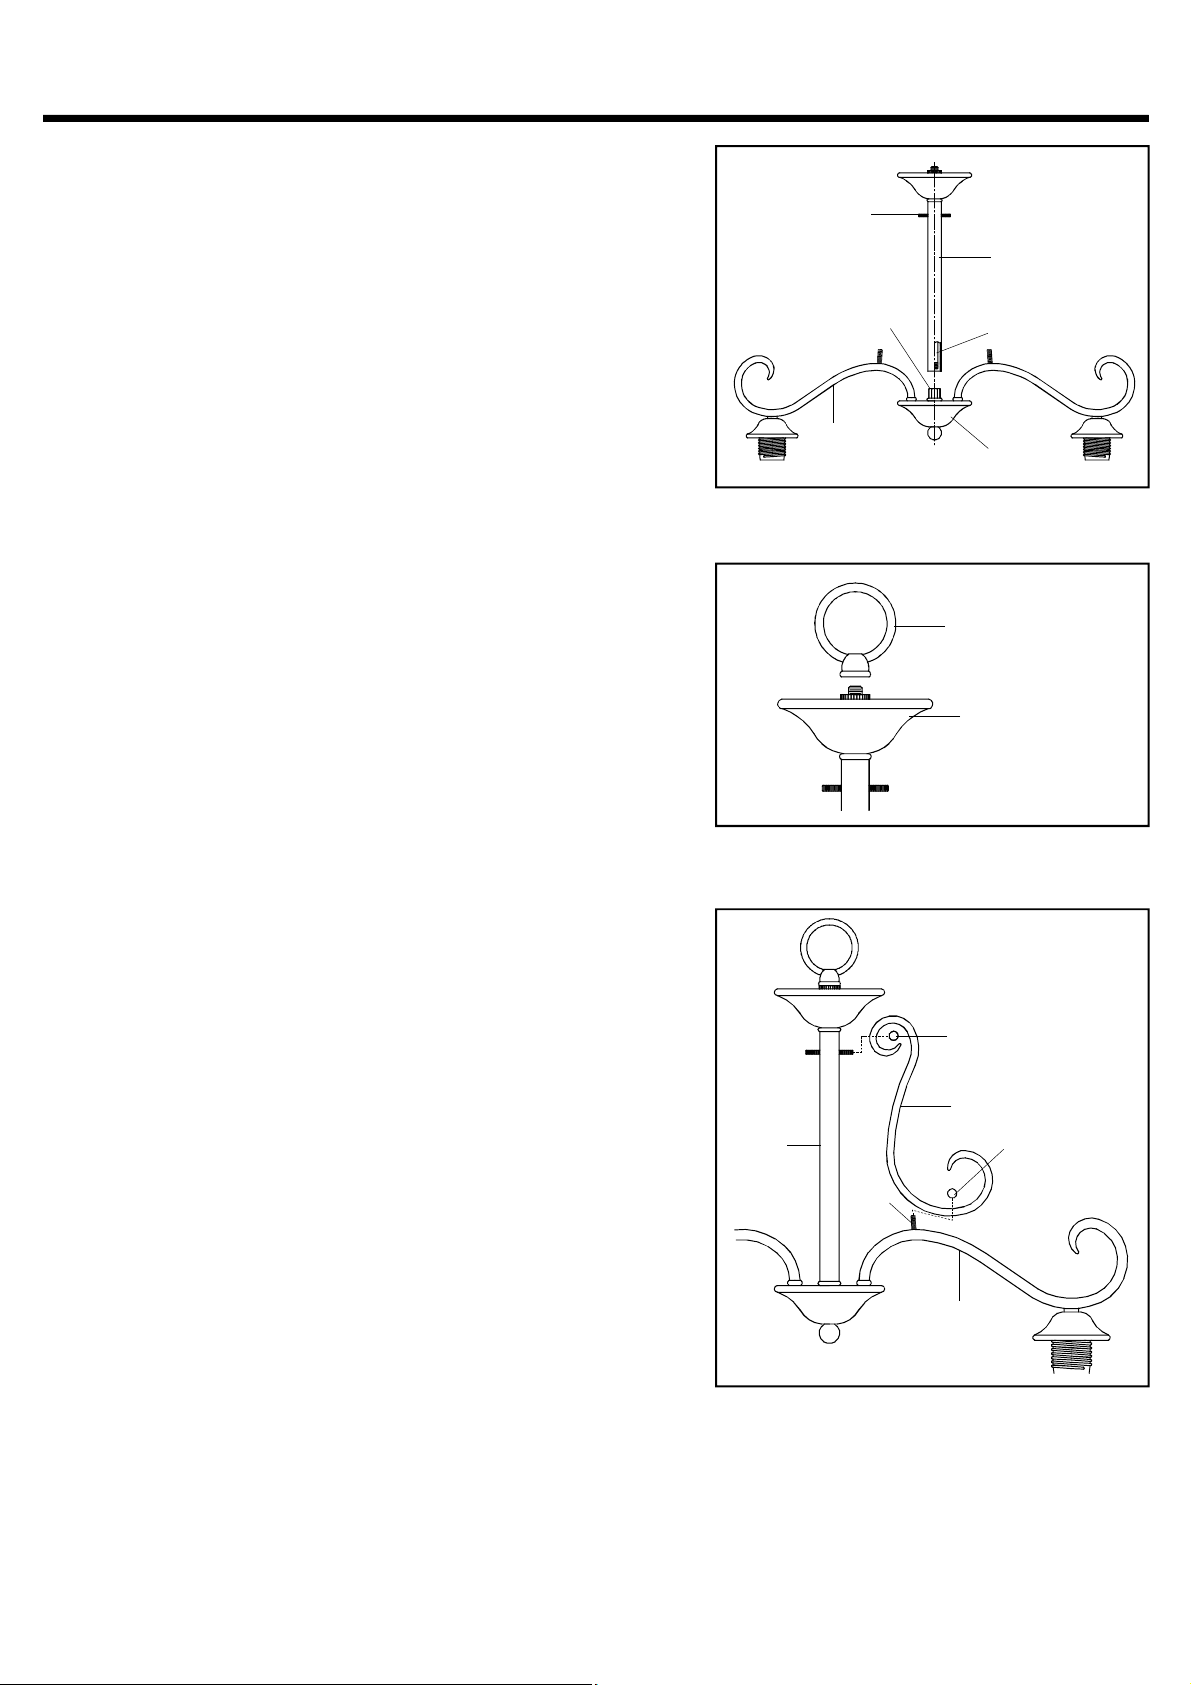
STEP2:
aThreadtheFixtureLoopontothenippleonthetopcenterof
.
theCenterStemAssembly.Handtightenuntilsnug.
HexCoupling
Support
Arm
CenterStem
Socket
Assembly
FixtureLoop
CenterStem
Assembly
STEP3:
aLocatetheholesontheSideArmovertheBoltsattheside
.
oftheCenterColumnandtheSupportArmasshown.
SecurebythreadingtheLockBallsontotheBolts.Handtightenuntilsnug.
Center
Column
LockBall
SideArm
LockBall
Bolt
Support
Arm
2OF4
Page 3

INSTALLATIONINSTRUCTIONS
STEP4:
aAttachtheCrossbartotheOutletBoxwiththeheadofthe
.
GreenGroundScrewfacingyou.SecureitwithOutletBox
Screws(notincluded)Tightenuntilsnug
..
STYLENUMBERDH5105AN,DH5105PN
:
OutletBox
Crossbar
STEP5:
* Pliersisrequiredforthisstep.
a.ThreadoneHexNuttooneendoftheNippleuntilitisat
least0.25” fromtheend.PassoneLockWasheroverthe
endoftheNippleandthreadtheCanopyChainLooponto
theNipple.Byusingpliers,threadtheHexNutagainstthe
CanopyChainLoopandhandtightenuntilsnug.
b.ThreadanotherHexNuttothemiddleoftheNipple.Place
anotherLockWasherovertheNippleandthenthreadthe
NippleintotheCrossbaruntiltheNippleisabout0.375”
abovetheCrossbar.
c.RemovetheCanopyLockRingfromtheCanopyChain
Loop.PlacetheCanopyovertheCanopyChainLoop
againsttheceilingtodeterminethecorrectpositionofthe
Nipple.ThreadtheCanopyLockRingontotheCanopy
ChainLoop.AdjusttheNippletoallowtheCeilingCanopy
torestagainsttheceilingwhenheldinplacebythe
CanopyLockRing.
d.RemovetheCanopyLockRingandtheCeilingCanopy.
TightentheHexNutagainsttheCrossbartosecurein
place.
GreenGround
Screw
Crossbar
OutletBox
Screw
LockWasher
HexNut
Nipple
HexNut
LockWasher
CanopyChainLoop
Ceiling
Canopy
CanopyLockRing
STEP6:
a.AdjusttheFixtureChaintoyourdesiredlengthby
removingthelinksifneeded.
*
Pliersisrequiredforthisstep.
b.WiththeFixtureChainstillnotattachedtotheFixtureLoop
andtheCanopyChainLoop,pullthesupplywiresthrough
theFixtureChainalternatinglinks.Afterthewiresare
throughtheFixtureChain,pulltheSupplyWiresandthe
GroundWirethroughtheCanopyLockRingandthe
CeilingCanopyinorder.
c.AttachoneendoftheFixtureChaintotheFixtureLoopand
closethechainloop.Liftthefixtureandchainupand
attachtheotherendoftheFixtureChainontotheCanopy
ChainLoop.Thefixturewillnowhangsafely.Closethe
ChainLoopattheCeilingCanopyLoop.
d.FeedtheSupplyWiresandGroundWirethroughthe
CanopyChainLoopandNippleintotheOutletBox.Cutthe
wiresleavingapproximately8”ofwireextendingfromthe
OutletBox.
e.RefertoStep7forwireconnections.
f.RaisetheCeilingCanopyandCanopyLockringupthe
FixtureChainandovertheCanopyChainLoop.Tighten
theCanopyLockRingontotheCanopyChainLoopuntil
tight.
OutletBox
SupplyWires
andGroundWire
Canopy
ChainLoop
FixtureChain
Ceiling
Canopy
Canopy
LockRing
FixtureLoop
3OF4
Page 4

INSTALLATIONINSTRUCTIONS
STEP7:
*()
UseWireConnectorsnotsuppliedtoconnectthe
.
wires
.
aConnecttheHouseGroundWiretotheFixtureGround
Wire.
.()
bConnecttheHouseWhiteorRibbedWiretothe
FixtureSupplyWireWhiteorRibbedSide.
.()
cConnecttheHouseBlackorRedWiretotheFixture
SupplyWireBlackorSmoothSide
.
dWrapeachconnectionwithapprovedelectricaltapeand
().
()
carefullystuffalloftheconnectedwiresintotheOutlet
.
Box
STEP8:
aPlacetheShadeovertheSocketasshown.Usingthe
.
SocketCollarTool,threadtheSocketCollarontothe
SockettosecuretheShade.Handtightenuntilsnug.
STYLENUMBERDH5105AN,DH5105PN
WHITEORRIBBED
FROMHOUSE
BLACKORREDWIRE()
FROMHOUSE
GROUNDWIRE GROUNDWIRE
FROMHOUSE FROMFIXTURE
:
WHITEORRIBBED
FROMFIXTURE
BLACKORSMOOTH
FROMFIXTURE
Socket
SocketCollar
SocketCollarTool
STEP9:
aInstallcorrectBulbsreferringtofixturemarkingsand/orlabelsformaximumwattage.
.
Shade
YourinstallationiscompletednowRestoreelectricityRetainthissheetforfuturereference
...
4OF4
 Loading...