

Page 1
6CORPORATEPARKWAY
GOOSECREEKSC29445
wwwquoizelcom
..
Quoizel,Inc.
6CorporateParkway
GooseCreek,SC
29445
CustomerService
Phone631.273.2700
Fax631.231.7102
www.quoizel.com
,.
ToolsRequired:Flatheadscrewdriver,Phillipsscrewdriver,pliers,wirecutters,wire
strippers,electricaltape,safetyglasses.
BulbRecommended: (4)MediumBaseBulbs100WMaximum
EstimatedAssemblyTime: 20-30minutes
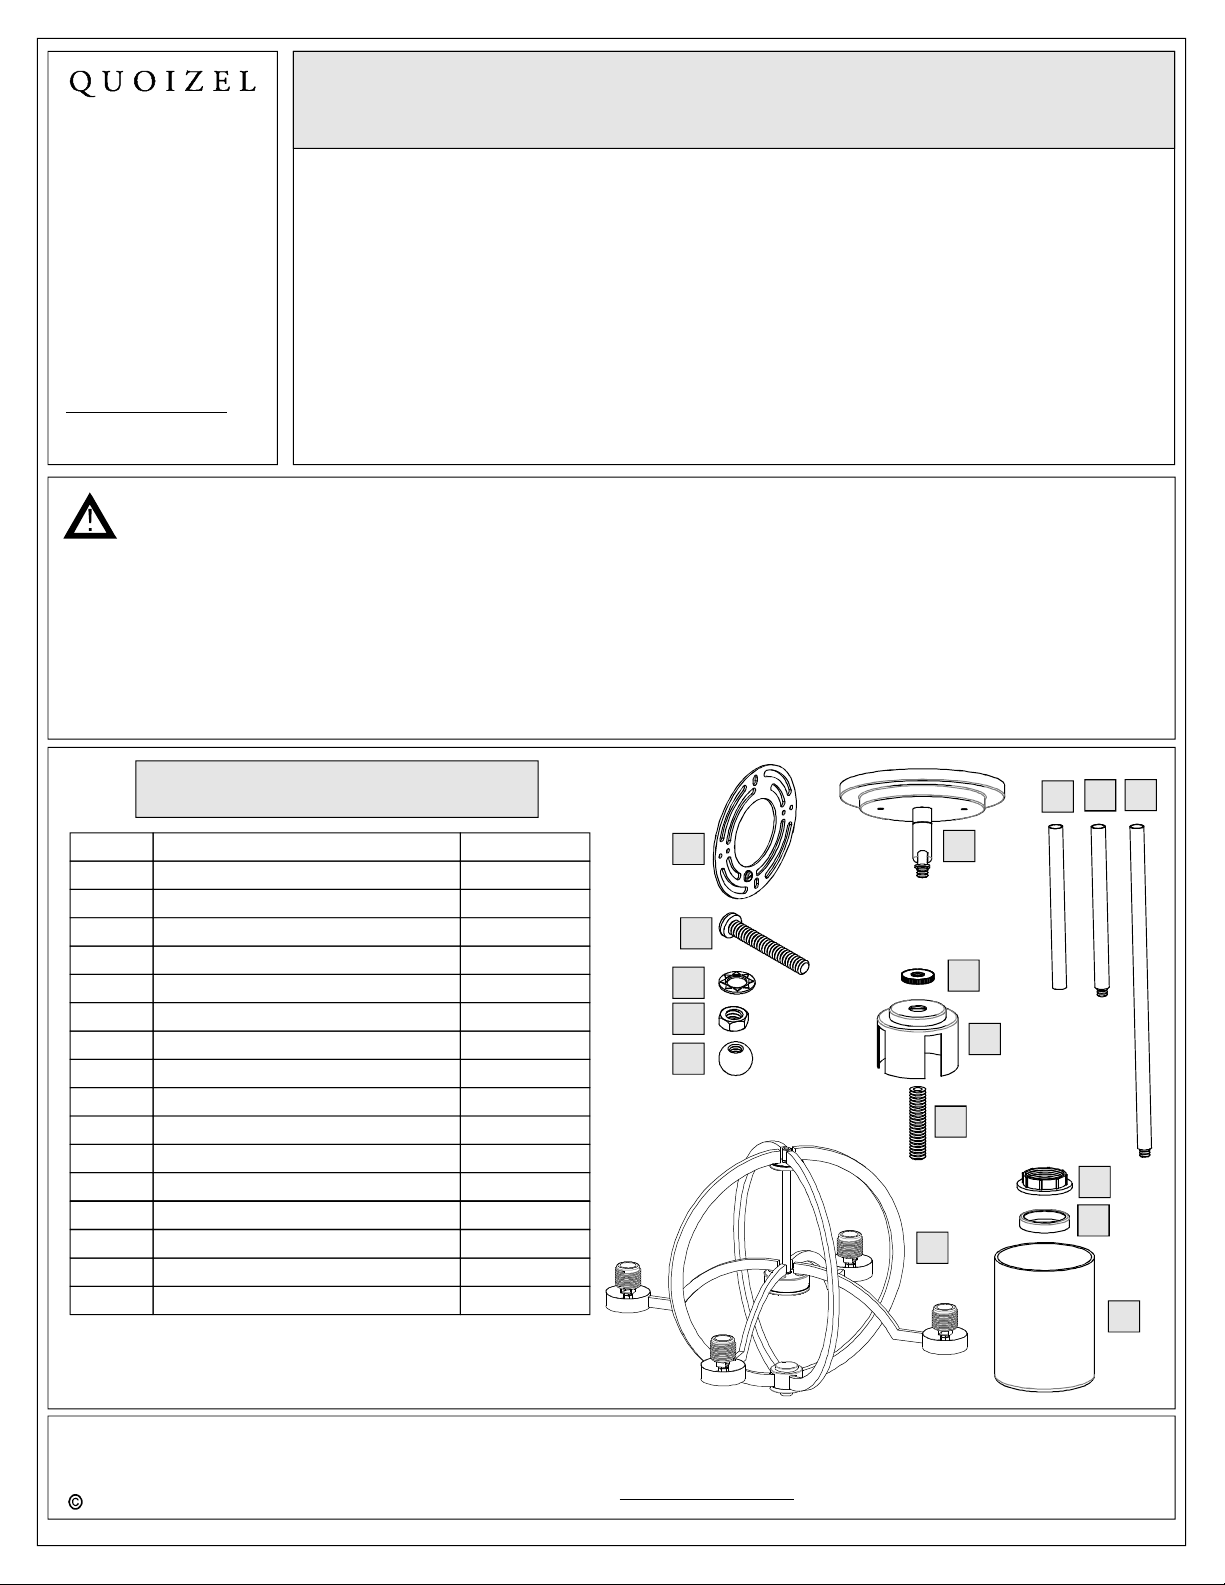
Preparation: Identifyandinspectallpartsbeforebeginninginstallation.Checkpackage
contentlistanddiagramsbelowtobesureallpartsarepresent.Ifanypartsaremissing
ordamaged,donotattempttoassemble,install,oroperatethefixture.Contactcustomer
serviceforreplacementparts.
AssemblyInstructionSheet#IS-CLT5004BN
ForStyleCLT5004BN
WarningsandCautions
Turnoffelectricityatcircuitbreakerormainfuseboxbeforeinstallation.Consultalicensedelectricianifindoubt.
Theseinstructionsareprovidedforyoursafety.Itisveryimportantyoureadthemcompletelybeforeinstalling
thefixture.Westronglyrecommendthatalicensed,professionalelectricianperformtheinstallation.
Disconnectfixturefrompowersourcebeforereplacingbulbs.Makesurebulbsaregivensufficienttimetocool
beforeremoval.Donotsubjectglasspartstoanyshockwhileinoperationorshatteringmayresult.
PackageContents
Part Description
A Crossbar
B
C
D
E
F
G
H
J
K
L
M
N
O
P
MountingScrew
LockWasher
HexNut
MountingBall
CeilingCanopy
6” Rod
6” RodwithNipple
12” Rod
I
KnurledNut
Cap
Nipple
SocketAssembly
SocketCollar
SteelCollar
Shade
Quantity
1pc.
2pcs.
2pcs.
2pcs.
2pcs.
1pc.
1pc.
1pc.
2pcs.
1pc.
1pc.
1pc.
1pc.
4pcs.
4pcs.
4pcs.
A
B
C
D
E
F
J
K
L
M
G
H
N
O
I
P
ThankyouforpurchasingaQuoizelproduct.
Needassistancewithpartsorassembly?CallQuoizelcustomerserviceat1-631-273-2700
2013QuoizelInc. October2013
orvisituson-lineat www.quoizel.com
1of6
Page 2
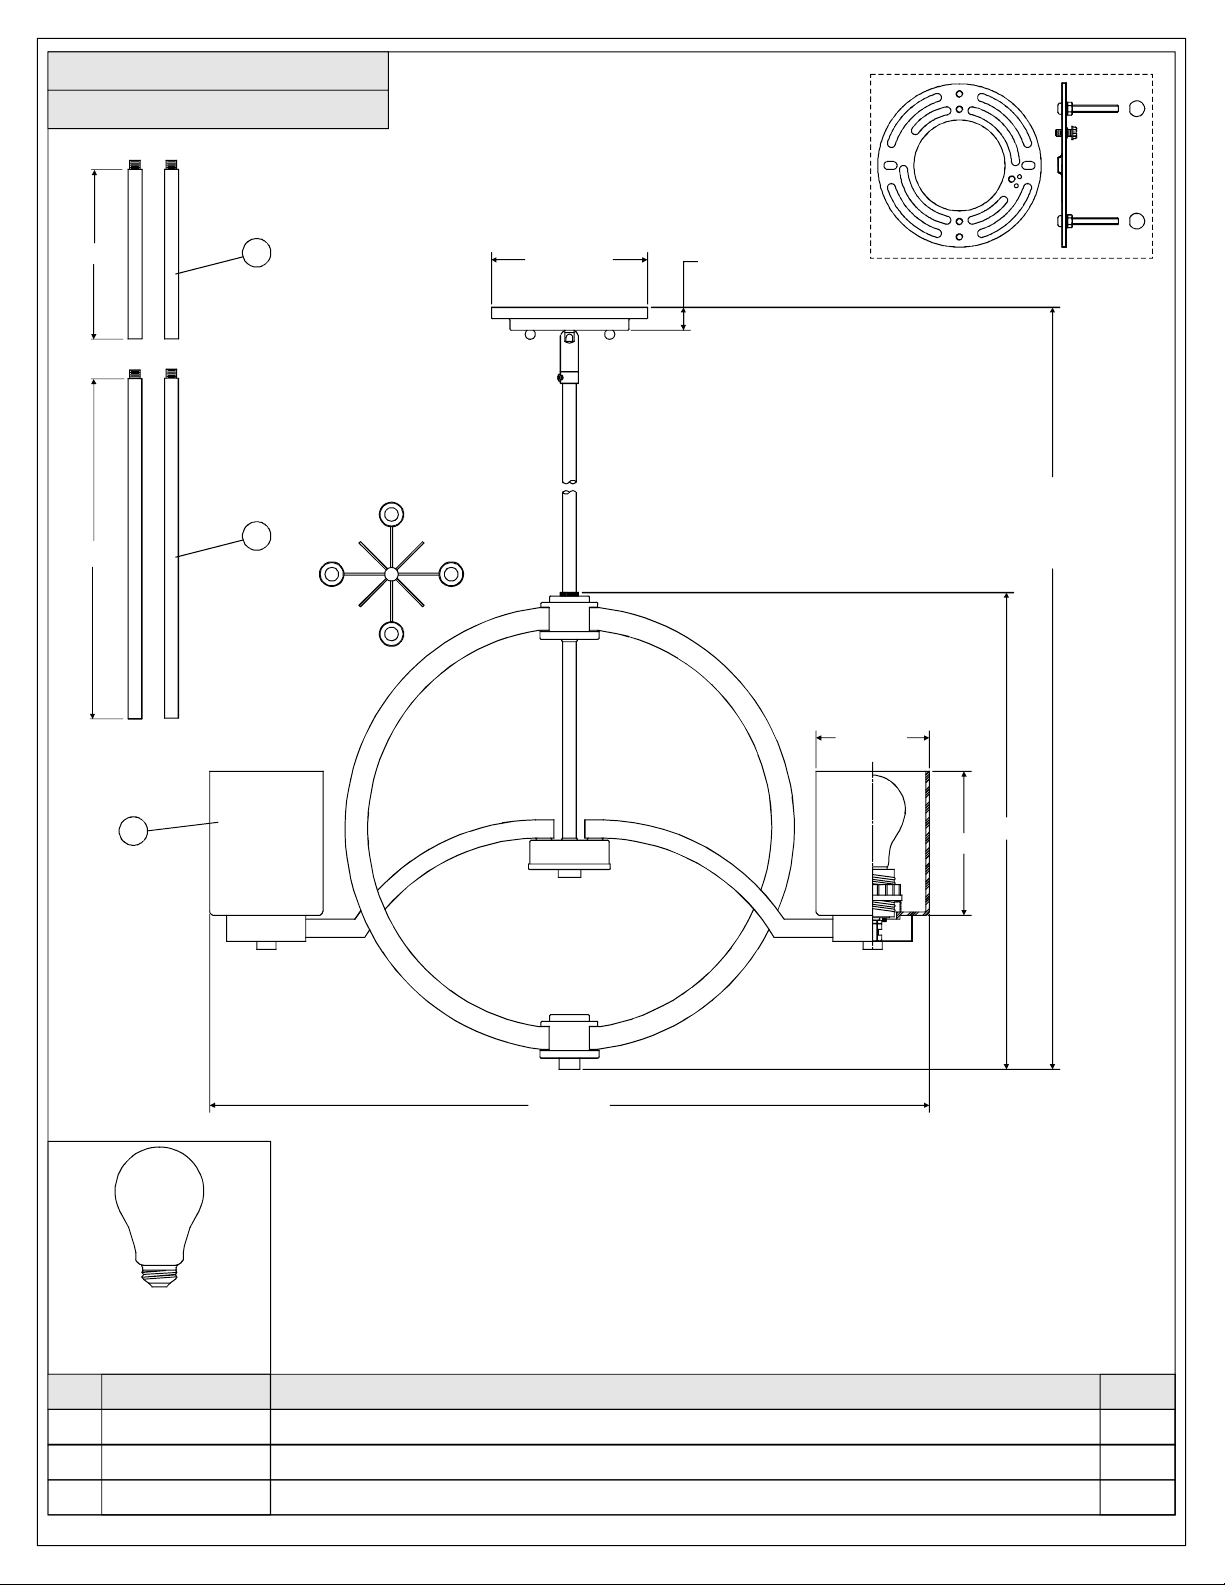
CLT5004BN
FINISH:BRUSHEDNICKEL
6”
12”
2
5.5” Dia. 1”
55”
OVERALLHEIGHT
3
INCLUDES
(2)6”AND12” RODS
4” Dia.
1
5”
16.5”
(4)100WMedium
BaseBulbs
(NotSupplied)
PARTNUMBER
NO.
1
2
3
G3650SH
9006EXBN
9012EXBN
25"Dia.
NOTE:ALLDIMENSIONSAREROUNDEDUPTOTHENEAREST1/2"
REPLACEMENTPARTDESCRIPTION
GLASSOPALETCHEDCLT5004BN
RODEXTENSIONBRUSHEDNICKEL6”LX0.5"D
RODEXTENSIONBRUSHEDNICKEL12"LX0.5"D
2of6
REQ.
4
2
2
Page 3

6CORPORATEPARKWAY
GOOSECREEKSC29445
wwwquoizelcom
..
,.
AssemblyInstructionSheet#IS-CLT5004BN
ForStyleCLT5004BN
STEP1InstallCap-
A.ScrewtheNipple(L)intotheHexCouplingonthetop
centeroftheSocketAssembly(M).Handtightenuntil
snug.
B.PlacetheCap(K)overthetopendoftheNipple(L)and
securewiththeKnurledNut(J).Handtightenuntilsnug.
STEP2AssembleRods-
A.DeterminetheRods(G/H/I)tobeassembledtothe
SocketAssembly(M)accordingtoyourhangingheight.
B.PassSupplyWiresandGroundWirethroughthechosen
Rods(G/H/I)andthenthreadthechosenRods(G/H/I)and
theSocketAssembly(M)together.Handtightenuntil
snug.
Figure1
Figure2
12” Rod
KnurledNut
Cap
Nipple
HexCoupling
Socket
Assembly
12” Rod
6” Rod
withNipple
Socket
Assembly
6” Rod
SupplyWireand
GroundWire
ThankyouforpurchasingaQuoizelproduct.
Needassistancewithpartsorassembly?CallQuoizelcustomerserviceat1-631-273-2700
2013QuoizelInc. October2013
orvisituson-lineat www.quoizel.com
3of6
Page 4

6CORPORATEPARKWAY
GOOSECREEKSC29445
wwwquoizelcom
..
,.
AssemblyInstructionSheet#IS-CLT5004BN
ForStyleCLT5004BN
STEP3AssembleCeilingCanopytoUpper
-
Rod
A.PassSupplyWiresandGroundWirethroughtheCeiling
Canopy(F)andthenthreadtheCeilingCanopy(F)and
theUpperRodtogether.Handtightenuntilsnug.
STEP4- AttachMountingScrews,Lock
WashersandHexNutstoCrossbar
A.LineupasetofholesontheCrossbar(A)andHoleson
theCeilingCanopy(F).
B.ThreadMountingScrews(B)intotheholesonthe
Crossbar(A),passLockWashers(C)andthreadHexNut
(D)ontotheMountingScrews(B).Handtightenuntil
snug.
Ceiling
Canopy
SupplyWireand
GroundWire
UpperRod
Figure3
MountingScrew
Crossbar
LockWasher
HexNut
Ceiling
Canopy
Figure4
STEP5- AttachCrossbartoOutletBox
A.AttachtheCrossbar(A)toOutletBoxandsecureby
threadingOutletBoxScrews(notsupplied)intothe
MountingHolesontheOutletBox.Tightenuntilsnug.
Figure5
OutletBox
MountingHole
Crossbar
OutletBoxScrew
(notsupplied)
ThankyouforpurchasingaQuoizelproduct.
Needassistancewithpartsorassembly?CallQuoizelcustomerserviceat1-631-273-2700
2013QuoizelInc. October2013
orvisituson-lineat www.quoizel.com
4of6
Page 5

6CORPORATEPARKWAY
GOOSECREEKSC29445
wwwquoizelcom
..
,.
AssemblyInstructionSheet#IS-CLT5004BN
ForStyleCLT5004BN
STEP6MakeWireConnections-
A.Usestandardwireconnectorstomakeallwire
connections.(Connectorsarenotincludedwithfixture.)
Stripandpreparewireendsaccordingtoinstructions
suppliedwithconnectors.
B.ConnectWhiteSupplyWirefromtheOutletBoxtoWhite
Wirefromfixture.
C.ConnectBlack(orRed)SupplyWirefromtheOutletBox
toBlackWirefromfixture.
D.ConnectGroundWirefromtheOutletBoxtoGround
Wirefromfixture.
E.Twistconnectorsuntilwiresaretightlyjoinedtogether.
F.Wrapeachconnectionwithapprovedelectricaltapeand
carefullystuffalltheconnectedwiresintotheOutletBox.
Figure6
Whitewirefromsupply
Blackwirefromsupply
(orRed)
Groundwirefromsupply Groundwirefromfixture
Whitewirefromfixture
Blackwirefromfixture
Figure7
STEP7- AttachCeilingCanopytoMounting
Screw
A.PlacetheCeilingCanopy(F)overtheMounting
Screws(B)andsecurewithMountingBalls(E).Hand
tightenuntilsnug.
STEP8InstallShade-
A.PlacetheShade(P)andtheSteelCollar(O)overthe
Socketasshown.SecurebythreadingtheSocket
Collar(N)ontotheSocket.Handtightenuntilsnug.
MountingScrew
CeilingCanopy
Figure8
MountingBall
SocketCollar
SteelCollar
Shade
Socket
Figure9
ThankyouforpurchasingaQuoizelproduct.
Needassistancewithpartsorassembly?CallQuoizelcustomerserviceat1-631-273-2700
2013QuoizelInc. October2013
orvisituson-lineat www.quoizel.com
5of6
Page 6

6CORPORATEPARKWAY
GOOSECREEKSC29445
wwwquoizelcom
..
,.
AssemblyInstructionSheet#IS-CLT5004BN
ForStyleCLT5004BN
STEP9- InstallBulb
A.Thisfixtureusesstandardbulbwithastandardscrew
base.Maximum100watts.
B.Insertbulbandscrewproperlyintoplace.
Yourfixtureisnowassembledandreadytouse.Enjoy!
Bulb
Socket
Figure10
ThankyouforpurchasingaQuoizelproduct.
Needassistancewithpartsorassembly?CallQuoizelcustomerserviceat1-631-273-2700
2013QuoizelInc. October2013
orvisituson-lineat www.quoizel.com
6of6
 Loading...