

Quiksilver SEAFIRE Instruction Manual

SEAFIRE INSTRUCTION MANUAL

INDEX
INDEX
1- Description of the display and control buttons
Chronograph :
2- Basic function
3- Accumulated timing
4- Intermediate or interval timing
5- Adjusting the chronograph hands to zero position
6- Setting the time

S
W
I
S
S
M
O
V
’
T
55
50
45
40
35
30
60
25
20
15
10
05
12
210
8 4
HOUR
60
1050
40 20
SEC
30
0525
20 10
MIN
DESCRIPTION
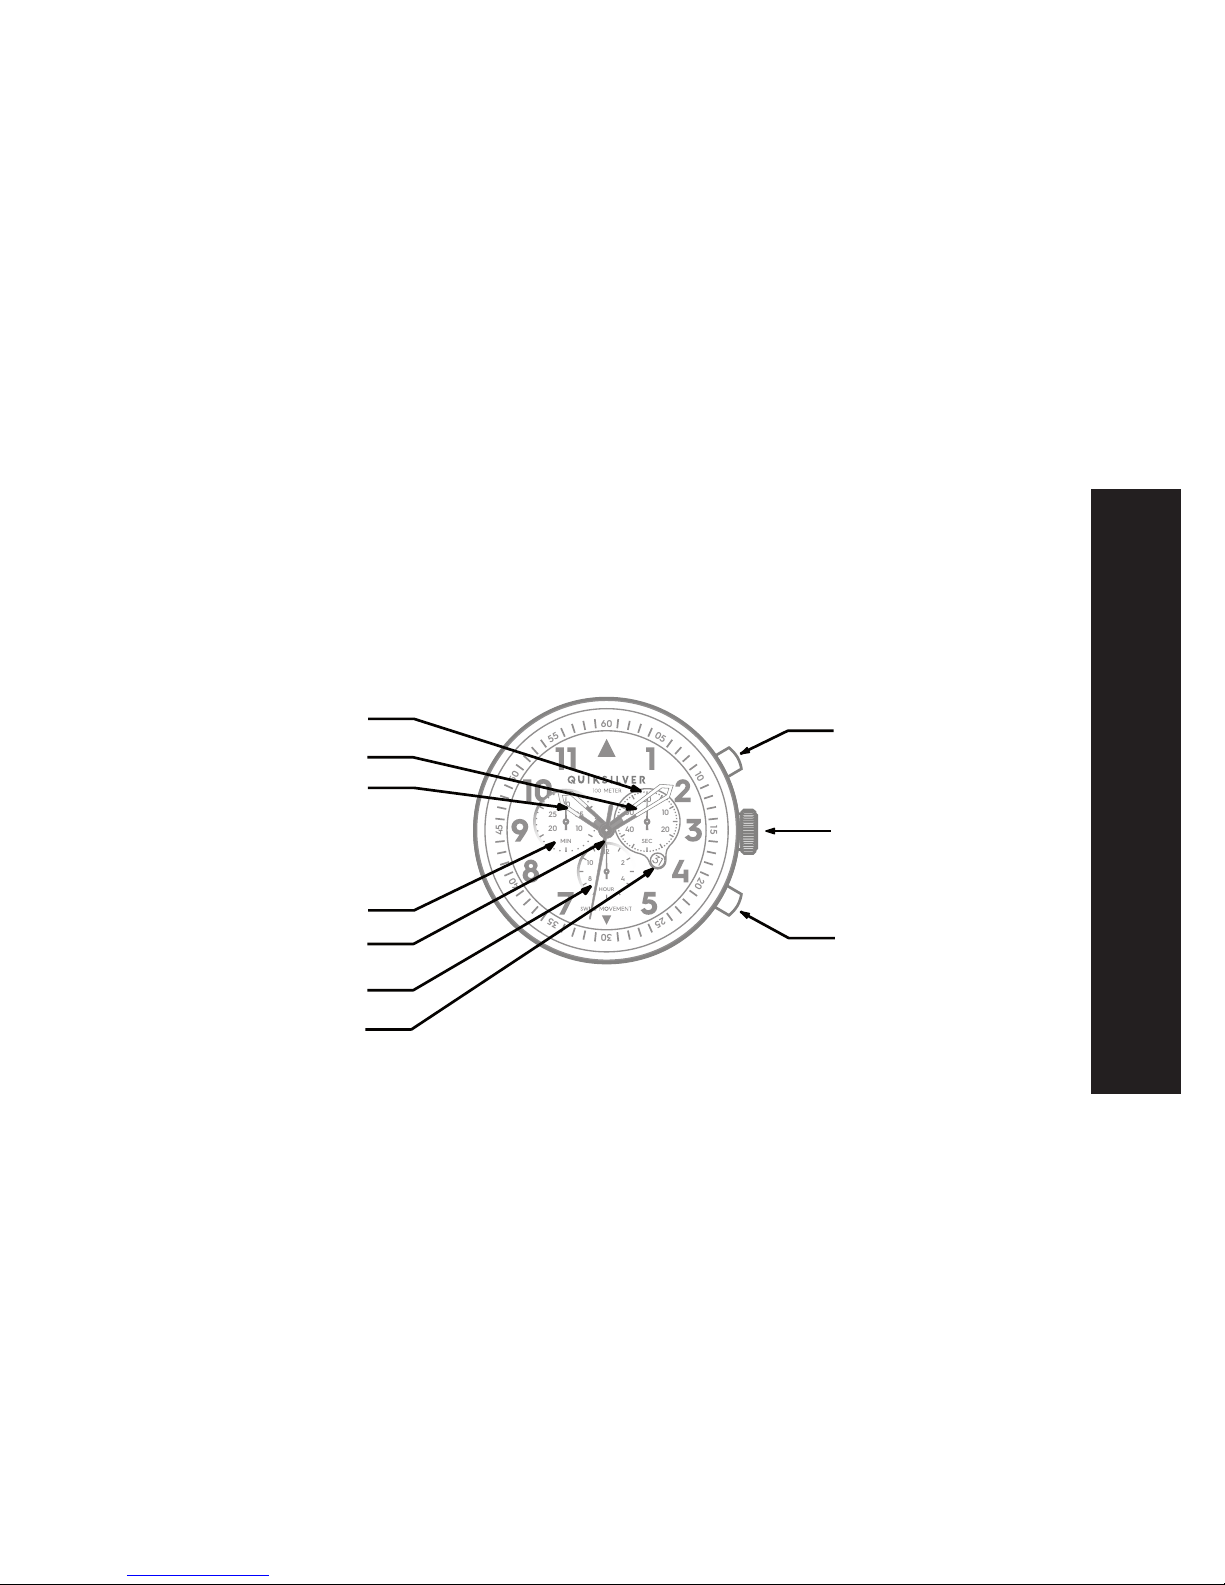
Description of the display and control buttons
Control buttonsDisplay elements
Hour counter
Minutes hand
Hour hand
Centre stop-second
Second hand
Minute counter
Push-button B
Crown
Push-button A
Date

S
W
I
S
S
M
O
V
’
T
55
50
45
40
35
30
60
25
20
15
10
05
12
210
8 4
HOUR
60
1050
40 20
SEC
30
0525
20 10
MIN
S
W
I
S
S
M
O
V
’
T
55
50
45
40
35
30
60
25
20
15
10
05
12
210
8 4
HOUR
60
1050
40 20
SEC
30
0525
20 10
MIN
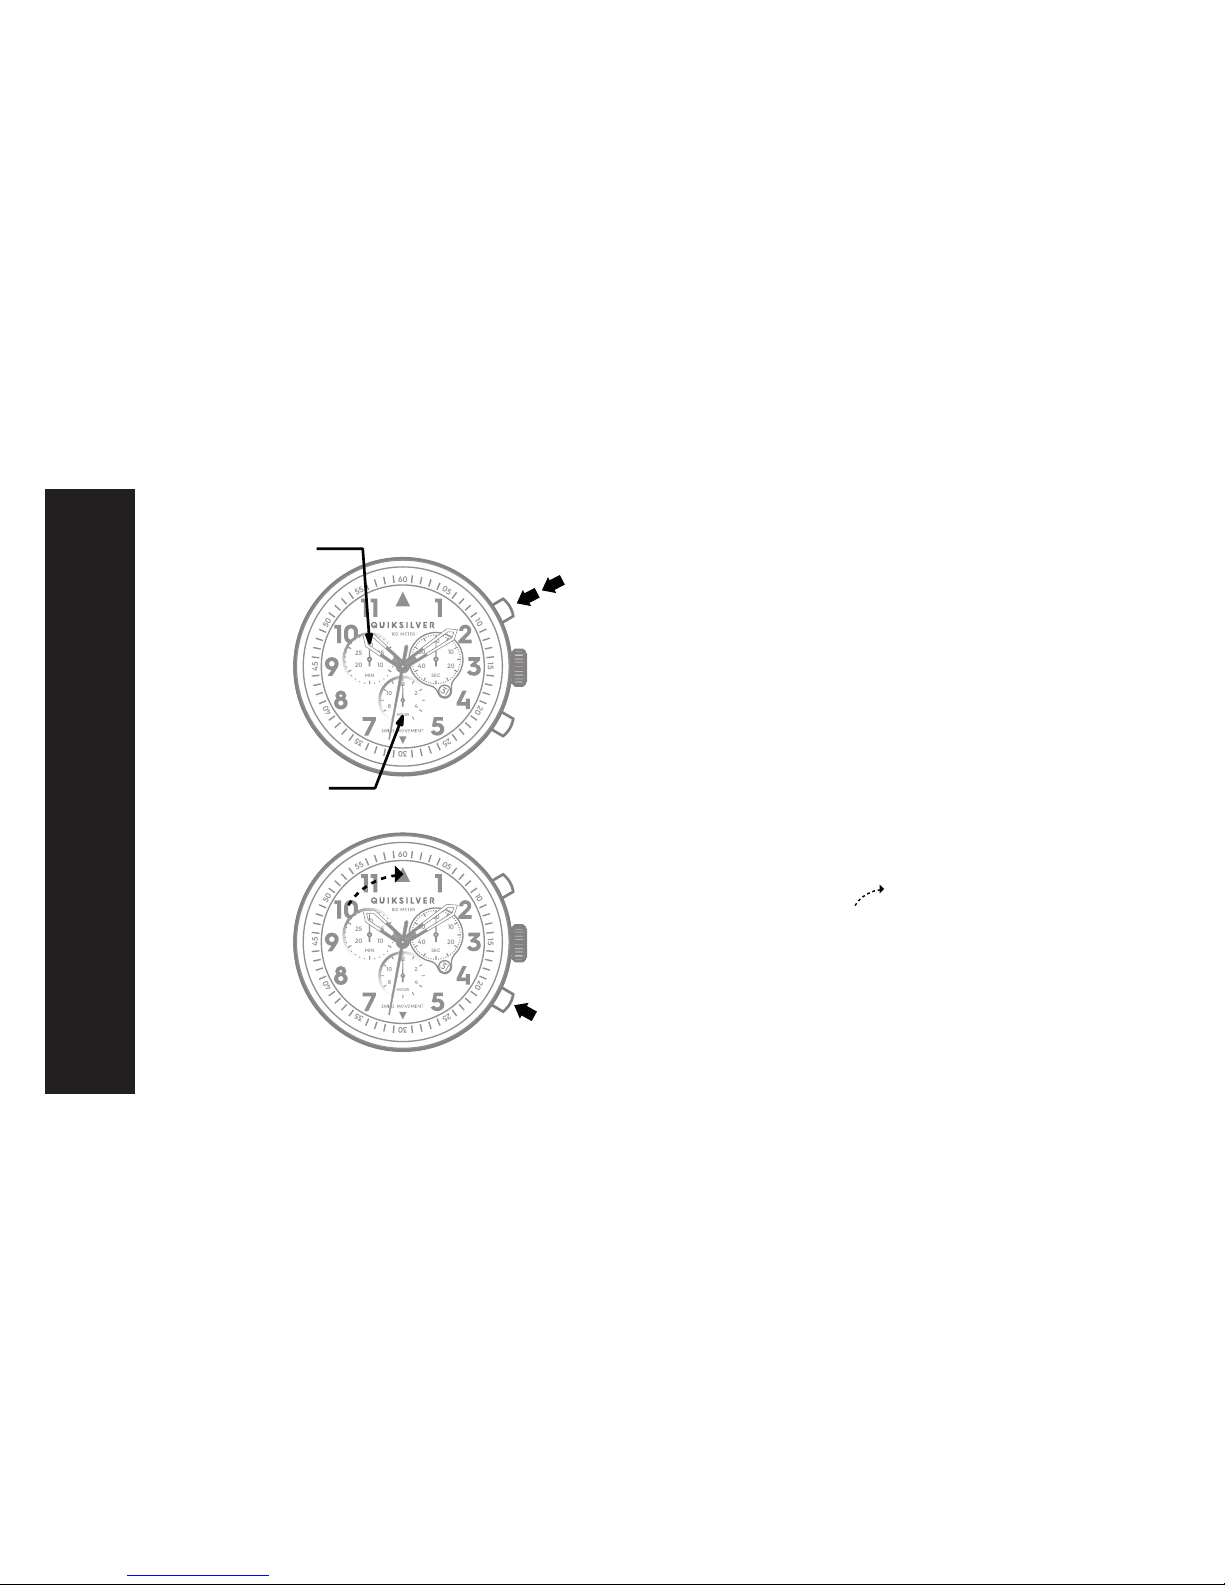
CHRONOGRAPH
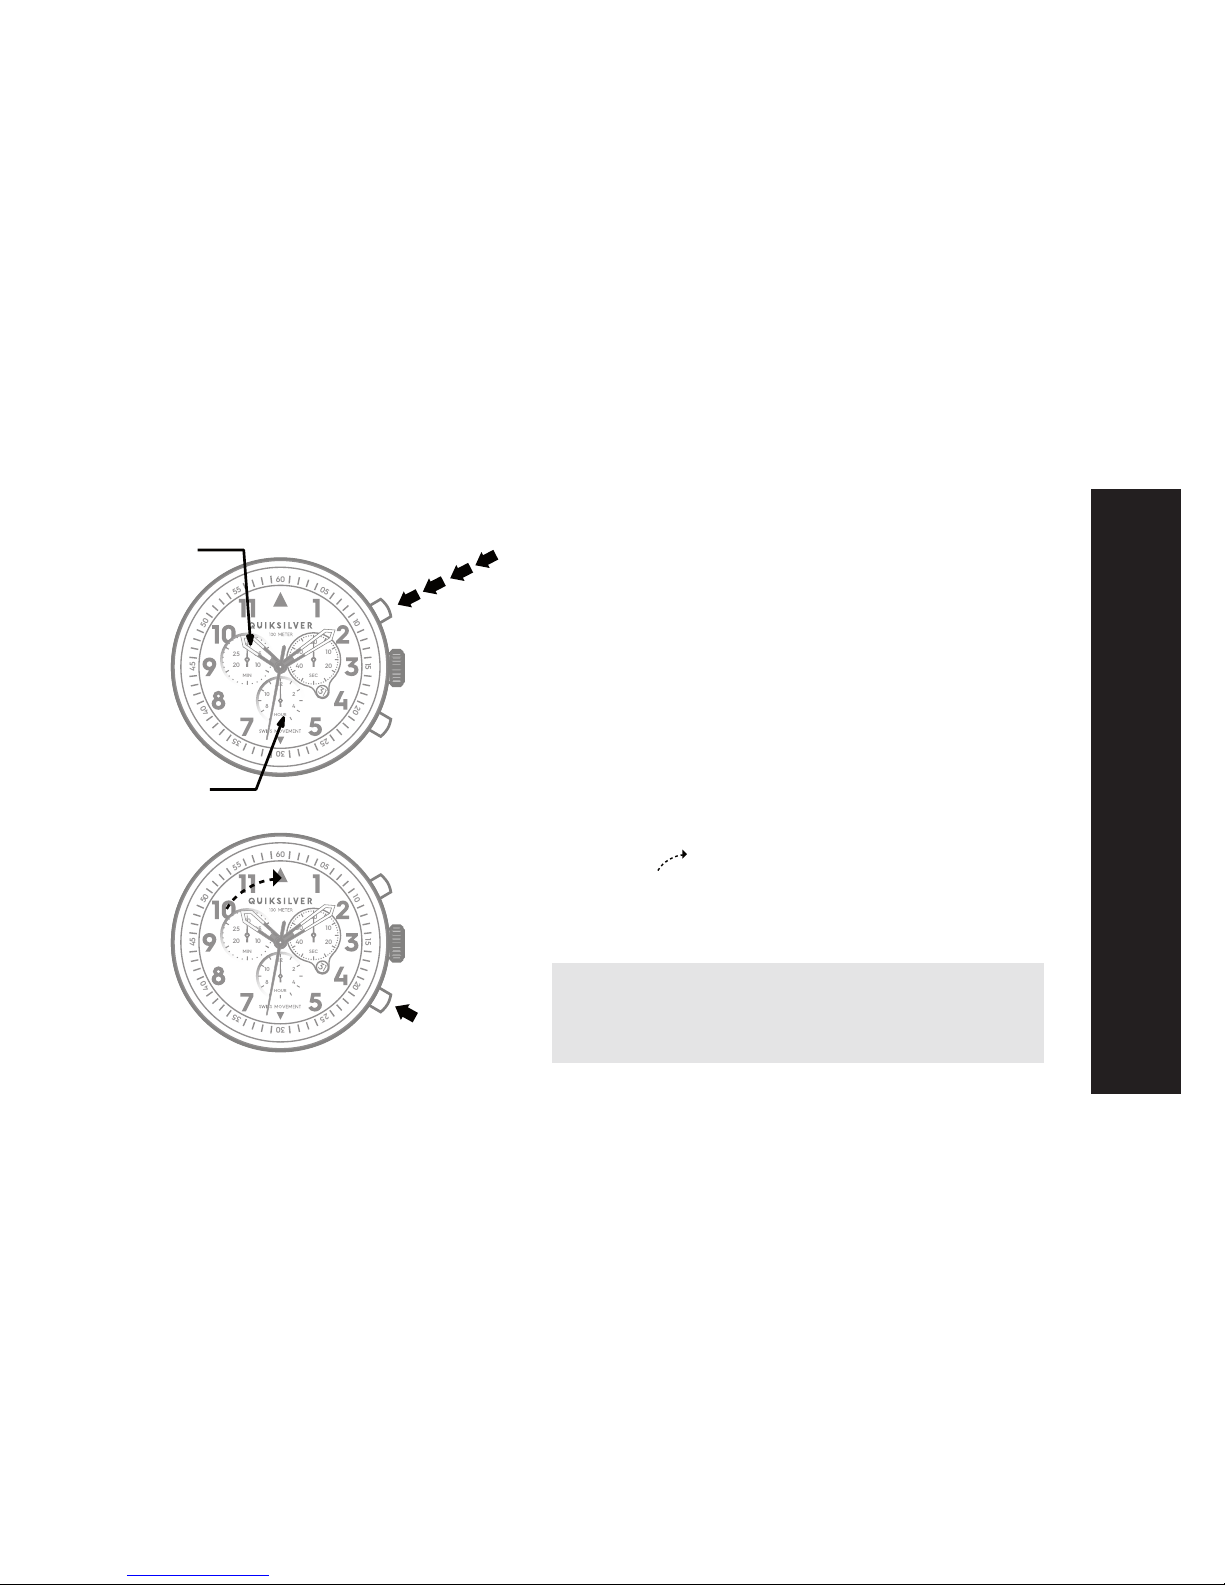
Chronograph : basic function
(start / stop / reset)
Example :
1- Start : Press push-button A.
2- Stop : to stop the timming, press push-button A
once more and read the three chronograph
hands : 1h / 20min / 10sec.
3- Zero positioning :
Press puch-button B.
(The three chronograph hands will be reset
to their zero positions).
1-
2-
3-
Push-button A
Push-button B
Minute counter
Hour counter
S
W
I
S
S
M
O
V
’
T
55
50
45
40
35
30
60
25
20
15
10
05
12
210
8 4
HOUR
60
1050
40 20
SEC
30
0525
20 10
MIN
S
W
I
S
S
M
O
V
’
T
55
50
45
40
35
30
60
25
20
15
10
05
12
210
8 4
HOUR
60
1050
40 20
SEC
30
0525
20 10
MIN
CHRONOGRAPH
Push-button A
Push-button B
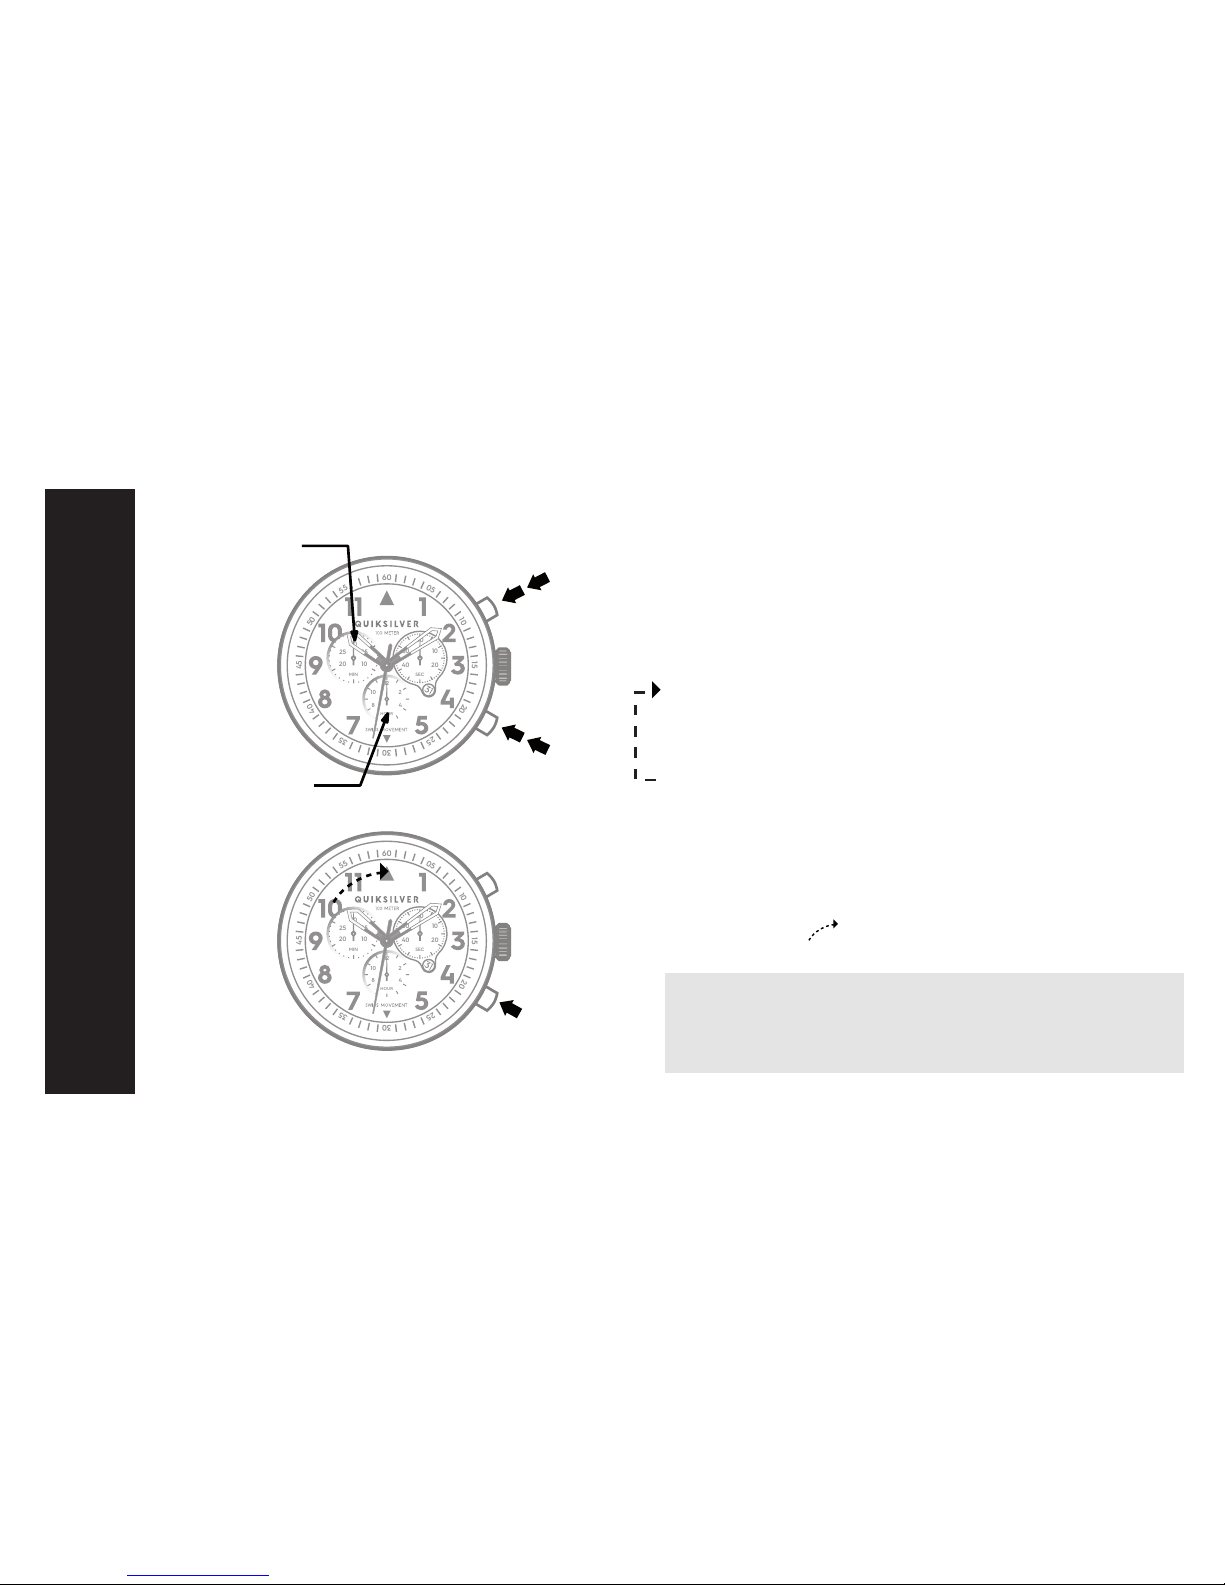
Chronograph : Accumulated timing
Example :
1- Start : start timing
2- Stop : e.g. 15min 5s following 1-
3- Restart : timing is resumed
4*- Stop : e.g. 13mn 5s following 3-
= 28mn 10s
(the accumulated measured time in shown)
5- Reset :
The three chronograph hands are returned to
their zero position.
Please note
* Following 4-, the accumulation of the timing can be
continued by pressing push-button A.
(Restart/Stop/Restart/Stop, ...)
1-
2-
3-
4-
5-
Minute counter
Hour counter

S
W
I
S
S
M
O
V
’
T
55
50
45
40
35
30
60
25
20
15
10
05
12
210
8 4
HOUR
60
1050
40 20
SEC
30
0525
20 10
MIN
S
W
I
S
S
M
O
V
’
T
55
50
45
40
35
30
60
25
20
15
10
05
12
210
8 4
HOUR
60
1050
40 20
SEC
30
0525
20 10
MIN
CHRONOGRAPH
Push-button A
Push-button B
Push-button A
Push-button B
Chronograph : Intermediate or
interval timing
Example :
1- Start : Start timing
2- Display interval :
e.g. 10mn 10s (timing continues in the
background)
3- Making up the measured time :
The 3 chronograph hands are quickly advanced
to the ongoing measured time.
4- Stop : Final time is displayed.
5- Mise à zéro :
The 3 chronograph hands are returned to their
zero position.
Please note
* Following 3-, further intervals or intermediates can be
displayed by pressing push-button B. (displayed interval /
make up measured time, ...)
*
1-
4-
2-
3-
5-
Minute counter
Hour counter

S
W
I
S
S
M
O
V
’
T
55
50
45
40
35
30
60
25
20
15
10
05
12
210
8 4
HOUR
60
1050
40 20
SEC
30
0525
20 10
MIN
S
W
I
S
S
M
O
V
’
T
55
50
45
40
35
30
60
25
20
15
10
05
12
210
8 4
HOUR
60
1050
40 20
SEC
30
0525
20 10
MIN
CHRONOGRAPH
Push-button A
Push-button B
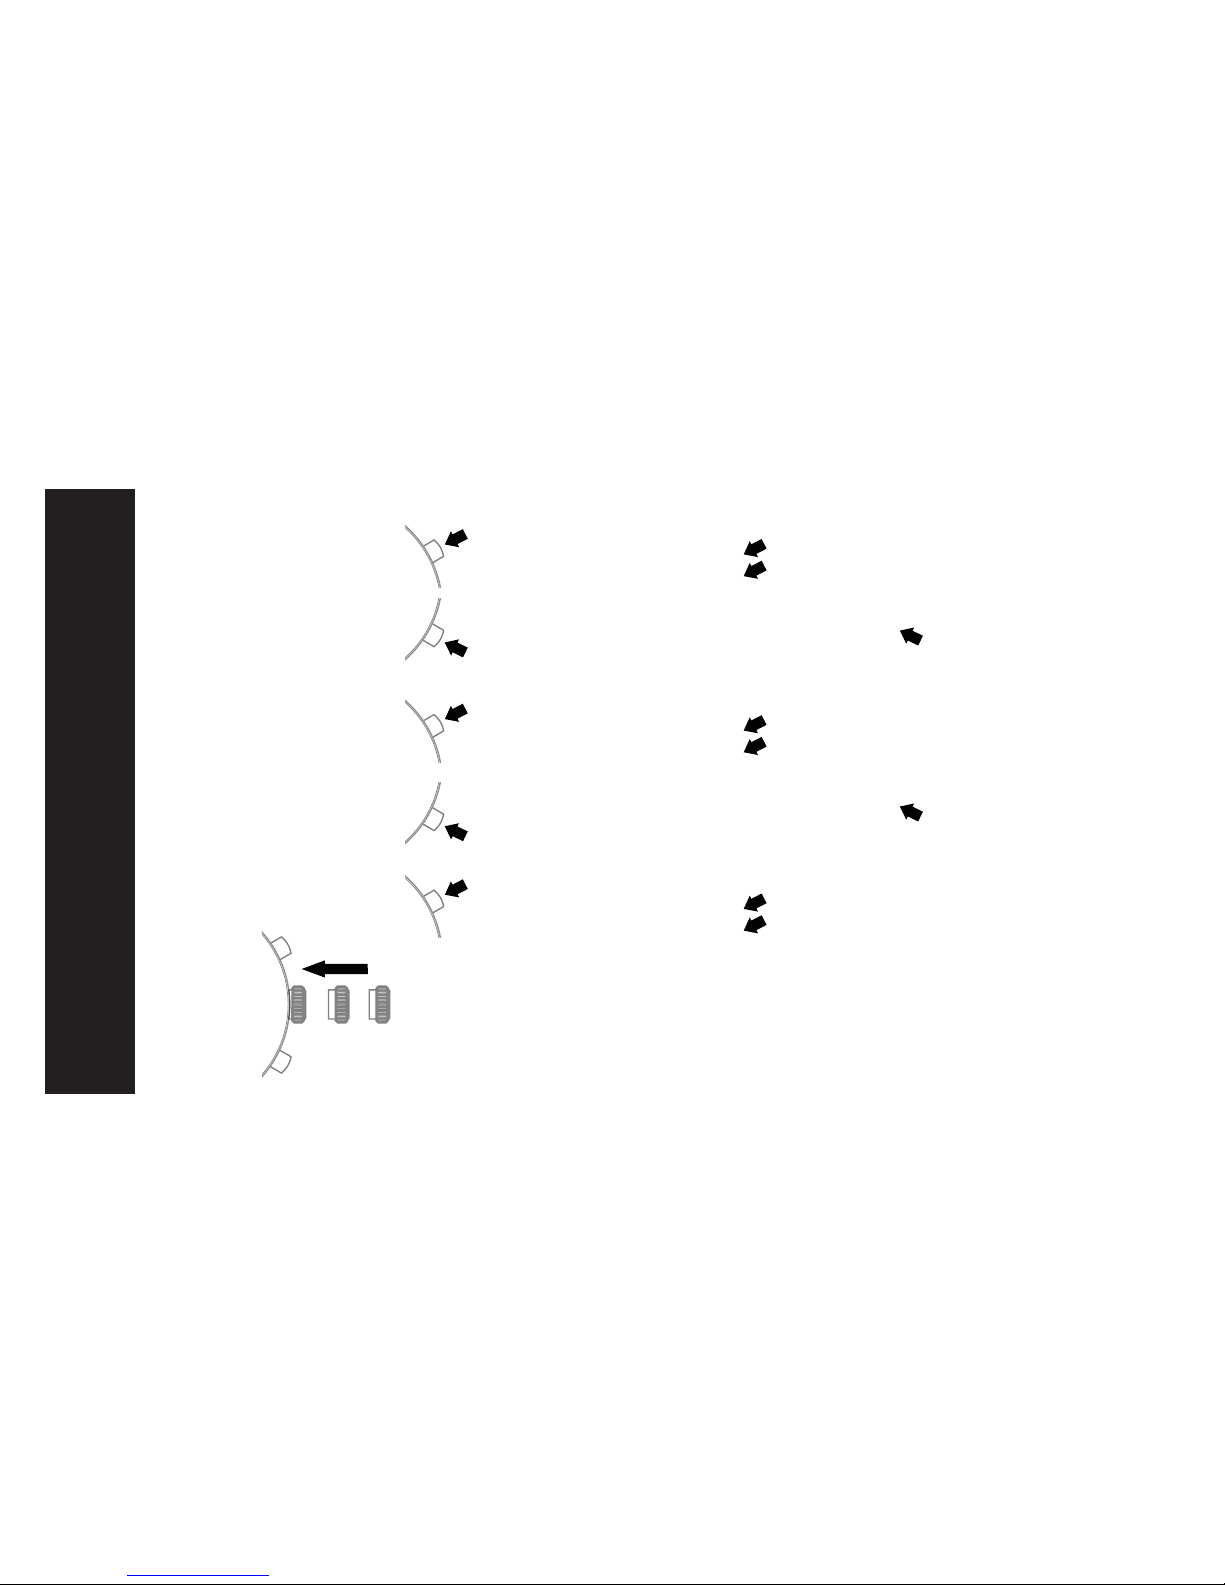
Adjusting the chronograph hands to
zero position
Example :
One or several chronograph hands are not in their correct
zero positions and have to be adjusted (e.g. following
a battery change).
1- Pull out the crown to position III (all 3 chronograph
hands are in their correct or incorrect zero position).
2- Keep push-buttons A and B depressed simultaneously
for at least 2 seconds (the center stop-second rotates
by 360° --> corrective mode is activated)
Centre stop-second
Minute counter
Hour counter
1-
2-
I II III
III
3-
I II III
CHRONOGRAPH
Adjusting the centre stop-second
Single step : A 1 x short
Continuous : A long
Adjusting the next hand B
Adjusting the hour counter hand (pos. 6h)
Single step : A 1 x short
Continuous : A long
Adjusting the next hand B
Adjusting the minute counter hand (pos. 9h)
Single step : A 1 x short
Continuous : A long
3- Returning the crown to position I
Termination of the chronograph hands adjustement
(can be carried out at any time).
A
B
A
A
B

S
W
I
S
S
M
O
V
’
T
55
50
45
40
35
30
60
25
20
15
10
05
12
210
8 4
HOUR
60
1050
40 20
SEC
30
0525
20 10
MIN
S
W
I
S
S
M
O
V
’
T
55
50
45
40
35
30
60
25
20
15
10
05
12
210
8 4
HOUR
60
1050
40 20
SEC
30
0525
20 10
MIN
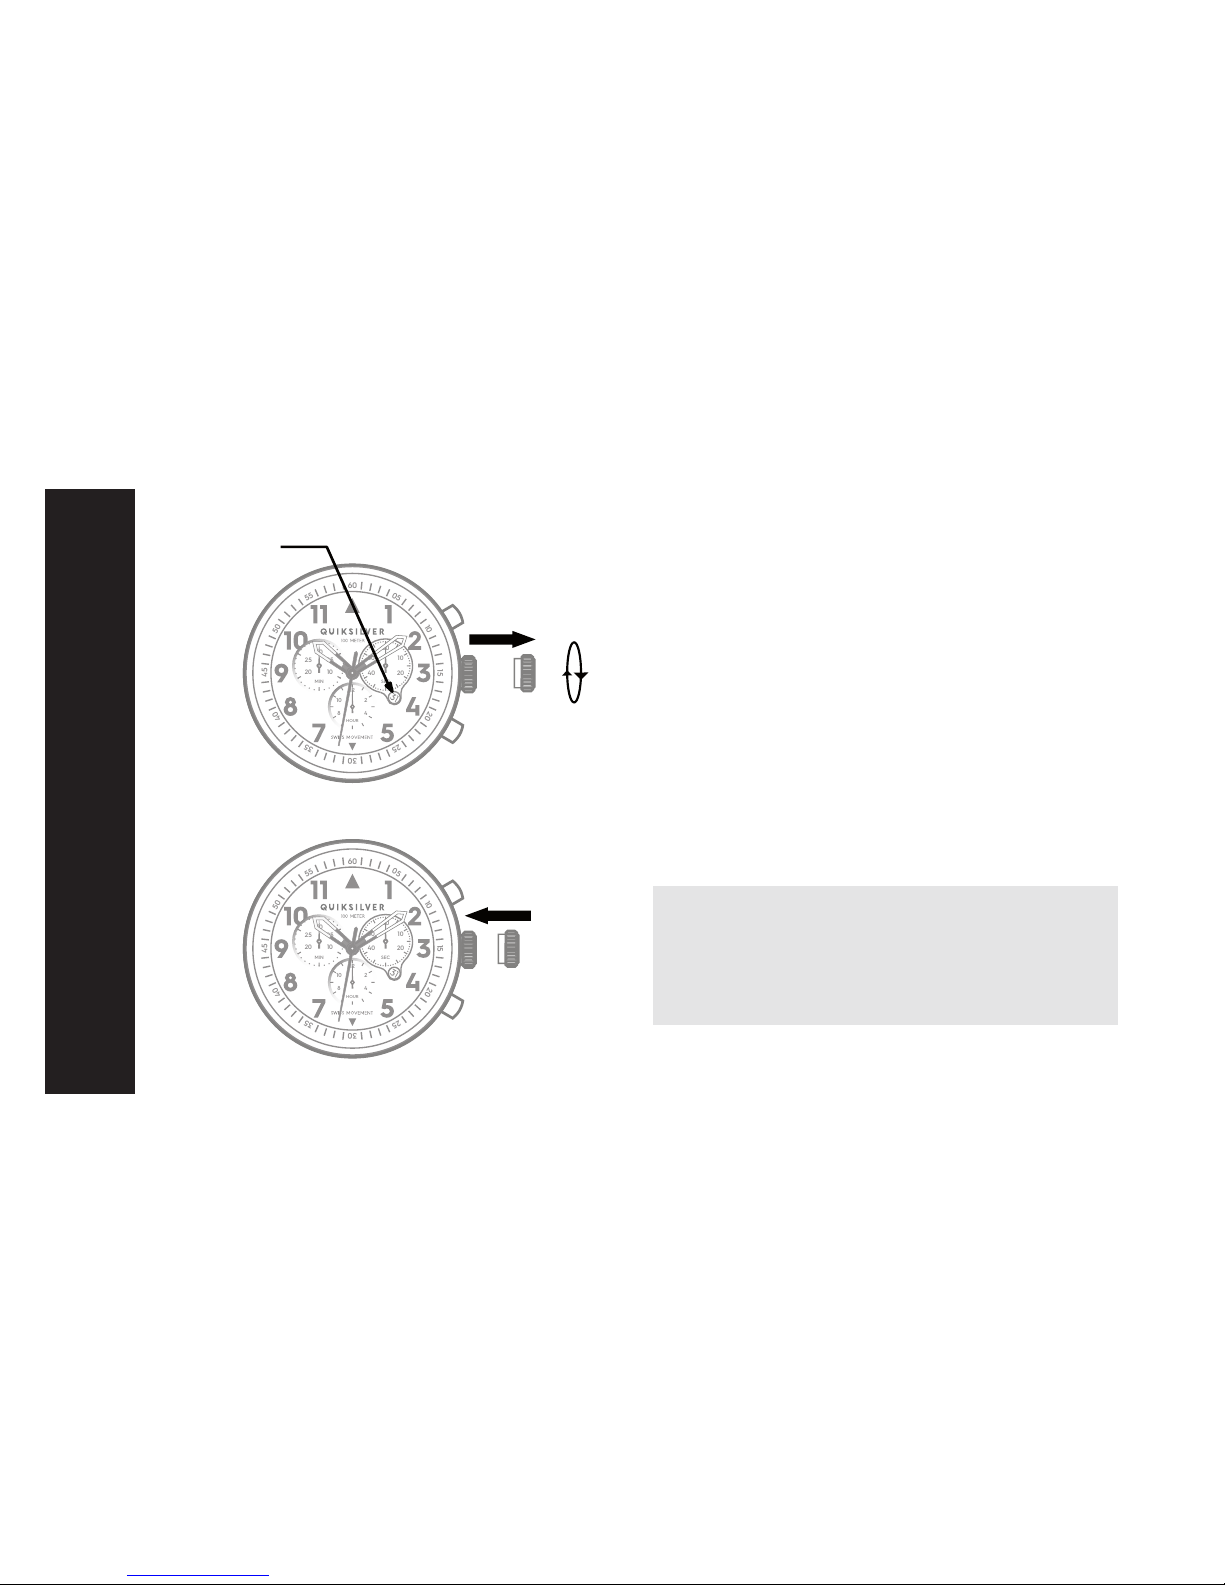
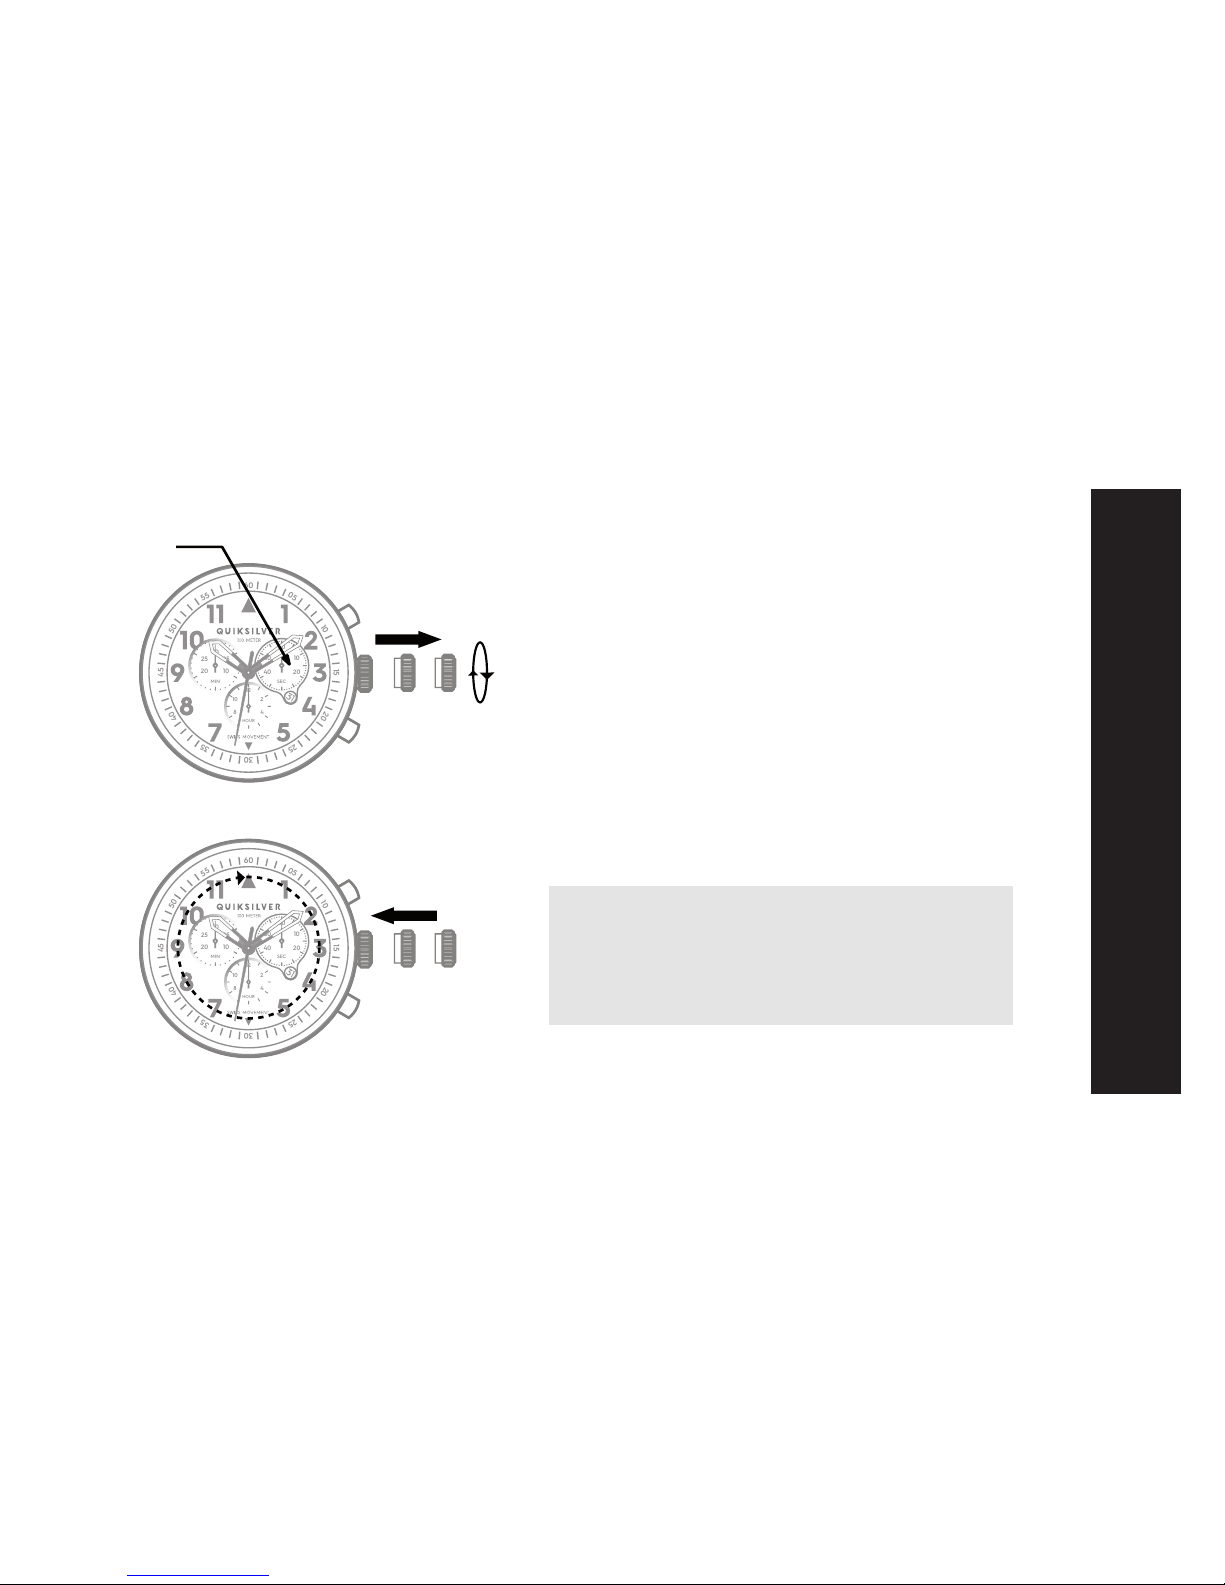
SETTING THE TIME
Setting the time
1*- Pull out the crown to position III
(the watch stop).
2- Turn the crown until you reach the correct
time 08:45.
3*- Push the crown back into position I.
Please note
* In order to set the time in exact second, 1- must be
pulled out when the second hand is in position “60”
(I). Once the hour and minute hands have been set,
3- must be pushed back into positio I at the exact
second.
1- 2-
I II III
3-
I II III
Second hand
SETTING THE DATE
S
W
I
S
S
M
O
V
’
T
55
50
45
40
35
30
60
25
20
15
10
05
12
210
8 4
HOUR
60
1050
40 20
SEC
30
0525
20 10
MIN
S
W
I
S
S
M
O
V
’
T
55
50
45
40
35
30
60
25
20
15
10
05
12
210
8 4
HOUR
60
1050
40 20
SEC
30
0525
20 10
MIN
Setting the date
1- Pull out the crown to the middle position (click)
2- Turn the crown anti-clockwise to the correct date
3- Press the crown in to the initial position
Please note
*The date changes automatically every 24 hours.
*To make sure that the date changes at midnight, adjust
the time before midday.
*Never operate the crown when the watch is under water.
1- 2-
I II
3-
I II
Date

SEAFIRE MODE D’EMPLOI

INDEX
INDEX
1- Description des organes d’achage et de commande
Chronographe :
2- Fonction de base
3- Chronométrage avec totalisation
4- Chronométrage des temps intermédiaires
5- Ajustage des aiguilles en position zéro
6- Réglage de l’heure
DESCRIPTION
S
W
I
S
S
M
O
V
’
T
55
50
45
40
35
30
60
25
20
15
10
05
12
210
8 4
HOUR
60
1050
40 20
SEC
30
0525
20 10
MIN
Description des organes d’achage et de commande
Boutons de réglageAchages
Compteur des heures
Aiguilles des minutes
Aiguilles des heures
Compteur des secondes au centre
Aiguilles des secondes
Compteur des minutes
Poussoir B
Couronne
Poussoir A
Date
CHRONOGRAPHE
S
W
I
S
S
M
O
V
’
T
55
50
45
40
35
30
60
25
20
15
10
05
12
210
8 4
HOUR
60
1050
40 20
SEC
30
0525
20 10
MIN
S
W
I
S
S
M
O
V
’
T
55
50
45
40
35
30
60
25
20
15
10
05
12
210
8 4
HOUR
60
1050
40 20
SEC
30
0525
20 10
MIN
Chronographe : fonction de base
(start / stop / remise à zéro)
Exemple :
1- Start : Appuyer sur le poussoir A.
2- Stop : Pour interrompre le chronométrage,
appuyer à nouveau sur le poussoir A
et lire les 3 compteurs du chronographe :
1h, 20mn, 10s
3- Mise à zéro :
Appuyer sur le poussoir B.
(Les 3 aiguilles du chronographe sont
remises à zéro).
1-
2-
3-
Poussoir A
Poussoir B
Compteur des
minutes
Compteur des
heures

CHRONOGRAPHE
S
W
I
S
S
M
O
V
’
T
55
50
45
40
35
30
60
25
20
15
10
05
12
210
8 4
HOUR
60
1050
40 20
SEC
30
0525
20 10
MIN
S
W
I
S
S
M
O
V
’
T
55
50
45
40
35
30
60
25
20
15
10
05
12
210
8 4
HOUR
60
1050
40 20
SEC
30
0525
20 10
MIN
Chronographe : Chronométrage
avec totalisation
Exemple :
1- Start : Faire démarrer le chronométrage
2- Stop : P.ex. 15min 5s après 1-
3- Restart : Relancer le chronométrage
4*- Stop : P.ex. 13mn 5s après 3-
= 28mn 10s
(le temps de chronométrage total est indiqué)
5- Mise à zéro :
Les 3 aiguilles du chronographe sont remises à zéro.
Note
* Le chronométrage avec totalisation peut se poursuivre
après 4-. Appuyer pour cela sur A.
(Restart/Stop/Restart/Stop, ...)
1-
2-
3-
4-
5-
Poussoir A
Poussoir B
Compteur des
minutes
Compteur des
heures
CHRONOGRAPHE
S
W
I
S
S
M
O
V
’
T
55
50
45
40
35
30
60
25
20
15
10
05
12
210
8 4
HOUR
60
1050
40 20
SEC
30
0525
20 10
MIN
S
W
I
S
S
M
O
V
’
T
55
50
45
40
35
30
60
25
20
15
10
05
12
210
8 4
HOUR
60
1050
40 20
SEC
30
0525
20 10
MIN
Chronographe : Chronométrage
des temps intermédiaires
Exemple :
1- Start : Faire démarrer le chronométrage
2- Achage du temps intermédiaire :
P.ex. 10mn 10s (le chronométrage continue
à l’arrière-plan)
3- Rattrapage du temps chronométré :
Les 3 aiguilles du chronographe rattrapent
à grande vitesse le temps de chronométrage
qui s’est écoulé.
4- Stop : Le temps nal est indiqué.
5- Mise à zéro :
Les 3 aiguilles du chronographe sont remises à zéro.
Note
* D’autres temps intermédiaires peuvent être chronométrés
après 3-. Appuyer pour cela le poussoir B (achage du
temps intermédiaire/rattrapage du temps chronométré, ...)
*
1-
4-
2-
3-
5-
Poussoir A
Poussoir A
Poussoir B
Poussoir B
Compteur des
minutes
Compteur des
heures

CHRONOGRAPHE
S
W
I
S
S
M
O
V
’
T
55
50
45
40
35
30
60
25
20
15
10
05
12
210
8 4
HOUR
60
1050
40 20
SEC
30
0525
20 10
MIN
S
W
I
S
S
M
O
V
’
T
55
50
45
40
35
30
60
25
20
15
10
05
12
210
8 4
HOUR
60
1050
40 20
SEC
30
0525
20 10
MIN
Ajustage des aiguilles du
chronographe en position zéro
Exemple :
Une ou plusieurs des aiguilles du chronographe ne
sont pas en position zéro correcte et doivent être
ajustées (p.ex. après un changement de pile).
1- Tirer la couronne en position III (les 3 aiguilles du
chronographe viennent à leur position zéro, correcte
ou incorrecte).
2- Appuyer simultanément pendant au moins 2s sur
les poussoirs A et B (l’aiguilles des secondes au
centre tourne de 360° --> le mode correction est
activé).
Poussoir A
Poussoir B
Compteur des secondes
au centre
Compteur des
minutes
Compteur des
heures
1-
2-
I II III
III
CHRONOGRAPHE
3-
I II III
Ajustage de l’aiguille du compteur des secondes au centre
Pas à pas : A 1 pression brève
En continu : A 1 pression maintenue
Ajustage de l’aiguille suivante B
Ajustage de l’aiguille du compteur des heures (pos. 6h)
Pas à pas : A 1 pression brève
En continu : A 1 pression maintenue
Ajustage de l’aiguille suivante B
Ajustage de l’aiguille du compteur des minutes (pos. 9h)
Pas à pas : A 1 pression brève
En continu : A 1 pression maintenue
3- Repousser la couronne en position I
Fin de l’ajustement des aiguilles du chronographe
(possible à tout moment)
A
B
A
A
B
REGALGE DE L’HEURE
S
W
I
S
S
M
O
V
’
T
55
50
45
40
35
30
60
25
20
15
10
05
12
210
8 4
HOUR
60
1050
40 20
SEC
30
0525
20 10
MIN
S
W
I
S
S
M
O
V
’
T
55
50
45
40
35
30
60
25
20
15
10
05
12
210
8 4
HOUR
60
1050
40 20
SEC
30
0525
20 10
MIN
Réglage de l’heure
1*- Tirer la couronne en position III
(l’aiguilles des secondes s’immobilise).
2- Tourner la couronne jusqu’à ce que l’heure
actuelle 08:45 soit indiquée.
3*- Repousser la couronne en pos. I.
Note
* Pour régler l’heure “à la seconde prés”, 1- doit être
tirée lorsque l’aiguille des secondes est en position
“60”. Après avoir réglé l’aiguille des heures et des
minutes, 3- doit être repoussée en pos. I “à la
seconde près”.
1- 2-
I II III
3-
I II III
L’aiguille des
secondes
 Loading...