

Quiksilver Fragment Instruction Manual

FRAGMENT INSTRUCTIONS MANUAL

FEATURES & FUNCTIONS
Time/Date
• Hours, minutes, and second display in 12Hr or 24Hr format.
• DOW – Date display
Chrono
• Hundredth seconds resolution
• 24 hour maximum
Alarm
• Hour and Minute elds
Other Features:
• 3 VDC Operating Voltage
• 3 VDC Operating Voltage
• Electro-luminescent (EL) backlight
• Four (4) buttons operation
• Hourly Chime
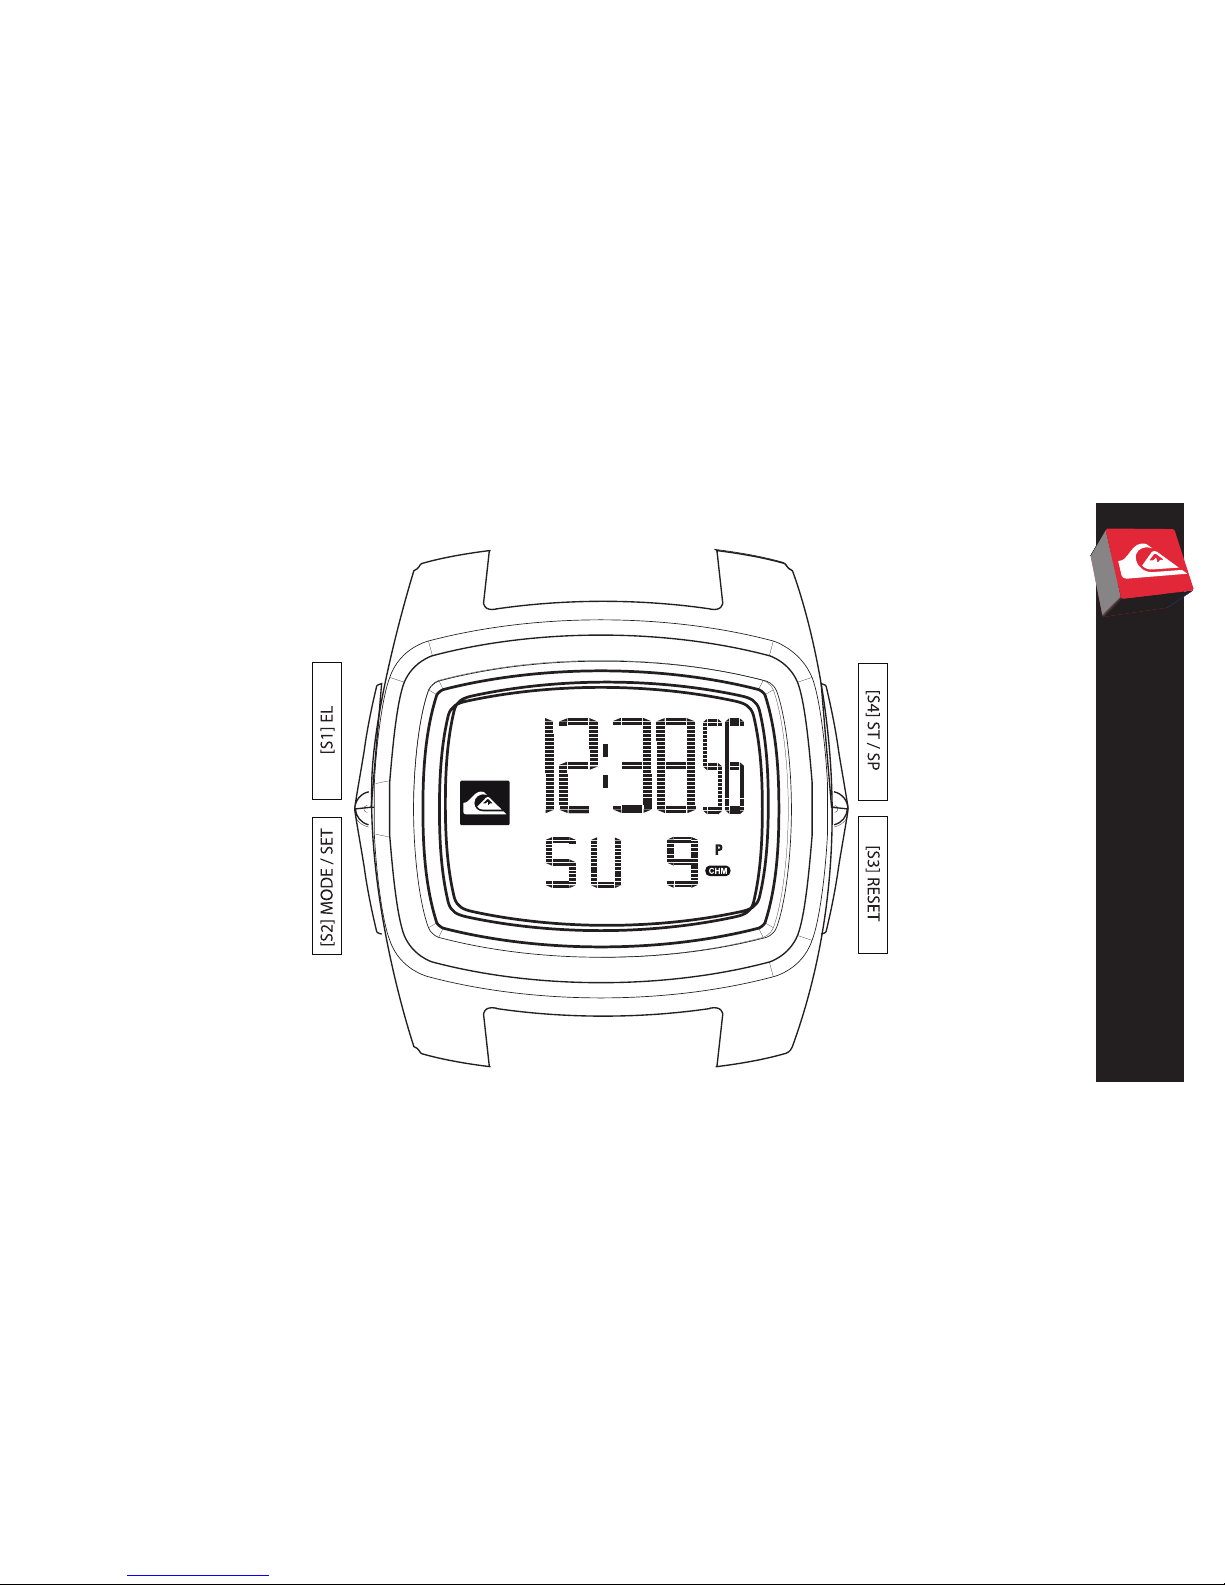
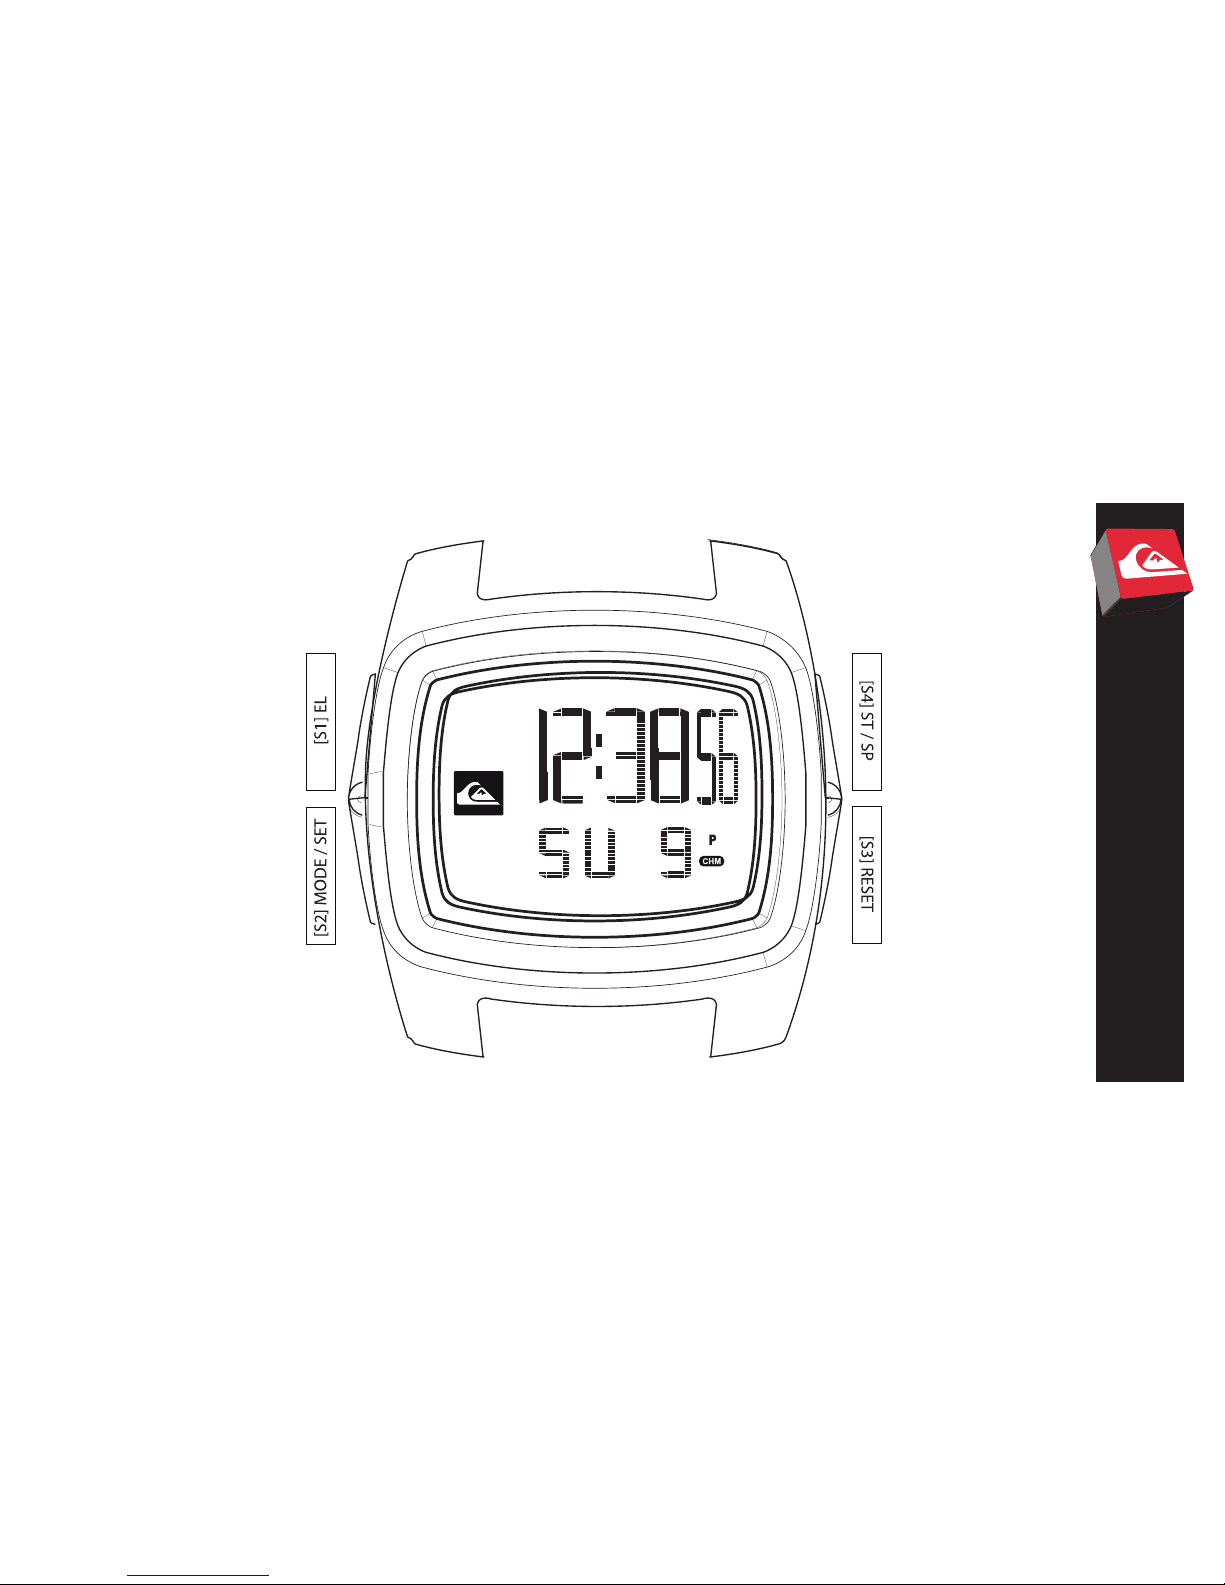
ENTRÉE / SORTIE
LCD Full Segment On

Flags
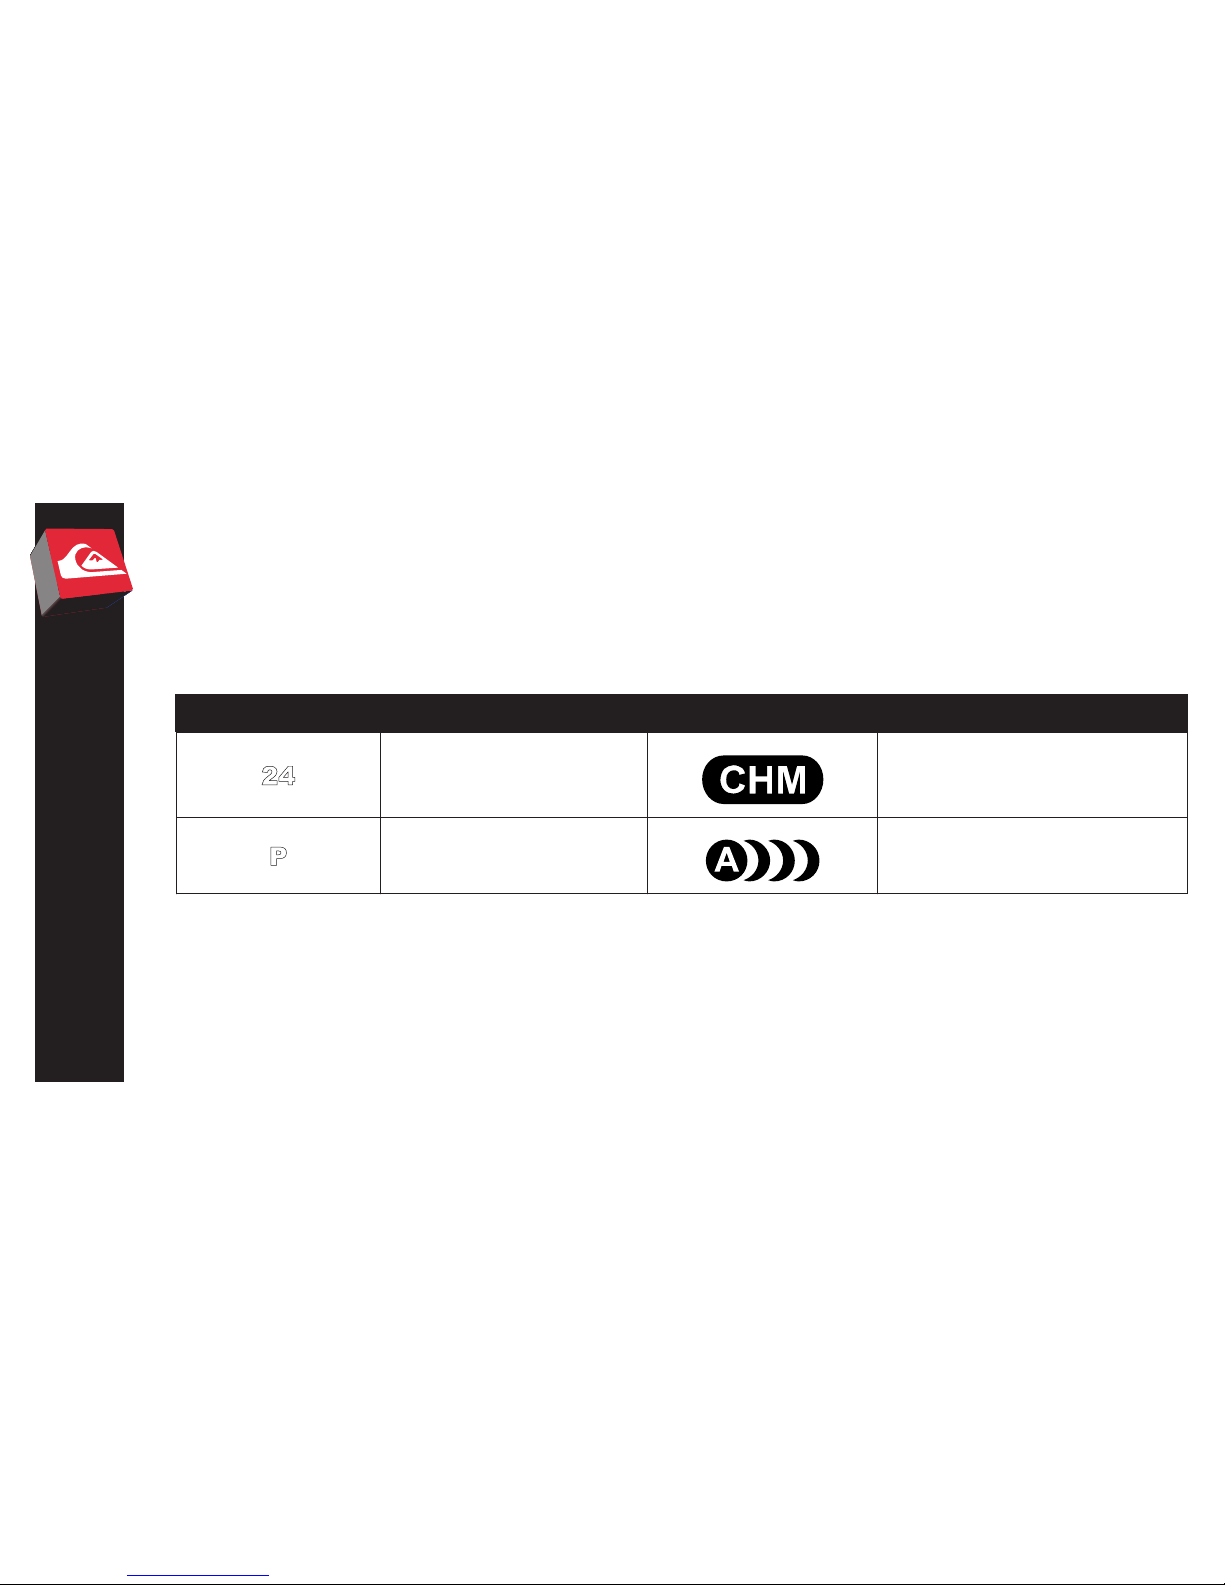
INPUT/OUTPUT
ICON NAME ICON NAME
24
24-Hour Format Chime/Keytone
P
PM Alarm

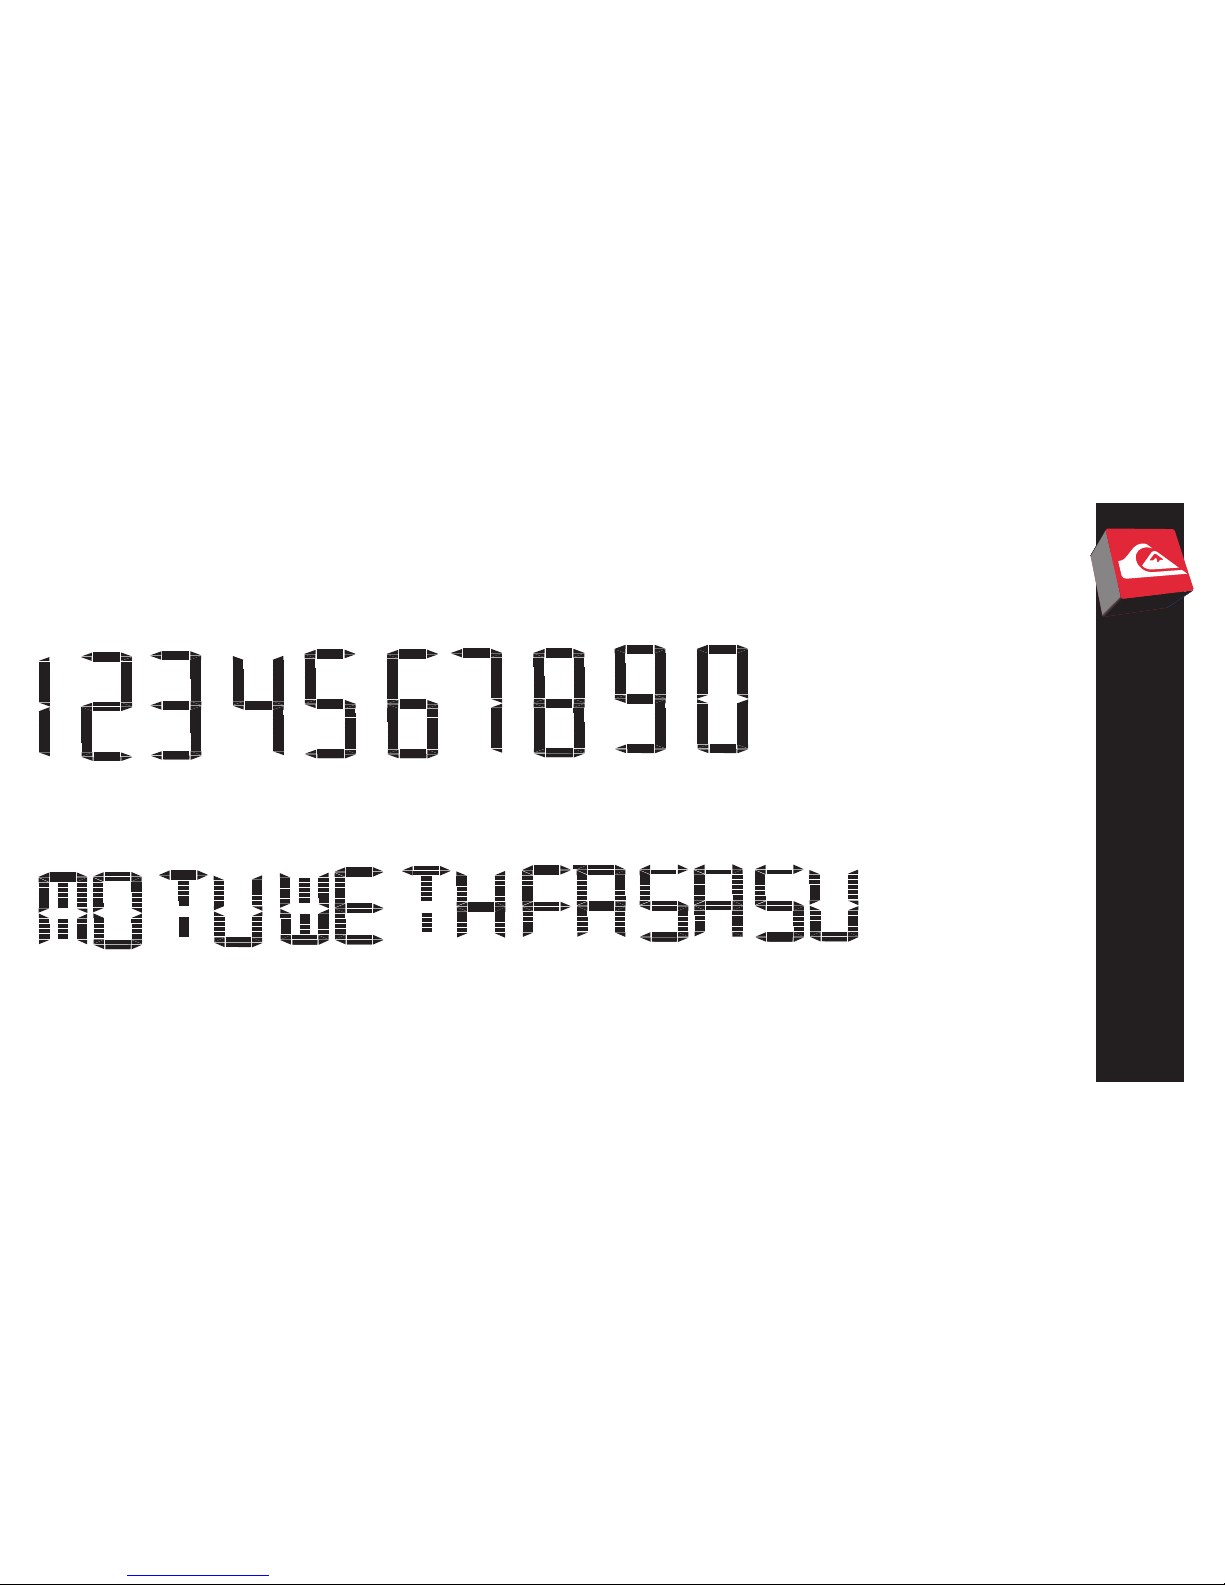
Small Digits
Big Digits
Font Table
INPUT/OUTPUT
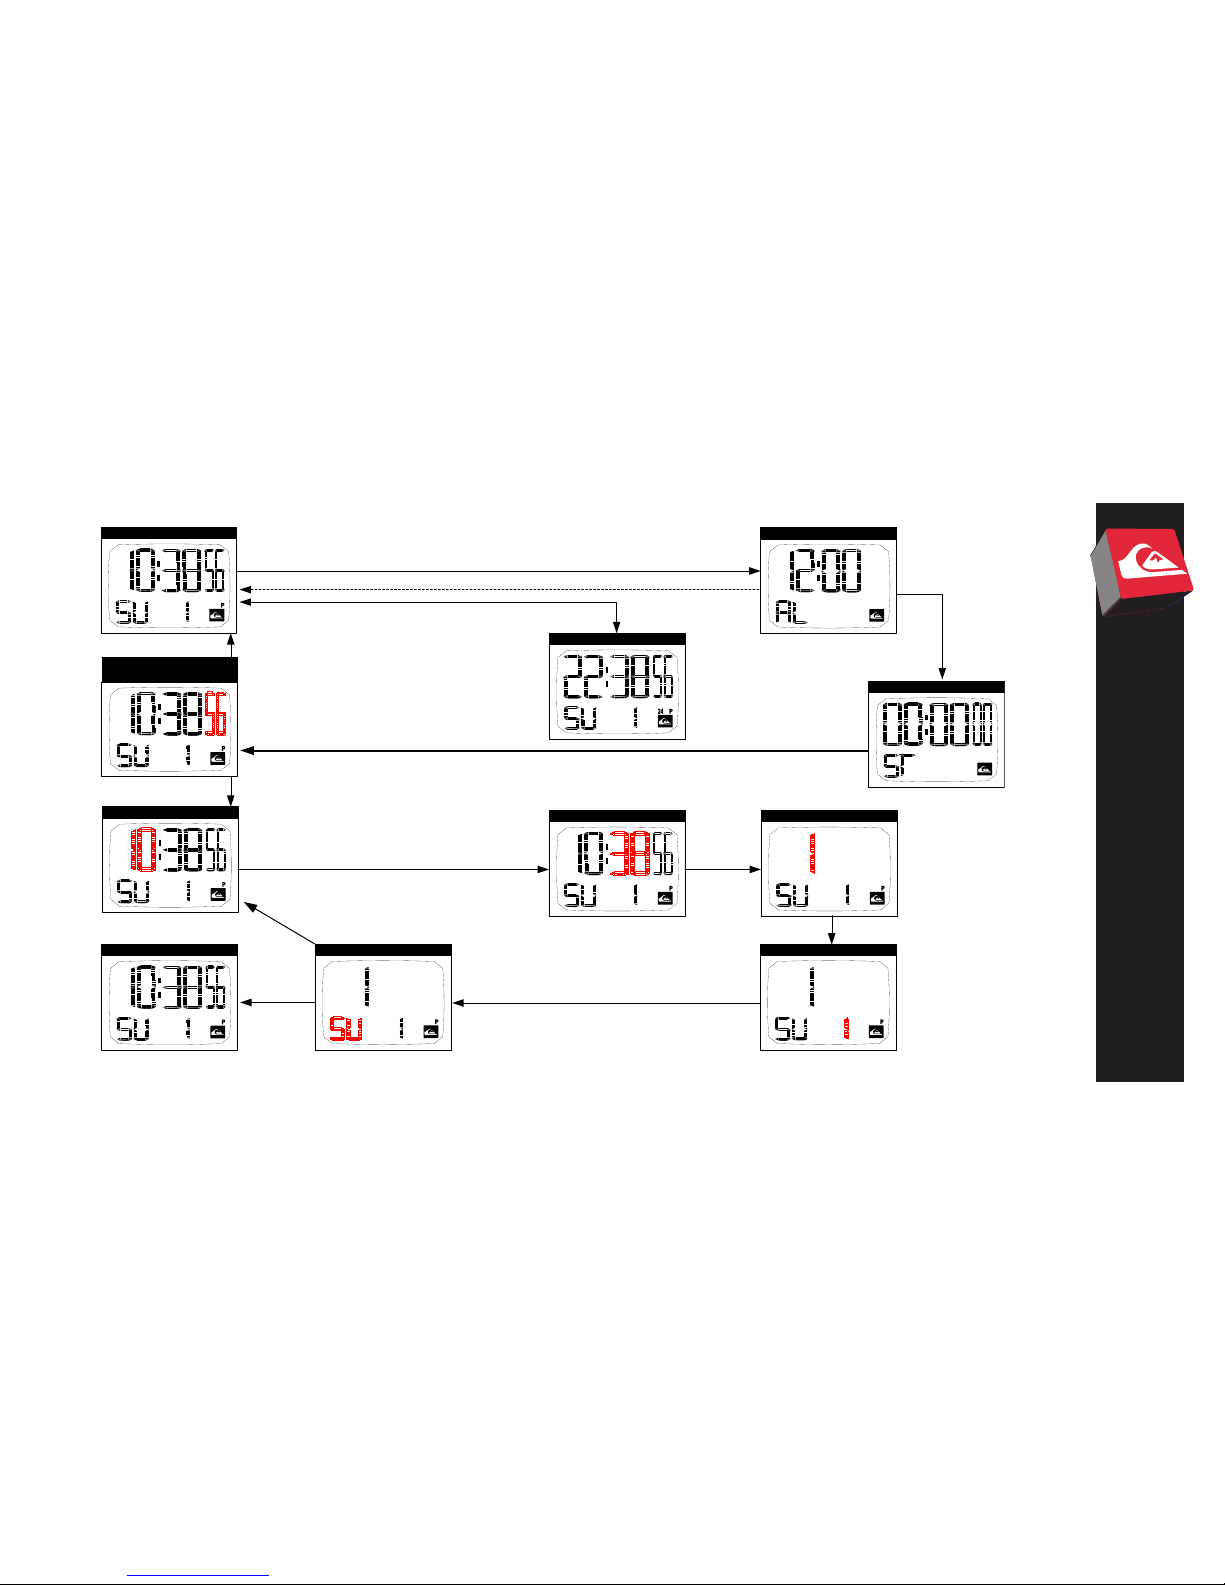
MODE LOOP
Mode Loop
Time of Day Mode
Power-On Defaults
Field Value
Time 12:00AM
Date January 1
Day of Week Sunday
Date Format DOW Date
Boundary Conditions
Field Value
Date Format DOW-Date
Hour 1 to 12 (12H), 0-23 (24H)
Minute 0 to 59
Second 0 to 59
Month 1 to 12
Date 1 to 28, 29, 30, 31 (depending on MONTH)

TOD
Alarm
Chronograph
TOD Setting State: Seconds Set
90 Seconds Timeout
Press [S2]
Press [S2]
Press [S2]
or
2 minutes timeout
TOD Hour Set
TOD Minute Set TOD Month Set
TOD Date Set
TOD Day Of Week Set
TOD Default
Press [S3]
Press [S2]
Toggle 24Hr Format
Press [S4]
Press [S2]
]3S[ sserP
]3S[ sserP
]3S[sserP
P
r
es
s
[
S
3
]
MODE LOOP

NOTES
1. After power on reset, the default Mode to appear is TOD. All
buttons are active then.
2. The sequence for the main mode loop will start from TOD ->
Alarm -> Chronograph -> Entry to TOD Setting State then back to TOD.
3. While inside Alarm’s default state and idle for 90 seconds, it will
return automatically to TOD. When in Alarm’s setting sta te, if idle for 2 minutes
then it will Auto-return to TOD.
MODE LOOP

4. In TOD Setting State, the following button functions are applied:
- [S2] Mode / Set, exit from setting state.
- [S3] Reset, move from current eld to the next eld.
- [S4] ST/SP, adjust the value of the eld in incrementing order,
wraps to the lowest possible when it reaches to the highest value.
Except for the seconds eld where it will be reset to 00 when being
adjusted..
- [S1] EL, no special function except for turning EL on.
5. The EL will activate during button press and will stay for 3
seconds after the key release.
MODE LOOP
Chronograph Mode
CHRONOGRAPH MODE
Power-On Defaults
Field Value
Chrono 00:00:00
Status RESET
Boundary Conditions
Field Value
Hour 0 – 23
Minute 0 – 59
Second 0 – 59
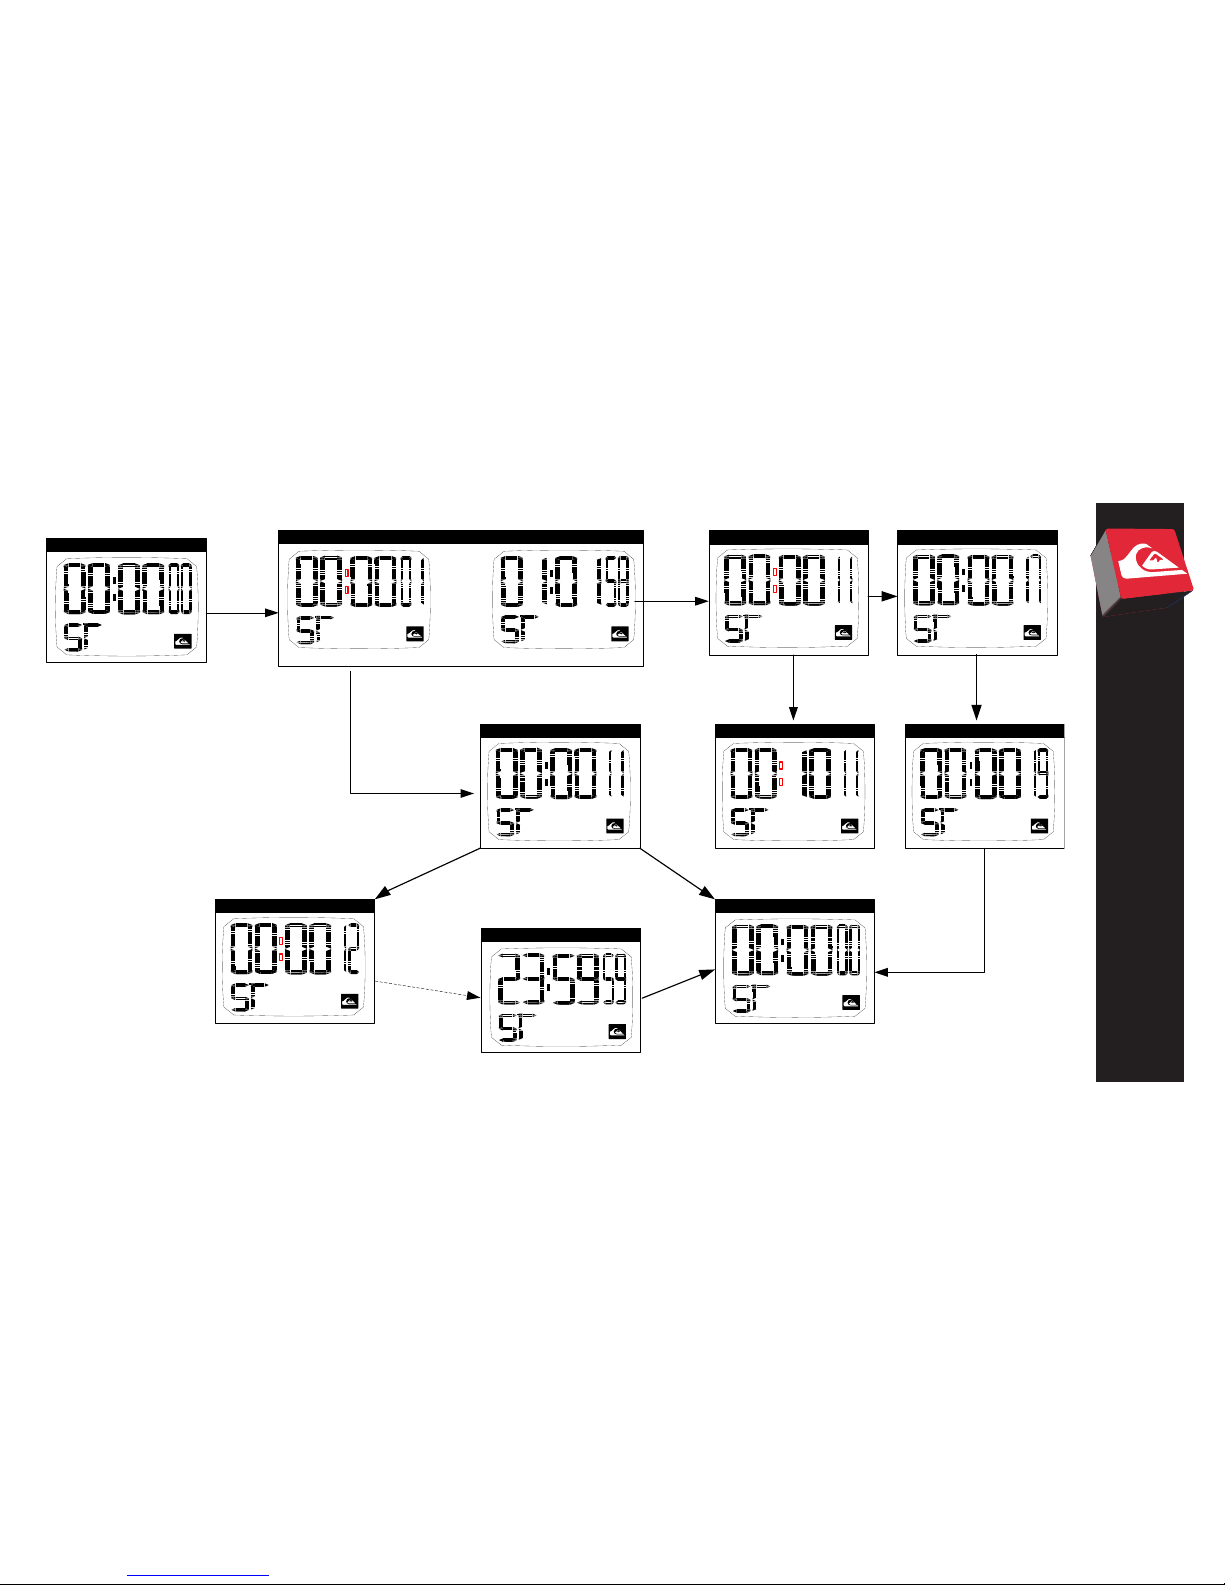
Chrono Reset State
STOP State
T < 60 minutes
T >= 60 minutes
Running State
Press [S4]
Press [S4]
Take Split
Press [S3]
Running State
Press [S3]
Assuming have 10
seconds elapsed
time
Running State
Press [S4]
Continue run...
Continue run plus
elapsed time (Split)
STOP Split
[S4]
Display Split Time
Chrono Reset State
P
r
e
s
s
[
S
3
]
Press [S3]
Press [S3]
Runout: Stop State
Press [S3]
MODE CHRONOMETRE

NOTES
1. Elapsed Time Measurement
a. Press [S4] button in the Chronograph reset state to start measu
rement
b. Press [S4] button to stop measurement and press [S4] again to
continue run.
c. During Stop State, pressing [S3] will reset the counter.
2. Split Time Measurement
a. During running state, pressing [S3] will take split time.
b. While in Split time display, pressing [S3] will go back to Chrono
graph display.
CHRONOGRAPH MODE

c. Press [S3] button to nalize the split time display with the chro
nograph in the Split Stoop State.
d. Press [S3] button to reset Chrono while in Stop state.
3. Chronograph resolution is 23:59:59.99s. There are two sets of display depending on the counter value.
a. MM:SS.hh, if the counter is less than an hour.
b. HH:MM.ss, if the counter is greater than or equal to onehour.
c. During running state, the colon is blinking.
MODE CHRONOMETRE
ALARM Mode
ALARM MODE
Power-On Defaults
Field Value
Alarm 12:00 AM
Alarm Status OFF
Chime Status OFF
Frequency Daily
Boundary Conditions
Field Value
Hour 12H: 12AM to 11PM, 24H: 0 to 23
Minute 0 – 59

Alarm
Alarm On Chime On Alarm On and Chime On
Press [S4]
Press [S4]
Press [S4]
Press [S4] -> disable all
Alarm Hour Set
Alarm Minute Set
Press [S3]
Press [S3]
Press [S3]
Alarm On
Press [S2]
ALARM MODE

NOTES
1. This is the default state of ALARM.
2. While in default mode, the following sequence will update Alarm
and Chime Icons.
-> Press [S4], enables the Alarm, press [S4] disarmed alarm and th en enable
Chime, and nally press [S4] again will arm both A larm and Chine. Another
press of [S4] will disable Alarm and Chime this time.
3. During Alarm default state, pressing [S3] will enter into setting
state where the hour eld is blinking and the Alarm Icon is automatically armed.
ALARM MODE

Pressing [S4] will adjust the value incrementally. Pressing the [S3] button will
move to the next eld. Setting sequence is fr om HOUR->MINUTES->HOUR. Fast
scanning is available during setting state.
4. The alarm will generate sound for 20 seconds when it is activated.
5. The alarm icon when armed is visible to all modes.
6. While in default state, if it is idle for 2 minutes then it will return
back to TOD (auto-return). During setting state, if it is idle for 90 seconds, it will
also exit back to TOD.
ALARM MODE

Global Rules
A. EL Handling and Operations
• EL will turn on during button press and will stay on for 3 seconds after
button release. While EL is ON, it can not be ca ncelled by any button press. If EL
button is pressed during EL ON, the 3s de lay will be reset after key release.
• EL can be activated in any mode’s state.
B. Key Handling and Operations
• No Press and Hold operation except for fast setting.
• Fast Setting will be on during setting state if held for 2s.
• When fast setting is ON, it steps 8 times per second.
• At any setting state, no key operation for 90 seconds will save changes and
exit setting back to TOD.
GLOBAL RULES
C. Display / Blinking
• Blinking of setting items will be twice per second.
D. Tone and Alerts
Application
GLOBAL RULES
Chime
o
Double Short Beep tone
Keytone
o
Single Short Beep tone
Alarm
o
Double beep tone for 20 seconds.


FRAGMENT Manuel d’Instructions

OPTIONS ET FONCTIONS
Date
• Achage des heures, minutes et secondes aux formats 12 ou 24 H
• Achage de la date DOW (jour de la semaine)
Chrono
• Résolution au centième de seconde
• 24 heures maximum
Alarme
• Champs Heure et Minute
Autres options :
• Tension de fonctionnement 3 Volts en continu
• Oscillation à quartz 32,768 kHz Heure
• Rétroéclairage électroluminescent
• Fonctionnement à (4) boutons
• Signal sonore horaire
ENTRÉE / SORTIE
Eclairage
Mode /
Réglage
Remise
à zéro
Marche /
Arrêt
Segment LCD complet activé
Repères
ENTRÉE / SORTIE
Icône Nom
24
Format 24 H Signal sonore
P
PM Alarme
Icône Nom
Petits caractères
Gros caractères
Tableau des caractères
ENTRÉE / SORTIE
MODE BOUCLE
Mode Boucle
Mode TOD (Heure de la journée)
Paramètres par défaut à la mise en marche
Champ Valeur
Heure 12:00AM
Date
January 1 (1 janvier)
Jour de la semaine
Sunday (dimanche)
Format date Date DOW
Conditions limites
Champ
Valeur
Format Date Date DOW
Heure 1 à 12 ( 12H), 0-23 (24H)
Minute
0 à 59
Seconde 0 à 59
Mois
1 à 12
Date
1 à 28, 29, 30, 31 (selon le MOIS)
MODE BOUCLE
TOD
Alarme
ChronomËtre
TOD Mode paramËtrage RÈglage
des secondes
inactivitÈ de 90 secondes
Appuyer sur [S2]
Appuyer sur [S2]
Appuyer sur [S2]
ou
2 minutes
RÈglage des Heures
RÈglage des Minutes RÈglage du mois
RÈglage de la date
RÈglage du jour de la semaine
TOD par dÈfaut
Bascule au format 24 H
Appuyer sur [S4]
Appuyer sur [S2]
Appuyer sur [S3]
Appuyer sur [S3]
Appuyer sur [S3]
Appuyer sur [S3]
Appuyer
sur [S2]
Appuyer
sur [S3]

REMARQUES
1. Après la remise à zéro de la montre, le mode TOD s’ache par
défaut. Tous les boutons sont alors activés.
2. La séquence du mode boucle principal est la suivante : TOD ->
Alarme -> Chronomètre -> Entrer dans le mode paramétrage de TOD puis revenir
à TOD.
3. Lorsque vous vous trouvez dans le mode Alarme par défaut
et qu’aucune touche n’est activée pendant 90 secondes, la montre retourne
automatiquement au mode TOD. Lorsque vous vous trouvez dans le mode
paramétrage Alarme et qu’aucune touche n’est activée pendant deux minutes, la
montre retourne automatiquement au mode TOD.
MODE BOUCLE

4. Dans les paramètres TOD, les fonctions suivantes sont activées :
- [S2] Mode / Réglage, quitter le paramétrage.
- [S3] Remise à zéro, basculer d’un champ à l’autre.
- [S4] Marche/Arrêt, ajuster la valeur du champ en ordre croissant, démarre par
la plus petite valeur lorsque la montre atteint la valeur la plus haute.
- [S1] Éclairage, aucune autre fonction particulière.
5. Le cadran s’éclaire pendant 3 secondes lorsque vous appuyez
sur ce bouton.
MODE BOUCLE

Mode Chronomètre
Paramètres par défaut à la mise en marche
Champ Valeur
Chrono
00:00:00
Etat
RESET (REMISE A ZERO)
Conditions limites
Champ Valeur
Heure 0 – 23
Minute
0 – 59
Seconde 0 – 59
MODE CHRONOMETRE
 Loading...