

Quik N' Crispy GF-II Installation Manual
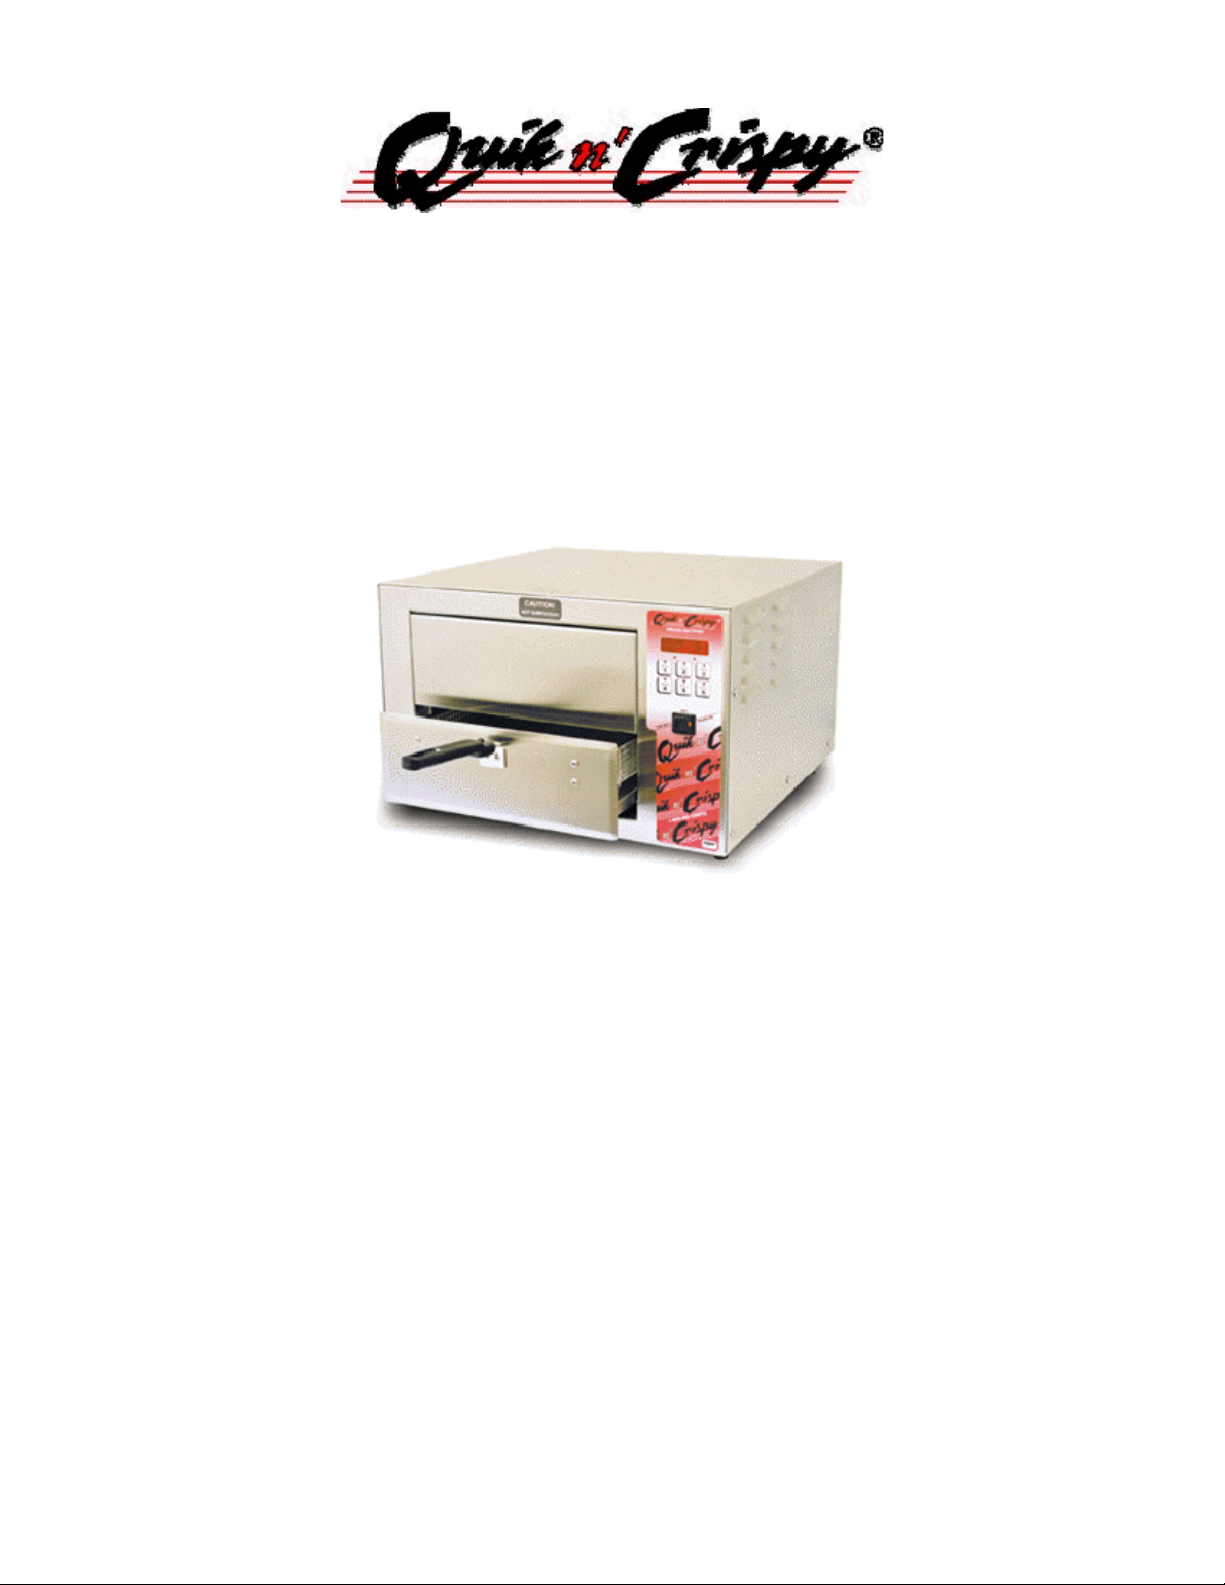
MODEL GF – II
OPERATOR’S MANUAL
Covering Quik n’ Crispy
Part Numbers:
600000
600005
600010
600015
600020
600025
©2004 QNC, Inc. 0404 Operator’s Manual

Table of Contents
Introduction / Packing List ……………………………………. 2
Installation Instructions………………………………………… 3
Installation Procedures…………………………………………. 5
Positioning the Separation Wall………………………………... 7
Initial Operation – Mechanical Control Models………………. 9
Operation Instructions – Mechanical Control Models………... 10
Initial Operation – Electronic Control Models………………… 12
Operation Instructions – Electronic Control Models…………. 13
Reprogramming the Electronic Controller……………………. 15
Cooking Procedures…………………………………………….. 17
Cleaning Procedures……………………………………………. 20
Product Registration and Service……………………………… 24
Appendix – Wiring Diagrams………………………………….. 25
GFII-120V Mechanical Controls………………………………. 26
GFII-240V Mechanical Controls………………………………... 27
GFII-120V Electronic Controls…………………………………. 28
GFII-240V Electronic Controls…………………………………. 29
©2006 QNC, Inc. 0106 Operator’s Manual 1

INTRODUCTION/PACKING LIST
INTRODUCTION
Marketed since 1990, the Quik n' Crispy® Greaseless Fryer is the result of years of
research, development, and refinement. By using the principles of forced hot air
and radiant heat, the Quik n' Crispy can quickly cook and brown a number of
"oven ready" convenience foods. This easy-to-use countertop greaseless fryer
safely and efficiently eliminates the health concerns, expense, and operating
difficulties inherent with hot oil cooking processes.
PACKING LIST
Included in the Quik n' Crispy packing carton are the following items:
1 Quik n' Crispy Greaseless Fryer
1 Cooking Basket Assembly
1 Cooking Basket Bracket, Handle & Mounting Screws
1 Drip Tray
1 Separation Wall Panel
1 Removable Front Panel
1 Splash Guard for Cooking Chamber Ceiling
4 Adjustable Legs
1 Operator's Manual
1 Product Registration Form
©2006 QNC, Inc. 0106 Operator’s Manual 2

INSTALLATION INSTRUCTIONS
Before the installation of your Quik n' Crispy, a suitable position in your retail
location should be selected. Points to consider when selecting a location are:
1. Accessibility by store employees
2. Proximity to customers
3. Proximity to refrigerator and freezer equipment
4. Proximity to other retail points of sale to take advantage of cross
merchandising opportunities
5. Sight line of customer (to enhance customer perception of "fresh"
preparation).
The Quik n' Crispy should be mounted on a sturdy food service appropriate table.
Stainless steel is the preferable material. Allow for a certain amount of workspace
near the Quik n' Crispy so that operators will not have to work in a confined
location. We recommend a minimum of 1" of space between the rear, sides and
top of the Quik n' Crispy, and the walls, ceiling or other structural surfaces of your
facility.
In addition to suitable locations, accommodation must be made for the necessary
electrical hookups. The Quik n’ Crispy is available with either mechanical or
electronic (programmable) controls. Both mechanical control models and
electronic control models are available in configurations to meet various electrical
requirements. Please note the following electrical specifications:
Electronic or Mechanical Control Models:
Part Number
Voltage, Hz Watts Amps Plug Type
MC EC
600000 600015 120v, 60 Hz, Single Phase Only 1740 14.5 NEMA #5-15P
600005 600020 120v, 60 Hz, Single Phase Only 2200 18.3 NEMA #5-20P
600010 600025 208v, 60 Hz, Single Phase Only
240v, 60 Hz, Single Phase Only
4326
5760
20.8
24.0
NEMA #14-30P
4-wire grounding
©2006 QNC, Inc. 0106 Operator’s Manual 3

The 120 volt, 18.3 amp units (part nos. 600005 and 600020) require an individual
branch circuit. Please insure that the Quik n’ Crispy is installed on an electrical
circuit conforming to the specifications above and that this circuit has been
installed and certified by a licensed electrician. When ordering parts or accessories
for your Quik n’ Crispy, please specify voltage or part number.
©2006 QNC, Inc. 0106 Operator’s Manual 4

INSTALLATION PROCEDURES
1. The Quik n’ Crispy weighs approximately 55 lb. The use of a second person
is advised for portions of this installation.
2. Open the shipping carton and fold back the shipping carton flaps. With the
flaps folded back, rotate the carton upside down on the floor.
3. Lift the carton leaving the Quik n' Crispy and the corrugated packing set in
place on the floor.
4. Remove the corrugated packing set from around the Quik n' Crispy.
5. Remove the plastic bag from the Quik n’ Crispy then remove the yellow tape
from the front of the Cooking Basket. Pull out the Cooking Basket assembly
and remove the zip lock bag from underneath the Cooking Basket.
6. Remove the Cooking Basket handle; handle bracket, mounting screws, and
adjustable legs from the Operators Manual zip lock bag.
7. Using your fingers, screw the 4 adjustable legs into the bottom of the fryer.
8. Lift the fryer into position on the designated counter. Again, we recommend
a minimum of 1-inch clearance from any adjacent walls or equipment.
9. Adjust the legs to balance the fryer on the designated counter.
10. Attach the Cooking Basket handle bracket to the Cooking Basket. A #2
Phillips head screwdriver and a 5/16" wrench are recommended to insure
proper mounting. Please check the other four screws and acorn nuts on the
cooking basket assembly and retighten if necessary. They may have
loosened while in transit to your facility.
11. Inspect the Separation Wall panel and look to see that it is mounted
properly. Because this can prove to be confusing, we have included a
separate installation procedure on pages 7 and 8. Please turn to page 7 at
this time and remove and install the Separation Wall panel.
12. Once the Separation Wall panel is installed, place the Drip Tray onto the
bottom drawer guides, angle it upward to a 45° angle to clear the stop and
slide it in. This tray should slide in freely.
13. Place the Cooking Basket onto the Drip Tray. The two parts should now
slide in and out of the Quik n’ Crispy in unison.
©2006 QNC, Inc. 0106 Operator’s Manual 5

14. At this point, be sure that the On/Off Switch for the Quik n' Crispy is in
the center “Off” Position. Plug in your Quik n' Crispy.
©2006 QNC, Inc. 0106 Operator’s Manual 6
POSITIONING THE SEPARATION WALL AND SPLASHGUARD
WARNING!
Before proceeding, make sure the Quik n' Crispy power switch is in the “OFF”
position (this is the center position of the On/Off Switch) and that the fan blower is
stationary and that the cooking chamber and heating element are not hot!
1. Lift the Removable Front Panel (RFP) that is located directly above the
Cooking Basket by applying slight upward pressure. It should slide out at an
upward angle.
2. Pull the Splashguard out of the top of the cooking chamber. This is a
formed piece of stainless steel that is located between the heating element
and the ceiling of the inner chamber. When inserted into the cooking
chamber, the surface of the splashguard should be in contact with the ceiling
of the chamber. The splashguard should be removed daily for cleaning with
the other removable items located in the inner chamber.
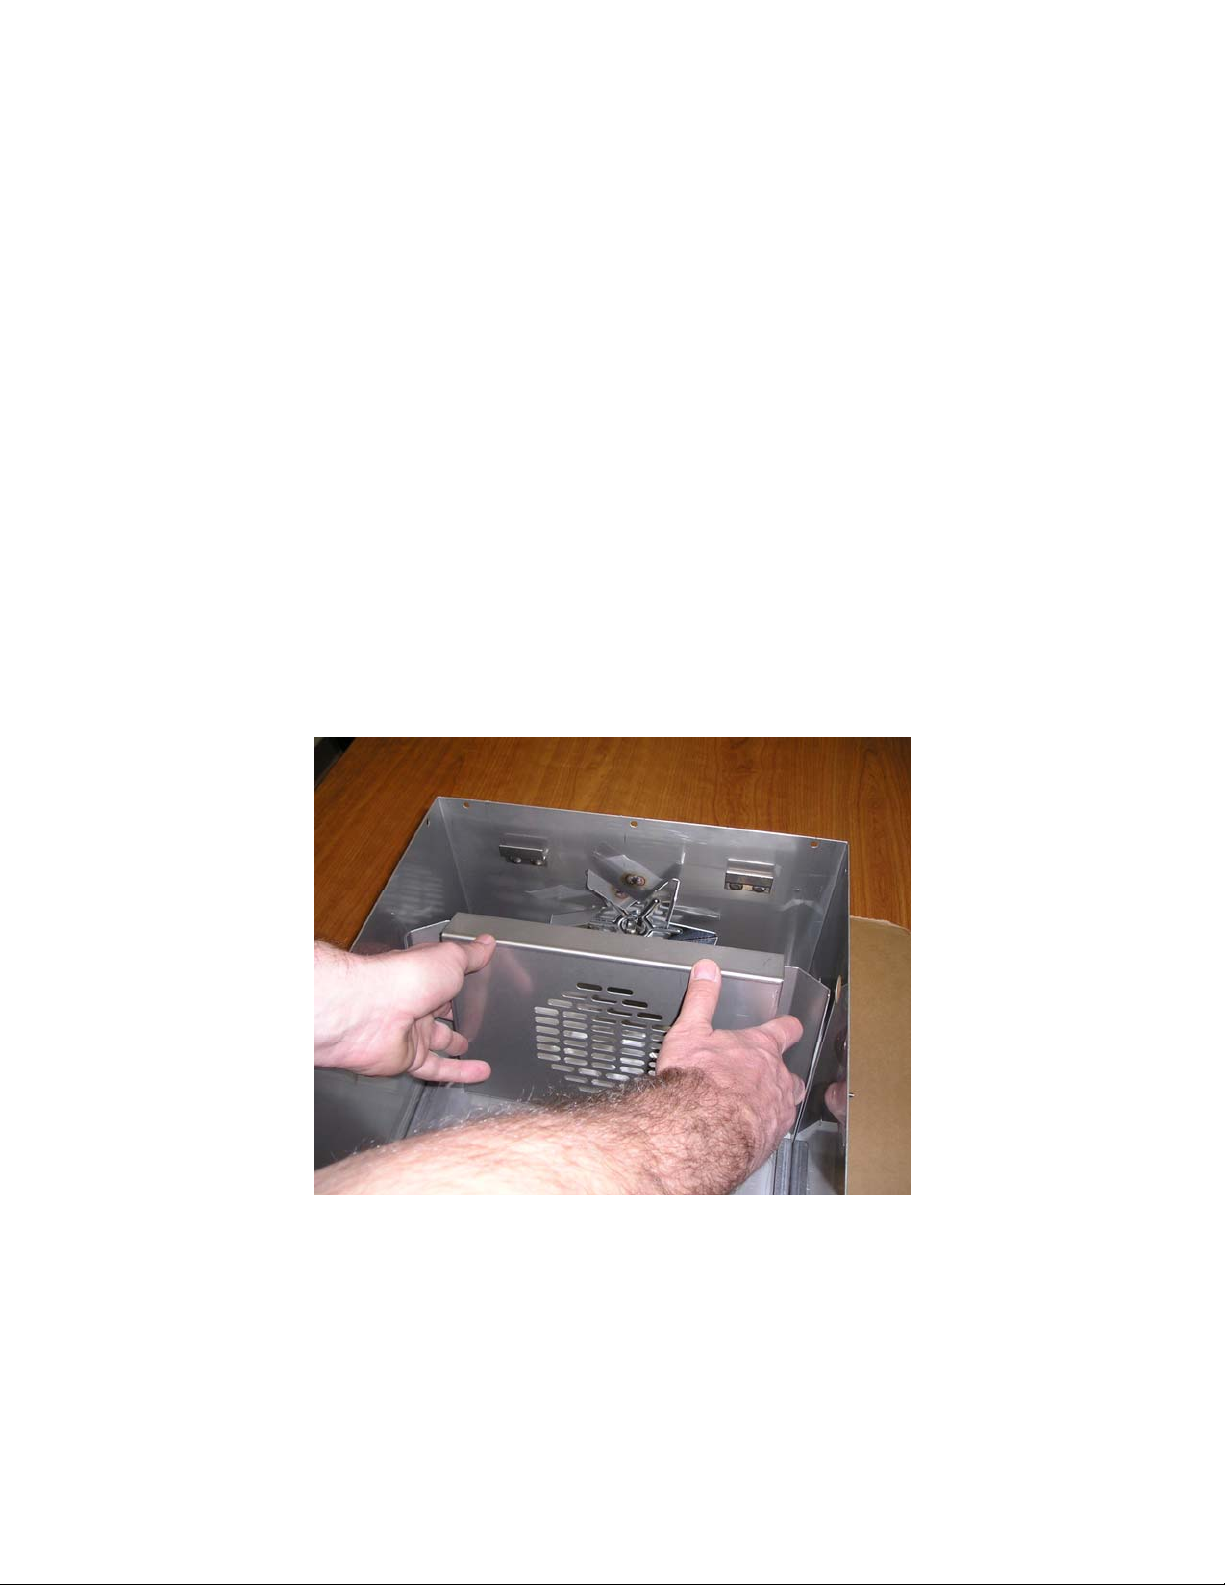
Separation Wall Cutaway View
3. The Separation Wall was positioned properly in the rear of the inner
chamber of your Quik n’ Crispy prior to shipping. It is held in place by
gravity with two inverted “U” channels that are formed on the back of the
Separation Wall, mating with two “U” channel tabs that are located on either
side of the fan (See picture above) on the rear wall of the cooking chamber.
The Separation Wall can often come off the tabs that hold it in place during
shipping. Please check and confirm that it is installed properly by removing
and replacing the Separation Wall at this time. The photo above illustrates
©2006 QNC, Inc. 0106 Operator’s Manual 7

how the separation wall is installed. It was taken with the top off of the Quik
n’ Crispy in order to clearly show the installation. It is not necessary to
remove the top to accomplish this procedure.
4. Place your hands on each side of the Separation Wall and lift it straight up to
the ceiling of the chamber to clear the mounting tabs. Pull the Separation
Wall towards you until it makes contact with the Heating Element. Now
pull the bottom of the Separation Wall out first and angle it out of the inner
chamber with the bottom of the Separation Wall coming out of the inner
chamber first.
5. Reverse the process and reinstall the Separation Wall by grasping it by the
sides with both hands and insert it into the front opening of the Quik n'
Crispy, entering the front opening just above the top set of Drip Tray guides.
Insert the wall straight back into the Quik n' Crispy until you touch the rear
wall of the cooking chamber keeping the Separation Wall parallel to the
floor of the Quik n' Crispy.
6. Angle the top portion of the Separation Wall upward towards the ceiling of
the inner chamber until it comes in contact with the ceiling. Slide the
Separation Wall further back into the inner chamber so that it comes in
contact with the rear wall of the inner chamber. Now lower the Separation
Wall so that the two tabs of the Separation Wall catch onto the tabs on the
top right and left sides of the rear wall of the cooking chamber. The
Separation Wall should now be hanging upright, with the bottom of the
Separation Wall approximately .25" up off the floor of the cooking chamber.
7. Slide the Splashguard back into the top of the inner chamber. Please note
that the surface of the splashguard should be closest to the ceiling of the
inner chamber.
8. Place the Removable Front Panel back onto the front of the Quik n’ Crispy.
It will slide down at an angle onto the four pins that are located on the front
of the unit.
©2006 QNC, Inc. 0106 Operator’s Manual 8

THE INITIAL OPERATION OF YOUR QUIK N' CRISPY®
WITH MECHANICAL CONTROLS
The first operating cycle after installation should be a confirmation of the Quik n’
Crispy's proper working order. To do this, we recommend that you turn the
On/Off switch to the "Timer On" position. If the Quik n’ Crispy is operating
properly, you should be able to hear the fan circulating air. If you are uncertain
that it is working properly, partially slide out the cooking basket and look into the
fryer. The fan should be turning at a high rate of speed.
Turn the timer clockwise to the 15 minute setting. If, in the operation of the Quik
n' Crispy®, you set the timer for a setting higher then desired, just turn the timer
knob back in the other direction. This will not damage the timer.
Set the thermostat to 400°F. If the fryer is operating properly, you should be able
to hear the fan circulating air and feel heat emanating from the fryer. If you are
uncertain that they are working properly, partially slide out the cooking basket and
look into the fryer. The fan should be turning at a high rate of speed and the
heating element should be glowing.
If the thermostat is working properly, a clicking sound will be heard. This is the
normal on and off cycling of the heating element as it maintains a constant internal
temperature. Also, do not be concerned with any unusual odors during this initial
cooking cycle. As with most commercial cooking equipment, a "factory" odor
(somewhat oily) is emitted until burn-off occurs.
DO NOT PLACE YOUR HANDS OR A METAL OBJECT INTO THE FRYER
WHILE THE UNIT IS OPERATING. This fryer operates at a high voltage and can
result in severe electrical shock to the user if caution is not exercised.
©2006 QNC, Inc. 0106 Operator’s Manual 9
 Loading...