


QUIETVOX AG
Sägereistrasse 20
CH-8152 Glattbrugg
Switzerland
http://www.quietvox.com
Product Specifications
QV -7T Series
Do not make any changes or modifications to the equipment unless otherwise specified
in the instructions. If such changes or modifications should be made, you could be
required to stop operation of the equipment.
This device complies with part 15 of the FCC Rules. Operation is subject to the following
two conditions:
(1) This device may not cause harmful interference, and
(2) this device must accept any interference received, including interference that may
cause undesired operation.
- 1 -

Product Overview
The QV -7T series product is designed specifically for the tour excursions and commercially named as
Tour Guide System (TGS).
The TGS consisting a low power transmitter which provides a one way communication addressing to
multiple receivers operating on the same channel.
There are two versions available in the QVT-7T series, the CE version and FCC version identifies by
extension of the model number, color codes and display ID as per the following:
1) Model No. QVT19-7T-864
Description : FM Transmitter, CE version, 40 Channels, 863.000~865.000MHz.
Color Code : White
Display ID : EU
1) Model No. QVR29-7T-864
Description : FM Receiver, CE version, 40 Channels, 863.000~865.000MHz.
Color Code : White
Display ID : EU
1) Model No. QVT19-7T-926
Description : FM Transmitter, FCC version, 40 Channels, 925.000~927.000MHz.
Color Code : Red
Display ID : US
1) Model No. QVR29-7T-926
Description : FM Receiver, FCC version, 40 Channels, 925.000~927.000MHz.
Color Code : Red
Display ID : US
FM Transmitter FM Receiver
Model No. QVT19-7T Model No. QVR29-7T
- 2 -

Initial setup
The transmitter (Tx) and Receiver (Rx) must perform an initial setup prior to operation.
The setup is simply program the corresponding channel number between the Tx and Rx.
Setup the Tx
1) Press and hold the [\/] button and power up by sliding the [Power] switch located on the right side
simultaneously as shown below:
[ENTER] button
[/\] button
[\/] button
[Power] on position
2) Release the [\/] button after powered, a screen similar to below is displayed:
Channel number
Operating Frequency
Relative to EU or US versions
“US”= FCC Version 926MHz
“EU”= CE Version 864MHz
2) While the “>” cursor is pointing the Ch=xx, momentary press the [ENTER] button
to adjust the channel selection 1~40 as shown below:
3) While the channel number is highlighted, press the [/\] button to increase or [\/]button to decrease.
4) Press the [ENTER] button once to exit channel selection when done. The“>”cursor should have
moved back to most left position and channel highlighting is off.
5) Press the [\/] button once and move the “>”cursor next to “Exit”.
6) Press the [ENTER] button to exit channel selection and setting is saved.
7) Reset power of the Tx for normal operation.
- 3 -

Setup the Rx
1) Connect the external display to the bottom of the Rx as shown below:
External display
2) Press and hold the [Volume Up] button and power up by sliding the [power switch] on the side.
[Volume Down]
[Power switch] up
position to power.
[Volume Up]
3) Release the [Volume UP] button and note that the display is on as shown below:
US= FCC Version 926MHz
EU= CE Version 864MHz
Channel number
Operating Frequency
Relative to US or EU
Versions
4) While the “>” cursor is pointing the Ch=xx, momentary press the [Volume Down] button
to enter the channel selection as shown below:
- 4 -
5) While the channel number is highlighted, press the [Volume Up] button to increase.
6) Press the [Volume Down] button once to exit channel selection when done. The“>”cursor should
have moved back to most left position and channel highlighting is off.
5) Press the [Volume Up] button once and move the“>”cursor next to“Exit”.
6) Press the [Volume Down] button to exit channel selection mode and setting is saved.
7) Turn off the Rx and remove the external display.
8) Reset power of Rx for normal operation.
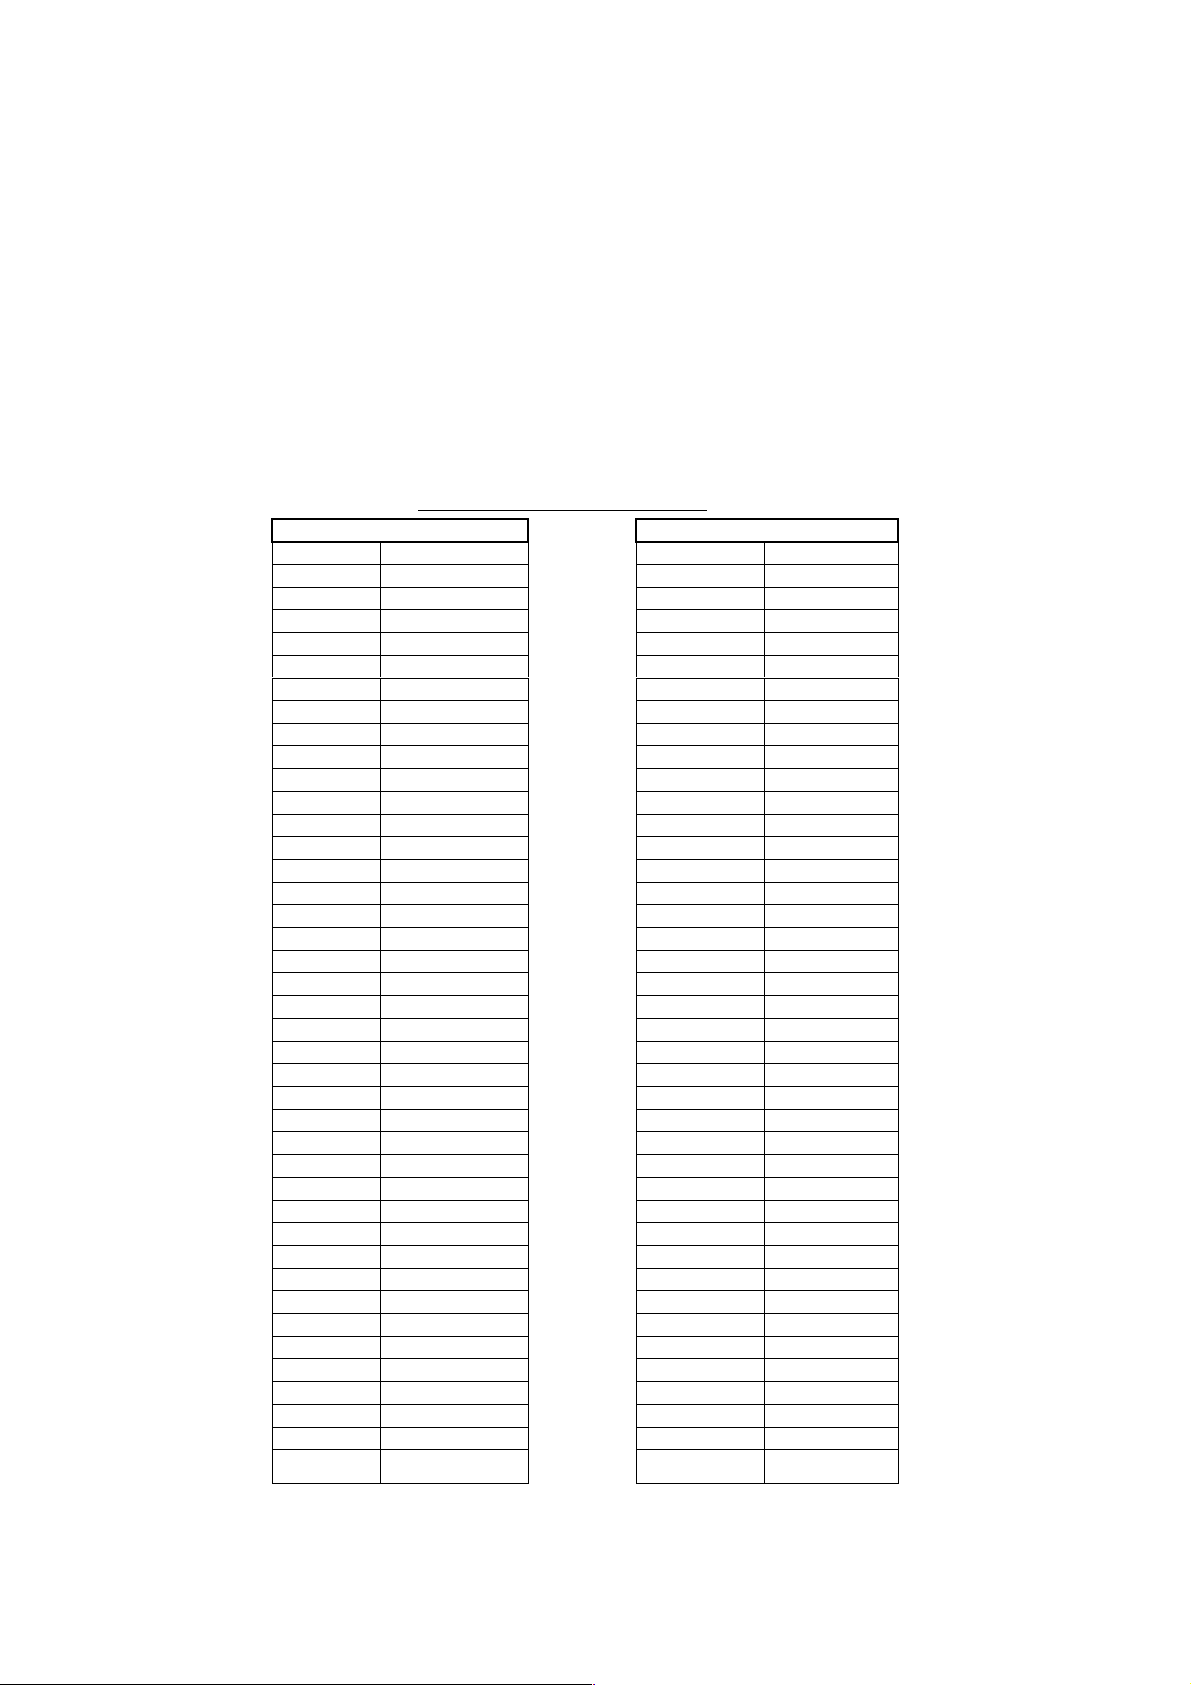
Channel No. vs Operating Frequency
926MHz 864MHz
Chan.No. Freq.MHz Chan.No. Freq.MHz
01 925.025 01 863.025
02 925.075 02 863.075
03 925.125 03 863.125
04 925.175 04 863.175
05 925.225 05 863.225
06 925.275 06 863.275
07 925.325 07 863.325
08 925.375 08 863.375
09 925.425 09 863.425
10 925.475 10 863.475
11 925.525 11 863.525
12 925.575 12 863.575
13 925.625 13 863.625
14 925.675 14 863.675
15 925.725 15 863.725
16 925.775 16 863.775
17 925.825 17 863.825
18 925.875 18 863.875
19 925.925 19 863.925
20 925.975 20 863.975
21 926.025 21 864.025
22 926.075 22 864.075
23 926.125 23 864.125
24 926.175 24 864.175
25 926.225 25 864.225
26 926.275 26 864.275
27 926.325 27 864.325
28 926.375 28 864.375
29 926.425 29 864.425
30 926.475 30 864.475
31 926.525 31 864.525
32 926.575 32 864.575
33 926.625 33 864.625
34 926.675 34 864.675
35 926.725 35 864.725
36 926.775 36 864.775
37 926.825 37 864.825
38 926.875 38 864.875
39 926.925 39 864.925
40 926.975 40 864.975
- 5 -

Operating – Tx (Stand alone operation)
1) Turn the Tx to on by sliding the [Power Switch] to upward position.
2) Hold the Tx in vertical position to transmit, opposite to stop transmit.
3) Maintain a distance of about 5cm between the mouth and microphone for best result. The
integrated microphone is located above the display as shown.
Integrated
Microphone
Active Standby
Transmit on Transmit off
5) Turn power to off when not in use.
Operating – Tx (External Microphone)
1) Turn the Tx to on by sliding the [Power Switch] to upward position.
2) Connect the external microphone to the 3.5mm jack.
3) Switch the microphone switch to“ON”position to make commentary or“OFF”position to stop
transmission.
4) Maintain a distance of about 5cm between the mouth and microphone for best result.
5) Turn power to off when not in use.
External Microphone
Microphone Switch
- 6 -

Operating – Rx
1) Turn the Rx to on by sliding the power switch to upward position.
2) Note that the Green LED is blinking signifies in standby condition.
3) Insert the earphone to the connector.
3) Adjust the volume to a comfortable level by pressing the [Volume Up] and [Volume Down] button.
4) Turn off the unit when not in use.
- 7 -

Technical details
Type of Equipment Tour Guide System
Type designation QV -7T series
Operating frequency 863.025MHz ~ 864.975 EU version
926.025MHz ~ 926.975 US version
Type of Modulation (ITU designation) 50KF3E
Channel separation 50kHz
Number of channels 40
Frequency stability 5ppm
Antenna type and length Tx, Rx Micro strip integrated antenna, 1/4 Wave, Unity
Gain.
FM Deviation (Normal) 2.5kHz
FM Deviation (Maximum) 5.0kHz
Microphone (Internal and External) Electret Condenser Microphone, Impedance: <2.2kΩ
Sensitivity: -55dB±3dB
Carrier Power (ERP) Less than 10mW
Spurious emission (ERP) Less than -36 dBmw
Transmitter control Up down directional on/off switch and Voice operated
Duty Cycle - Class Continuous transmission possible
Power supply Tx : 2 x AAA battery (1.5V Each)
Rx : 2 x AAA battery (1.5V Each)
End.
- 8 -
 Loading...