

Page 1
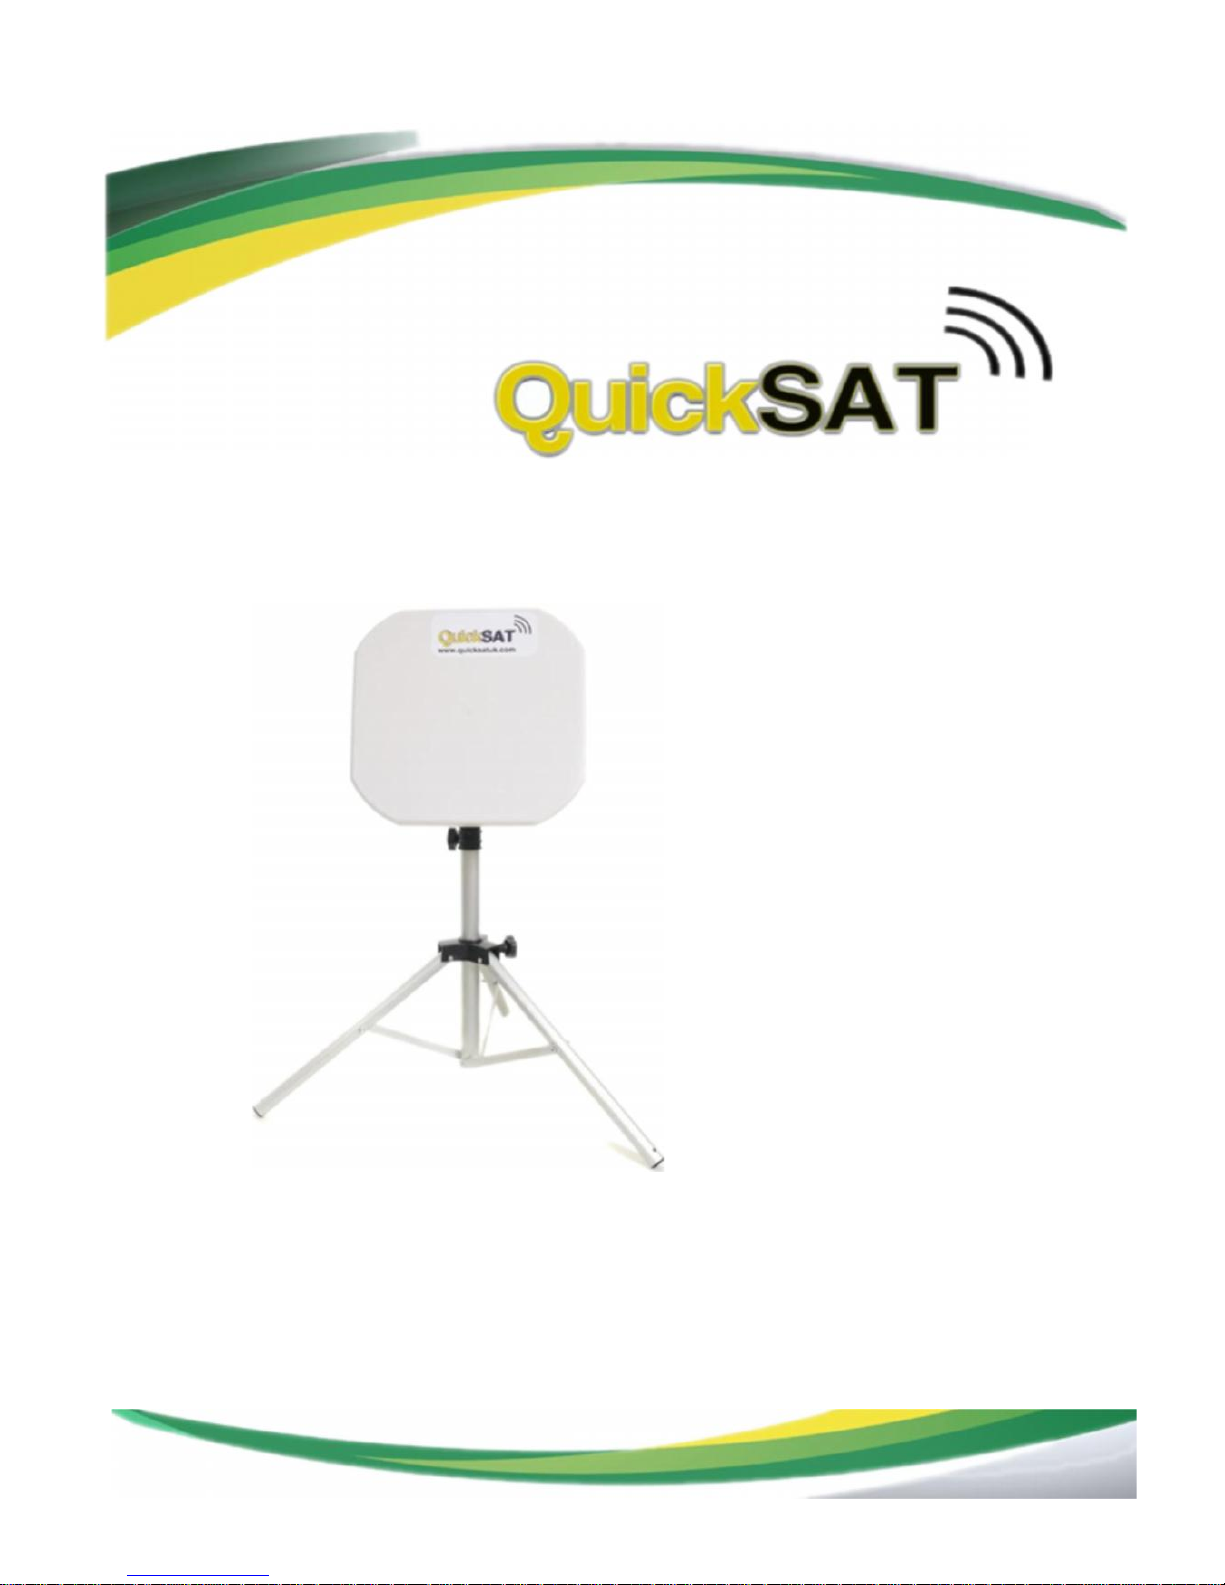
QS65USER MANUAL
Page 2

2
About QuickSAT
Congratulations on your new purchase and welcome to the world of QuickSAT
Satellite TV, QuickSAT is the simplest touring satellite system to set up and operate.
This guide will take you through the simple process required to get you
watching all of your favourite channels as soon as possible.
The QuickSAT Satellite Kit includes everything you need to watch Digital Satellite TV
on the move. Each kit includes the QuickSAT flat dish, sturdy lightweight tripod with
ground fixings, a QuickSAT elevation and alignment kit, all the necessary leads and
connections and optionally a pre-tuned dual voltage 240 volt AC/12 volt DC satellite
receiver.
The product can easily be transported and stowed away in the supplied carry bag
and is quite possibly the lightest most portable product currently available on the
market,
Please note that it is important to retain your receipt or proof of purchase so that we are
able to assist and deal with any enquiries you may have.
QuickSAT is a product and brand name of Falcon Technical Ltd using our patented smart
satellite finding technology
For more information on QuickSAT and our products please visit our website:
www.quicksatuk.com
Get in touch
QuickSAT c/o Falcon Technical Limited
Hill Farm, Northwich Road,
Dutton, Cheshire, WA4 4LE, UK
UK Enquiries: 01928 759 239
International: +44 (0) 1928 759 239
Email: [email protected]
Page 3
3
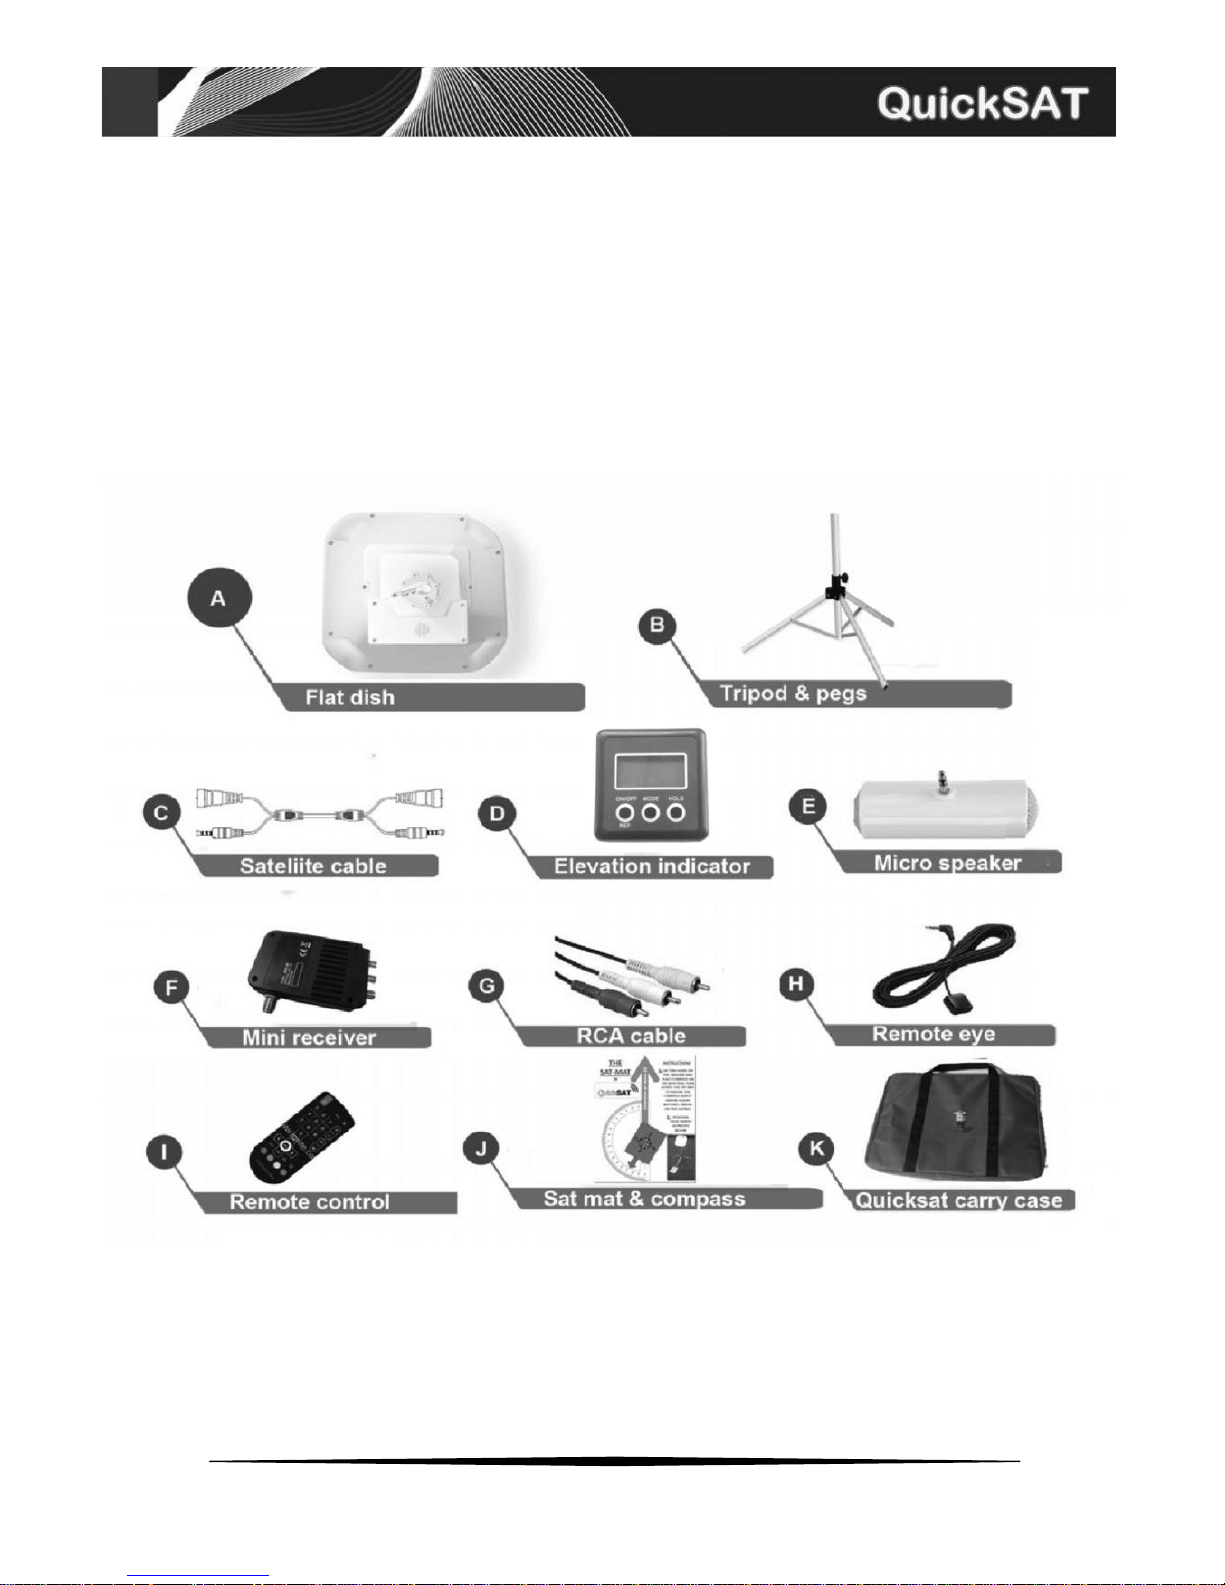
Package Contents:
Thanks for purchasing QuickSAT, the easy to use touring satellite system.
With your purchase you will find the following contents:
Note: Items F,G,H,I are only included with the optional mini receiver.
Page 4
4
Getting Started:
DISH SETUP
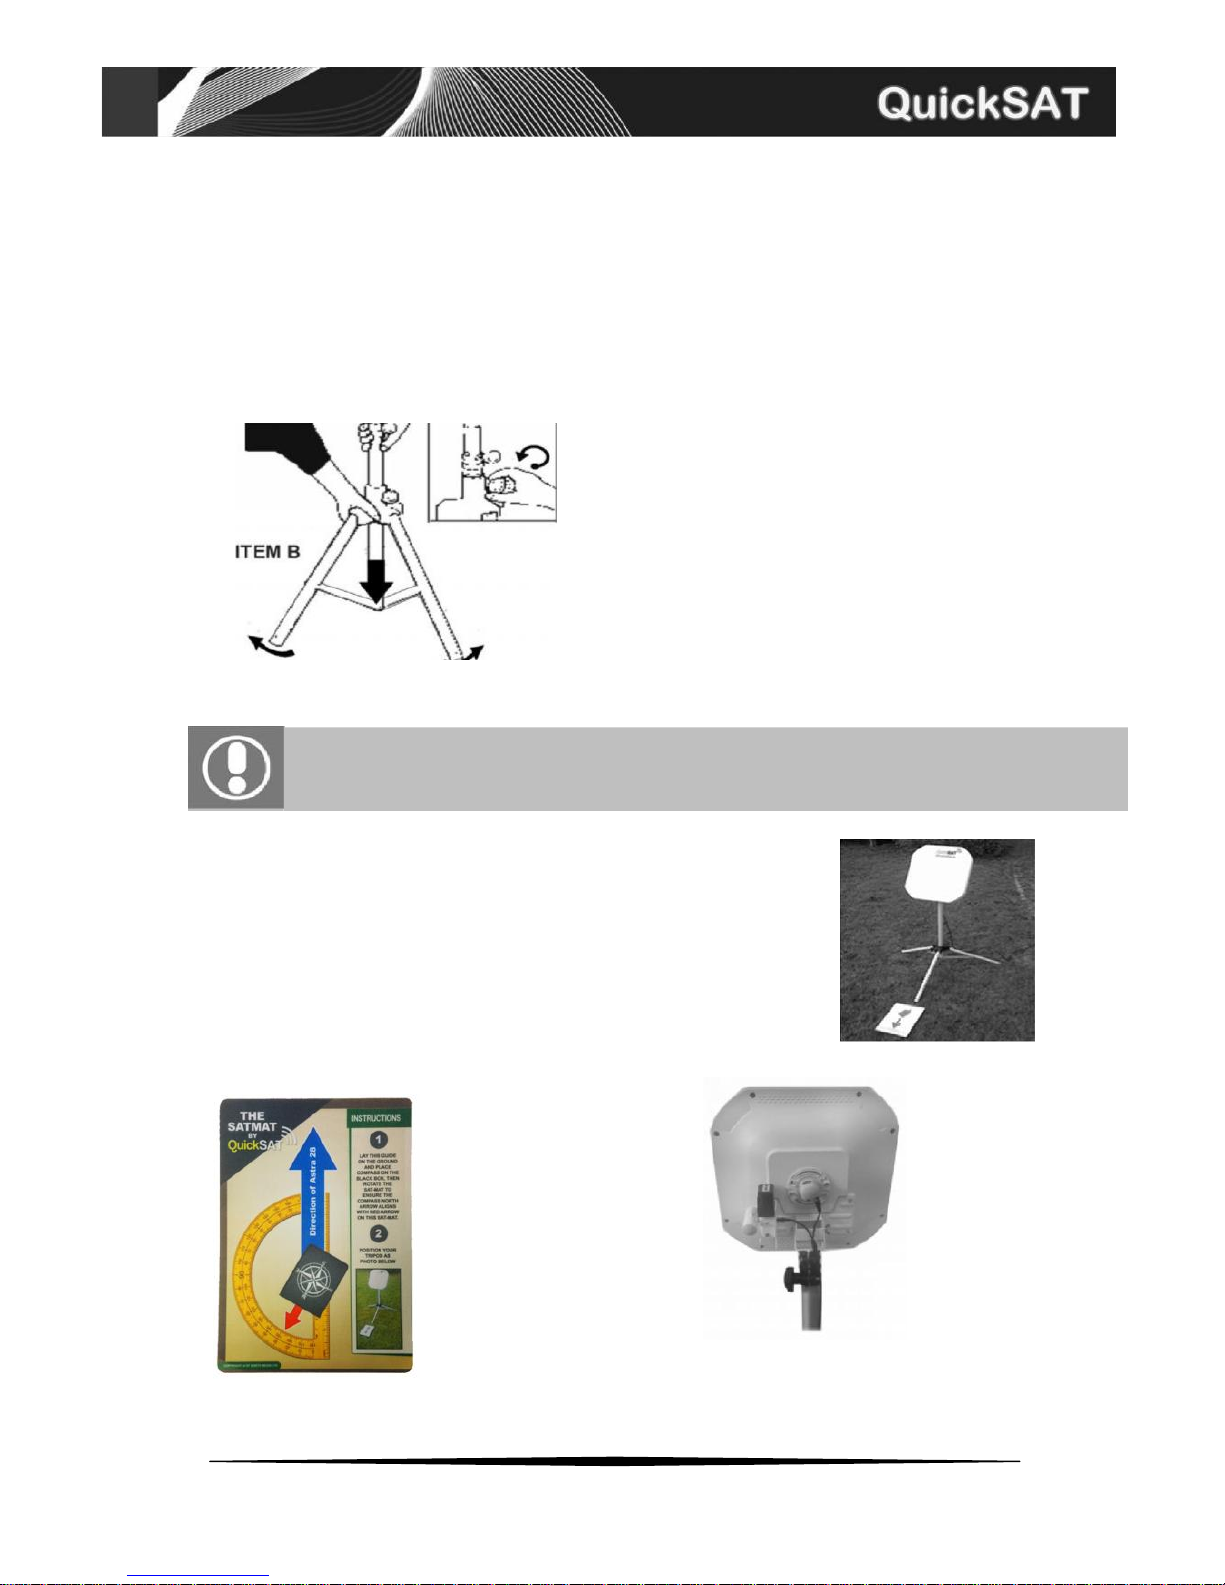
1) Loosen the fixing clamp on the tripod stand and push the legs downwards.
2) Extend the feet of the tripod stand as far as they will go for maximum stability
3) Ideally the tripod should be placed on reasonably level ground so that the tripod is vertical, use the ground
anchor pegs to secure the tripod.
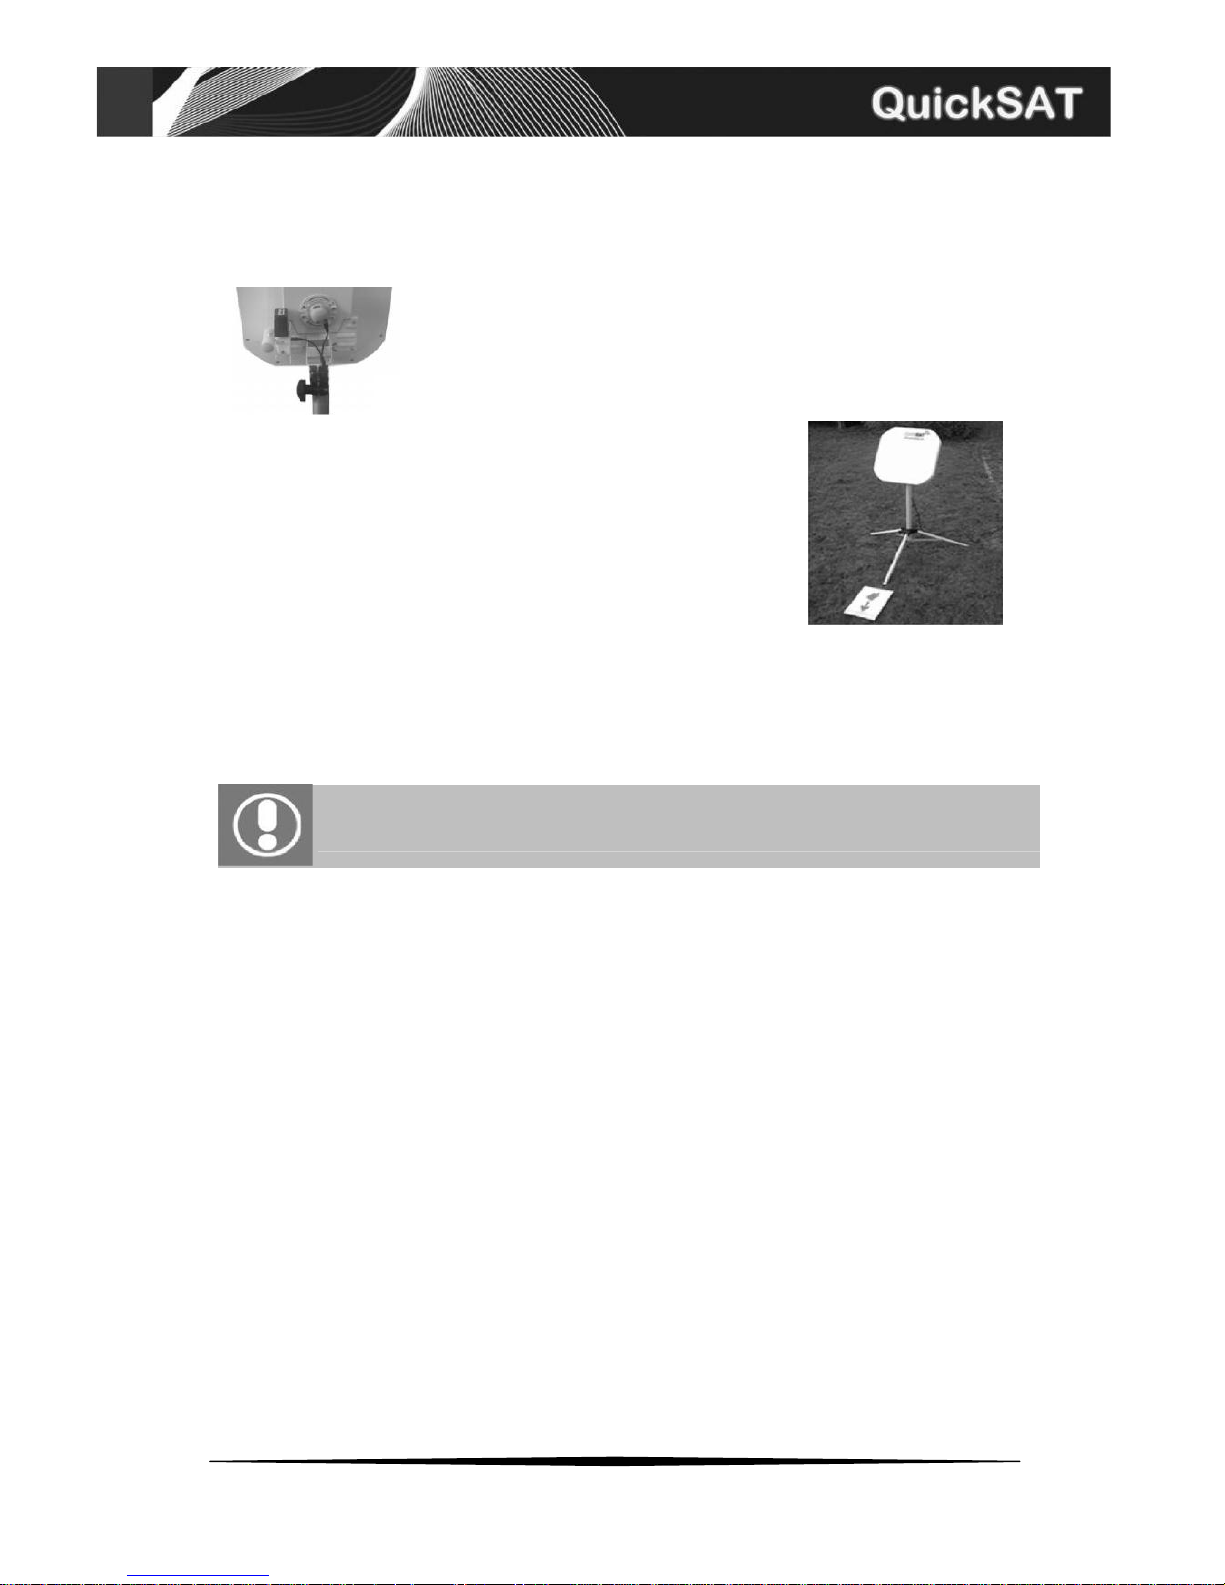
4) Using the Sat Mat and compass (Item J) align one of the tripod legs
so that it is in the direction of the arrow on the mat (FIG 2) and follow
the instructions on the Sat Mat.
5) Position and secure the dish to the tripod using the thumbscrew.
6) Once the dish is secured on the tripod it should look like the image
(FIG 3) Do not overtighten the thumbscrew at this point as rotation will
be required for the final step in tuning
Do not connect any leads until your satellite dish is firmly on the tripod
FIG 3
Sat Mat
FIG 2
Page 5
5
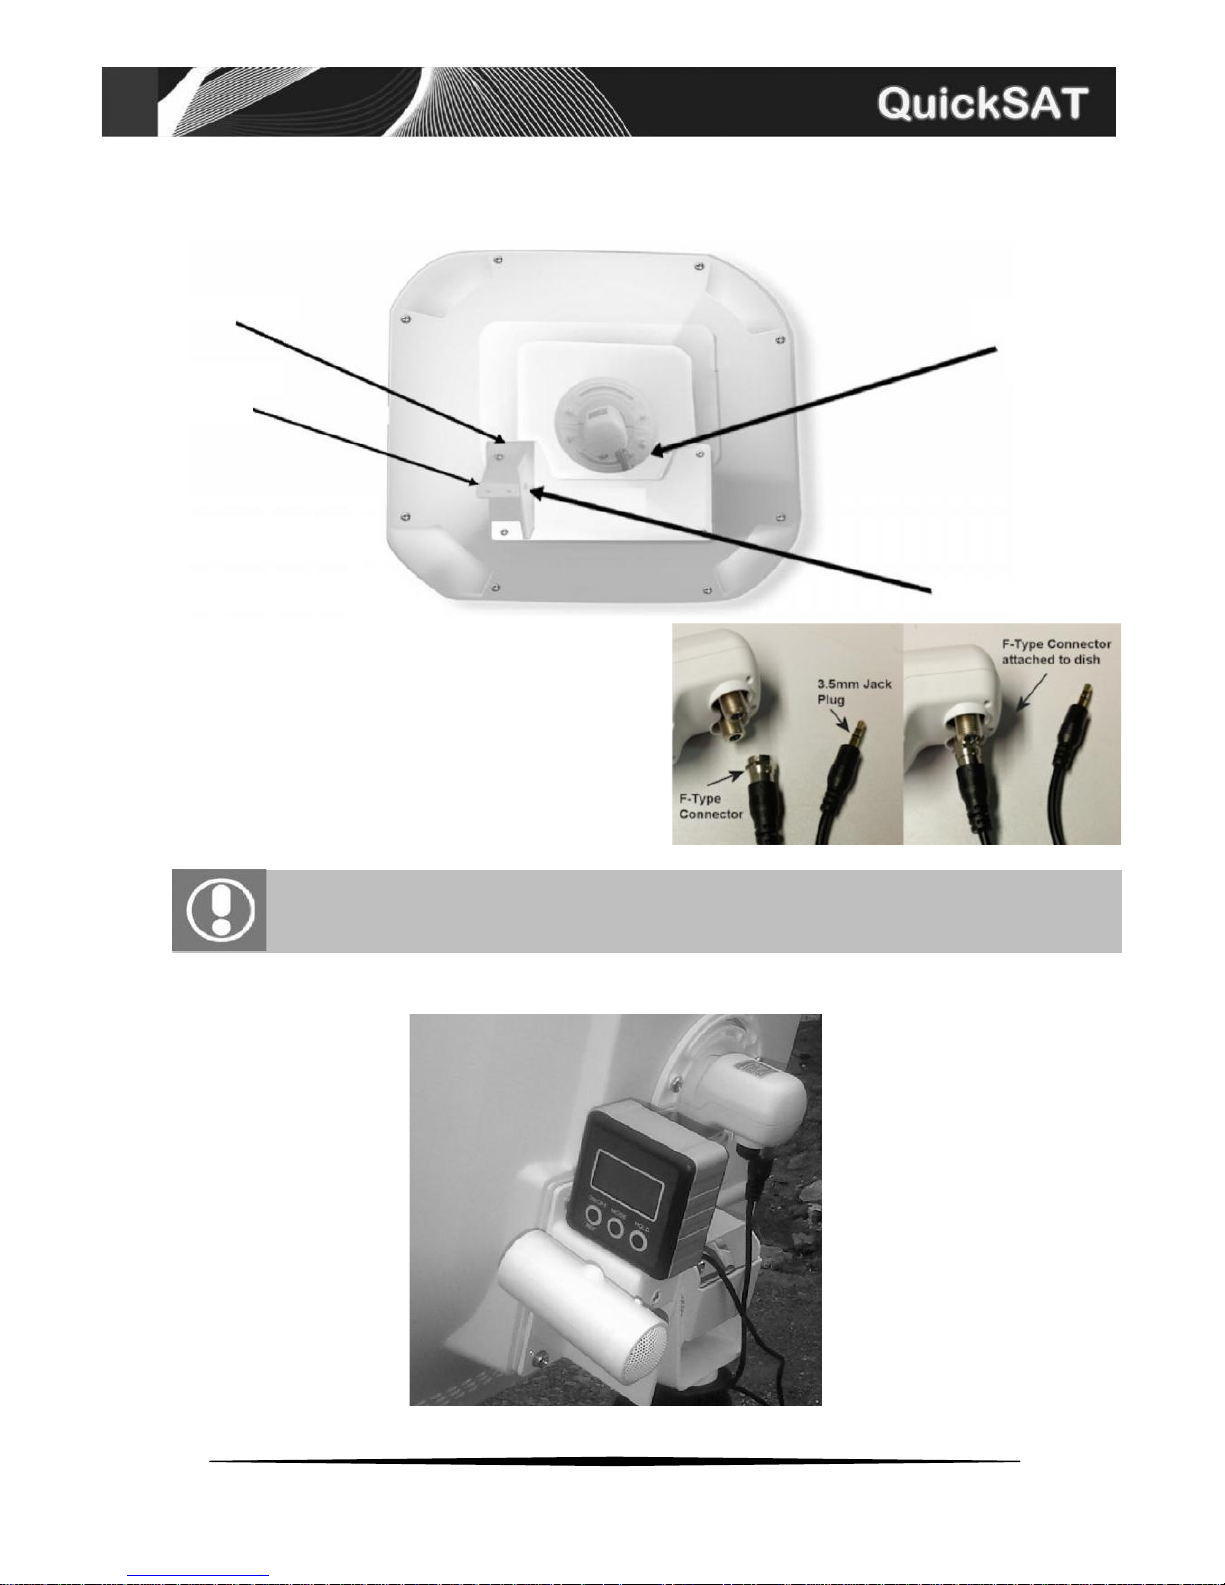
Micro speaker
output socket
Getting Started:
DISH CONNECTIONS
Elevation Meter
F-type
Connector
3.5mm input socket
7) Connect the F-type connector (screw in
connector) on the 10 metre dual cable (Item C) to
either of the matching screw sockets on the rear
of the dish and the 3.5mm jack plug to the input
socket as indicated above.
8) Attach the magnetic base of the elevation
meter (Item D) to the bracket
9) Insert the micro speaker (Item E) in to the
output socket located on the side of the bracket
Please ensure the micro speaker has batteries inserted and the switch is set to ON
Once you have assembled your QuickSAT dish it should look like the image below:
Page 6
6
Getting Started:
CONNE CTING REC EIVER
NOTE: These instructions show the optional QuickSAT mini receiver (Item F) but the procedure will be very
similar for other FREESAT and SKY set top receivers.
This section takes you through connecting the mini receiver.
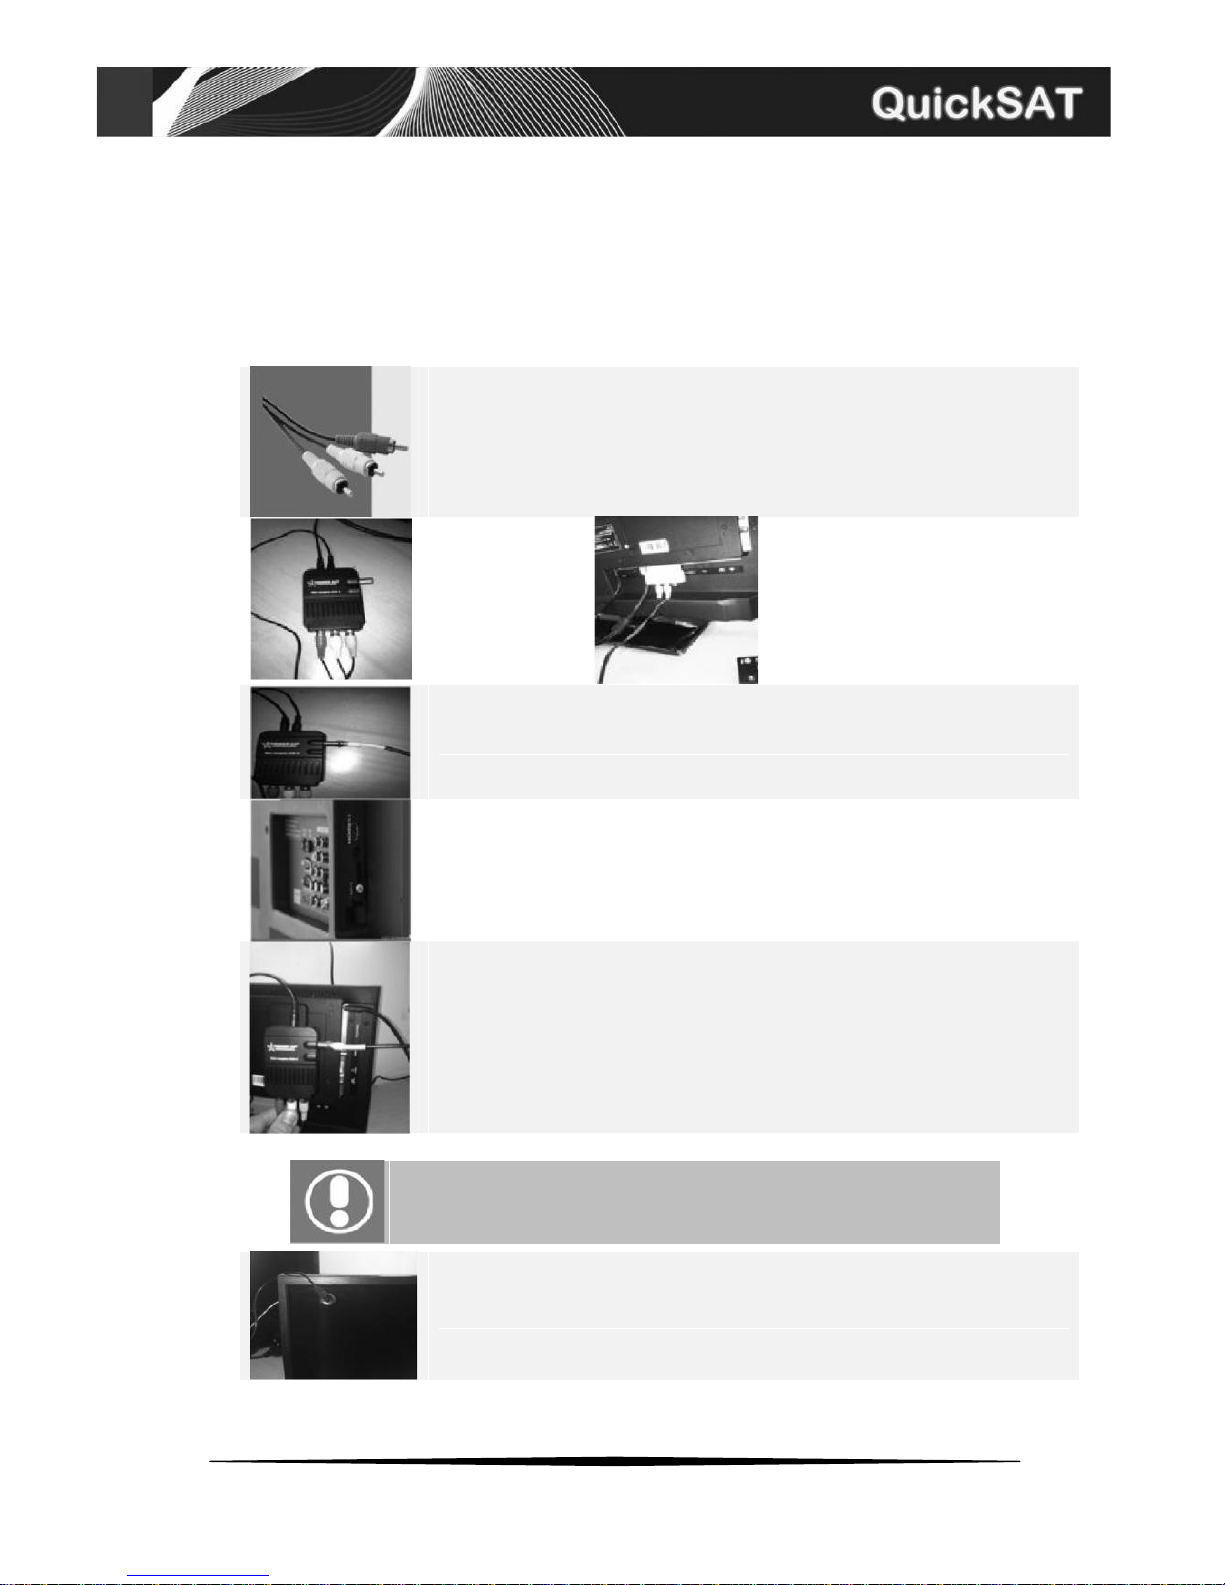
Connect the receiver to the TV, images 1 & 2 below show the optional mini
receiver connected using the RCA lead and SCART adapter
Image 1
Image 2
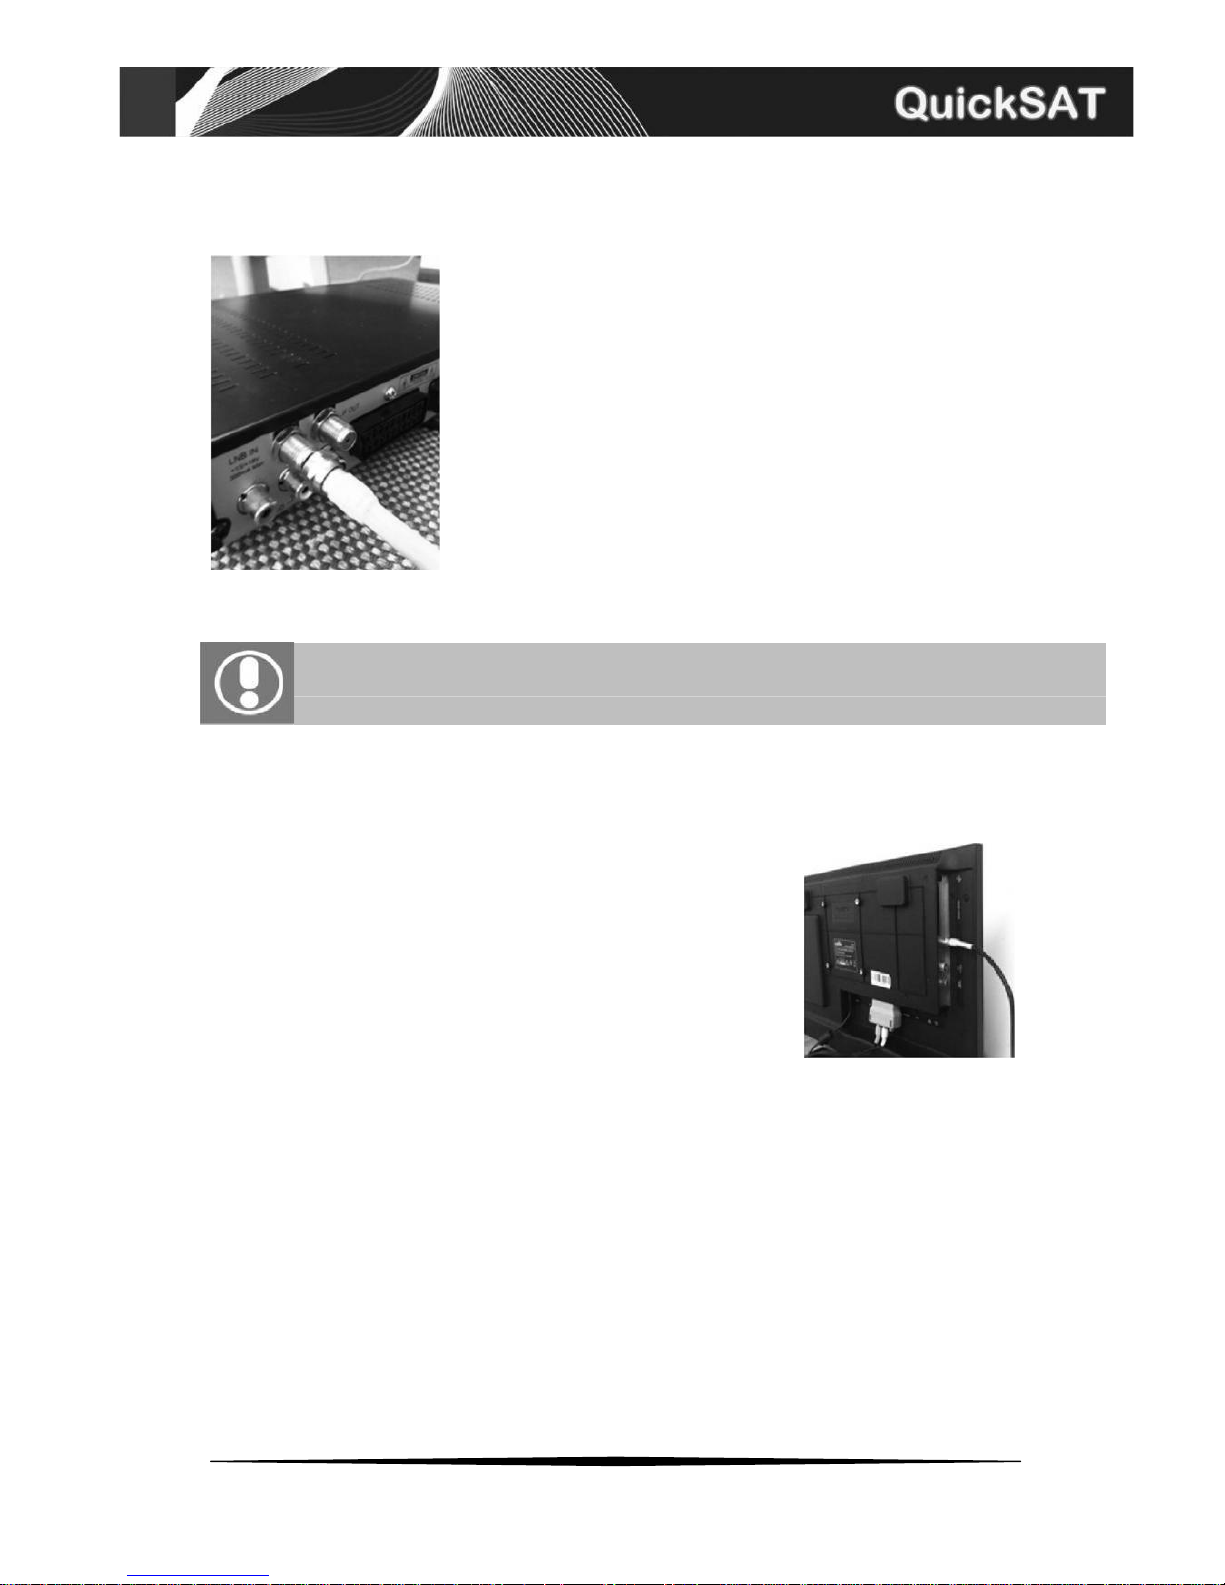
Connect the F-type connector on the dual cable (Item C) from the satellite
dish to the threaded LNB Input socket on the receiver (or LNB input on a
TV with integrated receiver)
Locate the headphone socket on your TV and plug in the 3.5mm jack plug
from the dual cable (Item C) into it
Connect the receiver to the power supply and position close to the TV.
Please ensure all equipment is switched off before
connecting/disconnecting any cables
If using the optional mini receiver plug the remote eye (Item H) into the
mini receiver (Item F) and position the eye on the front of the TV using the
supplied adhesive pad
Page 7
7
Getting Started:
POWER UP & TUNING
1) Switch on your TV and satellite receiver
2) Using your TV remote control select the relevant HDMI, SCART or AV input
(depending on the connection used) to view the receiver menu or select the
satellite input if using a TV with integrated receiver
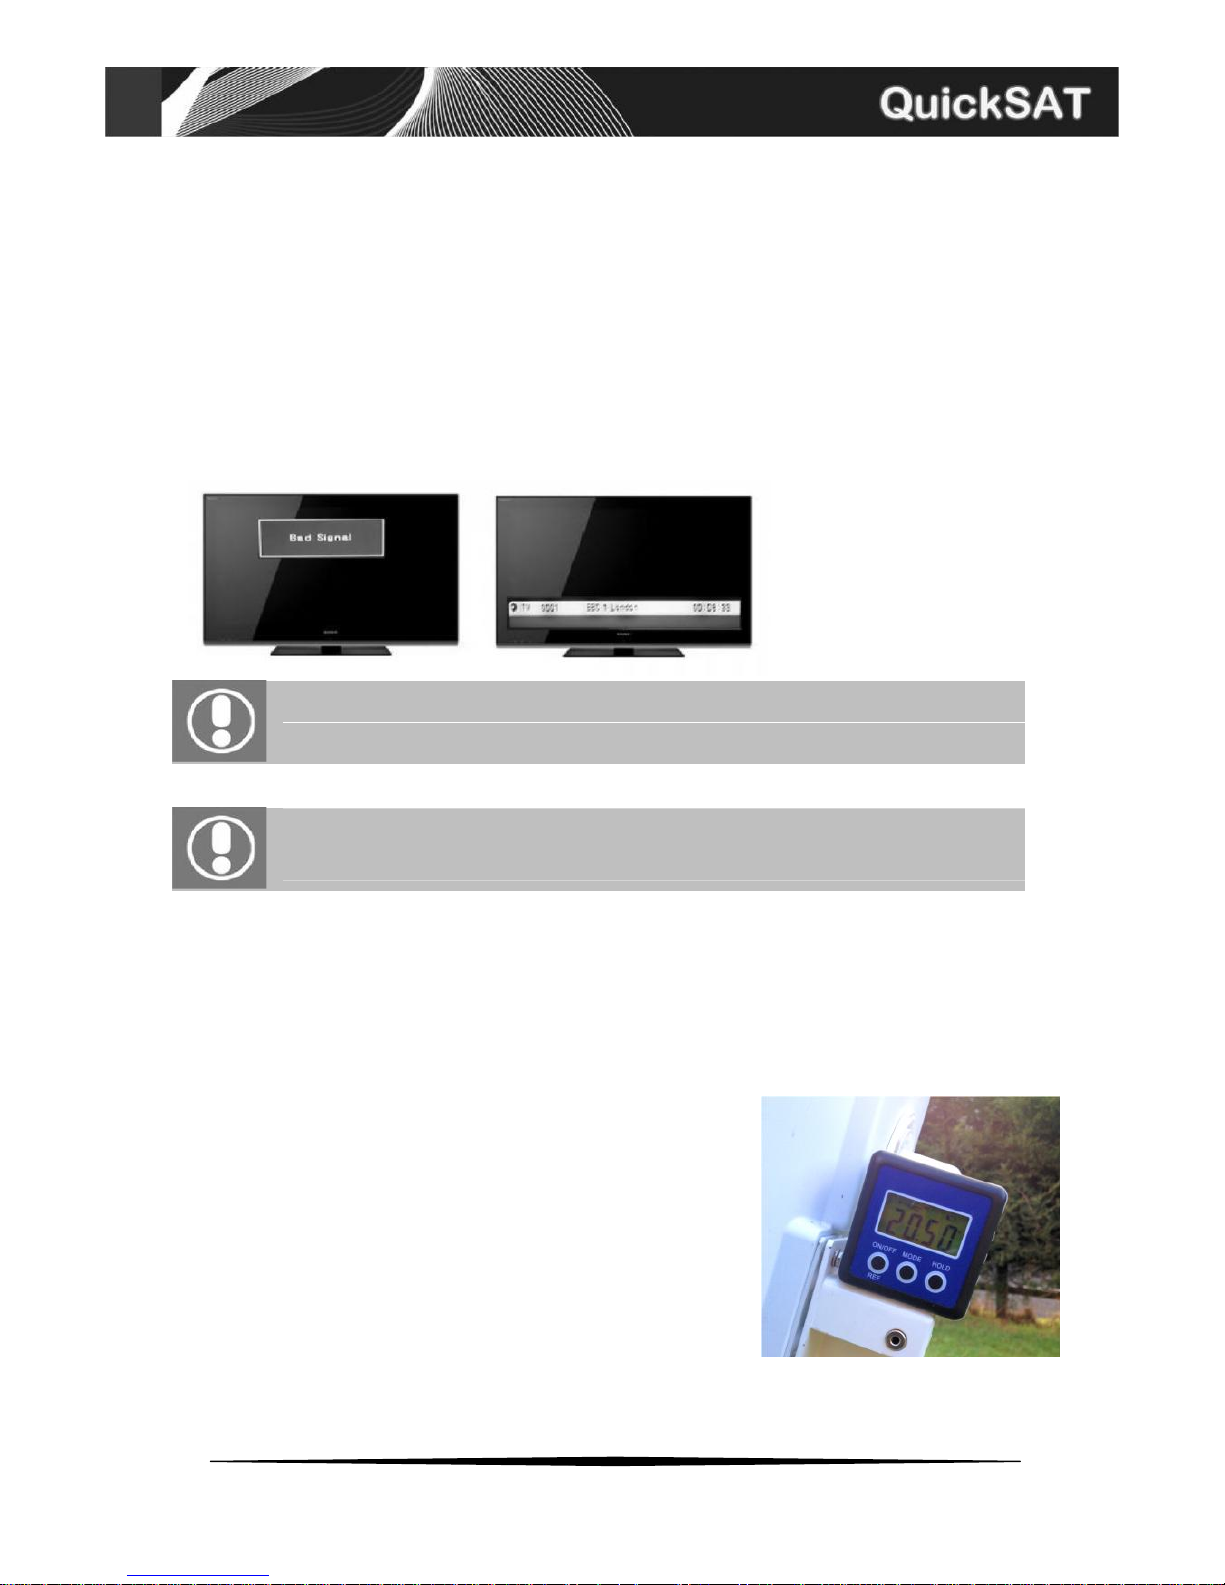
3) You should now see a 'no signal' or-'bad signal' message
4) Using the receivers remote (or TV remote if using a TV with integrated receiver) select BBC 1
(just press the 1 button if using the optional mini receiver, for other receivers/TVs refer to
its own user manual for instructions). The screen will return to the 'No signal' message after a
few seconds. You are now ready for the next part of the tuning process.
Note: The optional mini receiver has been pre-tuned to Astra 28 for UK TV,
for other satellites and channels please use the supplied mini receiver user guide
Note: If you are using your own receiver or a TV with integrated receiver you should
make sure that it has a channel list before use, if it does not then you should follow
the procedure to update the channels while it is connected to a pre-aligned dish.
5) If using the optional mini receiver use the remote (Item I) to increase the volume to full
6) Using the TV remote increase the volume to full
You are now ready to start the alignment of your dish
7) With the dish face starting at vertical slowly tilt the top of dish
back until the correct Elevation for your camping location reads
on the Elevation meter as demonstrated (Fig 1 )
You can get the correct elevation for you location from the
QuickSAT elevation chart or by using www.dishpointer.com or
an app on your smartphone such as Sat Finder.
Fig 1
Page 8
8
Getting Started:
ALMOST FINISHED!
8) Tighten the wingnut to secure the dish at the correct elevation level
9) With the dish pointing in the same direction as the arrow on the the Sat
Mat as shown on the right, slightly tighten the thumbscrew on the tripod
(so the dish can still be rotated)
10) Slowly rotate the dish from right to left, as you pass over the arrow on
the Sat Mat, as you pass over the correct position you will hear sound
from the micro speaker, continue to slowly position the dish until the
sound is clear
11) Fully tighten the thumbscrew
12) Your TV should now be displaying BBC 1
13) Switch off and remove the micro speaker and elevation meter and store
safely
14) Turn the volume on your TV down and remove the jack from the headphone socket on your TV
and the audio will resume normal operation
15) Congratulations! the dish is now perfectly aligned!
Please ensure all equipment is switched off before connecting/disconnecting any
cables
Page 9
9
Notes for use with SKY boxes
The procedure when using a SKY receiver is broadly the
same with a few things to note:
1. Connect the F-type connector on the dual cable (Item C) from
the satellite dish to the LNB input on your SKY box.
2. You must ensure your SKY box has a channel list before use, if
the box has not been used for a while it may have lost its
channel list. We recommend checking this before leaving home.
If you do not have a channel list then you should connect the
box to an already aligned dish and run a channel search.
3. Due to encryption used by sky it is better to move the dish in
staggered movements (at step 10), pausing for a few seconds
every degree to allow time for the signal to decode.
For SKY receiversmake sure your receiver has a channel list before use
Notes for use with TVs with integrated receiver
(including Cello Traveller and Avtex DRS)
The procedure for a TV with an integrated receiver is exactly the
same as for a separate receiver, just connect the F-type connector to
your TVs LNB/Antenna input and select the correct input on your TV,
this may be called Satellite, DVB-S, STV or ATV. Refer to your TV
instruction manual for more details.
Page 10
10
End of Life Disposal
A. Information on Disposal for Users (private households)
1. In the European Union
Attention if you want to dispose of this equipment, please do not use the ordinary dustbin! Used electrical
equipment must be treated separately and in accordance with legislation that requires proper treatment,
recovery and recycling of used electrical and electronic equipment. Following the implementation by
member states, private households within the EU states may return their used electrical and electronic
equipment to designated collection facilities free of charge. In some countries your local retailer may also
take back your old product free of charge if you purchase a similar new one. Please contact your local
authority for further details. If your used electrical or electronic equipment has batteries or accumulators
please dispose of these separately beforehand according to local requirennents_By disposing of this
product correctly you will help ensure that the waste undergoes the necessary treatment ,recovery and
recycling and thus prevent potential negative effects on the environment and human health which could
otherwise arise due to inappropriate waste handling.
2. In other Countries outside the EU
If you wish to discard this product please contact your local authorities and ask for the correct method of
disposal_For Switzerland Used electrical or electronic equipment can be returned free of charge to the Dealer,
even if you don't purchase a new product. Further collection facilities are listed on the homepage of
www.swico.ch
B. Information on Disposal for Business Users
1. In the European Union If the product is for business users and you want to discard it: Please contact your
QuickSAT dealer who will inform you about the take-back of the product_ You might be charged for the costs
arising from take — back and recycling_ Small products (and small amounts) might be taken back by your local
collection facilities.
2. In other Countries outside the EU If you wish to discard this product please contact your local authorities and
ask for the correct method of disposal.
The batteries supplied with this product contains traces of Lead.
For EU: The crossed out wheelie bin implies that used batteries shouldnot be put to the general household
waste!./There is a separate collection system for used batteries to allow proper treatement and recycling in
accordance with legislation. Please contact your local authority for details on the collection and recycling
schemes.
For other non —EU countries. Please contact your local authority for correct method of disposal of the used
battery.
W A R R A N T Y D I S C L A I M E R
Qui c k SAT is a tr adem a rk of F a lcon T e chni c al L td. A ll tech n ology a n d t echn i ques us ed to build an d d eliv e r o ur prod ucts ar e i ntel l ectu a l p rope r t y of th e
abo ve nam e d compa ny or its a sso ciat e d part n ers . It is aga i nst cop yri ght law s to att emp t to ext ract , rever se e ngi n eer , co py or m ani p ula te t he p ate nt
re g ist ere d tech n o logy i nclu d ed w i t h ou r prod u cts a n d an y part y who m a y br e ach t h ese c o ndi t i ons s e t he r ewit h will h e su b ject e d to l e gal a ct i on t o the f ull
ext e nt o f the l aw i n h is or h ers jur isd icti on.
All Qu ick S A T prod u cts a re c o v ere d by a 1 y e a r w a r ran t y aga i n st a n y ha r dwar e def e c ts ( O NLY) . Any d amag e s or acci d ental brea k a ges t o ha v e be e n
cau s ed b y use r d u ring ins tall a tio n or at a ny o ther tim e wi l l no t he cov e red und e r t h e te rms o f t h is a gre e ment .
The co nte nts of t his pu blic ati on a re beli eved to be co r rec t at the tim e o f go ing to pre s s h owe v er any
inf orm ati o n, D e tail s , pro d ucts or s e r vice s may be s u p plem e nte d , mod i fied o r wi t hdra w n wi t hout noti c e .
Page 11
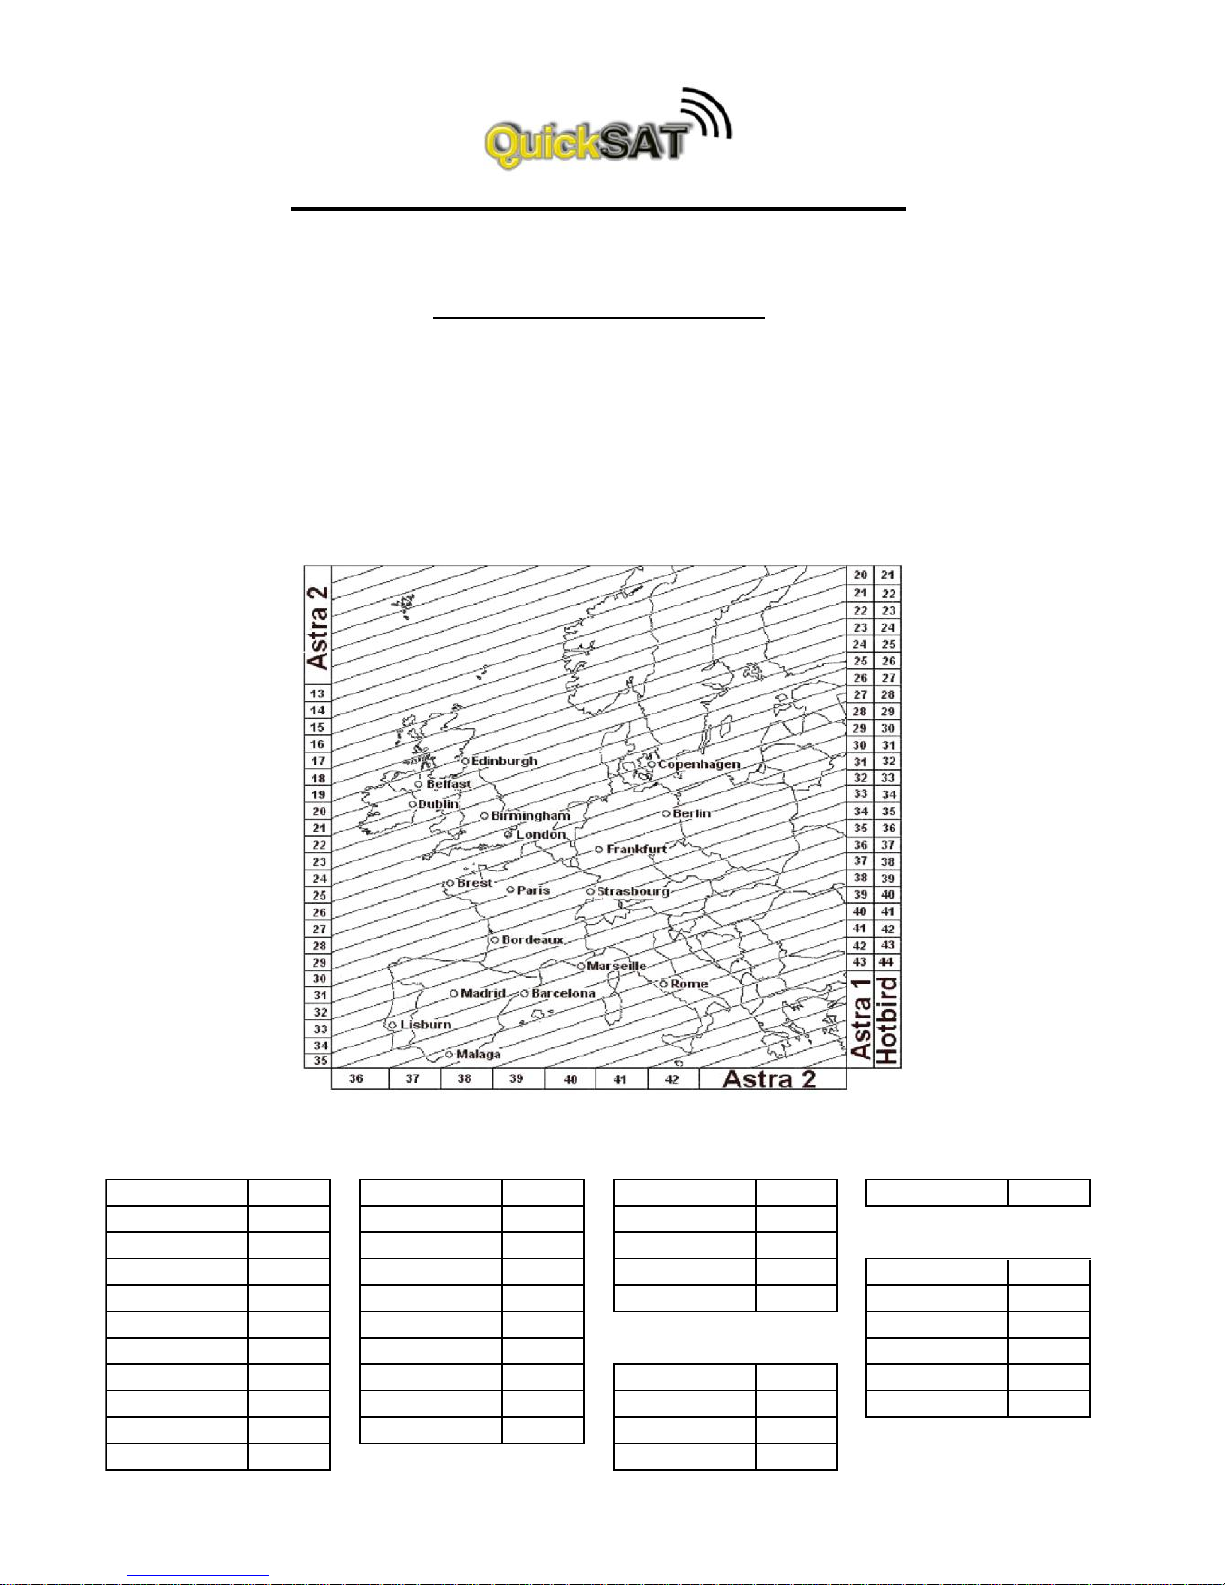
United Kingdom United Kingdom Ireland Belgium
Town/City Elevation Town/City Elevation
BANTRY 21.25 BRUSSELS 27.56
ABERDEEN 19.73 LIVERPOOL 22.64 BELFAST 20.5
BIRMINGHAM 23.86 LONDON 25.37 CORK 21.59
Belarus
BRISTOL 24.45 MADLEY 23.86 DUBLIN 21.38 BREST 30.25
CARDIFF 24.15 MANCHESTER 22.84 LONDONDERRY 19.74 GOMEL 30
CHILWORTH 25.35 NEWCASTLE 21.77 GRODNO 28.56
EDINBURGH 20.41 PLYMOUTH 24.72
Austria
MINSK 28.45
GLASGOW 20.11 STORNOWAY 17.41 GRAZ 34.45 MOGILEV 28.43
GOONHILLY 24.53 TEDDINGTON 25.77 INNSBRUCK 33.21 VITEBSK 27.03
INVERNESS 18.73 WINCHESTER 25.3 SALZBURG 33.16
LERWICK 17.4 VIENNA 33.46
If you have an iPhone or Android smartphone you can use one
of the apps such as “Satfinder” to use the phones GPS receiver
to pinpoint your location and tell you the correct elevation.
2. On a computer
On a computer visit www.dishpointer.com and enter your location
3. Use the elevation map below
4. Use the following tables
Finding the elevation for your location
For UK Freesat you want to select the 28.2 E Astra option on your receiver.
Find the town or city nearest to your location and adjust the elevation angle of the dish.
Methods for finding the elevation.
1. On your phone or tablet
Please note that this list is provided as a guide to elevations and does not guarantee you can receive any or all channels at all these locations.
Page 12
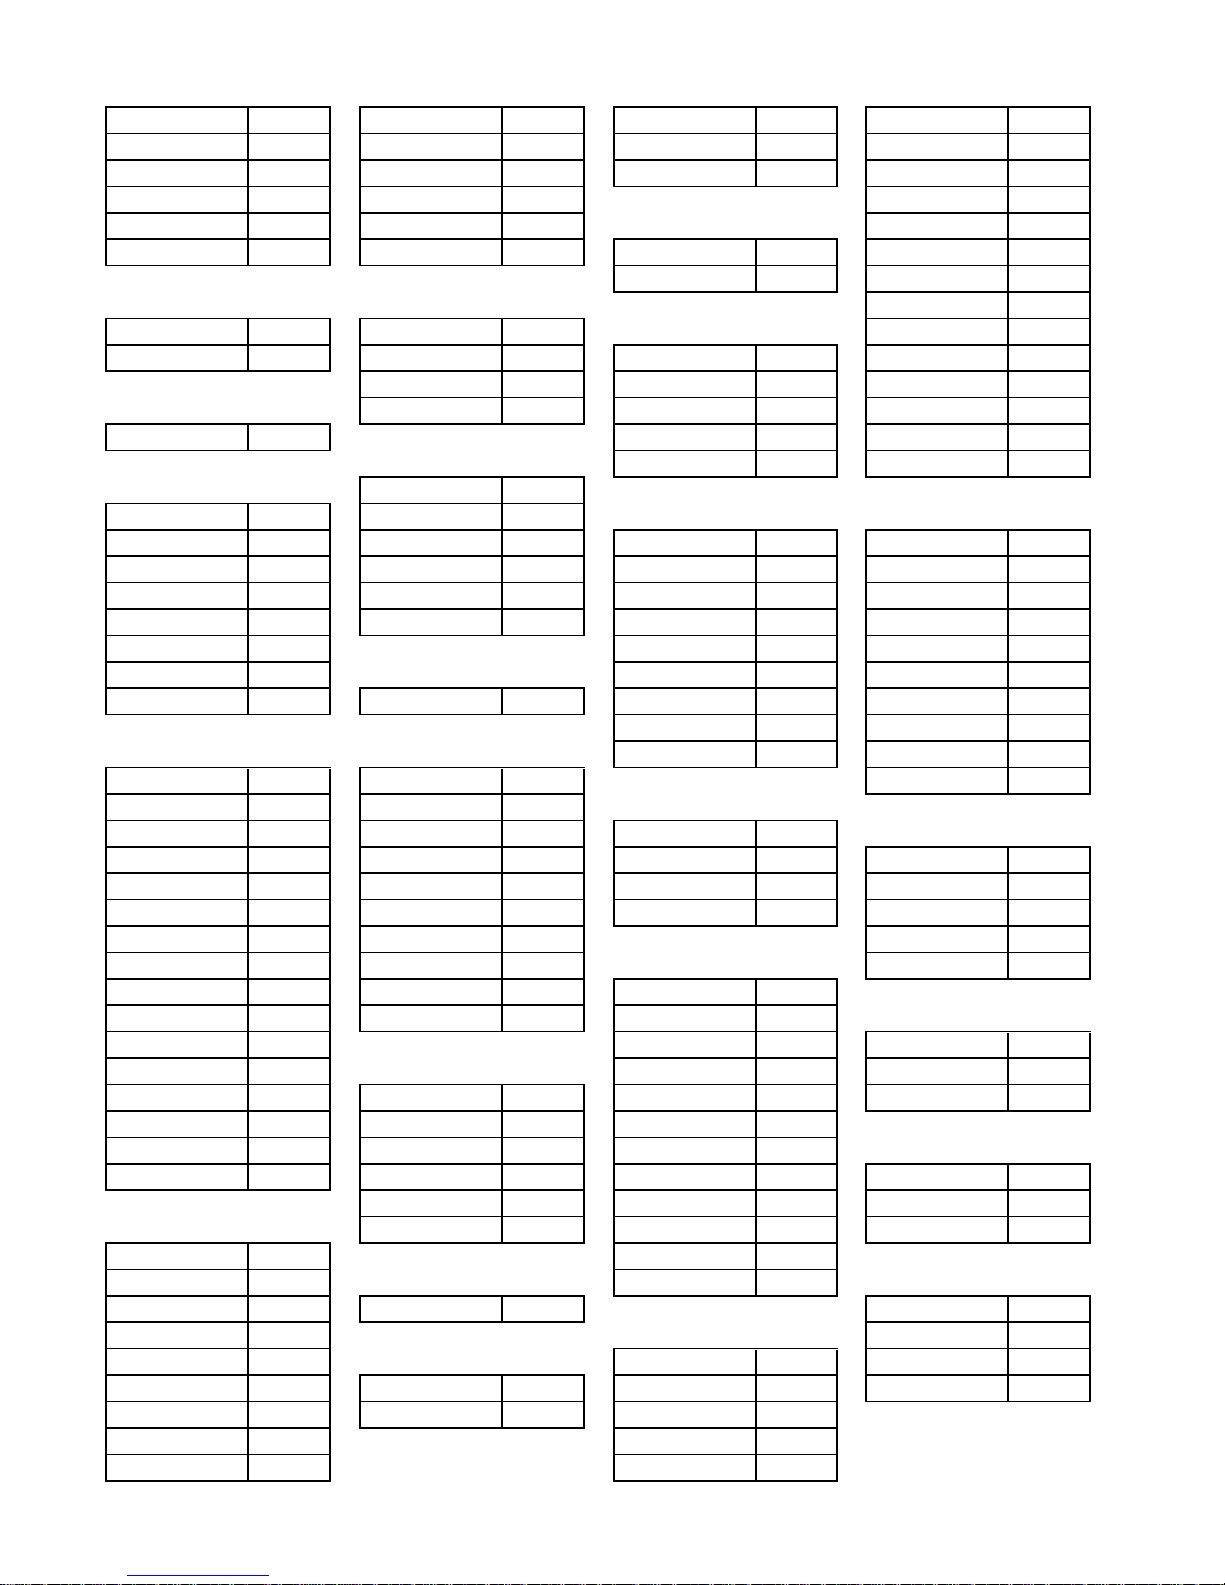
Bulgaria Germany Luxembourg Spain
BURGAS 40.93 LANGENBERG 27.97 DUDELANGE 29.46 GIBRALTAR 35.21
PLOVDIV 41.21 LEIPZIG 29.41 BETZDORF 29.32 GRANADA 35.54
RUSE 39.41 MAINZ 29.62 LUXEMBOURG 29.3 LA PALMA 29.9
SOFIA 40.47 MUNICH 32.41 LANZAROTE 33.49
STARA ZAGORA 40.96 ROSTOCK 26.51
Netherlands
LAS PALMAS 32.39
VARNA 40.16 STUTTGART 31.13 AMSTERDAM 26.29 MADRID 32.96
EINDHOVEN 27.37 MALAGA 35.41
Czech Republic Greece
PALMA 37.11
BRNO 32.46 ATHENS 45.75
Norway
SAN SEBASTIAN 31.57
PRAHA 31.09 KERKYRA 43.36 BERGEN 18.82 SANTA CRUZ 31.4
SALONIKA 42.71 BODO 13.56 SANTIAGO 28.32
Denmark
THESSALONIKI 42.71 OSLO 20.38 SEVILLA 33.89
COPENHAGEN 24.97 TROMSO 11.61 VALENCIA 35.58
Hungary
TRONDHEIM 16.9 VALLADOLID 31.45
Finland
BUDAPEST 34.7
HELSINKI 21.67 DEBRECEN 35.01
Poland Sweden
JOENSUU 19.17 GYOR 34.23 BIALYSTOK 29.09 BORLANGE 20.66
KEMI 15.83 MISKOLC 34.29 GDANSK 27.3 GOTEBORG 22.86
KUOPIO 18.87 SZEGED 36.2 KIELCE 31.32 KIRUNA 13.47
OULU 16.64 TALIANBOROGD 35.06 KRAKOW 32.09 LULEA 15.89
TAMPERE 20.25 LUBLIN 30.99 MALMO 25.17
TURKU 21.26
Iceland
OLSZTYN 28.18 ORNSKOLDSVIK 18.04
VAASA 18.46 REYKJAVIK 7.62 RADOM 30.76 STOCKHOLM 22.06
WARSAW 29.86 SUNDSVALL 18.83
France Italy
WROCLAW 30.54 UMEA 17.7
AJACCIO 37.67 BARI 41.05 AGESTA 22.21
BASTIA 37.17 BOLOGNA 36
Portugal
BIARRITZ 31.66 BRINDISI 41.86 FARO 32.86
Switzerland
BORDEAUX 30.95 CAGLIARI 40.46 FUNCHAL 28.85 BASEL 31.84
BREST (F) 26.12 CATANIA 44.39 LAGOS 32.3 GENEVA 32.58
DIJON 31.11 FIRENZE 36.73 LISBON 30.87 LUGANO 33.77
LE HAVRE 30.73 FUCINO 39.23 MONTREUX 32.62
LIMOGES 30.93 GENOVA 35.33
Romania
ZURICH 32.27
LYON 32.53 MILAN 34.39 ARAD 36.44
MARSEILLE 35.06 NAPLES 40.65 BACAU 36.42
Turkey
NICE 35.4 BRAILA 37.87 BURSA 43.51
PERPIGNAN 34.47
Italy
BRASOV 37.39 ISTANBUL 42.53
RAMBOUILLET 28.74 PALERMO 43.16 BUCHAREST 38.79 IZMIT 42.66
RENNES 27.69 ROME 39.01 CONSTANTA 39.07
ROUEN 27.65 SASSARI 38.76 GALATI 37.67
Ukraine
STRASBOURG 30.89 TORINO 34.2 ORADEA 35.54 CHERNOBYL 31.12
UDINE 34.97 PLOIESTI 38.18 KHARKOV 32.17
Germany
VENEZIA 35.37 SIBIU 37.13 KHERSON 36.2
BADEN-BADEN 30.83 TIMISOARA 36.89
BERLIN 28.38
Latvia
BRATISLAVA 33.66
Yugoslavia
BONN 28.55 RIGA 25.14 BEOGRAD 37.81
COLOGNE 28.32
Spain
DUBROVNIK 39.71
DRESDEN 29.97
Lithuania
ALICANTE 36.52 SARAJEVO 38.47
ERFURT 29.41 VILNIUS 27.58 BARCELONA 35.33 SPLIT 38.45
FRANKFORT 29.64 KAUNAS 27.26 BILBAO 31.11
GERA 29.75 CARTAGENA 36.8
HAMBURG 26.59 FUERTEVENTURA 33.41
Please note that this list is provided as a guide to elevations and does not guarantee you can receive any or all channels at all these locations.
 Loading...