

RFID‐BTLock
Model:BT2Lock
一. ProductSpecificationsandPerformanceParameters
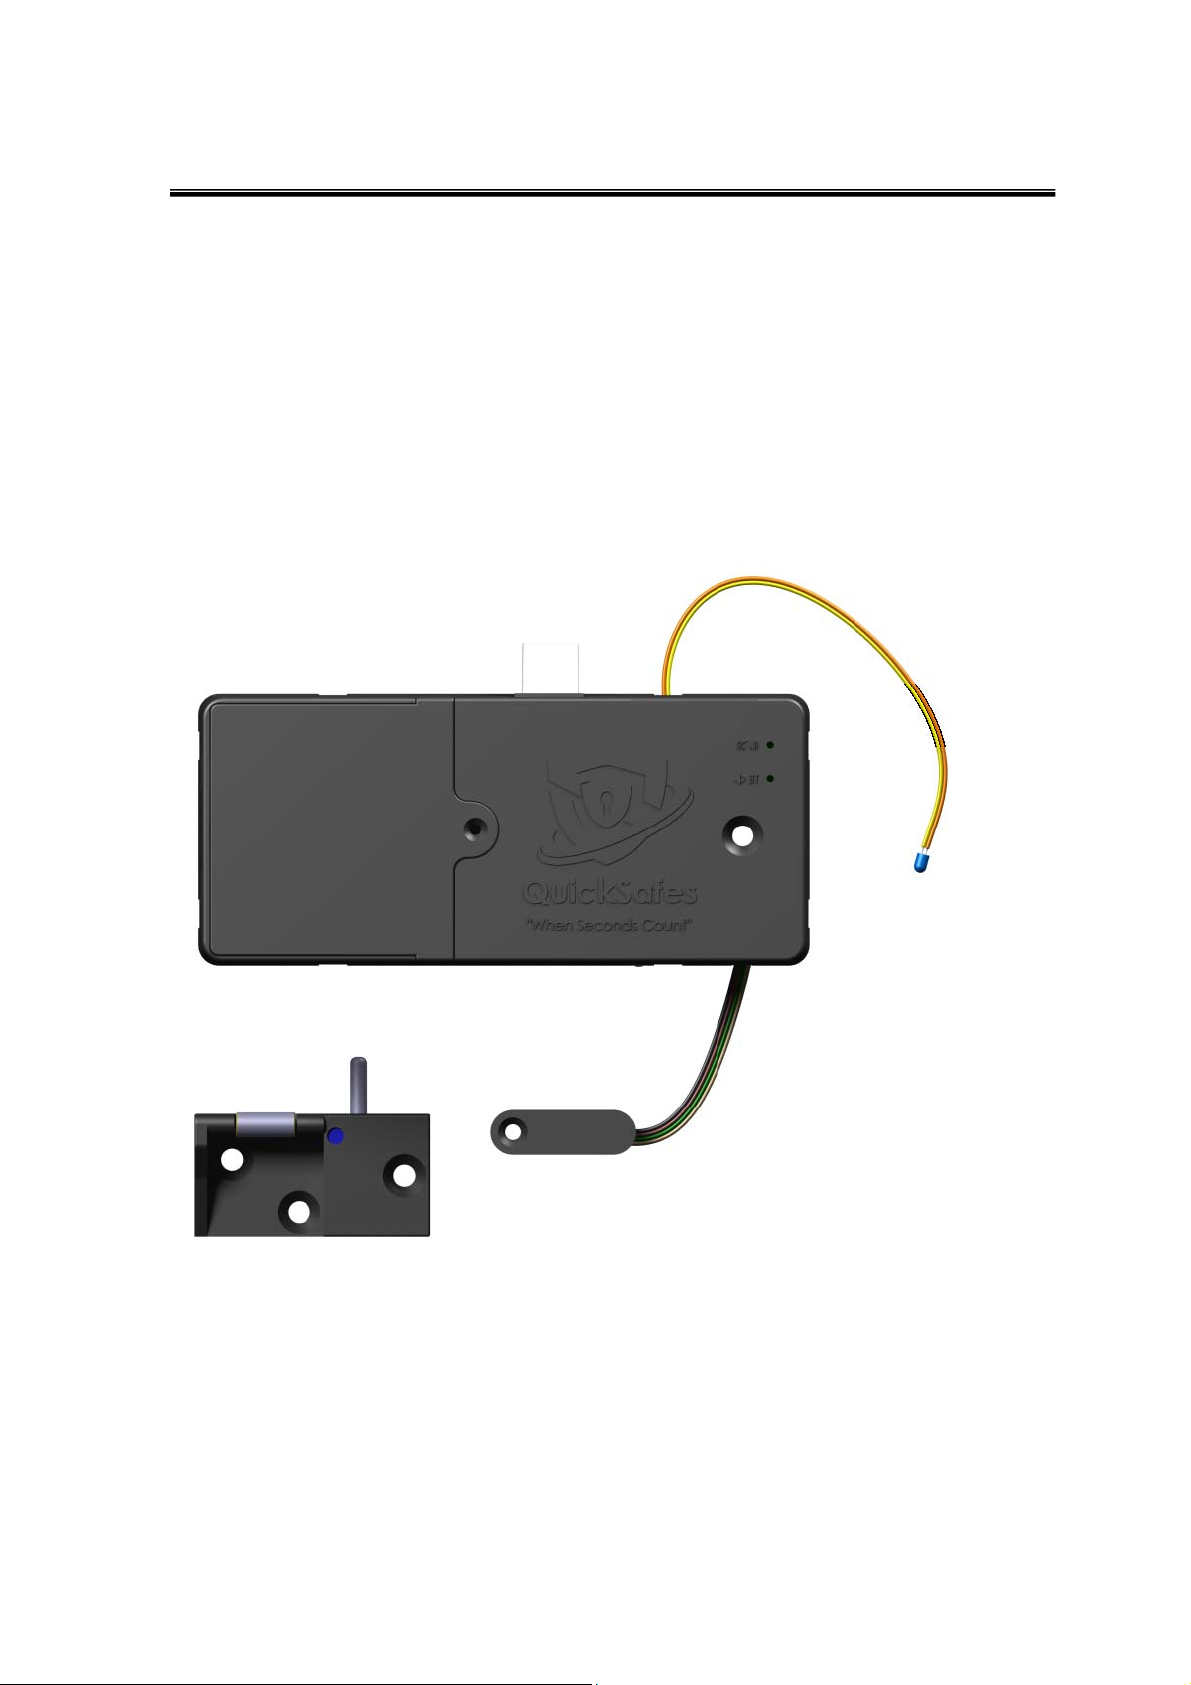
1):ProductAppearancePicture
1

Model: BT2 Lock
The Main Function:
Dimension:146.4*64.9*25.4MM Weight:
1: ST Micro Electronics, MUC: STM32F030C8T6 ‘ARM Cortex-M0 32-bit MCU, 64KB Fl ash , 8KB
Internal RAM, 39 I/Os, 48-pin LQFP, -40 to 85 degC, Tray;
2: EEROM Storage, 64Kbit Memory
3: Bluetooth 4.2 Single-mode Standard;
4: RFID 125KHz Mode;
5: Support the Cell-phone APP Open Operation;
2
6: Single Button Touch and Proximity Sensor Switch;
7: 6V External Power Supply;
8: Bluetooth Setting and Sound Switch;
Land on Google Market or Apple Store downlo ad the Quicksafe APP.
9. User Manual for BT2 Lock
1. Get a new safe;
2. Install battery and you will hear a beep and the blue LED indicator will illuminate.
Part 1 APP operation
1.Download and install Quicksafes APP;
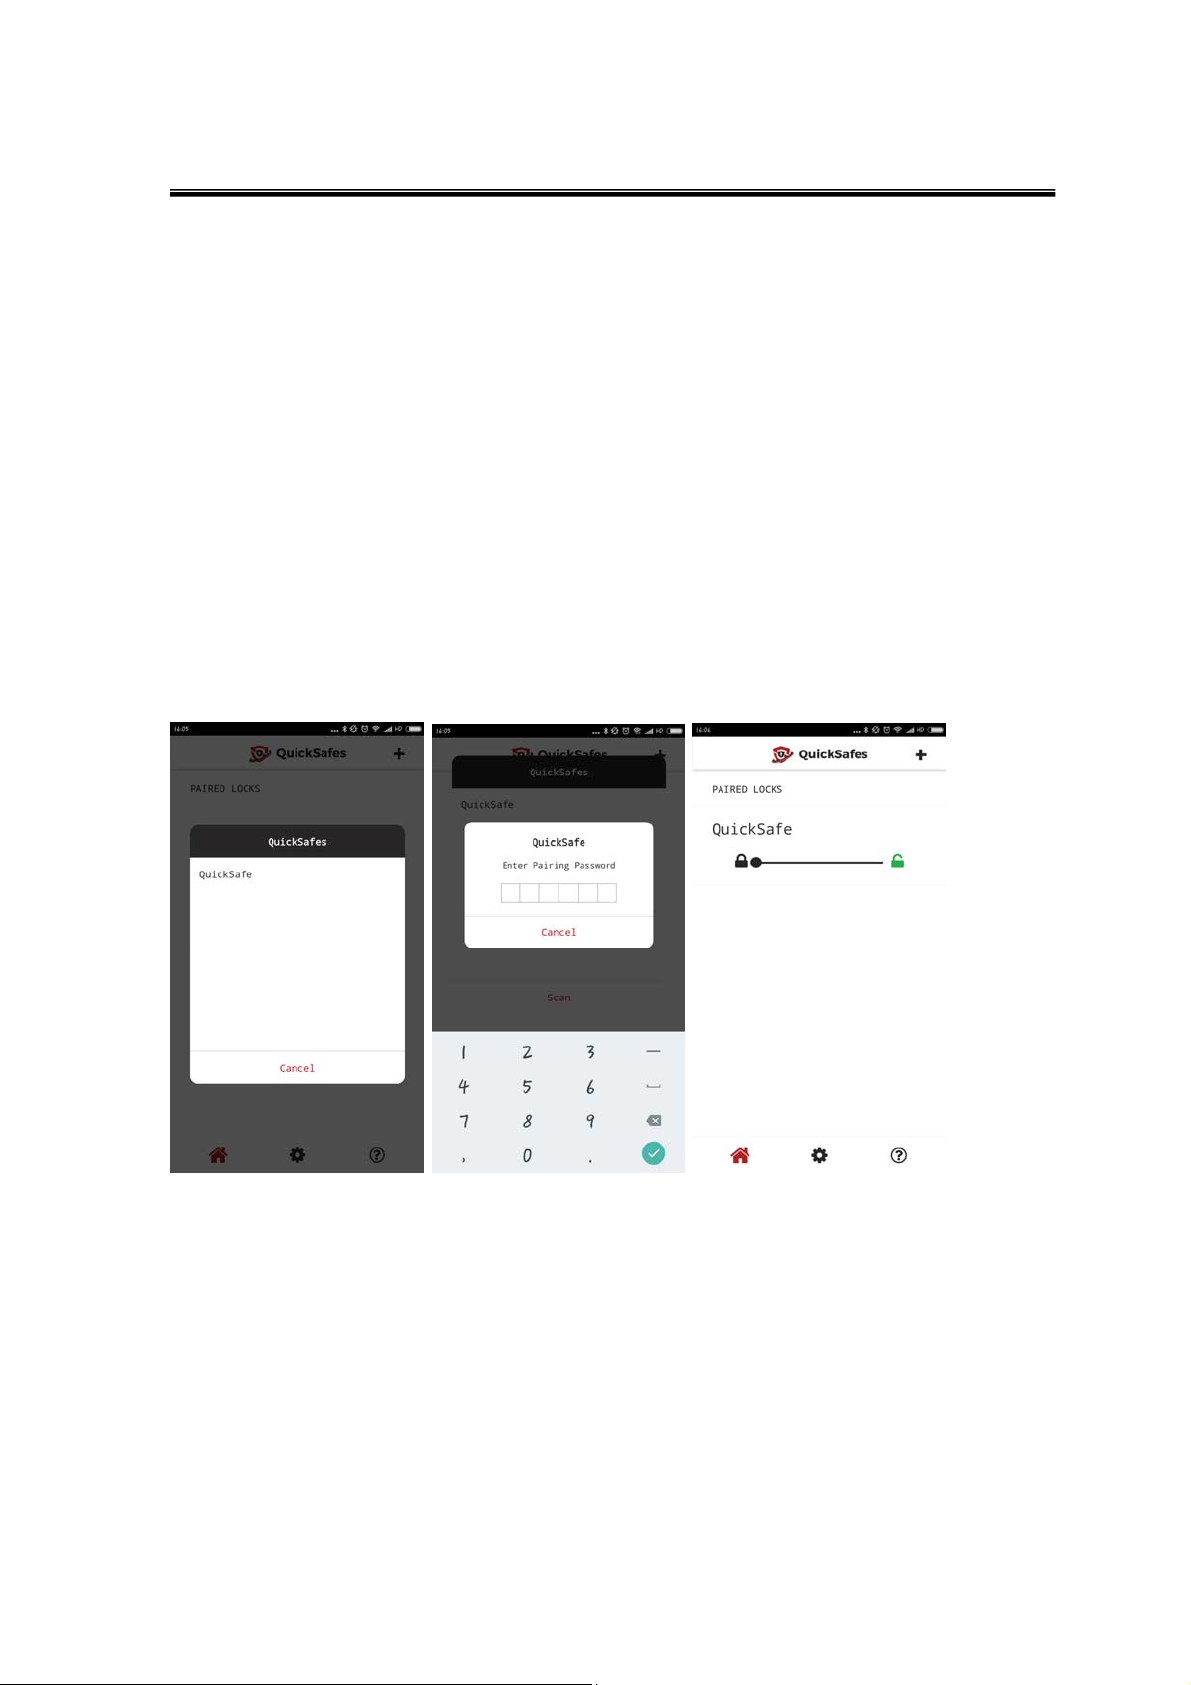
Start APP: Click the icon [+] to start automaticlly searching for visible Bluetooth devices.Select the Bluetooth
lock device when it is connectable. Enter password in the pop-up window to pair with the APP (Initial
password is “123456”). The first paired user will be the manager of the safe;
Searching input paired password lock paired
Notes:Effective connection and range of operation are within 60 meters.
2.Operation of Homepage: Click [Home] 、[Setting]、[Add]、[Help] at bottom navigation bar to switch the
interface.
[Home] is the main APP page, connecting lock background is in white color, unconnected in grey.
3

Unconnected page Connected page
[Setting] is the main operating page. Manager can re-name the safe Name, change the Password, view the
Open History, manage the User Control, choose the Unlock Mode, Enable TouchSafe Sensor and Unpair
Device.Common user can choose the Unlock Mode and Enable TouchSafe Sensor.
A.Rename
[Name]: it consists of 18 characters.Manager can click it edit the safe name and input the password to save
setting.Common user can just see the safe name.
B.Change password
[Password]: it’s consists of 6 numbers. Manager input the Current Password, New Password and Re-Enter
Password, then click Update Password save setting.
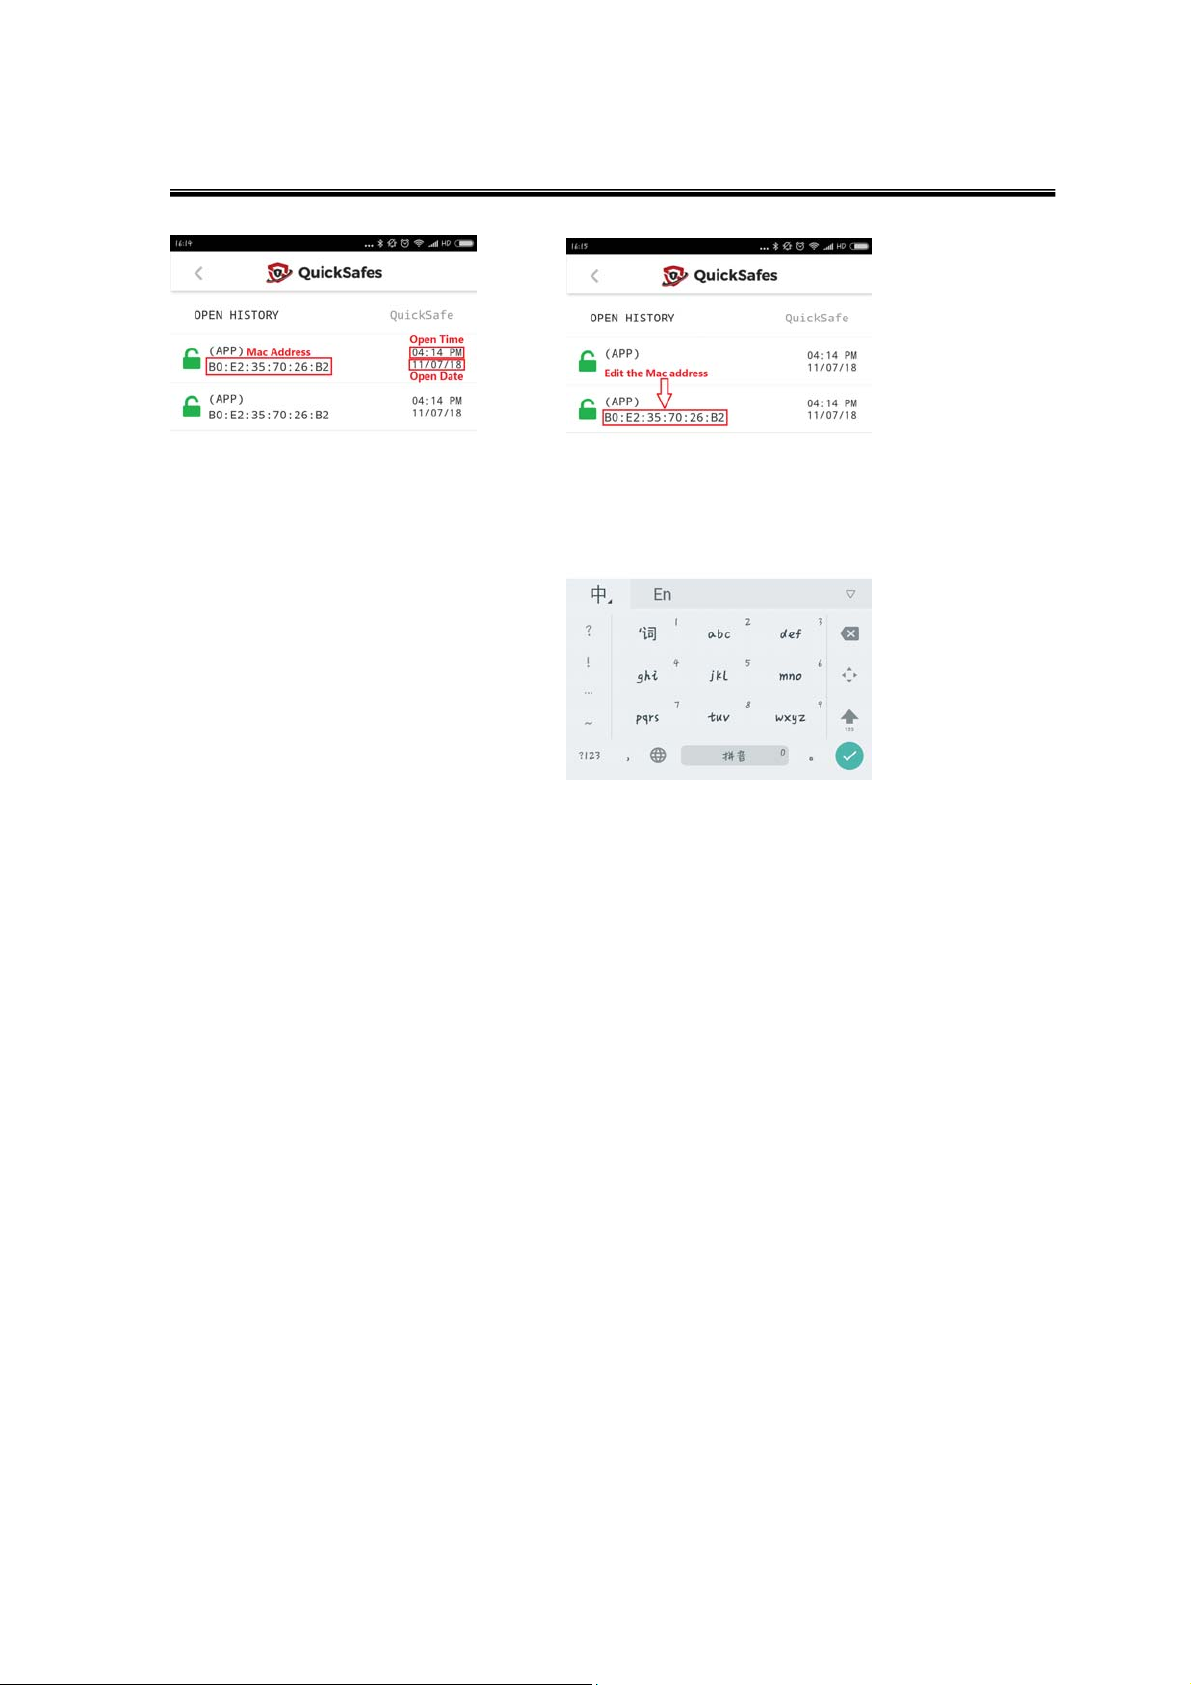
C.Check the open history
[Open History]: it will show the safe open way, APP Mac address and open time.Manager can edit the APP
Mac address.
4
D.Cancel user
[User Control]: manager can cancel any of the common user except itself. When manager click one of the
common user, it will pop up the window, then click cancel and input password save setting.
E.Change the open way
[Unlock Mode]:
a. Slide Only-it’s the default open way.In this open way, slide the bar on Home page, it will change from
black to red color, when up to 2/3 length, lock will open successfully and reminding “Lock is open” at the
bottom of the Home page.
b. Biometric ID-click the circle beside the Biometric ID and it will change to red color, then click save
setting at the bottom of Setting page.In this open way, Android need to loading the user fingerprint for
approval and ISO need face recognization.If pass the fingerprint and face recognization, the lock will open
successfully.
c.Password-click the circle beside the Password and it will change to red color, then click save setting at the
bottom of Setting page. In this open way, slide the bar on Home page and it will pop up the keyboard, input
the correct password, lock will open successfully and reminding “Lock is open” at the bot tom of the Home
page. If the password is incorrect, reminding “Incorrect password” at the bottom of the Home page.
F.[Enab le TouchSafe Senor]:click the circle beside the Enable TouchSafe Sensor and it will change to red
color, then click save setting at the bottom of Setting page.In this open way, use your finger access to the
TouchSensor, the lock will open successfully and reminding “Lock is open” at the bottom of the Home page.
G.[Unpair Device]:all the users can cancel the pairing from this opperation.Click the circl e besi de the Unpair
Device and it will change to red color, then pop up reminding window, choose Cancel and it will cancel the
pairing.
Part 2 RFID operation
1.Initialize the RFID:use a thin rod plug into the RFID hole on lock house for a long press, then the loc k will
beep Di----di-di-di-di-di within 6seconds and the blue LED indicator will illuminate.
5

2.Manager card configuration:when finish the RFID initialization, take the manager car d access to the RFID
coil, if the manager card read successfully, there will be a beep Di-di--and the blue LED indicator will
illuminate which means the manager card configure successfully.
3.Common user card configuration:take the manager card access to the RFID coil, the lock will open, there
will be a beep Di, then the lock will open and blue LED i ndicator will illumi nate 6 seconds. Take the common
user card access to the RFID coil when the blue LED i ndicator i lluminati ng, the lo ck will beep Di which means
the common user card configure successfully.When the blue LED indicator stop illuminating which means the
configuration is finished.
4.Cancel the common user card:use a thin rod plug into the RFID hole on lock house for a short press, then
the lock will beep Di-di-di-di-di- within 5seconds and the blu e LED indicator will illuminate. Take the manager
card access to the RFID coil in 2seconds, the lock will beep Di-di-di and the blue LED indicator illuminate
3times which means all the cards are canceled.
5.Unconfigured card: when an unconfigured card access to the RFID coil, the lock will beep Di-di-di and the
blue LED indicator illuminating.
TechnicalSpecifications:
Environmental Parameters
Working Temperature Range -10℃ to +60℃
Storage Temperature Range -20℃ to +70℃
Operating Humidity Range 45% to 80%RH
Storage Humidity Range 30% to 90%RH
System Parameters
Main Chip Type STM32F030C8T6
Storage Space 64Kbit
Operation System Android 4.1or IOS advanced in 8.0
Basic Parameters
Button/Switch RFID Setting Button, Bluetooth Re-set Button and Switch for
Voice
Touch Sensor External Power Jack, Metal Ring
RFID Module 125kHz
Bluetooth Module Bluetooth 4.2, Transmit Distance
Indicator Light External Blue Operation Indicator
Illuminate Light White
Operation Hints Voice and Lamplight Hint
Usage Time
Standby Mode More than one year
Power
Battery 1.5V R6P AA Alkaline Battery, 4pcs
Battery Type In Series
External Power Connector Type 4P 2.5mm Headphone Jack
Standby Current 0.3mA
6

Physical Parameters
Dimensions 146.4*64.9*25.4MM
Color Black
FCC Warning:
This equipment has been tested and found to comply with the limits for a Class
B digital device, pursuant to part 15 of the FCC Rules. These limits are
designed to provide reasonable protection against harmful interference in a
residential installation. This equipment generates, uses and can radiate radio
frequency energy and, if not installed and used in accordance with the
instructions, may cause harmful interference to radio communications.
However, there is no guarantee that interference will not occur in a particular
installation. If this equipment does cause harmful interference to radio or
television reception, which can be determined by turning the equipment off and
on, the user is encouraged to try to correct the interference by one or more of
the following measures:
• Reorient or relocate the receiving antenna.
• Increase the separation between the equipment and receiver.
• Connect the equipment into an outlet on a circuit different from that to which
the receiver is connected.
• Consult the dealer or an experienced radio/TV technician for help.
Caution: Any changes or modifications to this device not explicitly approved
by manufacturer could void your authority to operate this equipment.
This device complies with part 15 of the FCC Rules. Operation is subject to the
following two conditions: (1) This device may not cause harmful interference,
and (2) this device must accept any interference received, including
interference that may cause undesired operation.
RF warning for Mobile device:
This equipment complies with FCC radiation exposure limits set forth for an
uncontrolled environment. This equipment should be installed and operated with
minimum distance 20cm between the radiator & your body.
7
 Loading...